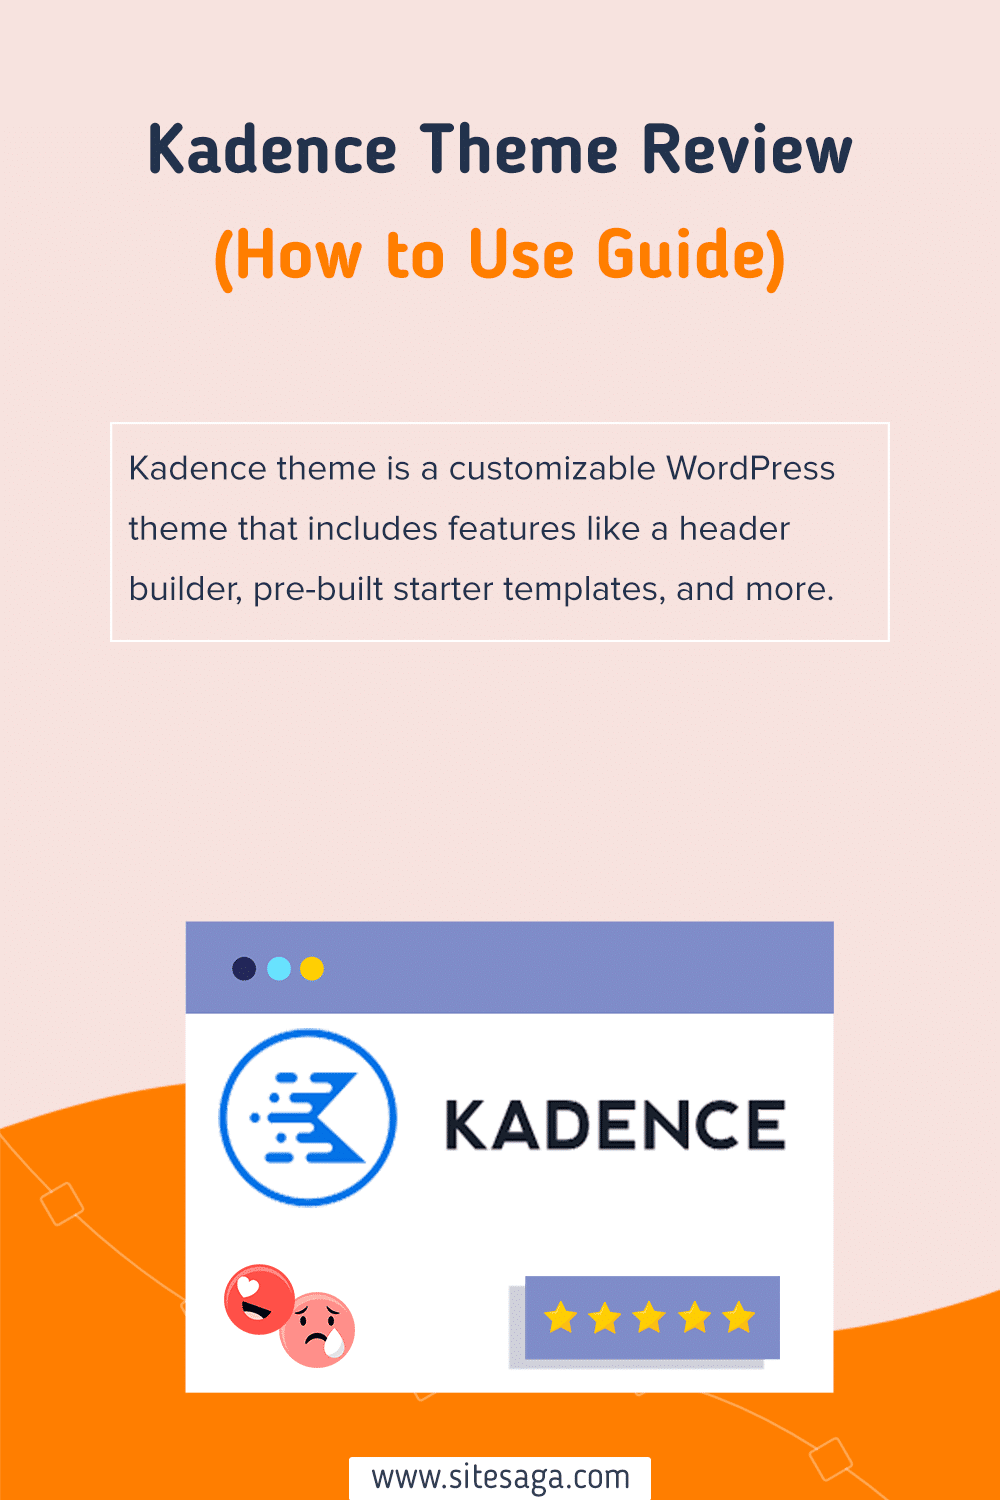
Are you looking for an honest review of the Kadence theme review? Are you unsure whether to use Kadence on your site? Then, this article will make everything clear for you.
As you might already know, Kadence is one of the most popular WordPress themes available. It has 200,000 active installations and a 4.8/5 average user rating. That’s pretty cool, right?
Well then, does that make it the best theme for WordPress? Is it a good theme to use?
Here, we’ll answer that! It’s our detailed review of the Kadence theme. We’ll discuss its ease of use, installation, customization, performance, pricing, and many other features.
So, let’s start!
Overall Rating
Kadence is a popular WordPress theme that you can use for free or upgrade to a paid plan if you need more features. With its multipurpose capabilities, you can easily create any type of website.
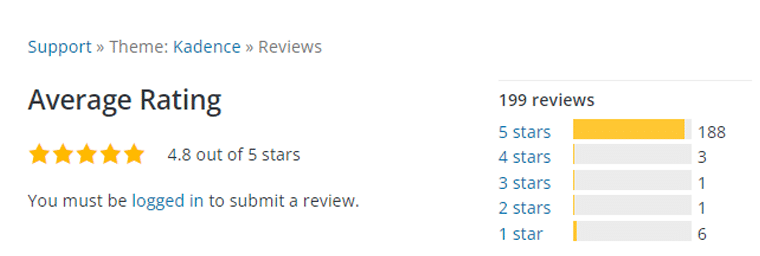
Let’s look at its user ratings on different platforms.
| Platform | Score |
| WordPress.org | 4.8/5 stars |
| Trustpilot | 4/5 stars |
| G2 Reviews | 4.4/5 stars |
Having tested the Kadence theme, we highly recommend giving it a try. We also give it a rating of 4.9 out of 5 stars. Hence, it’s a wise choice for anyone looking for a reliable and feature-packed WordPress theme.
So, why not give Kadence a try and see for yourself?
Pros and Cons of the Kadence Theme
Another section of our Kadence theme review is going through its pros and cons.
Like any WordPress theme, Kadence has its advantages and disadvantages. Considering these factors is essential when evaluating whether Kadence is the right choice for your website.
With that in mind, let’s look at the key pros and cons of using the Kadence WordPress theme.
Pros of Kadence Theme
- Includes Kadence AI for efficient site creation experience in no time without having to touch a single line of code.
- This theme follows WCAG (Web Content Accessibility Guidelines) standards, arial labels, focus control, and keyboard navigation.
- It’s built with a progressive code structure for modern PHP. Hence this theme is lightning-fast.
- Also, the theme header builder monitors your changes live within the native WordPress editing experience.
- It has high customization options, including layouts, colors, fonts, etc.
- You’ll be able to enable breadcrumbs using the built-in breadcrumb generator.
Cons of Kadence Theme
- This theme has a limited number of starter templates.
- You must upgrade to the expensive plan to get features like Kadence Blocks Pro, pro starter templates, custom fonts, etc.
A. Kadence Theme Overview
Kadence WordPress theme is a fantastic option for building your website. It’s a freemium and lightning-fast theme, so you can get started quickly. Its extensive customization feature allows to create a website that accurately represents your brand.
Moreover, it seamlessly integrates with popular WordPress plugins, including Gutenberg, Elementor, Beaver Builder, WooCommerce, and LearnDash. This allows you to incorporate additional functionality into your website easily.
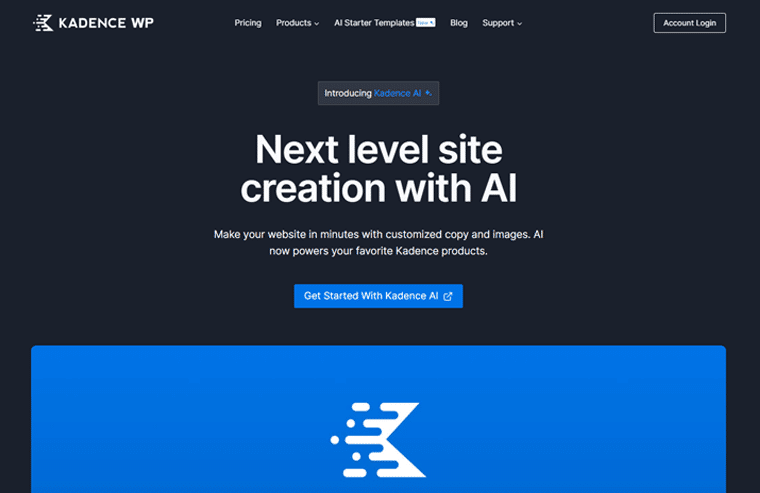
An exceptional feature of the Kadence theme is its integration with Kadence AI, which simplifies the website creation process. By providing your desired website specifications, Kadence AI presents a range of AI-generated pre-designed templates to choose from.
Once you’ve made your selection, you can effortlessly drag and drop elements onto the canvas, making website building faster and more efficient.
Have a look at how to use the Kadence theme with its latest AI power!
Besides, creating a visually stunning website is easier with a selection of pre-built templates and a drag-and-drop page builder. Plus, you don’t need to be a coding expert to use it.
Additionally, Kadence comes with its custom block plugins, i.e., Kadence Blocks, which lets you create visually stunning layouts without coding. The combination of Kadence Theme and Kadence Blocks opens up a wide range of possibilities for creating engaging and interactive web content.
We’ll talk about the Kadence Blocks plugin in detail in another section.
Having said that, let’s take a look at the next section of the Kadence theme review.
B. Key Features of Kadence Theme
Kadence theme comes with many features that enhance your website-building experience. Here, we’ve compiled a list of Kadence’s key features.
Let’s take a look at them!
1. Effortless Site Creation With Kadence AI
Designing and building a website no longer takes hours thanks to Artificial Intelligence (AI). AI is changing many industries, including website creation.
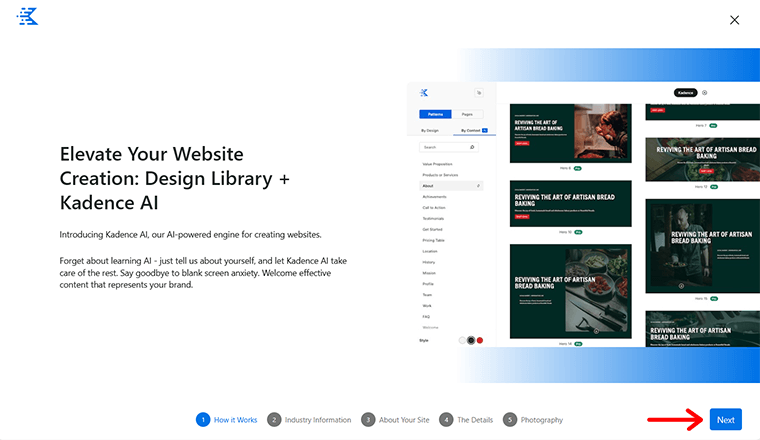
Kadence theme offers a key feature called Kadence AI, which simplifies WordPress site creation by using AI to make the process fast and easy.
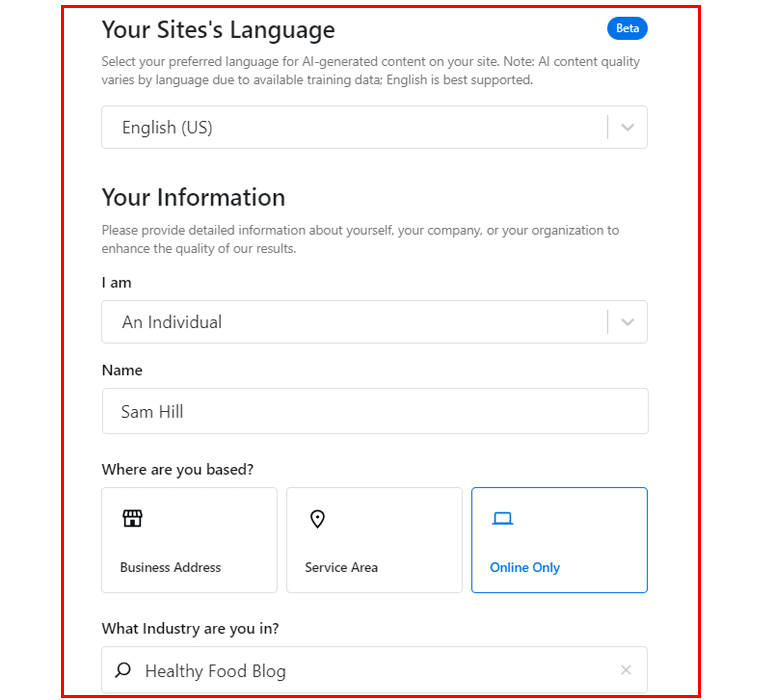
Simply provide the specifications and details of the website you want to create. Based on your input, Kadence AI offers a variety of pre-designed templates that are generated using AI for you to choose from.
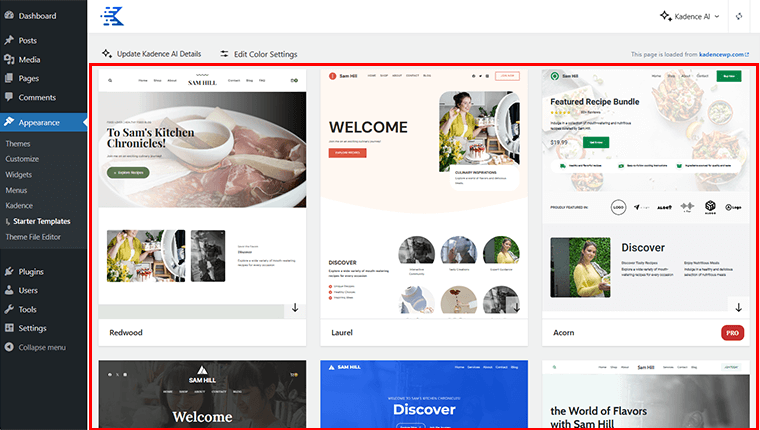
Once you select the template that suits your needs, you can easily drag and drop elements onto the canvas.
In no time, your website will be ready to go live!
But there’s more. Kadence AI also includes a built-in content generation feature. This creates content in fully designed patterns customized to match your mission and goals.
Say farewell to the time-consuming website creation process and welcome Kadence AI.
For more information and guidance, you can check out our article on how to use Kadence AI.
2. Prebuilt Starter Templates
Kadence WordPress theme comes with a range of prebuilt starter templates, making it effortless to design your website. You can quickly build a site by customizing these prebuilt templates to fit your niche. And with just a few clicks, your website can be up and running quickly.
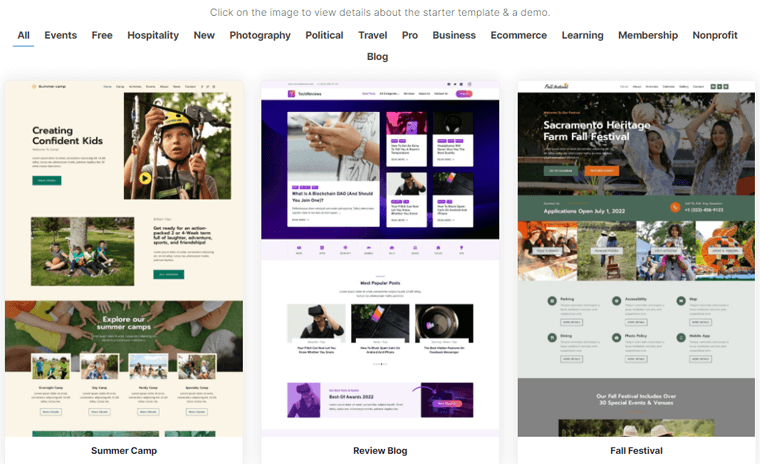
The starter templates suit multiple niches, including e-commerce, blogs, photography, portfolios, etc. Also, they are pre-designed, and you can easily customize them according to your brand’s identity,
Another great feature of the starter templates is that they are built using Gutenberg, the default WordPress block editor. Hence, providing you with an easy way to modify the content. So, you don’t need coding or design skills to create a stunning website.
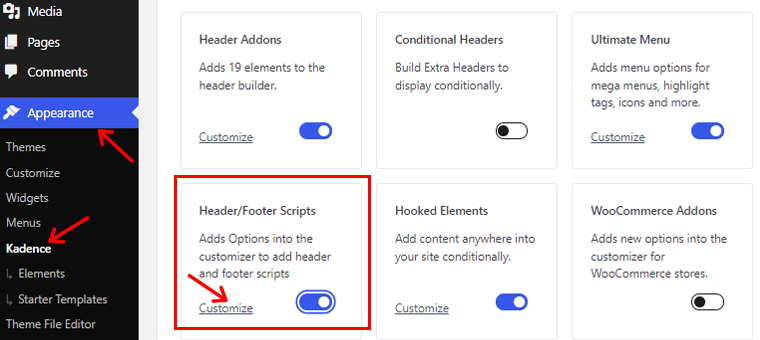
3. Header/Footer Script
Kadence Pro offers a handy feature allowing you to add scripts to your site’s header, body, or footer easily. With this feature, you can place any custom JavaScript, Google Analytics, or embed script.
Just go to “Appearance > Kadence”, and enable Header/Footer Scripts, then click the “Customize” option.
Following that, you’ll be taken to the Custom Scripts section in the WordPress Customizer. There you can add scripts to the header, opening body tag, and footer section.
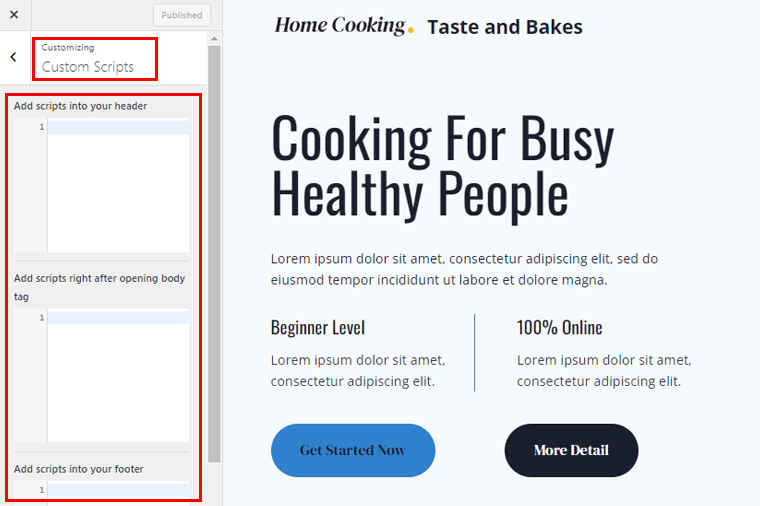
As you can see, the Header/Footer Script addon makes script addition a breeze. Eliminating the need for third-party plugins and streamlining the process.
4. Color Palette Switch
The next amazing feature is the Color Palette Switch which comes with 12 pre-defined color palettes. Once you choose the palette, it’ll instantly change the look and feel of your website. You don’t need to go through the hassle of changing the colors of each and every element of your website.

Not just the pre-defined palette, but also you get to change every single shade of the palette that you’ve chosen. Moreover, add the color code if you’ve any, or create a color code by simply changing the value of RGB colors.
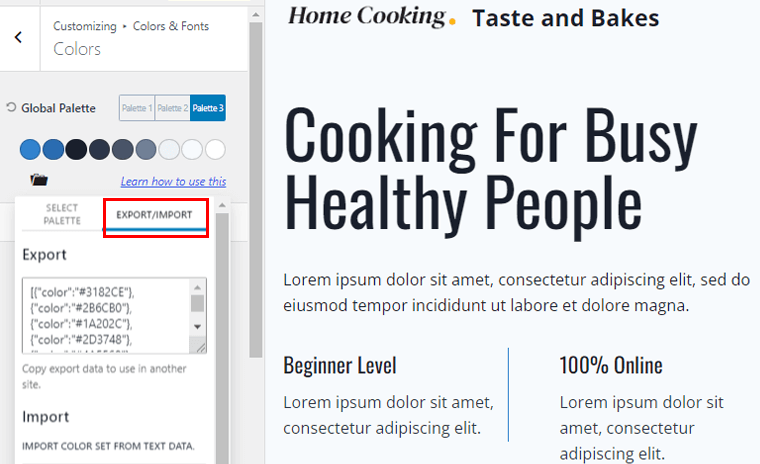
Additionally, you can even export or import the color palette that you’ve created. You can simply copy the color code and use it on other websites. To import, paste the code, click import, and use it on your website.
So you can see, you’re not limited to a particular option when it comes to changing the colors of your website.
5. Ultimate Menu
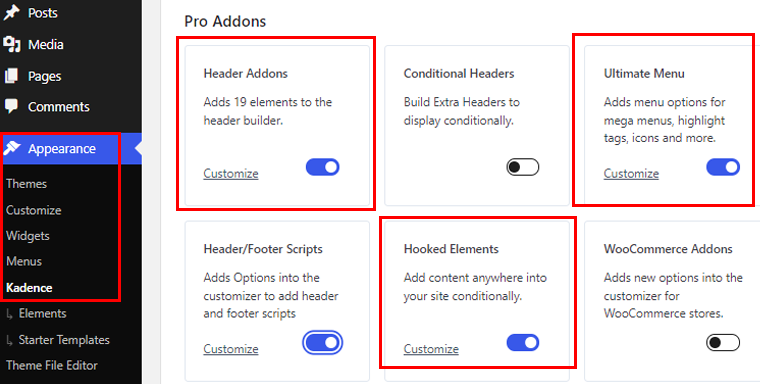
Now let’s talk about the Ultimate Menu addon of Kadence Theme Pro. Megamenus can be built in Kadence using this addon available in Kadence Theme Pro Addon.
It also allows you to build menu content using the WordPress block editor and display it in one or more columns in different layouts.
To get started, go to “Appearance>Kadence.” Under the Pro Addons option, enable the Ultimate Menu, Hooked Elements, and Header Elements.
Now we’re all ready and get started to create a mega menu.
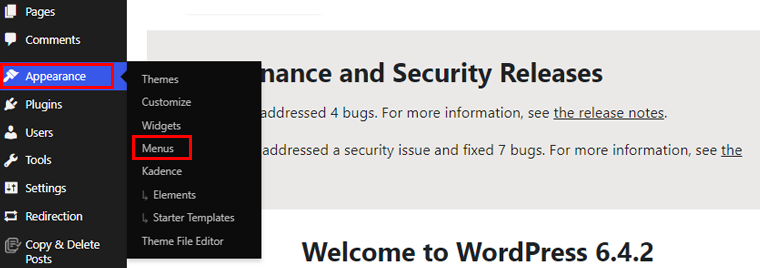
To create a mega menu, go to your dashboard, then go to the “Appearance> Menus” option.
Now there are 2 types of mega menus, a regular menu that has actual pages, custom links, or posts and categories. You can also create a menu that has custom blocks or sections you’ve created as part of the menu.
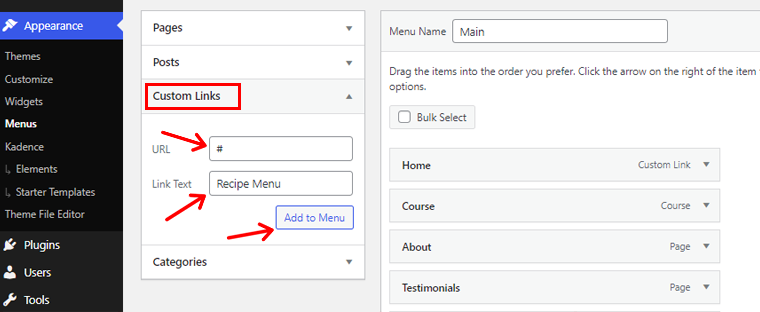
For this guide, we’ll be demonstrating how to create a regular mega menu. On the menu editing interface, first thing create a menu and name it. Let’s just say a Recipe Menu.
So, go to the “Custom Links” option, then add your menu name to the “Link Text” box. Then click “Add to Menu” and add it to your menu.
Note: Make sure you put “#” on the URL tab to nullify the link.
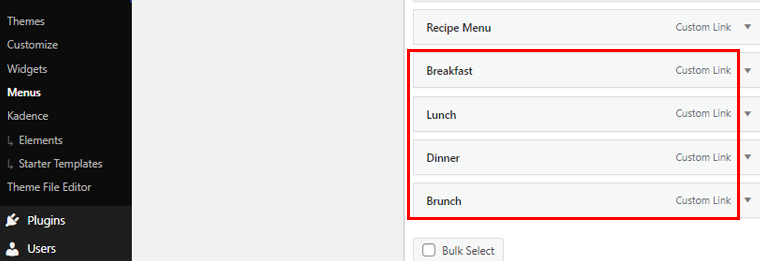
Following that, we’ll create 4 additional custom links.
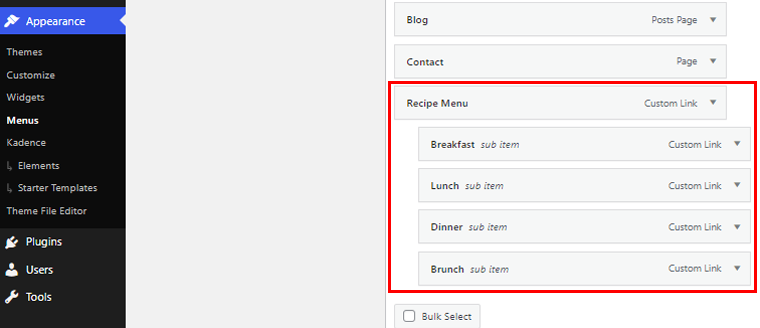
Now we need to change those custom links to a mega menu. So, Recipe Menu will be our parent link. Now you can simply hold and shift the rest of the links to the right side. And don’t forget to save the menu.
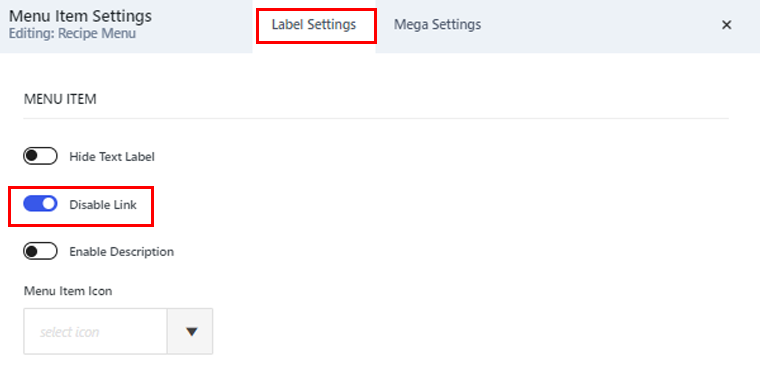
Following that, we’ll start configuring the parent menu first. So go to the parent menu which is “Recipe Menu” in this guide, then click on the “Menu Item Settings.”
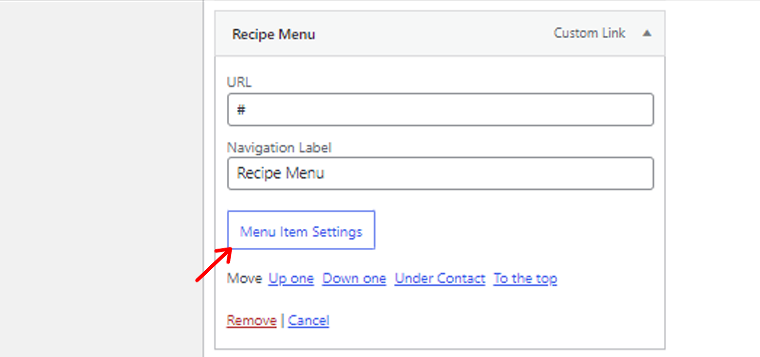
After that, it’ll open a pop-up setting page where first, you need to Disable the links.
Next, go to the “Mega Settings,” there, enable the Mega Menu Dropdown. Then, you’ll have the option for mega menu width, Mega Menu Columns, etc. Here, we’ll go with Content for mega menu width and set 4 columns.
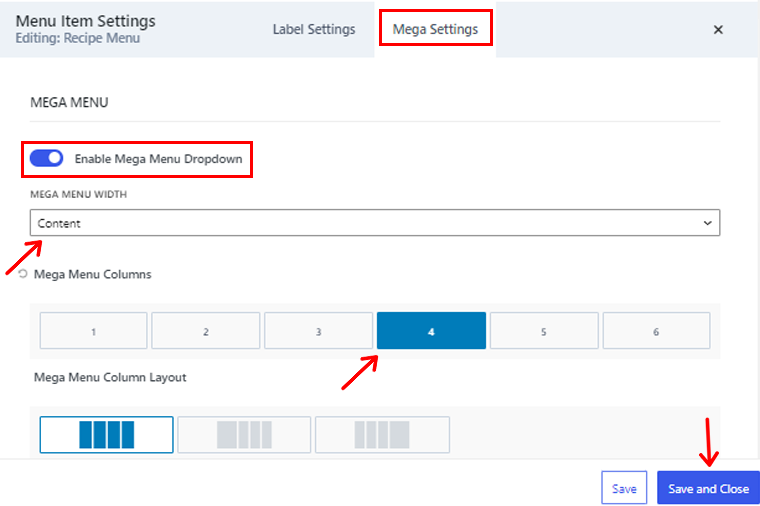
After configuring, click the “Save and Close” button.
If done right, by far your initial phase of the mega menu should look like the image below.
Now, let’s add a menu item to each column and make each of them a header. On your menu settings page, again go to “Custom Links,” here we’ll add 2 menu items just as we created the rest of the items before.
After that, we’ll place them under each header menu, like in the image below.
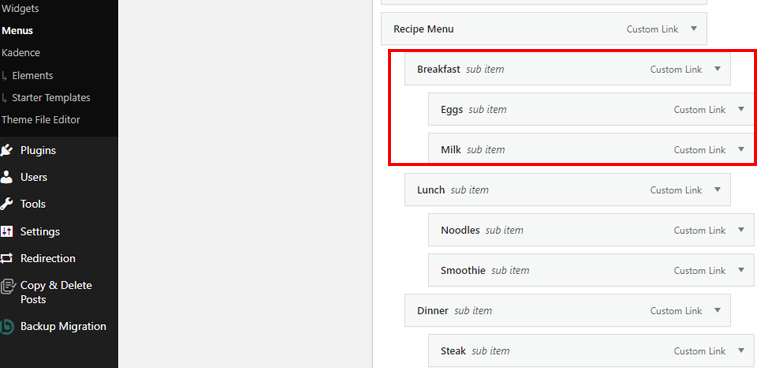
Don’t forget to save the menu every time you edit.
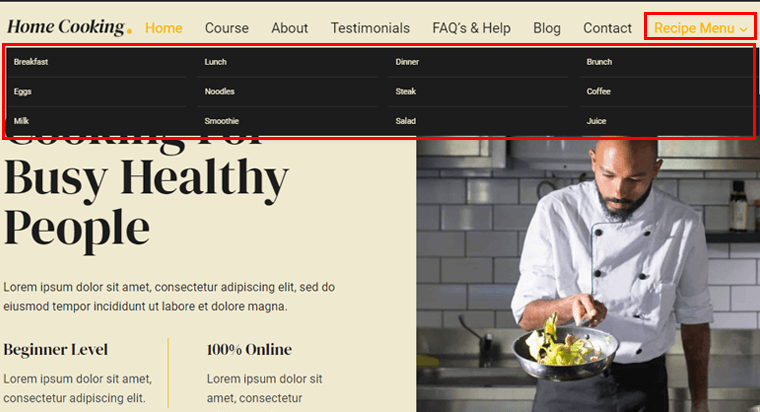
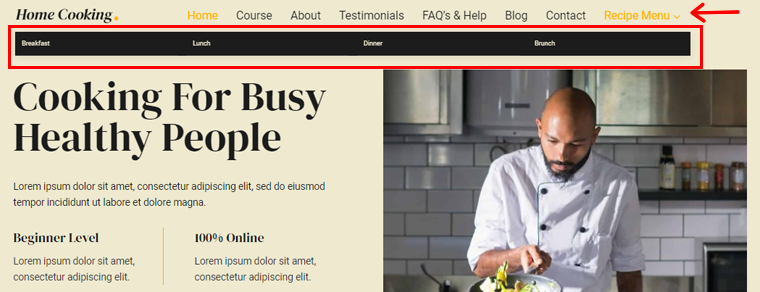
So, above is an example of the mega menu we’ve created. Similarly, you can create your mega menu by following these simple steps.
6. SEO Optimization
The Kadence WordPress theme is built with SEO in mind, so your website can rank high in search results. It follows the best practices for markup and schema, making it easy for search engines to crawl and index your site.
Also, the theme includes a breadcrumb generator to enhance user navigation. It’s not just visually appealing but also optimized for better SEO performance. Plus, it works seamlessly with popular SEO plugins like Yoast, Rank Math SEO, AISEO, etc.
7. Performance Optimization
The Kadence WordPress theme comes with a handy feature called Performance. Under this option, there are multiple customization options for you.
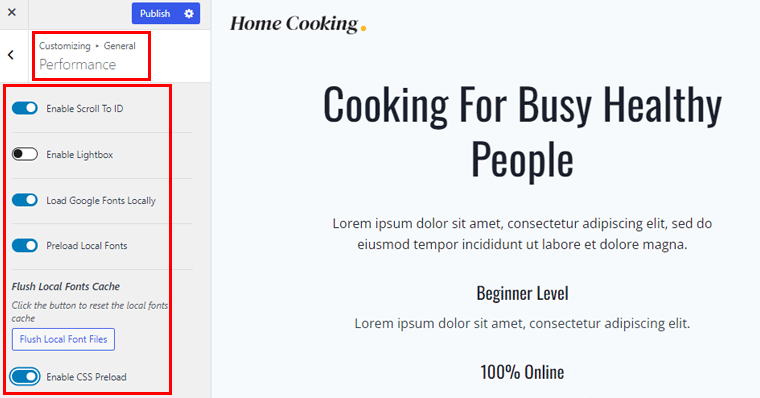
- Enable Scroll to ID: It’ll allow smooth scrolling to a specific section or element on a page. Typically identified by its unique HTML ID attribute, it provides a user-friendly navigation experience.
- Enable Light Box: This enhances user experience by displaying a larger view of images or multimedia without redirecting to another page.
- Load Google Fonts Locally: Enabling this will store fonts on your server, boosting website speed and user experience by minimizing external dependencies.
- CSS pre-loading: Enabling this preloads CSS in the header and ensures that only necessary CSS files are loaded.
8. Custom Fonts
Kadence Theme offers Custom Font features, facilitating a unique website design with professional font pairings. Here, you can easily customize typography for headings, buttons, and links. Hence, giving complete control over the website’s style and brand representation.
9. Integration With Plugins
Kadence WordPress theme seamlessly integrates with popular plugins like Elementor and BeaverBuilder for a consistent design. It also supports WooCommerce for easy online store management.
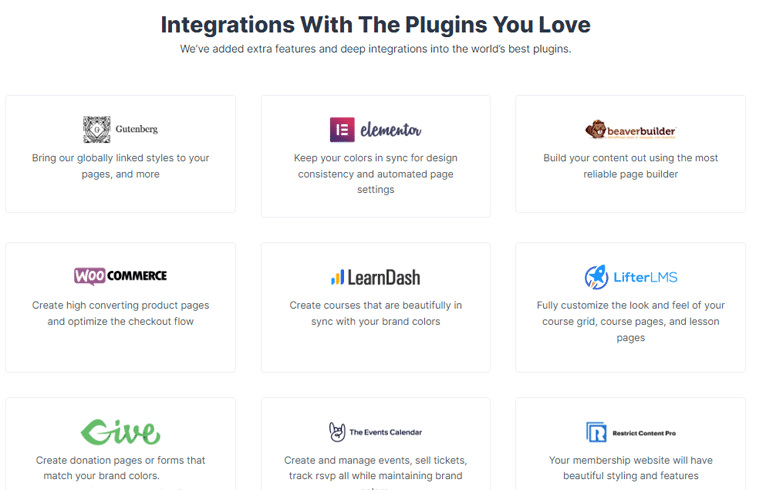
Additionally, it works well with LearnDash, LifterLMS, GiveWP, The Event Calendar, and bbPress for diverse website functionalities. With Kadence, creating a unique and functional website is effortless.
With all these integrations, Kadence makes it easy to create a functional, beautiful, and unique website.
10. Additional Features
Some additional features of the Kadence theme are:
- No heavy Javascript files for faster page loading times.
- It has inline SVG (Scalable Vector Graphics) icons for crisp and clean graphics.
- This theme also offers keyboard navigation for accessibility and ease of use.
- You’ll have 10+ elements to add to your header and build powerful navigation bars.
- Easily control your website layout down to the pixel with the Kadence Theme layout settings.
- You can use the Kadence theme global color palette to apply colors across your entire site easily.
- Ability to control the layouts for custom post types in the WordPress customizer.
This sums up the key feature section of this Kadence theme review article. Now let’s see how to get started with Kadence.
C. Getting Started with the Kadence Theme
Now that you know about the major features of the Kadence theme, let’s start with this theme.
So, please follow these steps serially, and you can quickly get started with the Kadence theme. Below we’ll show you how to install and get started with Kadence Pro.
Step 1. Purchase and Install the Kadence Theme
Now to install the premium version, the first thing to do is to purchase the theme. You can directly purchase the theme from its official website.
Installing Kadence Theme Free Version
First, we’ll discuss how to install the free version of the Kadence theme.
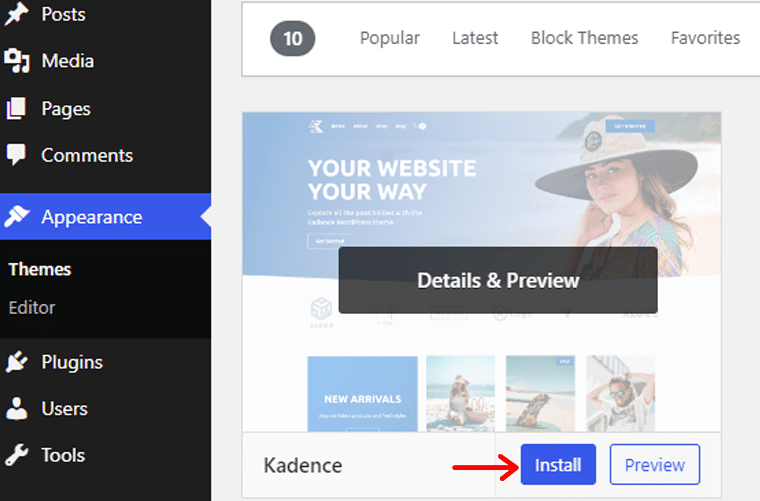
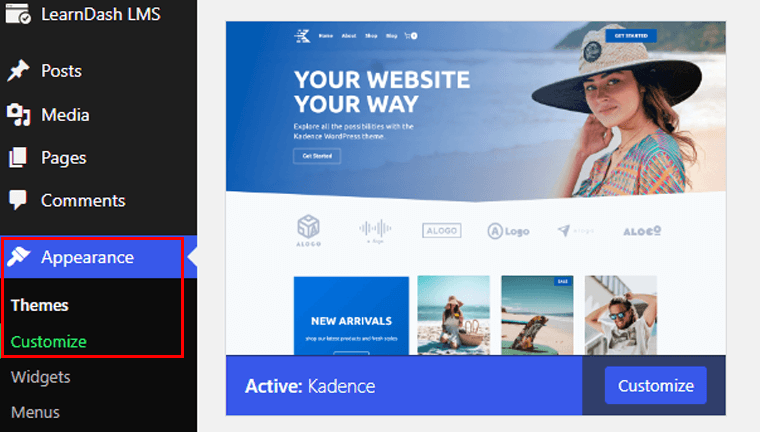
To install and activate the Kadence theme, first of all, log in to your WordPress dashboard. Go to the “Appearance > Themes > Add New Theme” option.
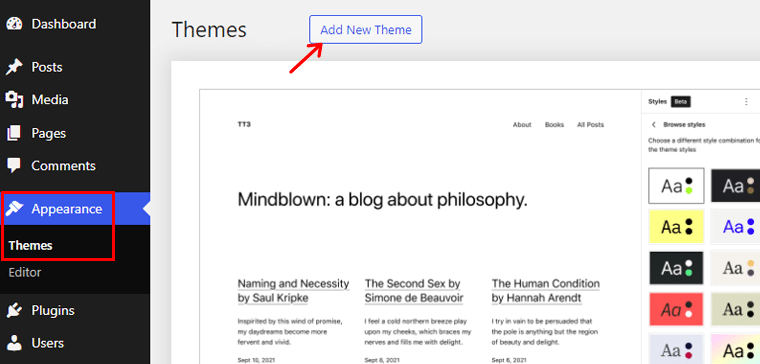
Once you spot the theme listed in the search results, proceed to click on the “Install” button.
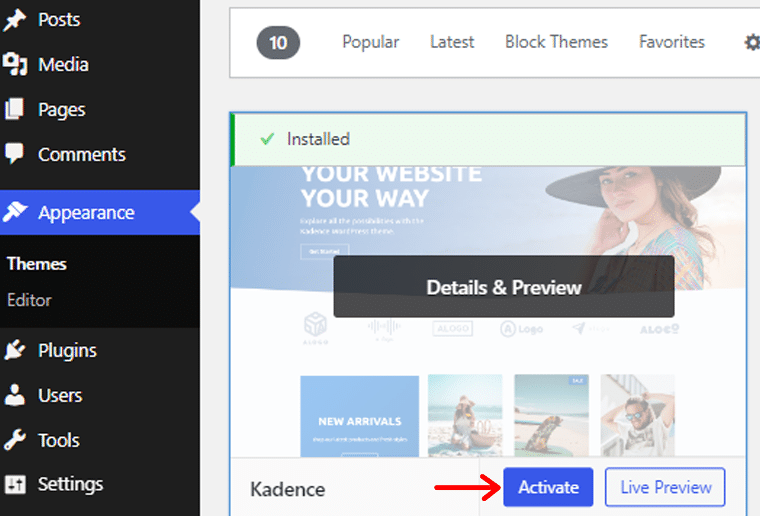
Next, press the “Activate” button when it shows up, just as shown in the example screenshot below.
If you want to learn more about installing a theme, then check our article on how to install a WordPress theme guide.
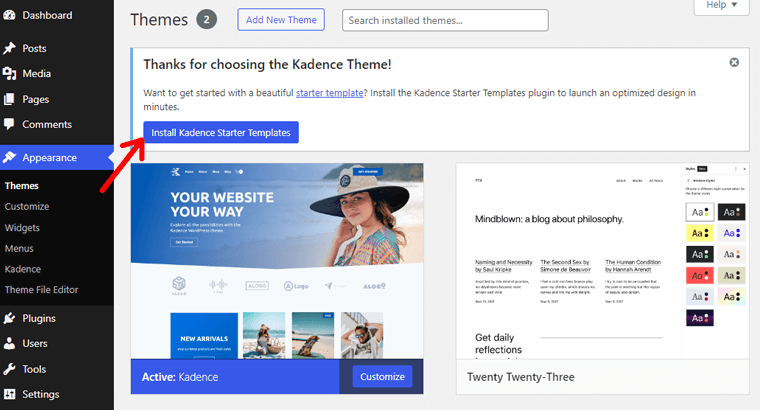
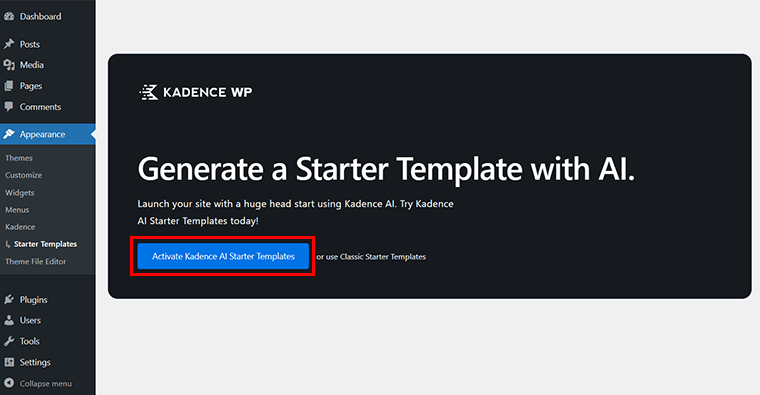
Also right after installing the free version, you’ll get a message to install the Kadence starter templates plugin. So click on the “Install Kadence Starter Templates” option.
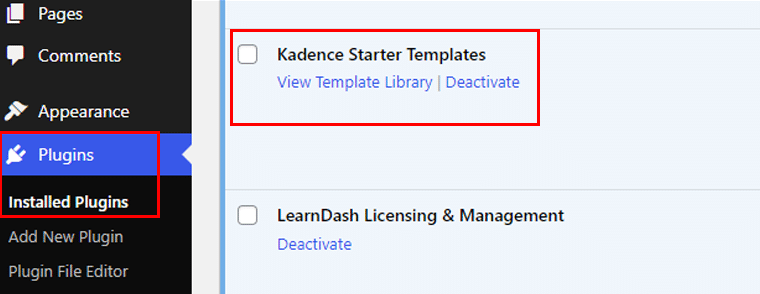
Once done, you’ll see the “Kadence Starter Templates” plugin installed on your dashboard from your “Plugins > Installed Plugins” menu.
If you want to build with the Kadence theme’s AI power, choose the “Activate Kadence AI Starter Templates” option.
After that, you can simply follow the video tutorial below and build a website. Give Kadence AI some details about your website and it’ll do the rest.
Or you can follow the steps below to select a template and customize your website manually.
Purchasing The Kadence Pro
The purchase process is quite simple. Start by logging in to Kadence’s website.
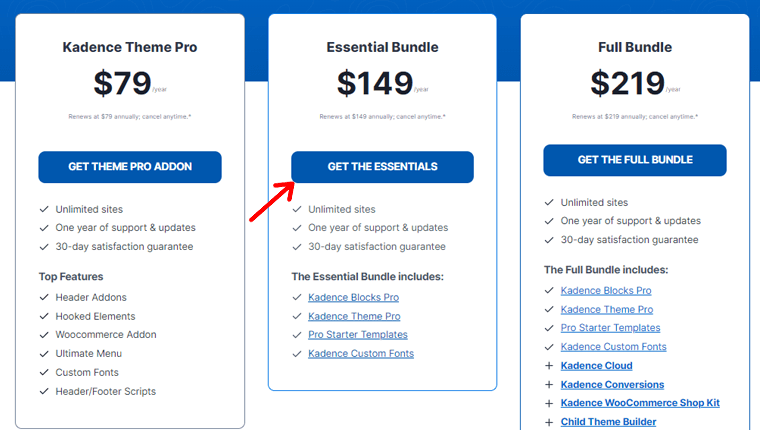
Although Kadence Theme Pro comes with robust features, we recommend using the Kadence Essential Bundle. With this plan, you’ll get Kadence Blocks Pro, Kadence Theme Pro, Pro Starter Templates, and Kadence Custom Fonts. Now click on the “Get The Essentials” option.
Following that, you’ve to add your billing details and payment method.

After purchase, go to “Accounts” from the menu. This will redirect you to your account dashboard where you can see your recent downloads, change your billing address, and edit your password details and address.

Now to download the Kadence Pro Zip, go to the “Product Downloads” option. There you can see all the full Kadence bundles that you purchased earlier.
For this tutorial, we’ll download the Kadence Pro Plugin and Kadence Blocks Pro. Now click on the “Download” button and your download should start right away.
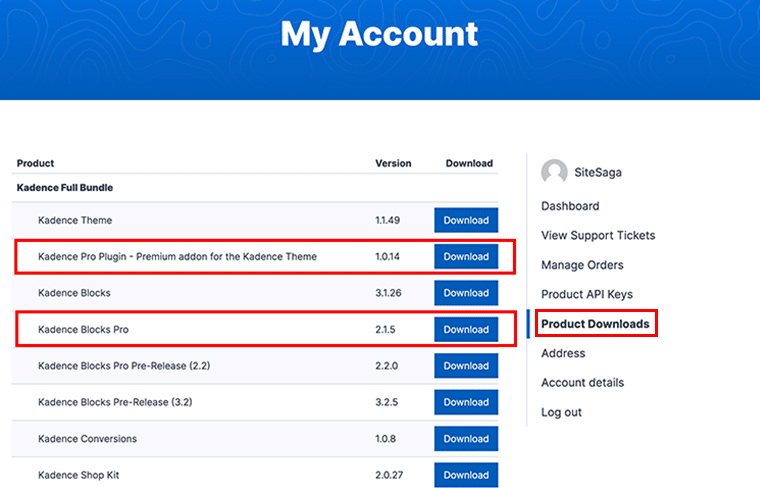
Besides, to activate the plugin you’ll need a license key. So go to “Product API Keys,” there you’ll find the list of license keys for your downloaded products.

Installing The Kadence Pro
Note: In order to work the Kadence Pro you need to have the Kadence theme free version installed and activated in your dashboard.
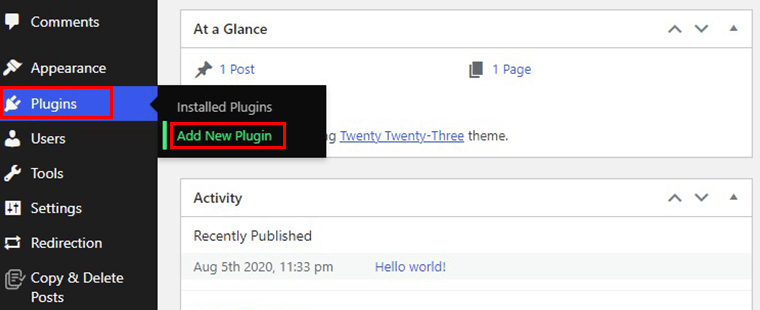
One thing you need to know is that Kadence Pro is a plugin, and you need to install it as a plugin. So go to your WordPress dashboard, and click on the “Plugins > Add New Plugin” option.
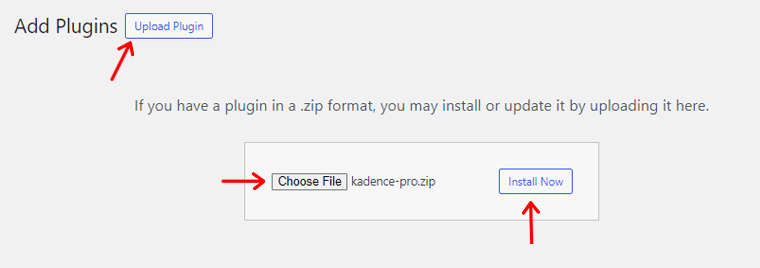
After that click on the “Upload Plugin” option and click on “Choose File” to upload. And then hit the “Install Now” button.
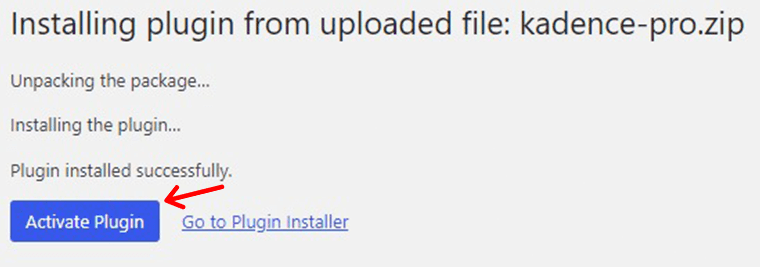
Following that, you’ll get a message saying your Kadence theme is installed, click on the “Activate Plugin” option. As shown in the image below.
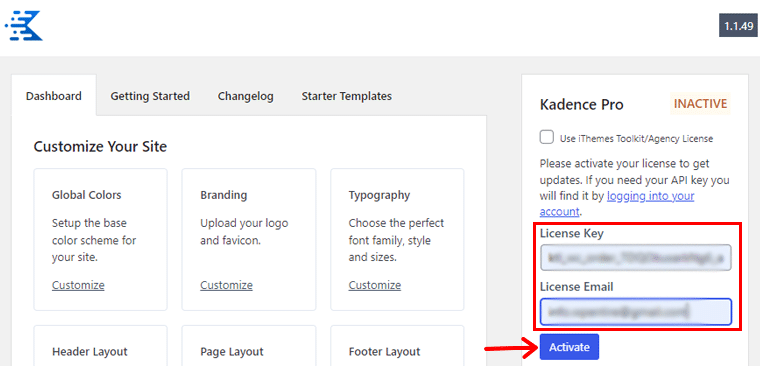
After that, you’ll see a message where you need to activate Kadence Pro Theme.

Once you click on it, you’ll be prompted to fill in the Licence key and Licence Email. Once completed click on the “Activate” button.
If the credentials are correct, you’ll see the Active message for your Kadence Pro.
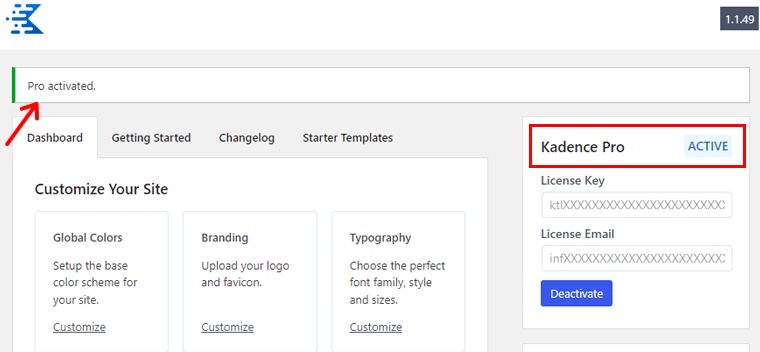
And, here we’ve successfully activated Kadence Pro!
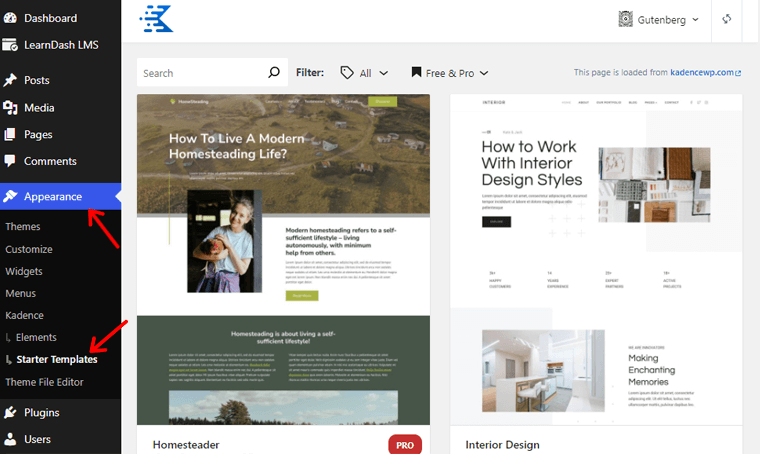
Step 2. Pick and Install a Kadence Starter Template
Now, go to the “Appearance” section in the left sidebar of your WordPress admin interface. Then click the “Starter Templates” under the Kadence option.
You can surf through these templates and select the one you want to import.
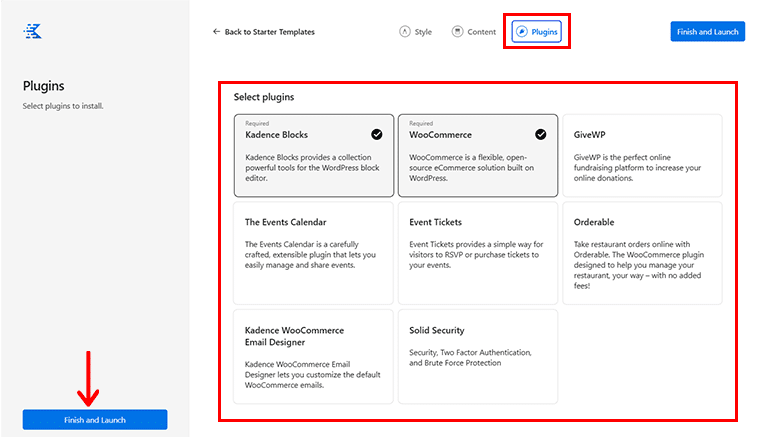
To use the pro template you need to have the Kadence Block Pro, LearnDash plugin, and LearnDash Course Grid Addon installed and activated on your dashboard. If it’s not installed you’ll get the requirement message once you select the template.
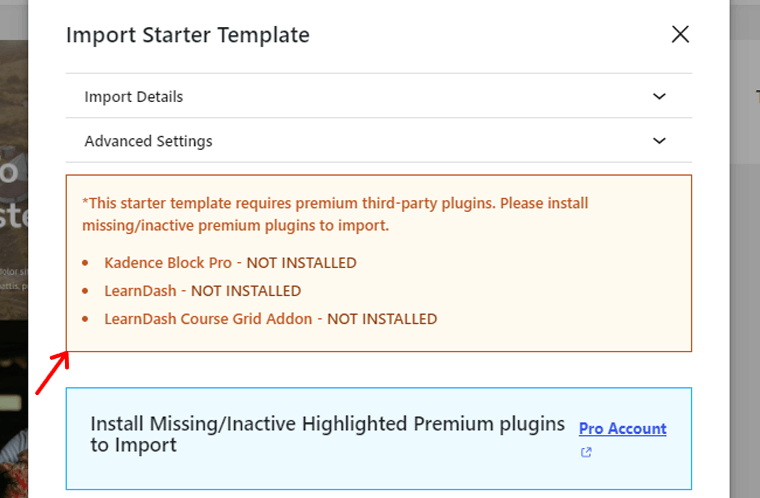
So do install those plugins.
You can check our article on how to install a WordPress plugin for a step-by-step guide.
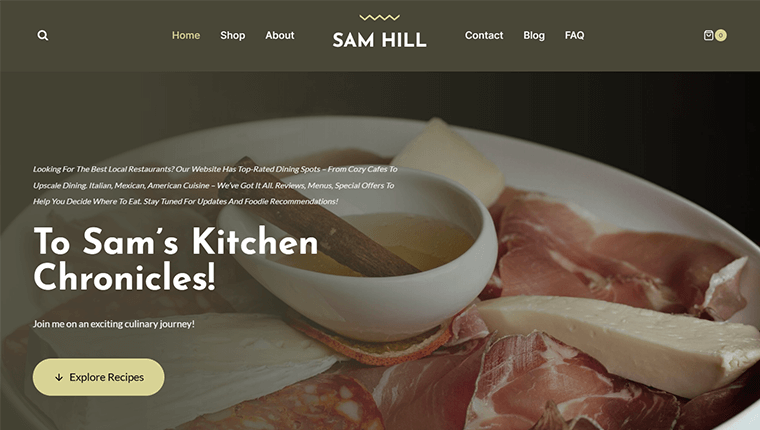
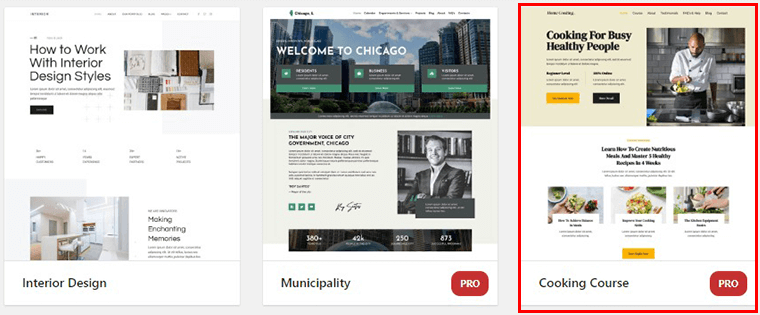
Moving on, for this Kadence theme review article, we’ve selected the “Cooking Course” template.
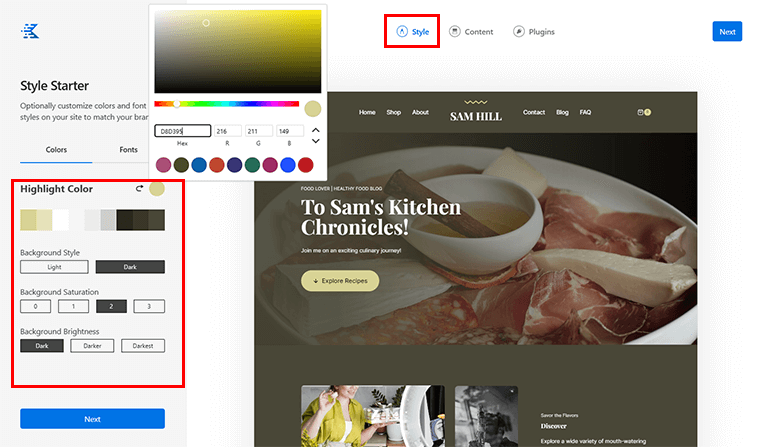
After selecting the template you’ll have options to change color schemes. The best part is when you choose a color shade, it changes the overall color of your website. So you don’t have to go through every design color and change manually.
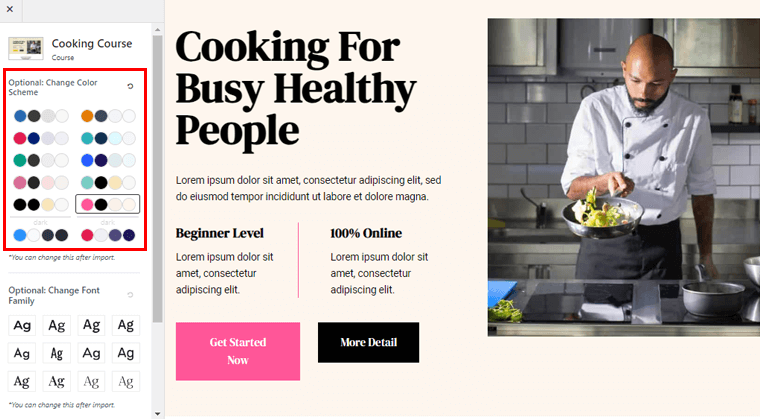
Below that, you’ll see the option to change the font. This option also lets you change the font throughout your website. So simply select the font you like and it’s done.
But first, you need to import the template to change the color and fonts.
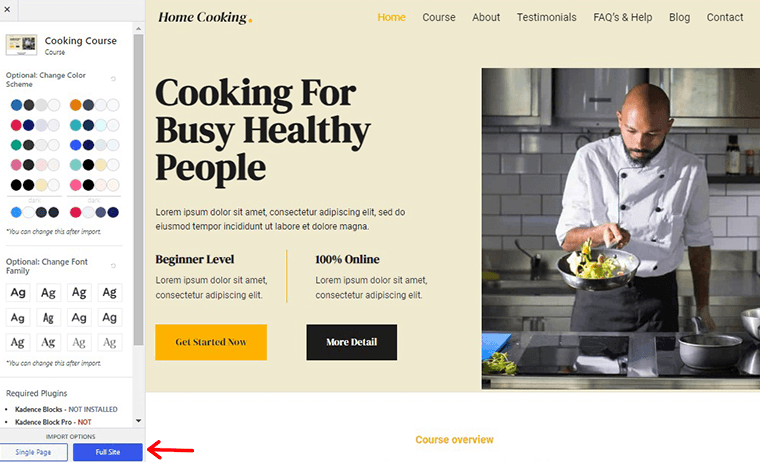
Now to import, you’ll have 2 options, one is to import the Single Page and the other is to import the Full Site.
For this Kadence theme review article, well import the full site. So click on the “Full Site” option.
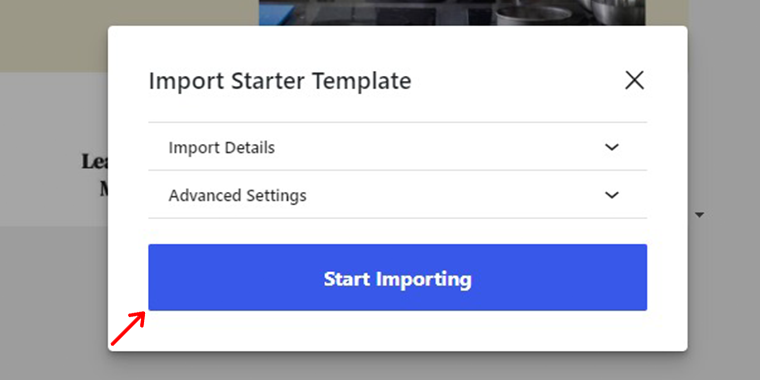
After that, you’ll see a popup window with the option to “Start Importing,” simply click the option.
Now the importing process is complete, you can go to the “Finished! View Your Site” button to get a quick look at your website.
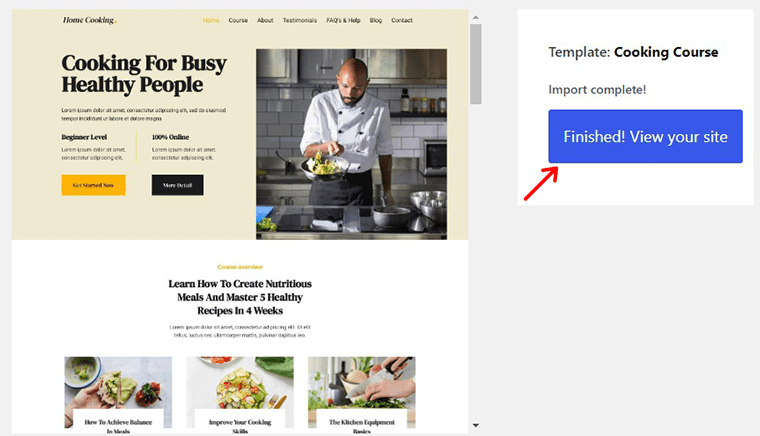
And you’re done!
Now, we’ll go to the Customize option.
Step 3. Customize Kadence Theme
After you’re done importing the template, click on the “Customize” option on the left menu bar under the “Appearance” option.
Following that, you’ll be redirected to the customization interface. Now, you can start tweaking and customizing the imported template to get started with building your website.
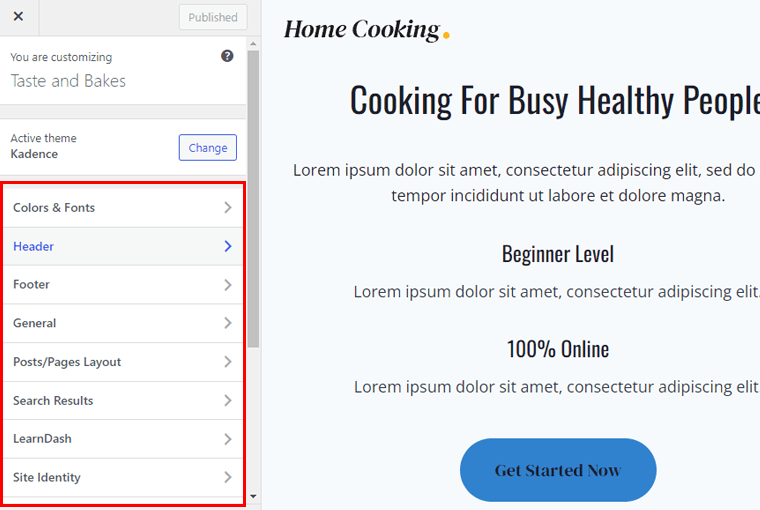
Here are the main sections of the template you’ll be customizing:
- General
- Color and Fonts
- Header
- Footer
- Post/Page Layout
- Search results
- Widgets
1. General
In this section, you can change how your website looks by adjusting:
- Layout: Set how wide your content is and the space around it.
- Sidebar: Decide how wide it is, the space around it, and its design. You can also make it sticky.
- Scroll to Top: Some themes include a “scroll to top” feature, especially in the free version. You can even change how the arrow looks. Cool, right?
- 404 Page Layout: Decide how your 404 error page looks by setting its layout.
- Comments: Decide if you want to get rid of the comments section or show it at the top of all comments.
- Breadcrumbs: Show a trail of links on your site. This feature works with SEO plugins like Yoast, Rank Math, and SEOPress.
- Social links: Add links to your social media accounts. Icons will appear where you choose, either in the header or footer. The icons are in SVG format, so they load quickly.
- Performance: Turn on certain features here to make your web pages load faster.
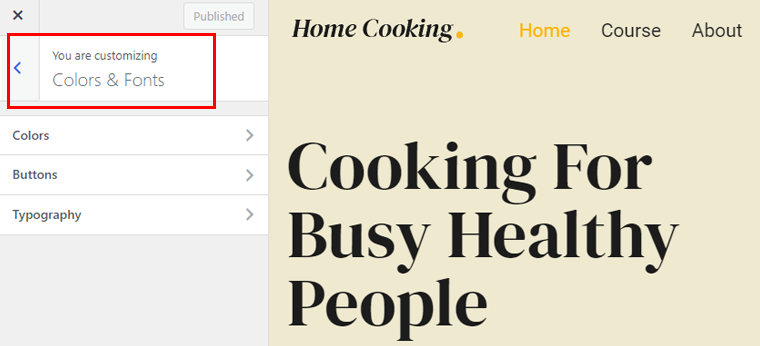
2. Color and Fonts
Under this option, you get to change your entire website color and fonts of your entire website.
Within the color option, you can alter the background colors of your site, content, title, and more. You can also decide how these colors appear on different devices like computers, tablets, and phones.
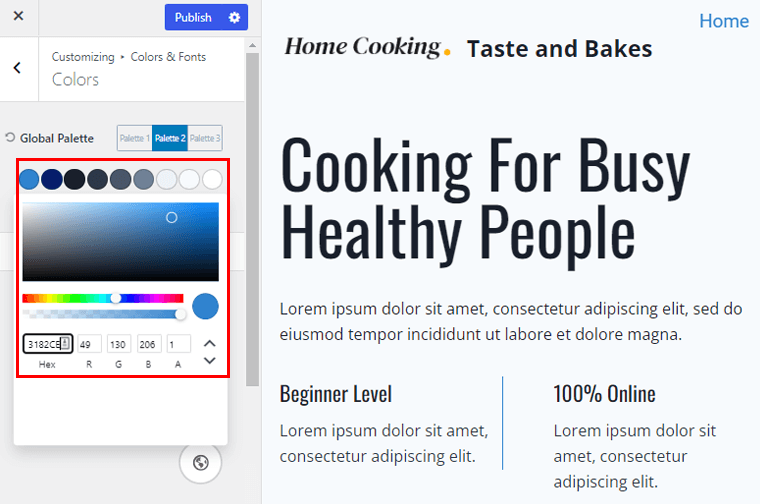
Besides, there are 3 color palettes within the Global Palette option. There you can choose the color shade for your site. Also, you can add a color code if you have any specific color. Or tweak the RGB code and get a custom color for your website.
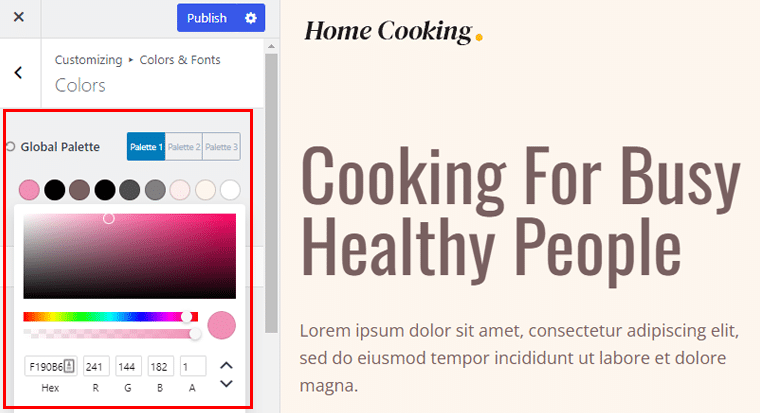
The best part is that, once you select the color shades, it’ll change the color of your entire website.
Colors you’ll be changing for:
- Site Background
- Content Background
- Title Above Content Background
- Title Above Content Overlay Color
- Content Links
In this section, you can also customize Buttons. There set up the colors, fonts, padding, shadow, and other properties for your buttons.
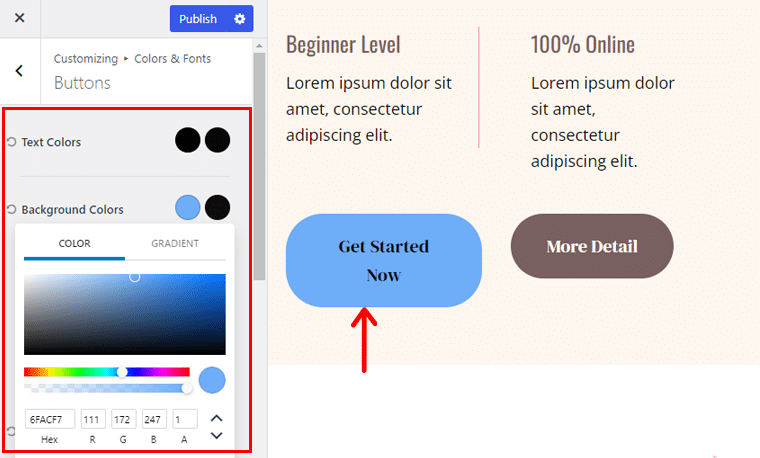
As you can see in the example image above, the color of the button has changed to the shade of blue just as we picked the color from the palette.
Under this customization option, you’ll be changing the color and fonts of the following fields:
- Text Color
- Background Color
- Border Colors
Moreover, you can change the Border Radius of your button depending on the different screen sizes like desktop, mobile, and tablets.
As well as you get to customize Typography. So, choose fonts and define their style, size, colors, etc. First, you can start by choosing the Base Font of your website and also can choose whether or not to enable Load Italic Font Styles.
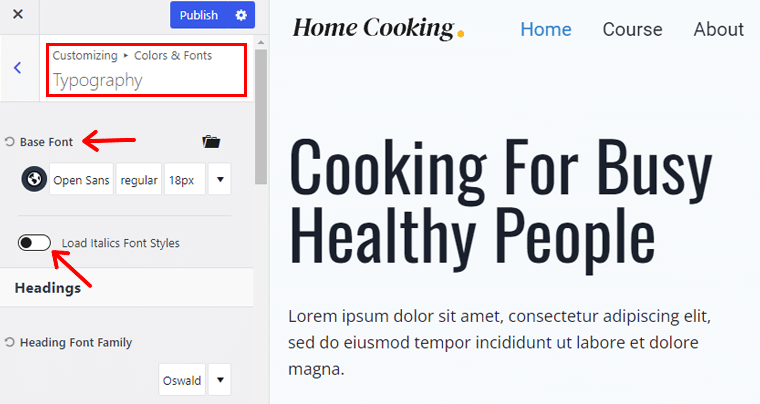
In addition, there are more areas where you can change the fonts.
- Headings
- Title Above Content
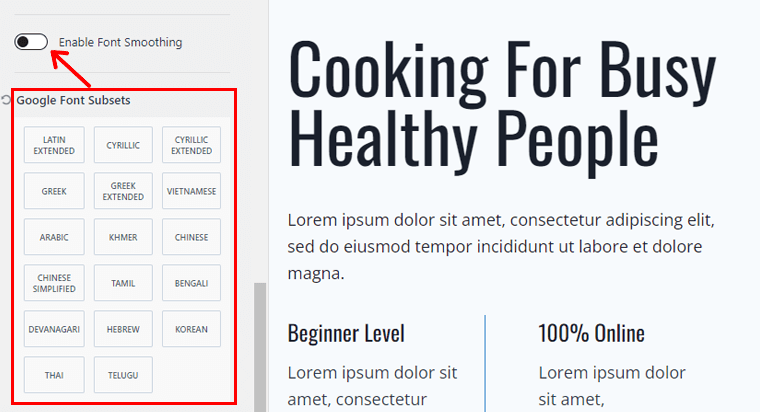
It doesn’t stop here, you get to choose whether or not to enable the Font Smoothing option. Plus you’ll get access to 17 Google Font Subsets.
3. Header and Footer
Moving on, we’ll be customizing header and footer sections.
Customizing Header
First starting with the header, you’ll have 2 options, General and Design.
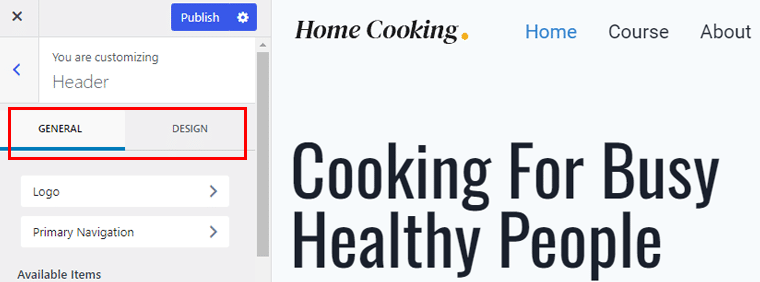
Under the general option, first, you can change the logo and primary navigation menu. Within the logo option, you get to entirely remove or change your site logo. As well as change the width of the logo depending on the screen sizes like desktop, tablet, and mobile.
As you can see in the example image above, we’ve set the layout as “Logo” only, so it displays the logo of the site on the header.
Besides these, it comes with different items to add to your header. Some of them are, Secondary Navigation, Search, Social, HTML, etc.
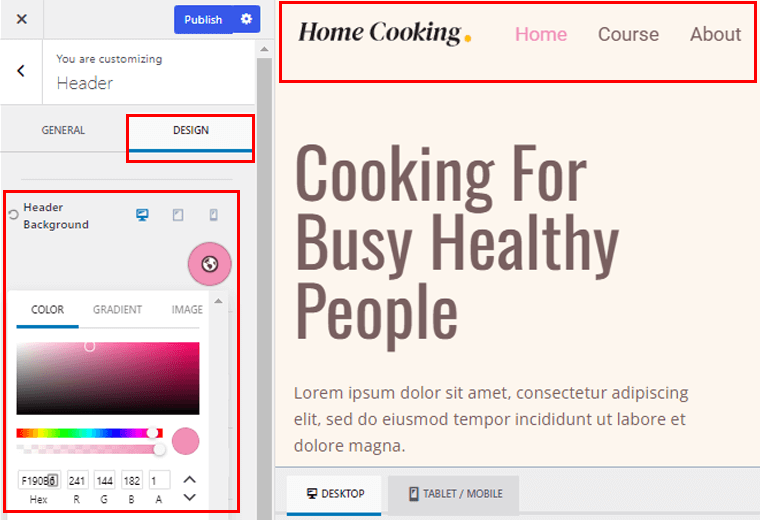
Now under the Design option, you get to choose colors for Header Backgroung. Plus you can select different color options for desktop, mobile, and tablet views.
Customizing Footer
While customizing the footer section, you’ll have 2 options Design and General. Under the General option, you can change:
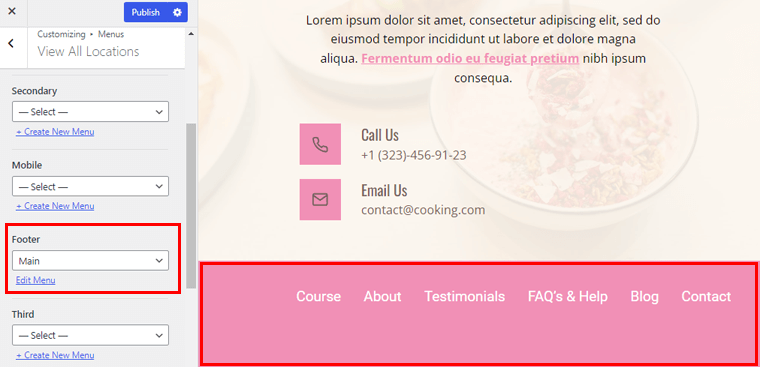
Let’s start by customizing Footer Navigation. Here you can choose the Menu option. As you can see in image below, we’ve set the main menu in the footer.
Further, you can add your social media account. Also, place your copyright by modifying the year, site title, etc. As you can see in the example image below.
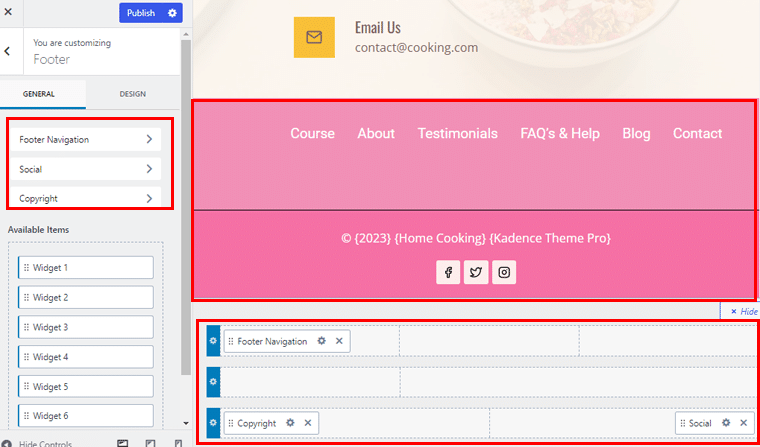
Not just this, Kadence allows you to add 6 widget areas at the footer section.
Now to the Design section, you get to change the background color of the footer for different screen sizes. Also, don’t forget to enable the “Keep footer on bottom of screen” option.
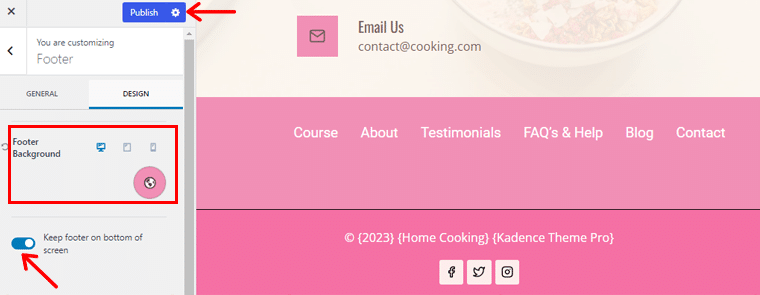
Once complete, don’t forget to hit that “Publish” button.
4. Post/Page Layout
In this part, you have various options to personalize all your pages. These are settings that apply to every page on your site, but you can also change them for specific pages in the WordPress editor.
First, on the Page Layout option, you’ll have 2 tabs:
- General
- Design
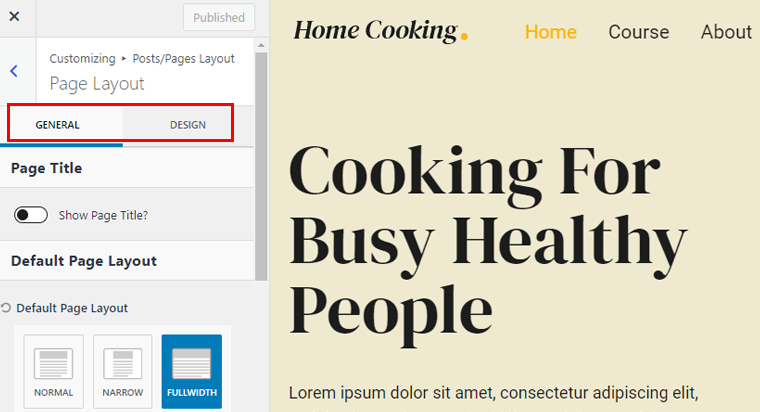
In the General tab, you can do the following:
- Page title: Show or hide the page title.
- Default page layout: Choose how your pages look – normal, narrow, full width, or with a left/right sidebar.
- Page default sidebar: Decide to display sidebar 1 or 2, which you can change in the “Appearance – Widgets” section.
- Content style: Display content in a box or without a box.
- Vertical padding: Add or remove top/bottom padding.
- Featured image: Show or hide the featured image.
- Comments: Show or hide comments on pages.
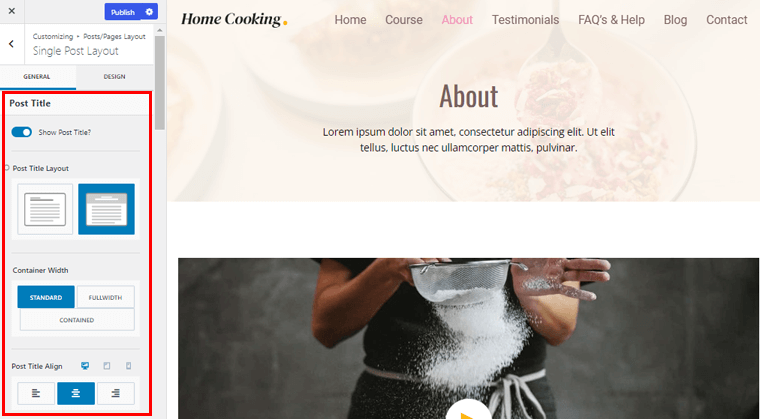
In the Design tab, you can set:
- Page title: Define colors and fonts for breadcrumbs and meta values.
- Default page layout: Adjust the background colors for the site and content.
Also, there are other customization options like customizing Single Post Layout. Use this option to pick how your blog posts look. You can choose the layout of the post title, its width, alignment, where the featured image appears, and more.
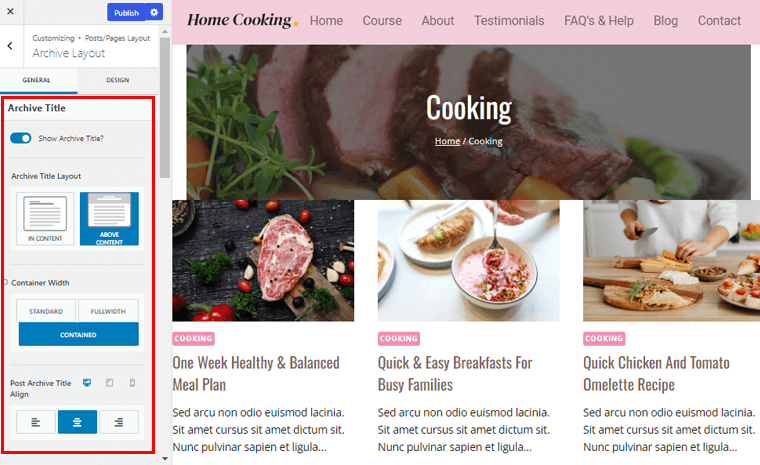
Next, you can customize your Archive Page just like the single post layout. Here you can decide the layout of the archive title, the width of the container, the color of the archive title, and other details.
5. Homepage Setting
In the Homepage settings, you get to pick what shows up on the main page of your website. It can either be a list of posts in the order they were published (like a traditional blog) or a fixed page.
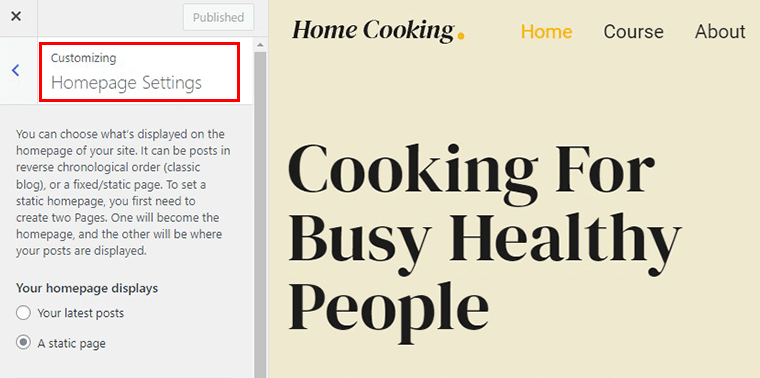
Also, you can choose what your homepage displays, either your latest posts or a static page.
So, these are some of the customization options you can try with Kadence Pro and make your website unique.
D. Adding Power with Kadence Blocks
Besides templates and add-ons, there comes Kadence Blocks.
Kadence’s Custom Blocks help you to create unique content with ease. From pricing tables to testimonials, customization options are endless.
With the intuitive interface, designing eye-catching layouts becomes simple, making Kadence’s Custom Blocks a valuable addition for diverse content creation needs.
But first, let’s start with installing and activating the Kadence Blocks free version in order to work Kadence Blocks Pro properly.
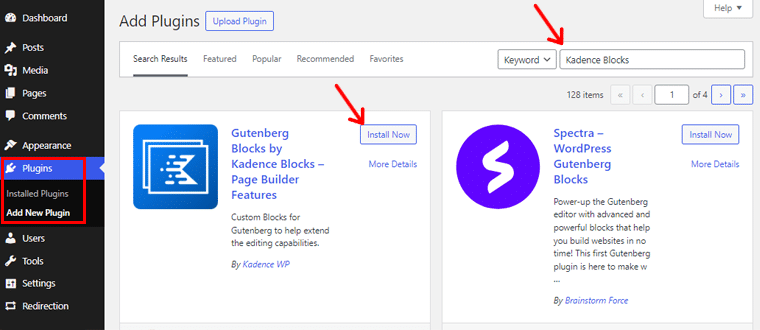
So, now let’s install the free version of Kadence Blocks. Go to your WordPress dashboard, then “Plugin > Add New Plugin.” Now search for the Kadence Blocks and click the “Install Now” button.
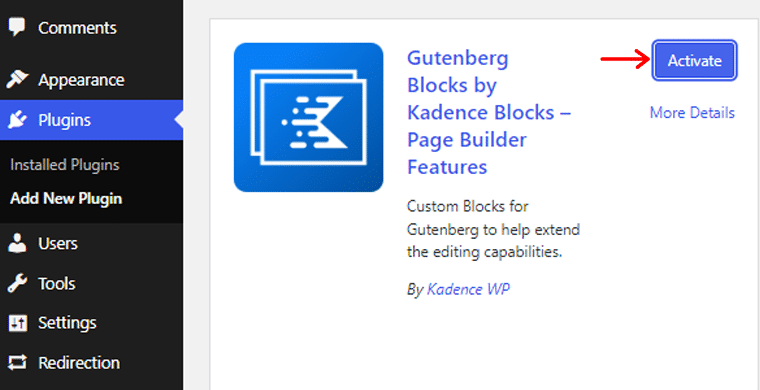
Following that, click on the “Activate” button, and you’re done.
Once done, let’s start with installing Kadence Blocks Pro.
For this guide, we’re using the Kadence Blocks Pro from the Essential Bundle plan that we’ve already purchased. Which is mentioned earlier in the purchasing Kadence Pro section. You can also download this plugin if you’ve purchased it, which you’ll get in a .zip file.
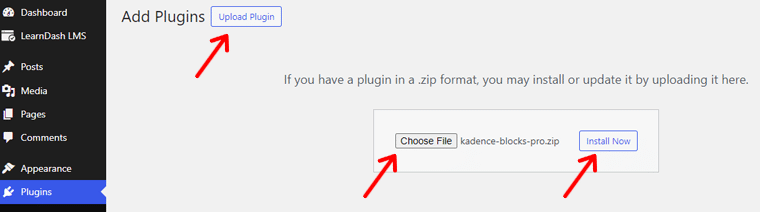
Now, let’s start with installation, navigate to your WordPress dashboard, then “Plugin > Add New Plugin.”
Now click on the “Upload Plugin” option then hit the “Choose File” option. After choosing the Kadence Blocks Pro zip, click on the “Install Now” button.
Once done installing, hit the “Click Here to Activate” option on the message bar to activate Kadence Blocks Pro.
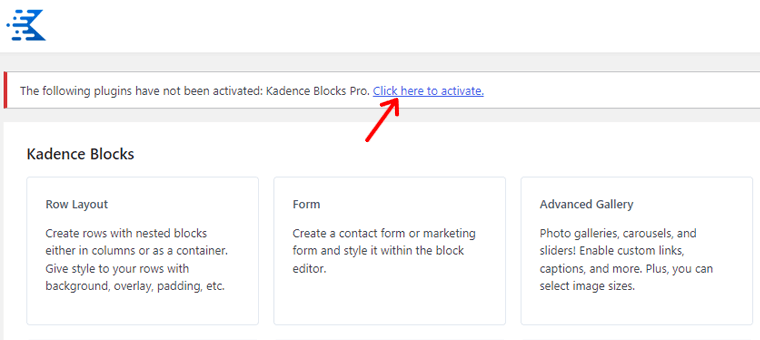
Now you’ll be prompted to a page where you need to add the license key and license email. After that, click on the “Activate” option.

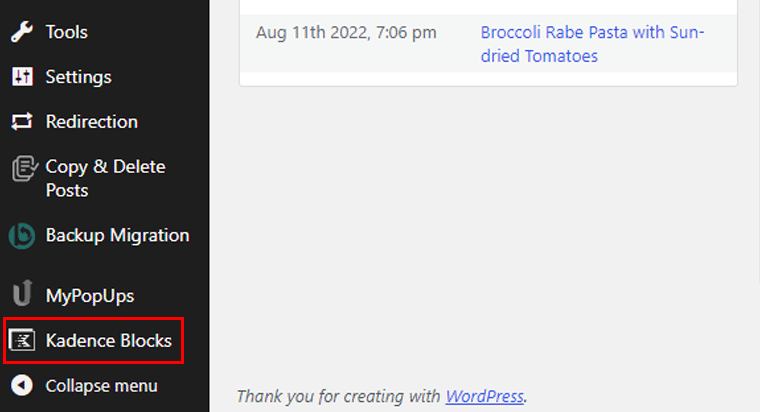
If everything is done right, then, your plugin will be activated successfully and you’ll see the Kadence Blocks menu on your left menu bar.
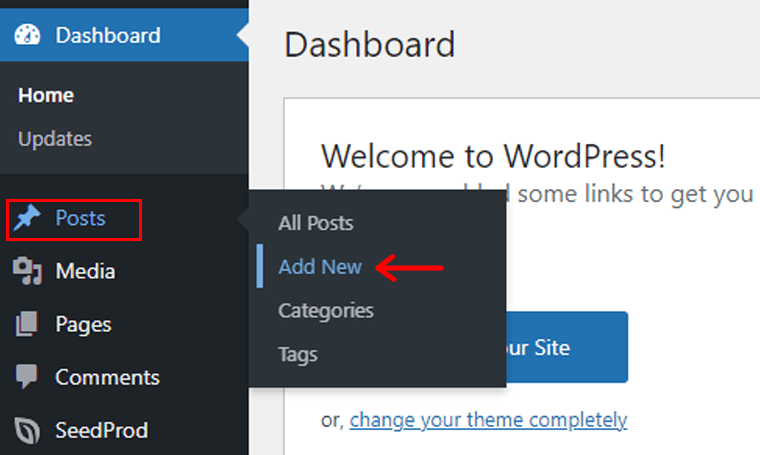
Here we’ll go through some of the Kadence Blocks and how to use it. To get started, first create a post. To do so, go to “Posts > Add New.”
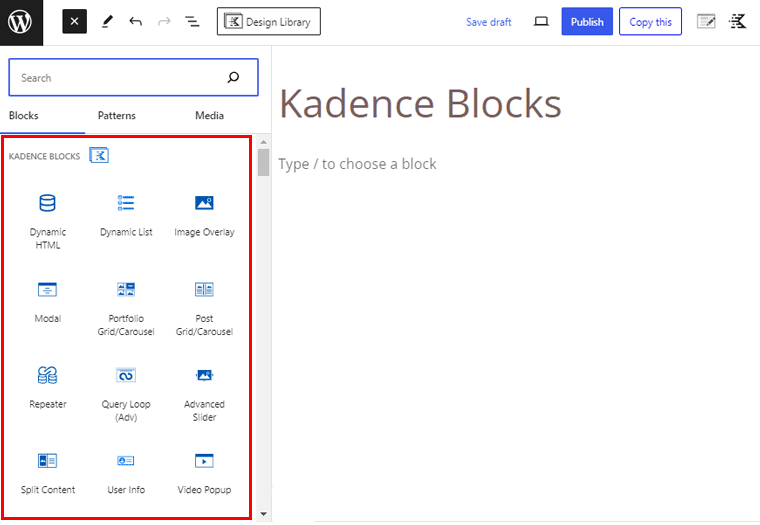
After that, add the post title and start adding Kadence blocks. To add blocks click on the “+” icon.
This will open a box where you’ll find the library of Kadence Blocks.
Some Kadence Blocks Features
Let’s take a look at some of the cool features of Kadence Blocks Pro.
- Animation on Scroll: This feature helps create a beautiful experience for your visitors with on-scroll animation to display your content.
- Custom Icons: Although there are tons of icons available, you can still upload your custom icons or an entire icon set.
- Dynamic Content: It allows you to add custom fields dynamically into your blocks. Offering robust control over your site elements, useful for hooked elements.
- Custom Fonts: With this feature, you can create a perfect design by uploading custom fonts or using one from Adobe Fonts.
- Page Specific Scripts: This feature enhances flexibility and customization if you need page-specific script implementation for various purposes like analytics.
Pricing
When it comes to pricing Kadence Blocks is available for both free and premium versions. You can easily download the free version from the WordPress.org official plugin repository.
However, the pro version is available on its official website for $89 per year. With this pricing, you can get all the top features like custom pro blocks, pro addons to Kadence Blocks, etc.
Now let’s see how to add blocks and how they look on a live website.
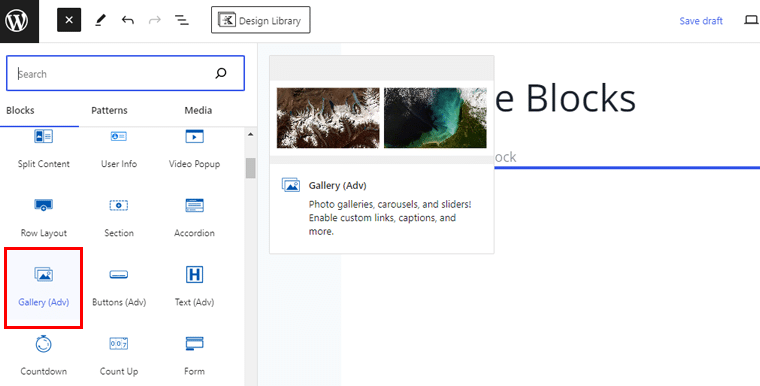
Using Advanced Gallery Blocks
First, let’s start with the Advanced Gallery Block. To add this block, simply click on it and it’ll appear on your page.
After adding the block, you’ll find 3 customization options on the right side, General, Style, and Advanced.
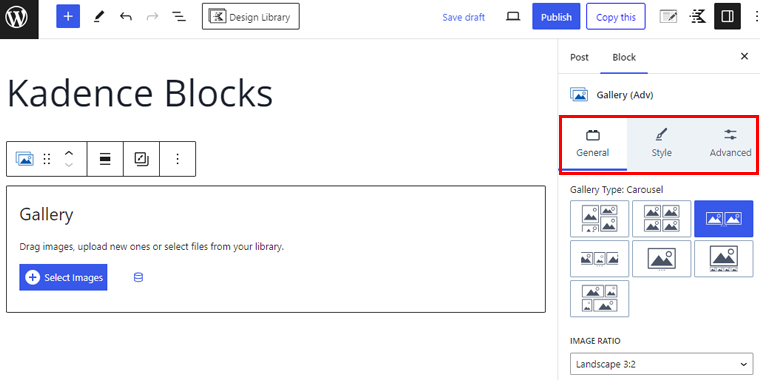
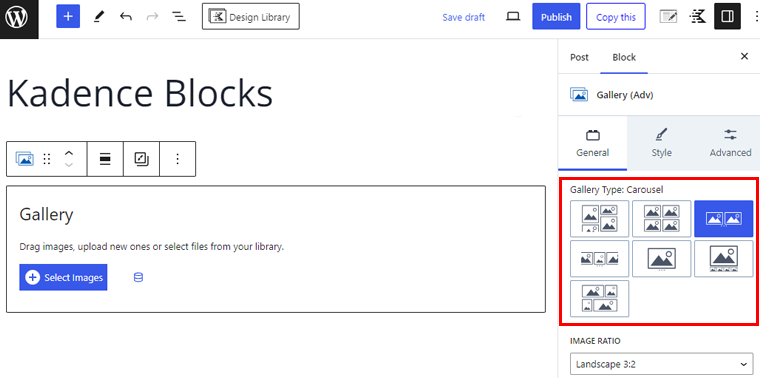
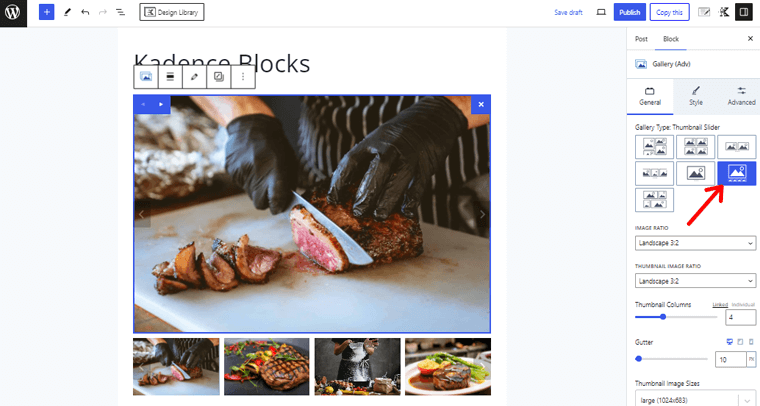
a. General
Under the General option, you can change how your gallery will look. It has 7 gallery types:
- Masonry
- Grid
- Carousel
- fluid carousel
- Slider
- Thumbnail Slider
- Tiles
To see how it looks, first, let’s create a gallery. So, click on the “Select Image” option on your Gallery block.
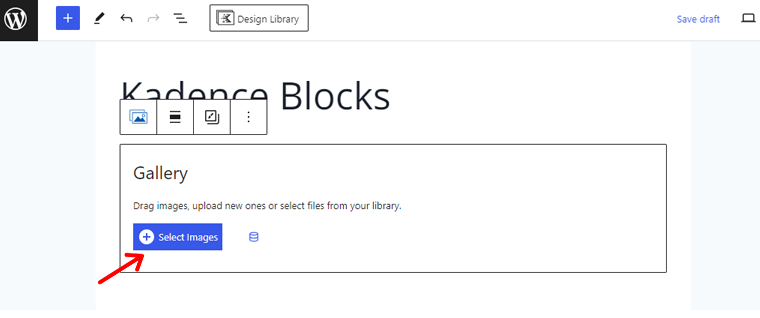
This will open your media gallery where you can select multiple images and click on the “Create a New Gallery” button.
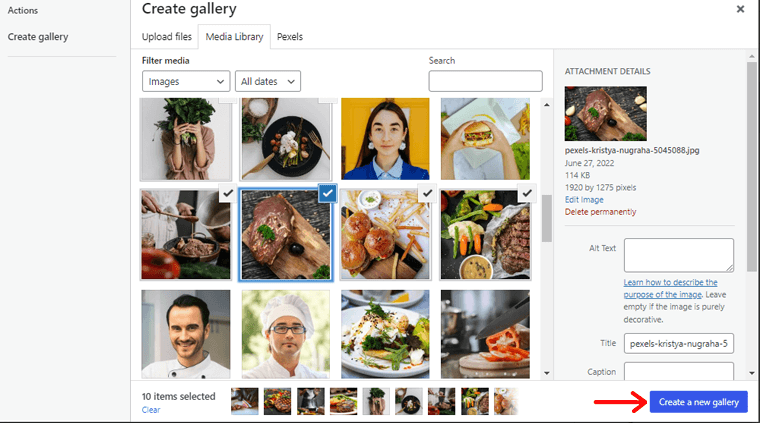
Following that, it’ll let you edit your images. Simply drag and drop the images to reorder them. Once done, click on the “Insert Gallery” option.

After inserting, below is an example of how your gallery will look like. Also for this instance, we’ve selected the Thumbnail Slider gallery style.
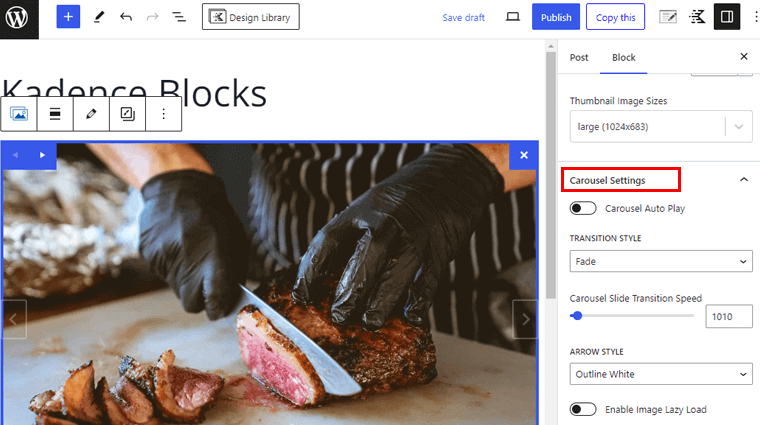
If you scroll more, then you can change the thumbnail image ratio, image size, etc. Moreover, it has Carousel Settings, where you can choose the transition (fade or slide), and set the transition speed. Also set Arrow style (white on dark, black on light, outline black, outline white, or none).
b. Style
Moving on to the style option, there you’ll have 2 settings Image Style and Image Shadow.
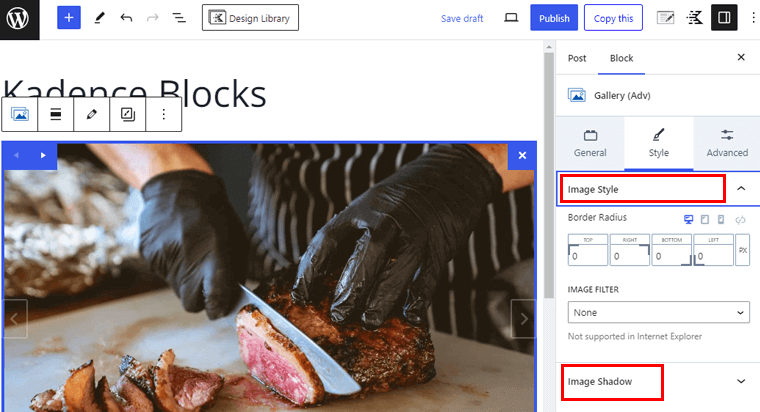
- Image Style: Here change the border radius of your image for different screen types. Also, change the filter for the images which includes Grayscale, Sepia, Vintage, etc.
- Image Shadow: Enabling this option lets sliders and carousels cut off shadows because of how items in a carousel are hidden. It has 2 options, Box Shadow or Hover Box Shadow.
c. Advanced
Within the advanced option, you can change the padding and margin of your images. You can also choose to save the settings as default for the block.
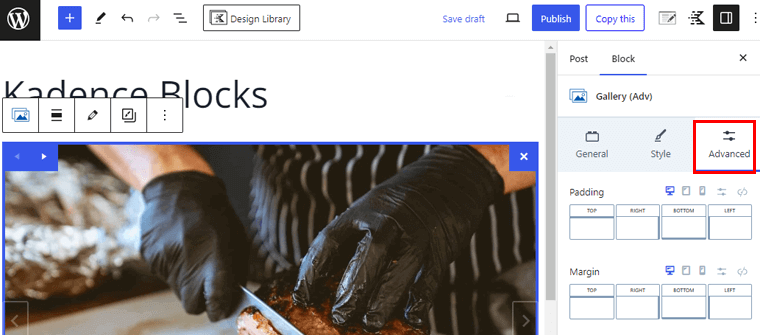
Moving on you can choose whether or not to enable the Condition Display option for your gallery. As well as change the Block Name and add additional CSS classes for the particular block.
The Advanced Gallery is the robust feature of Kadence Blocks. Using this block eliminates the hassle of adding any third-party gallery plugin to your website.
Using Accordion Block
Next, we’ll be adding the Accordion block. Simply click on the block and it’ll be added to your page.
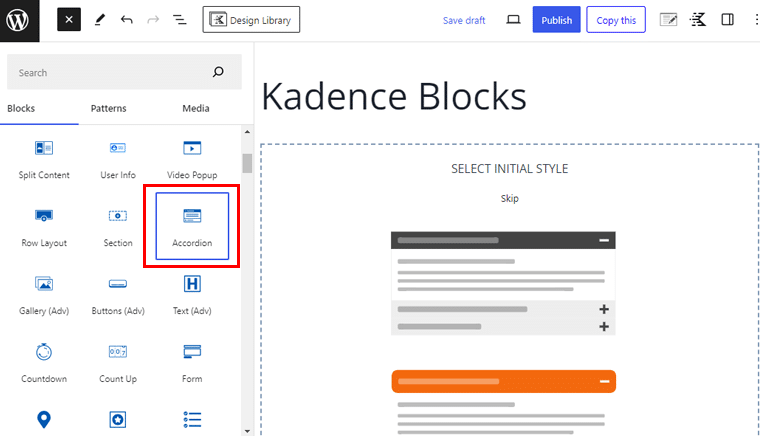
Similar to the Advanced Gallery Blocks, the Accordion Block also has 3 settings options (General, Style, and Advanced).
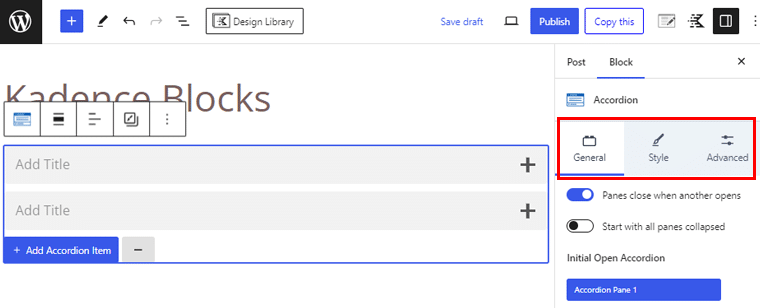
Let’s see how to use the Accordion block.
First, start by adding the title of your accordion. For example, it can “New Blocks.” Then click on the “+” icon on the Accordion block.
Following that, click on the “+” icon below and you’ll be prompted with the items that you can add to your accordion block. For this example, we’ll add the Paragraph block.
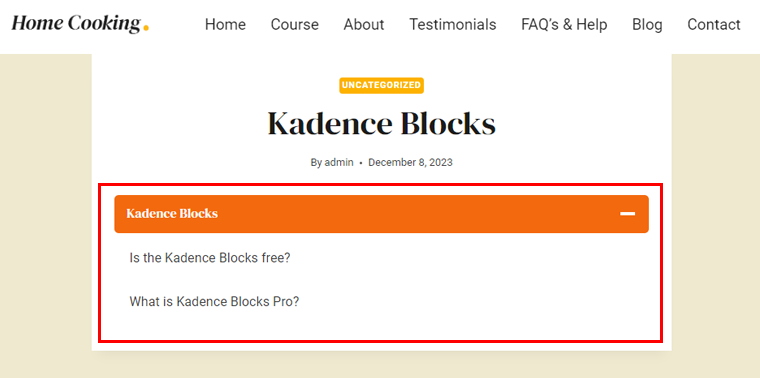
Now let’s add some questions regarding the Kadence Blocks to create an accordion for our example site.
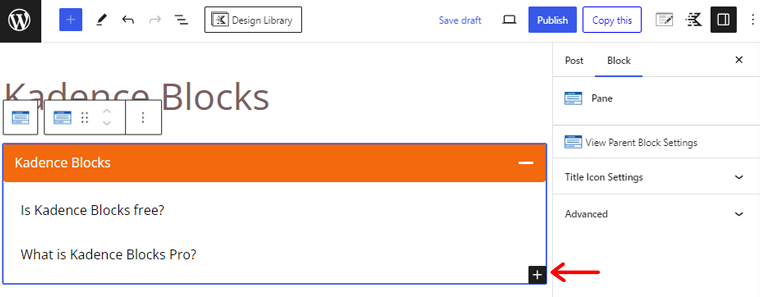
In the above image, we’ve added 2 questions. You can also do so by clicking on the “+” icon at the end of the Accordion Block, and then adding the Paragraph Block.
This is how your Accordion block will look on a live website.
Using Posts Blocks
Nest, we’ll be adding the Posts block, it helps to display clean posts with grid style anywhere on your website. This block can be great for your homepage where you want to add the featured or latest post.
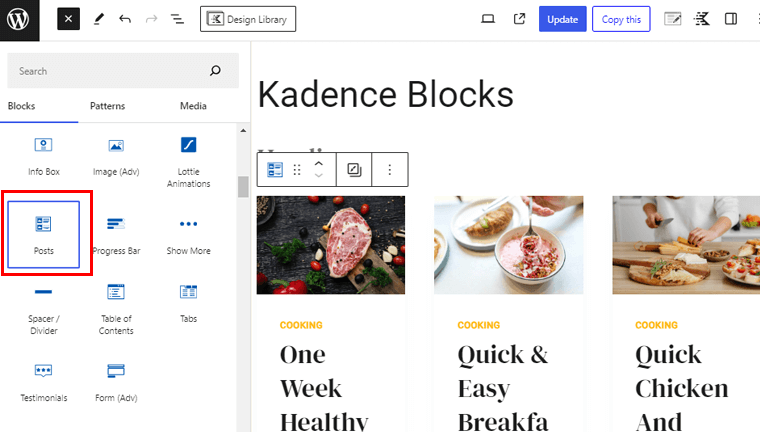
Like other blocks, the Posts block also has 3 setting options (General, Style, and Advanced). Go through them and customize them as per your preference.
Here you can select the post types like posts, pages, or any other available on your website. Plus, you can choose how many items to display, and the order of items like newest to oldest.
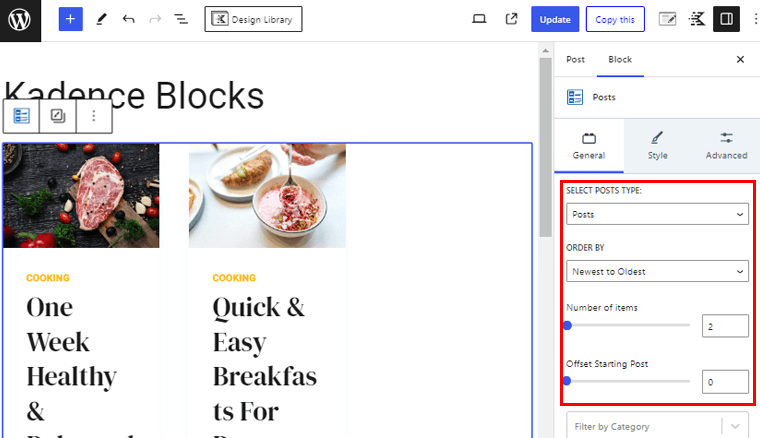
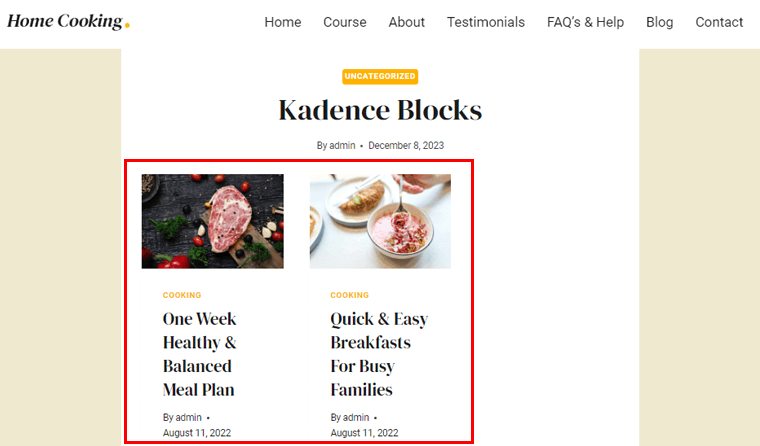
Once done with settings, that is how your post block will look on a live website.
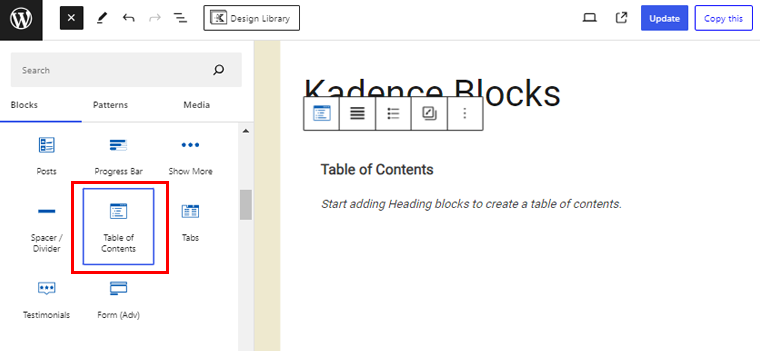
Using Table of Contents Blocks
Using the Table of Contents block enhances post-readability by guiding readers and providing a quick overview of the content structure. Let’s start with adding the Table of Contents Block on your page.
Start by clicking the “+” icon and click the “Table of Contents” block.
Just like any other Kadence Blocks, the Table of Contents Block also comes with 3 customization settings, (General, Style, and Advanced).
Upon customizing you can select what headings will appear on the table of contents block. Here in the example image, we’ve set H1, H2, and H3 to be visible.

Besides, there is also a Collapsible Setting, where you can enable collapsible content and set the icon style. Upon enabling the collapsible content you’ll see the icon appear on your table of contents block.
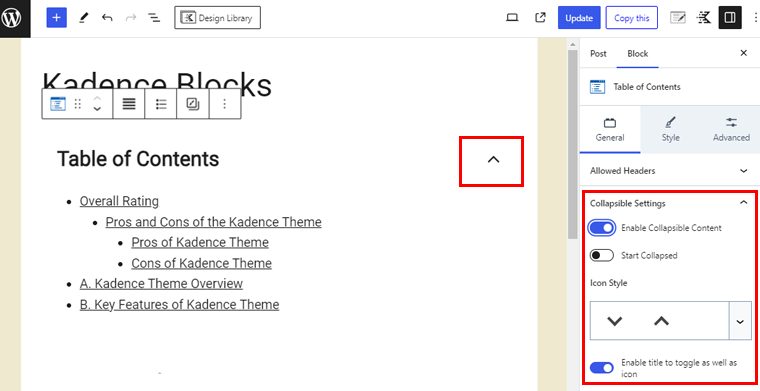
Moreover, you can go through its style settings and change the background color, title size, fonts, etc.
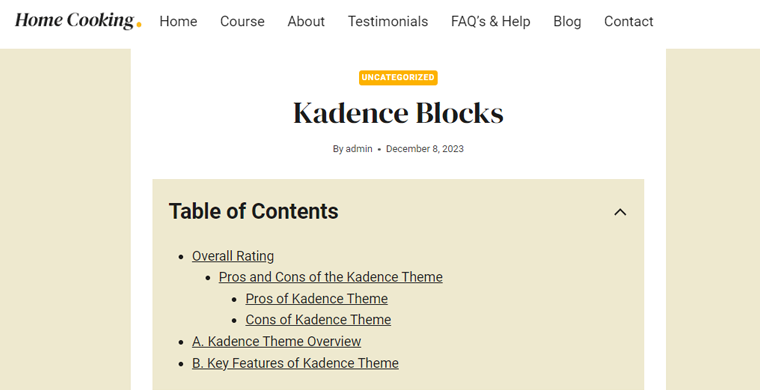
Once you’re done with your settings, this is how your table of contents will look on a live site.
E. Kadence Theme Support
The next part of this Kadence theme review article is going through its customer support options.
Any theme you use could cause you to become stuck, and that’s when you need excellent customer support.
So, let’s find out how good customer support Kadence Theme provides in this review article.
And the customer support of the Kadence theme is great, to begin with. It provides a comprehensive documentation section that covers everything from getting started to customization settings, header options, troubleshooting, and more.
In addition to the documentation, it offers premium support tickets for more personalized assistance. The ticket system is only available to premium users, and you must log in to use it. With the support ticket system, you can get fast and reliable help to ensure your website runs smoothly.
Further, it also comes with the Facebook community where you can socialize with other Kadence theme users. There, you can connect and resolve your queries or share interesting features of this theme.
F. Kadence Theme Pricing
Kadence Theme is a freemium WordPress theme offering free and premium versions. You can easily download the free version from the official WordPress theme directory or install the theme directly from your WordPress dashboard.
If you want to access additional features, then consider purchasing the premium version. Kadence offers 4 different pricing plans on its official website.
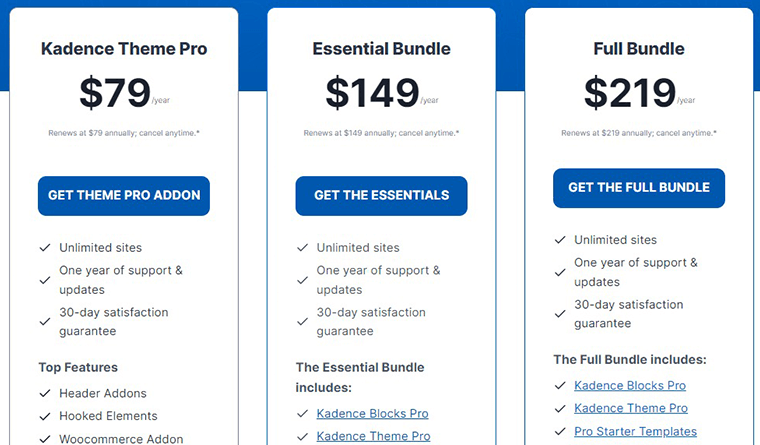
- Kadence Theme Pro Plan: Costs $79 annually, it includes unlimited sites, header addons, hooked elements, ultimate addons, etc.
- Essential Bundle Plan: Costs $149 annually, it comes with everything from the Kadence theme pro plan. It also includes Kadence Block Pro, Pro Starter Templates, and more.
- Full Bundle Plan: Costs $219 annually, it comes with everything from the essential bundle, plus Kadence Cloud, Kadence Shop Kit, etc.
- Lifetime Full Bundle Plan: Costs $799, one-time payment. It includes lifetime support, updates, and so on.
Besides, if you’re unsatisfied with their plan, then you can get your refund within 30 days from the purchase date.
While Kadence Theme Pro offers strong features, we suggest opting for the Essential Bundle plan. This includes Kadence Blocks Pro, Kadence Theme Pro, Pro Starter Templates, and Kadence Custom Fonts. So, it’s everything in one single plan.
So, this sums up our Kadence theme review.
Now let’s take a look at some of its alternatives.
G. Kadence Theme Alternatives
While the Kadence WordPress theme is a great option for building websites, it’s always wise to consider alternatives. There are several themes out there that might better suit your needs and preferences.
1. GeneratePress
GeneratePress is a multipurpose lightweight WordPress theme focusing on speed, stability, and accessibility. It prioritizes the essentials your website needs to achieve optimal performance for your visitors and search engines.

Moreover, this theme comes with a theme builder. This feature helps you to design and build theme elements in the block editor. Plus, with its Dynamic Block Elements, you’ll have total design freedom.
Additionally, it has an extensive library of professionally designed websites. So you can choose one and start your new site right away.
Pricing:
GeneratePress is available in both free and premium versions. You can download the free version from WordPress.org.
Whereas there are 2 pricing plans for the premium version:
- Yearly Plan: Costs $59/year, includes all premium features, full access to the site library, 1 year of updates and premium support, use on up to 500 websites, etc.
- Lifetime Plan: Costs $249, one-time payment, includes all premium features, full access to the site library, lifetime updates, premium support, use on up to 500 websites, etc.
For more details, check our article on GeneratePress review!
2. Divi
Divi is one of the most popular WordPress themes in the market. With its advanced visual builder technology, you can visually build your website with ease and efficiency. Also, its drag-and-drop editor helps to move elements around on the front end of your website without coding.
In addition, it offers 200+ website elements, and it’s a module for everything. Some of them include a call to action, sliders, forms, galleries, and more.
Furthermore, this theme is packed with 2000+ pre-made designs for free. It includes 200+ complete website packs and royalty-free photos, icons, and illustrations. You can choose one of them and immediately apply on your website.
Pricing:
Divi is a premium theme available on its official website with 3 pricing plans.
- Divi: Costs $67 per year with access to Divi, Extra, Bloom, and Monarch themes. It also includes hundreds of website packs and more.
- Divi Pro: Costs $211 per year with everything from the yearly plan. Plus, it includes lifetime updates, support, and unlimited website usage.
- Divi Agency: Costs $286 per year with Divi Theme & Builder, 100s of Website Packs, Unlimited Website Usage, etc.
3. Blocksy
Another on our list is Blocksy, one of the most innovative and lightning-fast WordPress themes. Also, it’s well-optimized for the Gutenberg editor and seamlessly integrates with other popular page builders like Elementor, Beaver Builder, etc.
Additionally, this theme is packed with dozens of cool features. For example, code-splitting features allow you to load JavaScript behavior only when needed. Plus, the live preview features help to display your changes in real time without slowing your workflow.
Moreover, it comes with many customization options, making it easy to start a website that matches your brand. You can set the layout option from default, narrow to full width. Also, change your header layout, customize the header elements, and more.
Pricing:
Blocksy theme is available in both free and premium versions. The free version is easy to download from the WordPress.org official theme directory.
Whereas the premium version is available on its official website with 3 pricing plans.
- Personal Plan: Costs $69/year for 1 site license. It includes features like multiple conditional sidebars, content blocks, extra post types, mega menus, etc.
- Professional Plan: Costs $149/year for 5 sites license. Includes custom code snippets, custom fonts, Adobe Typekit fonts, custom widgets, and more.
- Agency Plan: Costs $149/year for unlimited licenses. Includes white labels, duplicate header items, product share icons, gallery sliders, and many more.
Also, check out the Blocksy theme review for more detailed information.
H. Final Verdict – Is Kadence Theme Worth it for Your WordPress Site?
In short, the Kadence theme is a great choice for making a flexible and responsive website with cool features. Even the free version has tools for quick setup and lots of ways to customize your site.
One of the best features is the easy color scheme feature! You can pick a color palette and change your entire website’s color without doing a lot of manual work. Not only changes the background color, but also the color of buttons, titles, and many more.
The theme’s most impressive aspect is its Kadence AI feature, which revolutionizes website creation. Simply provide your specifications, and Kadence AI will offer a range of AI-generated, pre-designed templates.
Additionally, the Kadence theme does not limit you to using its features. But rather empowers you with its custom blocks which is called the Kadence Blocks plugin. This plugin has some cool blocks like Advanced Gallery Blocks, Posts, Accordion, etc. So, instead of adding any third-party plugin, it’s best to use the Kadence Blocks plugin.
With all these cool features, trying out the Kadence theme is a smart move for a feature-rich website.
Moreover, since it has a free version, why not give it a try and see it yourself?
Conclusion
That’s all, folks! We’ve arrived at the end of our Kadence theme review. We believe that you’ve understood the Kadence theme and can use it on your site.
We hope you liked our Kadence theme review article. If you’re using the Kadence theme for your website, then please share your experience below in the comment section.
However, if you’ve any further queries about the Kadence theme review, then please feel free to ask us. We’ll try to get back to you as soon as possible. Also, share this article with your friends and colleagues.
You may also check out our article on the best WordPress themes and templates and the best lead generation WordPress themes.
Don’t forget to follow us on Facebook and Twitter for more helpful articles.