Do you know what WordPress block patterns exactly are? Or want to know how to use them to design your pages? If that’s the case, then this tutorial article is for you.
Simply, you can understand block patterns as a pre-assembled collection of blocks that you can use to your pages in WordPress. Also, there are some exclusive block patterns for footers, headers, pages, and so on.
Hence, WordPress block patterns are pre-made content sections built with blocks. They help you easily design your pages, posts, and different areas of your site. No doubt, you can save up a lot of time using WordPress block patterns.
Do you want to know how to use the WordPress block patterns? We prepared this easy tutorial guide just for you! Let’s begin!.
Introducing WordPress Block Patterns
Let’s take a closer look at the WordPress block pattern before we get into how to use it to design your pages.
As mentioned earlier, WordPress block patterns are basically templates made up of a few blocks. It can include two or more blocks and they are placed in a specific manner to suit a page, post, sidebar, or any other part of a website.
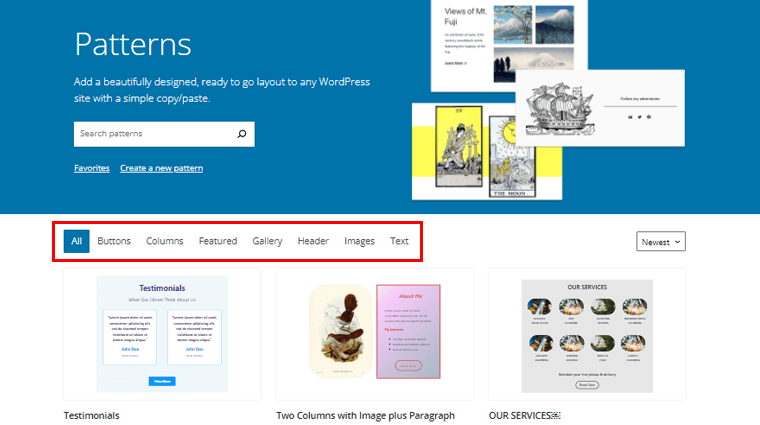
For example, you can find block patterns for a call to action, product description, pricing table, testimonial, team, contact, gallery, features list, etc. Also, you can get block patterns for the header, footer, 404 page, etc.
The main objective of block patterns is to help WordPress users design beautiful pages more efficiently. Instead of combining blocks one by one, pre-combined block patterns let you design way easier and faster.
Moreover, the block patterns come with the configuration settings for those pre-assembled blocks. This way, you can easily tailor the pattern to your favor by making some little tweaks like changing its color, content, and more details.
In essence, the top reasons to use WordPress block patterns to design your pages can be highlighted as:
- Instead of having to design individual pieces repetitively, you can save time by using a pattern.
- Comes in handy to build more complex page designs on your own.
- You can make use of professionally designed pre-made patterns by developers.
- It helps you to be more productive by allowing you to reuse particular content styles that you frequently create.
- Patterns are highly configurable and you can utilize them in a variety of themes and layouts within those themes.
Where Can You Find WordPress Block Patterns?
Now, you might be wondering where you can find the WordPress block patterns right?
Well, you’ll be glad to know that WordPress core comes with some block patterns. You can directly use them from the page editor interface to design your pages.
In addition, you can also find various beautiful block patterns right from the WordPress block pattern directory on WordPress.org.

These block patterns are submitted by contributors all around the globe, just like WordPress themes and plugins. A review team at WordPress.org reviews each block pattern submitted and then approves them.
Even you can create beautiful block patterns and submit them in the WordPress.org directory. We’ll show you how to do that in this article, so stick with us till the end.
With that said, let’s move forward to how to use WordPress block patterns to design your pages.
How to Use WordPress Block Pattern to Design Your Pages?
Basically, there are 2 easy methods to use WordPress block patterns to design your pages. So, let’s check out these methods individually.
Method 1: From the Editor Interface
The first method is to use WordPress block patterns directly from the editor interface.
Here, we’ll walk you through how to use WordPress block patterns from the editor interface to create your pages step by step.
Step 1: Create a New Page
In order to design a page, firstly you’ll need to create a new page. So, after you log in to your WordPress dashboard, navigate to the ‘Pages’ in the left navigation of your dashboard. Then, click on the ‘Add New’ option.
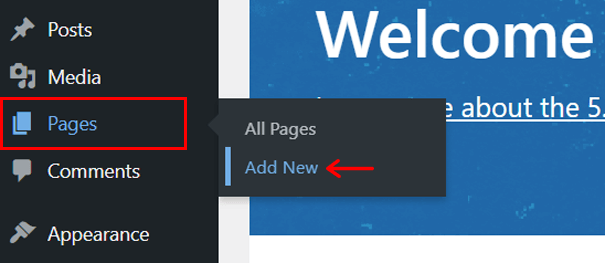
With that, now you’ll be taken to the page editor interface. Let’s name the page ‘Use WordPress Block Patterns’ for instance.
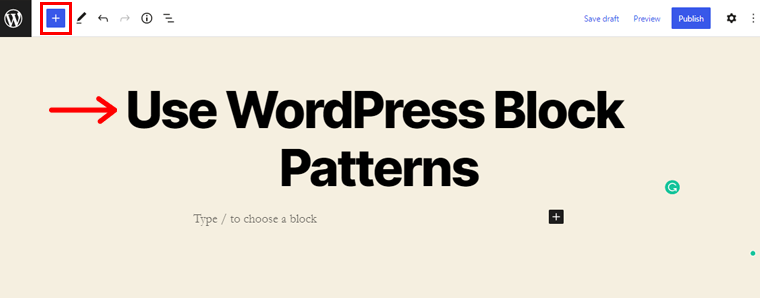
Following that, you can see the ‘+’ icon in the top-left corner. Click on it to bring up the content inserter.
Step 2: Explore Block Patterns
On clicking it, you’ll see 2 sub-options in the sidebar that appears. They are Blocks and Patterns. Now, toggle to the ‘Patterns’ tab.
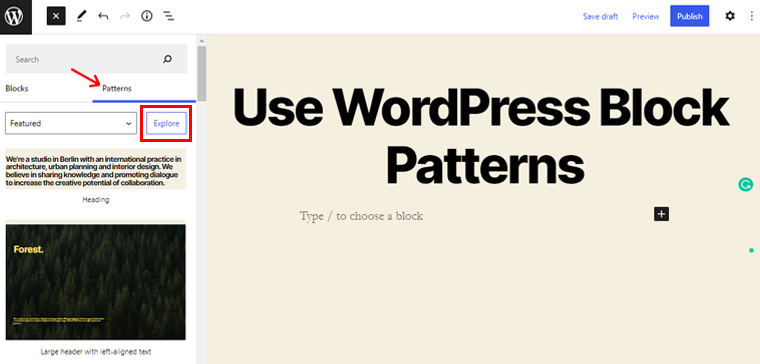
Following that, click on the ‘Explore’ option to explore various block patterns available on your interface.
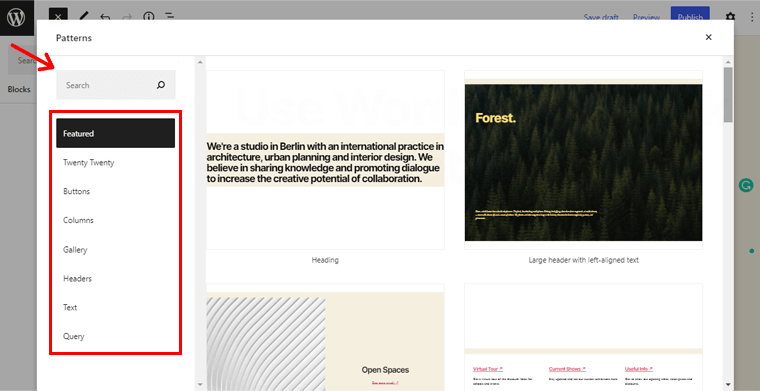
Afterward, you’ll see the page as shown above. You can use the right-hand menu to go through several pattern categories. Such as Featured, Buttons, Columns, Gallery, Headers, Text, and so on. You can also search for a specific block pattern by name in the search box.
Step 3: Integrating Block Patterns
Following that, let’s integrate some block patterns into our page. For now, let’s navigate to the ‘Headers’ menu and check out the available header patterns.
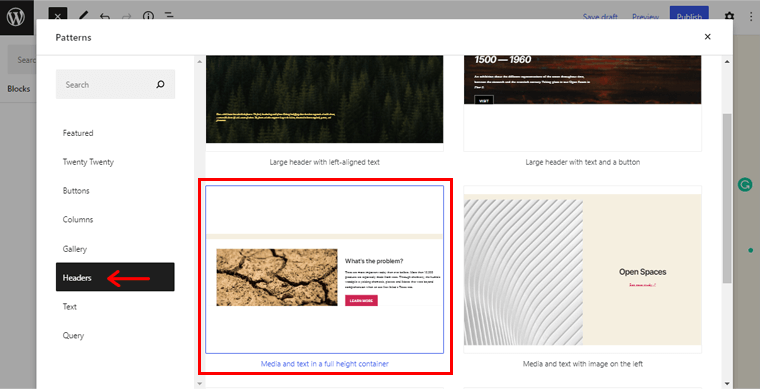
Among the various available patterns, you can choose the one you like. Here we’ve chosen the ‘Media and text in a full-height container’ header pattern.
You can simply click on your chosen pattern to integrate it.
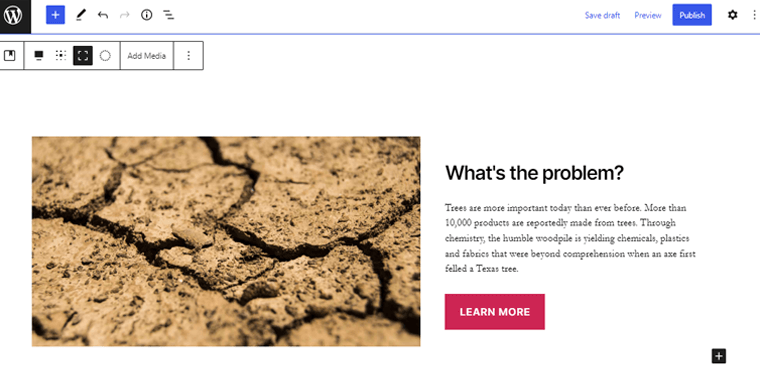
Now, you’ll simply see the header pattern already being integrated into your page as shown in the above screenshot. You can further customize the pattern to your choice which we’ll come up with shortly.
In the same way, let’s explore ‘Gallery’ patterns. And, here we’ve chosen the ‘Offset images with description’ gallery pattern. Like before, simply click on your chosen pattern to integrate it.
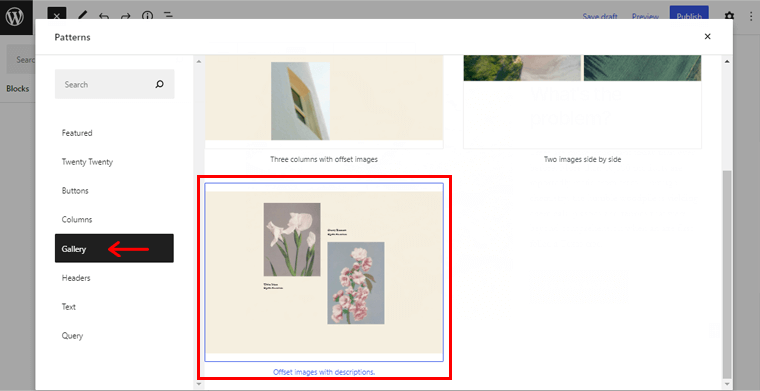
On successful integration, you’ll see the page as shown below. With that, you’ve made use of the gallery pattern.
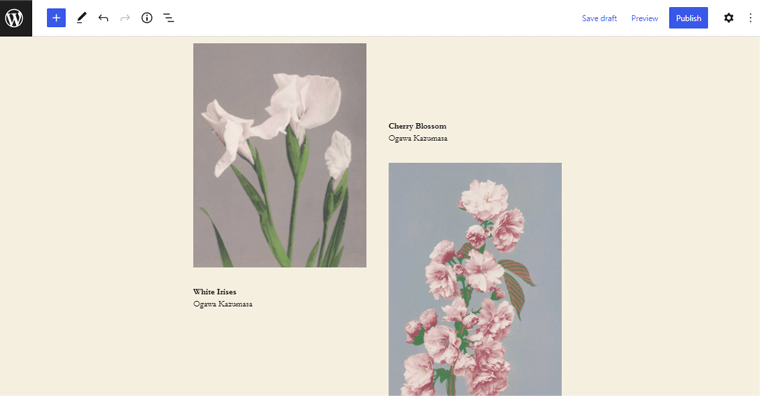
Similarly, there are other various patterns available. All you need to do is explore the required pattern and integrate it the same way as above.
Step 4: Customizing Block Patterns
After you make use of certain WordPress block patterns, you might wish to customize it to your choice.
So, let’s customize the Header pattern that we’ve integrated before.
You can simply click on the header pattern on your page to access the customization possibilities.
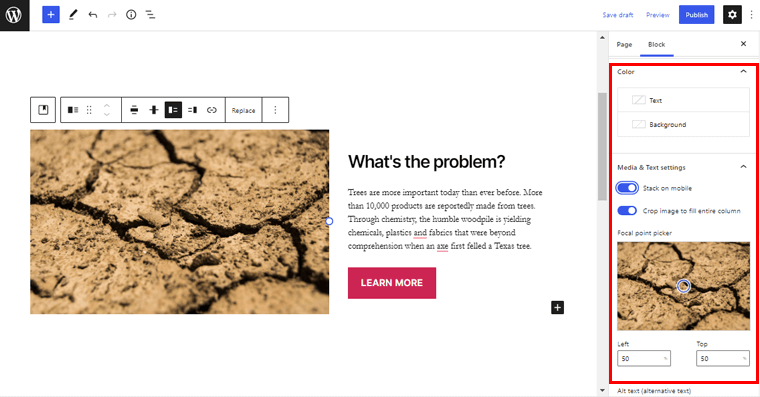
Once you do that, you’ll find the various settings on the right-hand side of your editor.
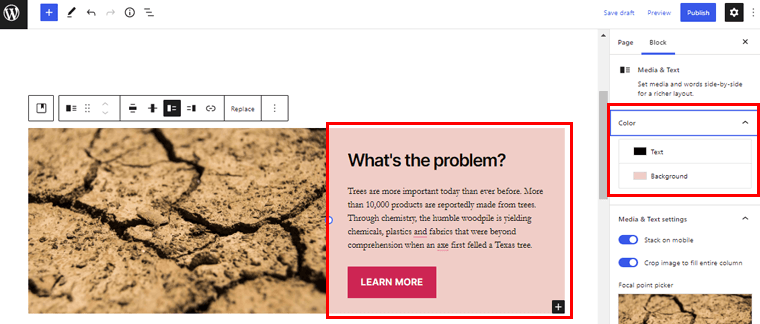
With the color option, you can put the color of your choice in the text and background.
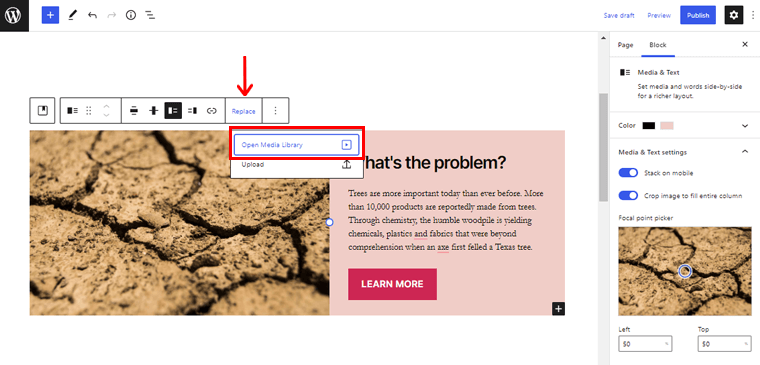
Further, you can simply click on the image to access the ‘Replace’ button. And upload the image of your choice from the Media Library.
Similarly, you can simply click on the heading and edit the text. Just how we’ve changed to ‘Travel Diaries!’ here.
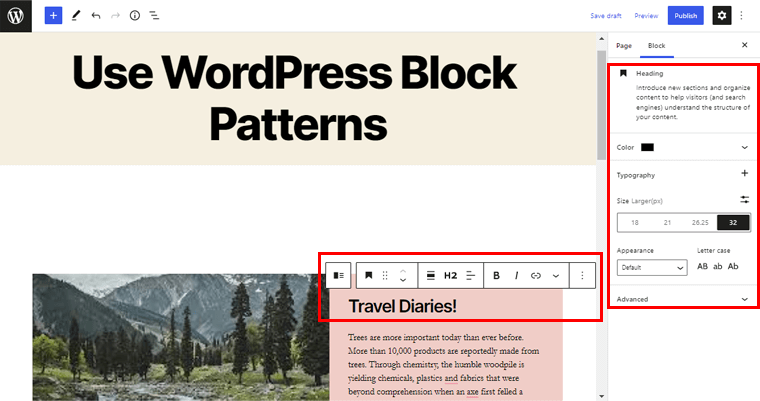
Further, you can also change the heading level, color, typography, size, and more.
Likewise, you can personalize the button style, color, border style and radius, and many more.
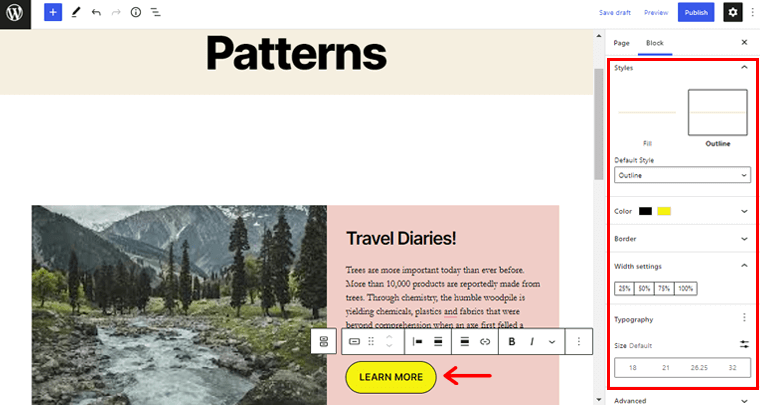
This way, you can customize the WordPress block pattern to your choice using all the provided customization possibilities.
In a similar way, you can personalize other various patterns that you’ve integrated to design your page. It’s really that simple.
Step 5: Preview the Page
After you’re done with customization, on the top right corner, you can see the ‘Preview’ button. Simply click on it to preview the page that you’ve just designed using the patterns.
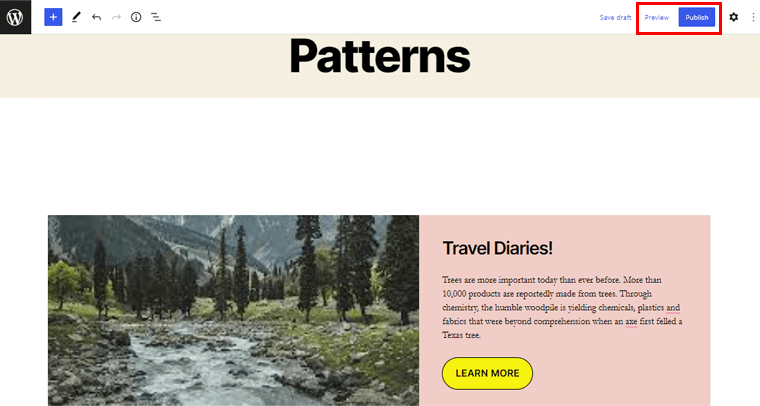
Once you’re okay with your designed page, you can click on the ‘Publish’ button to live your designed page.
This way, you can craft a gorgeous design layout on your website with the WordPress block patterns right from the editor interface in no time.
With that, let’s move forward to the next method to use WordPress block patterns.
Method 2: From the WordPress Block Pattern Directory
Similarly, if you cannot find the pattern that you’re looking for in the editor interface, then there is another method for you. That is to use WordPress block patterns directly from the WordPress block pattern directory.
So, let us check how to use WordPress block patterns from the WordPress block pattern directory to design your pages step by step. Follow us as we guide you through.
Step 1: Go to WordPress.org and Navigate to Patterns
In order to utilize the pattern from the WordPress block pattern directly, firstly go to the official WordPress.org website.
Now, you’ll see various options on the navigation bar such as plugins, themes, patterns, learn, etc.

To that, you need to click on the ‘Patterns’ option.
Step 2: Explore the Patterns
After that, you’ll be taken to the page as displayed in the image below. From here, you can now explore various block patterns available in the repository.

Generally, the patterns are categorized as Buttons, Columns, Featured, Gallery, Header, and so on. You can also search the kind of pattern you’re looking for from the search box.
As of now, in the Columns sub-section, we explored and chose the ‘Two Column with Image and Paragraph Description’ pattern.
Step 3: Click on Copy Pattern Option
So after you’ve found the pattern you’re looking for, simply double-click on it to preview the pattern.
And on the top-left, you can see the ‘Copy Pattern’ option. Click on it to copy the pattern.
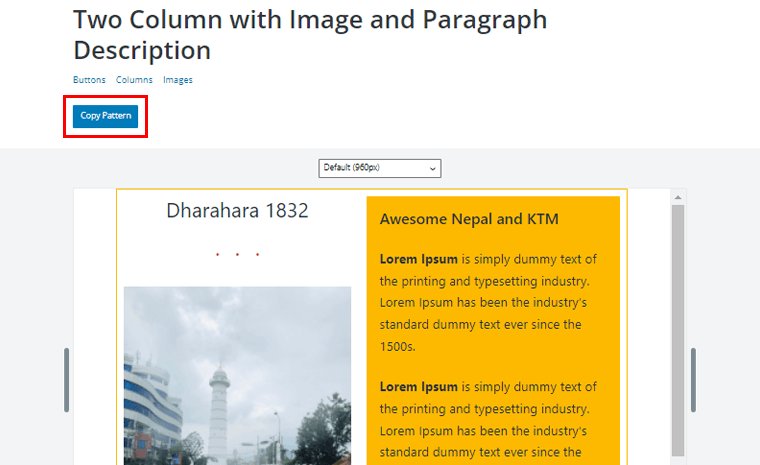
Alternatively, you can simply hover your mouse over the pattern. With that, you’ll see the ‘Copy’ option. Simply, click on it to copy the pattern.
Step 4: Paste the Pattern on the Page
Following that, now you need to come back to your WordPress page editor.
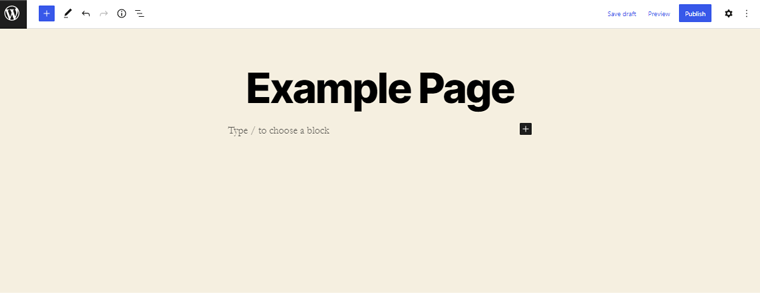
Now, you need to paste the pattern that you just copied from the WordPress directory on your page editor. And thereby, you’ll see the changes as shown in the below image.
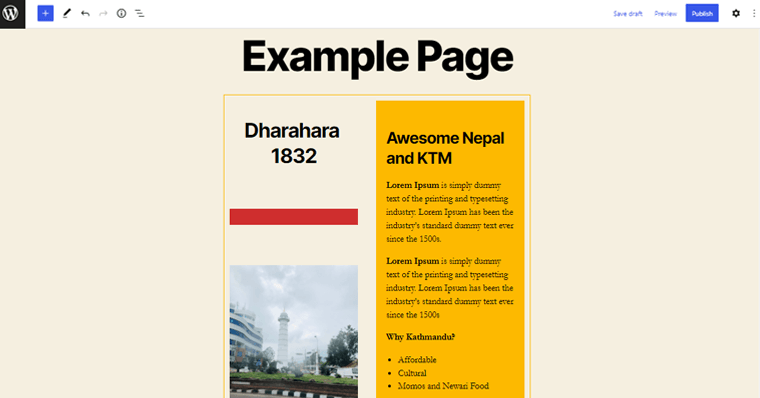
Step 5: Customizing the Pattern
Afterward, you can further customize the pattern to your choice. Just like in the previous method, you can customize the pattern in the same manner.
So, let’s make some tweaks and turns to the pattern to make it our choice.
You can simply double-click the pattern block to access the customization possibilities on the right-hand side.
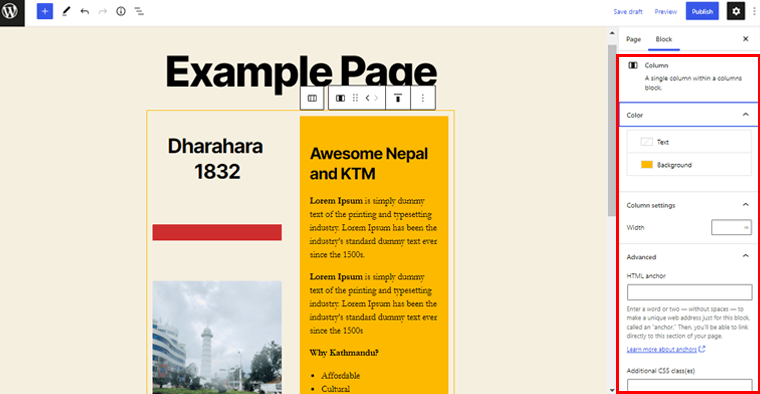
You can easily change the pattern text to your choice by directly editing the interface of the pattern.
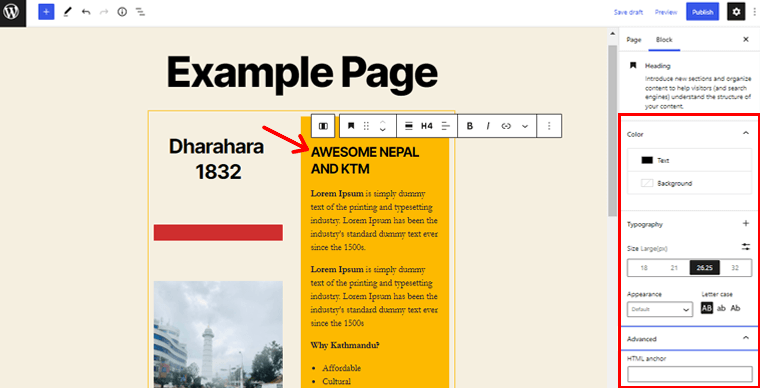
Further, from the right-hand side customization settings, you can easily make changes to the text. Such as tailoring text color, background color, typography size, the appearance of the text, letter case, and so on.
Similarly, you can change the default color of the column to your choice. All you need to do is simply click on the column to which you want to change to color.
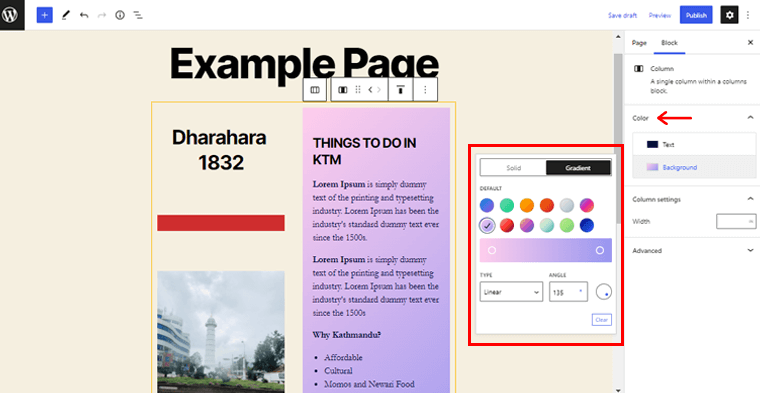
And simply place the color of your choice from the customization settings just as shown in the above screenshot.
Likewise, you can replace the default image of the pattern with the image of your choice.
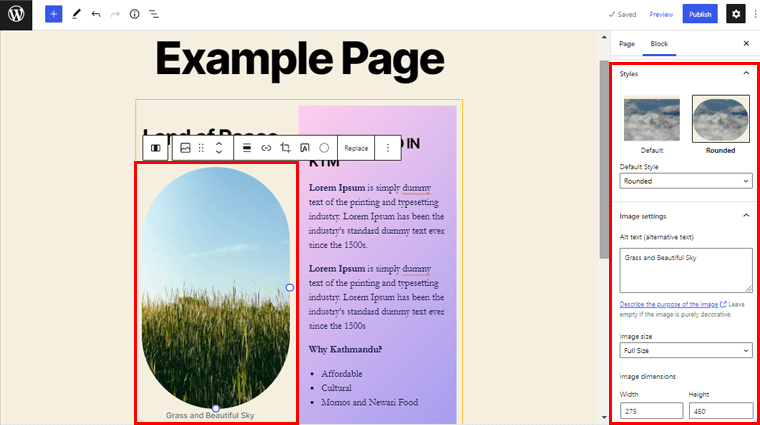
Further, you can tailor the default style of the image, personalize image size, customize image dimensions, and much more. In addition, you can also remove any block within the pattern that you find unnecessary for your page.
Following that, let’s customize the button section of the pattern.
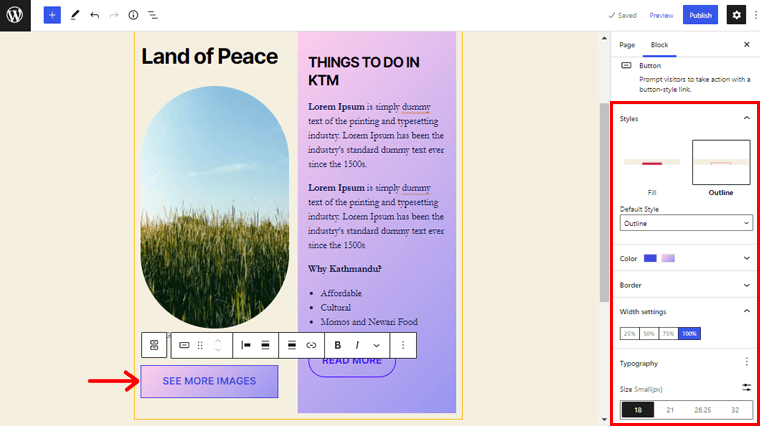
You can change the button style, text and background color, border radius, width settings, typography, and so on.
Following the same process, you can twist and turn every nook and cranny of the pattern to personalize it.
Step 6: Preview the Page
After you’ve finished customizing, look for the ‘Preview’ button in the top right corner. Simply click it to see a preview of the page you just crafted using the patterns.
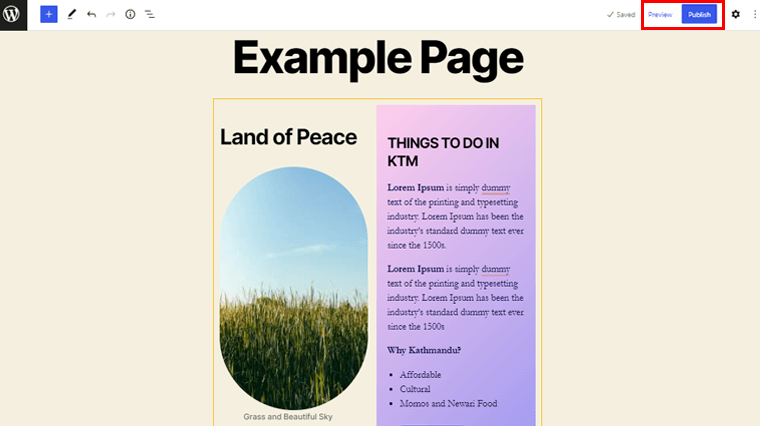
Once you’re satisfied with your designed page, click the ‘Publish’ button to make your page live.
That way, you can quickly craft an elegant page design layout for your website. All with the help of WordPress block patterns from the WordPress block pattern library. Isn’t that quite cool?
How to Create and Submit Your Own WordPress Block Patterns?
Now that you know how to use block patterns to design your pages, you might be wondering if you can also contribute to creating any block patterns.
Well, you’ll be happy to know that you can do so. But is it hard? Absolutely not!
We’ll go over how to create your own block patterns and submit them to the repository in this section. Please follow along with us as we walk you through the following steps:
Step 1: Create your Account on the WordPress.org
So, in order to create and submit block patterns, you need to have an account on WordPress.org. If not, the first thing you need to do is create your account.
You can easily create your account by navigating to the ‘Register’ option on the WordPress.org official website.
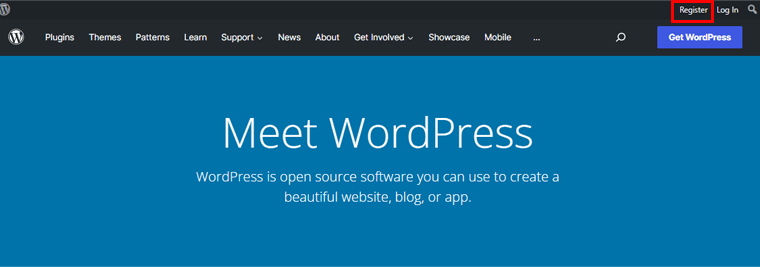
And further, fill in the required information to create the account. It’s really that simple.
Once you created your account, you can easily log in and further create your block patterns.
Step 2: Create and Submit Your Block Patterns in the Repository
To create block patterns, firstly, navigate to the ‘Patterns’ menu on the official WordPress.org website.
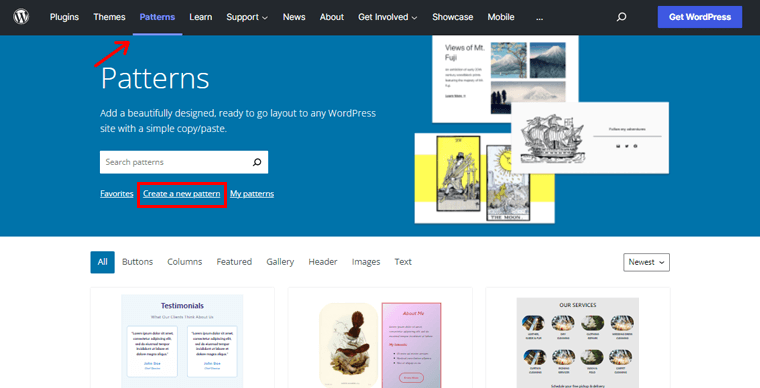
Following that, you can see the ‘Create a new pattern’ option as shown in the above image. Click on it. With that, you’ll see a new editor page where you can create your pattern.
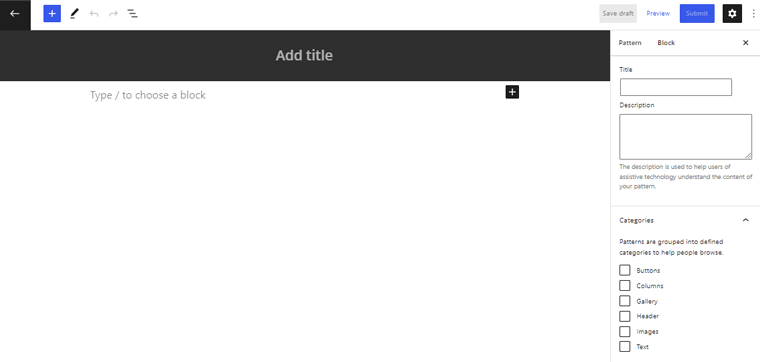
Now, let’s give a suitable name to the pattern. For example, ‘Two Column Pattern with Double Image and Description’. Afterward, you can simply click on the ‘+’ icon to insert the required blocks.

For now, let’s insert Column blocks. Further, you can choose the number of columns that you want for your pattern.
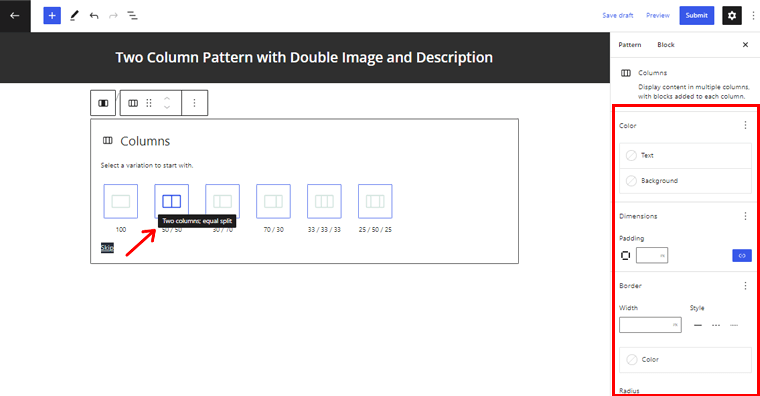
As here we’re going to create a two-column pattern, we’ve chosen a 50/50 two-column block. Also, you can tailor the column to your choice from the settings option on the right-hand side.
Further, you can click the ‘+’ icon on the column and add the sub-blocks inside it.
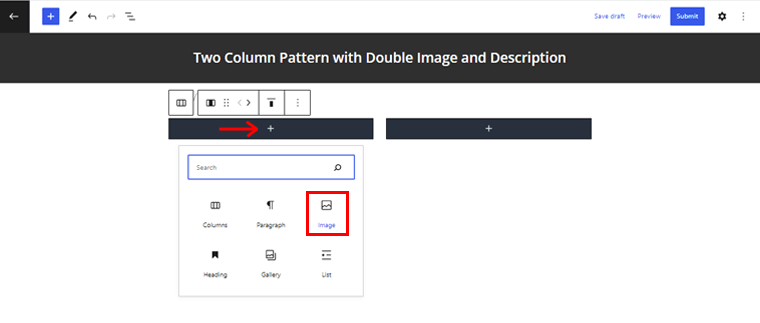
So, let’s insert the Image block. Once you do that, you can upload any suitable image found on the WordPress.org repository from the media library. However, do note that you cannot upload your own image in the pattern.
Further, you can insert the Paragraph block for creating a description section in your pattern.
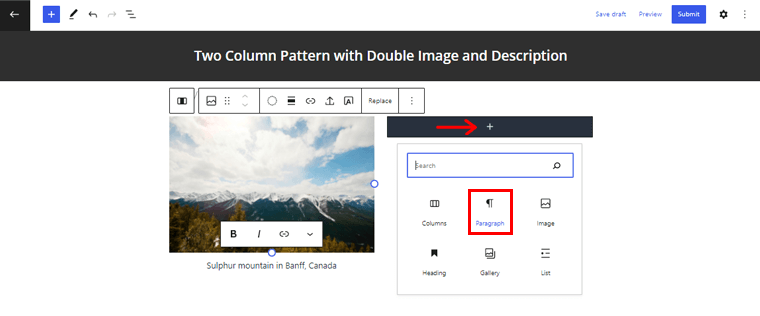
Similarly, you can add another block in the same column by clicking on the ‘+’ icon on the block.
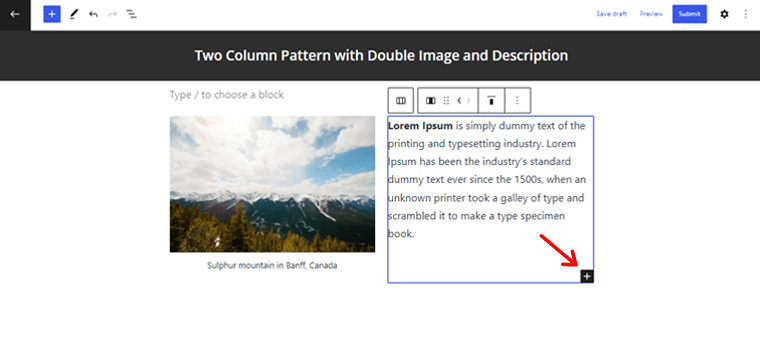
In the same way, you can add another paragraph block in the first column.
Further, you can make the necessary customization to your pattern. Simply double-click the whole column to access the customization.
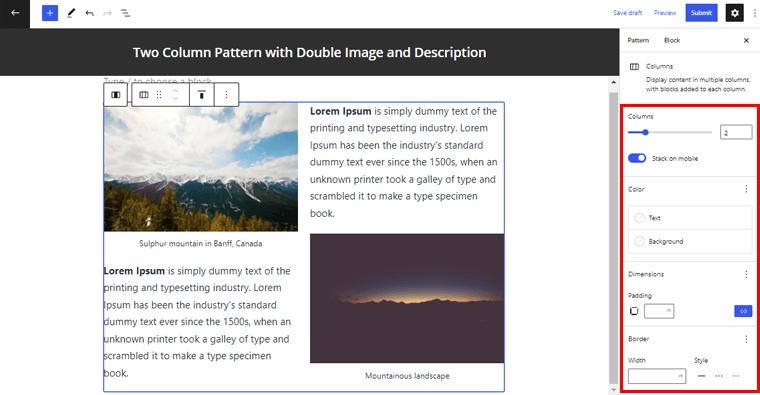
Now, you can change text and background color, border style, radius, padding, and many other settings.
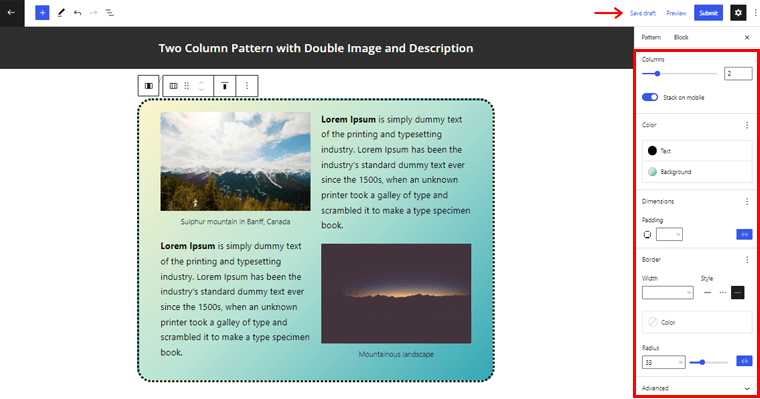
Once done, you can simply click on the ‘Save Draft’ option at the top.
Lastly, you can click on the ‘Submit’ button in the top right corner to publish your pattern.
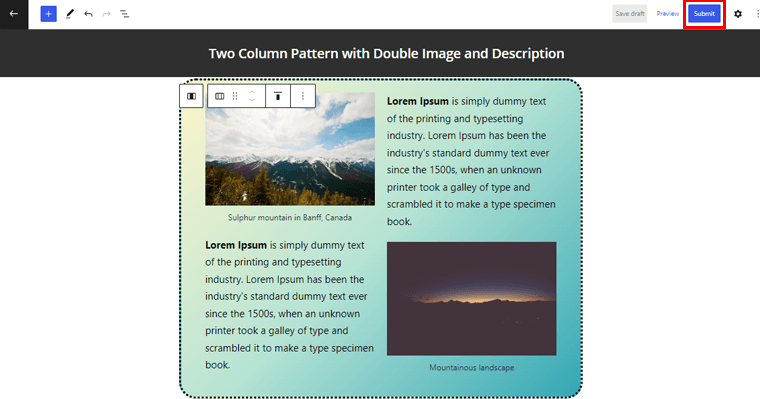
It’s really that easy. Once your pattern gets approved, you’ll find it in WordPress official pattern directory.
Conclusion
That’s all there is to it, folks! We’ve arrived at the end journey of this article.
We hope this article gave you an idea of WordPress block patterns and how to use them to design your pages. Following the above methods, you can easily make use of WordPress block patterns to elegantly design your pages in no time. And also, create one if you wish.
If you’ve any confusion regarding how to use WordPress block patterns, then please don’t hesitate to leave a comment below. We’ll get back to you as soon as possible.
Also, please mind sharing this article with your friends and family if you enjoyed it.
You might also be interested in our other article like best WordPress block themes for full site editing. Also, make sure to check this article on the best Gutenberg block plugins for WordPress too.
Lastly, don’t forget to like and follow us on Facebook and Twitter for more related articles.
