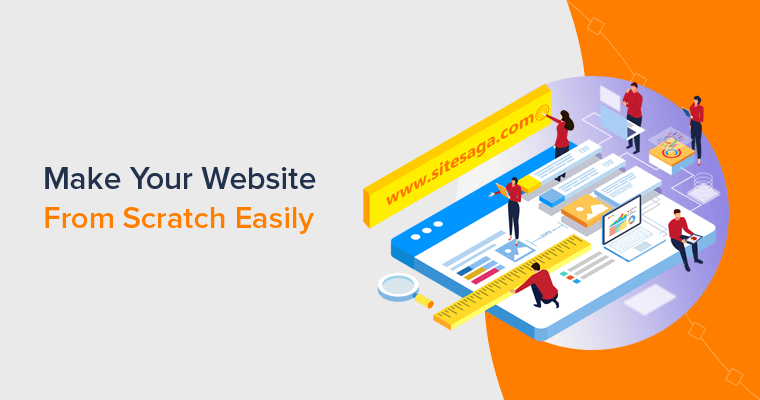
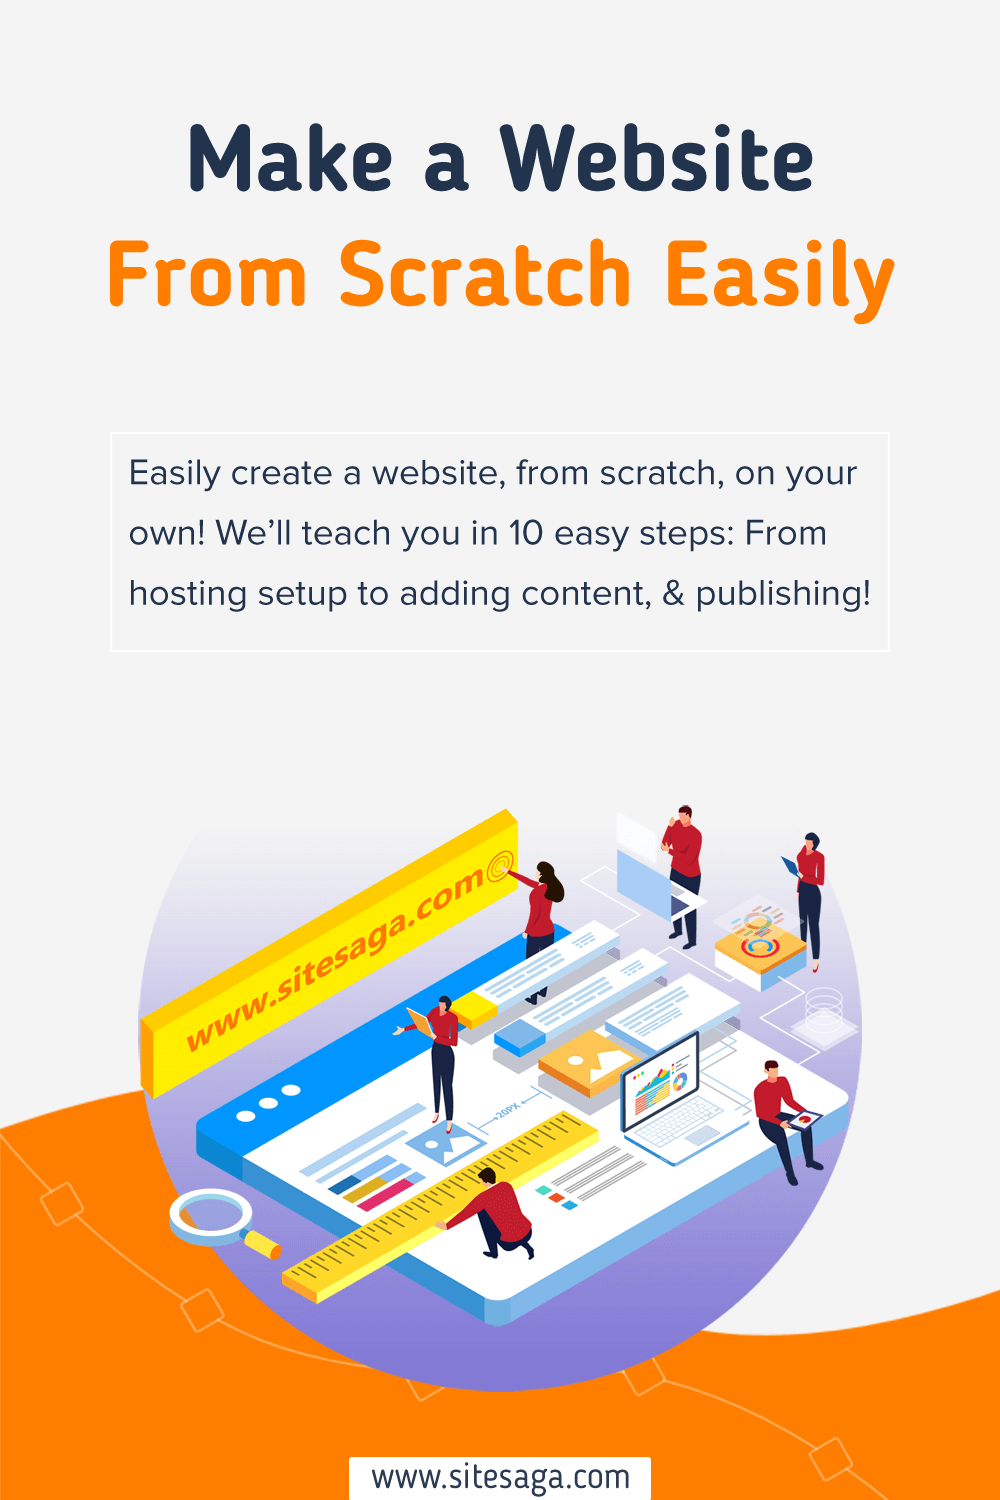
Do you want to know how to make a website from scratch? Or wondering how to create a website on your own?
So, you want a great online presence but are not sure how to get started! For a beginner, it may sound like an impossible high-tech task.
Even so, you don’t need to panic! With a proper guide, anyone without any coding skills can make a website. Yes, anyone including you can design a fully functional site on your own.
Lucky! You’re on the most beginner-friendly guide now. Below, we’ve discussed the whole website-building process in 10 easy steps. You don’t need any coding skills nor do you have to hire a developer. You can make a website on your own, from scratch.
Let’s get started!
Step 1. Choosing a Website Type (Niche)
Having a website helps you build a professional identity online for yourself as an individual or for your organization. But that’s just a basic function of a website.
In actuality, there are a wide variety of websites and they serve a multitude of functions. Also, each type has distinct perks.
So, you have to carefully look at them and find out which kind is the best for you. And, it’s the first important step in the website-building process.

To help you out, we did the research and picked some of the most popular website types you can build in 2024. Now, let’s take a look at them.
i) Blog
Love writing? Start a blog! Share your thoughts, help others, and even make money through ads and partnerships. Perfect for passionate writers.
For example, you can see our blog (https://www.sitesaga.com/) itself. The article you’re currently reading is a blog article.
ii) Personal Website
For beginners wanting to show off their skills or just share thoughts, a personal website is your online resume. For example, Matt Mullenweg’s website (https://ma.tt/).
iii) eCommerce Website
Got things to sell? Start an online store! It’s like having a shop that’s open 24/7, accessible worldwide, and costs less than a physical store. Great for businesses. Example,
iv) Business Website
Every business needs a website to be found online. It’s like your digital storefront. Microsoft’s site (https://www.microsoft.com/) is a big example. If you have a business, you need a website.
v) Membership Website
Want to share exclusive stuff? Make a membership site! Dunbar Academy does it well. A bit tricky, but you can earn regularly. Use WordPress for an easier start with membership plugins.
vi) Online Course (LMS)
Teach online with an LMS site! Coursera is a pro at it. Share free courses and charge for the good stuff. Great for education lovers. Explore WordPress LMS plugins for this.
vii) News/Magazine
If you love news and want to share it, start a news site. Time.com does it right. You can even make money through ads and subscriptions. Perfect for news buffs.
viii) Directory Website
Make a directory site to organize info. Zomato is like a directory for restaurants. Ideal for showcasing businesses or services. Use WordPress directory plugins for an easy setup.
ix) Organization/Non-profit
Care about a cause? Make a non-profit site! Save The Children is a great example. Connect with people and get donations. Use WordPress organization themes for your site’s design.
x) Podcast/Video Website
Love talking or making videos? Start a podcast or video site. 99% Invisible does cool podcasts. Great for connecting with your audience. Use podcast WordPress themes for a beautiful design.
To know in detail, you can check our article on the most popular types of websites.
Step 2. Choose the Right Website Building Platform
There are various ways to build a website from scratch. You can categorize them as two methods as shown below:
- Conventional Method of Website Building by Coding. It’s a manual process of coding with complex programming languages. If you don’t know code, then hire a developer and get your work done.
- Easy & Quick Method Using Website Builders: Nowadays, you can find powerful website builders that let you build websites easily, no matter how unfamiliar you are with coding.
Among the two options, the usage of site builders is the preferred method nowadays. Also called Content Management System (CMS) platforms, they provide powerful software and tools to easily set up and publish a site online.

According to W3Techs, about two-thirds of all websites on the internet are based on content management systems.
The major reason behind the growing popularity of site builders is the simplicity they offer. In contrast, creating sites by coding is complex as well as time-consuming. On top of that, if you have to hire a developer, then it’ll get costly too.
Learn more about what website builder is and its benefits from this article.
To sum up, we clearly endorse creating websites with website builder platforms. You can make a website from scratch but no coding is required! And, you’ll always stay ahead in the game with latest site technology and tools.
Which Website Builder Should You Use? (Top 4 Platforms)
Now, you might be wondering which website builder to use. And, that’s a legit concern because every website platform has its own features and specialties. Even more, some are specialized in building a particular type of website.
So, to help you choose the right platform, we’ve reviewed the top 4 website platforms briefly here.
i. WordPress – Most Flexible & Powerful Platform
Used by more than 43% of all websites on the web, WordPress is the most popular and most powerful CMS software. It offers a user-friendly yet super flexible platform to make a variety of websites.
WordPress is open-source software available for free download on WordPress.org. It means that it’s absolutely free to download, use, even modify and redistribute limitlessly. Along with the core software, you’ll get tons of free themes and plugins for developing a fully functional website.
To build a website from scratch with WordPress, you’ll need a web hosting account and a domain name that cost you some money. But still, it’s nothing compared to what developers and other platforms charge.
Pros:
- WordPress is a simple yet highly extendible platform. Lets you make any type of website, professional blogs, portfolios, to an eCommerce store.
- You can get plenty of resources for free. On the official WordPress.org website, you’ll get over 10,000+ free themes for your site’s design and 60,000+ free plugins for adding functionalities.
- Plenty of WordPress guides and tutorials for free on the internet. You can get an answer to most queries, without paying any penny.
- Free support via the forum on the WordPress.org site.
- You’ve full control of your site. You can choose a web host as per your needs and build the site your way. No restrictions.
Cons:
- Setting up a WordPress site may take some time for absolute beginners. Because you have to choose a domain, hosting, and install WordPress.
In a nutshell, WordPress is the best platform for building professional sites. If you’re a newbie, then follow the steps below patiently. You can make your first website from scratch, on your own.
ii. Shopify – Simple eCommerce Site Builder
Specifically designed for eCommerce websites, Shopify is one of the most popular eCommerce platforms. It specializes in building powerful eCommerce sites without coding.

The platform is suitable for all kinds of eCommerce solutions ranging from small to large-scale stores. Also, it’s scalable i.e. you can tune up and down the storage, hosting, and other requirements as per your need.
Pros:
- It’s an all-in-one eCommerce solution that includes everything you to start an online store. Provides domain, hosting, backup, updates, maintenance, and security.
- Shopify provides huge options for transactions and payment methods. So, it can be used for your online shop targeting customers anywhere in the world.
Cons:
- Shopify is a little costly platform; setting up a website on this platform takes up a huge portion of your budget.
In the nutshell, Shopify is a user-friendly eCommerce platform. If you’re looking for an easy and quick way to start an online shop, then this site is for you. Learn more from the Shopify review blog.
iii. Wix – Simple Site Builder for Beginners
If you’re an absolute beginner and want to start quickly, Wix is the right platform for you. It is a beginner-friendly platform i.e. anyone without any technical skills can also make a website with it from scratch.

Unlike WordPress.org, it’s a fully hosted platform that cares for everything you need to make a site. Including software, hosting, and domain. You just need to sign up to get started.
Pros:
- Wix is a fully hosted website builder that provides everything you need to get started, including domain and hosting. Easy to start a site.
- Offers a fully drag-and-drop interface. You can easily design beautiful pages by dragging and dropping content elements.
- There are 100s of predesigned templates to choose from. You can make an attractive and visually impressive site.
- It has a free plan with its.com subdomain.
Cons:
- You’ve limited options. Your site uses Wix’s servers, so resources like storage space and bandwidth will be as per their plans.
- There are limited themes and addons for your site’s design and features.
In the nutshell, Wix is suitable for small-scale websites like blogs, portfolios, brochures, etc. If you’re running small businesses, it’s great for you to get started. If you’re confused, then here’s our comparison blog on Wix vs WordPress.
iv. Webflow – Intuitive Website Builder
Webflow is an all-rounder website builder that you can utilize to build websites without learning how to code. It provides intuitive visual editors, custom templates, and a drag-and-drop interface, making site creation quick and easy.
As a new business owner, freelancer, or blogger, Webflow gives you top flexibility to design professional-looking sites reflecting your brand. Also, it offers seamless animations and interactive controls to improve user experiences.
In addition, it offers SEO tools to help your website get discovered online. With fine-tuned control and reliable content management tools, your website will get more chances to rank.
Pros:
- Provides strong and responsive design capabilities to let your site look good on all devices.
- With its set of eCommerce features, you can easily manage online shops.
- Includes collaboration tools for you and your new team to work in the assigned roles together.
- Contains website hosting and offers security and support options for uptime.
Cons:
- Comparatively, its pricing plans are high for beginners.
- The learning curve of Webfow is steeper than other builders.
- It’s difficult to make custom changes to your site through coding.
In the nutshell, Webflow is perfect for starting a blog or eCommerce site or other intuitive websites. However, investment in time and effort is necessary for beginners. But once you get the gist, you can create innovative sites. Learn WordPress vs Webflow.
Want to try more alternative platforms? You can read our article on the best website-building platforms in detail.
v. Our Recommendation – WordPress.org
We’ve tested and analyzed all these website-building platforms based on ease of use, feature availability, cost efficiency, web design, and users’ reviews.
Then we came up with the conclusion that the free open-source WordPress aka WordPress.org is the best choice.
Here are the top reasons:
- No matter what type of website you’re going to make, you’ll be capable of doing it with WordPress. From a simple blog site to a complex eCommerce store, it has the solution for you.
- On the other hand, WordPress gives you a huge collection of both free and premium themes for every type of website. You can select and use the appropriate one for your particular niche.
- Similarly, WordPress plugins add or extend the functionalities on your site. There is an abundance of powerful plugins on the WordPress.org plugin directory and other third-party stores.
- In fact, there’s a plugin for every function you want to add to your site. This means the WordPress plugins allow you to do pretty much everything.
- Not to mention, the WordPress plugin WooCommerce is the most widely used eCommerce software. Using WordPress, creating eCommerce sites is also easy.
So, we recommend you use the WordPress platform for building your website. Hence, the steps below (steps 3 to 10) are for making a WordPress website from scratch.
Step 3. Get a Domain Name and Web Hosting
As we’ve mentioned above, WordPress is a self-hosted platform. The advantage of choosing a self-hosted platform is that you can choose a domain name and hosting plan by yourself. Hence, it’s making a website from scratch in the true sense!
First, let’s understand in brief how to choose domain names and web hosting.
A. Choose a Domain Name
A domain name or simply, a domain is a unique name for your website. It’s the name by which users can locate your site. To visit your website, people must type your domain name on their web browsers. As a result, your website will be displayed on their screens.
For example, www.SiteSaga.com is the domain name of our website (the website that you’re currently viewing).

A domain name provides you with an identity on the internet. It’s the name by which people will know you or your company. So you must be very careful while picking a domain. Here’s a list of factors to consider while selecting a domain name:
- Your domain should be short and simple.
- It must include keywords that define your business.
- Ensure you don’t use hyphens or numbers. Also, it must be easy to pronounce or spell.
- Use .com or any other popular and trustworthy extension.
- The domain must be unique and reflect your brand.
For more help, read our guide on how to choose a domain name. Or, you can use domain name generators to come up with unique and clever domain name ideas.
Once you’ve decided on your domain name, the next step is to register it. We’ll show you the entire process in the following sections below. So, keep reading.
B. Select a Reliable Web Hosting Service
In simple terms, web hosting is the service that allows you to upload your website on the internet. Without hosting your website, your site can’t go live and be available to viewers.

You can get web hosting services from many hosting companies. Some of the best web hosting service providers are Hostinger, DreamHost, Cloudways, Kinsta, etc.
These companies provide the technologies required to get websites online. However, you must consider the values before selecting a hosting platform. Here are those factors to consider:
- Ensure the host has all the crucial security features, like SSL certificates, malware scanners, DDoS protection, etc.
- Check if the provider offers performance features like caching and CDN service.
- Your host must provide enough storage, bandwidth, and other resources for the website.
- The given plans must align with your budget and requirements.
- Find the customer support options and check its reviews and ratings.
Web hosting is a crucial aspect of any website. Along with making your site online, it determines the overall speed and security of your site. So, you must carefully pick a web hosting service.
To help you out, go through our full guide on what to look for when selecting a web hosting company.
When you’re just starting out, you won’t most likely get much traffic. Also, your site won’t have much volume. So, you can get started with the cheapest plan by a reliable company. We’ll explain more and show you the process of setting up step-by-step in the following sections.
C. Where to Buy Domain Name and Hosting From?
There are plenty of options for purchasing the domain and hosting services. For domains, the best domain registration companies are Namecheap, GoDaddy, and Domain.com.
For web hosting, Hostinger, Kinsta, DreamHost, Bluehost, Nexcess, Pressable, and Cloudways are popular.
But it’s important to note that companies like Hostinger, DreamHost, Bluehost, Namecheap, and GoDaddy provide both hosting and domains. In fact, you can get a domain name for free on the purchase of an annual web hosting plan on all these platforms.
Also, the starting price on these platforms is cheap. For example, with Hostinger, you can get started as low as $2.49/month billed yearly. And, since both services are in one place, it’s easy to set up for beginners.
But, website resources and features included in these basic plans are limited. Hence, you’ll get just fine site speed and security. Yet, it’ll be fine for a new small website.
But if you need more speed, security, and more features, then it’s better to buy hosting from managed hosting platforms like Kinsta costing $35 per month. And, register a domain on another platform like Namecheap or Domain.com.
So, here’s our conclusion:
- Buy a basic hosting plan with a free domain – if you’re just starting a small website. Recommended: Hostinger, DreamHost, Bluehost.
- Buy managed hosting – if you need a more powerful, secure, and fast website. Recommended hosting: Kinsta, Cloudways, Nexcess, and Pressable. Recommended domain registrar: Namecheap, Domain.com.
For this tutorial, we choose Hostinger.
Hostinger is one of the most affordable web hosting and domain registration services. We’ve been using its services for many years and are truly happy! It’s not just beginner-friendly but also offers excellent support. You can check users’ reviews on Trustpilot!
Purchasing Hosting from Hostinger
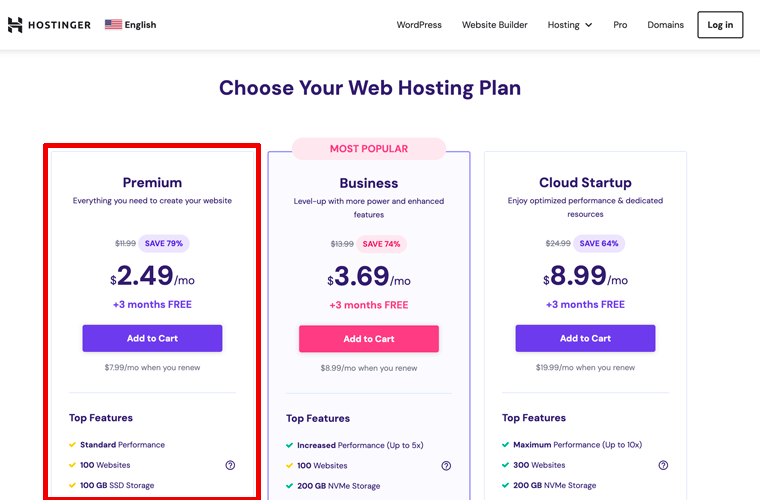
Hostinger is available in 4 major categories based on the type of web hosting solution. They are:
- WordPress Hosting: Hosting plans for managed WordPress sites at $2.49/mo.
- Shared Web Hosting: Affordable plans in shared server starting at $2.49/mo.
- Cloud Hosting: For your web projects with cloud infrastructure, starting at $8.99/mo.
- VPS Hosting: Ideal if you want dedicated resources for your site, starts at $5.99/mo.
Now, these are the steps for purchasing a WordPress hosting plan from Hostinger.
Step 1: Visit the Hostinger WordPress hosting page or open Hostinger.com and click ‘WordPress‘.
Step 2: There, you can find various price options for various business sizes. So, click on the ‘Add to Cart‘ button to purchase either the Premium, Business, or Cloud Startup plan. Here, let’s pick Premium.
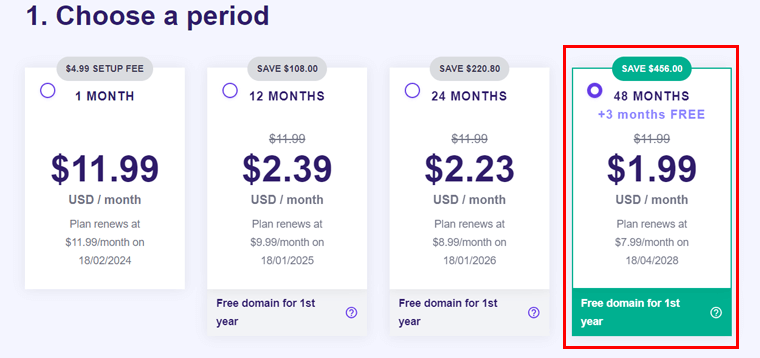
Step 3: Now, you’ll be on the cart page where you must pick a period for the payment. For example, the ‘Premium’ plan has 1 month, 12 months, 24 months, and 48 months periods.
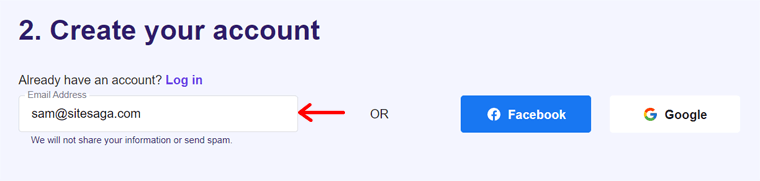
Step 4: After that, you can create an account using email or Facebook or Google account. If you already have it, then log into your account instead.
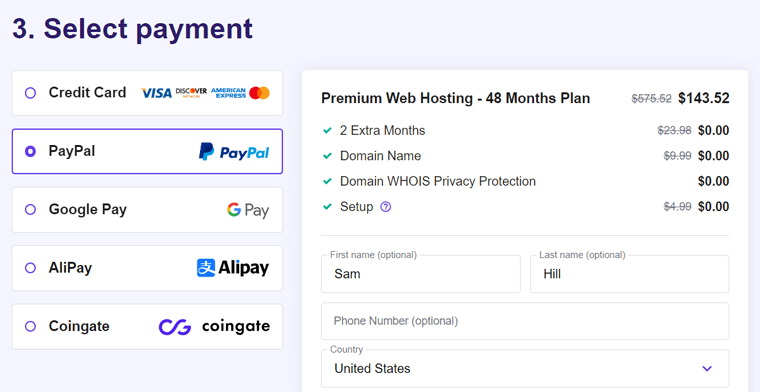
Step 5: Next, you should choose a payment method among credit cards, PayPal, Google Pay, AliPay, and Coingate. There, insert your personal and payment details and click the ‘Submit Secure Payment‘ button.
That’s how you purchase a WordPress hosting plan from Hostinger for your website.
Step 4. Set Up Your Hosting Account and Install WordPress
After purchasing the domain and hosting, your next job is to set up your hosting account and install WordPress to get your site running.
But to start the website setup process, your hosting account order must be approved by the hosting company first. And, you should get an email notifying that with login credentials. So your job is to keep an eye on your email inbox because you may get an email anytime.
However, the process also depends on your hosting platform. So, let’s go through that of Hostinger!
i. Log into Your Hostinger Account
Once your account is ready, sign into Hostinger. Just click the ‘Log in‘ button and enter your login details.
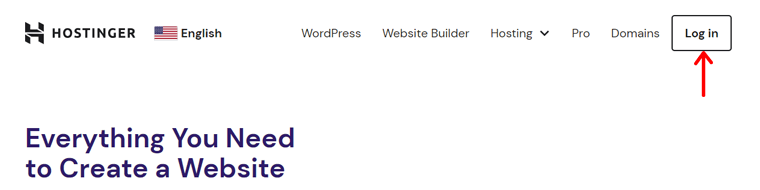
Then, press ‘Start Now‘ which redirects you to the account with an email verification message.
ii. Claim Your Website Domain
After that, you must press the ‘Claim domain‘ button present on your ‘Home‘ menu to utilize its domain. Remember, you can find an available domain and pick the extension for using the free domain for the 1st year.
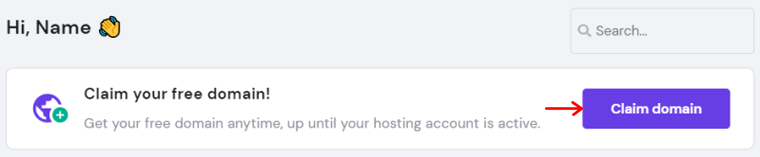
There, you must enter your primary and contact information for registration. But if you want a premium domain or want to utilize an existing domain, then point it out to Hostinger servers instead.
iii. Set Up A WordPress Site
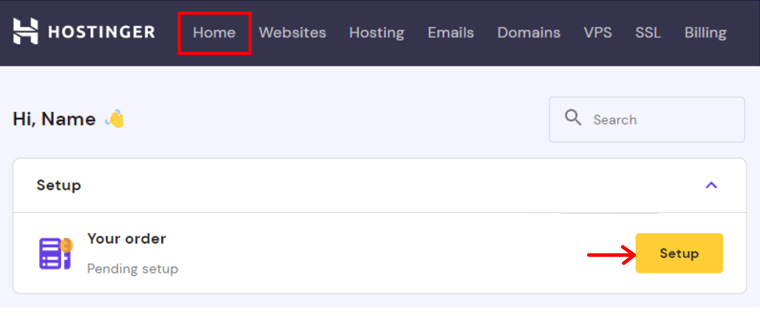
Following that, you can find the ‘Your order‘ section where you must click ‘Setup‘. This begins the onboarding process where you must give answers to the questions.
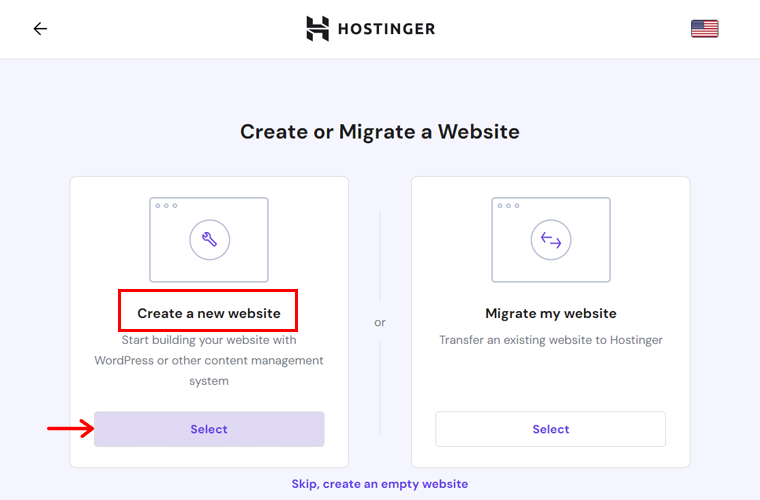
Next, you can click ‘Create a new website‘ among the given configuration options.
After that, you can choose a website builder where we’ll pick ‘WordPress‘. For that, you must create a WordPress account by entering a valid email, language, and strong password. Later, click ‘Continue‘.
Moving forward, choose the essential plugin recommendations to directly add them to your WordPress site and click ‘Continue‘. Next, you may also choose a theme, content, and other requirements.
iv. Again Choose the Domain
Afterward, you must choose the domain for your new WordPress website. It can be the one you claimed for free or any existing domain you have. But ensure you point it to the servers.
v. Pick the Server Location
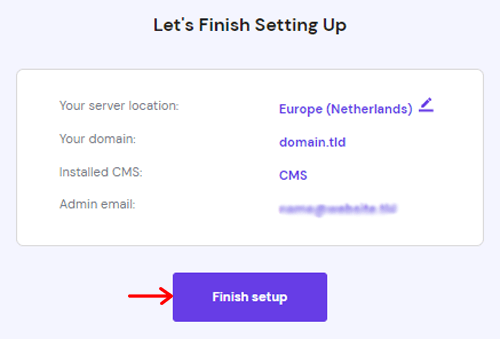
At the end, check your website and plan details. Then, choose a data center location present in the ‘Your server location‘ from the Edit icon. Later, press ‘Finish Setup‘ to conclude the steps.
vi. Logging in to Your WordPress Dashboard
To open your WordPress admin area, you must visit the ‘Websites‘ menu on your Hostinger control panel. There, click the ‘Admin Panel‘ button for the website.

By doing that open your WordPress area after you log into the WordPress dashboard. So, ensure you use your username and password, then hit ‘Log In‘.
Another way to log into your WordPress dashboard is to go to your browser and type:
‘Your domain name’ followed by ‘/wp-login.php’ or ‘/wp-admin/’
For example, www.example.com/wp-login.php
or www.example.com/wp-admin/
Note: Don’t forget to replace ‘example.com’ with your domain name.

Notably, always choose a strong password. For generating strong passwords and securely storing passwords, you can use a free tool like LastPass.
vii. Adding an SSL Certificate to Your Domain
The next important thing you must do is add an SSL certificate to your domain.
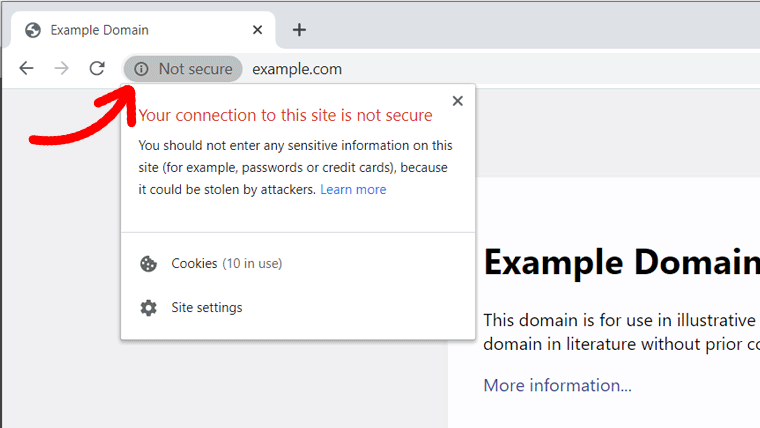
SSL (Secure Sockets Layer) is the standard security technology to establish a secure connection between the web hosting server and the browser. It ensures that the information passed between your site visitors and the site is encrypted and safe.
An SSL-enabled website’s URL will have a secure padlock icon and ‘https:’ when viewed on the browser. See the example below.
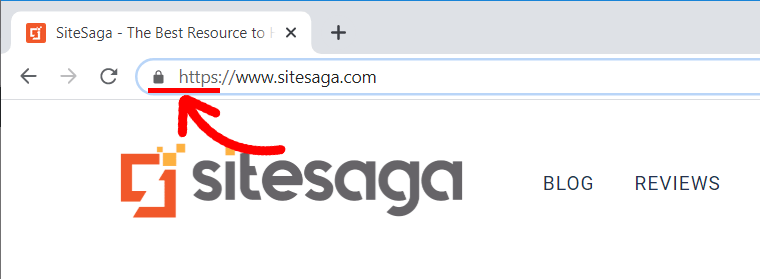
Whereas there will be a ‘not secure’ message if your site doesn’t have an SSL certificate.
Generally, an SSL certificate comes with some cost. But, with Hostinger, you get it for free with the hosting service. Learn about SSL certificates in Hostinger here.
Learn everything about Hostinger in our honest Hostinger review!
Next, you can start designing and developing your site. You can add desired themes, necessary plugins, available tools, settings, and so on. We’ll explain that in the steps below.
Check Your Site Status
Once you’ve successfully set up your domain on hosting, and installed WordPress, your website should be live on the web. You can check that by quickly typing your domain name into your browser.
If your site is online, then the browser displays your site. If it doesn’t appear, then there must be something not set up properly.
In such a case, you must go back and check your hosting control panel. If you still can’t find any issue, then contact your hosting provider company to check it.
Adding a Coming Soon Plugin
Remember! You wouldn’t want your visitors to see your site before it’s ready.
So, it’s better to enable coming soon mode when you’re working on your site. A coming soon page notifies your visitors that your site is under development. Behind the scenes, you can carry on the design task without any trouble.
For that, you can simply install a coming soon plugin on your site.
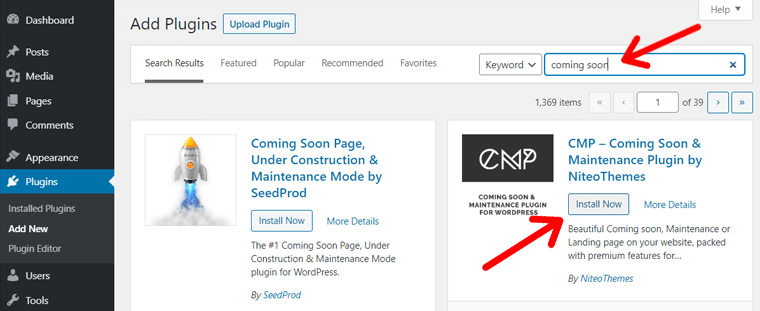
To install a coming soon plugin, go to ‘Plugins >> Add New‘ from your WordPress Dashboard first.

On the next screen, you’ll see the ‘Add Plugins‘ page with plugin options from WordPress.org. Search ‘coming soon’ in the search box and then plugins matching the keyword will appear.
Click the ‘Install Now‘ button to install a plugin. For this tutorial, we’ll install ‘CMP – Coming Soon & Maintenance Plugin by NiteoThemes‘.
Next, you must activate the plugin. Once activated, you just need to turn on maintenance mode.

Step 5. Choose a Theme and Customize Your Site Design
Now that your WordPress site is completely installed on your web host, it’s time to pick a suitable theme.
A theme is a design component of your WordPress site. A WordPress theme provides an overall outlook for your site. It works like the skeleton of a WordPress website.
When WordPress is installed, it also installs some default themes with the latest one activated. For example in the screenshot below, the Twenty Twenty Four theme is active.

You can easily change the theme by installing a theme of your choice. We’ll show the step-by-step process of changing a theme below.
In WordPress, there are thousands of themes available for you. The official WordPress theme directory alone provides more than 10,000+ free themes.
Moreover, you can look at marketplaces and theme stores like ThemeForest, Themify, etc. for professional paid themes.
A. Choosing the Best WordPress Theme for Your Site
The first step to selecting the best theme is considering your website niche. That means you should choose a theme that has enough features to build the type of website you want to build. Easily without having to customize a lot.
For example, if you want to create an eCommerce website, then you should choose a WooCommerce-ready theme. If you picked a simple blog theme by chance, then it’d be really difficult to add the eCommerce you want to your site.
Luckily, there are plenty of WordPress themes available for any type of site. Here are some popular theme categories and the best themes in those categories.
- Best themes for blogging: GeneratePress, Kadence, Ashe. For more, check out the best WordPress blog themes.
- Business website themes: Astra, OceanWP, Blocksy. For more options, check out our list of the best WordPress business themes.
- For eCommerce websites: Storefront, Flatsome. If you need more choices, then see our full article on the best WordPress WooCommerce themes.
- Also, check our ultimate list of the best WordPress themes (for various niches).
For more ideas, you can get help from our article on how to choose a perfect theme for your site.
For this tutorial, we’ve chosen the Kadence theme which is one of the most popular and growing themes on the WordPress theme repository.

It’s a freemium (both free and premium) multipurpose theme you can use for business sites, blogs, as well as eCommerce sites. With powerful page builders like Elementor and Beaver Builder, it becomes a more highly extensible and user-friendly theme.
For more information, please read our full review of the Kadence theme.
Need a WordPress theme for Full Site Editing?
Are you using the WordPress 5.9 or more recent version? Or want to use the new full site editing based site editor? If yes, then you need to use a block theme.

As it's a new feature just introduced, there are a limited number of themes. Even among the available themes, many are experimental and basic. So, we're using a classic theme for this tutorial.

If you want to still try full site editing, then click the button below and pick the best theme!
B. Installing a Free WordPress Theme
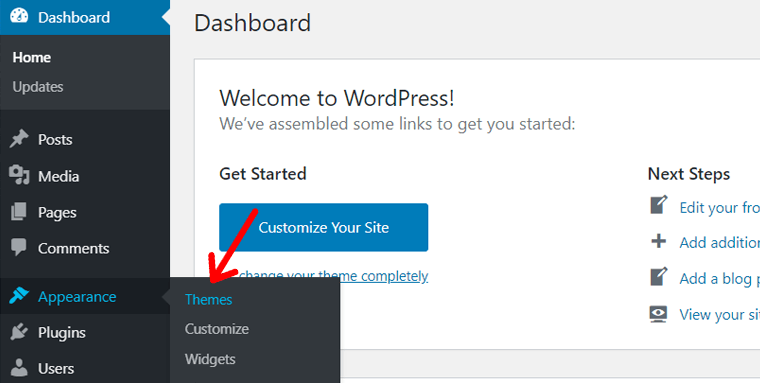
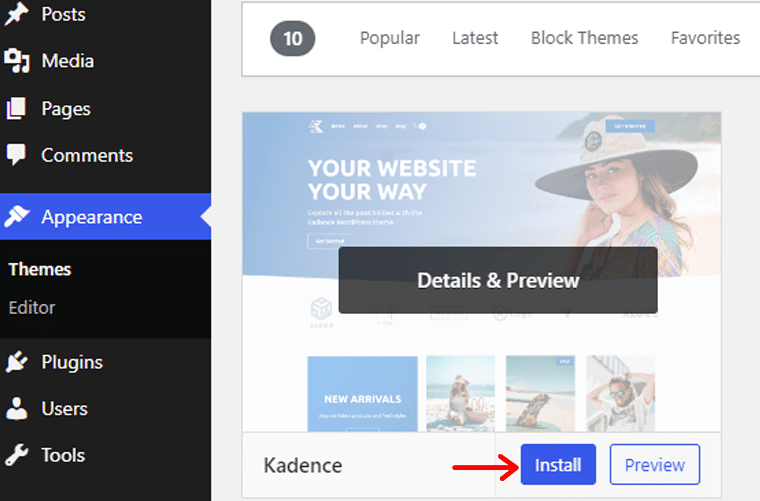
Step 1: Log into your WordPress admin area and go to the ‘Themes‘ option under the ‘Appearance‘ menu.
Dashboard >> Appearance >> Themes
Step 2: On the next page, you’ll see the already installed themes and buttons to add a new theme. You can simply click on the ‘Add New’ button at the top, or the ‘Add New Theme‘ box after the installed themes.
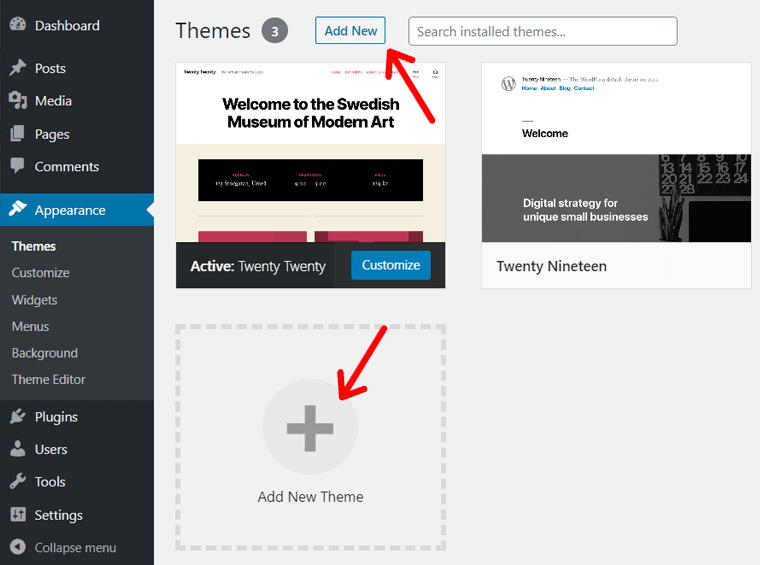
Step 3: Next, it’ll open the ‘Add Themes’ page with theme options from WordPress.org. There, you can search for your preferred theme by typing a name or keyword.
For example, we searched ‘Kadence’. When you find the theme, simply click on the ‘Install‘ button.
Step 4: After the installation is complete, click on the ‘Activate‘ button.
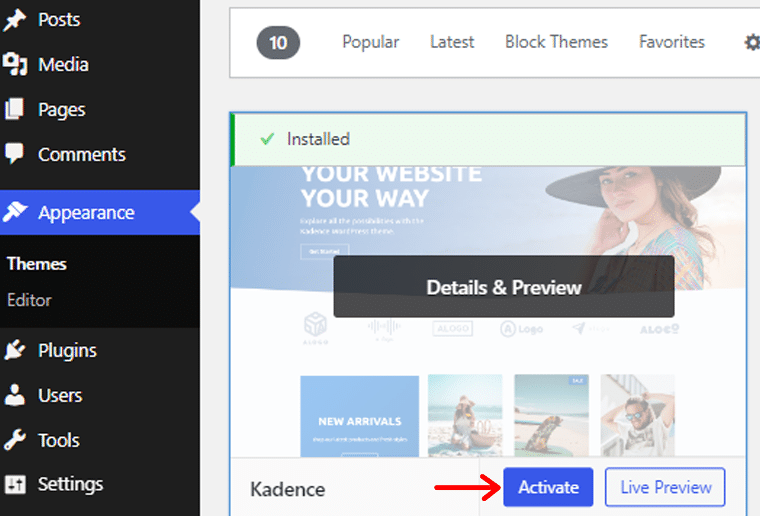
After that, the theme will be activated on your site. You’ll see the ‘New theme activated‘ message and your new theme as the ‘Active‘ theme.

You can see the changes on your site by visiting your site.
Don’t worry if you see your website a little bland after just activating the theme. That generally means that you’ll now have to customize your site and give it a fantastic look.
C. Installing a Premium WordPress Theme
If you need to install a premium theme, then the ‘Upload method‘ is necessary. Here, we’ll show you the purchase and installation process of Kadence. Let’s begin!
First, open the Kadence website and navigate to the ‘Pricing‘ menu.
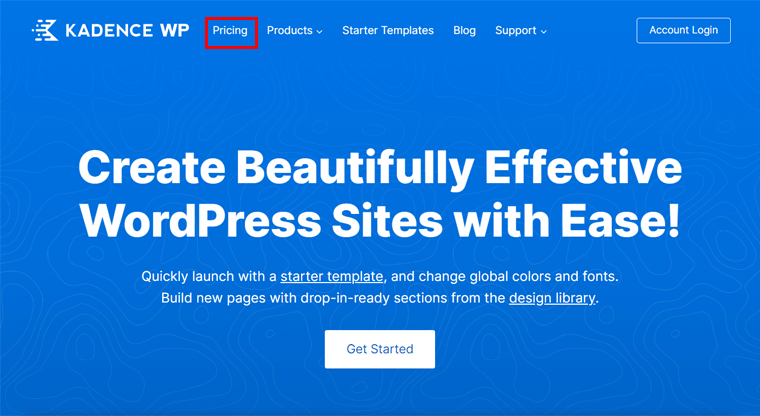
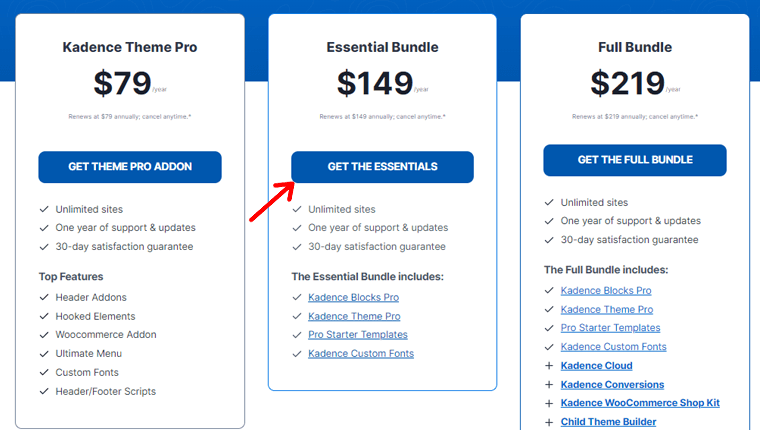
Among the given pricing options, click the button of the one you require. Here, we’ll go for ‘Get the Essentials‘.
Now, on the checkout page, you must create a new Kadence account or log into your existing one if you have one. After that, enter your billing and payment details, followed by clicking ‘Place Order‘.

Next, open the ‘Accounts‘ menu and navigate to ‘Product Downloads‘. Among the given download options, download Kadence Pro and Kadence Blocks Pro.
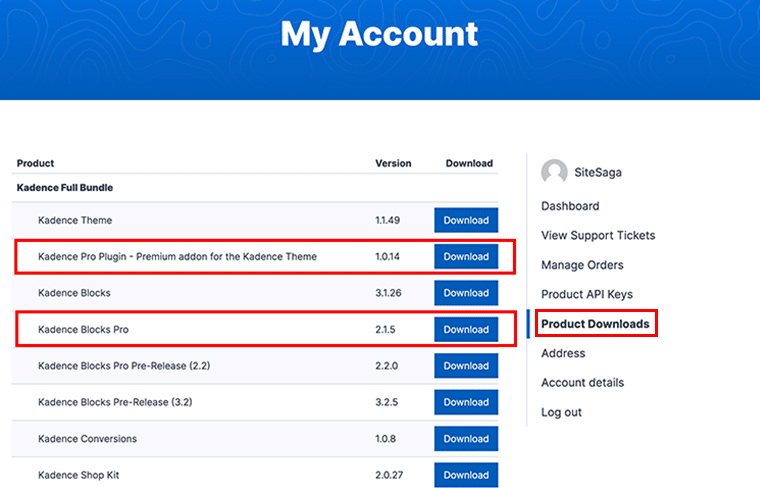
Afterward, go to ‘Product API Keys‘ and copy and save the license keys of the products to use.

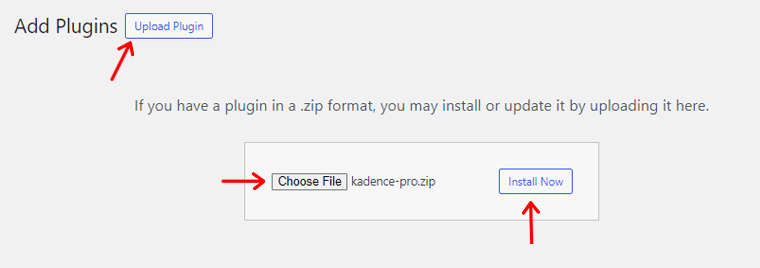
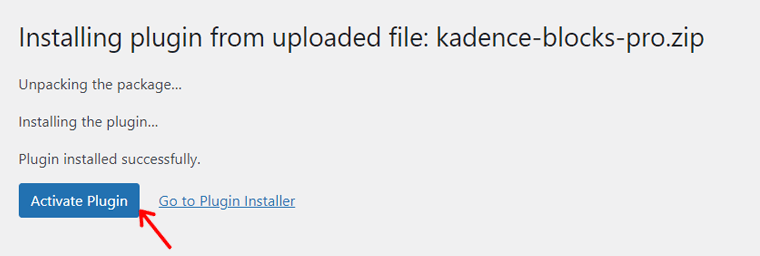
Following that, you can move back to your WordPress dashboard for the Kadence Pro installation. As an add-on, navigate to ‘Plugins > Add New Plugin‘. Next, click ‘Upload Plugin‘ followed by ‘Choose File‘. After the upload, click ‘Install Now‘.
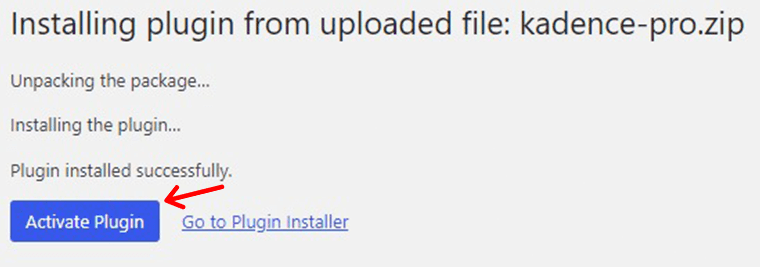
Once the installation process completes, click ‘Activate Plugin’.
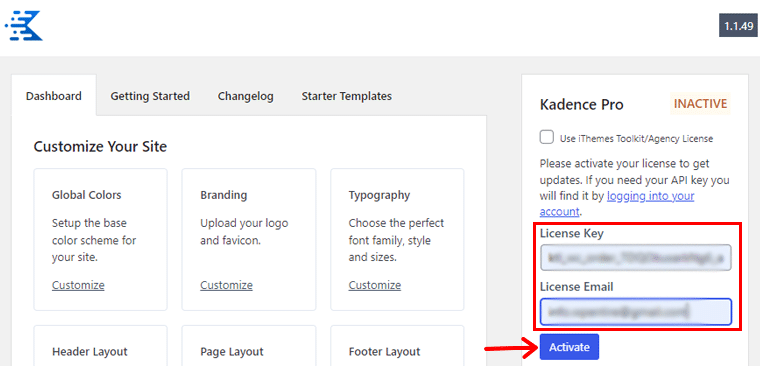
Now, click the ‘Click here‘ option that you’ll find on the notice message. Then, add the license key and email on the form you’ll see. Later, click on the ‘Activate‘ button.
Read our detailed guide on installing WordPress themes with 3 different methods.
D. Import a Template and Personalize it
You must insert a template only after you’re sure about your website design. Hence, let’s suppose we’re creating a website with reference to the real Starbucks website.

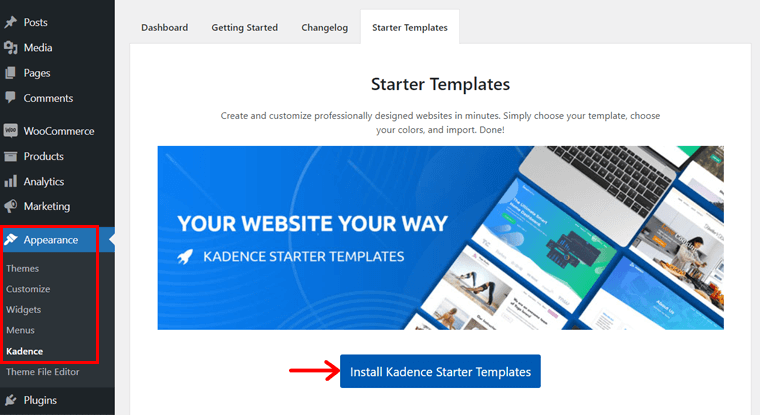
Now, accordingly, select a template. For that, open the ‘Appearance > Kadence‘ menu and click the ‘Install Kadence Starter Templates‘ button.
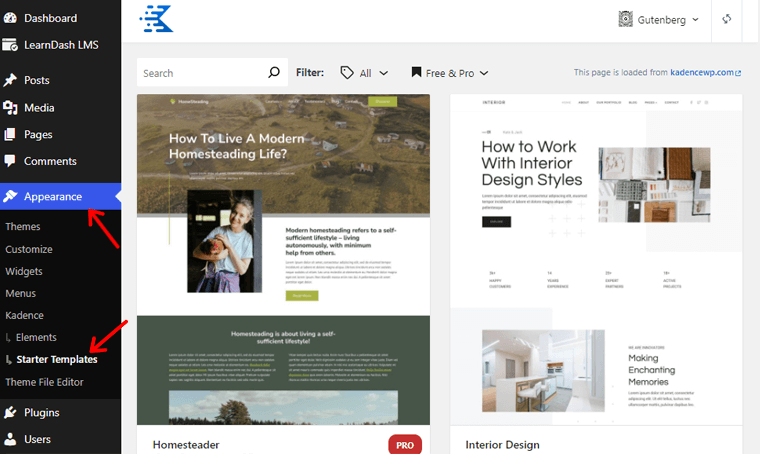
Now, open ‘Appearance > Kadence > Starter Templates‘ on the menu.
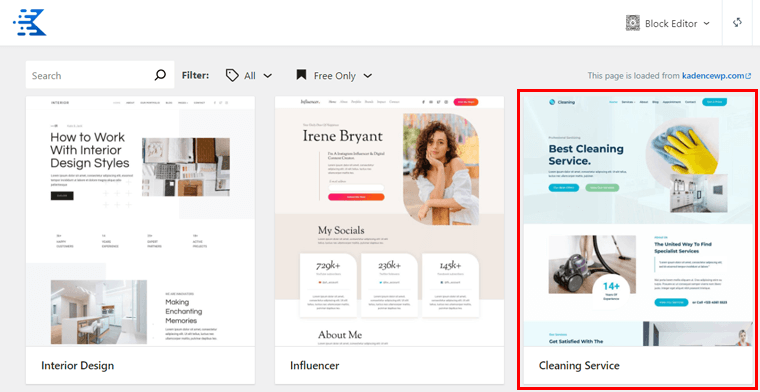
Following that, select a template suitable for the blog like we’re doing in this template ‘Cleaning Service‘.
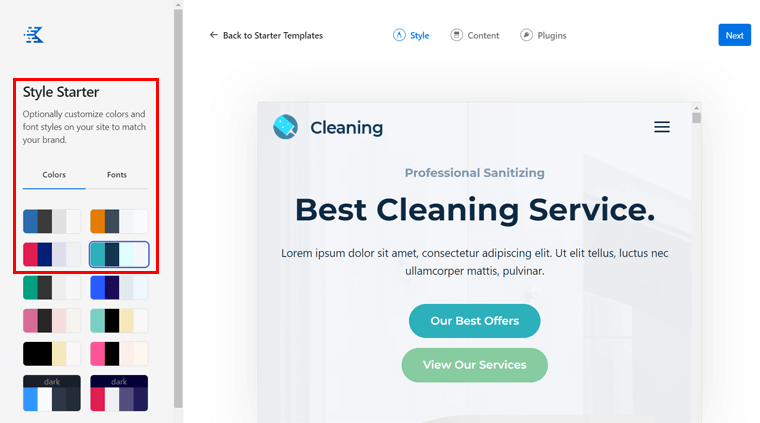
Next, Kadence provides customization options, so you can choose a color scheme and font style. Then, click ‘Next‘.
Next, select to insert a Single Page or Full Site for your blog. Here, we’ll go for the ‘Import Full Site‘ option and click ‘Next‘.
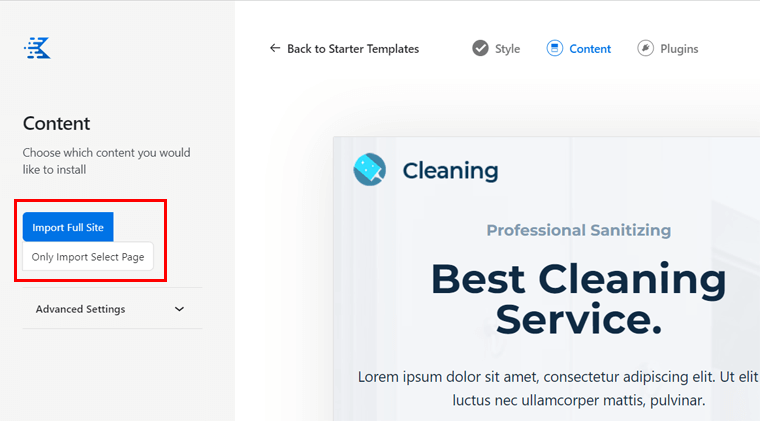
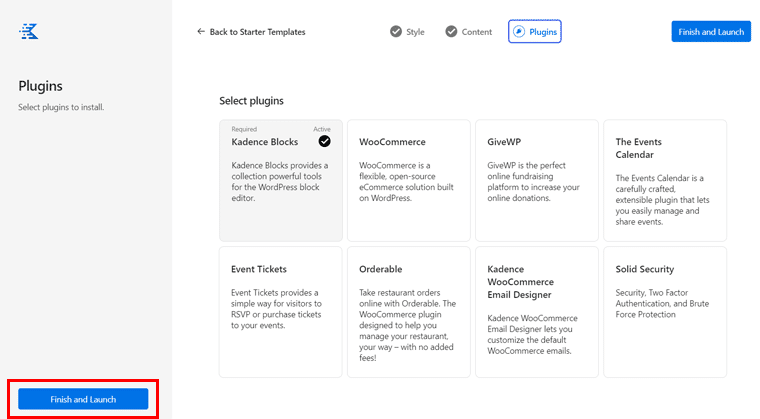
Plus, you may be required to install some necessary plugins, which install automatically. Once you do that, click ‘Finish and Launch‘.
Now, you can go back to your dashboard.
E. Customizing Your WordPress Site Design
Customizing your site feels interesting. It’s because of the control you get over designing your site. It’s the freedom you get when making a website from scratch! And when you’re using a powerful platform like WordPress!
As mentioned above, a theme controls the overall design of your site in WordPress. So when you’ve installed a theme like Kadence, you’ll have tons of things to do with your site. Like, you can customize the header, footer, sidebar, colors, typography, and so much more.
Adding Your Site Logo and Title
Now, to start the customization, go to Appearance, and click on Customize on your Dashboard. The Customize section is the area where all the modifications and customization happen.

The first thing you can do with your site is to add a suitable logo and Title. For that, go to Header on the Customize Menu.

Then click Logo. On the Site Identity section, you’ll see options to add a logo, website title, etc..
If you’ve got a logo predesigned, then you can simply upload the logo and crop it to the required dimension. Similarly, you can add the site icon, the icon displayed in the browser tab.
If you don’t have a logo, then you can easily design one using logo maker tools like Canva.
For your site title and site tagline. You can keep your business or site name as the site title. For the tagline, you can add your business motto or a catchy phrase.
You can see the changes on your site simultaneously during the time of editing. It is an important feature of WordPress and called ‘live customization’. To permanently save the changes, click on the Publish button at the top left.
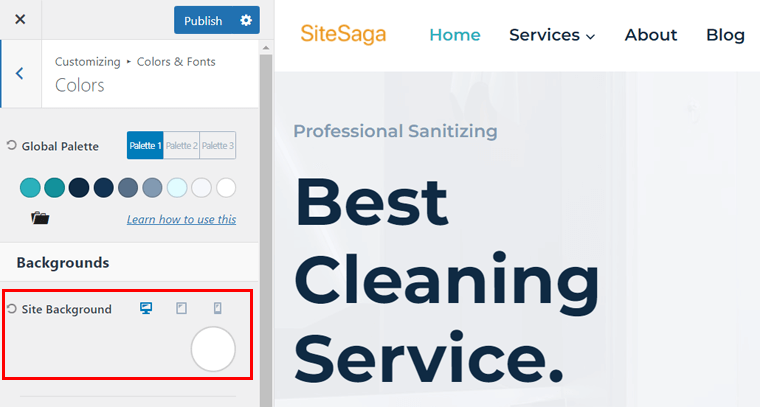
Changing Color Schemes
Having a combination of appropriate colors on your website is really important. The colors should match and speak for your brand or business.
To change the primary colors of your theme, go to ‘Appearance >> Customize‘ and click on the ‘Colors & Fonts‘ option. There, click ‘Colors‘.

Next, you can change the color of the content, links, and overall website. Moreover, you can select each section and alter its color as well.
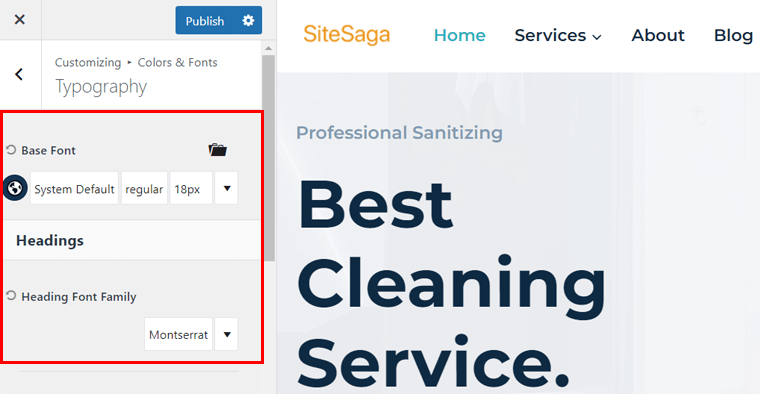
Changing Typography
Same way, you can change the font style, size, weight, etc. of different texts on your website. In a more technical term, it is also called typography.
For typography customization options, go to ‘Appearance >> Customize‘ and click on the Colors & Fonts option. Next, click on Typography.
Now, there are further 2 options available: Base Typography for normal text and Headings Typography for 6 heading types (H1 to H6).
Under these options, you can select appropriate fonts for text and headings. Also, you can set font size, weight, case options, etc. for those fonts.
Like these, there are tons of other customization options. In fact, there is a lot of customization possible with WordPress themes. So frankly, it’s impossible to list and guide you through all the available options.
But good news! It’s easy to customize your site. So, why don’t you experiment with it yourself? Be playful and give it a try. Maybe you can come up with some cool designs and use them on your site.
Note: Remember that the number of customization options on your site depends upon the theme you’re using. Also, different themes may have customization settings under a different name or heading.
F. Utilize Kadence Blocks
Kadence Blocks is the ultimate WordPress block plugin for your website built with the Kadence theme. It offers many advanced and powerful blocks to let you easily beautiful websites.
In addition, you can design stunning websites with its Kadence Design library. Also, you can customize them so that the page sections match your brand.
Thus, let’s look at how we can get started with Kadence Blocks.
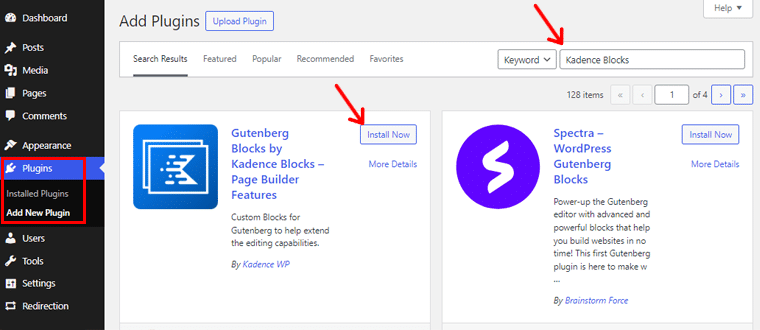
Installing the Free Kadence Blocks Plugin
For the free version of Kadence Blocks, open the ‘Plugins > Add New Plugin‘ menu and look for ‘Kadence Blocks‘. After you find it, click ‘Install Now‘.
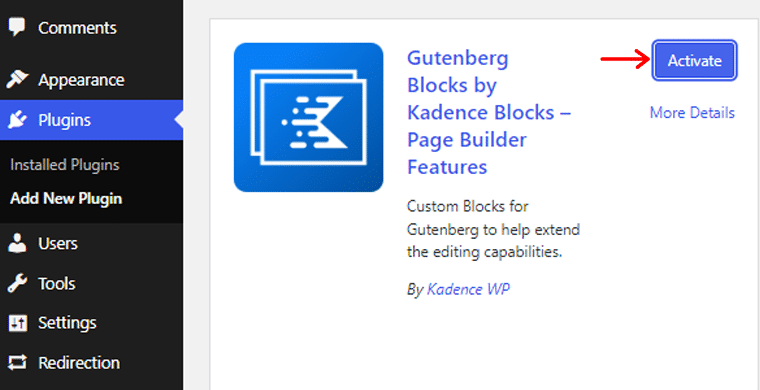
Afterward, click the ‘Activate‘ button, and all the beautiful blog blocks are now available.
Installing the Kadence Blocks Pro Plugin
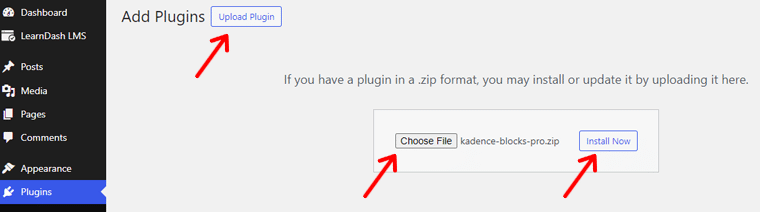
For more blocks, you can use the premium plugin. For that, navigate to ‘Plugins > Add New Plugin > Upload Plugin‘ and click the ‘Choose File‘ button. There, upload the ‘Kadence Blocks Pro‘ file and click ‘Install Now‘.
Next, click the ‘Activate Plugin‘ button for the premium plugin activation.
Following that, press the ‘Click here to activate‘ option on the notice, and then add the license key and email for it on the text boxes. Later, press ‘Activate‘.

Ensure you have the free Kadence Blocks installed before following these steps!
Creating a Post or Page Utilizing Kadence Blocks
Moving forward, you can begin making a post or a page of your website. You’ll learn how to add a post or page in WordPress in the upcoming steps. Moreover, Kadence blocks will be auto-added along with those of the Gutenberg editor.
Now, utilize the blocks by first clicking on the ‘+‘ icon present at the top of the bar.
There, you can find all the blocks under ‘Kadence Blocks’ as shown below.
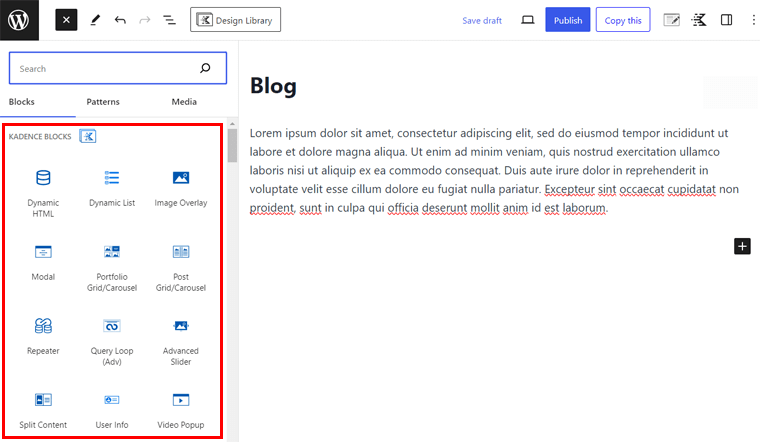
Now, select a Kadence block and check if it’s added to your post or page. For instance, the ‘Image Overlay’ block is used in the screenshot below.
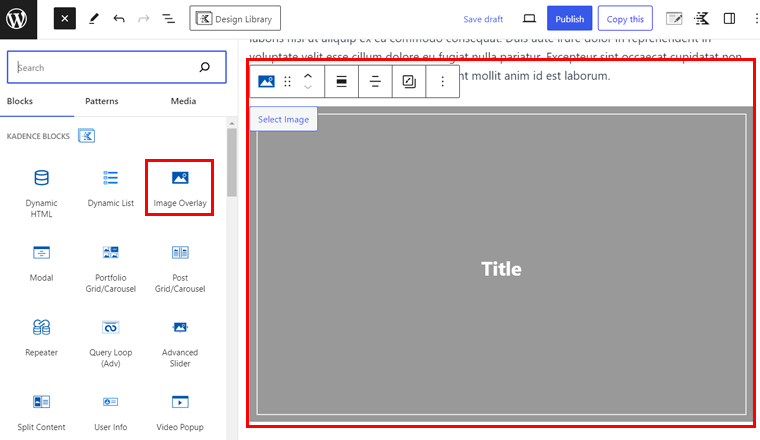
After the addition, you can utilize the respective settings on the right side for that block.
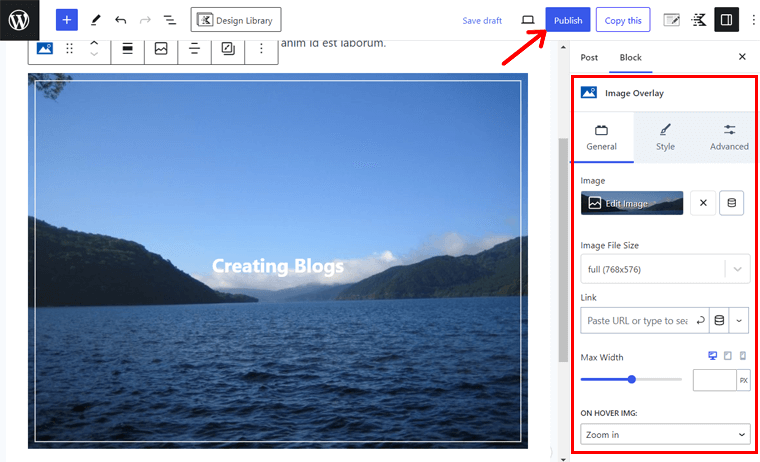
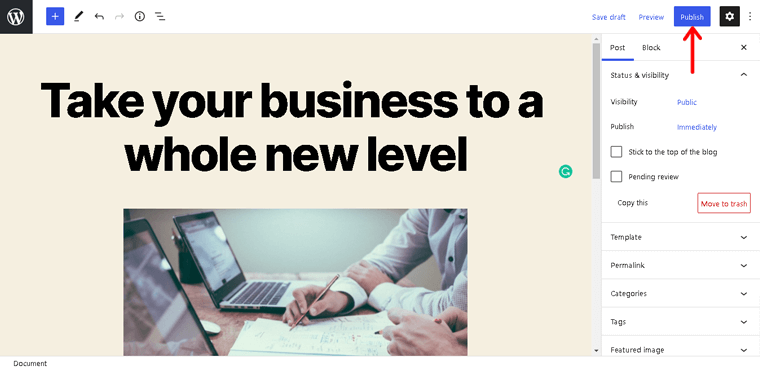
Also, you can insert the image and change the text. Once you’re done, press ‘Publish‘. This is the process of building stunning designs with Kadence Blocks.
G. Choosing a Homepage for Your WordPress Site
In WordPress, you can choose either a static page or show the latest posts on your site’s front page. For your information, both of these homepage types are equally popular. So, you can use the homepage provided by the template from Kadence.
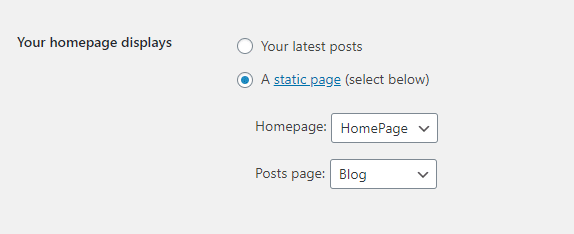
Here, let’s learn how to create a homepage from scratch. For that, create a new page and name it ‘HomePage‘. To make this page the website’s ultimate homepage, go to Settings > Reading Settings from your WordPress admin.
There, you’ll see an option to select your homepage. So, you can tick on the static page and below, select the page you’ve created.
Now, open your homepage and start editing and customizing taking the reference of Starbucks. First, ensure you adjust the default settings provided by the template if you want to alter them.
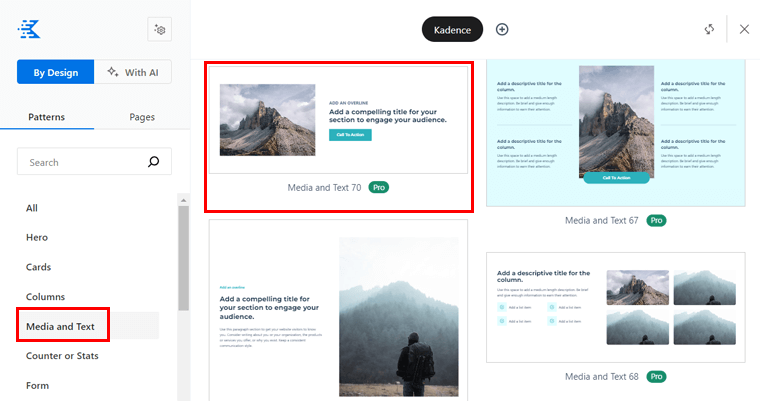
After that, let’s create the first section. For that, click the ‘Design Library‘ option at the top header and open the ‘Media and Text’ section. There, click the ‘Media and Text 70‘ pattern suitable for the section.
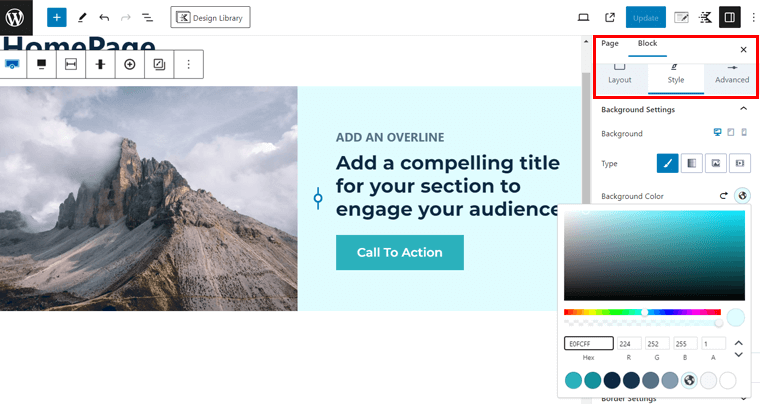
This pattern isn’t exactly how we want, so you can customize them from the right side block settings. That includes changing the block layout, altering the color of the text section, etc. For example, select the pattern and open the Style tab, there change the background color like this:
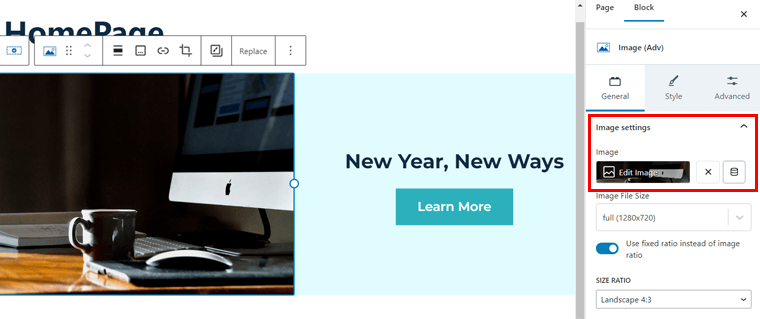
Now, change the image and text as you want. For example, select the image block and open the General settings. There, click the ‘Edit Image‘ option, upload the new image, and select it.
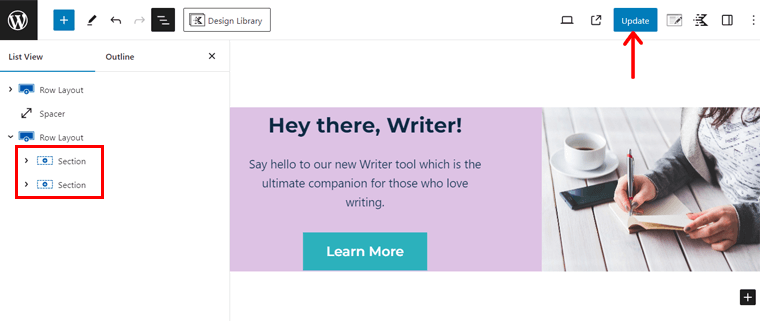
The other sections are similar to it. So, just duplicate the pattern, and change the text, image, and color. But ensure you add certain spacing between the patterns. Also, you need to switch the position between the two rows of the pattern using the list view. Lastly, click ‘Update‘ after you add all sections.
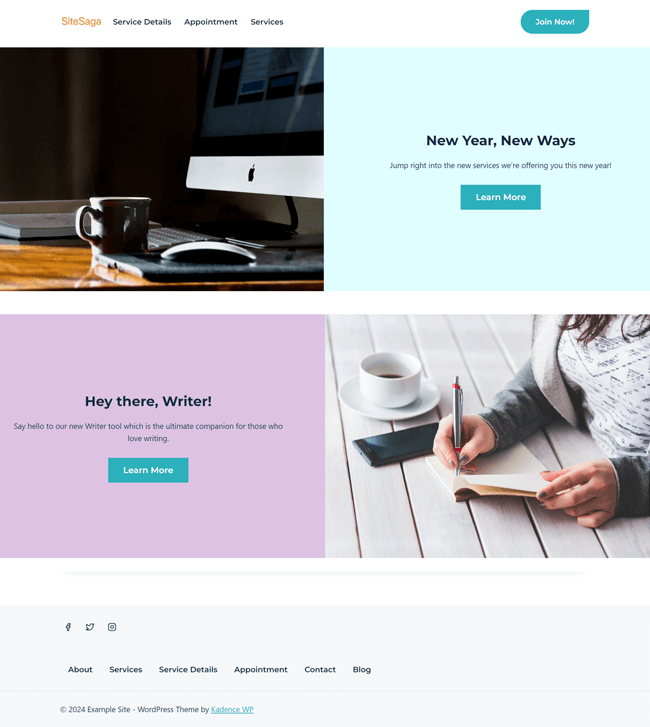
This is what the website preview looks like:
But how to add the navigation with menu items? Learn that next!
Step 6. Start Adding Content on Your WordPress Site
In the beginning, your WordPress site would look blank no matter which theme you install. It’s your job to add content to your site. You should add the type of content that you want your users to see.
There are mainly 2 types of content you can add on WordPress:
- Pages
- Posts
The main difference between the two is what they’re used for. Pages are mainly designed for static content like about us, contact page, home, etc. Whereas posts are used for dynamic content like blog articles, news, and reviews which tend to change with time.
Besides pages and posts, other content elements commonly used in WordPress sites are menus and widgets. We’ll show the step-by-step process for creating all of these below.
Getting Started with WordPress Block Editor ‘Gutenberg’
When you start to add a page or post, you’ll get a similar type of editor interface. The editor is commonly called ‘Block Editor’, ‘WordPress Editor’, ‘WordPress Block Editor’, or also ‘Gutenberg Editor’. Gutenberg is the code name of the new WordPress block editor.
As the name speaks, the block editor is an entirely block-based editing area. Every piece of content is a block, like a ‘Paragraph’ block for a paragraph, an ‘Image’ block for an image, a ‘Heading’ tag for the headings or subheadings, etc.

Adding content and editing with the WordPress block editor is easy and user-friendly. Anyone without technical skills can also easily make beautiful pages and post articles with this.
Now, let’s see how you can add content to your WordPress site.
A. Creating Pages in WordPress
Pages are usually more static types of content that you don’t often change. They consist mainly of Homepage, About Page, Contact Page, Blog, Service Page, etc.
In your WordPress Dashboard, go to ‘Pages‘ and then, ‘Add New‘.

With that, you’ll come across ‘Add New Page‘ with the modern Gutenberg block editor. It has 2 main sections: ‘Main content area’ in the middle and ‘Settings panel’ in the right sidebar.
All the content like text and images should be added to the main content area. And you can configure and customize the content from the Settings panel on the right.
To start, you can add the title in the ‘Add Title’ section. For example, we’ll create an ‘About Me’ page.
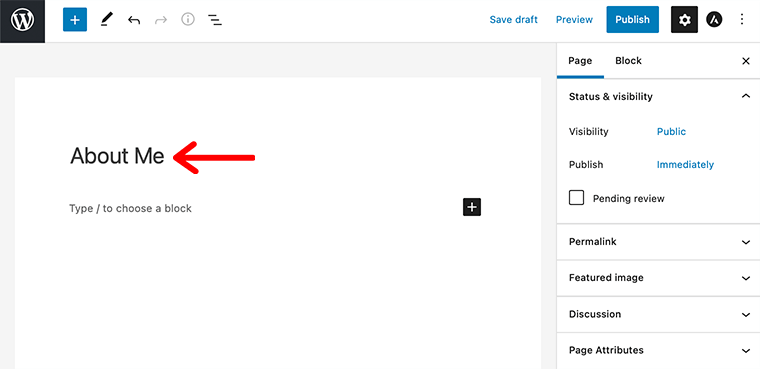
Below the ‘Title block’, you can see ‘Start writing or type / to choose a block’.
For example, if you add the ‘Paragraph’ block, you can start typing to add text content there. As you start typing, you’ll see the ‘Paragraph’ block settings in the ‘Settings’ panel on the right sidebar.
Similarly, you can add various types of content elements like images, a gallery, buttons, lists, headings, etc. with the blocks. Feel free to use the settings to make tiny adjustments.
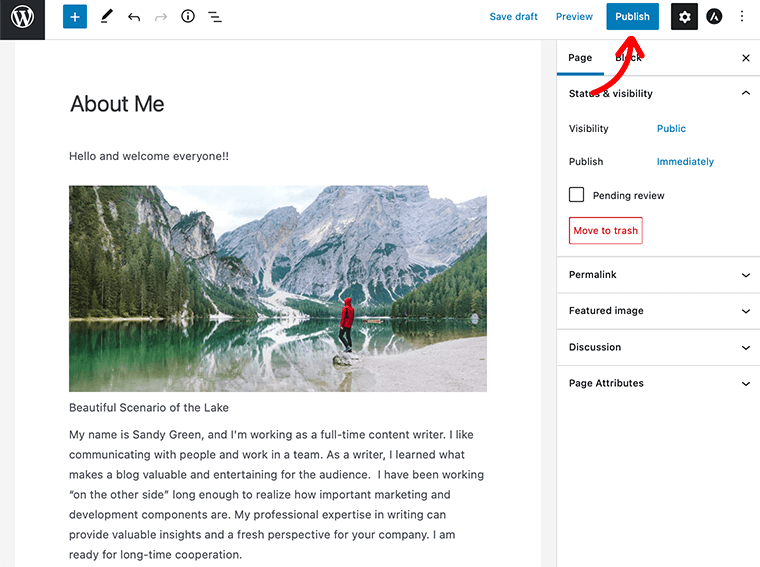
After everything is done, click on the ‘Publish‘ button at the top right corner of the page.
Want a more visually attractive ‘about’ page? Check our complete guide on creating an ‘about’ page.
B. Creating Posts in WordPress
Posts are the informative content of your website. Posts are dynamic types of content like articles on your website. Unlike pages, posts are for timely articles which you can update often. They usually appear in the Blog section of your website.
To create posts, just go to Posts >> Add New from your Dashboard.

On the next page, you’ll come across the Gutenberg editor. Now, you can start by adding your post title. The process of adding and customizing the content in a post is the same as on a page that we explained above.
Moreover, the Post settings include the visibility option – make it public or private, publish option – publish immediately, or schedule. Besides, you can edit your post permalink, set a featured image, add or choose an article category, enable or disable comments, etc.
When everything is set up, you can publish the post by clicking the ‘Publish’ button on the top right corner.
C. Adding Navigational Menus
Now, you can begin adding a navigation menu for the website. The navigational menu is the area on the top of your website that guides visitors to other pages. You can add links to your important pages like blog, contact, about, pricing, or specific articles in the menu.
To have a menu, you should first have web pages for each menu item. So, the first step is to create web pages that you want to add to the menu, which you can find in the next section!
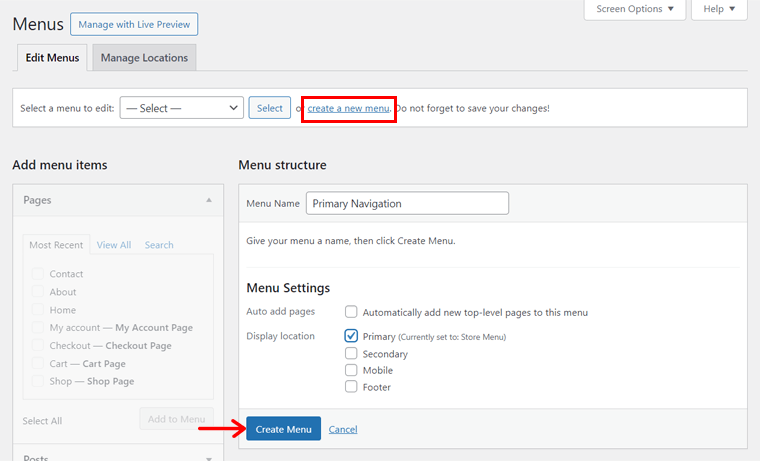
As we’re taking the reference of Starbucks, some related pages are added. Now, you must add a menu by going to ‘Appearance > Menus’ from your WordPress admin panel. Then, follow these steps:
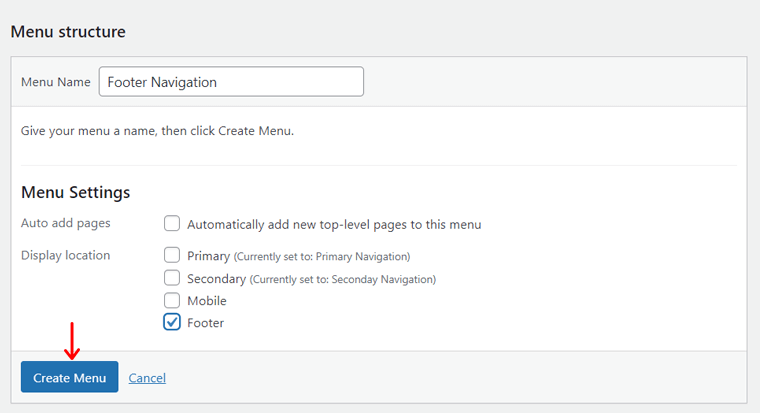
- Under the Menu Structure heading, add a Menu Name, for example, ‘Primary Navigation‘
- Choose the display location as ‘Primary‘
- Click on the Create Menu button.
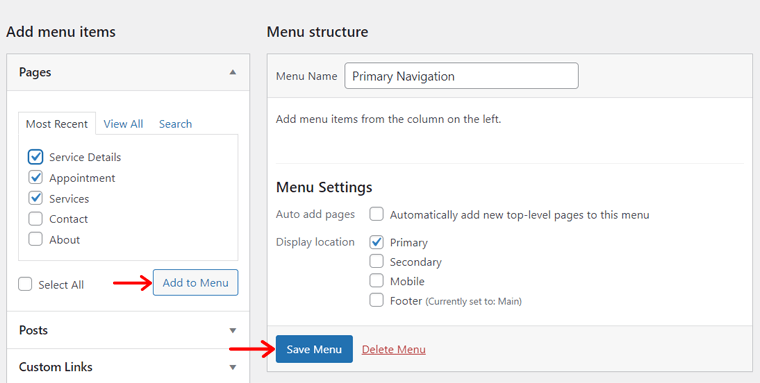
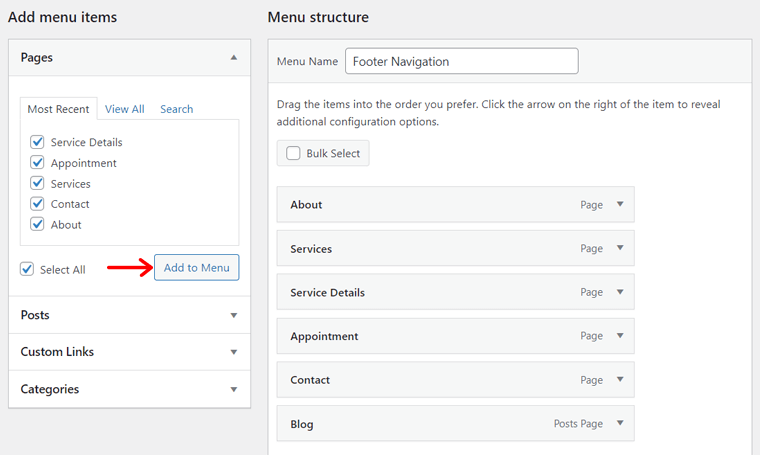
Next, you’ve to add those pages to the menu. The steps are:
- Select the pages that you want to add to the menu.
- Click on Add to Menu.
Now, arrange the menu items in order by dragging and dropping. Finally, save the menu by clicking the Save Menu button.
After completing these steps, quickly visit your site from the dashboard to see the navigation you added just before.
Similarly, let’s add a footer menu. Just create a new menu like before but this time name it ‘Footer Navigation‘, select ‘Footer‘ as the display location, and click ‘Create Menu‘.
Moving forward, add the menu items you want on the footer by selecting them and clicking ‘Add to Menu‘. After that, sort the items and click ‘Save Menu‘.
For more advanced navigations, check this guide on creating a drop-down menu in WordPress.
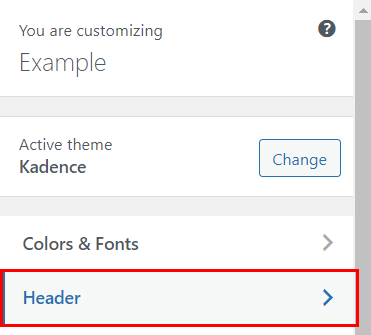
Following that, open ‘Appearance > Customize‘ and click ‘Header‘ to adjust the header.
On the header builder, we can move the Primary Navigation menu to another position. Similarly, rename the button as per our needs. All of that must be on the main row.
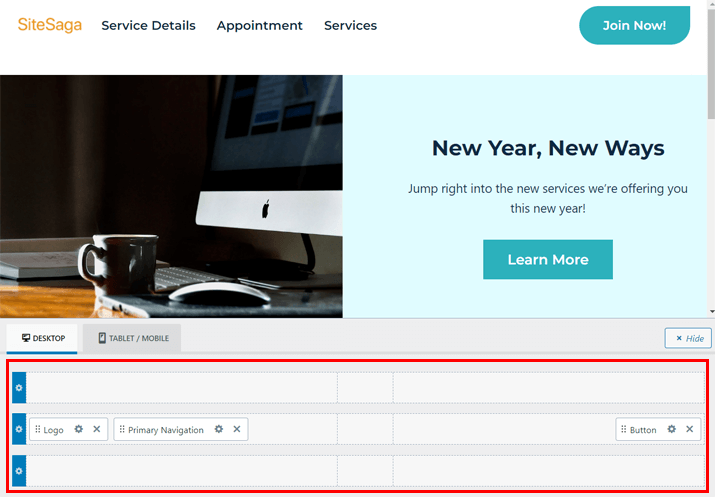
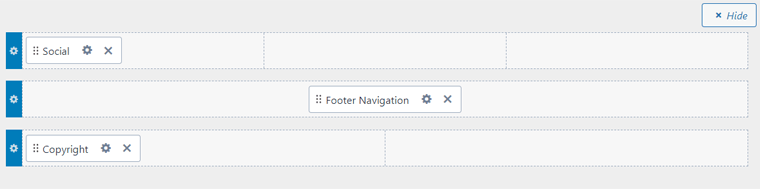
Similarly, open the footer options and add the social widget from the template in the top row, footer navigation in the main row, and copyright widget in the bottom row. Ensure all of them are left-aligned. Lastly, click ‘Publish‘.
Here’s how the homepage of the new website looks like:
Step 7. Configure Your WordPress Site Settings
Configuring your site means adjusting your website entities to function better. WordPress allows tuning your website’s internal settings to specify how it functions. Also, you can set how your website elements and pages appear to the visitors.
You can find WordPress settings under the ‘Settings‘ menu in your dashboard admin panel.

Here, we’ll talk about some of the important settings. Then, you can try others on your own according to your likes. To start off, you can work with the general settings in the beginning.
i. Configuring General Settings
When you click on the General button under Settings, you can see tons of fields and options.
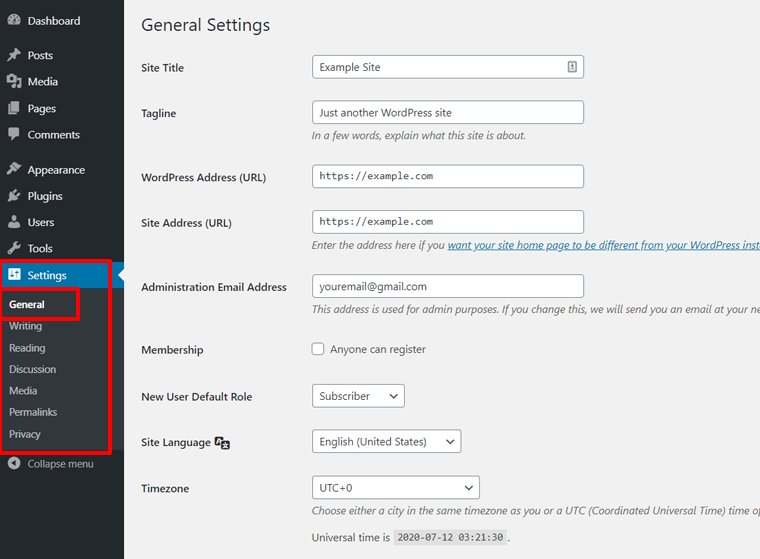
As you can see in the figure, the things you can do from here are:
- Edit your site title and tagline
- View your website URL, email address, etc. (You can also edit your website URL and WordPress URL but it’s not recommended because it can crash your site.)
- Enable or disable user registration
- View site language (You can also change your site language but it can cause errors on your site.)
- Change your site’s timezone, date and time format, etc.
If you changed anything, then you should click on the ‘Save Changes‘ button at the end to save your settings.
ii. Disable Search Engine Visibility Until Your Site is Ready
Another important setting is Search Engine Visibility. By default, your WordPress site is visible to search engines after it’s published live. But you may not want that when your site is in development (maintenance) mode and no useful content is displayed.
In WordPress, you can easily disable search engine visibility and stop search engines from crawling your site until your site is ready.
Go to ‘Settings >> Readings’ from your WordPress dashboard and locate the ‘Search Engine Visibility’ option. You can see a small check box for disabling your site to be visible on search engines.

Check the box and click on the ‘Save Changes‘ button at the bottom.
Note: Please don’t forget to remove the check as soon as your site is fully ready with actual features and content. You can save a note for yourself to do this later.
iii. Configuring SEO-Friendly Permalinks
A permalink is a unique link that appears on your browser’s address bar when you open a particular web page. It’s the full URL of any page on the web, also called the ‘permanent link’.
A permalink is normally composed of 2 parts: domain name and slug. Slug is the part of a permalink that comes after the domain name.
For example, the permalink of this article is https://www.sitesaga.com/how-to-make-a-website/. In this link, the first part (https://www.sitesaga.com) is the domain and the other part (/how-to-make-a-website/) is the slug.
In WordPress, there are different options for your permalink structure. You can choose a plain link with post ID, show date or month and name, post name, post number, etc.
However, it’s best to choose the ‘post name’ for better SEO (Search Engine Optimization). The permalink is what search engines and your site visitors use to view your site, so it’s best to create a simple and easy-to-understand slug.
To set a simple and SEO-friendly permalink, go to ‘Settings >> Permalinks‘ from your WordPress dashboard and choose ‘Post Name’.

Don’t forget to click on the ‘Save Changes‘ button at last.
With this setting, WordPress will automatically create short and descriptive URLs with your post name. You can edit the slug further from your post settings before publishing.
iv. Configuring Discussion Settings
Discussion settings in WordPress are for managing comments on your blog posts. They are to help you approve comments, set comment validity, get notifications of comments, control comment spam, and more.
To adjust these settings, you can go to ‘Settings >> Discussion’. There, you’ll see lots of checkbox options. You can tick and untick the boxes according to how you want the comment settings.
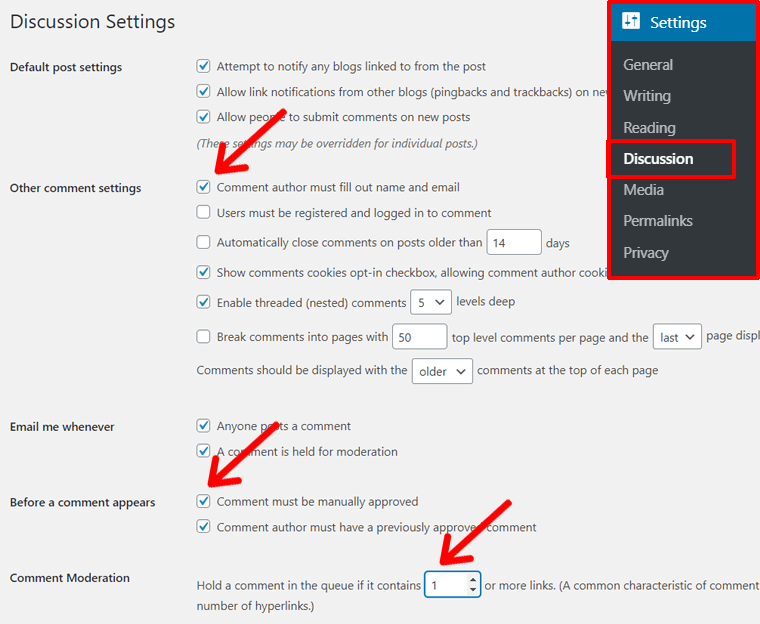
Some important settings you should look for are:
- Other Comment Settings: Check ‘Comment author must fill out name and email’
- Before a comment appears: Check ‘Comment must be manually approved’
- Comment Moderation: Hold a comment in the queue if it contains (1) or more links.
With these settings configured, you’ll protect your site against comment spamming, however, that’s not enough. You must use comment anti-spam plugins like Akismet or Antispam Bee. We’ll explain must-have plugins in Step 8 below.
Likewise, there are many more settings under the Settings section of the dashboard. For instance, you can go to the Media section to control the dimensions of images.
You can take a look yourself from your own WordPress Dashboard.
Step 8. Add Essential Plugins and Tools
Your site may not have all the functions that you want in the beginning. But, you can always add the extra features you like. Adding features to your WordPress site is facilitated by WordPress plugins.
A WordPress plugin is software that you can add to your WordPress site to add a feature. Each plugin serves a unique purpose on your site. For example, WPForms is a plugin for adding contact forms to your site.
You can select and use more than 60,000 free plugins from the WordPress.org plugin directory only. Plus, you can download and install the best plugins manually on your site from third-party sources.
And, yes you can install any plugin you want on your site! It’s another freedom you get when making a WordPress website from scratch. In contrast, site builders like Wix have a limited set of plugins and most are available for expensive plan customers only.
i. How to Install & Manage Plugins in WordPress?
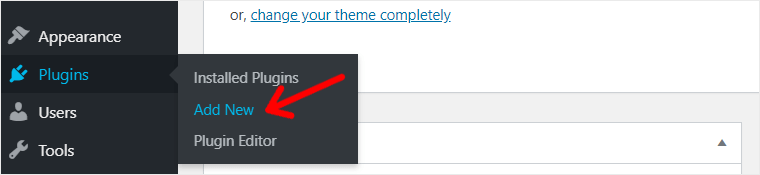
To manage the plugins on your site, go to ‘Plugins > Installed Plugins‘ from your WordPress Dashboard. On the next page, you’ll see a list of installed plugins that you can update, activate, deactivate, and remove.

To install a new plugin, click on the ‘Add New‘ button at the top of the Installed Plugins page or visit ‘Plugins > Add New‘ from your WordPress admin area.
On the next screen, you’ll see plugins from the official WordPress plugin repository. From here, you can search for a plugin by its name or a keyword and directly install it on your site.
For example, we searched the ‘contact form’ keyword, and plugins like Contact Form 7, and WPForms appeared. Of them, we’ll install WPForms by clicking on the ‘Install Now‘ button.
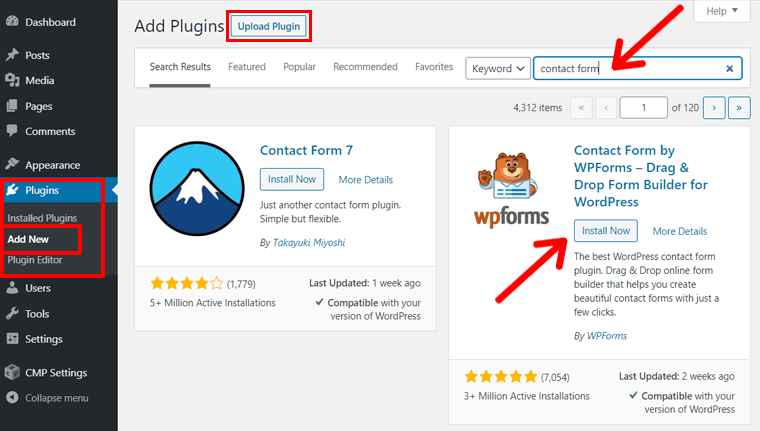
After that, you can click on the ‘Activate‘ button and start using it right away.
But if you want to install a paid plugin or pre-downloaded plugin (a plugin file on your local device), then the steps are different. For step by step process, read our full guide on installing plugins (3 methods).
ii. Best Must-Have WordPress Plugins and Tools
Now, we’re going to discuss some important and best WordPress plugins that you should install for a start.
1. Wordfence
Your website is vulnerable to various kinds of threats if you haven’t taken any security measures. For example, a forcible attempt to sign in to your admin panel, flooding your comment with spam, unusual visits, etc.

So, you need to have a security plugin to keep safe from these kinds of threats. Among tons of plugins available, we recommend using the Wordfence Security plugin. It is the most used and high-rated security plugin in WordPress.
For more information, please check our detailed guide on website security.
- Pricing: Free (paid version also available)
- Alternatives: iThemes Security, Sucuri Security (Free version of both plugins available on WordPress.org, paid version on their official site).
2. Rank Math
A website is useful only if it reaches the targeted visitors. Here’s a fact, websites get most of their visitors from search engines. So, you should make your website discoverable from search engines, mainly Google.
Technically, the process of using measures to make your site visible in search engines is called Search Engine Optimization (SEO).
For your WordPress site, Rank Math is a very useful SEO plugin. It provides you with SEO guidelines, checks SEO scores, checks readability, etc. with the power of AI. Read our full Rank Math review.
- Pricing: Free (paid version also available)
- Alternatives: Yoast SEO, AIOSEO (Free version of both plugins available on WordPress.org, paid version on their official site). Check more Yoast alternatives. Compare AIOSEO vs Rank Math.
3. UpdraftPlus
Backing up is the first and most important step for securing your website from data loss. It is the process of creating copies and saving your website files in remote locations.
In WordPress, UpdraftPlus is a popular plugin for creating backups in WordPress. Also, you can easily restore the backup files and migrate your website files if required. Learn how to back up your site here.
Pricing: Free version available on WordPress.org. The paid version is also available, on its official website.
4. Akismet Anti-Spam
Every blog on the web is prone to spam comment issues like comment flooding, link advertising, etc. And, your website is no exception to that. So, you should use a plugin for blocking spam comments on your site.
For that, the Akismet Anti-Spam plugin is the most recommended. It’s the most popular spam-preventing plugin with over 5 million downloads. It is developed by Automattic, the company behind WordPress. And, it’s one of the 2 plugins that comes installed with WordPress.
- Pricing: Free for personal sites only.
- Alternative: If you need a free alternative for your commercial site or blog, then you can use the Antispam Bee plugin.
5. WP Rocket
Caching is the process of saving web pages as static pages so that they load faster whenever people visit your site. Caching results in increasing your website speed and enhancing users’ experience on your site.
So, using caching software is crucial for your site. Also, you may already know that site speed is an important factor for ranking your site on Google.
For that purpose, we recommend using the WP Rocket plugin. It’s a popular caching plugin that offers lots of caching functions. Moreover, it works fine for most of the WordPress plugins.
- Pricing: Premium
- Alternative: If you need a free alternative, then you can use the WP Super Cache plugin.
6. Novashare
Facebook, Twitter, Instagram, LinkedIn, etc. are the most popular websites people are engaged with nowadays. To grab people’s attention on social media, your website must have social media integration.

Novashare is one of the most popular social media plugins on WordPress. It lets you add social share buttons on your pages, posts, and other areas of your webpage.
Just install it from the plugins section of the dashboard and see all the options it has to offer.
- Pricing: Free (Paid version also available)
- Alternative: If you need an alternative, then you can use the Social Media Share Buttons & Social Sharing Icons plugin.
7. WPForms
WPForms is a simple and user-friendly WordPress contact form plugin with an easy drag-and-drop form builder. With WPforms, you can create various types of forms like contact forms, sign-up forms, surveys, etc.

With a variety of options provided, you can add tons of fields and edit them as you like. You can use fields like text, email, dropdowns, checkboxes, and so on. Also, you can drag and drop the fields to set them in the order you like.
- Pricing: It’s free on the WordPress.org plugin directory. The paid version is present on its website.
- Alternative: Gravity Forms (cool premium alternative form builder plugin).
8. Site Kit by Google
Now, your site needs a traffic analyzing plugin, no matter what kind of website it is. The most popular website analytics tool is Google Analytics. It’s a free tool from Google.
To use the service, you must create a Google Analytics account and connect your WordPress site with it.

In WordPress, it’s easy to add Google Analytics with a plugin. Site Kit by Google is a free plugin by Google company itself that helps you through the entire process of creating an Analytics account and connecting with your site.
Once the setup process is complete, you can view the analytics result easily from your WordPress admin panel.
- Pricing: It’s 100% free.
- Alternatives: MonsterInsights (another powerful free plugin with premium plans also present)
9. Mailchimp for WordPress
Every website should adopt an email marketing strategy to grow its site. It involves collecting email addresses and sending out emails about new products, posts, updates, notifications, etc.
Mailchimp is one of the most popular email marketing services.

In WordPress, you can use the plugin ‘MC4WP: Mailchimp for WordPress’ to integrate Mailchimp into your site. The plugin lets you easily connect your WordPress site with Mailchimp and increase your email subscribers.
Pricing: Free (Paid add-on also available)
10. WooCommerce
If you want to sell things via your site, then WooCommerce is the best option. Developed by Automattic, WooCommerce is the most popular eCommerce plugin to set up an online store.
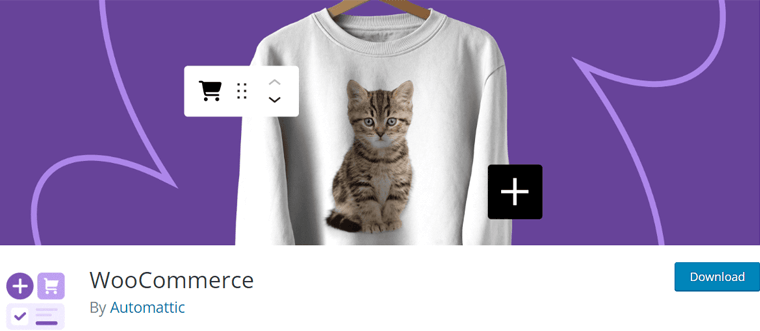
It provides a complete set of eCommerce solutions like adding products, adding carts, choosing payment and shipping methods, searching and filtering products, etc. If you need more features, then you can find tons of add-ons and extensions both free and premium.
Pricing: Free
So, these are the most useful plugins that websites generally use to keep their site running. However, you may not need all of these plugins on your site. Because every site requires a different set of features and functionalities.
For example, you don’t need to install the Akismet plugin for a static portfolio that doesn’t have a comment section. So, be sure of which plugins you need and then, install them accordingly.
For more suggestions, please read our ultimate collection of the must-have and best WordPress plugins!
Step 9. Check Everything and Publish Your Website
After effectively completing the above steps, you’re almost done with building your website and ready to publish. However, we suggest that you check your site once from top to bottom.
It’s just to make sure that your site has no defects, and that you’ll have everything in order. Also, that’s to ensure an excellent experience for your visitors.
After all, a website is the foundation of your business growth and credibility. So, you should spend some time checking and fixing the issues on your website.
Hence, here are the things to cover before finally publishing your site.
i. Proofread all the Content
Sometimes, little blunders go unnoticed during the writing and editing of content. There may have been some faults in grammar, spelling, or formatting. So, you should proofread your posts and pages to get rid of those things.
You can get help from online tools like Grammarly. You can simply add its browser extension and it automatically tracks grammatical errors, spelling mistakes, unwanted phrases, etc. on your web pages.

Plus, it provides the appropriate suggestions that you can use and make your content better.
ii. Check WordPress Settings Again
Re-check your WordPress settings and ensure that everything is in place. As already discussed above, you can regulate your sites’ adjustments from the Settings menu in your dashboard. And some alterations may be required in the plugin’s settings too.
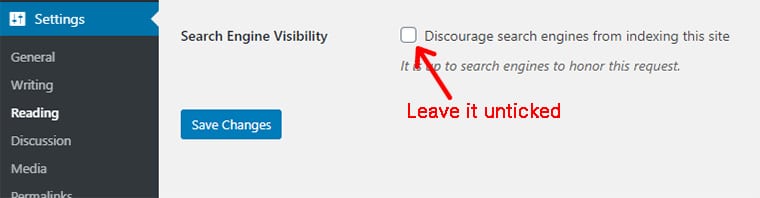
Mainly, you have to make your site visible to search engines. You can manage it by going to ‘Settings > Reading‘ from your dashboard. On the page, make sure that the ‘Discourage search engines from indexing this site’ option is not checked.
But most importantly, you have to configure the Yoast SEO plugin at its best for better search rankings in search engines.
Similarly, you can check the configuration of discussion (comments), media, and permalinks from the Settings under respective sub-menu names. And, fix if there are any issues left.
iii. Test All the Links
Sometimes, your website may have problems with broken links (dead links). They are the links that don’t work and show an error when clicked.
Your website may have broken links due to many reasons like changes in the URL, deleted webpage, etc. Also sometimes, links don’t work when you accidentally alter the URL characters.
To solve the problem, you can use free online tools like the Broken Link Checker. Just insert your website URL and find out if there are any broken links. Then, you can edit your content pages and fix the issues by redirections.
Learn how to check and fix broken permalinks in WordPress websites from here.
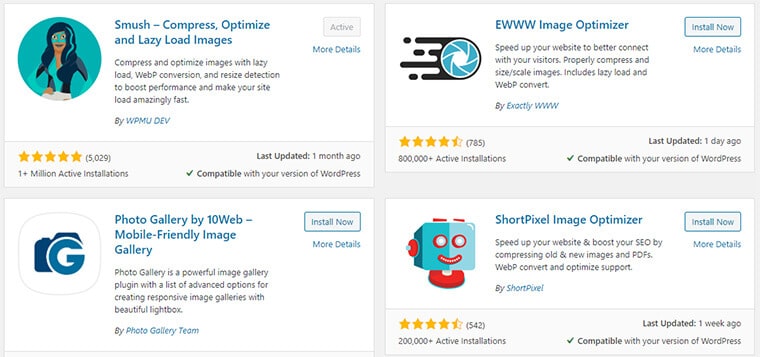
iv. Check Images on Your Site
Images are the important assets of your website. So, you should use images on your site after optimizing. Image optimization means reducing the image size without reducing its quality. This way, your image looks great, loads faster, and minimizes server storage.
To minimize the image sizes, you can use various online tools like TinyPNG, Compressor.io, etc. There are a lot more like these on the web.
However, there are lots of plugins for minifying the images in WordPress itself. Most of the popular ones are Smush, Imagify, etc.
And, don’t forget to check the titles and alt tags of each image. These tags help Google and other search engines understand what the image is about. So, it would rank better in search engines’ image searches.
v. Test Your Site Speed
Website speed is associated with your site’s growth in lots of ways. Faster websites rank higher in Google and provide a better user experience. Also, studies show that people tend to quit websites that take a longer time to load.
So, you should optimize your site speed. You should try various methods to speed up your website.
Also, you can check your website speed with tools like PageSpeed Insights, GTmetrix, Pingdom, etc.

They not only give speed insights but also provide feedback on things to improve to speed up the site.
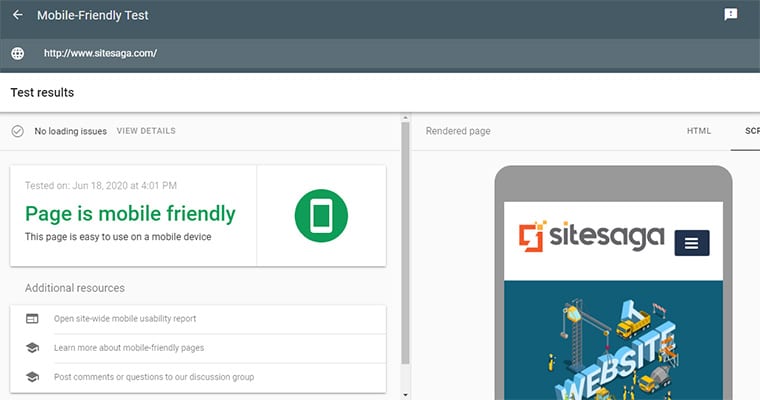
vi. Test Your Site for Mobile
Make sure that your website runs fine on small-screen devices too. You may be amazed to know that more than 50% of users surf the internet through smartphones and tablets. So, you should have a responsive website that runs seamlessly on all devices.
To test the responsiveness of your site, the easiest way is by restoring your browser. First, open your site on a browser, and then click on the restore button. Then, narrow down the screen to see how it looks with small screens.
Besides, you can check the mobile-friendliness of your website using Google’s Mobile-Friendly Test. Just input your URL and get your result instantly.
vii. Check Your Site on Different Web Browsers
You might know that Google Chrome is the most popular browser with over 60% of the market share. However, if your website is only accessible with Chrome, then you’ll be missing out on the rest of the 40% of users.
So, you should make sure that your website runs well in other major web browsers like Opera, Safari, Firefox, Internet Explorer, etc.
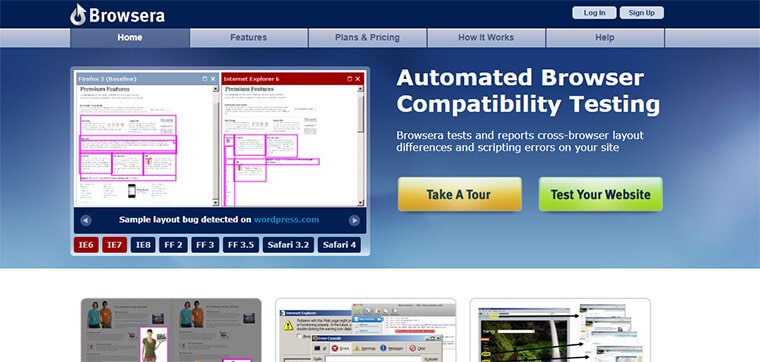
To check the browser compatibility of your site, you can use online tools like Browsershots, Turbo Browser Sandbox, Browsera, etc.
After checking everything, your site is ready to go live. You just need to disable the ‘Coming Soon’ plugin if you’ve set it earlier (as suggested in the end of Step 4). After disabling it, your site will be published and available for visitors.
Woo-hoo! You’re done with making a website from scratch, on you own!
Step 10. Continue Improving and Marketing Your Website
After publishing the site, you’ll have reached a milestone. It’ll be ready to host web traffic and provide your services to visitors.
However, your duty as a website owner won’t end here. You should realize that launching the site is just the beginning.
Here’s an obvious fact, users won’t visit your website until they discover it. Also, they won’t stay long if it has dull design and boring content. So, you should work on constantly improving and promoting your site.
To improve your site, here’s the list of things you should take care of.
1. Improve Content
You should keep on uploading more content to keep your site running. This will keep a steady flow of visitors to your site.
Moreover, consider providing more interactive and interesting content like videos and podcasts.

And also, update your previous posts timely with fresh information that your visitors can rely on.
2. Improve the Site Design
Design is what attracts the users’ attention to your site. If your website has an appealing look and easy interface, then your visitors are likely to come again. So, you need to keep improving your website design.
You can work on making navigation easier so that the visitors can easily move through different pages. Also, choose your website color combination that is easy on the eyes.
3. Enhance Security
Your website may be a vital part of your business and earnings. Thus, you must keep it safe from cyber-attacks and data breaches.
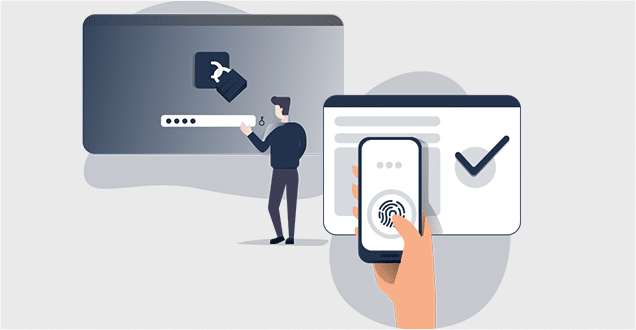
To increase your WordPress site security, it’s compulsory to use security plugins. They allow you to set the 2-step verification login, lock multiple failed logins, block unusual visiting patterns, and so on.
For a WordPress site, the maximum threats come from plugins as it’s provided by external parties. So, you should check the background of plugin authors, reviews, ratings, etc. And, install only the trusted ones.
Besides, back up your website files and data from time to time in case it gets hacked. Check out our complete website security guide to keep your site secure.
4. Add features like chat, forum
If you offer products and services with your site, then it’s important to provide your customers with good support.
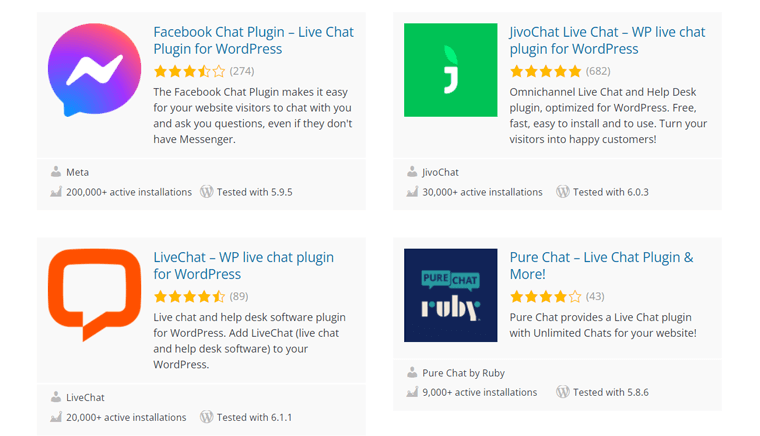
For that, you can integrate a live chat facility into your site later on. This enables your customers to contact you easily for any help or suggestion. To add a live chat facility, you can use various WordPress chat plugins available at WordPress.org.
Also, you can add a forum or community on your site. Having that, you can allow users to conduct discussions on various related topics. It can help you to gain reviews and feedback from users.
Check out the most popular WordPress community plugins!
5. Make Your Site Multilingual
Upgrading to a multilingual site lets your website translate into different languages. Having that, you can gain visitors, clients, or customers from all around the world. Thus, having a multilingual website helps your business grow.

In WordPress, it’s more than easy to enable the multiple languages of your site. There are multilingual plugins like WMPL, Polylang, etc. that enable translation so that your site can go multilingual.
6. SEO
You need to keep improving the SEO of your site to reach more users. More visitors mean more potential customers and eventually, more revenue.

You should work on various on-page and off-page measures of SEO. Mainly, you should work on using keywords, optimizing URLs, internal and external linking, speed, security, etc. to improve the SEO score on your site.
Check our definitive SEO guide for the best SEO tips.
7. Social Media Marketing
According to stats, about 3 billion people are active on various social media like Facebook, Instagram, Twitter, and Pinterest. That’s why; social media marketing can be an effective strategy to derive more traffic to your site.
To begin, you should necessarily have a social media presence. Then, you’ll have to get in touch with the targeted audience, and then publish your content and provide links to your website.

There, you’ll have to engage and interact with your audience to gain trust and build the credibility of your business.
8. Email Marketing
Email marketing is one of the most popular ways to lead traffic to your site. Also, it’s been seen as effective in the past.
Many big companies adopt this method for updating people about their products, services, updates, etc. You can make similar efforts to gain visitors by promoting your content over emails.
It involves gathering a list of email addresses and then sending them mail in a group. Start with one of the best email marketing services.
With that, we’re at the end of our comprehensive guide on creating a website from scratch. So, let’s conclude with some last words!
Frequently Asked Questions (FAQs) on Website Creation
Still, have questions? Check the Frequently Asked Questions (FAQs) quickly.
FAQ 1. How Much Time Does It Take to Make a Website?
The time to make a website depends on various things. Firstly, it depends on the method you use to build a website from scratch.
By Coding: If you’re a web developer, then you can design your site using coding languages like HTML, CSS, JavaScript, etc. But if you’re not, then you’ll need to learn it. It takes several months or years. Anyways, it takes a longer time.
Hire a Web Developer or Agency to Make Your Site: Another way, you can also hire developers or an agency who can do it for you, but that’s a costly approach. Plus, they’ll charge more if you want your website delivered fast.
Build Your Site Yourself With a Website Builder: Or, you can do it yourself easily with the help of website builders. Just use a website platform, and you’ll be ready to launch your site within hours. They’re easy to use and also far more cost-effective.
Also, the type of website you’re making matters a lot. For example, with a website builder like WordPress, building a simple blog site can take just some hours to a few days.
It takes up to a week to a few months to completely set up a complex working eCommerce store.
Learn in brief from our guide on how long it takes to build a website.
FAQ 2. How Much Money Do You Need to Create a Website?
As we’ve already mentioned, hiring web developers costs you a lot. So, we advise you against it.
And if you’re using a website builder, then it’ll cost you much less. So, you should use website builders if you want to save some money.
If you choose a website builder platform, you’ll need mainly these 3 things.
They are;
1) Website Software
2) A domain name
3) And a hosting account
Among the popular website software options, WordPress is a fully free-of-cost software.
Next, you need to buy a domain and hosting. But that’s not a problem because top hosting companies like Hostinger offer web hosting as low as $2.49/month billed yearly. Plus, provide a domain name for free.
Further, there are managed WordPress hosting services by platforms like Kinsta. They may charge you more but offer dedicated features to help you manage the entire hosting infrastructure.
Other website builders like Wix also let you create a website for free. But, those websites usually have fewer functionalities and hosting features. Along with that, you can’t use a custom domain name with those free websites.
To learn more about hosting your site from our web hosting FAQs article.fewer
FAQ 3: Can I Switch My Site From WordPress.com Or Others to WordPress.org?
Yes, you can switch your website to WordPress. You may have made a mistake as a beginner when setting up a site on the wrong platform. Or you aren’t satisfied with your current site builder.
Hence, you can migrate your website from any website builder to WordPress.org. The crucial thing to remember is to make sure your permalinks move seamlessly without affecting the SEO.
Conclusion
Let’s wrap up! We’re at the end of this article on how to make a website from scratch.
We hope that you understand how to make a website from scratch, specifically using WordPress. Also, we’re sure that you’ll be able to build a professional website on your own. Following this guide step-by-step, you’ll have your website ready in no time.
Still, having some confusion? Or need any kind of help with website building? Then, please comment below. We’ll be happy to help you.
Also, read some recent helpful blogs on how to build a WordPress site without hosting and domain. Plus, our list of the best website builders for SEO.
If you like this article, then please share it with your friends and colleagues.
Lastly, follow us on Facebook and Twitter for updates on more useful articles.