Do you want to know what a landing page in WordPress is? Or are you planning to create a landing page for your WordPress site? Then, you’ve come to the perfect spot to know that.
No doubt, converting your site visitor into potential leads is the perfect way to create a sustainable business. But you can do so only with an optimized landing page.
Simply, a landing page is a well-optimized page on your site intended to capture users’ interest in your products or services in the form of sales or contact information. Therefore, if you’re running any marketing campaigns, then a landing page can help you achieve your goals and generate more conversions.
In this article, we’ll explain everything you need to know about landing pages and guide you through a landing page on a WordPress site.
Let’s begin!
A. What is a Landing Page in WordPress? Why Do You Need a Landing Page?
A landing page is a standalone page that is mostly used for email, social media, or marketing campaigns. You can use this page to promote your products or services. Any engaging landing page can turn website visitors into customers and subscribers with ease.
Similarly, landing pages are made with clear call-to-action (CTA) goals in mind. As they can generate better conversion rates than regular blog posts or site pages.
Hence, the goal of a landing page is to get your website visitors to take some kind of action when they visit your website. The action could be buying a particular product from your online store, subscribing to your email list, or, filling in a form.

Therefore, the visitors “land” on the landing page when they click through the banner, targeted ads, an email newsletter, a search ad, etc. All these landing pages are part of an advertising campaign targeting the niche audience.
A landing page takes a very important role in any business development. Any landing page must include beautifully written content and a pleasant design and layout to look at. Despite all these, it should also serve the purpose of lead generation in the first place too.
Meanwhile, the landing page can be part of an existing multi-page site, or be a standalone web page without a website. Whereas if you choose it to be a standalone web page then it needs to have a separate unique URL.
Therefore, as a rule, a landing page must have at least one call to action. In order to make your visit complete at least one action without forcing them to make a choice. Hence, forcing many options onto your page can make it more difficult to decide.
In the market, you can find several landing page hosting and integration options. Therefore, it won’t be much of a task to set up a landing page. However, you should be careful with the landing page structure. You need to make sure that your landing page is actually different from regular website pages and should benefit both you and your customers well.
Why Do You Need a Landing Page?
Unlike other pages, landing pages are highly focused on specific, short-term goals so that you can get the results you want. Besides increasing conversions, and yielding new audience insights, landing pages also helps with:
- Generate Leads – No doubt, landing pages mostly focus on conversion rates rather than education and information. It helps to generate leads for your business and increase sales.
- Increase Traffic – A landing page not only helps with lead generation but also increases website traffic. With a landing page, you can increase brand awareness and allow potential customers to learn more about your business.
- Boost Your Credibility – A well-planned landing page comes with clear and simple messages that explain the value of what you’re offering. In this way, your visitors will appreciate and will show interest in your products and business.
- Strengthen Your Brand – Nowadays, building a digital brand is a must. When you’ve got a clear and strong brand identity, you can have several benefits from it. Therefore, a landing page can help your customers remember you in the future and even recommend you to their friends.
Therefore, landing pages are greatly essential to your marketing strategy. And the more optimized landing pages you have, the better the results you can expect from.
B. What is the Difference Between a Homepage and a Landing Page?
With that, a short introduction to what is a landing page in WordPress. You might have a question arising within you i.e. whether the landing page and homepage are the same or not.
To be honest, mostly both pages look the same in terms of the content. However, each of them serves a unique function and purpose. Now let’s talk about their differences below.
A homepage is the first web page that a visitor sees after they’ve typed in the domain name into their browser. It’s the main web page of a website that is displayed when the application first opens.
Whenever a visitor visits your website, a homepage should instantly tell visitors who you are and what you do.
On the other hand, a landing page is much more of a promotional tool. A visitor will land on this page after clicking on a banner, or link in an email, advertisement, or social media post.

A good homepage comes with an attractive and alluring website design. This will then encourage your visitors to engage with your WordPress website. Such as, exploring other pages, browsing products, or signing up for your email newsletter.
Similarly, as mentioned above, a landing page is specifically used for marketing or advertising campaign purposes. Besides that, it mostly encourages your visitors to make a purchasing decision or share information as part of a lead generation strategy.
Not just that, a website can have only one homepage, whereas you can create as many landing pages as you want.
Here are a few more differences between homepages and landing pages.
Homepage
- The homepage uses your root domain; for example www.yourwebsite.com.
- The traffic that you mostly receive is from organic searches.
- You’ll find the links to every other important page of your website.
- It gives your visitor a comprehensive overview of what your business is about.
- Also, it uses a broad call to action, such as Contact Us and Learn More.
Landing page
- A landing page is a secondary page on your website; for example, www.yoursite.com/landingpage.
- Here you’ll receive traffic mostly through paid marketing campaigns ( such as search ads, social ads, and email marketing).
- On a landing page, you can stay focused on a particular topic or offer throughout the page.
- Also, it uses a specific call to action, such as Sign Up and Buy Now.
However, sometimes the same page can serve both as a homepage and landing page. Some small-scale products build a single page website where they add information plus call-to-action elements.
That being said, in our next section, we’ll look at how to create a beautiful custom landing page in WordPress.
C. What Makes a Great Landing Page?
Okay before we move into other stuff, one should remember that sometimes your homepage also works as your landing page. You should land your customers on a page that will tempt them to take advantage of whatever special offer you’ve promised them. In this way, your landing page will have a better chance of capturing attention for a longer period of time.
However, there are several key components to consider when you start building your landing page.
- Focused content and design: The content of your landing page should be focused and free of distractions. It should deliver the end goal of providing the visitor with what they want while completing the call-to-action events.
- When building a landing page make sure to segment your customer base and target specific consumers through customized campaigns. In this way, you can draw the attention of a particular base and nurture those leads for the future.
- A good landing page should be able to collect specific information about your prospective customers. When collecting demographic data it should include more than simply a name and email address.
- You should never incorporate lengthy forms into your landing page. It would rather be a daunting task and you may lose the opportunity of generations to lead. Instead, break down your forms into smaller sections and let the user see exactly where they are in the process.
- A landing page should provide a medium to access other marketing channels. Alongside your deals, you can provide links to other offers, your social media profiles, or an email list sign-up.
- Include a strong call to action with an eye-pleasing design and minimal wording. You should know your target market and based on that you should tempt your potential customers.
- A good landing page must be followed by a thank you page. This will not just only act as a good gesture but they’ll also feel appreciated. It’ll also assure the customers that they’ve completed the registration or purchase process.
There is no doubt about it, we are living in a digitally connected world. With that, approaching a digital marketing campaign is one of the best investments that you make for your business. Therefore, including a landing page to build your digital marketing toolbox is a smart move, and both you and your customers can be benefited.
That being said, in our next section, we’ll look at how to create a beautiful custom landing page in WordPress.
D. How to Create a Landing Page in WordPress?
Now, we just looked at how the landing page is different from other web pages. We hope that you’re now clear about when and why to use a landing page for your WordPress site.
That being said, let’s take a look at how to create a beautiful landing page in WordPress.
- Method 1. Creating a WordPress Landing Page using Stackable Blocks
- Method 2. Creating a Landing Page in WordPress using Elementor Page Builder
Method 1: Create a Landing Page Using Stackable Blocks
The very first method that we’re going to look to create a landing page in WordPress is using Stackable blocks.
Stackable is a popular Gutenberg blocks page builder that allows you to build dynamic websites with the Gutenberg WordPress editor. It’s the all-in-one solution to build dynamic websites with custom blocks, ready-made designs, global settings, and advanced customization options.
Now, let’s see the steps that you need to follow to create a stunning landing page.
Step 1: Install and Activate the Stackable Plugin
The first step is to log into your WordPress dashboard, from where we’ll install the plugin.
Following that, on the left sidebar of the dashboard, go to the Plugins section and click on the Add New button.
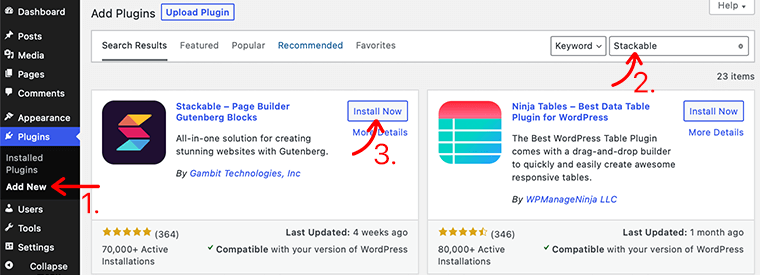
After that, type the Stackable plugin in the search field at the top right corner of your dashboard. Once you’ve found the plugin, click on the Install Now button.
After you’ve completed the installation, you’ll see the Activate button, as seen below. Activate the button by clicking it.

You’ve now successfully installed the free version of the Stackable plugin. However, if you want more advanced functionalities, you can purchase its premium version.
Step 2: Create a New Landing Page
Next, after you’ve successfully installed the plugin, you need to create a landing page.
To do so, go to your WordPress dashboard, navigate to Pages > Add New, and then it’ll take you to the WordPress editor page. And now from here onward you can start creating your landing page.

Step 3: Use Stackable Blocks to Add Elements to Your Landing Page
Now your landing page is ready, it’s time to start building your page to have the elements you want. In this guide, we’ll show you how you can add elements to your landing page using Stackable Design Templates.
Inside this design template, you’ll get a huge library of design templates for different blocks. You can access these design templates by clicking on the Design Library button at the top of the WordPress editor page.
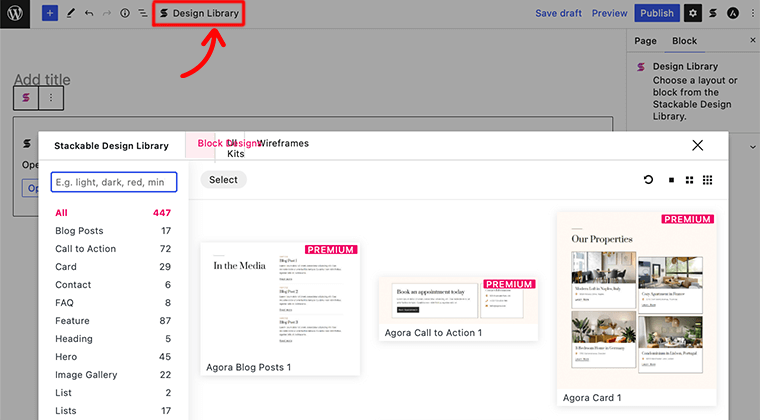
For instance, you can start by adding the hero section to your landing page.
i. Add Hero Section
The first thing that you’re going to add to your landing page is a hero section. Here, in the Stackable Design Templates, click on the Hero block option. It’ll display all the templates related to the hero block as shown in the below picture:
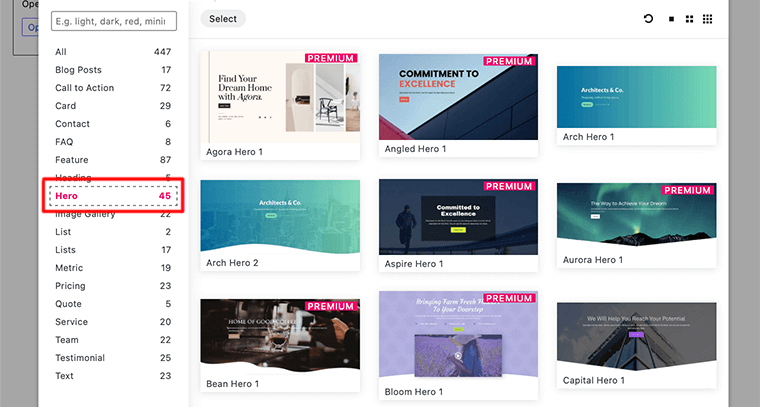
From the template library, choose and click on the template that you want to use. After that, Stackable will apply that design to your landing page and will take you to the WordPress editor.
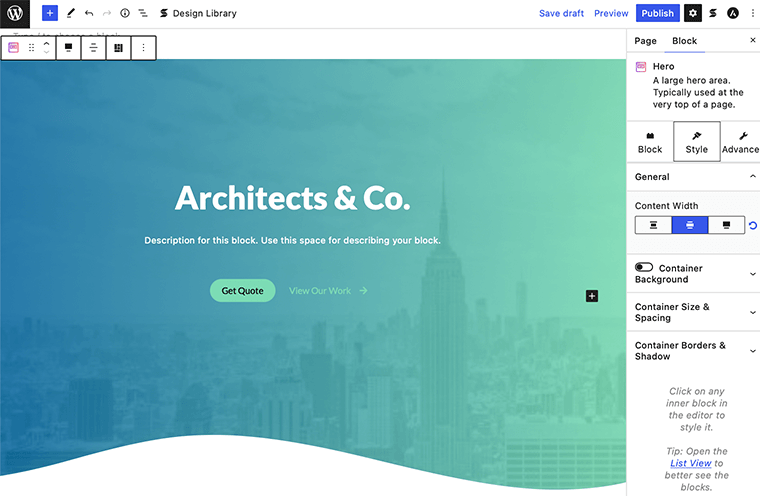
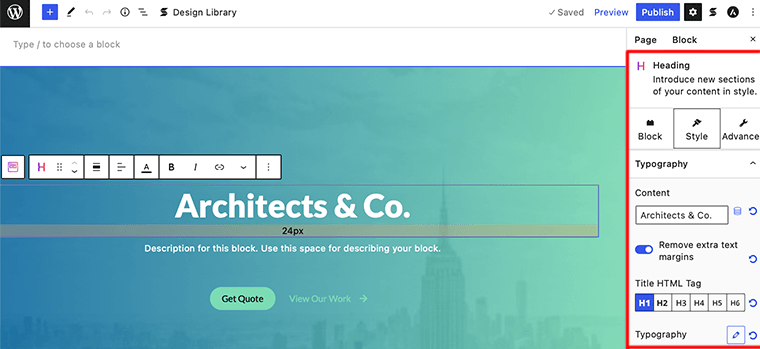
In order to edit any element of a template, click on that particular element. And you’ll find the setting panel for that particular block on the setting menu.
For instance, in the template that we’ve used, if we click on the heading section, we’ll get all the settings options related to it on the right side. You can now choose the customization the way you like. There you can change the text, text color, size, etc.
ii. Add Call to Action Block
Now that you’ve added the hero section, it’s time to add a call to action block to your landing page. This is a great section to have as it allows you to call the attention of your visitors to your products and deals.
Just like adding a hero block, click on the Design Library and search for the Call to Action block as shown below picture:
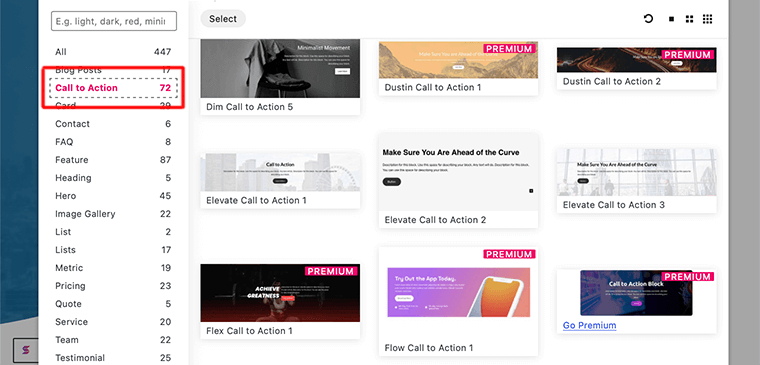
Once you’ve added the block, you’ll see the call to action section to your content area on the left-hand side.
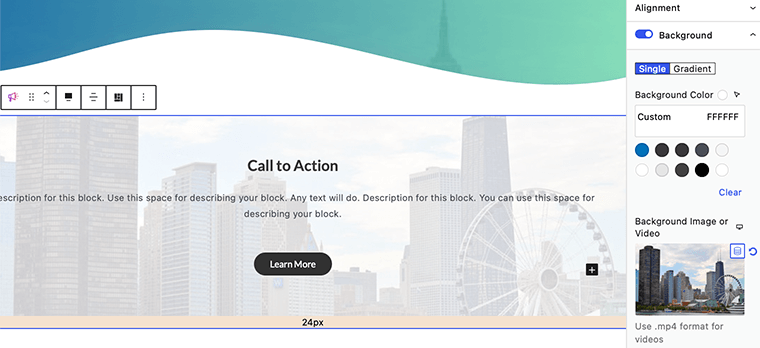
In the picture below, we can see the group of CTA blocks that contains three other blocks – heading, text, and button. Make sure that you change the title, text, button background, etc. If you further want to style your block then you can find the setting panel on the right-hand sidebar.
iii. Add Feature Block
The next element that we’re going to add to our landing page is the feature section. You can use this type of block to display a product feature or everything you want.
Inside the Stackable Design Templates, click on the Feature block and it’ll display all the templates related to the feature block.
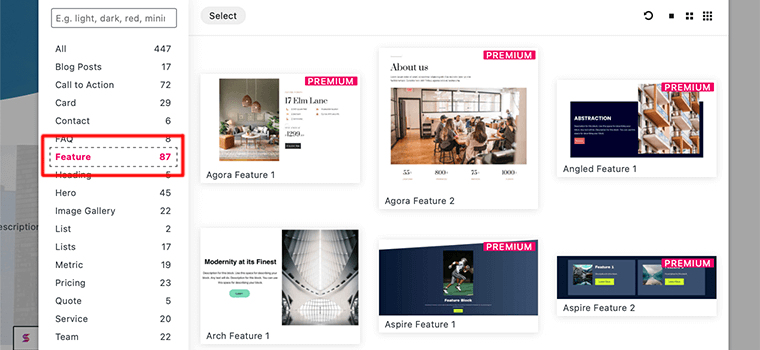
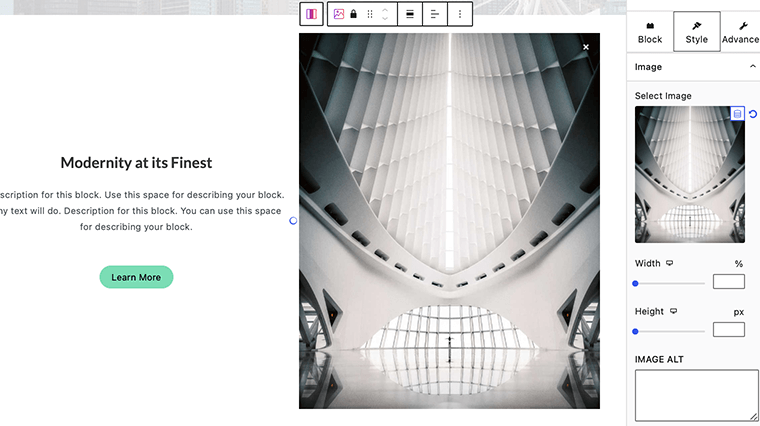
Once you’ve done that, this block will let you add an image along with text and a button.
You can list out the features and images of the product simultaneously. Make sure that you don’t forget to add a call to action button to make them purchase the product.
iv. Add Other Element Blocks
Depending upon your requirement, make sure you add the appropriate blocks to your landing page. In this guide, we’ve only shown a few blocks to add to your landing page.
However, just like those blocks, you can add more blocks to your landing page. Such as coupons, post carousels, testimonials, latest posts, etc.
Step 4: Publish Your Landing Page
In this last step, once you’ve put together all the elements, make sure to preview it. While previewing that, also check into all the CTA buttons and see whether they deliver their events or not.
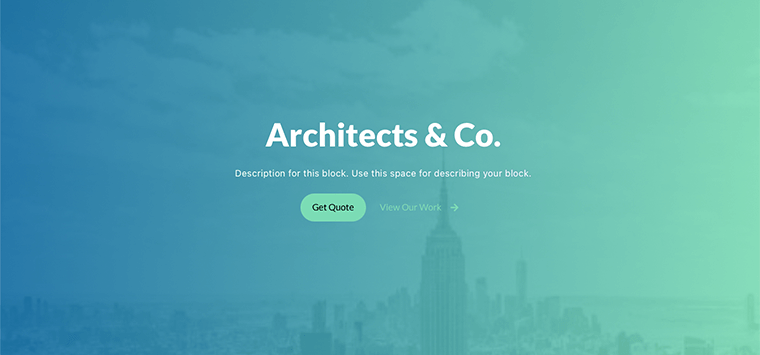
Lastly, if everything looks great the way you’ve created, then click on the Publish button. In this way, you can build your landing page using Stackable Blocks for your WordPress website.
Method 2: Create a Landing Page Using Elementor
Now that we looked at the first method, let’s look at how we can create a landing page using a page builder.
To create our landing pages, we’ll use Elementor and its visual drag-and-drop interface. In the market, you’ll find many WordPress page builder plugins that allow you to create beautiful landing pages with a simple drag-and-drop tool.
However, Elementor is the best page builder that gives you access to a powerful visual drag-and-drop design editor. Besides that, it gives you a dedicated landing page management area. Also, it comes with professionally designed landing page templates that you can customize to your needs.
However, Elementor allows you to build your landing page either using Elementor templates or build it from scratch. In this article, we’ll look into both possibilities so that it becomes easier to choose the best one for you.
With that, are you ready to build your first landing page using Elementor? Follow the steps below to create a highly converting landing page using the Elementor page builder plugin.
Using Elementor Templates to Build a Landing Page
First, let’s look at how we can create a landing page in WordPress using Elementor templates. Now, what if you want to build a landing page within a few minutes?
In that case, we’d recommend using the ready-made Elementor landing page templates offered by Elementor page builder. As Elementor comes with many stunning Elementor templates for building landing pages.
Here’s how to build the landing page using Elementor landing page templates:
Step 1: Install and Activate the Elementor Plugin
But before we start building the landing page, the very first step would be to install the Elementor website builder plugin.
The first step is to log into your WordPress dashboard, from where we’ll install the plugin.
Then, on the left sidebar of the dashboard, proceed to the Plugins section and click on the Add New button.
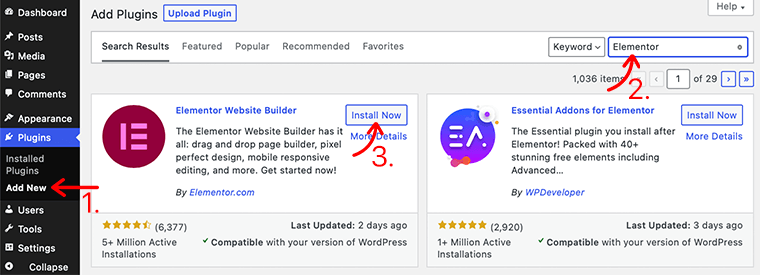
Now, type the Elementor plugin in the search field at the top right corner of your dashboard. Once you’ve found the plugin, click on the Install Now button.
After you’ve completed the installation, you’ll see the Activate button, as seen below. Activate the button by clicking it.

You’ve now successfully installed the free version of the Elementor plugin. You’ll discover the Elementor menu in the left navigation area.
However, for much more advanced functionalities, you must purchase its premium version. Once you’ve bought it, you can upload and install it to your WordPress site. To learn more on how to install a plugin, check our complete guide on how to install a WordPress plugin.
Step 2: Create a New Landing Page
In this second step, we’ll create a new landing page for our WordPress site.
To create your first landing page, in your WordPress dashboard, navigate to Templates > Landing Pages and click on the Add New Landing Page button.
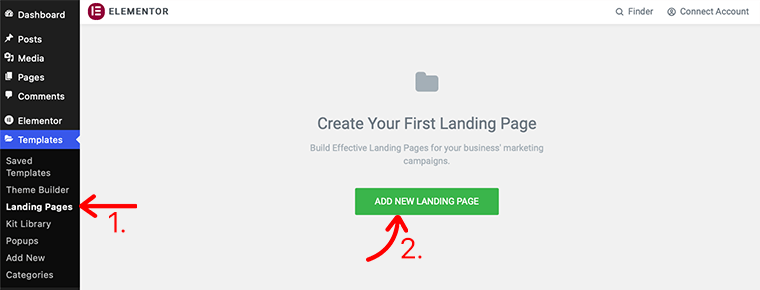
After that, it’ll take you to the Elementor editor page. But before that, it’ll pop up an Elementor Template Library. You can choose one of the premade landing page templates to build your landing page.
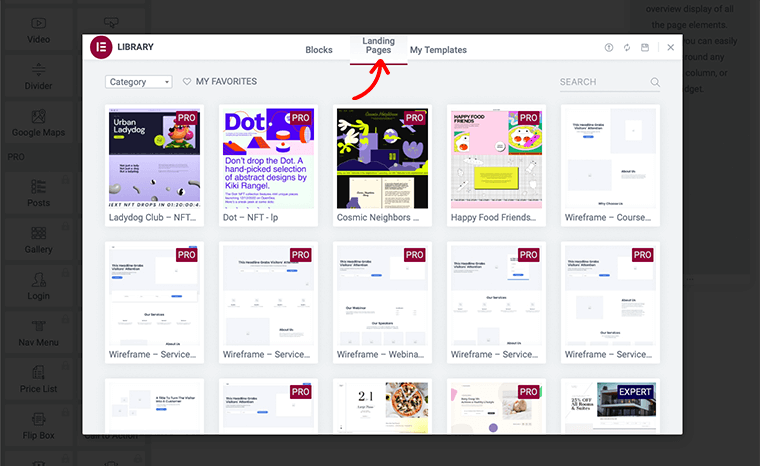
However, you’ll notice that Elementor comes with both free and premium landing page templates. Hence, make sure you can choose according to your needs and budget. Nevertheless, both types of landing page templates are highly optimized for the device and SEO.
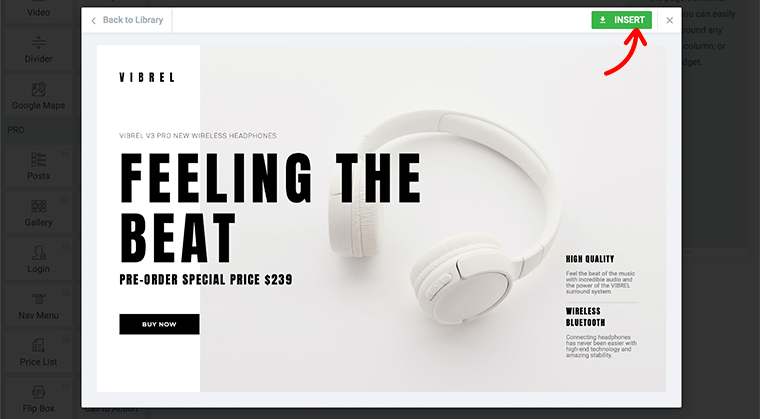
Now, once you’ve found the perfect landing page for your website, click on the INSERT link. After that, Elementor Builder will apply that design to your landing page and will take you to the Elementor visual editor.
Step 3: Edit and Customize the Template
Inside the Elementor visual editor, you’ll find out that it has completely replaced the basic WordPress editor with a live front-end editor. So that, you can create complex design layouts visually without having to switch between the editor and the preview mode.
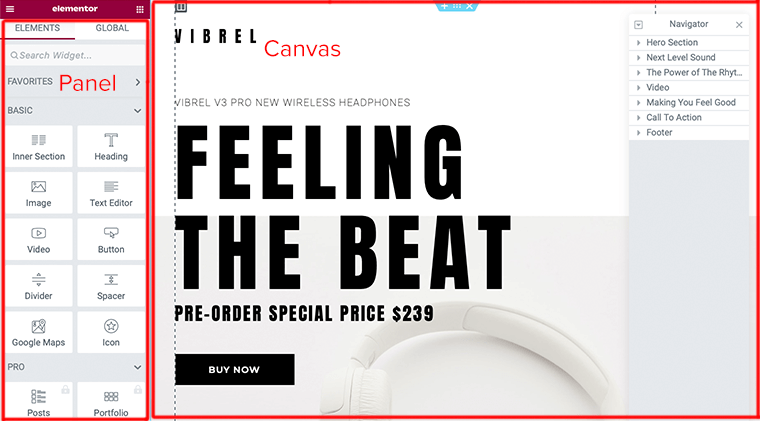
Now, you’re ready to start editing your landing page. However, you first need to understand the basic structure of Elementor. Thus, the Elementor editor consists of 2 main areas: the Panel and the Canvas.
- Elementor Panel – This is where you can find all of the tools and settings required for editing and customizing your site.
- Elementor Canvas – It’s also known as a visual content area where you’ll create your page/post/site part.
With that, let’s look at how we can edit any element of the template. In order to edit any element of a template, click on that particular element. This will then pop up the Editor Panel on the left side.
When it opens a popup, it’ll contain all the settings for that particular block. For example, in the following image, we’re going to edit the Heading element.
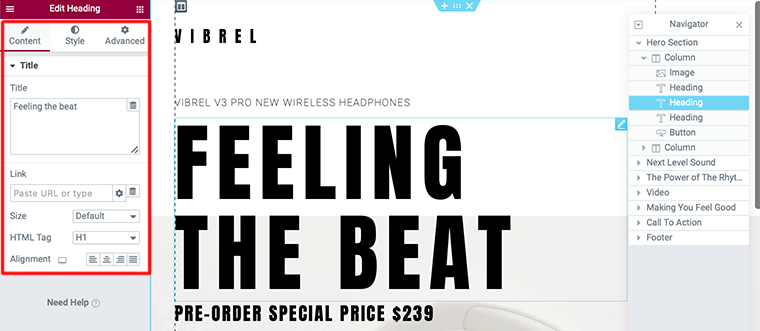
Similarly, you can edit other elements of the template as you want. However, you can move around your template via Navigator and edit them.
In our next example, let’s look at how we can edit the button element of our template. For that, click on the Button element and it’ll open an editor panel for the button on the sidebar.
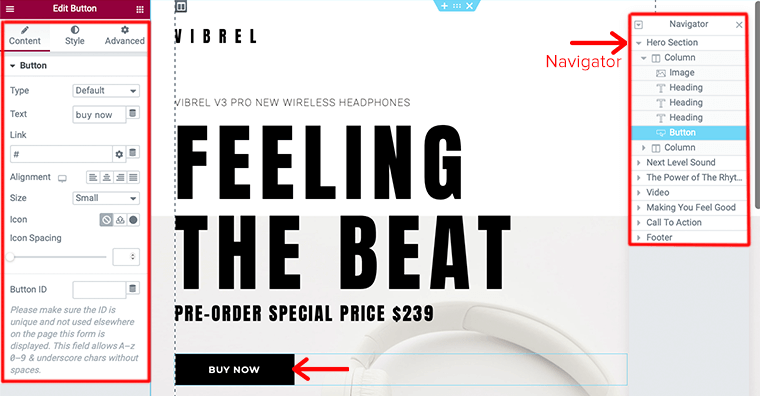
On its editor panel, you’ll find the setting options for adding a URL, editing a text, size, alignment, and spacing of the button. Similarly, you can also edit the look and style of the button by clicking on the Style button.
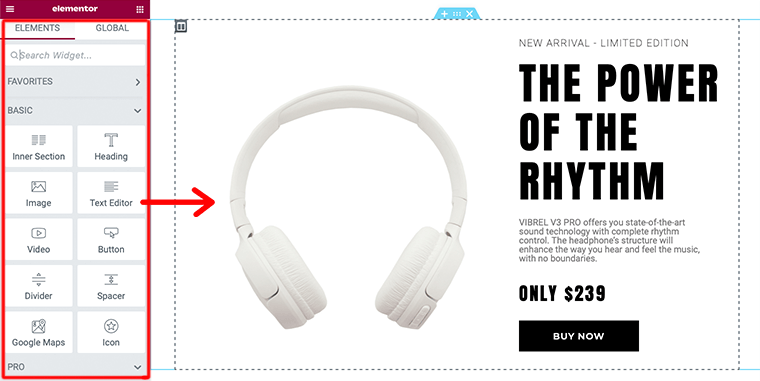
Likewise, you can add more elements to your landing page by clicking on the Widget icon. After that, you’ll find many element widgets that you might want to use. To add those widgets to the landing page, drag and drop them onto your content area.
Step 4: Preview and Publish Your Landing Page
In this last step, before you publish the landing page that you’ve built, make sure to preview it. This is the important step as an admin you should know how it will look when published.
To do so, you need to click on the eye icon located on the bottom left panel.

Once you’ve completed previewing it, if everything looks good, go ahead and publish your landing page. You will notice the green Publish button next to the eye icon on the bottom left panel.
Once you’ve clicked on the Publish button, it’ll now change the green Publish button to a gray Update button.
Congratulations, you have now built and published your very first Elementor landing page for your WordPress website.
Building Landing Page from Scratch
In this method above, we just looked at how one can build a landing page using Elementor templates. Now, what if you want to build a custom landing page on your own?
In that case, we’d recommend you build a landing page on your own from scratch. However, one must know how to use a page builder on their own so that one can build it from scratch.
Here’s how to build the landing page in Elementor from the scratch:
Step 1: Create a New Landing Page
To create your landing page, in your WordPress dashboard, navigate to Pages > Add New and then click on the Edit with Elementor button.
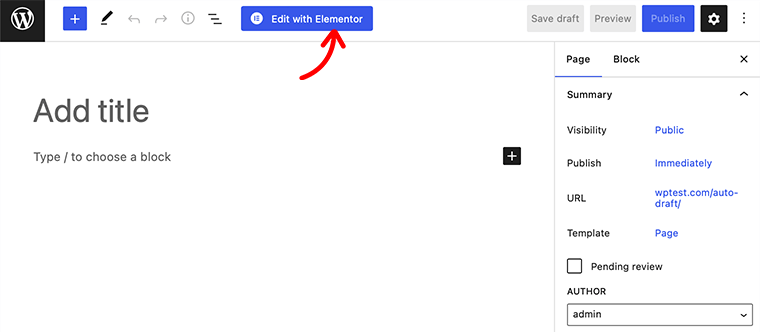
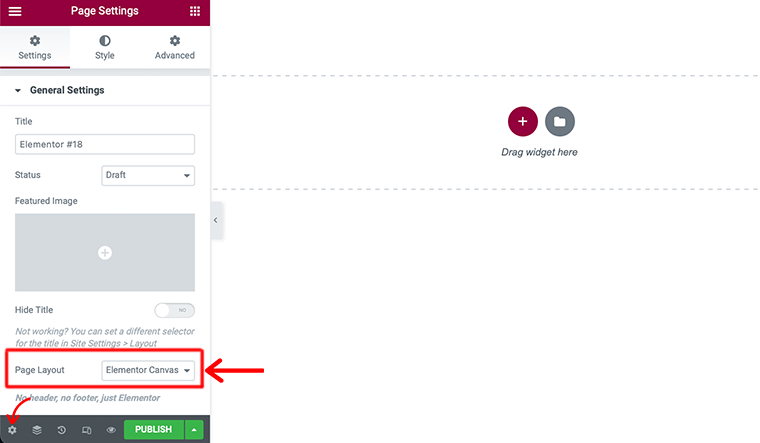
After that, it’ll take you to the Elementor editor page. But before we start building our landing page, go to Elementor Settings at the bottom left of the page. In there, set the Page Layout from Default to Elementor Canvas to work on a blank landing page.
Step 2: Add Elements to Your Landing Page (Build the Hero Section)
In this very next step we’re going to add elements to our very own landing page. Nevertheless, every landing page can be different and can have dozens and dozens of different elements to your landing page.
For instance, let’s look at how we can add a hero section to our landing page. A Hero section is the first thing that your visitor sees when they visit your website.
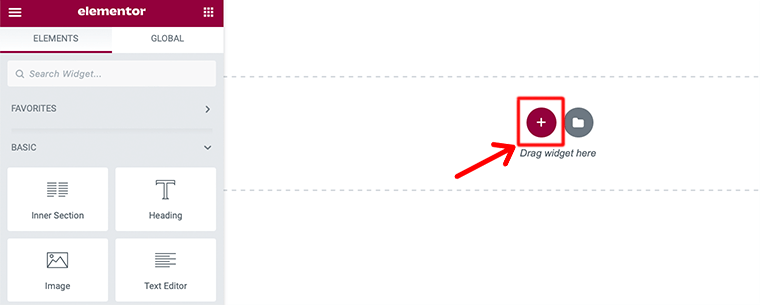
To begin, click on the “+” icon of the Elementor editor area and select the structure for your landing page. However, we prefer two column-sections that help you to show your heading, subheading, and image/video side-by-side.
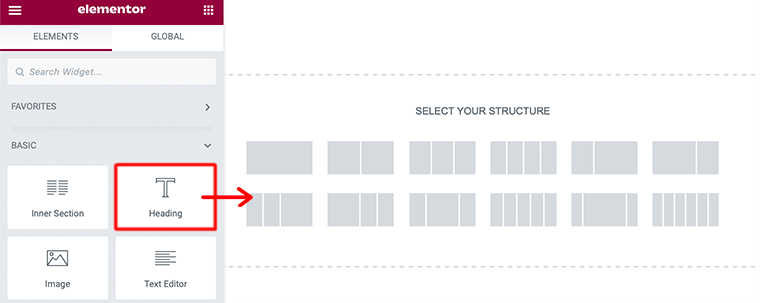
Add Headings – The first thing we’re going to add to our hero section is the heading element. Here, we’ll drag and drop the Heading widget from the Elementor block area.
For instance, in the image below we’ve dropped and dragged two heading widgets. Then, we used the H1 tag for the first heading and the H2 tag for the subheading.
Add CTA – Next thing we’re adding to our hero section is the CTA (Call to Action) widget element. You can drag and drop the Call to Action widget from the Elementor block area.
However, to be able to use this widget, you must purchase its premium version. Now once you’ve added the call to action button, you can make any changes you like in the content, style, and layout, and you’re done!
In this way, you can build the hero section manually by dragging and dropping the Elementor widget.
Step 3: Build the About Section
Next, we’re going to build the about section for our landing page. Here’s how you build the About section with Elementor:
Firstly, click on the Add Template icon from the Elementor editor area.
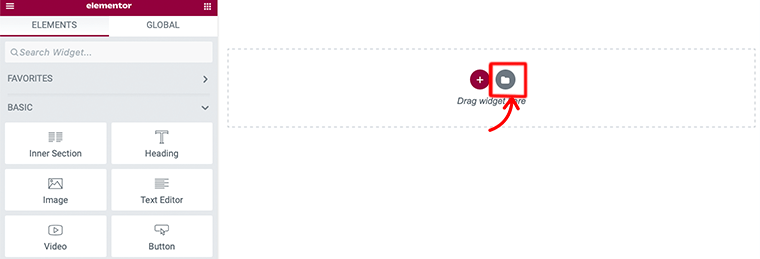
From there go to the Blocks menu from the top bar. After that, choose the About category from the drop-down menu.
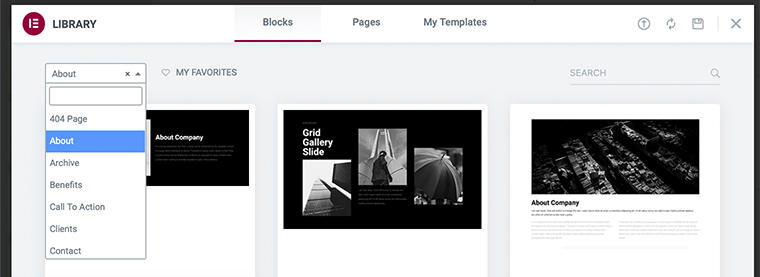
Following that, you’ll find the list of About block templates. From there, you can choose your desired one and click on the INSERT link. After that, you can make the change and customize it the way you want.
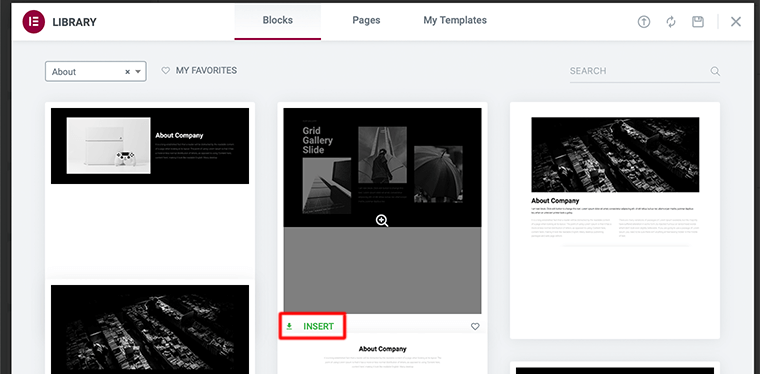
Indeed, while creating an about section, adding team photos and a relevant video to this area is a good idea.
Step 4: Add Other Remaining Blocks and Sections
By far, if you’ve been following these steps properly then you’ve almost completed creating your very first landing page. However, there are other elements that you can add to your landing page. Such as contact form, galley, feature section, and more.
You can add these elements similar to the other blocks that we’ve added to our landing page. Some more elements can be obtained when you purchase its pro version.
Lastly, add the blocks to your landing page according to your requirement without making it look clunky and disoriented.
Step 5: Preview and Publish Your Landing Page
In this last step, before you publish the landing page that you’ve built, make sure to preview it. Once you’ve completed previewing it, if everything looks good, go ahead and publish your landing page.
Congratulations, you have now built and published your Elementor landing page from scratch for your WordPress website.
E. FAQs – Frequently Asked Questions
A landing page is a standalone web page that a visitor can land on when they perform certain actions like signing up for an email list, subscribing to a service, or purchasing a product.
A landing page is a great way to drive conversion, improve your SEO and build your brand. Nowadays, approximately around 68% of B2B businesses use strategic landing pages to garner new sales leads.
Some of the best WordPress landing page themes are Astra, Kadence, GeneratePress, Neve, Mesmerize, PopularFX, OceanWP, etc.
When we say lead generation WordPress plugins, we actually mean the WordPress plugins that help you in creating and growing leads. Some of the best lead generation plugins are SeedProd, Leadpages, OptinMonster, WPForms, Icegram, etc.
Conclusion
Well, that’s all for now!
In this article, we’ve shown how to create a landing page in WordPress. We hope that’ll help you to know all the steps to create a landing page on the WordPress website.
So, if you’ve any queries or suggestions regarding this article, then let us know in the comment below. Besides, you can also share your experience of creating a landing page in WordPress.
You can also check out our complete guide on how to create an email campaign. With that, you may also like to check out another popular article on the best SEO tools for your small businesses. Make sure you go through them!
If you like this article, then please share it with your friends and colleagues. Also, don’t forget to follow us on Twitter and Facebook.
