Do you want to learn how to upload PDF files to your WordPress site? And want to display it in the best way possible? Then, you’ve come to the perfect spot to know that.
No doubt, embedding a PDF file into your WordPress pages is certainly a beautiful way to present your content to your site visitors. Nevertheless, the real concern is how you display PDF in the most elegant and best way.
However, don’t worry anymore! We’ve got you covered. In this tutorial article, we’ll guide you through various methods through which you can upload PDFs to your WordPress site. And display it in the nicest way possible.
Now, let’s get rolling!
Why Upload PDF in WordPress?
Briefly speaking, PDFs are one of the most widely used file types, and adding them to your WordPress website has several merits.
So, before we dive into the topic, let’s check out a few of the reasons why you would want to upload PDFs in WordPress. Some of the notable reasons are as follows:
- You can use PDF file downloads to increase your email subscriber base.
- Adding PDF files to your website can increase user engagement and reduce bounce rates.
- Turn your long manuals and tutorials into PDF files. And offer them as exclusive content to your site visitors.
- Use PDF files to provide your paying subscribers with premium content. That is exclusively available to members of your membership site or course.
Having said that, let’s move forward on how to upload PDF files to your WordPress site.
Did you accidentally land on this article but thinking about creating a website on your own? Then, do check our comprehensive article on how to make a website for more insight.
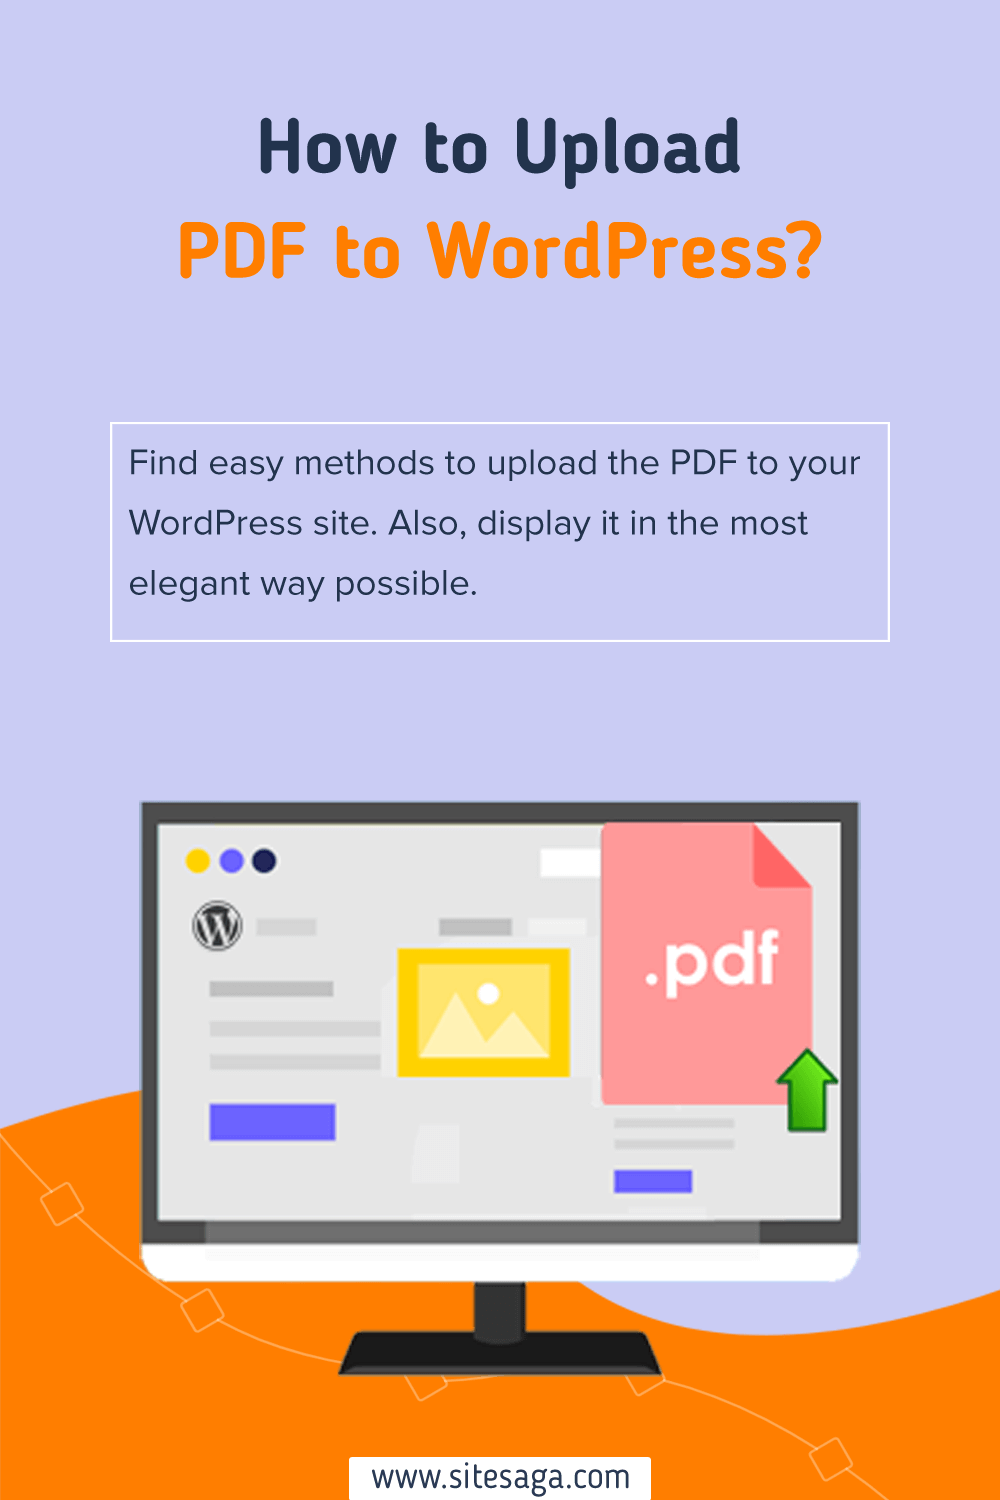
How to Upload PDF to WordPress & Display it in the Best Way?
There are various methods that you can use to upload PDFs to your WordPress site. Here, we’ll check out some of the easiest and quick ways to upload the PDF as well as display it the best way.
So stick with us as we guide you through each method. And pick the best one that suits you and your WordPress site.
Method 1: Use a File Block in your Posts
The first method on the list is through the use of a File block to upload your PDF files in your posts. It’s one of the easiest methods to upload PDF files without needing to use any plugins.
So, bear with us and follow the step-by-step instructions stated below.
Step 1: Go to Posts and Add New
First thing first, you need to log in to your WordPress dashboard and go to the respective post where you want to upload your PDF files. Alternatively, you can also create a new post.
From the left navigation of your dashboard, go to the ‘Post’ and click on the ‘Add New’ option.
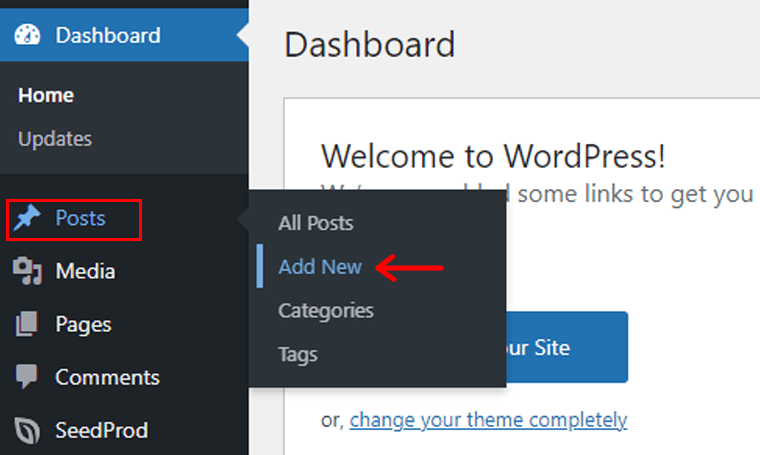
With that, you are taken to a new post editor.
Step 2: Click on the ‘+’ Icon and Select File Block
Now, let’s give a name to the post. For instance, ‘Uploading PDF Using File Block’. And then, click on the plus ‘+’ icon as shown in the image below.
Now, type ‘File’ on the search bar, and once you locate the ‘File Block’, click on it.
Step 3: Upload your PDF File
Following that, you’ll see 2 options. They are: ‘Upload’ and ‘Media Library’. If you’ve already uploaded the PDF file, then you can quickly select from the Media Library section.
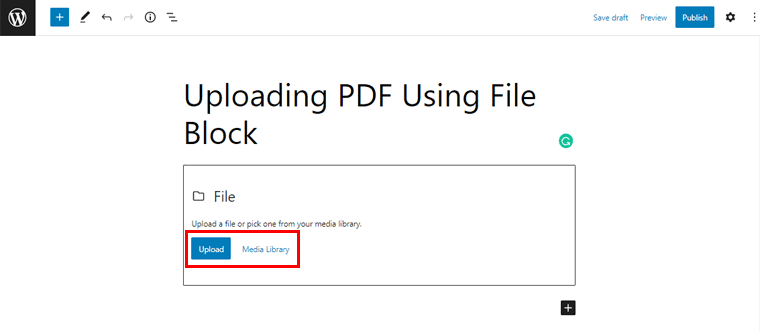
If not, then simply click on the ‘Upload’ button. Then, simply upload your PDF file. With that, you’ll see that your PDF file is uploaded as shown in the image below.

Also, you’ll see a download button at the end of the PDF where you can ‘Add text’. For instance, let’s keep ‘Download the PDF Here!’ in the ‘Add text’ button.
Similarly, if you ‘select the File block’, then you can see ‘various settings that you can make to your PDF’.
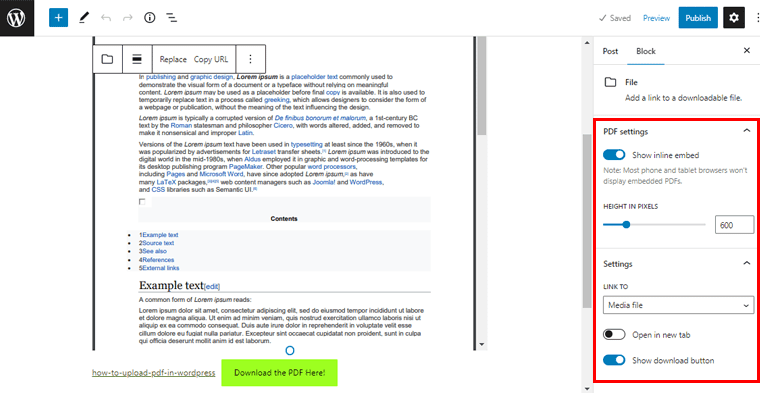
Here, as you can see the ‘Show inline embed’ option is enabled by default. You can simply ‘disable’ it to make your PDF file uploaded look clean and clutter-free.
You can also click on the ‘Open in new tab’ option to let your users view the PDF file in a separate tab. Likewise, you can also ‘show/hide the download button’ as per your preference.
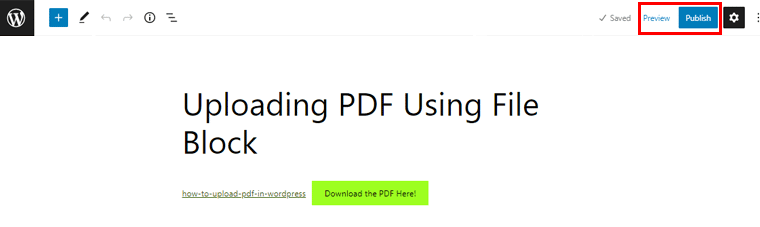
Following that, you can simply click on the ‘Preview’ option to see how your PDF file looks in your post. And then, finally hit the ‘Publish’ button to make it go live!
With that, let’s move ahead to the next method to upload the PDF to your WordPress site.
Method 2: Using a WordPress Plugin Embed Any Document
Next up, you can also use a WordPress plugin to upload the PDF to your WordPress posts. There are various WordPress plugins out there that are built specifically to help you embed your PDFs.
For now, we’ll be using the plugin Embed Any Document plugin. This versatile WordPress plugin allows you to integrate your PDF files effortlessly. Along with that, you can upload Word documents, PowerPoints, and Excel sheets. In fact, it has amazing 70000+ active installs with amazing 4.3/5 star ratings.
So, let’s see how to upload PDF files using this Embed Any Document plugin in the following steps.
Step 1: Install and Activate the Plugin
As Embed Any Document is a free WordPress plugin, you can directly install it from your WordPress dashboard.
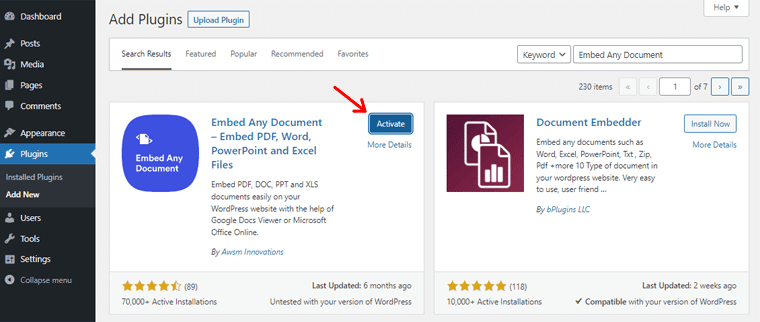
For that, head into the ‘Plugins’ section and click on the ‘Add New’ option from the left navigation of the dashboard.
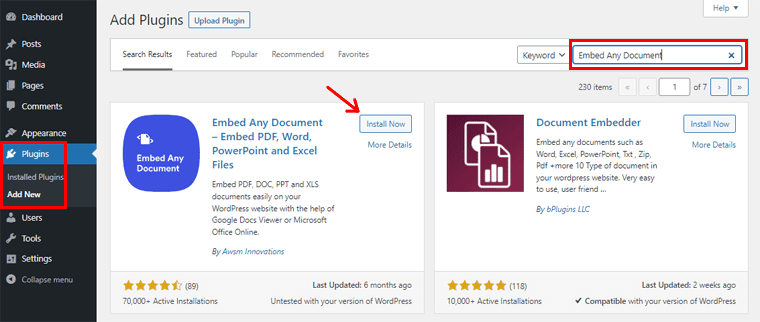
Now, on the top right corner of your dashboard, type the ‘Embed Any Document’ in the search field. After you’ve located the plugin, click on the ‘Install’ button.
After installation is complete, you’ll see the ‘Activate’ option, as shown below. Simply, click the button to activate it.
Step 2: Configure the Settings
Following that, you need to configure the settings of the plugin. For that, you need to head into the ‘Settings’ option from the left navigation. And then, click on the ‘Embed Any Document’ option. With that, you’ll see the page as shown in the snapshot below.
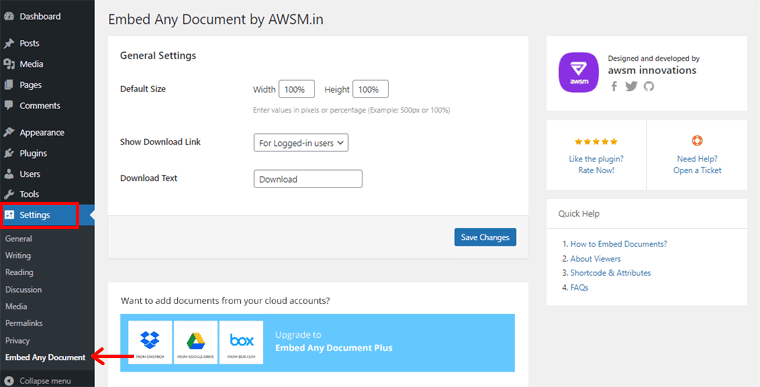
From here, you can configure the following settings:
- Default Size: The default size of your pdf is by default 100% in both width and height. You can change as per your preference on how you want to show your PDF file. For instance, here let’s change the height to 50%.
- Show Download Link: In this field, you can find 3 options to allow visitors who can access your PDF files. Namely, For all users, for logged-in users, and no download option. Here, let’s select the ‘for logged-in users’ option.
- Download Text: By default, you can see the Download as text. If you want to change, then you can simply edit in the box. Or else, you can leave it as it is.
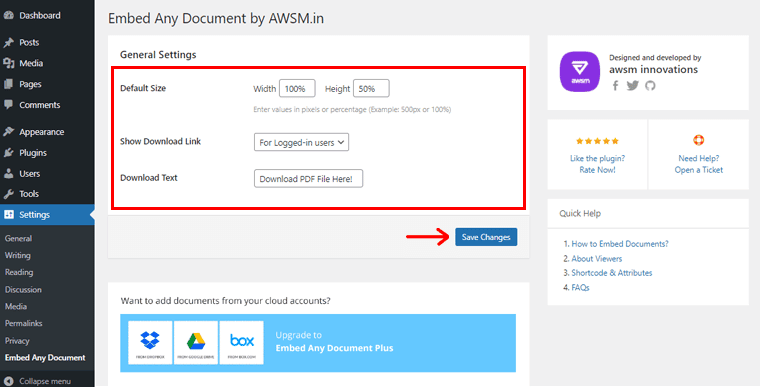
Once done, click on the ‘Save Settings’ option to save the configurations made. Shortly, you’ll be notified of the ‘Settings Saved’ notification.
Step 3: Use Document Block to Add a New PDF File
Again, the next step is to come back to your Post where you want to embed your PDF file. If not, then you can always create a new post like before. By simply navigating to Posts > Add New.
As done earlier, let’s keep the Post name, ‘Adding a PDF File Using a Plugin’. Then, click on the plus ‘+’ icon.
Following that, type ‘Document’ in the search bar. (Just to let you know, the Embed Any Document plugin provides you with a Document Block to add your files.) So, once you locate it, simply click on the ‘Document Block’.
Shortly, you’ll see a page as shown in the snapshot below.
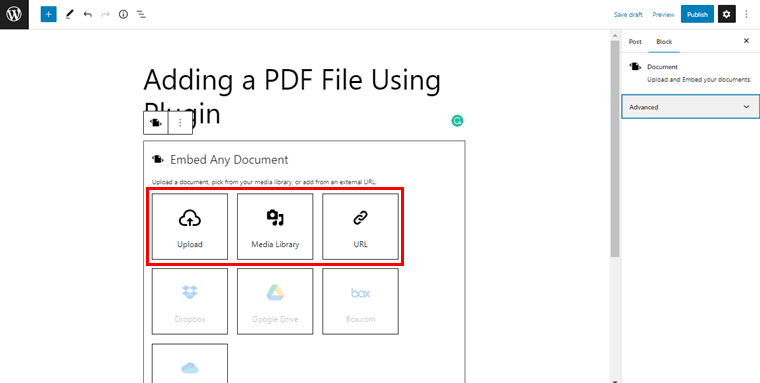
From here, you can upload your PDF file from the Upload option. Alternatively, you can also do it via the Media Library or put the direct URL link of the PDF. Whichever is convenient for you. For now, here we ‘upload the PDF file’.
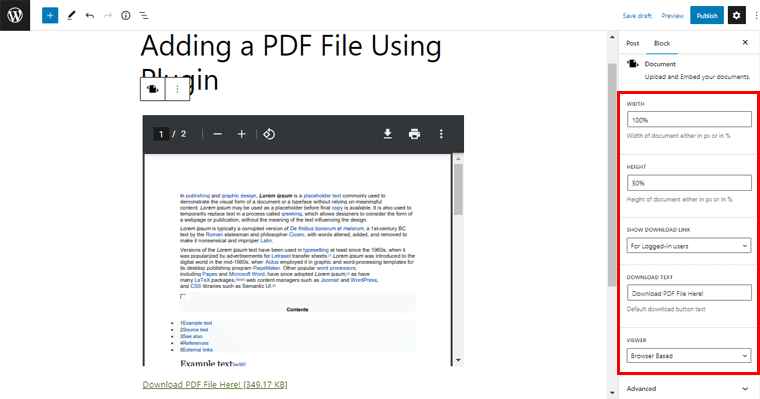
Once you do that, you’ll see that the PDF file is uploaded. You can make further configurations if you want from the block settings on the right-hand side.
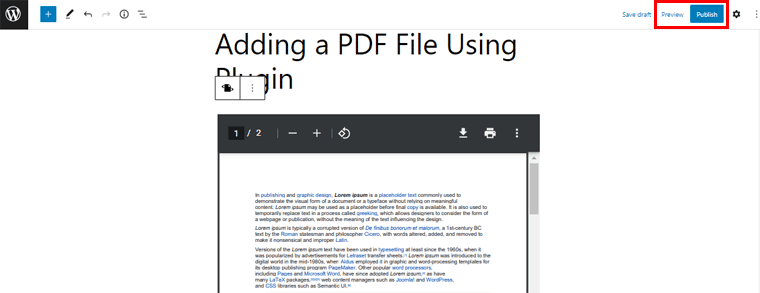
Lastly, you can simply ‘Preview’ and ‘Publish’ the PDF file to make it go live.
Alternative PDF Plugins
Besides Embed Any Plugin, there are also a few other capable WordPress plugins that allow you to upload PDF files to WordPress. And display it in the best possible way. So, let’s check them out.
1. Document Library Pro
Document Library Pro is a premium WordPress plugin that allows you to quickly create, organize, and display documents. With the help of this plugin, creating resizable WordPress PDF libraries is simple and quick. It makes it simple to handle WordPress document libraries overall as well as during initial setup.
Moreover, it includes a number of features that makes managing your documents or PDF collection more effective. Also, this plugin offers you sophisticated sort and filter options. Consequently, this provides complete freedom to your visitors to quickly discover the PDF files they’re looking for.
Pricing:
Document Library Pro is a premium and highly sophisticated plugin. So, it’s particularly useful if you run an educational website or any other site. You can definitely go for it if you’ve to upload tons of PDFs time and again.
It’s available to you at the following pricing packages:
- One Plugin: Includes Document Library plugin. Costs $99 for 1 site per year or $299 for 1 site as a lifetime payment.
- Two Plugin Bundle: Includes Document Library plugin plus protected categories. Costs $129 for 1 site per year or $399 for 1 site as a lifetime payment.
2. Embed PDF Viewer
The next alternative PDF plugin is the Embed PDF Viewer that you can use to upload PDFs to your WordPress site. It’s a simple free PDF plugin that provides an additional PDF block. Using it, you can easily integrate PDF files into your posts and pages.
Moreover, you can embed the PDF files right from the Media Library. Besides, you can also upload it from another location using oEmbed or as a fallback with Google Doc Viewer. Nevertheless, you need to make sure that the URL of your PDF is a globally accessible link.
Pricing:
Embed PDF Viewer is a free WordPress PDF plugin that you can install directly from your WordPress dashboard. Or download it from the WordPress.org plugin repository.
3. PDF Poster
Last but not least, you can use the PDF Poster plugin to upload your PDF files to your WordPress site. It’s a very lightweight plugin that is equally user-friendly.
Moreover, it comes with Gutenberg PDF Viewer Block. With that, you can quickly insert PDF files into posts, pages, widget areas, page blocks, and theme templates.
In addition, it also has a premium version popularly known as PDF Poster Pro. This version provides you with more advanced functionality to display your PDFs. For instance, you can disable the download option to stop users from downloading your PDFs. Also, you can impose copy protection on your documents.
Pricing:
As you might know, PDF Poster is a freemium plugin. You can directly download the free version of the PDF Poster directly from the WordPress.org directory.
Meanwhile, the premium version is available to you at the following prices:
- Single Sites: $30 as a one-time payment.
- 3 Sites: $75 as a one-time payment.
- Unlimited Sites: $299 as a one-time payment.
All of these plans offer you features like Quick Embedder, Custom CSS, Dropbox API, Lightbox, Show Inline PDF, and so much more.
Having said that, let’s move on to the next method of how you can upload the PDF to your WordPress site.
Method 3: Via the Google Drive
Are you wondering if you can upload PDF directly from your Google Drive to your WordPress site? That also without having to use any kind of plugin? Then, this method will exactly teach you that.
Now, let’s check out how you can directly upload the PDF to WordPress via Google Drive in the following steps.
Step 1: Upload the PDF file to Google Drive
First thing first, make sure that you have your PDF ready on your Google Drive. If not, then you can quickly upload the PDF file directly on your Google Drive.
To do so, from your Google Drive, click on the ‘New’ option in the top left corner. And following that, click on the ‘File upload’ option as shown on the snapshot below.
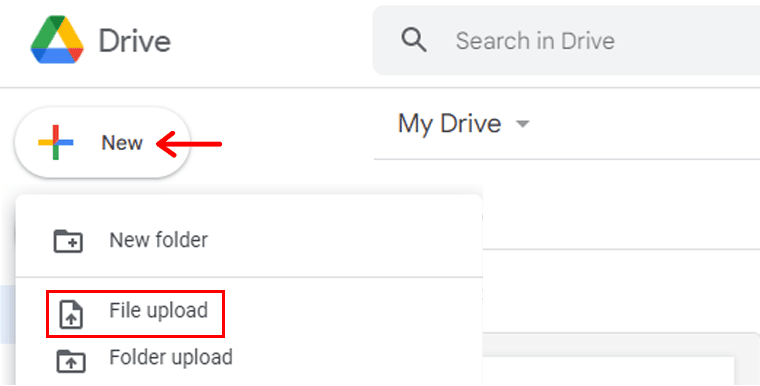
With that, you can simply ‘upload your PDF’ to Google Drive from your local PC.
Step 2: Make your Chosen PDF Shareable
Following that, simply ‘double click on the uploaded PDF’ on your Google Drive. Once the file opens, click on the ‘Three Dots Icon’ in the top menu bar’s right-hand corner. For reference, you can see the screenshot below.
Then, among the available options, click on the ‘Open in new window’ option. With that, your PDF is opened in a new tab. Again, you need to click on the ‘Three Dots Icon’. But this time, click on the ‘Share’ option.
With that, you’ll see the page as shown below. Now, you can simply click on the ‘Settings Icon’ to make further configurations on your PDF.
With that, you’ll see 2 settings choices. If you don’t want viewers to download your PDF, then you can simply disable the second option. Alternatively, you can also leave it as it is.
Once you make changes, simply click on the ‘Back’ option. And now, copy the link from the ‘Copy Link’ option and hold on to it.

Step 3: Embed the Link Using Button
Now, you need to come back to your WordPress dashboard. And, then head to the page where you want to embed the PDF link.
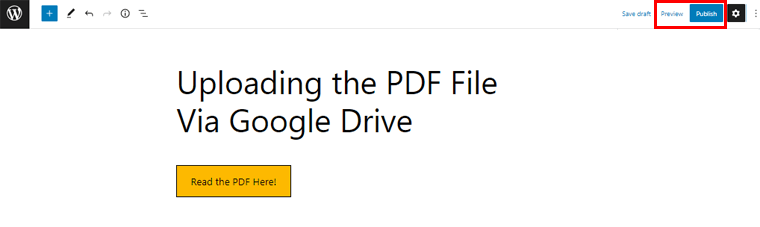
As done earlier, let’s give a name to the post. For example, ‘Uploading the PDF File Via Google Drive’. Also, we’ll be using the button to embed the PDF link so that it looks more elegant and clutter-free.
For that, simply click on the plus ‘+’ icon. Then, type ‘Buttons’ in the search bar. Once you locate it, simply click on it. Following that, you’ll see that the button has been inserted.
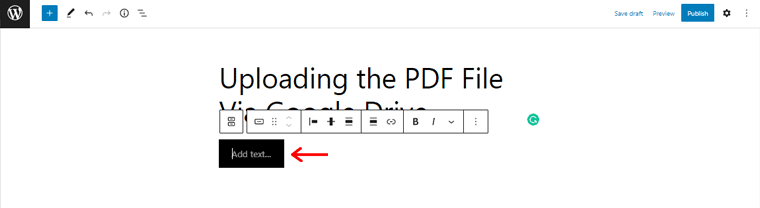
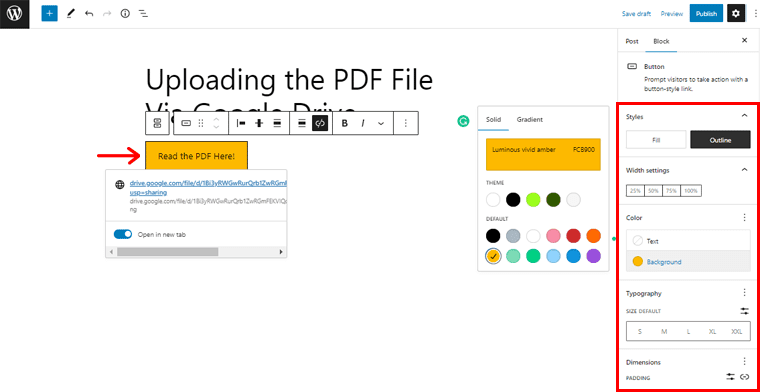
Now, on the ‘Add text’ option, you can add your preferred text. For example, ‘Read the PDF Here!’
Also, you can simply click on the ‘Link Icon’ and ‘Insert the Link’ that you copied previously and hit the ‘Enter’ button. Similarly, you can also click on the ‘Open in a new tab’ option if you want the PDF to open in a new tab.
Furthermore, you can also make further changes to Buttons if you wish. All you’ve to do is ‘Select the button’. And on the right-hand side, you can see various configuration options. Here, you can make changes like changing the button’s color, size, etc.
After it’s done, click on the ‘Preview’ option in the right corner to see what your PDF looks like. And finally, hit the ‘Publish’ button.
Conclusion
And that’s it, folks! Here, we’ve reached the end of our article on how to upload the PDF to WordPress and display it in the best way.
We hope this article definitely helped you find your ideal way to upload the PDF to your WordPress site. Also, do let us know which of the above methods you intend to use.
And please feel free to ask any kind of queries in the tutorial process. We’re happy to guide you and clear your confusion.
Do go through our other similar articles. Such as how to make a dropdown menu and how to add a chatbot on your WordPress site.
If you find this article fruitful, then do spread the word with your friends and family.
Lastly, remember to like and follow us on our social media handles Facebook and Twitter to stay tuned to our articles.