
Are you wondering if WP Adminify is the best WordPress dashboard plugin? Do you want an honest review on WP Adminify? Then, you’ve got to come to the right place.
WP Adminify is a brand new WordPress dashboard plugin that lets you customize your WordPress dashboard beautifully and improve your workflow. In other words, it lets you white-label your entire WordPress admin area, login page, and create a whole new experience.
Nevertheless, let’s review this plugin and see whether it’s worth using or not. Well, here, we’ll look into its key features, installation & setup, prices, pros, cons, and more.
So, let’s dive in!
A. WP Adminify – Overview
WP Adminify is a simple and easy-to-use WordPress dashboard plugin that helps you customize the WordPress dashboard to create a more user-friendly experience. It’s developed by Jewel Theme and released recently in 2021.
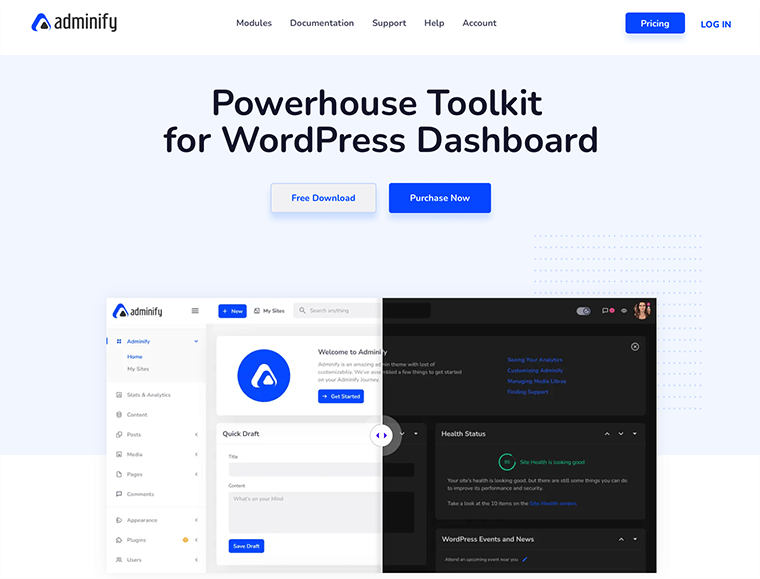
WP Adminify comes with tons of powerful toolkits that help you redesign the purpose of your WordPress dashboard. It’s completely lightweight and doesn’t include any messy code which might slow down your website.
Hence, installing this plugin guarantees to improve your workflow and somehow overthrow the traditional WordPress dashboard in terms of features.
We suppose a user-friendly and white-labeled experience is definitely on your bucket list! And this list can be fulfilled with WP Adminify.
So let’s jump into another section to know more about the WP Adminify plugin.
B. How to Install the WP Adminify Plugin?
Before we begin, let’s look at how we can install and activate the WP Adminify plugin.
Like any other WordPress plugin, WP Adminify is also extremely easy to install and use. It’s so easy that even beginners can install and set up the plugin without any hassle.
Now let’s look at how you can install and use the WP Adminify within a few clicks:
I. WP Adminify Free Installation
To install and activate the free version of the WP Adminify, you have to log in to your WordPress dashboard and then go to Plugins > Add New.
After that at the very top, on the right-hand side, you would see the search field. Then, type in WP Adminify and find the plugin.
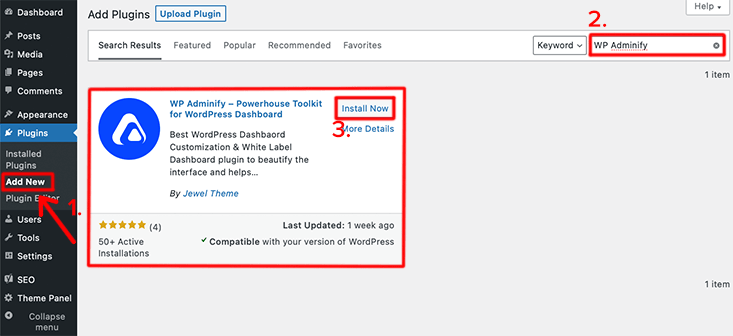
Once you found your plugin click on the Install Now button. After installing it, click on the Activate button. This is how you fully install WP Adminify on your website.
This is how you fully install and activate the free version of the WP Adminify plugin on your WordPress website.
II. WP Adminify Pro Installation
For a more extensive set of features, you’ll have to purchase a premium plan of WP Adminify.
For that, you’ll have to purchase its premium plan from its official website. Once you’ve done that you’ll get an email with your license key, username, password, and premium version Download link.
Now download the premium version of WP Adminify on your local device. The downloaded file will be downloaded in the form of a zip file.
To install the premium version of WP Adminify, you’ll need to follow the following steps:
The first thing you’ll have to do is log in to your WordPress Dashboard and go to Plugins > Add New. Following that, at the very top, you’ll find the Upload Plugin button. Click on that button and it’ll open a space where you can upload the purchased and downloaded premium version.
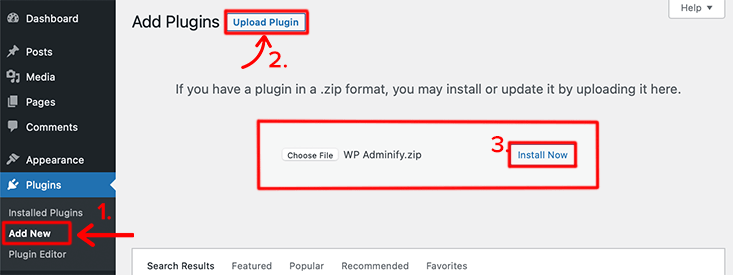
Once you’ve completed uploading the file, click on the Install Now button.
Woo-hoo!! Congratulations, if you’ve been able to install and activate the WP Adminify plugin on your WordPress site.
For more detailed information, check out our article on how to install a WordPress plugin.
C. WP Adminify Dashboard – First Look
At the very first look, we found the dashboard looked premium and well organized. All the elements around the dashboard are quite distinguished. The placement of certain features is quite genuine and handy.
It does give you the feel of our native dashboard. However, lots of elements from the native dashboard are missing but the new elements that are there are quite interesting.
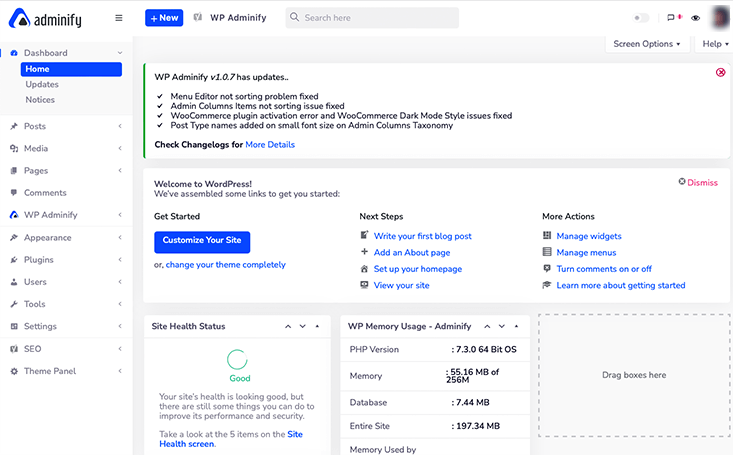
The first thing you notice once you’ve installed and activated this plugin is that your topbar menu has been replaced by something else. You’ll see that there’s the logo of WP Adminify placed at the top-left corner of the page.
In the native dashboard, you’ll get only a few options available in the top bar menu. But in this WP Adminify dashboard, the options available are quite great and intriguing.
Let’s say, the + New button that helps you easily create new posts, pages, media, and users. This will make sure that you don’t have to move around the dashboard to create content.
Not only that, you can access the whole WP Adminify settings from the ‘WP Adminify‘ option available at the top bar. On clicking on that option, it’ll list out the whole settings options that are available in it.
If we talk about its light/dark mode, then you can easily access it from the enable icon present in the right-hand corner of the top bar.
These are a few things that you would notice when you first activate this plugin. Now let’s take an in-depth look and try to learn about WP Adminify.
D. In-Depth Look at WP Adminify Admin Panel
Let’s take an in-depth look at the WP Adminify admin panel. Most of the options that are available in this admin panel can be disabled if you don’t need them.
Without any more explanation, let’s take a look at the following list. These are all options you’ll see regularly while visiting the WP Adminify options panel.
To start, navigate to the ‘WP Adminify‘ menu in your dashboard and click on it.
Modules
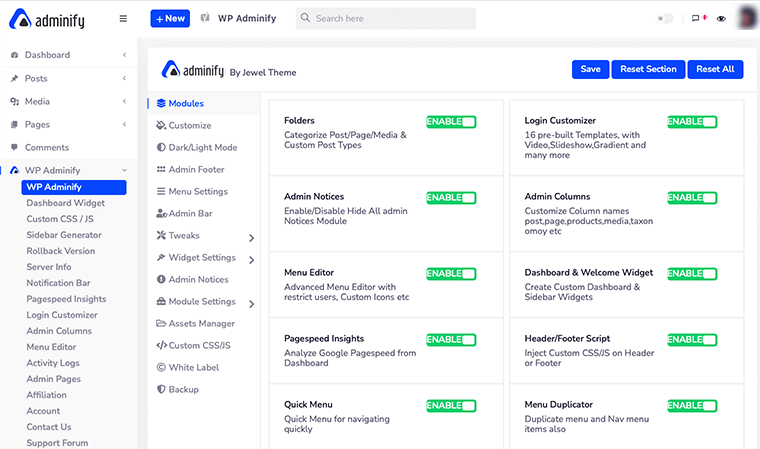
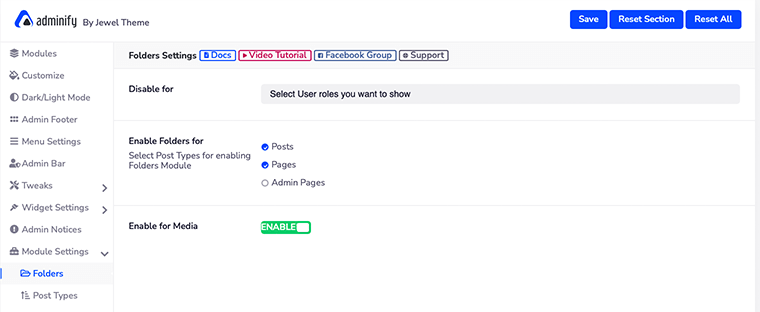
At the very first, you’ll find an option called ‘Modules‘. Inside those, you’ll find many modules that you can enable or disable as per your requirement. By default, all the modules are enabled at the moment.
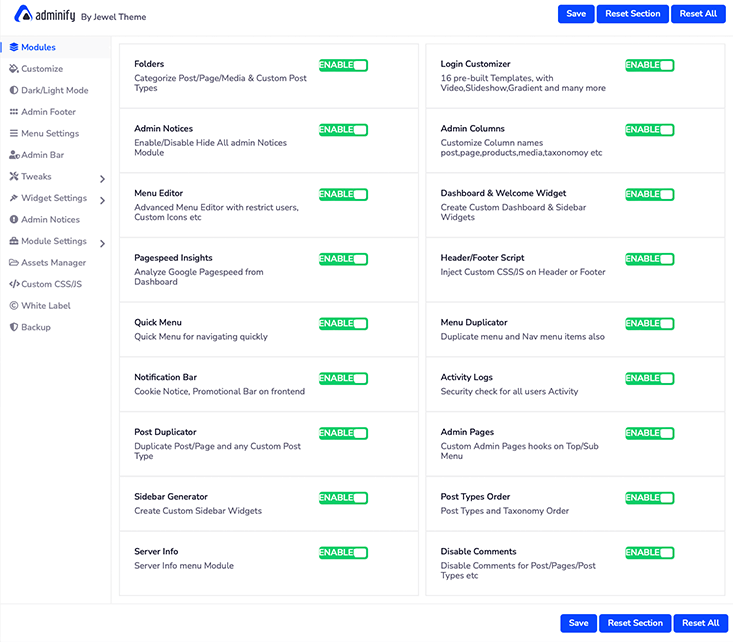
For example, you can disable the ‘Folders‘ module if you don’t want to categorize your posts and pages. After that, you can simply click on the ‘Save‘ button to save the changes. In this way, it’ll now remove the folder system from your WordPress dashboard.
Customize
From this option, you’ll be able to customize your WordPress Dashboard looks as you like. For example, you can customize the body font, font style, size, body color, dashboard background type, etc.

However, to be able to change the body font you’ll have to purchase the Pro version of WP Adminify.
Dark/Light Mode
If you’re the type of person who loves dark theme-based dashboards, then hey this is surely for you. Here in this option, you’ll be able to manage your ‘Dark/Light Mode‘ and logotype properly.

Not just that, if you’ve got a premium version of WP Adminify, then you’ll also be able to schedule your dark mode.
However, you’ll need to remember that you need to have two different sets of logos for dark and light modes respectively. Or else, you’ll have a problem with readability.
How to Schedule Your Dark Mode with WP Adminify?
Once you’ve purchased the premium pack, you’ll notice that under the ‘Dark/Light Mode Settings‘, ‘Schedule Dark Mode‘ settings are visible to you.
You’ll see that there are four new setting options to help you with scheduling your dark mode. The very first thing would be to enable the ‘Enable Schedule Dark Mode‘ option.
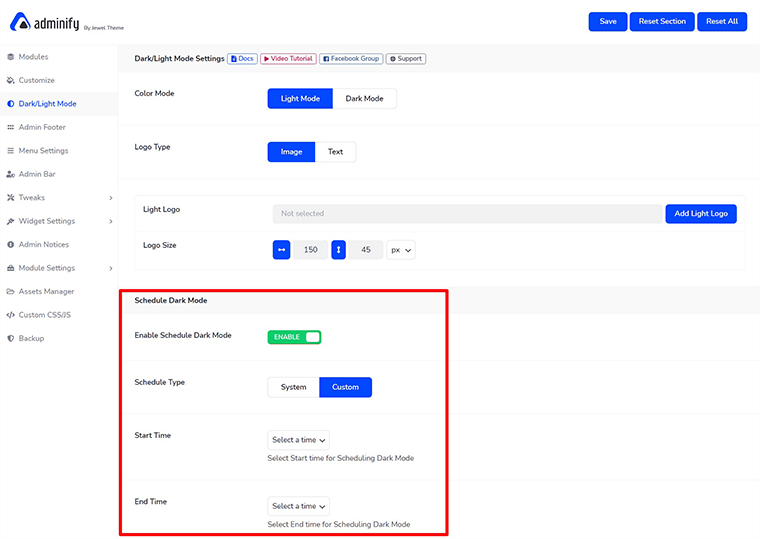
Next, you’ve to select whether you’ll schedule your dark mode manually (Custom) or let the System take over it.
If you choose the Custom, then you’ll also have to select the Start Time and End Time for scheduling the dark mode. At last, don’t forget to click on the ‘Save‘ button to save your changes. In this way, you can schedule your dark mode with WP Adminify.
Admin Footer

At the bottom of your dashboard, you might have seen some information flashing out like WP version, WP Memory Limit, PHP version, IP, etc. WP Adminify by default shows this information but you can easily hide them if you don’t want them there.
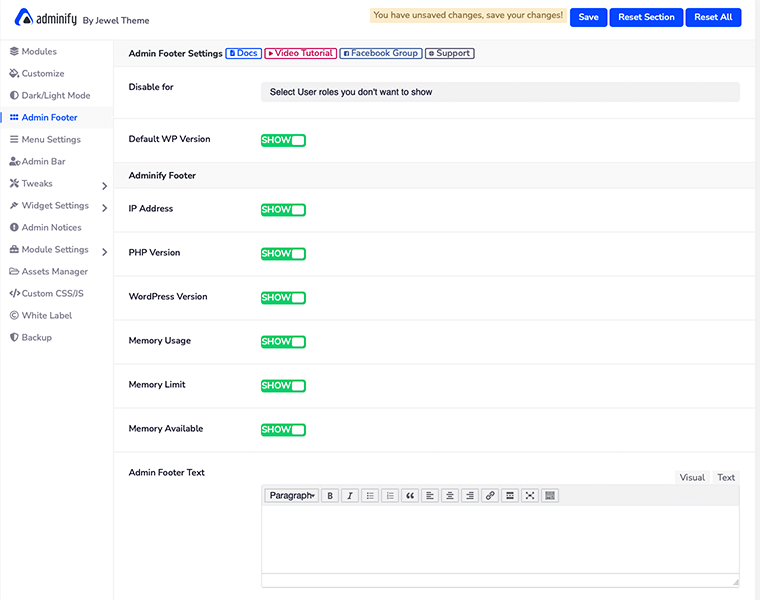
To do so, all you have to do is disable the info that you don’t want to be shown in your footer. Similarly, you can disable this info based on the User Roles too.
Menu Settings
If you’re bored with your vertical sidebar dashboard menu, then WP Adminify gives you the option to transform it into a Horizontal Menu. Not just that, you can even choose your favorite menu types and style from the ‘Menu Settings‘ option.

However, to set your menu horizontally, you should have the premium version of WP Adminify.
How to Set Your Menu Horizontally with WP Adminify?
The very first set to set your menu horizontally would be to enable the Horizontal Menu from the Menu Type.
After you’ve done that, you’ll select the Menu Item Style where there are three options to choose from – Icon Only, Text Only, or Both.

Following that, there are some more options that you can either enable or hide as per your requirement. For example, there is a toggle button called ‘Break Long Lists‘ to break the long menu list so that it doesn’t cover the screen width.
In this way, you can easily set your boring vertical menu into the horizontal menu with WP Adminify.
Admin Bar
Inside Admin Bar settings, you can customize your dashboard topbar menu item and its style.
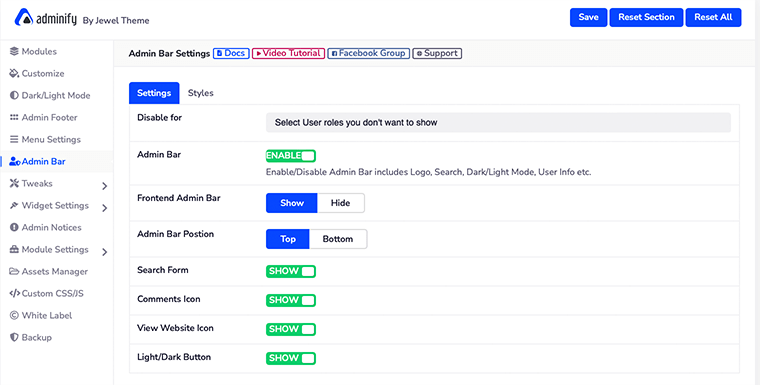
With this, you’ll be able to hide or show the frontend admin bar and set the position of that bar too. Similarly, you can individually show or hide the search form, comment icons, light/dark buttons, and view website icons.
Whereas from the ‘Style‘ tab, you’ll customize the background color, text color, button style, and more.
Tweaks
WP Adminify ‘Tweaks‘ will help you solve some of the very specific problems for your website. Inside Tweaks settings, you’ll find some more menus available such as Head, Feed, HTTP Response, WP JSON API, etc.
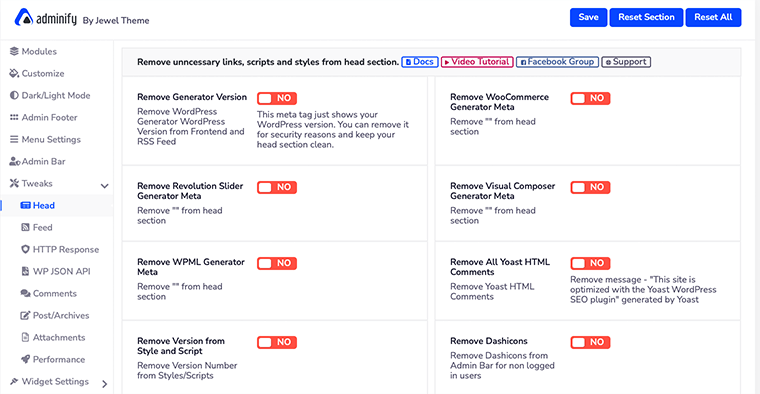
Each of these categories of the menu will help you fix some of the ongoing issues that can come across as you build your website.
For example, the ‘Head‘ menu will help you remove unnecessary links, scripts, and styles from the head section. Likewise, the ‘HTTP Response‘ menu will clean up your server response HTTP headers.
Widget Settings
Based on the user role, you can define what you want to show on their dashboard and sidebar widget section. Hence, by using this you can declutter the dashboard and sidebar of your team members also.
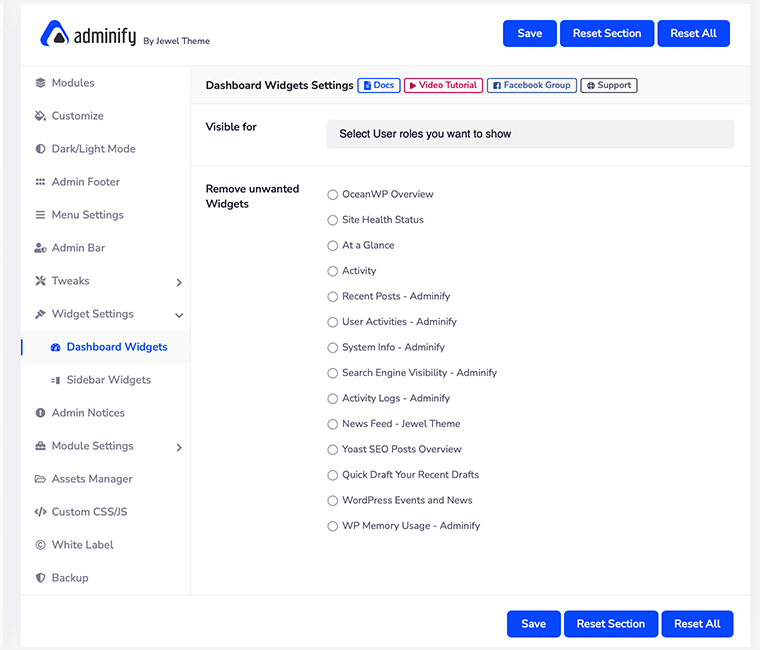
For that, all you’ve to do is select the widget that you want to remove and then click on the ‘Save‘ button. You can individually remove the unwanted widgets for both the dashboard and sidebar.
For example, if you want to remove System Info, At a Glance, and Activity widgets from the Dashboard, then you simply select them and remove them.
Admin Notices
While working on something important on your website, it’s frustrating to see notices bothering you at the top of every page in your WordPress dashboard.
If that’s the case, then with ‘Admin Notices‘ you’ll be able to disable all the admin notices from your dashboard. In this way, you can get rid of all notices and can focus more on your content creation.
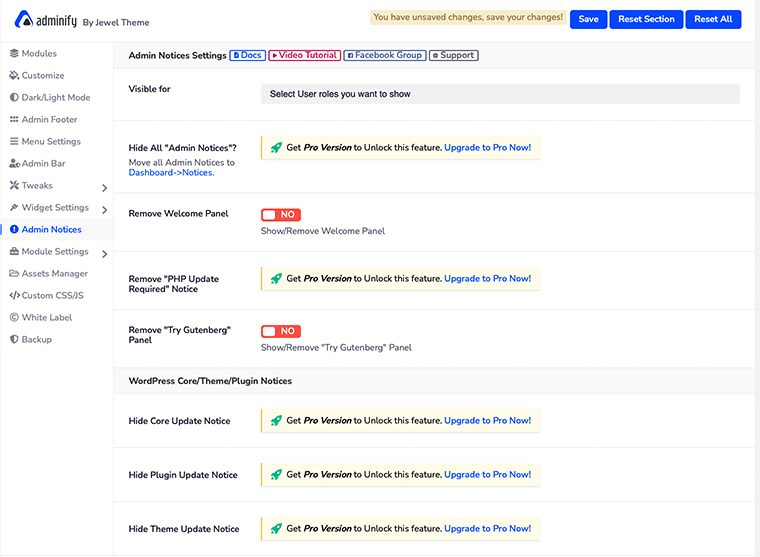
Not only can you remove all admin notices but also you can remove the welcome panel, PHP update notice, core update notice, and more.
However, to do so, you must purchase one of the premium plans of WP Adminify.
Module Settings
As we’ve already talked about the WP Adminify Modules, some modules might need some extra setting options. If that is so then you can access those settings from this Module Settings option.
Here you’ll find some extra setting options for Folders, Quick Menu, Post Status Color, and more.
Assets Manager
Are you having trouble with your website speed? Then, it’s time to remove all the unnecessary scripts and styles from your website.
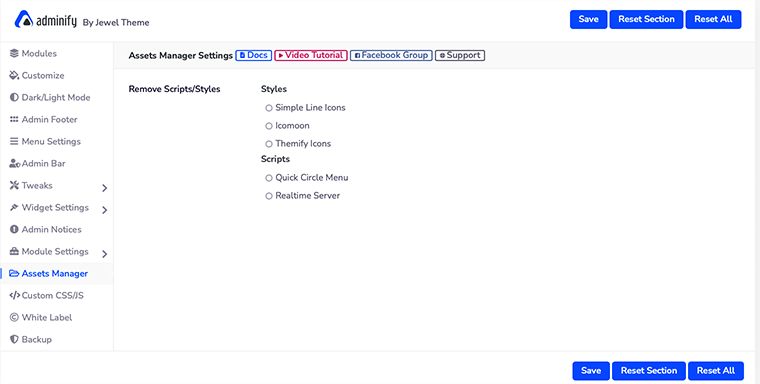
To do so, WP Adminify has come up with an Assets Manager. From here you’ll be able to manage and remove all the unnecessary scripts or styles from the website. All you do is select those scripts that seem unnecessary and click on the Save button.
Custom CSS/JS
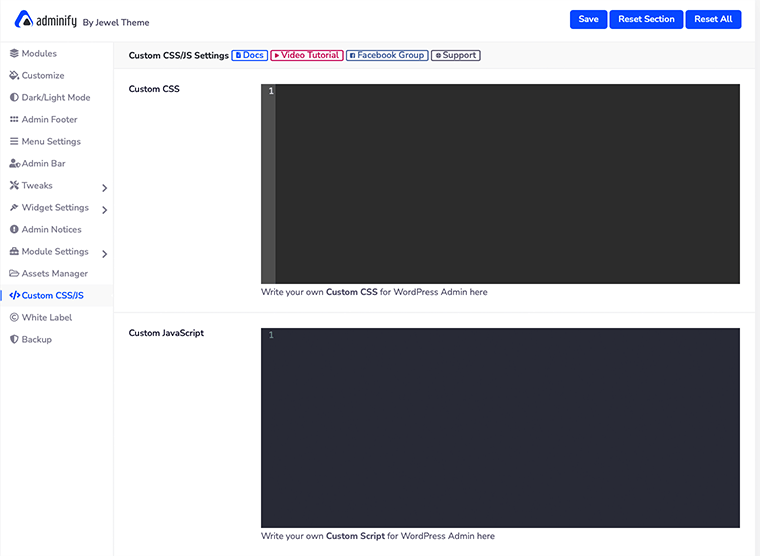
In this ‘Custom CSS/JS‘ option, you’ll be able to write your custom CSS and JavaScript JS code for the WordPress admin dashboard. This is quite a good feature for developers who want to customize the appearance of their dashboard on their own.
White Label
This is one of the important features of WP Adminify that has made it the best dashboard plugin for WordPress users. White labeling allows you to change the image logo, plugin name, description, developer name, plugin URL, etc., and make your WordPress workplace look like your own space.

This means that you can completely rebrand the website with your logo, name, and author details. But this feature is only available for premium users (Agency Plan only).
Backup
At last, it has the ‘Backup‘ option that lets you export and import the desirable files, themes, and plugins. This is a great way to keep the backup of your website files and store them in a safe place.
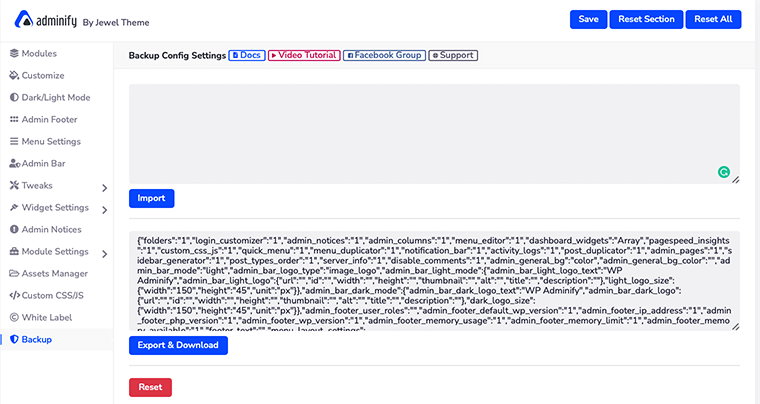
Similarly, it’s a good option for users who are running WP Adminify on multiple websites. In this way, the plugin setting used in one website can be used for all other websites. You just need to export the files and import them to your desired website.
E. 8 Key Features of WP Adminify
1. WordPress Login Page Customization
This is the very first feature of the WP Adminify that we loved. This WordPress Login Page Customization will allow you to change every element of the login form.
The best thing is that you can see the live preview of the layout changes. We can bet that you’ll be able to customize the login page on your own without any coding skills required.
How to Customize WordPress Login Page?
To customize the WordPress login page on your own, you’ll first need to login into your WordPress dashboard. Following that, you’ll need to hover over the WP Adminify menu and then select the Login Customizer option.
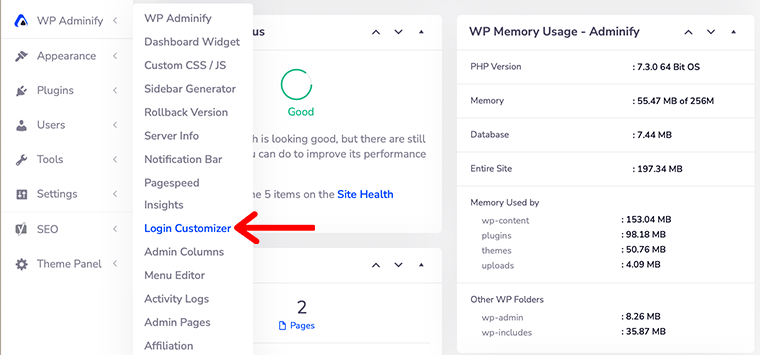
Next, it’ll take you to the ‘Login Customizer‘ page from where you’ll be able to customize the login page as you want.
Hence, from here onward you can start customizing the WordPress login page.
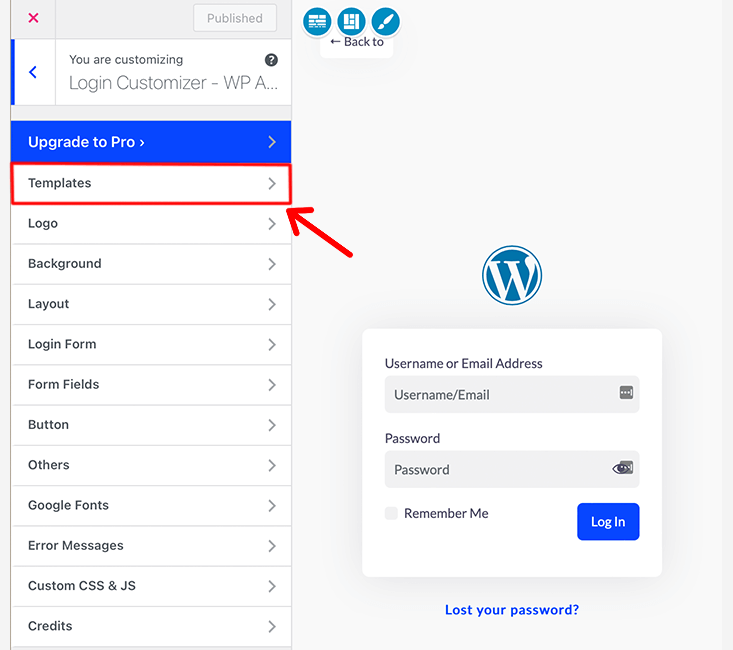
First of all, select a template for ‘Login Customizer‘. The plugin comes with 16 premade login page templates for you to choose from. However, you’ll get access to only 4 templates in the free version.

To access the built-in login page templates, navigate to the Templates from the sidebar and it’ll take you to the template library.
In this way, you’ll choose the login page template for your WordPress. Following that, you can now start customizing the logo, button, form fields, etc.
At last, we can say that as with any other WordPress customization, you’ll be able to customize your login page with ease. Therefore, we’ll give these features a BIG THUMBS UP!!
2. Pagespeed Insights
Let’s talk about another great feature of WP Adminify that has possibly made us try WP Adminify in the first place. Google Pagespeed Insights is an in-built tool inside the WP Adminify that helps you determine how to make your website faster.
Also, WP Adminify is integrated with Google Lighthouse. It gives you in-depth page optimization suggestions for a fast page. Not just that, it even helps you determine how to improve the speed of your website.
You do get a complete history of your speed, allowing you to browse and compare it to how it was in the past.
Hence, Google Pagespeed Insights is a comprehensive tool that acts as a metric for SEO and helps your website rank higher in the SERPs.
How to Improve Your Website Performance with Google Pagespeed Insights?
So to use Google Pagespeed Insights, first you have to set your Google API key. To do that go to the WP Adminify and click on the ‘Module Settings‘ option. After that look for the ‘Google PageSpeed‘ option and click on it.
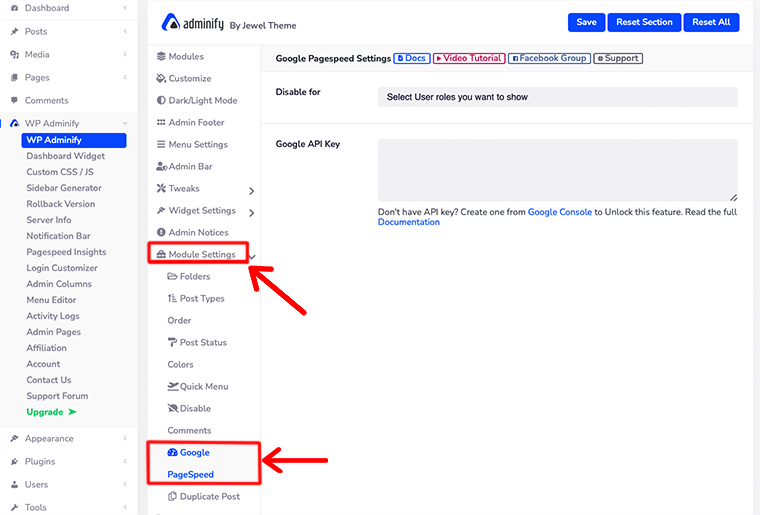
Following that, it’ll open ‘Google PageSpeed Settings‘ where it’ll ask you to input your Google API key. Also, you can disable this feature for specific user roles too.
Now once you’ve added your Google API key, it’s time to access your Google Pagespeed insights. To do that, navigate yourself to WP Adminify > Pagespeed Insights.
Next, you’ll see that there are two options – Analyze and History in front of you.
- Analyze – This option will let you analyze the speed of any page of your site. If you look closely then at the top right corner there is a button called New Analyze that lets you enter your page URL.
Similarly, in the middle of the page, you’ll see a field to enter a web page URL. This allows you to not only your website but also you can analyze other web pages too. - History – This is quite amazing since it lets you see the previous data stored in it. Unlike before you don’t have to take a screenshot on your laptop and store it locally.
This option makes sure that you can access previous data anytime and anywhere. However, you can also delete the previous history once you’ve finished your speed optimization.
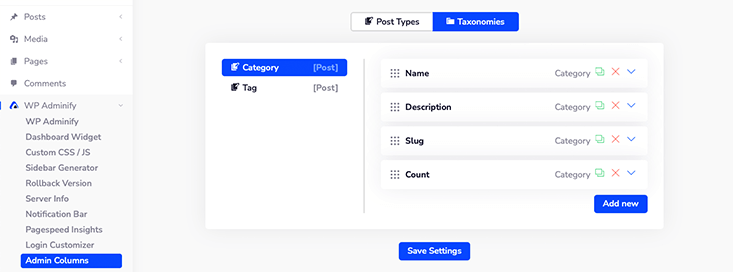
3. Admin Columns
With this Admin Columns module, you can easily customize default WordPress admin columns displayed on your posts, pages, custom post types, and taxonomies.
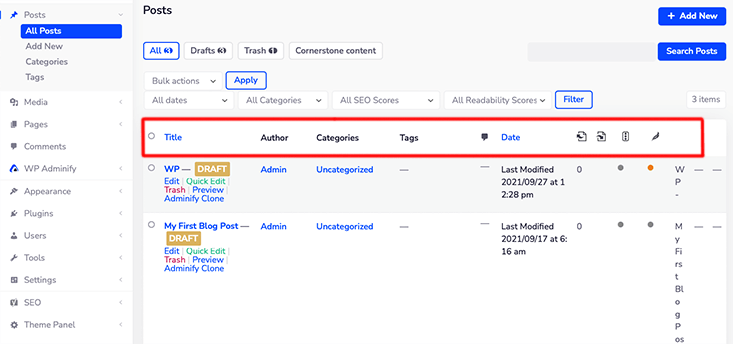
WordPress comes with default columns for the post title, author, categories, tags, date, and comments. If you wish to rename the title or rearrange their order then you can easily do it with the Admin Columns.
How to Manage Your WordPress Admin Columns?
First, make sure that you enable the ‘Admin Columns‘ module from the ‘WP Adminify Modules‘ settings.
Following that, hover on the ‘WP Adminify‘ menu and click on the ‘Admin Columns‘ option. Once you do so, you will see something like this on the screen.
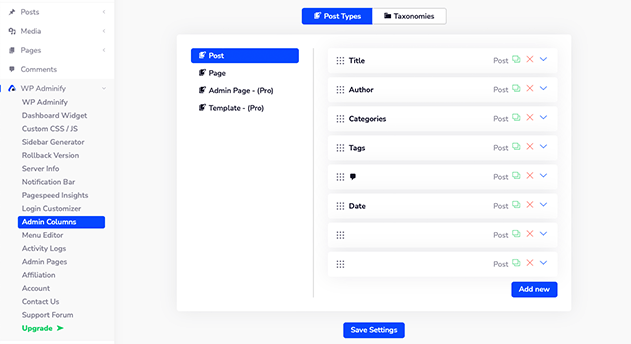
There you’ll see two options – ‘Post Type‘ and ‘Taxonomy‘. By default, it’ll open the Post Type option, and from there select the column that you want to customize.
Or else you can add the column of your choice by clicking on the ‘Add New‘ button.
Similarly, you can do the same thing for Page, Admin page, or any other post type too. Although to customize the admin column for Admin Page and Template, you’ll have to purchase its premium plan.
Likewise, if you click on the ‘Taxonomies’ option, you can access the category and tags column there.
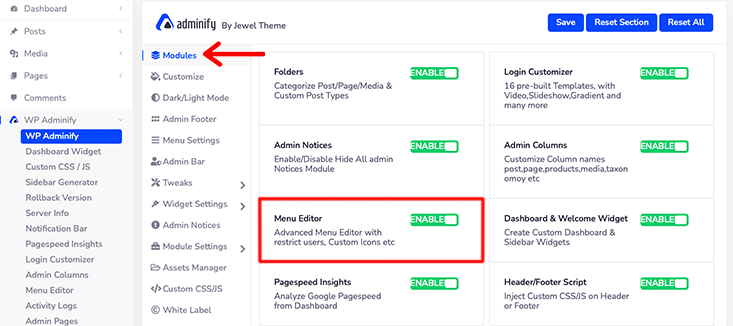
4. Menu Editor
When we look into the dashboard sidebar, we’ll see the very first Dashboard menu followed by Posts, Media, and Pages respectively.
But did you know that you can easily change the order of that menu item in your dashboard? Well, it’s possible now with Menu Editor.
This Dashboard Menu Editor gives you full control over your dashboard’s menu. Based on your requirement, you can now show or hide specific menus, change permissions, change icons, and much more.
To use this feature, you’ll first have to go to the ‘WP Adminify > Modules‘ settings and enable the ‘Menu Editor‘ module.
Once you’ve enabled that module, you can now navigate to ‘WP Adminify > Menu Editor‘.
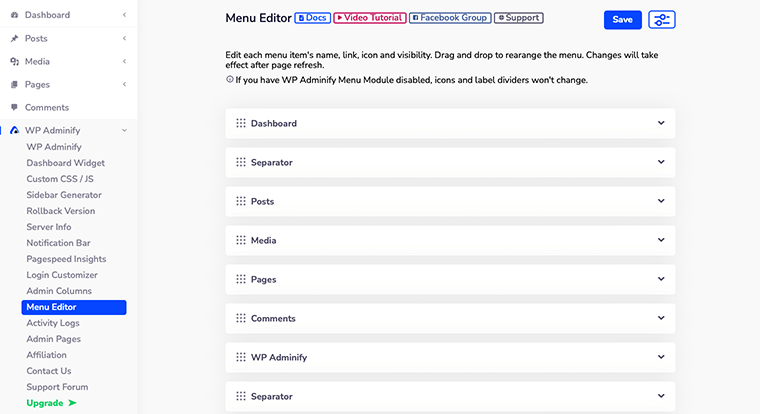
How to Rearrange Admin Menu Editor?
Inside the Menu Editor, you’ll see the list of menus that are placed according to the orders in the WordPress dashboard sidebar.
Now from here, you can change your default menu item name and set icons, and permalinks for your dashboard menu item. Similarly, you can edit the submenu of each menu too.
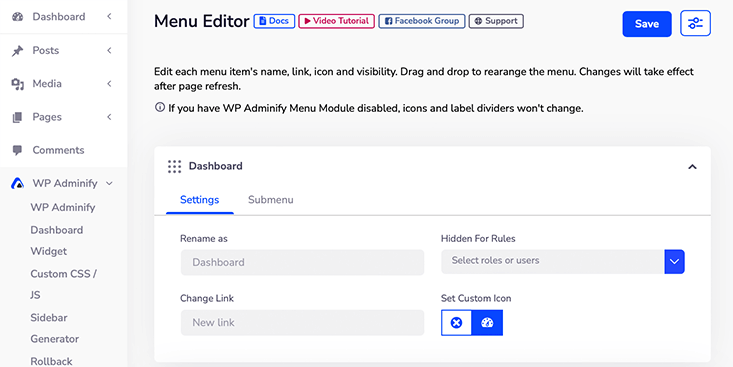
With this, you can even define the user roles for your dashboard menu items. Not just that, you can pick the icon of your choice for the menu from WP Adminify Icon Picker.
Lastly, you can drag that menu item and arrange the list according to your preference. However, we think that the default order of the menu list is perfect and doesn’t require any rearrangement at all.
That’s all for the Dashboard Menu Editor by WP Adminify.
5. Custom Sidebar Generator
Sidebar Generator lets you create a custom sidebar for your WordPress site. It’s a great way to customize your site as it lets you add features like social media buttons, advertisements, images, or other custom content.
Besides, it’s an easy-to-use tool and doesn’t require any kind of coding knowledge to use it. It’s a perfect tool for non-professional users who want to create as many sidebars as they need using this custom sidebar generator.
However, to be able to use Custom Sidebar Generator you must have WordPress before the 5.8 version. Because it only works in the classic widgets.
But, if you want to use Custom Sidebar then make sure to install the official Classic Widgets Plugin by WordPress Contributors. Once you install and activate this plugin, you’ll be ready to use Custom Sidebar.
How to Create a Custom Sidebar in WordPress?
Before we start with creating a custom sidebar, you first need to enable the ‘Custom Sidebar‘ module form inside the ‘WP Adminify Modules‘ menu.
After you’ve done that navigate to ‘WP Adminify ‘and click on the ‘Sidebar Generator‘ option.
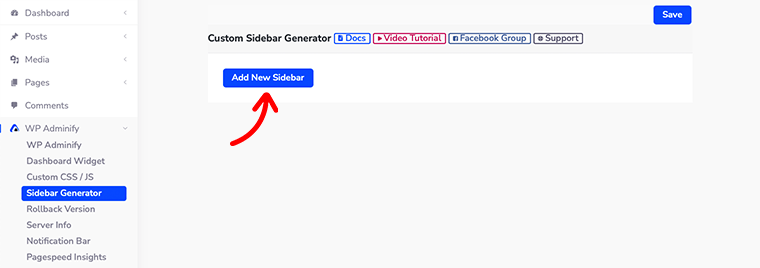
Once you’ve clicked on it, you’ll see a new page opened at the side with just a blue button called ‘Add New Sidebar‘.
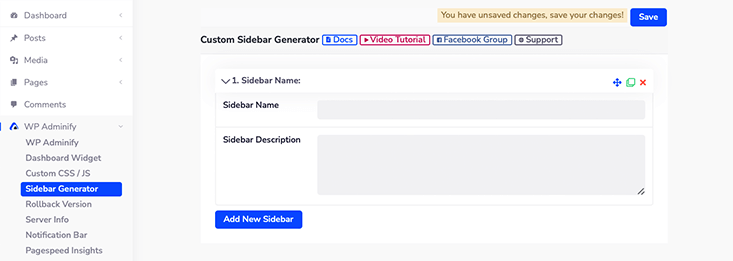
Then click on that button and you’ll see two fields – Sidebar Name and Sidebar Description popping in front of you.
In the Sidebar Name field, you can give the title to your new sidebar. And in the Sidebar Description, give a little description of your new sidebar. This will make it easier for your users to know about your sidebar.
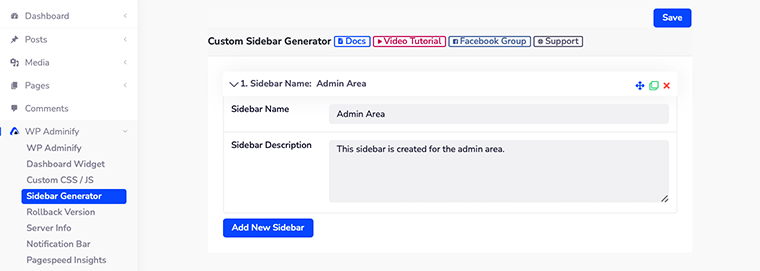
After you’ve completed filling up those fields, don’t forget to click on the Save button.
How to Add Widgets to the Custom Sidebar?
We just now saw how we can successfully create a custom sidebar. Now let us see how we can add some WordPress widgets to that newly created custom sidebar.
To start with that, go to ‘Appearance > Widgets‘ and you’ll see that your newly created sidebar is already present there.
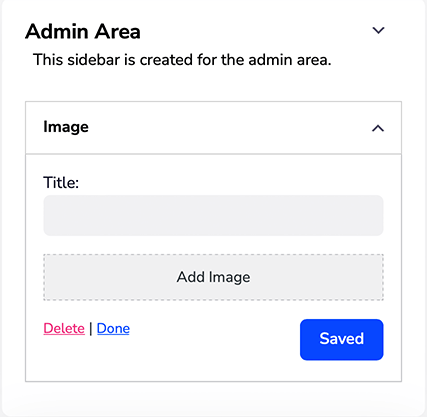
Now you just need to drag and drop any widgets that you want inside your custom sidebar. For example, we’ve dragged the Gallery widget inside our sidebar to display the image gallery.
That’s it, this is how you are going to add a custom sidebar to your WordPress site. However, we again want to remind you all that this feature only works if your WordPress version is before 5.8.
6. Dashboard Widget Generator
Similar to that of the Sidebar Generator, now you also create your custom dashboard widget with the Dashboard Widget Generator.
WordPress comes with some default dashboard widgets like Welcome, Activity, WordPress Event & News. Although you might want to have your custom widgets on your WordPress dashboard.
With Dashboard Widget Generator, you’ll be able to generate and add different types of dashboard widgets in a minute.
For now, let’s see how we can create a custom dashboard widget for our WordPress.
How to Create a Dashboard Widget in WordPress?
Firstly, login into your WordPress dashboard and then navigate to WP Adminify > Dashboard Widget option.
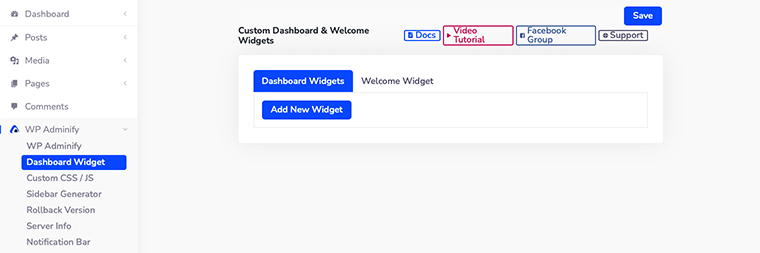
Following this, you’ll see the settings page for Custom Dashboard and Welcome Widgets.
The best thing that WP Adminify does is that it not only lets you create a custom dashboard but also a Welcome widget. In the Welcome Widget, you can create a customized welcome dashboard message to welcome your users.
In this way, it’ll make your users much more welcome to your WordPress site.
First, let’s see how we can create a custom dashboard widget. Click on the ‘Add New Widget‘ button and it’ll open some new options to configure your new widget.

- Widget Title – This is where you’ll give a title to your new widget.
- Widget Position – You’re asked to choose between Side or Normal as the position of your widget.
- Content Type – WP Adminify allows you to create 5 types of content inside the dashboard widget. They are Editor, Icon, Video, Shortcode, and RSS Feed.
- Content – Based on the content type that you’ve selected, it’ll automatically show you the layout of that content.
- Allowed User Roles – You can define the user roles and based on that you’ll be able to show different widgets to the different user roles. You can even select multiple user roles for a single widget too.
7. Affiliation
At some point after using WP Adminify, you realized that this plugin is powerful enough to let you customize your WordPress dashboard. And then you decided to be associated with this plugin.
In this way, you can become one of their brand ambassadors and can earn some cash too.
You can refer this to some of your friends and make them new customers of this plugin. In this way, you’ll earn a 25% commission on each successful sale you refer.
So, by now you’re already eager to know how you can become an affiliate of this plugin. So without wasting time let’s look at this in detail.
How to Become an Affiliate with WP Adminify?
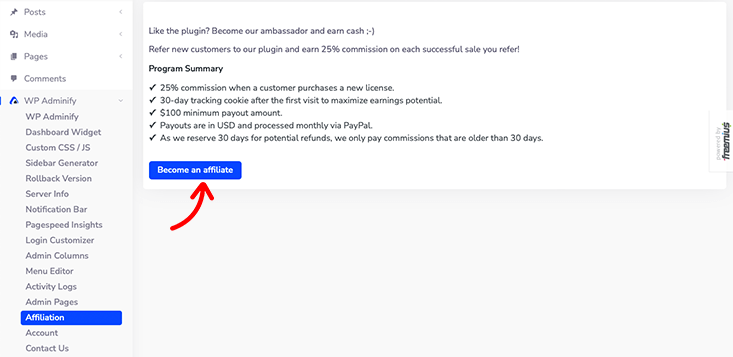
Firstly, login into your WordPress dashboard and then navigate to the ‘WP Adminify > Affiliation‘ option.
Once you’ve done that, click on the blue button called Become an affiliate. Hey, but don’t forget to read the Program Summary before clicking on that button.
Following that, this will open up a form that you fill out with your personal information. As of now, you’ll have to provide your email address, full name, PayPal account email number, promotion mode, and more.
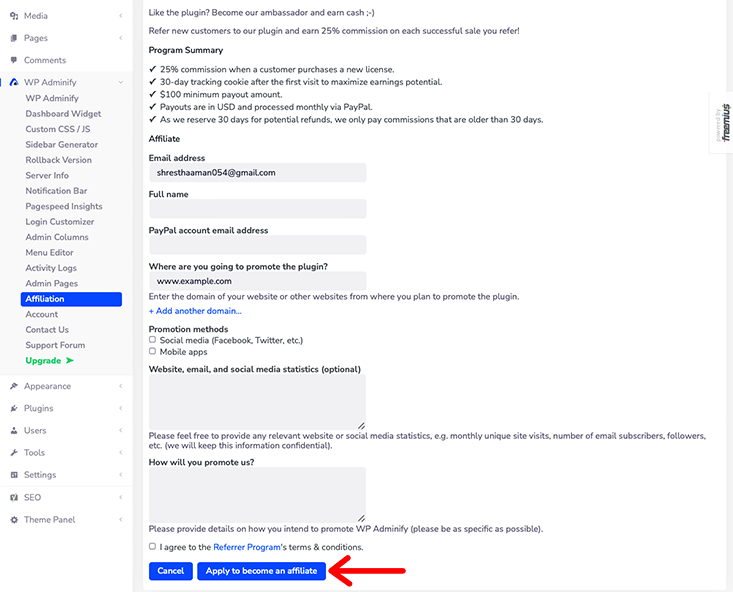
At last, after you’ve filled out all the form details, you’ll agree to their terms & conditions and then click on the Apply to become an affiliate button.
After that, all you’ve to do is wait for the official confirmation from the WP Adminify team about your becoming an affiliate.
8. Server Info
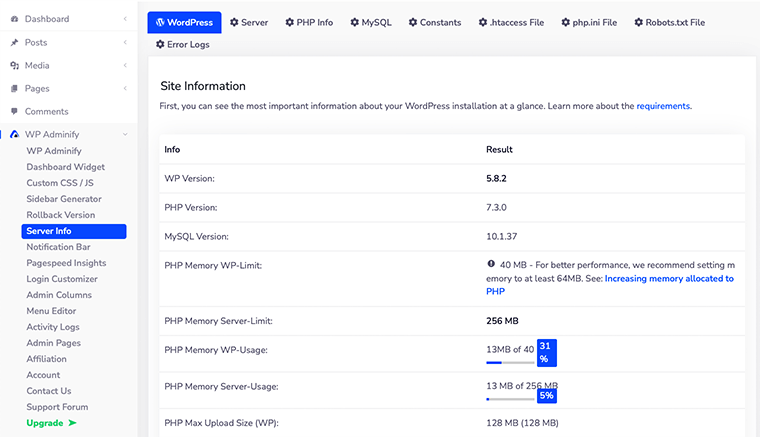
It’s important to keep an eye on the technical details of your WordPress site. It makes sure that any upcoming errors and any other kinds of issues that occur can be traced to that information.
WP Adminify makes it easier for you to access that information in one place. It gives you access to various necessary info such as WordPress, Server, PHP Info, MySQL, Constants, .htaccess file, php.ini file, Robots.txt file, and Error Logs.
To access all this information, you have to log in to your WordPress dashboard and then go to the ‘WP Adminify > Server Info‘.
Besides, it’s a really good feature for developers since it’s a completely wholesome place to find all the technical information. And based on that, they can update and upgrade their products easily.
That’s it! These are some of the features of WP Adminify that will make you fall in love with this plugin. Besides, there are other features that you’ll surely want to check out.
F. WP Adminify’s Remarkable Features
WP Adminify offers dozens of features for its users. Hence, we’ve shortlisted some of its unmissable features below.
- Ready RTL
- Multisite Support
- WPML Support
- White Label
- White Label WordPress Dashboard
- Scheduled Dark Mode
- Color Control Dashboard
- Google Fonts For Dashboard
- Admin Footer Customization
- BG Gradient/Slideshow/Video (Dashboard)
- Memory Limit & Usage in Footer
- 60+ WordPress Tweaks
- Custom Column Style
- Included Floating Menu
- Footer & Header Scripts
- Unlimited Sidebar Generator
- Post Status Background Colors
- Third-Party Plugin Compatibility
- Text & BG Color for Dashboard Menu
G. WP Adminify Support
There is no doubt that while using any plugin, you might get stuck somewhere. That’s why you need customer support.
Fortunately, when it comes to customer support, WP Adminify provides you with everything under a single roof. All you’ve to do is to go to their official website and click on the Support menu at the top of the page. On clicking that, it’ll take you to its Support Forum.
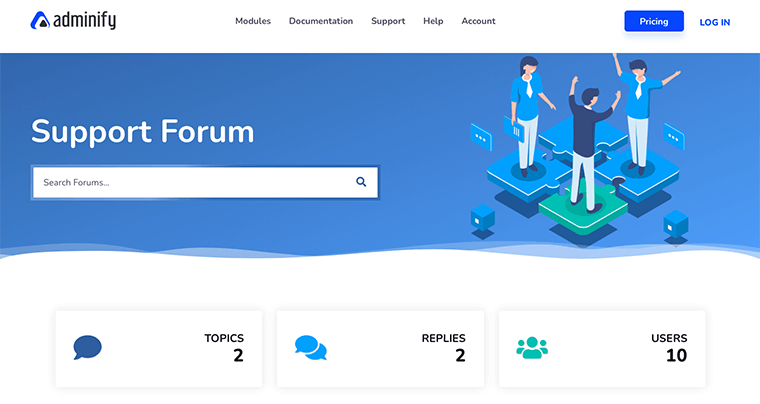
In the Support Forum, you’ll find answers to all the current and most discussed topics that are answered by the dedicated support team.
Not only that, but a similar support forum is also available on WordPress.org. Since this plugin is quite new, you’ll find very few topics that have been discussed.
However, it seems that the WP Adminify support team is quite dedicated and quick to respond to your queries and issues.

Similarly, just beside the Support option, you’ll also find the WP Adminify Documentation option in the menu. Inside the Documentation section, you’ll get all the pre-written information that you might need starting from Plugin Installation to Adding Custom CSS or JS.

If you’re still a beginner who is struggling to use WP Adminify then it also comes with video tutorials and FAQs. Besides, it also comes with a Facebook Group Community that helps you fix your issue quickly in the community forum. Hence, it’s a great way to get connected with the community and discuss topics with other fellow members.
At last, we can say that WP Adminify provides 24/7 support whether it’s troubleshooting issues or related to business advice. Hence, WP Adminify support is always there with you throughout your WordPress journey.
H. WP Adminify Pricing
Now let’s talk about the pricing and the cost involved in downloading WP Adminify.
As of review, we’ve already known that WP Adminify is a freemium plugin. This means that it comes in both a free version at WordPress.org as well as a premium version with additional features.
If you want a free version of this plugin, then you can also download it from the official WordPress plugin directory. We’d say that its free version is somewhat generous with its features.
Most of the features that we’ve discussed are already included in the free version. With that, you’ll get basic support and features, and lifetime updates.
Still, if you want premium exclusive features or priority support then you can go with their premium plans.
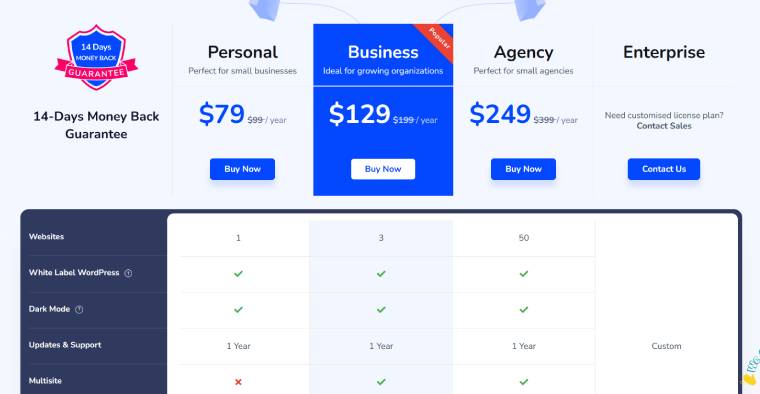
When it comes to premium plans, WP Adminify seems to offer you four different plans.
- Personal – For 1 Site ($79) Includes priority support, dismiss admin notices, and 1-year updates.
- Business – For 3 Sites ($129) Everything in a Personal plan, multisite support, and 1-year updates.
- Agency – For 50 Sites ($249) Everything in Personal and Business plan, WP Adminify white label, and 1-year updates.
- Enterprise – For more Sites. Everything that’s included in Agency and more custom features.
Besides that, you can request back your money within the first 14- days of purchase if you aren’t completely satisfied with WP Adminify. That, too, without being asked any questions.
Find more information on the WP Adminify pricing page.
I. Pros and Cons of WP Adminify
So far, we’ve already talked about how amazing the WP Adminify is. Meanwhile, we hope that you’ve enjoyed reading our review on WP Adminify and have found it useful.
To sum up, let’s look at some of its pros and cons in this section.
First, let’s start with the pros:
Pros of Using WP Adminify:
- Quick and easy to set up
- Visually attractive dashboard
- Fully customizable
- Includes powerful toolkit options within its free version
- Built with performance in mind
- Lightweight and instant loading
- 14 days money-back guarantee
Cons of Using WP Adminify:
- Newly launched plugin, so sometimes it can become overwhelming for beginners to use this plugin
- Some of the features of this plugin still need to be updated
J. Final Verdict on WP Adminify – Should You Use it?
As shown above, we tried and tested every feature of the WP Adminify plugin and we’re happy that it stood tall in most of our tests!
So, we can say that WP Adminify is a great WordPress dashboard plugin. It’s handy with tons of different features to customize the WordPress dashboard experience.
We think that its completely new extensive features such as PageSpeed Insights, Login Customizer, Admin Notices, and Activity Log will be the favorite features of lots of WordPress users.
Not to mention, how can we forget the visual changes to the WordPress dashboard? Its sleek yet intuitive design will surely be with you for a long time. Its light and dark theme mode is our personal favorite of all.
When starting with this amazing plugin, you may want to use all the features at once. But we suggest that you only pick the one that you think you require at the current moment.
Finally, we want to say that WP Adminify is worth trying out. But we still suggest you install and explore it by yourself. Trying it yourself will help you understand how convenient it’d be for you.
Conclusion
That’s about it. This is a brief review of the WP Adminify WordPress Dashboard plugin. We hope that you’ll agree with our review.
If you have any further queries about WP Adminify and how it works, then please leave a comment below. We’ll try to get back to you as soon as possible.
You may want to take a look at our article 9 top Yoast SEO alternatives and also have a look at the Rank Math vs All in One SEO.
If you like this article, then please share it with your friends and colleagues. Also, don’t forget to follow us on Twitter and Facebook.