Are you searching for an honest DreamHost review? Then, look no further.
DreamHost is a compelling web hosting provider for beginners seeking a simple and affordable platform for their websites. Unquestionably, it’s one of the WordPress.org recommended hosting providers.
Along with that, DreamHost caters to a wide spectrum of website needs. It offers many comprehensive hosting solutions that don’t compromise on quality. You’ll also get multiple advanced tools and top-notch support.
But does DreamHost live up to its promises? Fear not, we’ve put DreamHost to the test, exploring its features, usability, and pricing.
Now, let’s begin this DreamHost review!
Overall Rating
DreamHost is one of the cheapest and easiest-to-use web hosting services for beginners. Overall, it offers multiple web hosting solutions that meet the needs of various businesses and sites. Each of these is packed with amazing features.
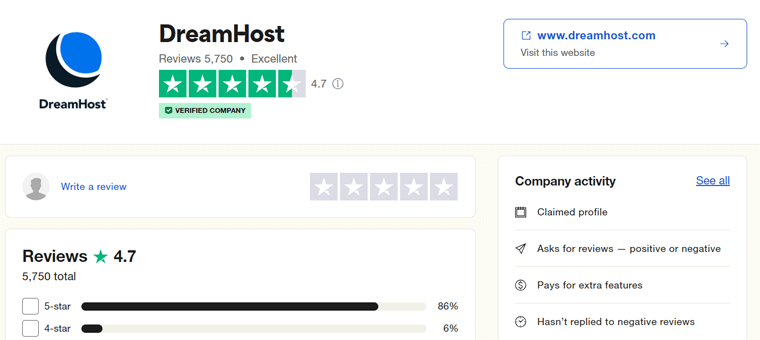
In addition, DreamHost scores an outstanding 4.7 out of 5 stars on Trustpilot based on 5731 customer reviews. Similarly, it has an average rating of 3.9 out of 5 stars in G2 Reviews as per 131 customer reviews. It’s phenomenal, isn’t it?
Thinking about what our viewpoint is?
We’ll give DreamHost a solid 4.5 out of 5 stars. The reason behind deducting the other 0.5 ratings is due to the limited number of data center locations and some features that cost extra.
But is DreamHost a cheap and easy-to-use hosting option for beginners? That’s definitely a YES! It offers affordable pricing plans and easy-to-use features for your sites.
Notably, try DreamHost, keeping its money-back guarantee policy in mind. The shared hosting offers 97 days, while others give 30 days. During this time, confirm if this is the host you want. If not, then get a full refund of your hosting fees.
Pros and Cons of DreamHost
Before diving into the review, here’s a quick look at the DreamHost pros and cons!
Pros of DreamHost
- Offers a 97-day money-back guarantee policy in its shared hosting plans.
- An official WordPress.org recommendation with award-winning service.
- Provides a free domain for the 1st year and gives SSL (Secure Socket Layer) certificates.
- Supports unlimited traffic, so that your website works well at any time.
- Gives a WordPress website builder for fast website development.
- Offers affordable prices with the presence of 3-year-term pricing schemes.
Cons of DreamHost
- It provides several additional features, but they are expensive.
- DreamHost focuses on WordPress sites, although it supports other CMS.
- There are data centers only in 2 countries, most of which are in the US.
With that, let’s begin the review with a quick overview of DreamHost. Let’s go!
A. What is DreamHost? – A Quick Overview
DreamHost is a reputable web hosting provider known for its affordability and user-friendly features. In the 20 years since its establishment, it has emerged as a popular choice for beginners and site owners for individual sites and businesses.
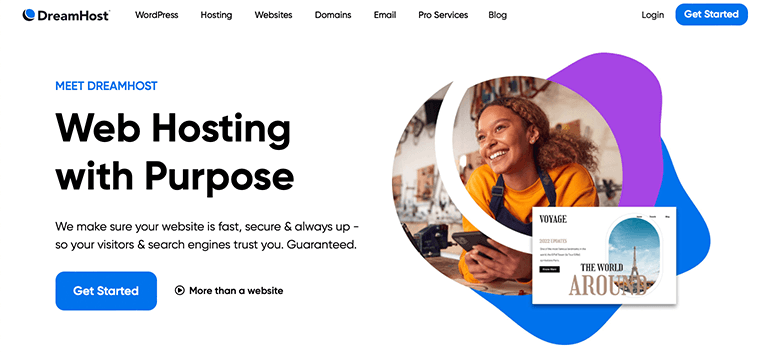
Further, it’s a comprehensive web hosting provider offering many hosting services. That includes shared, VPS (Virtual Private Server), DreamHost dedicated, cloud hosting, etc. So, you can pick a hosting option tailored to meet your site’s needs.
As an official WordPress.org recommendation, it offers WordPress Basic, DreamPress, and DreamHost WooCommerce hosting services. Further, it provides a powerful WP Website Builder to instantly launch WordPress sites.
Moreover, DreamHost also offers domain registration services. Its plans offer a free domain for the 1st year with a free SSL certificate.
On top of that, it comes with a custom DreamHost control panel. Easily, you can manage your hosting account, domains, emails, backups, and other features.
Plus, you can get unlimited bandwidth and storage on your plan. Hence, you won’t need to worry about running out of space or slow loading times.
Looks fascinating? Then, start using DreamHost now!
To start using DreamHost, choose the best-suited hosting solution and plan. For that, press the button below and begin the purchase process right now!
Overall, it’s a fast and secure hosting for beginners. Keep reading to know how!
B. Key Features and Highlights of DreamHost
Exploring the feature set is an essential step when picking a web hosting platform. So, we’ve collected and listed all the key features and highlights of DreamHost.
Go through them and determine if it’s a cheap and easy hosting for you. Let’s go!
1. Super Easy-to-Use Control Panel
DreamHost offers a custom control panel to easily manage your web hosting plan. It has a user-friendly interface with a design similar to the WordPress dashboard.
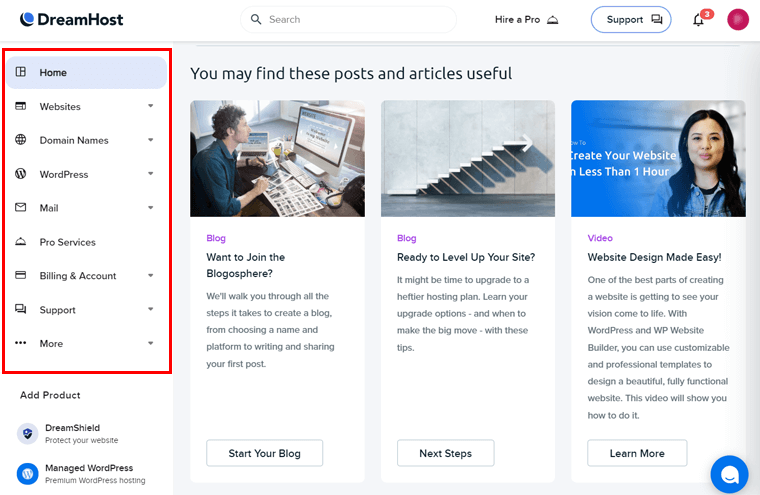
As soon as you land on your panel, you can find multiple options on the left side. There, you can manage your sites, domains, users, the hosting account, etc.
Further, the process of creating a new website is also super easy. Just click the add new site option, enter your domain, and create it or migrate an existing one.
Moreover, there are multiple features for managing each website. Once you open a website’s settings, you’ll find the options at the top bar. That involves your website files, databases, upgrade hosting, staging environments, security, etc.
Overall, you can easily kickstart site management with DreamHost as a beginner.
Learn about the details of its control panel here!
2. Managed WordPress Hosting with ‘DreamPress’
DreamHost offers WordPress Basic plans, including general features for WordPress websites. But if you want managed WordPress hosting, then go with DreamPress.
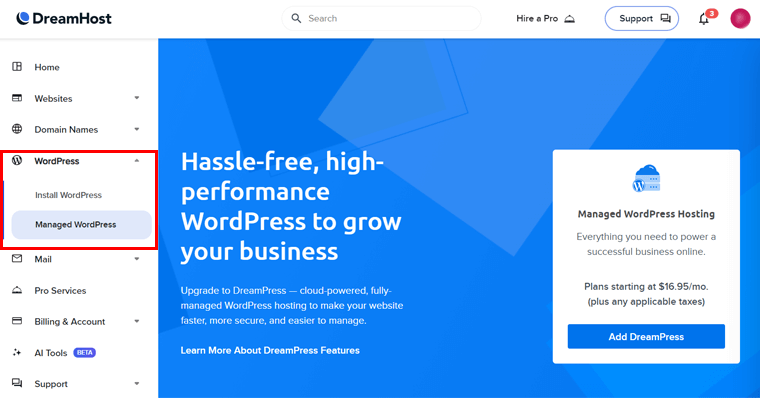
DreamPress is a hassle-free and high-performance hosting solution optimized for WordPress sites. As a managed WordPress hosting service, you don’t need to worry about your hosting infrastructure. All you must do is focus on your site.
Hence, DreamHost is one of the best WordPress hosting services.
The list below points out some of the best highlights of DreamPress:
- Uses a managed cloud platform with resources dedicated to your website.
- Includes a 1-Click staging option to test new plugins, themes, and code before making changes to your live website.
- Perform automated and on-demand backups to protect and restore your site.
- Provides free priority WordPress and free automated WordPress migrations.
- Takes care of WordPress core and security updates.
- The powerful Jetpack plugin is pre-installed on the plans for site protection.
- Offers support from the dedicated WordPress support team.
You can also use WordPress backup plugins for more capabilities.
3. Optimized Speed and Performance
Website speed is crucial for conversion and search engine rankings. Considering that, DreamHost offers multiple speed and performance features on its plans, like:
- Built-in caching features make your website fast and give better results.
- Uses NGINX, a powerful web server, for optimal site speed and security.
- Enabling GZIP compression helps with website speed optimization.
- Offers an SEO (Search Engine Optimization) toolkit that automatically enhances your site’s SEO score.
- Provides unlimited CDN (Content Network Delivery) service in its higher plans for good performance.
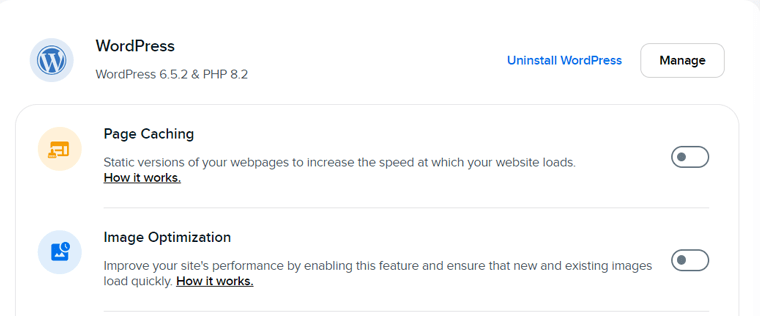
- Includes the image optimization function so that images quickly load on your websites.
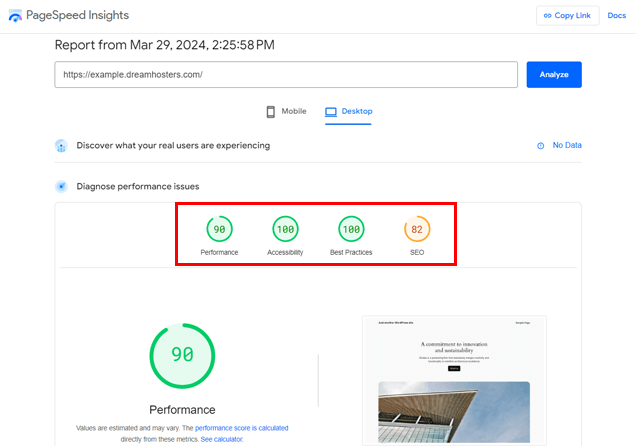
We’ve tested a newly built DreamHost website on popular online tools. In Google PageSpeed Insights, the following are the metrics:
- Average score of 90 out of 100 for site performance on desktop devices.
- A full score of 100 ensures the website follows the latest industry standards and development practices.
- A high score of 82 out of 100 on the SEO performance of the website.
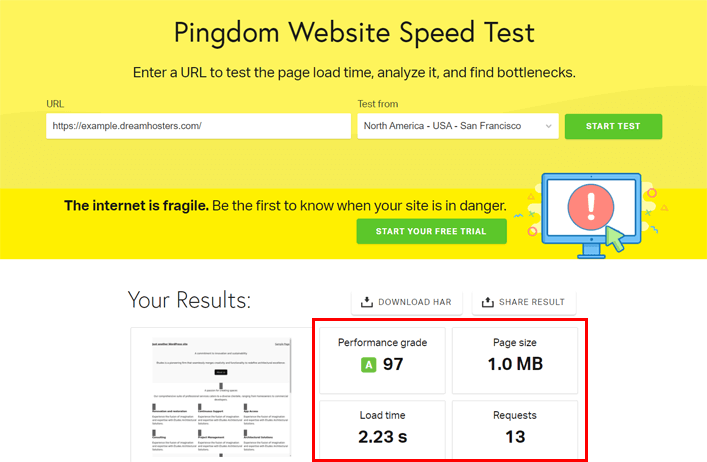
Similarly, the same DreamHost website was tested on Pingdom. Here, the site scored an excellent A97 performance grade. Plus, the loading time is 2.23 seconds, and the home page size is 1.0 MB.
To enhance website speed, check out the best speed optimization plugins and best WordPress caching plugins.
4. Quick WP Website Builder
WordPress offers endless themes and plugins for building any website. However, beginners may feel overwhelmed when selecting the most suitable ones for their websites.
Don’t worry, DreamHost introduces the WP Website Builder. This website builder has a suite of premium tools and plugins, making editing and managing your website easier.

Hence, all you need to do is choose your plan, pick a theme, create content, and launch the site. To do that, you’ll get access to hundreds of premium starter sites.
Some notable features include:
- Quick-start Inspiration Wizard: Select the design, add functionalities, and input key site information instantly.
- Post and Page Builder: A combination of a drag-and-drop editor with design blocks that have both simple and advanced options.
- SEO Suggester: Provides SEO tips right in the website builder for visibility.
5. Strong Security Features
Security is a major factor to consider when picking a reliable web hosting platform. In terms of DreamHost, it contains a lot of security features for your websites.
The following list points out some of the valuable security and privacy features:
- Multi-factor authentication via the Google Authenticator app and YubiKey.
- Offers developer features like SSH (Secure Socket Shell) and OpenSSL.
- Automatic activation of sFTP for secure file transmissions.
- Free domain name for the 1st year with SSL certificates for each site.
- Provides premium security services like DreamCare. It features website management, monitoring, and hacked site repair.
- Strong anti-spam policy enforced, with free WHOIS privacy protection.
- Guaranteed 100% uptime service for continuous website operation.
- Site statistics gives raw logs and lets you perform actions on them.
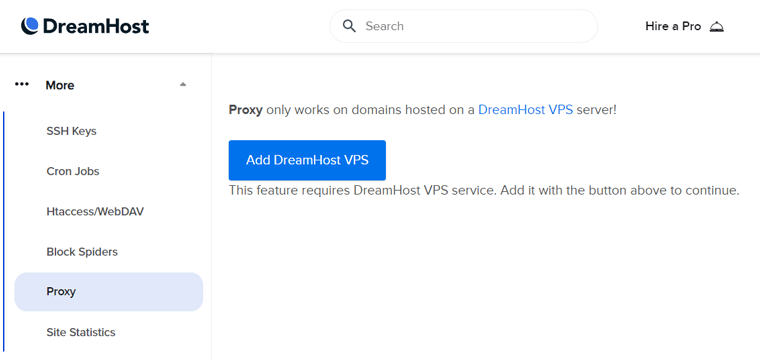
- Other security features include block spiders, cron jobs, proxy, etc.
Find the best WordPress security plugins and learn how to secure your domain.
6. Free WordPress Migrations
Ready to move your website to DreamHost? Guess what? The website migration process to DreamHost is a breeze.
You can use the free DreamHost Automated Migration plugin to migrate the website yourself. The process is quick and effortless. Generally, it takes less than an hour for the migration. Only if the site is complex and large may it take more.
Another way is to let the professional experts migrate the website to DreamHost. They can move the entire website for you without requiring your involvement.
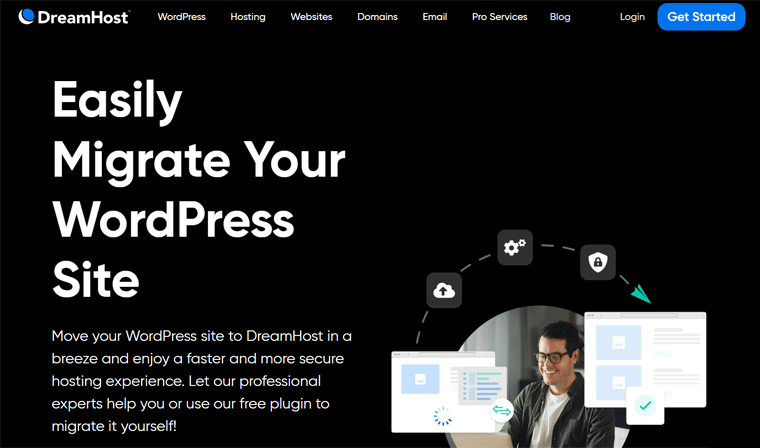
The priority professional site migration (free with DreamPress) takes one business day. Similarly, the standard professional site migration takes three business days.
Concerned about whether your website will be down during migration? Just make it clear! Whether you migrate yourself or use the migration service, DreamHost handles your DNS to prevent or reduce any potential downtime.
Notably, you can later migrate your DreamHost website to another platform.
Learn how the DreamHost migration process works on this documentation.
7. Reliable Email Services
Moving forward, DreamHost offers a professional email for your domain. Further, it offers streamlined organizational tools. With that, you can perform these actions:
- Drag-and-drop messages between folders in webmail.
- Configure automated delivery filters.
- Route messages with the help of custom aliases.
Plus, it supports IMAP, which syncs your laptop, phone, and other mobile devices. In addition, you’ll get the free inbound spam filtering function that keeps your inbox safe from spam, viruses, and other threats.
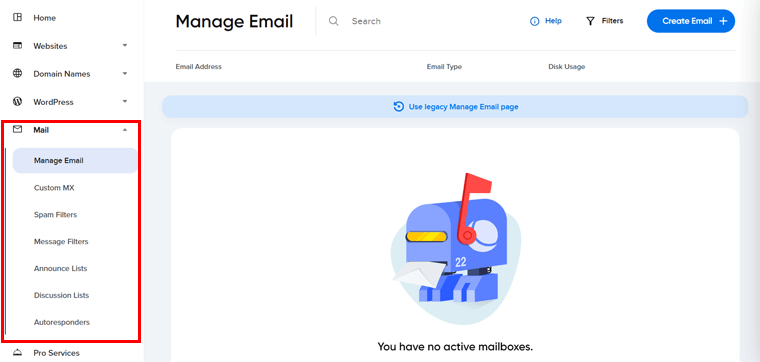
Further, you can add announcement and discussion lists to your account for easy mail delivery. Once you manage your email, you can also set up autoresponders.
Here’s a complete guide on email marketing if you want to create successful email campaigns. Also, find the best email marketing services.
8. Several Pro Services
As a beginner, you may be confused about starting your website. Aren’t you?
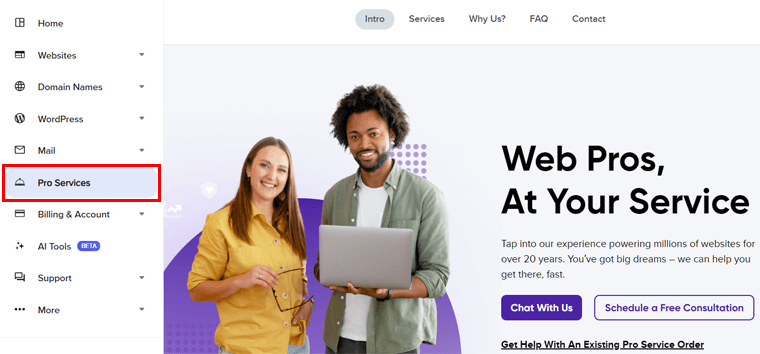
If you’re building your first website for a growing business, then you can enjoy the pro services offered by DreamHost. The various pro services in DreamHost are:
| Pro Service | Description | Starting Price |
|---|---|---|
| Design Services | Get a custom and professional website design that matches your brand. | $1499 |
| Website Management Services | Hire the DreamHost experts to manage your website software and maintain the backend so that you focus on your business. | $59 per month |
| Custom Web Development Services | With its web development service, your website will be ready effortlessly. | $89 per hour |
| SEO Marketing | Grow your website traffic through enhanced SEO. | $399 per month |
| Social Media Marketing | Maximize your social reach through optimized social content. | $399 per month |
| Training | Receive a training service that gives 1-on-1 instruction by the experts. | $99 per session |
9. Additional Features
Other than the aforementioned features, the following are some extra highlights:
- Provides multiple deals regularly on its hosting and domain services.
- Offers open-source solutions to let the community give to the community.
- The built-in Google Workspace boosts collaboration via Google products.
- All of its data centers are present in the US.
- Lets you transfer your domain from a different provider to DreamHost.
- Introduces AI (Artificial Intelligence) tools with AI chat function.
That’s all! If you’re eager to start using DreamHost by looking at these features, then follow the step-by-step guide below. Without further delay, let’s move ahead!
C. How to Get Started with the DreamHost Hosting?
Before you start using DreamHost, you must be aware of the steps you’ll follow for the purchase and its working functionality. So, this section shows the process of purchasing and configuring a plan, plus creating and setting up a DreamHost site.
If you’re willing to use DreamHost, then follow these steps on a plan, considering the money-back guarantee policy it offers. Now, let’s start, shall we?
Step 1: Purchase a Shared DreamHost Hosting Plan
First, you must buy a suitable DreamHost plan. Among the hosting solutions, we recommend going with the cheap and easy shared hosting plan for beginners.
Buckle up, and check out the steps below to get started!
Step i: Pick a Cheap Plan
Open the DreamHost site and hover over the ‘Hosting’ menu in the navigation. Now, click the ‘Shared Website Hosting’ drop-down sub-menu item.

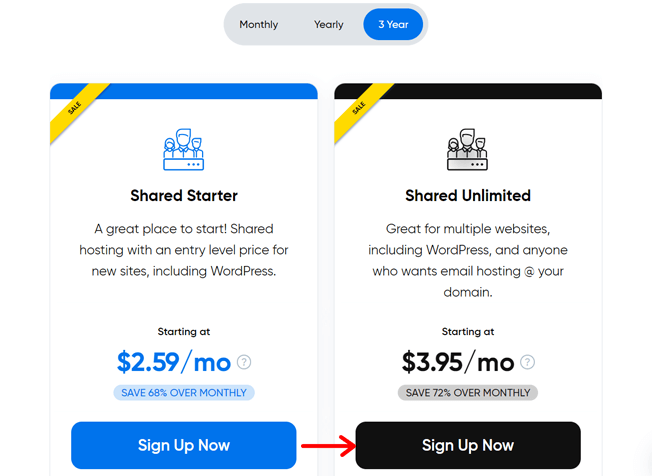
Scroll down and find the available plans for the hosting solution. There, select a payment term and click ‘Sign Up Now’ for the plan you want. Here, we’ll go with ‘Shared Unlimited’.
Step ii: Choose a Domain
Once you pick the plan, you’ll be redirected to the sign-up page. Currently, you’re on the ‘Choose a domain’ step. There, it includes 3 options to choose from. They are to either pick the domain later, use an existing domain, or register a new domain.
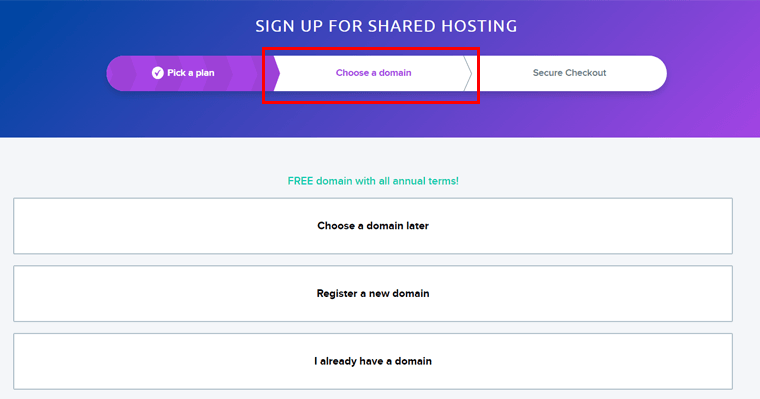
Here, if you register a new domain or choose to pick it up later, then the domain gets added to the cart. With that, you’ll directly move on to the next step.
Step iii: Secure Checkout
In this step, you can either complete the purchase with a credit or debit card or PayPal. So, make your choice and fill out the card details and billing information.
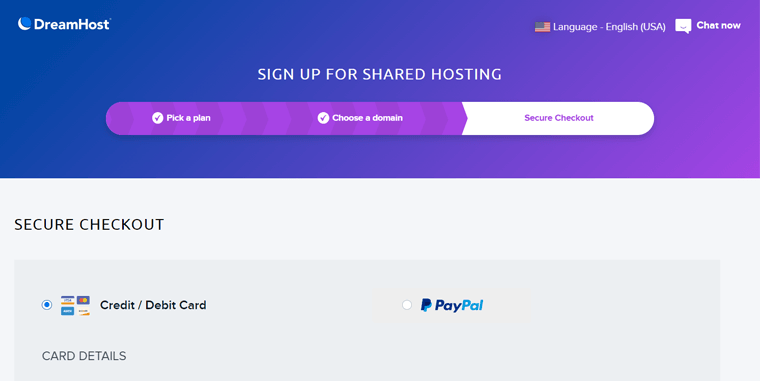
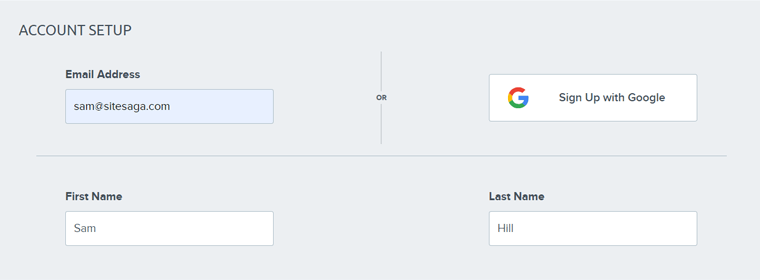
After that, scroll down to the ‘Account Setup’ section. Here, sign up with your Google account, or just enter the email address. Plus, you can add your personal and account details. Further, select the additional premium services if you want.
Following that, pick the additional options if you want. Lastly, click the ‘Submit Order’ button after accepting their terms and conditions.
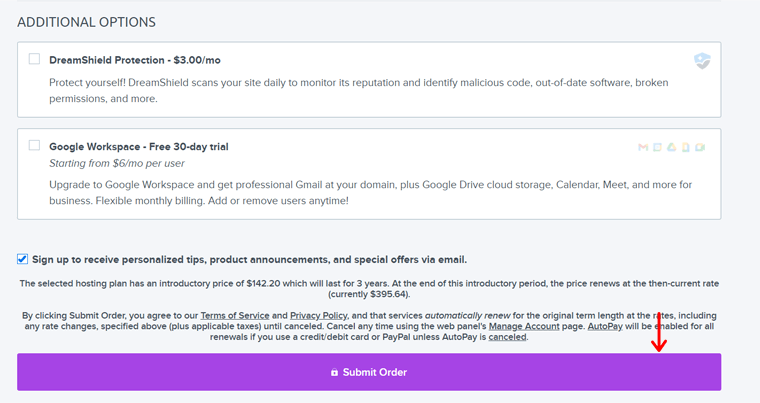
Congratulations on purchasing your first DreamHost plan! Find the detailed guide in this documentation on the official website.
Step 2: Setting Up Your Hosting Plan
After the payment is processed, you can start accessing and setting up your plan. Here are the steps involved!
Step i: Account Setup
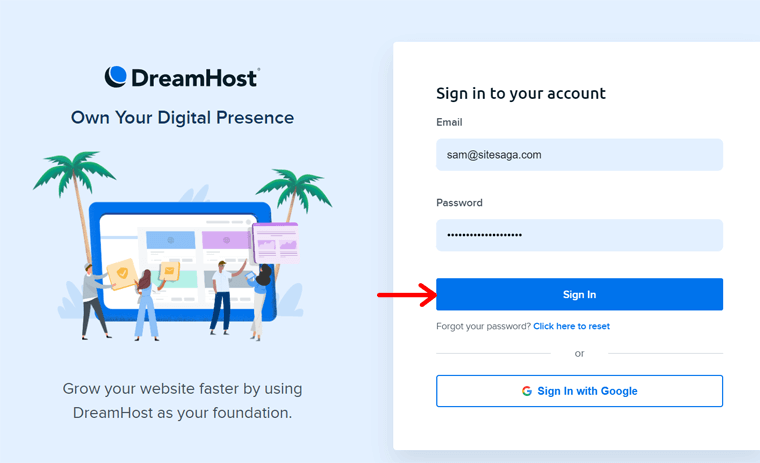
Initially, you’ll get an email with your DreamHost control panel’s login details. So, click the ‘Login’ button present at the top-right of the website.
On the login page, use those credentials and click the ‘Sign In’ button. This opens your control panel.
Step ii: Add a Website
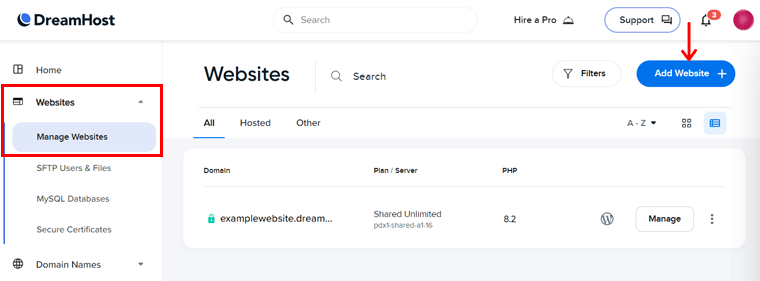
We’ll explain all the vital features and settings present in the control panel later. For now, let’s add a new website to your account.
To do so, go to ‘Websites > Manage Websites’. There, click ‘Add Website’.
Now, you must add your domain to the website. This can either be the domain you registered with DreamHost earlier, a subdomain, or you can register a new one. Plus, it can also be a free subdomain on DreamHost.
Here, we’ll go with a free subdomain for the guide. This involves adding the name for the starter domain.
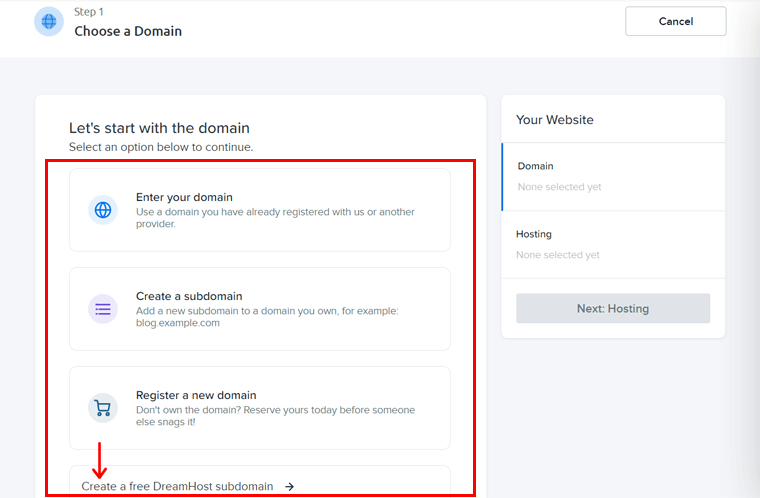
Note that your domain should be unique worldwide. After giving the domain, click ‘Next: Hosting’.
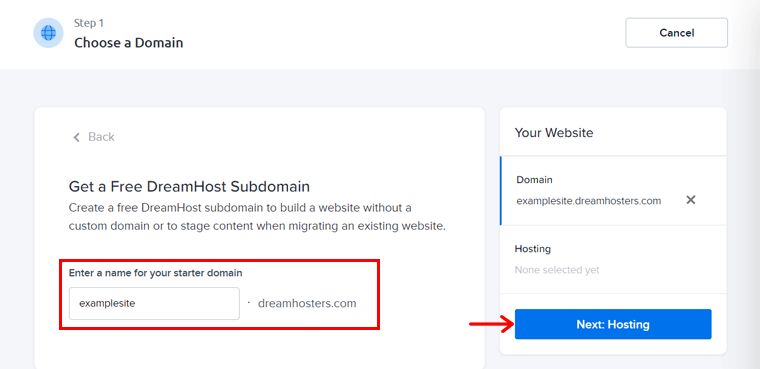
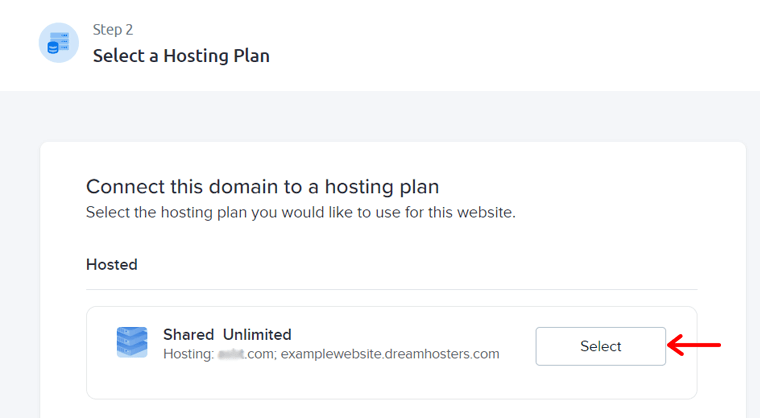
Following that, click the ‘Select’ button on your hosted plan. Here, it’s ‘Shared Unlimited’.
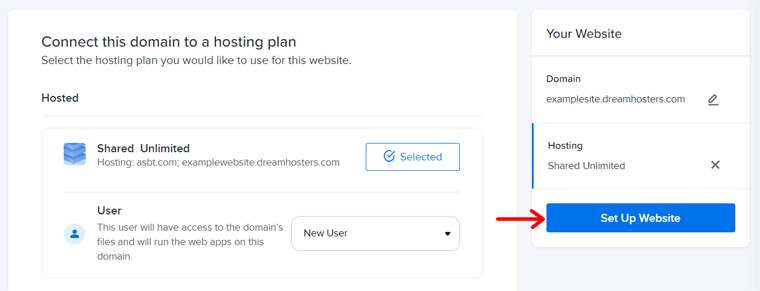
Next, pick ‘User’ for the website and press the ‘Set Up Website’ button.
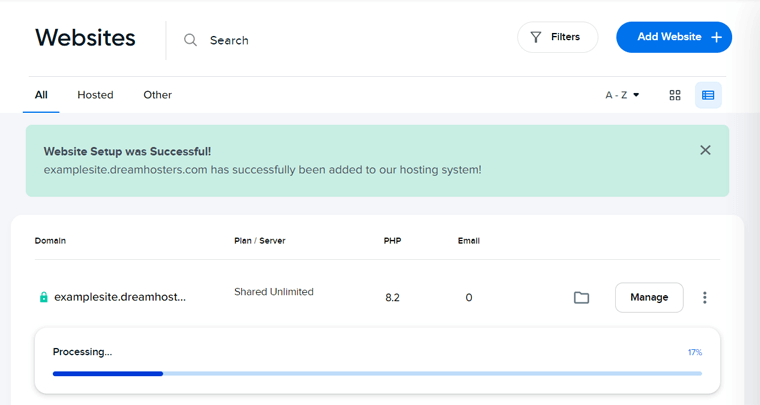
As soon as you do that, a notice displays a successful website setup. But it takes a few minutes to make the website go live.
Step iii: CMS Installation
Once your website is ready, you can install a CMS (Content Management System). Doing that is easy with the one-click installer. Here, we’ll add WordPress.
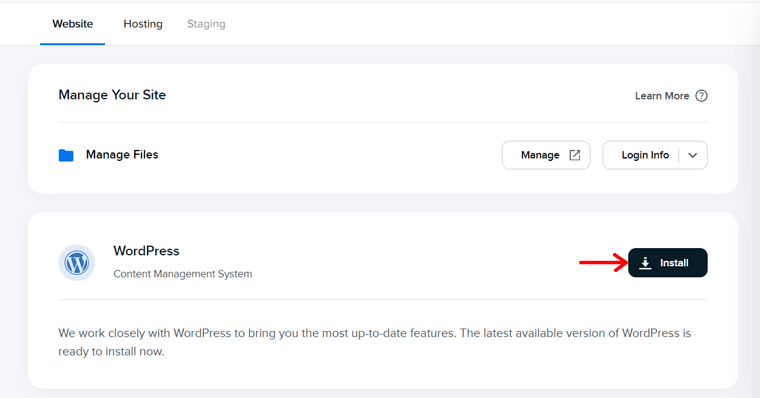
For that, click the ‘Manage’ button on your website.

There, click the ‘Install’ button for the WordPress CMS.
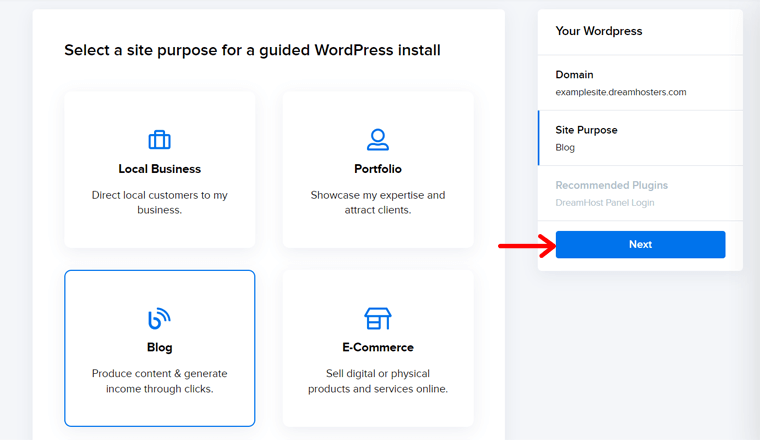
Following that, you must choose your website niche among the given options. Here, we’ll select ‘Blog’ and press ‘Next’.
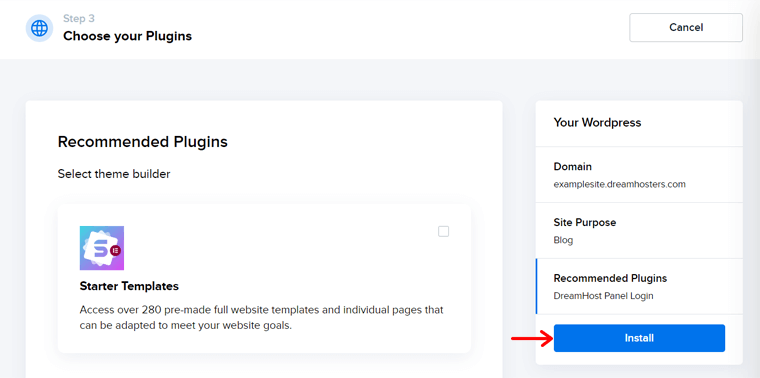
In addition, you can even install the recommended WordPress plugins you want right now. Just mark them and click ‘Install’.
After a while, your website is ready to use with your chosen CMS platform.
Step 3: DreamHost Panel Walkthrough
Before we move forward with configuring the website, let’s have a quick look at the DreamHost control panel. The aim of doing this is to get familiar with your dashboard.
The left-side menu contains the following options:
- Home: Here, you’ll find the website setup progress and many recommended features and services that you can add to your plan.
- Websites: On this menu, it lets you manage websites, users, databases, etc.
- Domain Names: Manage domain registrations and transfers on this tab.
- WordPress: Install WordPress or get managed WordPress hosting here.
- Mail: Here, you can manage email, spam filters, autoresponders, and more.
- Pro Services: All the pro services we mentioned before can be added here.
- Billing & Account: Manage your account, payments, and invoices here.
- AI Tools: Use the beta version of the AI tools, like Business Advisor.
- Support: Here, you can find support options like contact, knowledge base, system status, etc.
- More: This includes options for SSH, site statistics, proxy, and more.

Other than that, the following are other options present on the top bar:
- ‘Hire a Pro’ to let experts help you build or manage your website.
- The notification icon lists out the notices related to your account and sites.
- You can edit your profile, pick a different language, configure security, etc.
Step 4: Manage Your WordPress Website
Hopefully, you’re well aware of your control panel and have configured your plan and account. But this doesn’t end the features of your website.
Simply put, you can configure each website on your plan to work as you want. So, let’s check out those options, shall we?
Before that, go to ‘Websites > Manage Websites’ and press ‘Manage’ for the site.
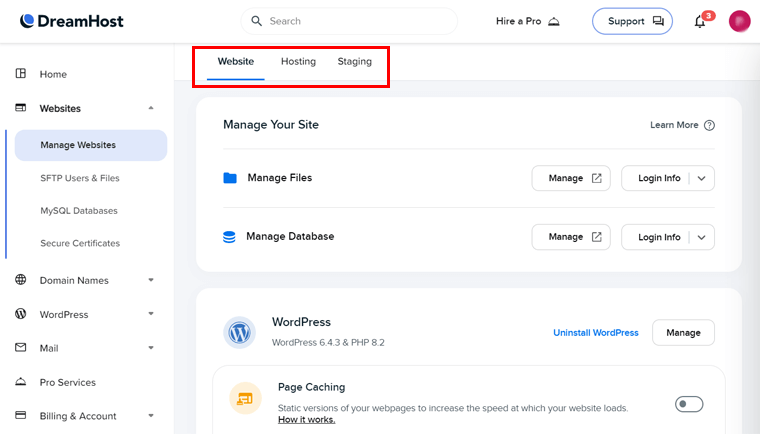
On the top of the screen, you’ll find the configuration options for the website. Each of these is discussed below:
- Website: Manage your site files, migrate your site, and transfer the domain.
- Hosting: Here, change the hosting plan, add a unique IP, restore files, etc.
- Staging: DreamPress lets you add staging sites to test your websites.
- DNS: Manage your nameservers and add DreamHost records on this tab.
- Security: Here, you can add your site certificate and activate DreamShield.
After you complete setting up your website on the hosting account, start editing.
Step 5: Configure Your Website
To configure the site’s design and features, navigate back to ‘Websites > Manage Websites’. There, hit the ‘WordPress’ option with its logo.
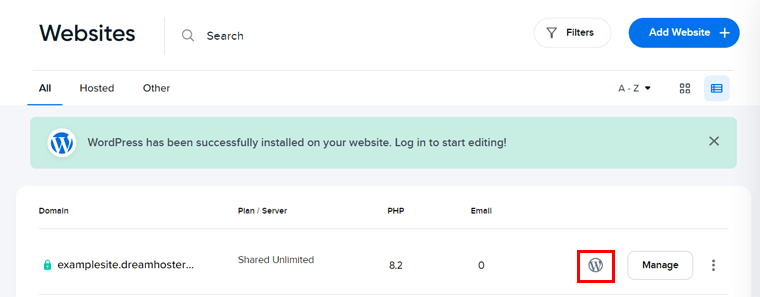
This directly opens your WordPress website dashboard using the auto-generated password. You can alter the admin panel password through your profile.

After that, you may need to log into your WordPress dashboard with the new password. Once you’re done, follow the steps below to set up your website.
Let’s get rolling!
Step i: Install a WordPress Theme
On your WordPress dashboard, the first thing to do is add a WordPress theme. This provides the front-end design for your website.
The process simply includes navigating to the ‘Appearance > Themes’ menu. There, click the ‘Add New’ button presented above. After that, search for the desirable theme and click on its ‘Install’ button once you find it.
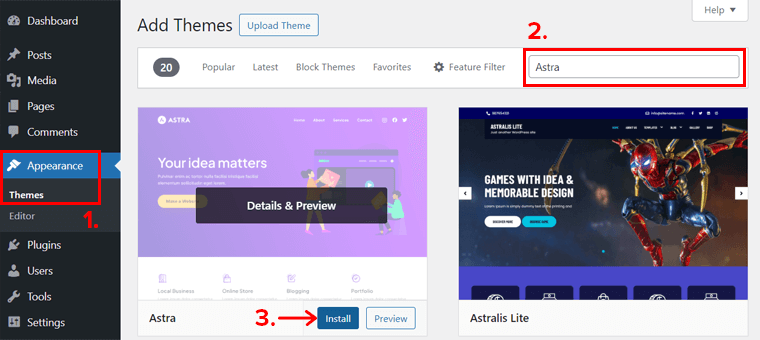
After a while, click on its ‘Activate’ button. That’s it for inserting a free theme.
The process differs if you add a premium theme. Learn how to pick a WordPress theme and how to install a WordPress theme here.
Step ii: Add the Necessary WordPress Plugins
Moving forward, you can insert the necessary WordPress plugins into your website. Every plugin adds some functionality to extend your website’s features.
To install a free plugin, go to the ‘Plugins > Add New’ menu. Following that, search for the plugin you want. Once you find it, click the ‘Install Now’ button.
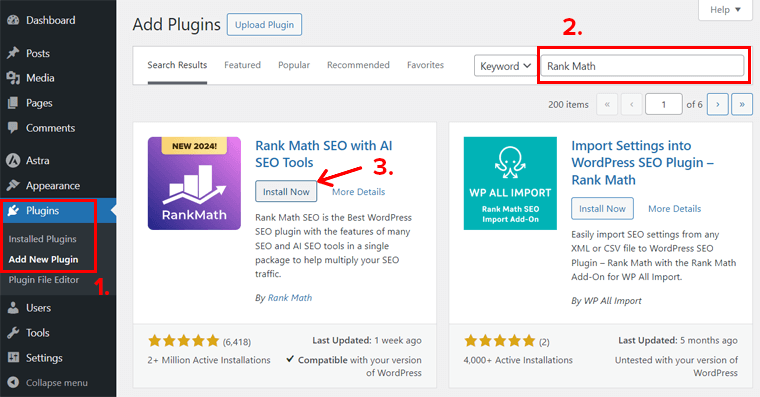
Afterward, press the ‘Activate’ button to make the plugin work on your site.
That’s all you need to do for a free plugin! Want to insert a premium plugin for advanced capabilities?
If yes, then here’s the tutorial on how to install a WordPress plugin. We also have guides on how to pick a WordPress plugin and the must-have WordPress plugins.
Step iii: Make Your Site Go Live
Once you add those plugins with the required features, it’s time to begin adding the site content. This includes creating pages and posts, followed by making them live.
As a beginner, you must know that pages are the static content of your website. Some pages include about us, contact, services, etc. On the other hand, posts are dynamic blog content. They can be news, articles, etc.
Don’t be concerned! The process of creating and publishing posts and pages is similar. Let’s learn one, and you’ll know the other.
To create a post, go to ‘Posts > Add New’. After the post editor opens up, you can insert the title, blog content, media, etc. Once you’re done, simply hit ‘Publish’.
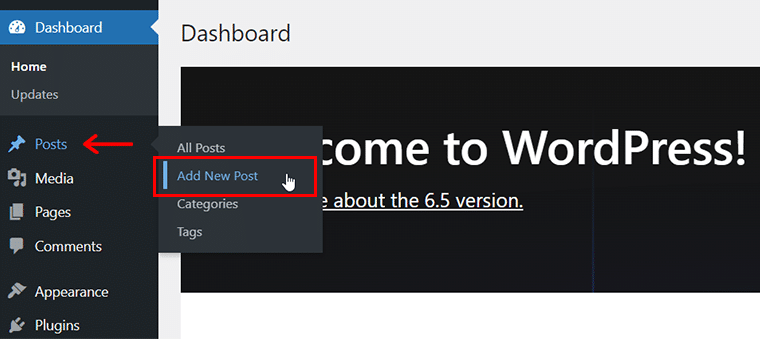
The only difference for pages is that you must hover over the ‘Pages’ menu instead.
Step iv: Preview Your Site and Database
You must preview the website after the changes you make to it. But did you know that you can directly preview your website from your control panel?
Just navigate to ‘Websites > Manage Websites’ and click the link to the website. Your website will open up in a new tab.

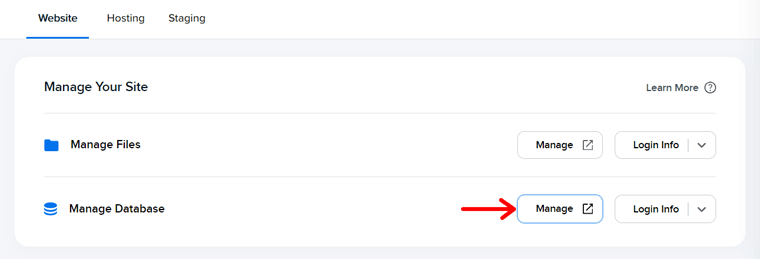
Similarly, if you want to manage and access your website files and databases, then do that from the panel. Just click the ‘Manage’ button on the website.
Right on the ‘Manage Your Site’ section, you’ll find the options to manage and login info. They are for both website files and databases.
By clicking on ‘Manage’ for the database, the database opens up in phpMyAdmin.
That’s all that we’ve got here! Hopefully, you understood all the steps involved in starting your DreamHost website.
Next up includes its pricing schemes. So, keep reading!
D. How Cheap are the DreamHost Pricing Plans?
DreamHost is an affordable web hosting provider ideal for beginners. Further, it offers many kinds of web hosting solutions suitable for contrasting needs. Such as shared hosting, WordPress basic, DreamPress, cloud hosting, VPS hosting, etc.
Before you purchase a plan, you must carefully understand and pick a plan for your website’s needs. Here, it has pricing plans for some solutions ideal for beginners.
So, let’s go through their pricing structures, shall we?
1. Shared Web Hosting
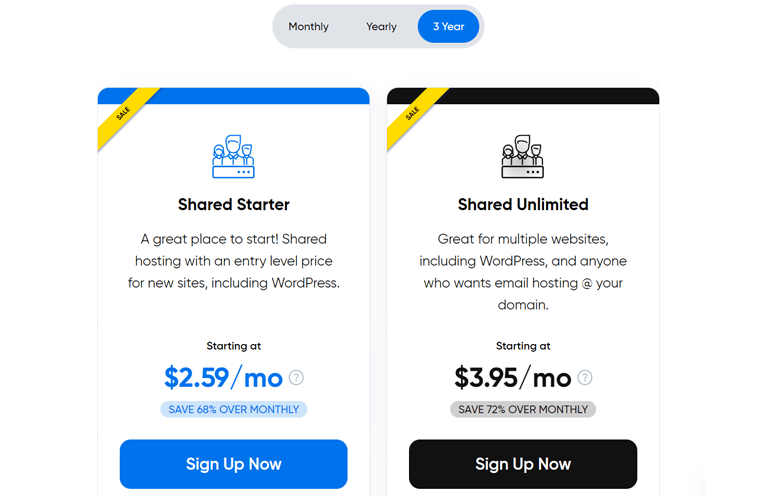
The cheapest hosting solution is DreamHost shared hosting. In a shared hosting plan, you’ll share the resources with other customers. The table below showcases its available pricing schemes:
| Plan / Features | Shared Starter | Shared Unlimited |
| Price Per Month Billed 3-Year Term | $2.59 | $3.59 |
| Price Per Month Billed Yearly | $2.95 | $2.95 |
| Price Per Month Billed Monthly | $4.95 | $8.95 |
| No. of Sites | 1 | Unlimited |
| Storage | 50 GB | Unlimited |
| Bandwidth | Unlimited | Unlimited |
2. DreamPress
DreamHost offers WordPress Basic plans for general features for WordPress sites. For advanced features, pick DreamPress, the managed WordPress hosting solution.
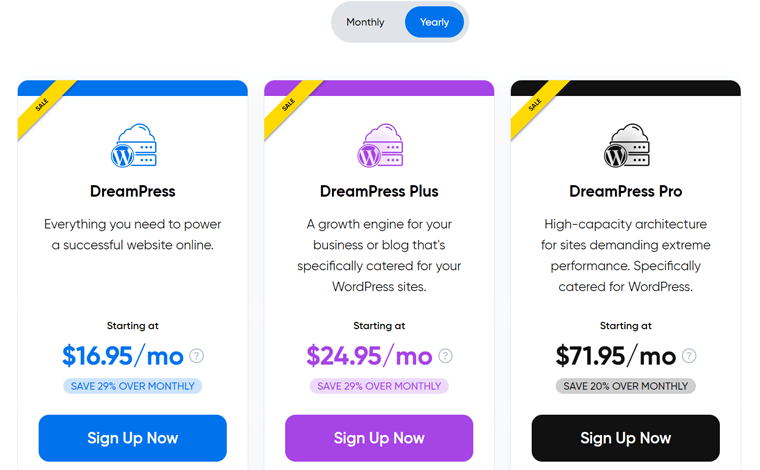
The table below shows the plans for DreamHost managed WordPress hosting.
| Plan / Features | DreamPress | DreamPress Plus | DreamPress Pro |
| Price Per Month Billed Yearly | $16.95 | $24.95 | $71.95 |
| Price Per Month Billed Monthly | $19.95 | $29.95 | $79.95 |
| No. of Sites | 1 | 1 | 1 |
| Storage | 30 GB | 60 GB | 120 GB |
| Monthly Visitors | ~100K | ~300K | ~1M |
Similar prices are also present if you choose DreamHost WooCommerce solutions. All of these plans incorporate the popular plugin for creating WooCommerce sites.
3. VPS Hosting
Another cheap hosting solution on this host is DreamHost VPS hosting. This plan creates a virtual machine on the dedicated resources for your website on a physical server shared with other customers.
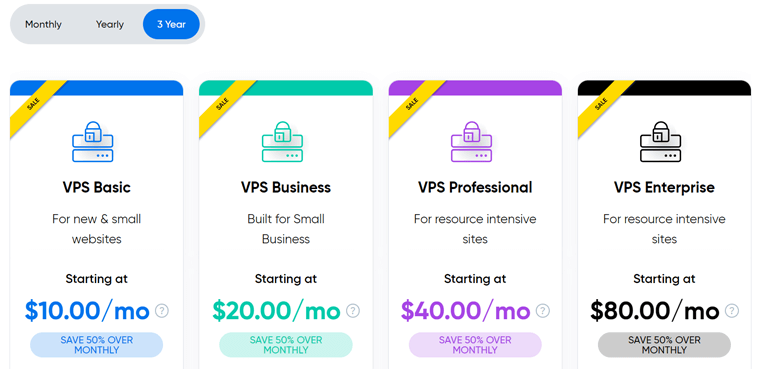
The following are its pricing schemes:
| Plan / Features | Basic | Business | Professional |
| Price Per Month Billed 3-Year Term | $10 | $20 | $40 |
| Price Per Month Billed Yearly | $13.75 | $27.5 | $55 |
| Price Per Month Billed Monthly | $15 | $30 | $60 |
| No. of Sites | Unlimited | Unlimited | Unlimited |
| Storage | 30 GB | 60 GB | 120 GB |
| Monthly Visitors | Unlimited | Unlimited | Unlimited |
E. What are the Customer Support Options in DreamHost?
Already assured of going with DreamHost for your websites? Then, ensure you access all of its customer support options before you begin using it. This makes sure you get help whenever a situation occurs.
Overall, DreamHost provides 24/7 customer service to its customers. It claims to provide support in less than 1-minute. Further, it holds achievements like 73% first-contact issue resolution and 91% customer satisfaction.
As a customer, you can contact the technical support team at DreamHost via the control panel of your account. Other than that, you can visit its Support page.
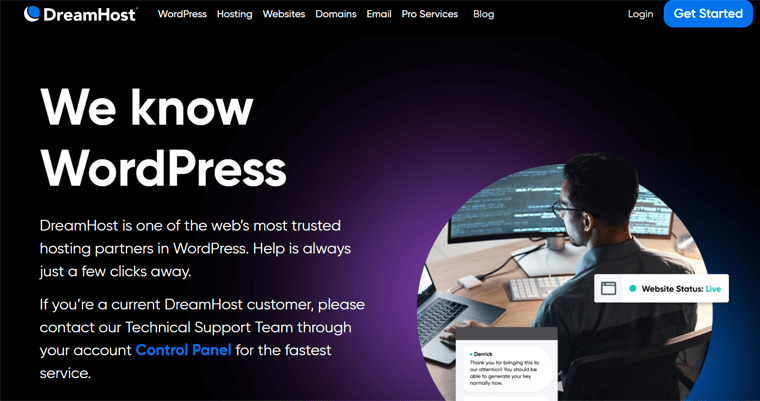
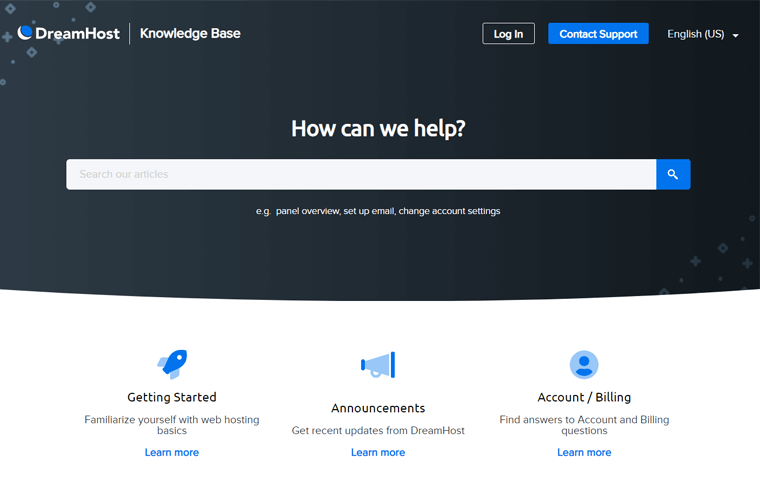
Moreover, beginners can check out the knowledge base to read the guides on multiple aspects. That includes hosting plans, domain registration, WordPress, etc.
In addition, DreamHost can also report abusive activity through email. All of this information is on the Abuse page.
If you’re a beginner but budget is no big deal for you, then get access to its Pro Services. They help you in multiple web creation and management aspects. Visit the Pro Services page to get expert support on branding, designing, etc.
Want video tutorials instead? Then, subscribe to the DreamHost YouTube channel.
Guess what? DreamHost offers phone call support with 3 callbacks per month. Therefore, customer support at DreamHost is really easy to get and top-notch.
F. Customer Reviews on DreamHost
It’s always a good idea to read the customer reviews of your web hosting provider. Doing that lets you learn the trustworthiness, pros, and cons real users have faced.
Keeping that in mind, we present you with the customer reviews of DreamHost. That too by taking reference to the 2 legitimate online review websites. Let’s see!
Trustpilot TrustScore
DreamHost scores a perfect score of 4.7 out of 5 stars based on 5731 user reviews on Trustpilot. Out of the total user reviews, 86% of them have rated it 5 stars.

Some of the positive reviews about DreamHost are related to its customer support, email hosting, and usability. On the other hand, the negative reviews concern the speed and security of it.
Thus, these DreamHost reviews and ratings look genuine. Find the latest reviews and ratings at this link.
G2 Reviews
Similarly, DreamHost scores 3.9 out of 5 stars in G2 Reviews according to 131 user reviews. Here, a remarkable 52% of the customers rated it 5 stars.
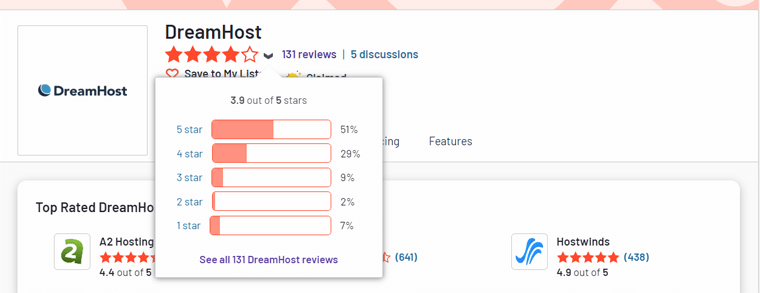
In G2 reviews of DreamHost, the following are the positive and negative viewpoints of this host:
| Positive Reviews | Negative Reviews |
| Customer service | Technical issues |
| Affordable pricing | Downtime issues |
| Ease of use | Expensive |
In summary, there are mixed feelings about the pricing plans of DreamHost. This can be because of the different pricing ranges. But customer support is one of the top features customers believe about this host.
If you’d like to check out the recent reviews and ratings, then visit this link.
G. Best DreamHost Alternatives
Want to explore more hosting platforms before making a decision? Undoubtedly, DreamHost is an outstanding hosting service for beginners with its cheap and easy plan.
However, you can always compare it with other providers to pick the right hosting. So, here are the best DreamHost alternatives to consider using for your website.
Without further delay, let’s dive into the list!
1. Hostinger
Hostinger is one of the best DreamHost alternatives and is popular among beginners. It’s because of its affordable plans and easy-to-use hPanel. With cheap plans, you can host your site on a cloud-based server, which is powerful and simple to use.
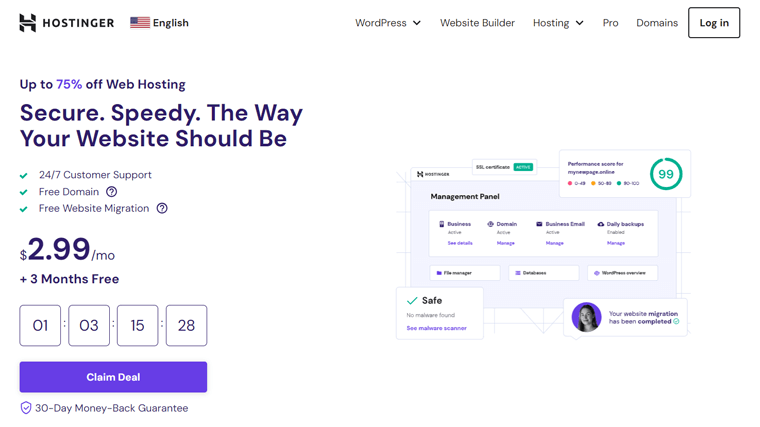
Further, it offers relatively more data center locations worldwide than DreamHost. This makes your website fast in every country. Plus, your visitors can enjoy the lowest latency and enhanced reliability with the Tier-3 global data centers.
Pricing:
The table below shows the plans for Hostinger shared and Hostinger WordPress.
| Plan / Features | Premium | Business | Cloud Startup |
| Price Per Month (Free for 3 Months) | $2.99 | $3.99 | $9.99 |
| Price After Renewal | $7.99 | $8.99 | $19.99 |
| No. of Sites | 100 | 100 | 300 |
| Storage | 100 GB | 200 GB | 200 GB |
| Bandwidth | Unlimited | Unlimited | Unlimited |
Find our comprehensive Hostinger review to learn everything about this host. Compare and contrast Hostinger vs DreamHost to easily make a choice.
2. Bluehost
Bluehost is yet another leading web hosting provider, with several users worldwide. It comes with a simple website builder, which makes building a website a breeze for both professionals and beginners.

In addition, Bluehost includes domain registration and email hosting services. The domain, SSL, and domain privacy are free for the 1st year. Further, some email services include webmail, POP3, and SMTP, which aren’t present in DreamHost.
Pricing:
Check out the pricing plans of the Bluehost shared hosting solution below:
| Plan / Features | Basic | Choice Plus | Online Store | Cloud |
| Price Per Month | $3.99 | $8.99 | $15.99 | $29.99 |
| Number of Sites | 1 | 3 | 3 | 50 |
| Storage | 10 GB | 40 GB | 40 GB | 225 GB |
Learn about this web hosting service in our full Bluehost guide. Here’s our article that differentiates Bluehost from WordPress.
3. Kinsta
If your website grows and you want a managed WordPress hosting plan, then go with Kinsta. It’s one of the best cloud hosting platforms. Whether you’re planning to start an online store or a business, it’s ideal for your different website needs.
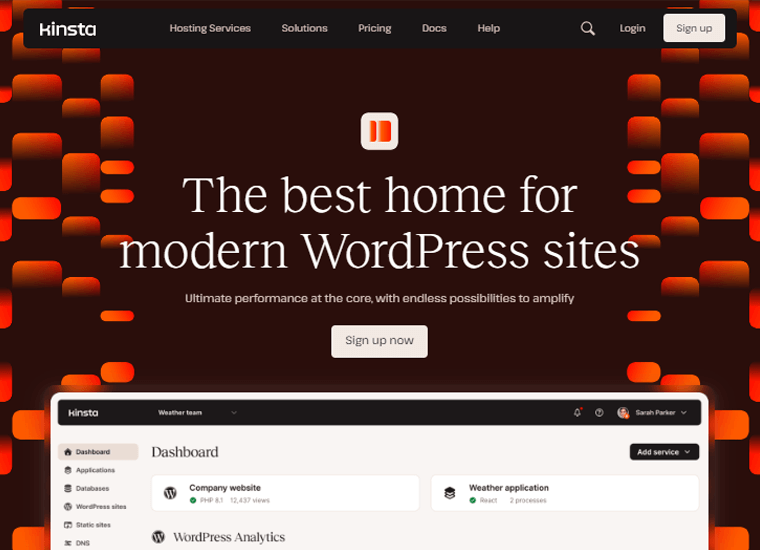
Moreover, it’s built on Google Cloud Platform’s premium tier network and the quickest C2 virtual machines. Hence, your website will undoubtedly be fast and available in all parts of the globe.
Pricing:
Some of the Kinsta managed WordPress hosting plans with its features are:
| Plan / Features | Starter | Pro | Business 1 | Business 2 |
| Price Per Month Billed Yearly | $30 | $59 | $96 | $188 |
| Price Per Month Billed Monthly | $35 | $70 | $115 | $225 |
| No. of Site(s) | 1 | 2 | 5 | 10 |
| Visits Per Month | 25K | 50K | 100K | 250K |
| Storage | 10 GB | 20 GB | 30 GB | 40 GB |
Want to know more? Here’s our complete Kinsta review; you should not miss out. Find the top Kinsta alternatives too.
H. End Result – Is DreamHost a Cheap and Easy Hosting?
We’re happy customers of DreamHost and use it for some of our websites. Further, we performed thorough research and extensive testing with DreamHost. By doing that, we presented this comprehensive DreamHost review.
The main aim of this review is to ascertain whether DreamHost stands out as a cheap and easy hosting option for beginners.
In summary, DreamHost offers affordable hosting solutions for various businesses. Further, these plans have exceptional speed, security, and performance features.

We wholeheartedly recommend DreamHost and advise using a suitable plan. The best plan for one year that hosts unlimited sites costs $2.95/ month. Further, if you need a plan for one site, then pick its 3-year plan at $2.59/ month.
In addition, DreamHost offers a 97-day money-back guarantee policy on its shared hosting plans. The policy is for 30 days when choosing other hosting solutions.
Feel free to revisit our DreamHost review for insights into its features and setup processes whenever needed. Ultimately, the decision to invest in a hosting platform rests with you. So, best of luck with your decision!
I. Frequently Asked Questions (FAQs) on DreamHost
Check out some FAQs on DreamHost to learn more about this hosting service.
1. What hosting services does DreamHost offer?
DreamHost offers a range of hosting services like shared, VPS, cloud hosting, WordPress hosting, managed WordPress hosting, WooCommerce hosting, etc.
2. Is DreamHost suitable for beginners?
Yes, DreamHost is suitable for beginners. This hosting platform has user-friendly interfaces, one-click installation for popular CMS platforms like WordPress, affordable plans, reliable support, etc. All of which let beginners get started.
3. How reliable is DreamHost’s uptime?
DreamHost has a strong reputation for uptime and reliability. It boasts an uptime guarantee of 100%. While no host can guarantee 100% uptime due to unforeseen circumstances, DreamHost monitors their robust systems to reduce downtime.
4. Can I upgrade my hosting plan with DreamHost as my website grows?
Yes, DreamHost lets you easily upgrade your hosting plan as your site grows. They offer scalable hosting solutions that allow seamless transitions. That can be from a lower to a higher-tier plan or different hosting solutions based on your needs.
5. Does DreamHost offer a money-back guarantee?
Yes, DreamHost offers a generous 97-day money-back guarantee on its shared hosting plans. Further, it provides a 30-day money-back guarantee on other hosting services, letting customers try their services risk-free.
Here’s a link to the blog ‘Web Hosting FAQs’ to learn answers to common queries.
Conclusion
Thanks for taking the time to delve into our detailed DreamHost review. This guide highlights DreamHost as a cheap and easy hosting option for beginners.
Our thorough research aims to equip you with the necessary knowledge to make a well-informed decision. With its rich array of features and options, DreamHost emerges as a standout choice for beginners.
We invite you to share your queries or questions in the comment section for further clarification. We are committed to assisting you in selecting the right solution.
For additional valuable insights, we encourage you to explore our other articles. That includes the best web hosting for freelancers and the best web hosting services for Google AdSense.
Stay connected with us on our social media platforms, particularly Facebook, Instagram, and Twitter, for the latest updates.


