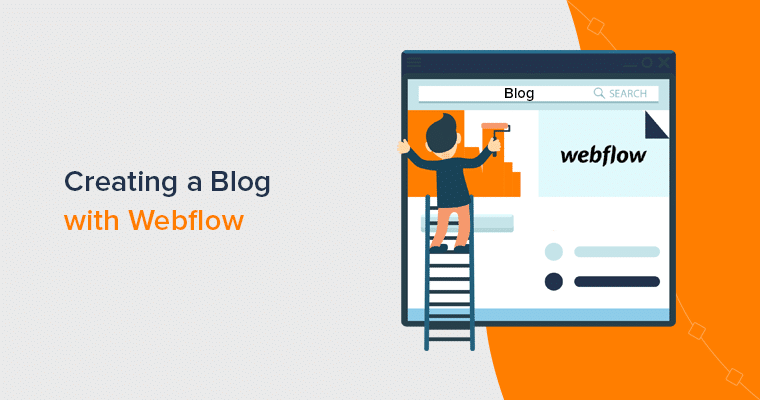
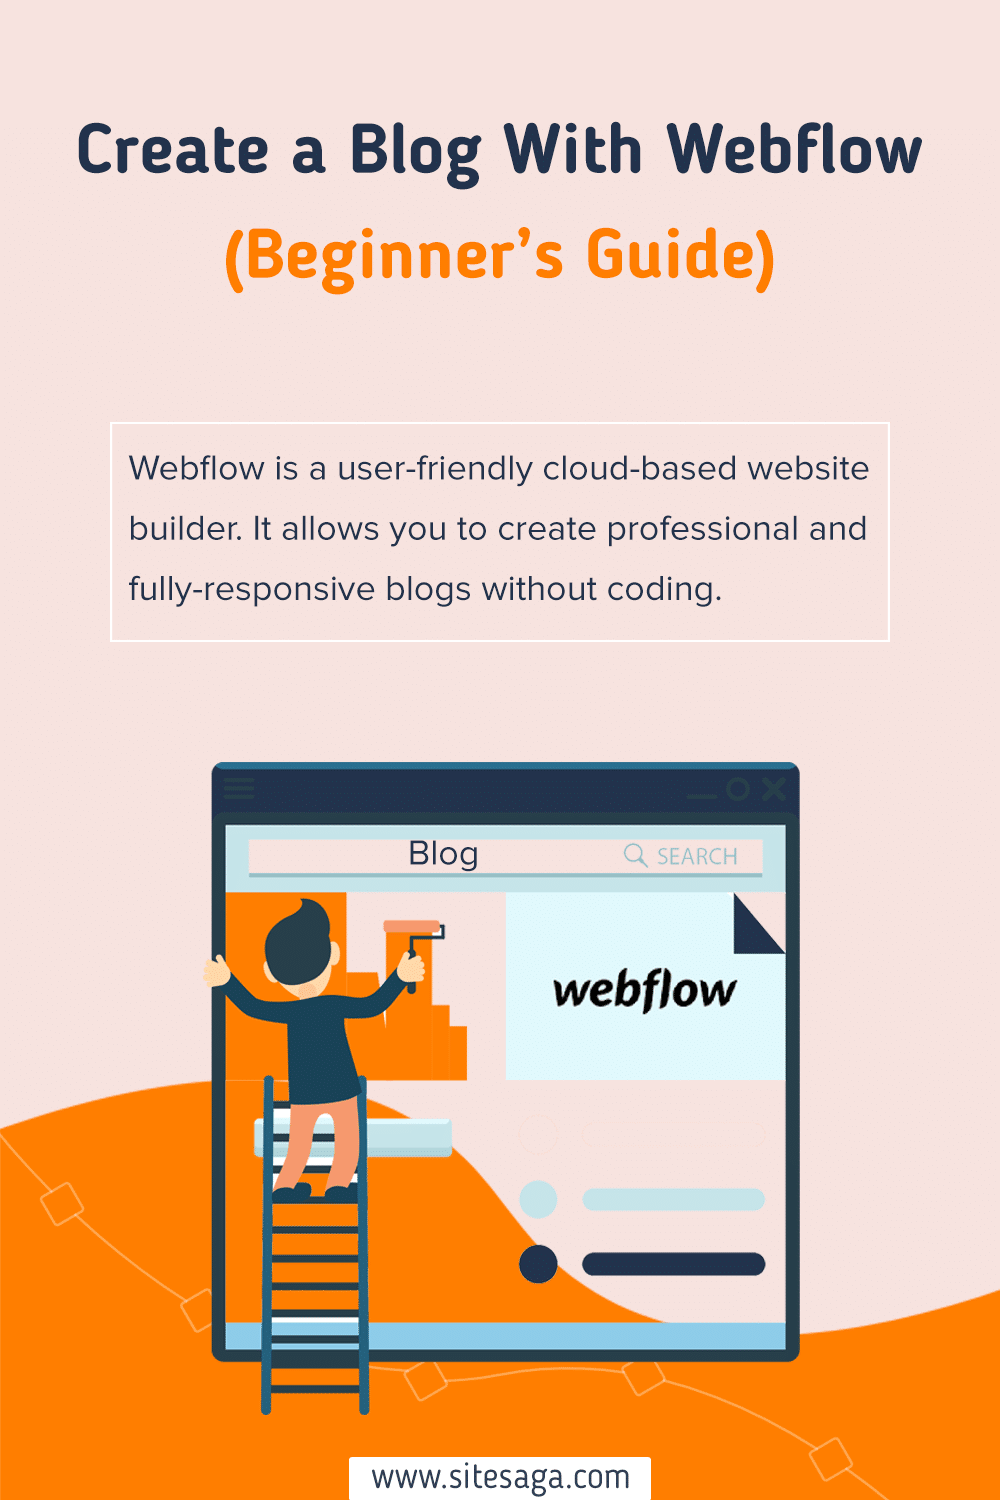
Are you wondering how to create a blog with Webflow? Look no further, because you’re in the right place.
Webflow empowers you with its intuitive interface, limitless design possibilities, and seamless functionality. It provides a user-friendly environment that allows you to craft visually stunning and fully-responsive blogs.
No coding skills? No problem! Webflow’s drag-and-drop interface makes it effortless to design your blog. From selecting captivating color schemes to choosing elegant fonts, the design possibilities are endless.
In this article, we’ll show you exactly how to create a blog with Webflow. From setting up your Webflow account to creating and designing your blogs. We’ll cover all the essential steps you need to take to start seeing results.
Let’s dive in and learn how to create a blog with Webflow and take your website to the next level!
Understanding Webflow
If you’re new to Webflow, then it’s important to understand what it’s and how it works before starting a website. First, let’s briefly introduce it.
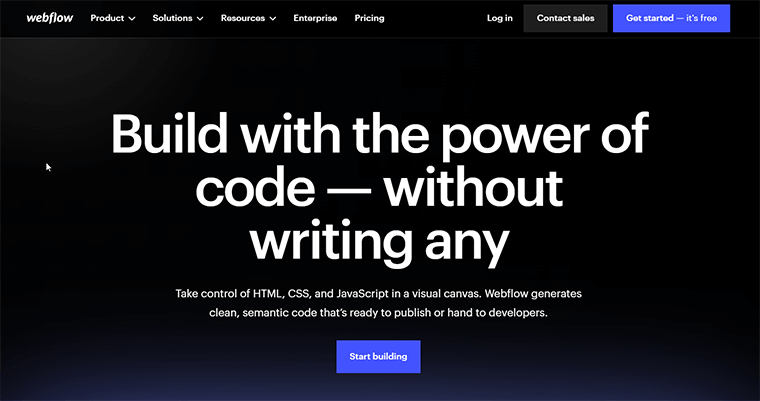
Webflow is a web designing platform that enables you to create beautiful and interactive websites. It combines the flexibility of a visual design tool with the power of a content management system.
Moreover, you can bring your ideas to life without the need for coding expertise. It’s a platform that allows you to unleash your creativity. Hence, build any type of website that truly represents your brand.
Additionally, Webflow’s user-friendly interface makes it a breeze to navigate. From the moment you log in, you’ll be greeted by an intuitive dashboard. That puts all the necessary tools at your fingertips.
Furthermore, the clean and organized layout ensures that you can easily find what you need. Whether it’s designing elements, managing content, or tweaking the site’s settings.
Therefore, with Webflow, creating your blog becomes an enjoyable and seamless experience. So, let’s learn to create a blog with Webflow.
Check out our article on what makes a good website to map out your online journey.
How to Create a Blog with Webflow?
Now that you understand what Webflow is. So, you might be wondering how to use it effectively to create a blog.
Here are the steps that can help you create a blog with Webflow and drive traffic to your site.
A. Planning Your Blog
Begin your quest by setting a clear purpose for your blog. Ask yourself what message you want to convey and how you wish to impact your readers. Whether it’s sharing personal stories or providing expert advice, pinpointing purpose gives your blog a unique essence.

In addition, you’ll discover a plethora of stunning blog designs and layouts. Allow your creativity to soar as you choose one that complements your content. So, it captivates readers but also reflects your blog’s personality.
Additionally, map out the virtual landscape of your blog with a well-organized content structure. Also, divide your ideas into distinct categories, creating an easy-to-navigate path for your readers.
As a result, this thoughtful approach will keep your audience engaged. Plus, they’ll come back for more as they embark on a seamless journey through your blog.
B. Setting Up Your Webflow Account
To set up a Webflow account, follow these simple steps:
Creating an Account on Webflow
To begin creating your Webflow account and embark on your blogging journey, follow these steps:
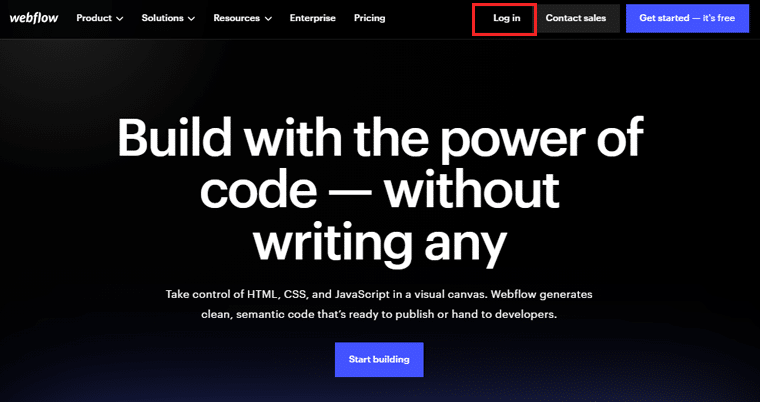
First, visit the official Webflow website. This is where you’ll find all the necessary tools and resources to build your blog.
Now, locate the “Log in” button on the website’s homepage and click on it.
Since you’re creating a new account, click on the option to sign up. Fill in the required personal details, like your name, email address, etc.

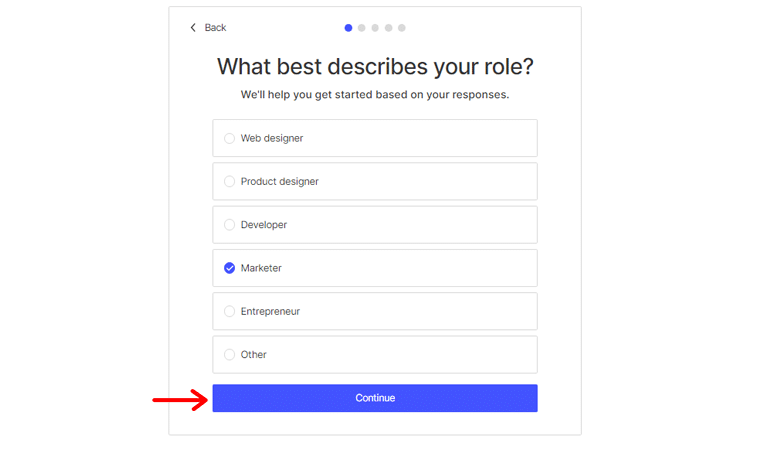
After that, click on the “Create Account” button. Next, specify your role or profession. Select “Marketer”, as it aligns with your intention of creating a blog.
Once you’ve chosen your role, click on the “Continue” button to proceed.
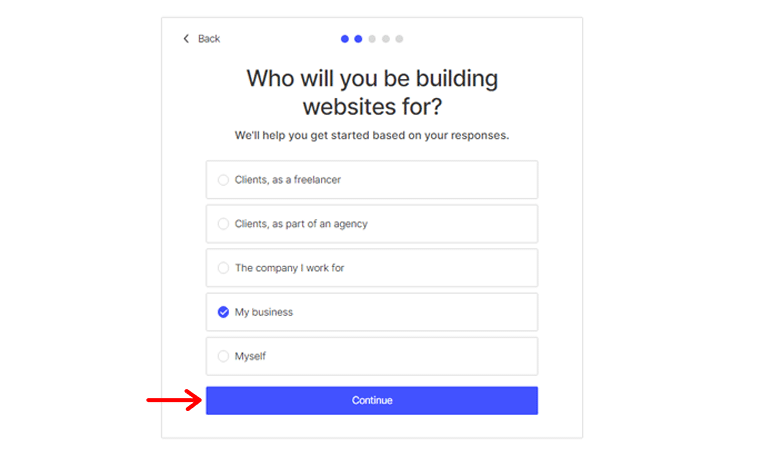
Following that, Webflow will ask you, “Who will you be building websites for?” In this case, select “My Business” to indicate that you’re building the blog.
Click on the “Continue” button to proceed further with the setup process.
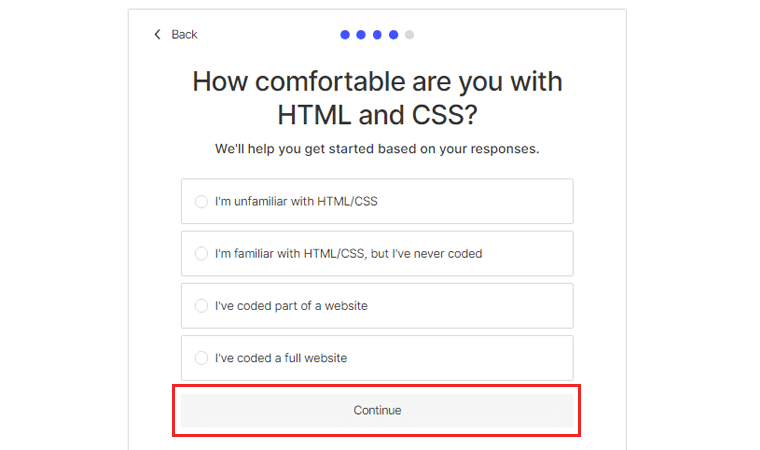
At this stage, Webflow will inquire about your familiarity with HTML and CSS. Choose the option that best represents your comfort level.
After making your selection, click on “Continue” to move on to the next step.
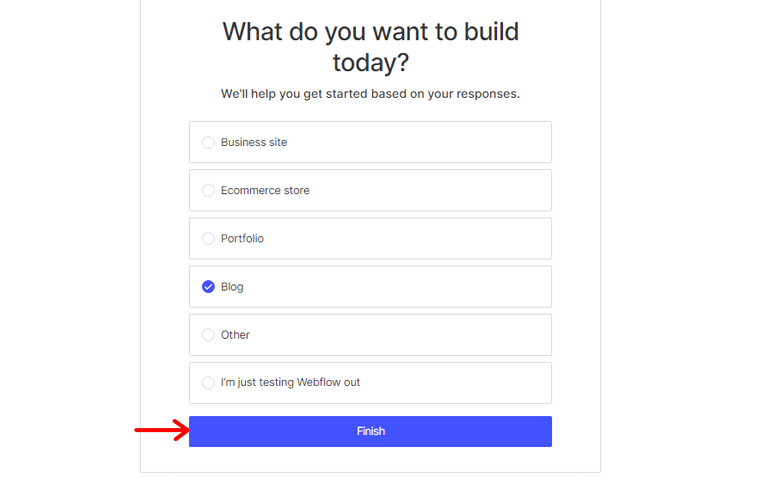
Now it’s time to specify what you want to build using Webflow. Since your goal is to create a personal blog, choose the “Blog” option from the available choices.
Once you’ve made your selection, click on “Finish” to complete the account setup process.
Congratulations! You have successfully created your Webflow account, taking the first step towards making your blog.
Now it’s time to dive into the exciting world of Webflow’s features.
Exploring Different Pricing Plans
Webflow offers various pricing plans to cater to different needs and levels of functionality. Go to your Webflow dashboard, where you can access all the features and settings.
Once you’re in the dashboard, locate and click on the “Pricing” menu. This will take you to the page where you can choose pricing plans.
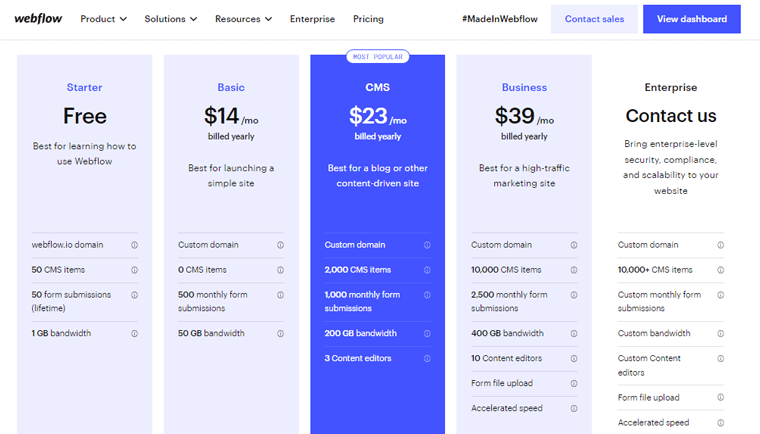
Take some time to carefully review each plan and its details. Pay attention to factors like the number of form submissions, CMS (Content Management System) features, etc.
Click on each plan to expand and see more details about what it includes. This will provide you with a comprehensive overview of the features and limitations associated with each plan.
After making your decision, click on “Add Site Plan” associated with your chosen pricing option. And You’re done!
Now moving on to the next section on how to create a blog with Webflow.
C. Designing Your Blog
Designing your blog with Webflow is an exciting journey. This platform allows you to unleash your creativity and build a stunning online presence. Whether you’re a seasoned blogger or just starting, its intuitive platform offers a plethora of design options.
In this section, we’ll explore the essential steps to designing your blog from scratch.
1. Choosing a Suitable Webflow Template
Before diving into the design process, selecting the right template lays the foundation for your blog’s aesthetics. Besides, Webflow provides many beautifully crafted templates designed specifically for blogs.
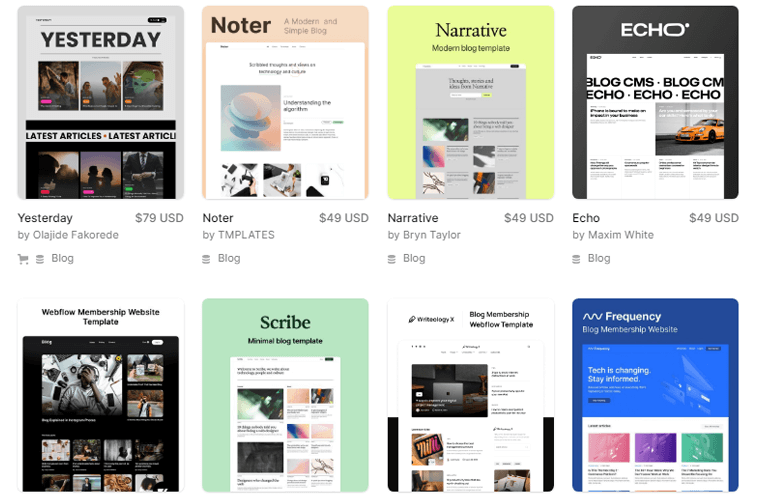
Moreover, when choosing a template, consider your blog’s niche, target audience, and desired visual identity. Also, explore the templates that align with your content and resonate with your vision. Once you find the perfect match, start customizing it and making it uniquely yours.
2. Customizing Colors, Fonts, and Branding Elements
Webflow empowers you to infuse your blog with personality by customizing it. This step is crucial as it creates a cohesive and memorable visual experience for your readers.
Begin by selecting a color palette that compliments your blog’s theme and aligns with your brand’s identity. Use vibrant colors to evoke emotions or subtle tones for a more minimalist feel.
Next, choose fonts that reflect the tone and voice of your content. Also, Webflow offers an extensive library of typography options, from classic to modern. Hence, ensuring your blog’s text is both visually appealing and easily readable.
Besides, don’t forget to incorporate your branding elements. For instance, use logos and icons, to reinforce brand recognition and consistency throughout your blog.
3. Adding and Arranging Blog Elements
With your template customized to perfection, it’s time to bring your blog to life. This is where you can experiment with different layouts to create a visually engaging blog.
So, start by adding essential elements like headers, footers, and navigation menus. These components provide a seamless user experience. Enabling readers to explore your blog effortlessly.
Next, integrate blog-specific elements like featured post sections, blog postcards, and author bios. Moreover, the visual editor allows you to drag and drop these elements. Therefore, it’s simple to create a captivating layout that showcases your content beautifully.
Additionally, leverage dynamic content and conditional visibility to personalize your blog. Based on user interactions, you’re delivering a tailored experience to every visitor.
D. Creating Blog Posts
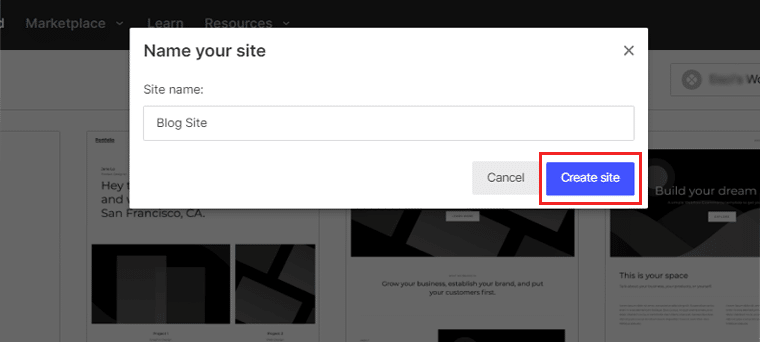
In the Webflow Editor, locate the Workspace section where your existing posts are stored. Click on the “Add New Post” button to create a new blog post.
This will open up a blank canvas where you can start crafting your content. Or choose any template of your choice and begin.
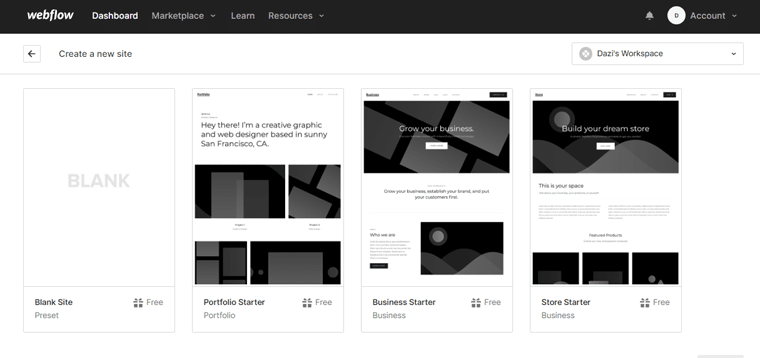
Now, start by entering the “Name” of your site and clicking on the “Create” option.
Then, proceed to write the body of your blog post. Utilize a mix of short and long sentences to maintain a dynamic flow in your writing.
Additionally, enhance the visual appeal of your blog post by incorporating elements like images, videos, or infographics.
Furthermore, structure your blog post using headings and subheadings to improve readability. This helps your readers navigate through the content and understand the flow.
E. Creating Blog Categories and Tags
Organizing your blog posts into categories and tags helps readers navigate through your content. With Webflow, managing these categories and tags is a straightforward process.
Let’s explore how to create blog categories using Webflow:
Creating Categories
To begin organizing your blog posts into categories, follow these simple steps:
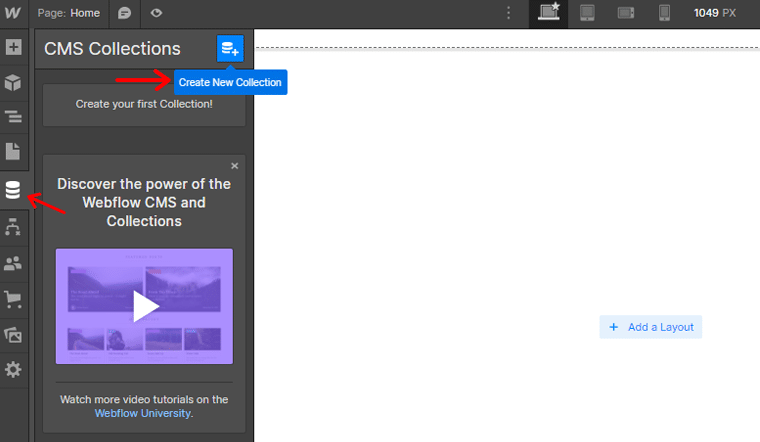
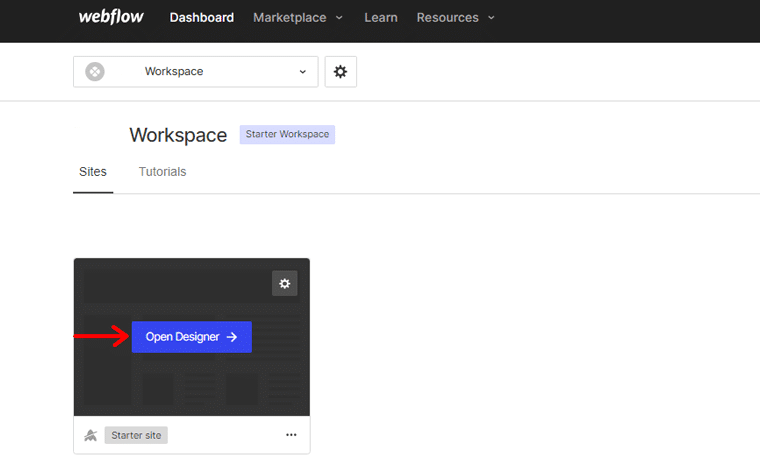
Firstly, log into your Webflow account and navigate to “Open Designer.”

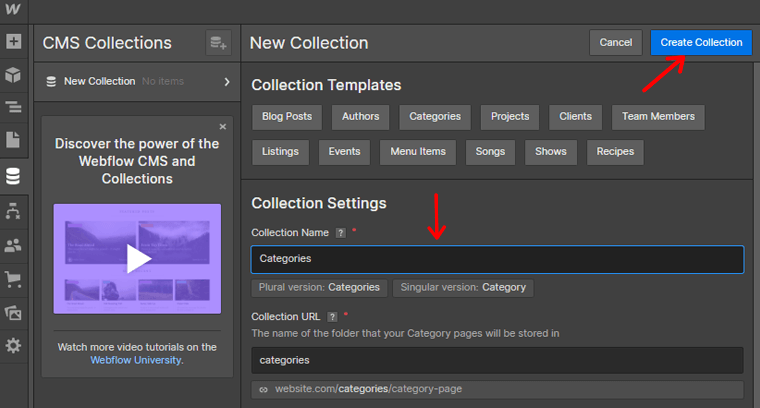
On the left-hand side of the screen, locate and click on the “Collections” tab. Within the Collections tab, you’ll find the “Add Collection” button. Click on it to create a new collection for your categories.

In the name field, enter the appropriate name for your categories. For instance, if you’re creating categories, you can type “Categories” as the name. After entering the name, click on the “Create Collection” button at the top of the screen.
A pop-up box will appear. In this box, select the “Create a New Category” option.
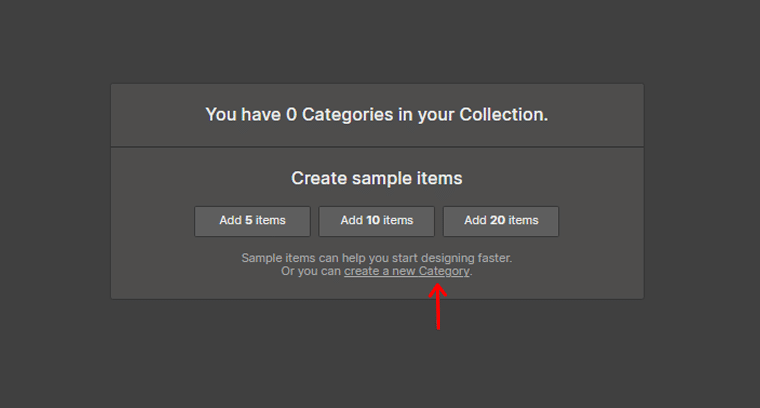
Provide a name for the category you’re creating, and then click on the “Create” option located in the top right corner. Now name your category and click on the “Create” option in the top right corner.

By following these steps, you can successfully create a category for your blog post.
Creating Tags
To begin organizing your blog posts into tags, here are the simple steps to follow:
Log into your Webflow account and navigate to the Designer.

On the left-hand side of the screen, locate and click on the “Collections” tab. Within the Collections tab, you’ll find the “Add Collection” button. Click on it to create a new collection specifically for your tags.
In the name field, enter a suitable name for your tags. For example, if you’re creating tags, you can simply type “New Tags” as the name to keep it concise and easily understandable.
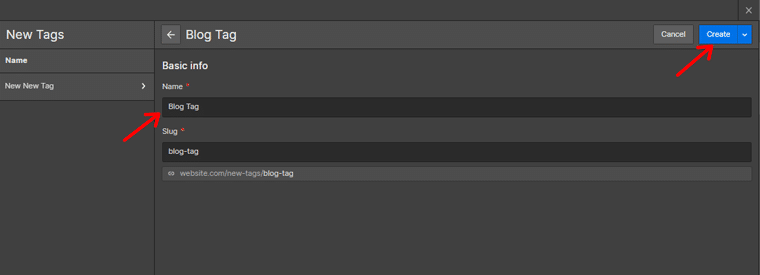
Once you’ve entered the name, click on the “Create Collection” button located at the top of the screen. A pop-up box will appear, here, select the “Create a New Tags.”
Provide a name for the tags you’re creating, ensuring it accurately represents the theme or topic associated with the tag.
Once you’ve entered the name, click on the “Create” option located in the top right corner.

By following these straightforward steps, you have successfully created tags for your blog posts.
F. Designing a Beautiful Homepage
The blog’s homepage is a digital front door that welcomes visitors and sets the tone for the entire browsing experience. Besides, designing a beautiful homepage is crucial to create an aesthetically pleasing platform.
Let’s get into the steps you can take to design a stunning homepage using Webflow:
Showcasing Featured Blog Posts
One way to make your homepage visually appealing and informative is by showcasing featured blog posts. These are the articles that you want to highlight and draw attention to.
Here’s how you can do it:
- Decide on the number of featured blog posts you want to display on the homepage.
- Choose visually captivating images or thumbnails that represent each blog post.
- Create an engaging title or teaser for each featured post that entices visitors to read more.
- Link each featured post to its respective full article page, allowing visitors to easily access the complete content.
By showcasing featured blog posts on your homepage, you create a visually appealing and engaging experience.
Creating an Engaging Introduction and Call-to-Action
Your homepage should include an introduction that captivates visitors. Here are some tips to create an engaging introduction:
- Craft a concise and compelling headline that immediately grabs attention.
- Write a brief description that provides an overview of your blog’s purpose.
- Incorporate a strong call-to-action (CTA) that encourages visitors to take a specific action, like subscribing.
- Use visually appealing design elements, such as colors, fonts, and graphics, to enhance the overall aesthetic.
Utilizing Dynamic Content
To keep your homepage fresh and up-to-date, consider utilizing dynamic content to display your recent blog posts. Dynamic content automatically updates based on the latest posts you publish.
Here’s how you can do it:
- Set up a dynamic list element on your homepage that pulls content from your blog’s collection.
- Configure the list to display a specific number of recent blog posts, like the three most recent articles.
- Customize the layout and design of the dynamic list to ensure it aligns with your blog’s overall visual style.
- Include essential information for each post, such as the title, featured image, publication date, and a brief excerpt.
- Link each post to its respective full article page to allow visitors to read the complete content.
Invest time in crafting an aesthetically pleasing and user-friendly homepage. So that it reflects the essence of your blog. Eventually entices visitors to dive deeper into your content.
A well-designed and user-friendly navigation system is essential for any blog. It helps visitors easily explore your content and find what they’re looking for.
In this section, we’ll explore how to implement effective blog navigation using Webflow.
Before diving into the design, take a moment to plan the structure of your navigation menu. Consider the main categories or sections of your blog and how you want them to organize.
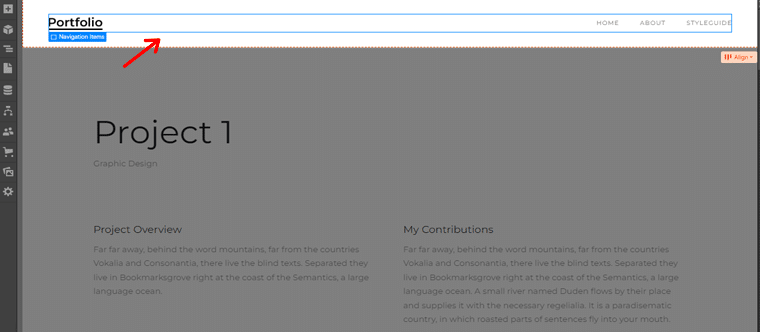
Start by logging in to your Webflow account and navigating to “Designer.”
In the Designer, locate the header section or any area where you want to add the navigation menu. This is typically found at the top of the page.
With the navigation bar selected, you can customize its appearance, layout, and behavior using the settings panel.
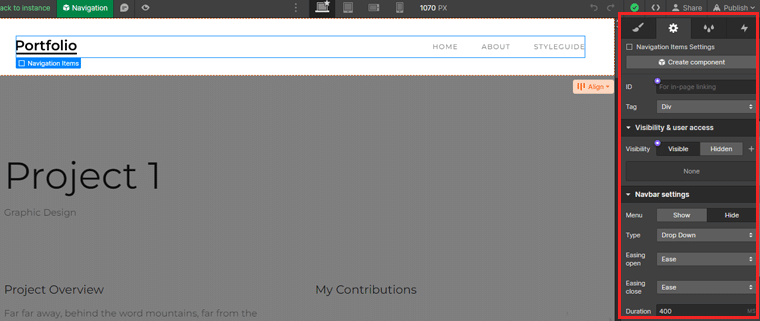
You can also choose different styles, adjust the alignment, and add dropdown menus if needed. Also, you can add menu items that correspond to the main sections.
And you’re done!
Take the time to design and optimize your blog’s navigation. And provide a positive user experience and keep your readers engaged with your content.
Let’s move on to the next section on how to create a blog with Webflow.
H. Enhancing User Engagement
When creating a blog, it’s crucial to focus not only on the content but also on enhancing user engagement. Because engaged readers are more likely to return to your blog, share your content, and become loyal followers.
There are several comment systems available that you can integrate into your Webflow blog. Popular options include Hyvor Takl, Disqus, Chatwoot, etc. Choose the system that aligns with your preferences and suits the needs of your audience.
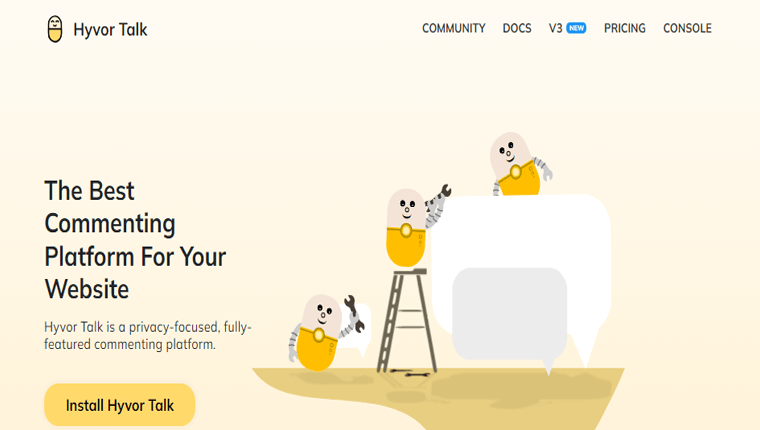
Here, we’ll guide you to add a comment section using Hyvor Talk.
Visit the Hyvor Talk and click on the “Install Hyvor Talk” option to create an account.
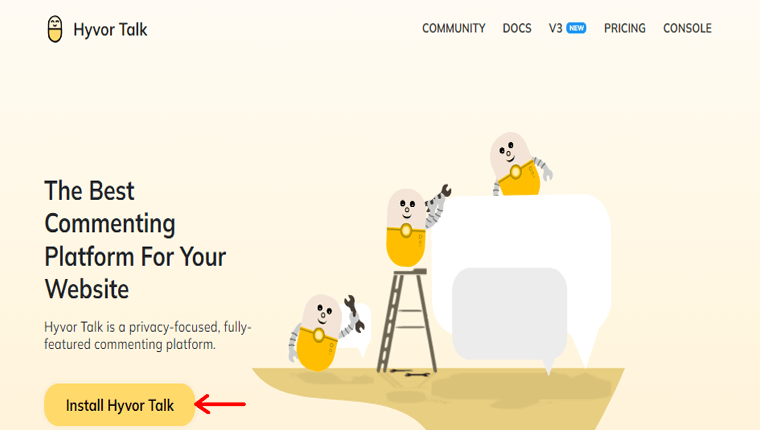
There enter your personal details and click on “Sign Up”.
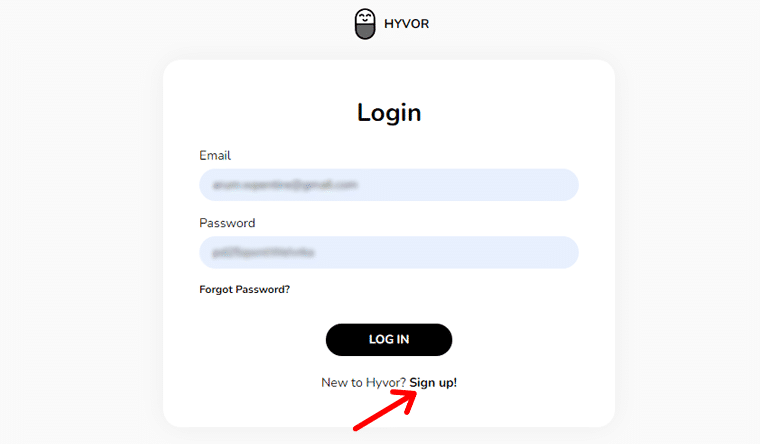
After signing up, you’ll receive a confirmation email. Once confirmed, you’ll be redirected to the Hyvor Talk console.
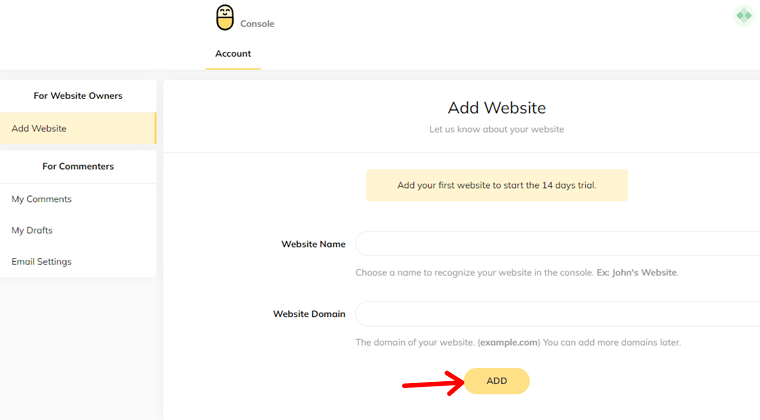
Add Website on Hyvor Console
In the Hyvor Talk console, enter a name for your website and provide your website’s domain. Then, click on the “ADD” button to add your website to the console.
Within the console, navigate to the installation section. Here, you’ll find installation guides for various platforms. Click on the “Copy” button. This code will be used to load the comments section.
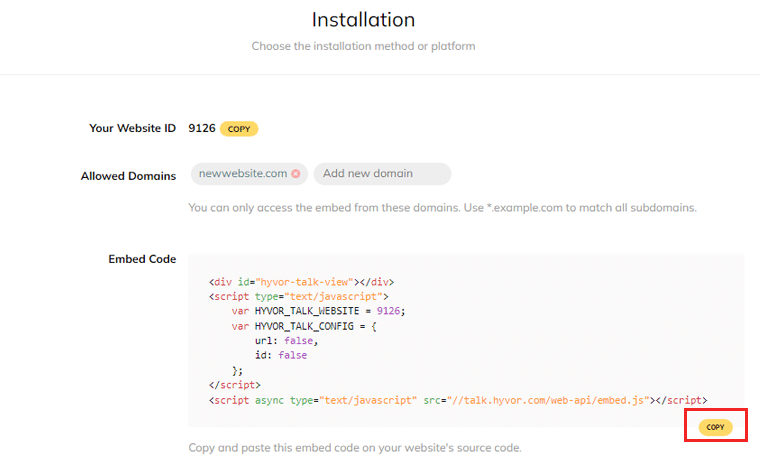
Now, open your Webflow project and locate the section where you want the comments to load. Typically, this is placed after the blog post’s contents. Add an embedded component to that specific location.
Paste the copied code into the code field of the embed component you added in the previous step. This will integrate the Hyvor Talk comment system into your blog.
Once done, save your changes in Webflow and publish your website. The comments section with reactions will now be visible on your blog.
Focus on fostering engagement and building a community around your blog. So to establish a loyal following and make your blog a vibrant hub of interaction.
I. Optimizing Your Blog for SEO
Search Engine Optimization (SEO) plays a vital role in increasing your blog’s visibility and attracting organic traffic. Optimize your blog for relevant keywords and improve its overall structure and content.
Therefore, you can enhance its chances of ranking higher in search engine results pages. This, in turn, can drive more targeted traffic to your blog and increase your readership.
Meta titles, descriptions, and URLs are critical elements that influence how search engines perceive and display your blog in search results.
To optimize these elements:
- Craft compelling and descriptive titles for each blog post, incorporating relevant keywords.
- Write concise and engaging meta descriptions that accurately summarize the content.
- Include relevant keywords and highlight the value.
- Create clean and readable URLs that reflect the topic or title of your blog post.
- Use hyphens to separate words and avoid using unnecessary characters or symbols.
Besides, Webflow provides built-in SEO tools and features that can help you optimize your blog effectively. Here are some best practices to leverage these tools:
- Keyword research: Conduct thorough keyword research to identify relevant keywords and phrases related to your blog’s topic.
- Image optimization: Optimize your blog’s images by adding alt text that describes the image’s content using relevant keywords.
- Structured data: Utilize Webflow’s structured data options to add schema markup to your blog posts. Providing search engines with additional context about your content.
- Mobile responsiveness: Ensure that your blog is mobile-friendly and responsive across different devices. Because it’s a crucial factor in search engine rankings.
- Site speed optimization: Improve your blog’s loading speed by optimizing image sizes, and minifying CSS and JavaScript files.
J. Making Your Blog Mobile-Responsive
In today’s mobile-driven world, ensuring that your blog is optimized for mobile devices is essential. With Webflow, you’ll have the ability to create a mobile-responsive blog that provides a seamless user experience.
Let’s explore the steps to make your blog mobile-responsive using Webflow:
Before launching your blog, it’s crucial to test its responsiveness on various devices. Follow these steps to test and optimize your blog:
1. Utilize Device Emulators
You can use device emulators like BrowserStack that allow you to simulate how your blog appears on different devices. Use these emulators to preview your blog’s layout, content, and functionality on different screen sizes.

Hence, you can give your users a seamless experience by testing on real devices and browsers.
2. Test on Physical Devices
While emulators are useful, testing your blog on actual devices is equally important. Check your blog’s responsiveness on popular mobile devices, including both iOS and Android platforms. This ensures that your blog delivers a consistent experience across a wide range of devices.
3. Optimize Images and Media
Mobile devices often have smaller screens and limited bandwidth. Optimize images and media files by compressing them without compromising quality. This helps reduce page load times, ensuring a smoother experience for mobile users.
4. Use Breakpoints
Breakpoints are specific screen widths at which your blog’s design adjusts to provide an optimal user experience. Identify the breakpoints that align with popular device sizes and adjust your blog’s layout accordingly.
5. Adjust Element Placement
Ensure that elements such as text, images, and navigation menus are appropriately positioned and scaled to fit different screen sizes. Use Webflow’s responsive design options to modify element properties at different breakpoints, ensuring a visually pleasing and functional layout.
6. Consider the Mobile-first Design
Adopt a mobile-first design approach by focusing on the mobile layout first and then expanding it for larger screens. This ensures that your blog is optimized for the most common device usage scenarios and provides a solid foundation for responsive design.
Once complete, you can create a blog that caters to the ever-growing mobile audience.
K. Adding Additional Functionality with Webflow Integrations
Creating a blog with Webflow opens up a world of possibilities, allowing you to customize and enhance your blog’s functionality. With a range of integrations available, you can add additional features and capabilities.
Let’s dive into the process of adding functionality to your Webflow blog through integrations:
Exploring Popular Integrations for Blogs
Webflow offers a variety of integrations that seamlessly work with your blog. Here are some popular integrations to consider:
- Mailchimp: By connecting your blog to Mailchimp, you can effortlessly collect email addresses from your visitors. Also, manage your email marketing campaigns to engage with your audience effectively.
- Google Analytics: Gain valuable insights into your blog’s performance and audience behavior with Google Analytics. Also, track metrics, like website traffic, visitor demographics, and popular content.
- Disqus: Enhance reader engagement and encourage discussions on your blog by integrating Disqus. It allows visitors to leave comments, reply to others, and engage in meaningful conversations.
- Zapier: Using Zapier, automate repetitive tasks and streamline your workflow. Simply create custom “zaps” that trigger actions between Webflow and other platforms.
Embedding External Media and Content in Blog Posts
Webflow allows you to embed external media and content seamlessly within your blog posts. Here are some options to enhance your blog’s visual appeal.
- YouTube or Vimeo videos: Embed videos from YouTube or Vimeo directly into your blog posts. This allows you to share video content, tutorials, or interviews, with your readers.
- SoundCloud or Spotify audio: Enhance your blog posts with embedded audio tracks from SoundCloud or Spotify. This is particularly useful if you’re sharing podcasts, interviews, or music-related content.
- Social media posts: Embed social media posts from platforms like Twitter, Instagram, or Facebook to showcase relevant conversations. Or to encourage social sharing and interaction.
Enhancing Functionality with Third-party Apps
In addition to integrations, Webflow supports a wide range of third-party apps that can enhance the functionality and user experience of your blog.
Here are a few examples:
- AddThis: This helps to enable social sharing buttons on your blog posts. Making it easy for readers to share your content across various social media platforms.
- Typeform: Use Typeform to create interactive and engaging forms for surveys, feedback, or lead generation. Also, it helps to gather valuable insights and drive user interaction.
- Hotjar: Gain deeper insights into your readers’ behavior and interactions using Hotjar. This tool provides heatmaps, session recordings, and user feedback.
These integrations and tools empower you to create a more engaging, interactive, and personalized experience for your readers. Take advantage and elevate your blog to the next level.
Check our detailed tutorial article on adding social share buttons for more guidance.
Moving on to the next section of this article on how to create a blow with Webflow.
L. Publishing and Launching Your Blog
Once you’ve crafted your blog posts and fine-tuned your design, it’s time to publish and launch your blog. This is an exciting milestone where your words and ideas come to life on the web.
To ensure a successful launch, it’s essential to take certain steps to preview and test your blog.
- Review your content: Ensure that the text is free from grammatical errors, typos, and formatting issues. Pay attention to the readability and flow of your content.
- Check your links: Go through each blog post and click on the internal and external links. Fix any broken links and verify that they direct users to the intended destination.
- Test responsiveness: Test your blog’s responsiveness across different devices and screen sizes.
- Validate forms and interactive elements: If your blog includes forms, comment sections, or other interactive elements, test them thoroughly.
- Optimize loading speed: Test the loading speed of your blog using tools like Google PageSpeed Insights or GTmetrix.
- Proofread design and layout: Carefully review the design and layout of your blog. Pay attention to typography, spacing, and overall visual appeal.
- Test navigation and user flow: Test the menu, search functionality, and any navigation elements to ensure they are intuitive and easy to use.
Setting up a Custom Domain and Publishing Blog
There are numerous domain name providers where you can purchase your domain. Some of the best domain name generators that we’d recommend are Nameboy, DomainWheel, and Instant Domain Search.
Take the time to compare prices and consider selecting a professional and fitting domain. Once you’ve made your decision, proceed with the purchase.
Keep in mind that adding a custom domain requires upgrading your Webflow account to a paid plan.
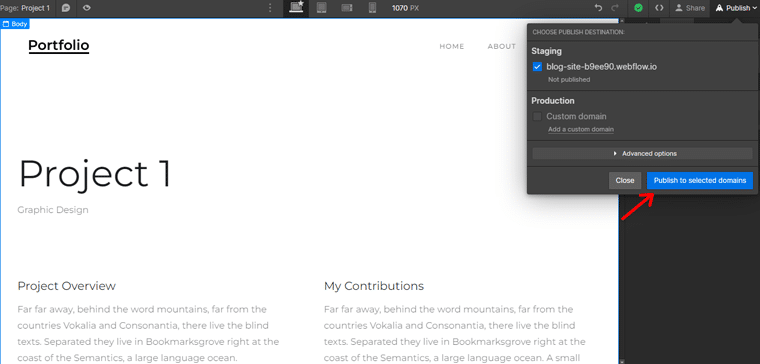
After that, simply go to the “Publish” button in the top right corner. Then choose the domain you want to publish your blog. Finally hit the “Publish to Selected Domain” button.
Go through our article on how to choose a domain name for your blog for detailed information.
Promoting Your Blog
After creating your blog, it’s crucial to promote it effectively to gain visibility and attract readers. While sharing your blog’s link across various platforms is a good start. It’s important to pay attention to SEO for better results.

Therefore, consider utilizing a reliable SEO tool to optimize your blog and enhance its visibility in search engine rankings. Additionally, make use of an analytical tool to monitor user behavior and understand the sources of traffic to your blog.
That’s all with our steps to create a blog with Webflow. Moving on we’ll give you some tips and tricks. Let’s move on!
Final Tips and Best Practices
Creating a successful blog with Webflow is an exciting journey filled with endless possibilities. To help you make the most of your blogging experience, here are some of the tips.
- Establish a regular blogging schedule to engage your audience and build momentum.
- Aim to publish new content consistently, whether it’s weekly, biweekly, or monthly.
- Define your audience’s demographics, interests, and pain points.
- Incorporate powerful words, ask questions, or offer valuable solutions to pique curiosity.
- Focus on delivering informative, engaging, and well-researched articles that provide solutions, answer questions, etc.
- Enhance the visual appeal of your blog by including eye-catching images, infographics, videos, or other multimedia elements.
- Implement effective search engine optimization strategies to improve your blog’s visibility in search engine results.
Creating a blog is a creative and rewarding endeavor. Embrace the process, enjoy expressing your thoughts and expertise, and connect with your audience.
Remember that building a successful blog takes time and effort. So stay patient, persistent, and passionate about what you do.
Conclusion
That’s the end of our beginner’s guide on how to create a blog with Webflow. We hope that it’ll help you to create a blog with Webflow.
By following these steps, you can acquire the knowledge and tools necessary to bring your blogging aspirations to life. All you need to do is get started now!
If you’ve any further queries on how to create a blog with Webflow, then please leave a comment below. We’ll try to get back to you as soon as possible.
You may also want to explore our comprehensive guides on how to start a blog and make money and the benefits of personal blogging.
Lastly, don’t forget to follow us on Facebook and Twitter. And, please share this guide on your social media accounts and spread the message!