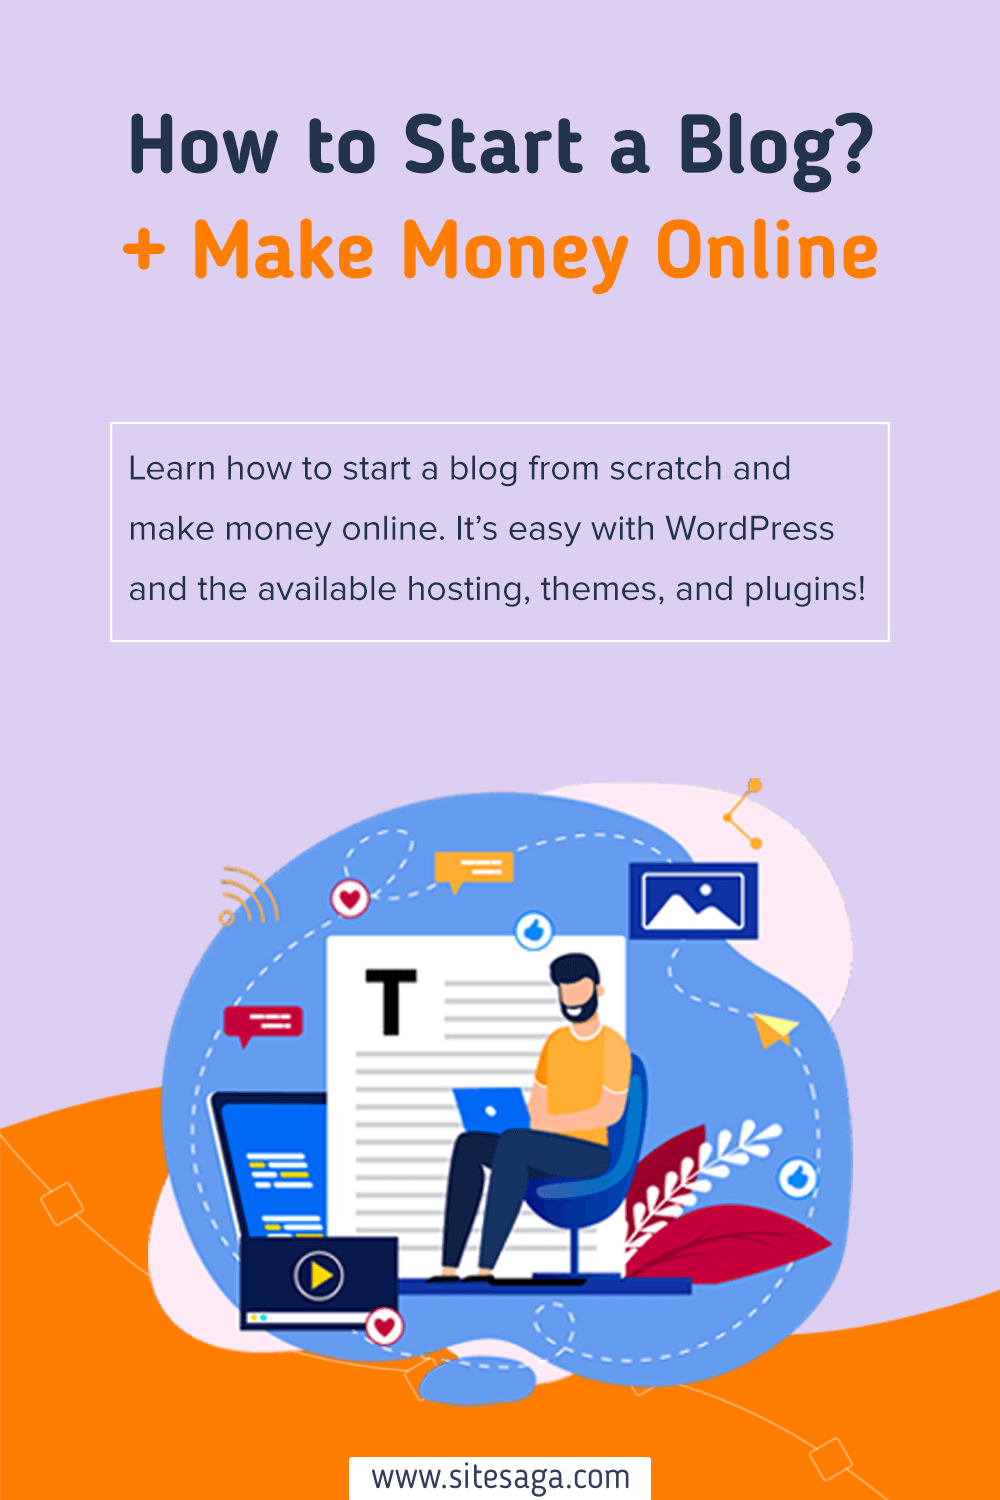
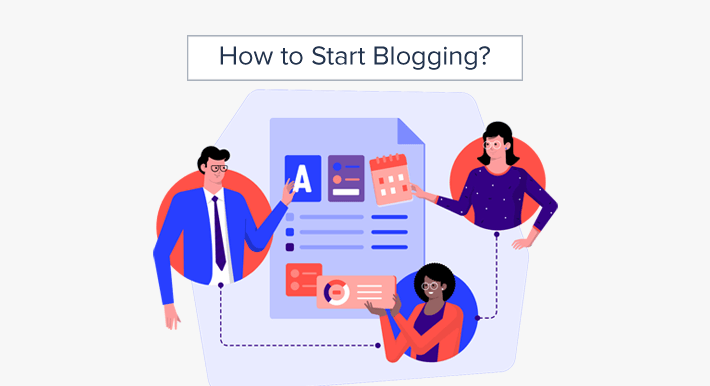
Are you trying to find a simple guide on how to start a blog and make money out of it? Then, you’re in the right place.
Yes, it’s possible that a beginner can make money with a blog. Woohoo, the internet has given us that freedom! Now with this, we can become digital influencers and earn an income from anywhere in the world.
In this article, we’ll show you exactly how to create a blog for beginners and start earning money online. We’ll walk you through each step to make it all clear.
Let’s begin!
A. What is a Blog? Should You Really Start Blogging Now?
In short, blogs kicked off as simple text entries. As it was derived from the word Weblog (web + log) which usually means nothing more than an online diary.
Nowadays, blogs are much more than that! Broadly, a blog is an informational website that contains articles about a specific niche or subject and the articles are displayed in reverse chronological order – the most recent blog post appears first.
For example, SiteSaga (the website you’re currently viewing) is a blog. We publish articles on the website about website-building regularly.
In other words, a blog is a type of website that contains regularly updated content.
The content present in that blog is usually referred to as entries, blog posts, or articles. Similarly, the people who create and maintain blogs are called bloggers.
Early-day bloggers used to write their blogs from a personal perspective to connect with their audiences. But nowadays, blogs vary in nature, niche, as well as effort.
You can find various types of blogs from individual diaries to political campaigns, marketing blogs to news programs, business affiliates, and more. They range in scale from the writing by an individual author to the collaboration of an outsized community of writers.
To conclude, people are using blogs for a variety of purposes – to share information, market products, entertain people, earn money, etc. And, it’s important to note that many organizations and business owners are using blogs to market their services and products.
Should You Really Start Blogging Now? (5 Top Reasons)
Many people think that to start a blog and be successful in it, you need to be a great writer. The truth is that you don’t need to be an expert. Just share your views or ideas with the world on any topic you like. For that, all you need is a passion to write for your topic.

But you also need more interesting reasons, right? Don’t worry, here are the top 5 reasons why you should start blogging right away!
1) Perfect Way to Express Yourself
Today the internet has given us the freedom to raise our voices and be heard by millions of people. Also, who doesn’t want to be heard? Hence, a blog is such a platform that allows you to share your opinions and thoughts with the entire world.
Likewise, just knowing that your stories are being heard is something rewarding enough in itself. To start, you can just write about your daily thoughts and experiences so that others can all be a part of their lives.
2) Make Money
Most people start their blogging journey as a personal blog which is quite fun at the beginning. However, if done correctly, blogging can be quite profitable.
There are lots of people who work as full-time bloggers and earn quite a bit. Similarly, even a part-time blogger has been found to make a wholesome profit if they do it correctly.
Blogging can be one way of earning a passive income just by spending a few hours a week writing a piece of your favorite content. And from that, you can continuously earn profit even after writing is finished.
3) Promote Your Business
A successful blog can help you gain a ton of recognition in your respective field. In addition to that, it can be one of the most cost-effective and easiest ways to promote your business.
A good blog can attract more traffic and increase your sales. Besides that, it’s the best way to establish yourself in your industry and even helps you reach new markets.
4) Creates a Community
Blogging can establish a sense of community by opening a space for communication and encouraging interaction. With every blog post you publish, people can comment on it.
In this way, it creates a good healthy connection with the people who are interested in the same thing as you are. With that, you would be able to share your knowledge and thoughts with those people based on your experience.
Not only that, they can be your motivation to write even more blog posts and even allow you to learn from them as well.
5) Complement Your Website
If you’ve ever gone through some other popular website, then you might have seen that they’ve added a Blog section to it.
Adding a blog to your website can help your visitors connect with what you have to say and offer. Likewise, it even drives targeted traffic to your website.
B. How to Start a Blog? (Ultimate Guide for Beginners)
Being a new blogger, it’s always difficult to know where to start. Although you keep on hearing that people are making money with their blogs. And you somehow feel quite confused.
Hence, we bring you a comprehensive guide on how to make money from blogging for beginners. We’ve put forward a step-by-step plan to teach you how to start earning passive income from your blog.
Let’s begin with the first step – picking popular and profitable topics for your blog.
Step 1: Pick a Topic/ Niche for Your Blog
Once you’ve decided that you’re going to start your blog, now you might be asking, “What should I blog about?”
Hence, the very first thing you need to do is to pick the niche for your blog. By niche, we mean to find the topic that you can most identify your blog with. For instance, our niche is “technology” since we write about different kinds of technical subjects related to website building.
By now you may have already selected a niche or maybe you haven’t. Always remember that picking a perfect niche is always crucial to succeed in blogging. Although you can blog just about anything, you need to find one thing to write about.
How to Choose an Appropriate Blogging Niche?
However, if you don’t have an idea for a topic already, then here are a few ways to choose your blog niche:
- Interests and Passions – For newbies, pick the topic that you know better or are comfortable with. Go with that topic that you most like to talk about, and you can comfortably talk about it for hours.
- Know Your Audience – Make sure that you conduct your market research to know whether your audiences are interested in your niche or not.
- Pick Smaller Niche – It’s always good to have good healthy competition between the competitors. Therefore, if you ever find too many competitors for your choice of niche, you can narrow down your niche by picking a smaller niche.
- Check Niche Size – You need to choose an appropriate-sized niche. Because instead of aiming for an audience of “everyone”, go with a specific audience group.
- Monetization – Finally, you need to look for whether your niche of choice generates some money or not. Although it’s fun to blog about your interests, it’s even better if it generates a nice income out of your blog as well.
What are Popular & Profitable Topics for Blogging?
If you’ve already gotten a topic for your blog then you can skip this one. Or else here are a few examples of blog niches that help you earn money from blogging.
Personal Finance Blog
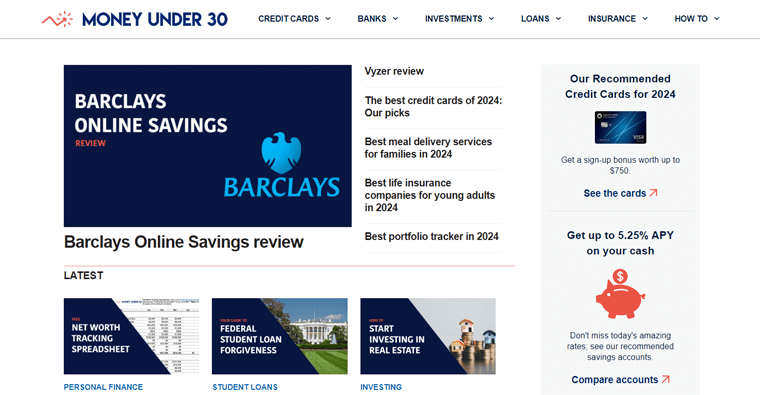
Personal finance is one of the most highly-demanded niches out there on the internet as everyone wants to know how to make and save more money. In recent times, topics like investing, frugality, and budgeting have become a keen interest for more people.
However, to jump into it, it’s not as easy as it seems, As it’s always a good thing if you have a formal finance-related education. In this way, you can at least handle your own money, and share tips and tricks with your readers.
Health and Fitness Blog
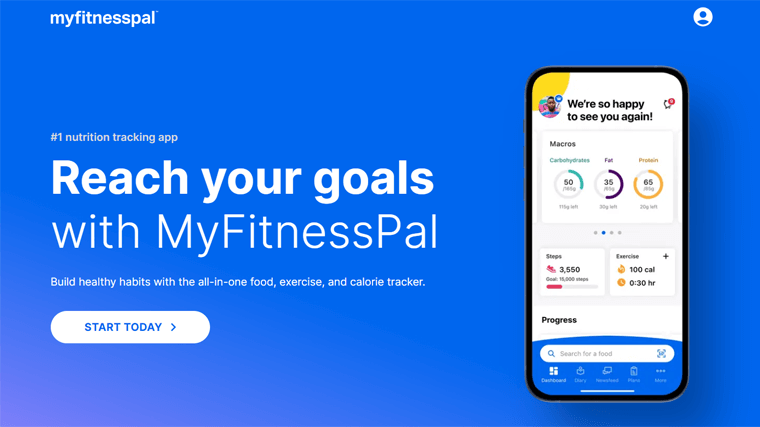
Health and fitness are some of the most contentious and profitable blog niches. It’s a huge topic where you can definitely find a large audience if you’re thinking about blogging in this area.
Many people can be found constantly searching for fitness advice, a gluten-free diet, or CrossFit that can help them lead a better life. However, before going with this profitable blog niche, you need to know your stuff and have the proof/evidence to back it up.
Plus, it’s a perfect bogging niche if you’re a doctor, certified dietitian, licensed fitness instructor, or have an incredibly personal story related to the topic.
Lifestyle Blog

A lifestyle blog is a multi-topics blog where you can write about a range of different topics. And somehow all those topics are connected through having the same audiences.
Somehow nowadays, this kind of blog is becoming quite popular. As it’s a perfect niche for those who aren’t sure about what to blog about or want to blog about a multitude of things. However, you need to make sure that your blog has a clear brand to give it focus and direction.
Food and Drinks Blog
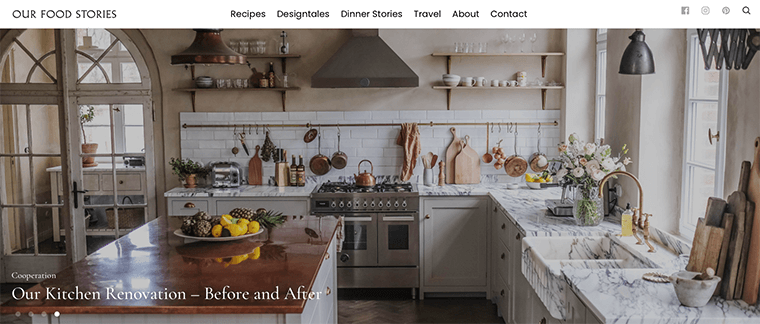
Who doesn’t love to eat delicious and mouth-watering food! Food is something that always brings people together. Therefore, food blogs are perhaps one of the most saturated niches out there.
If you love eating almost anything or criticizing every food that you eat for the first time, then it makes sense that you have to start a food blog. Similarly, if you have a strong culinary background or a passion for baking then you must also give it a try.
Many food bloggers out there seem to be earning a wholesome amount through advertising, affiliate links, or restaurant and bar reviews.
Technology Blog
Technology is another fast-paced niche topic that is great for making money from affiliate income, or from software companies themselves.
Technology is transforming every inch of our lives. With this happening, it’s an over-accomplishing topic that could cater to a large number of tech-savvy audiences.
With new techs launching every week, you can write in-depth product reviews with lots of links to products or software using affiliate links. Also, you can start writing tutorials on how to use a specific piece of software or gadgets too.
Travel Blog

If you love traveling, exploring new places, or meeting new people, then a travel blog can be a great companion during your trips.
Many people love traveling but cannot either afford it or don’t have the time. Then, for those people, you can be one who can share your travel stories and make them see the world from your eyes.
Hence, travel blogs seem to attract a lot of traffic which makes them extremely easy to monetize. You can monetize your blogs through affiliate links to hotels, recommended travel agents, and so on. And, sometimes you even get lucky with free vacations around the world.
But that’s not all! There are many other popular and profitable blogging topics in the market. Such as education, DIY, marketing, science, yoga, sports, personal development, entertainment, etc. Find the best blog website examples here!
Step 2: Choose the Best Blogging Platform
Now that you’ve finalized your blogging niche, it’s time to decide where you should create your blog.
There are many blogging platforms available out there in the market. And all those platforms differ from one another in terms of price, features, ease of use, and more.
Hence, you need to be careful while choosing a blogging platform for yourself.
How to Choose a Blogging Platform?
Before heading to the list, let’s look at a few elements while selecting the best platform for your blog.
- Easy Learning Curve: If you’re new to blogging, you probably shouldn’t start with an overly complex platform. Always go with those platforms that are fairly straightforward to get started with.
- Cost-Friendly: As per your budget, consider whether you can afford a paid blogging platform or not. However, the platform that you are going with must deliver precisely what you need.
- Customization Option: A good blogging platform should give you the freedom to create your blog the way you want.
- Audience-Building Tools: As your blog grows, you will want your audience to grow with that. Make sure that your blogging platform supports all the tools that help you build audiences.
- SEO-Friendly: To attract high traffic and rank better in search results, you’ll have to look for an SEO-built-in blogging platform.
- Monetization Option: In the beginning, you may have not planned to make money from blogging. However, you should opt for a platform that offers better monetization options.
With all that in mind, let’s look at some of the best blogging platforms to start with.
What are Different Popular Blogging Platforms?
Here are the popular blogging platforms you can use to start your own blog today:
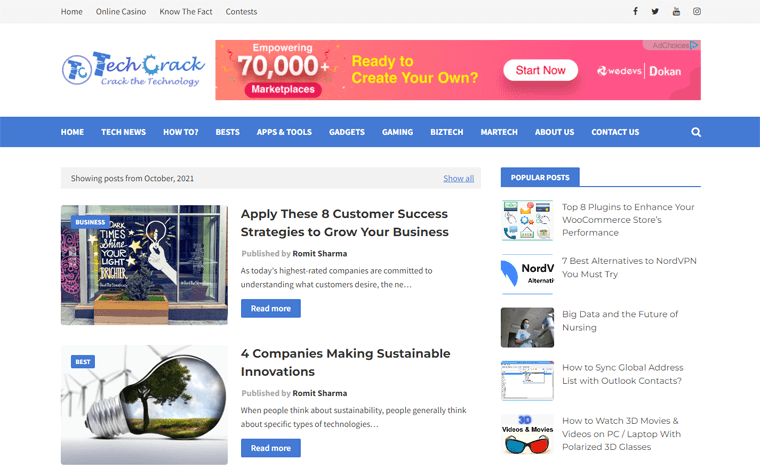
1) WordPress.org – Best for Creating Highly Customizable Blog
WordPress is the most popular blogging platform that powers over 43% of websites worldwide. It’s open-source and free software that allows you to build your blog within minutes.
You can download this software from WordPress.org for free. After that, choose web hosting and a domain name, and build your blog. It comes with a powerful yet user-friendly editor that makes it easy to create any type of content on your blog.
Hence, WordPress is a perfect choice for both personal blogs as well as professional blogs.
Pricing
WordPress is a completely free website builder specialized for blog sites. So, you can start building your blog once you install WordPress.
However, the cost may apply if you’re using a premium plugin or theme for advanced features. In addition, you need to pick a host yourself so that the blog is available for everyone. Each host has separate pricing schemes, which you’ll learn later.
2) Blogger – Free Blogging Platform Backed by Google
After WordPress, Blogger is another free and popular blogging platform. It’s one of the oldest blogging platforms that was first launched in 1999 by Pyra Labs and later acquired by Google in 2003.
The best thing about Blogger is that it’s quick and easy to create a blog even for non-techy beginners. To start, all you need is a Google account and you’re ready to start with your first blog.
Also, it provides you with a free blog address that looks like www.yourblogname.blogspot.com.
Pricing
Similarly, Blogger is also a free platform for implementing blogs. It’s ideal for beginners who want to blog for free.
Also, check our detailed WordPress vs Blogger comparison!
3) Wix – Best Blog Web Builder for Beginners
Wix is a fully-hosted blogging platform that helps you create a full-fledged website with a blog included. It’s one of the most versatile blogging platforms. Hence, even people with no coding background can easily create their websites without any restrictions.
Additionally, it uses Wix Artificial Design Intelligence (ADI) which helps you design your website visually by simply entering your preferences. Overall, it’s an intuitive drag-and-drop editor and its tools help you create individualized layouts and designs.
Also, it offers many SEO features from alt tags for your images and internal links to SEO titles and descriptions.
Pricing
Wix is a premium platform having its hosting service. So, you must pay to build and launch your blog. The starting cost of Wix is $4.5 per month having basic requirements for a blog website.
You might also want to check our side-by-side comparison of WordPress vs Wix!
4) WordPress.com – Hosted Version of WordPress
Just like WordPress.org, WordPress.com also allows you to create websites using the open-source WordPress software. But it’s a fully-hosted platform while WordPress.org is self-hosted. For more details, please read WordPress.com vs WordPress.org.
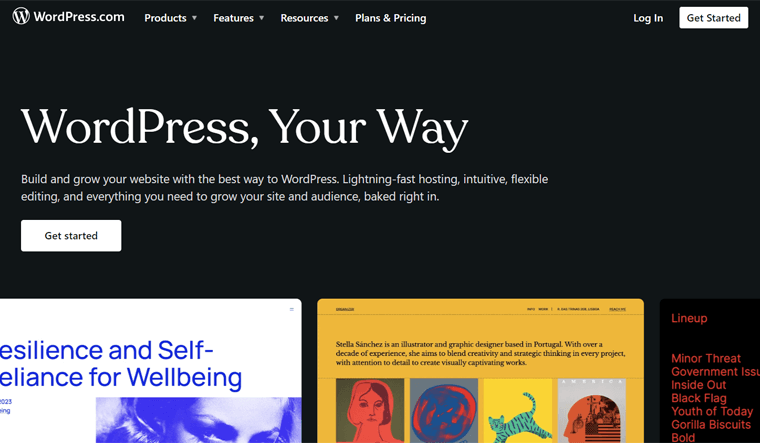
It’s a hosting plus website building tool provided by Automattic, the company by Matt Mullenweg who’s the co-founder of WordPress. It offers you a wide range of plans to start a blog or website.
To begin with, you can choose a free plan that takes care of your hosting and even provides a free subdomain. And your free subdomain would look like this: https://yourblogname.wordpress.com.
Hence, WordPress.com is a perfect blogging platform for those absolute beginners with no technical knowledge. Also, for those who don’t want the overwhelming features of self-hosted WordPress.
Pricing
WordPress.com is a freemium website builder with a hosting infrastructure. If the free plan is limited, then go with a premium plan starting at $4 per month.
Also, check our WordPress.com vs Blogger to pick one of the hosted blogging sites.
5) Medium – Best For Writers, Bloggers, and Journalists
Medium is different from the rest of the blogging platforms discussed above. Unlike other blogging platforms, it’s an already popular blogging network with a built-in audience.
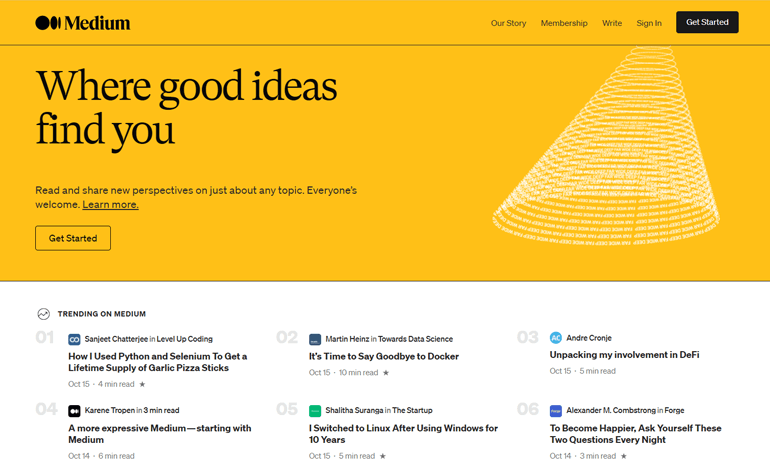
In fact, it’s a healthy community of writers, bloggers, journalists, and experts. And, it delivers content on diverse topics as anyone with an account can write.
Medium is super simple to use and also comes with built-in social networking features. However, it makes sure that you solely focus on your writing, instead of designing a website.
Also, it helps you generate tons of backlinks and makes your content more liable to rank higher on SERPs.
Pricing
Medium is also a freemium platform for blogging. You can start with a free account or upgrade to a premium one that costs $5 per month with unlimited access.
If you want to learn more, please check our full review and comparison of Medium vs WordPress.
Our Recommendation – WordPress.org
Among all the mentioned blogging platforms, we’d like to recommend that you should go with WordPress.org. Since it’s a free platform that you can download and install on your own webserver to create a blog. Besides, it lets you host your own blog and website.
Not only that, it’s quite user-friendly and even a non-tech person can easily learn how to use it and can start their own blog. All you need is a domain name and a web hosting account to get started with WordPress.org.
Lastly, it’s an extremely flexible and versatile blogging platform. With WordPress, you can run any sort of blog. Regardless of whether it’s a business blog, personal blog, travel blog, fitness blog, or even an e-commerce store, WordPress can easily handle it all.
Step 3: Find a Good Domain Name
By far, we’ve already picked a topic and chosen the platform for our blog. Now, in this step look at how we can choose a good domain name for our blog.
Choosing the best domain name is quite stressful because it’s an essential element of your branding. Hence, you make sure that you don’t make any mistakes.
Actually, a domain name is the address or URL of your blog using which visitors open your blog. In other words, it’s the unique name that identifies your blog on the internet. Normally, a domain name consists of a word or phrase with an extension like .com, .org, .blog, .co, etc.
For example, www.sitesaga.com is our blog’s domain name.

Hence, it’s important to pick the right domain name on the go, or else it’ll be hard to switch later on. Keeping this in mind, here are a few tips and tricks that help you pick the best domain name for your blog.
| Strategies | Description |
| Always Prefer .com Domain | There are plenty of domain name extensions to choose from. However, we recommend using the .com domain as it remains to be the normal standard. That’s because it’s a more established, credible, familiar, and easy-to-remember extension. Plus, today’s most smartphone keyboards have introduced a .com button. |
| Short Domain Name | You should always keep your domain name short and easy to memorize. If you don’t want people to have trouble remembering your domain name, then keep it under 15 characters. Moreover, having a shorter domain name means less chance of misspellings, and easier to type in your URL without mistakes. |
| Make it Easy to Pronounce and Spell | In addition, ensure that the domain is easy to read as well. As you don’t want others to pronounce your domain name wrongly. Likewise, if your domain name is simple to read, say, and remember, then it’ll even make it easy to type. |
| Add Keywords to Your Domain | Adding keywords to your domain names is like adding a cherry on the cake. It not just only describes your business to your audience. But, also tell the search engines what your website is about. Plus, it’ll make more sense to your customers. |
| Avoid Hyphens and Numbers | When you add a number or hyphen to your domain name, it often creates misunderstanding, typos, and misplacement errors. For example, you use a number (say 7) in your domain. Then the person who hears it for the first time will be confused about whether you’ve used the numeral ‘7’ or the word ‘seven’ itself. |
| Make it Reflect Your Brand | Always go with a domain that reflects and describes your brand, making it unique so that you can stand out in your readers’ minds. Also, you don’t want to confuse your visitors by using irrelevant names that have no association with what you do. |
| Check for Copyright and Trademark | After spending so much of your time, and money, you don’t want to get sued for infringement. Therefore, make sure that the name that you’ve chosen is neither trademarked, copyrighted, nor used by other companies. |
| Simply Use a Domain Name Generator | Finally, if you’re still unable to decide, then simply use domain name generators. You can find many free generator tools online. These tools are quite easy to use as you just have to type keywords or phrases related to your business. And, then it’ll automatically spit out hundreds of domain name ideas. |
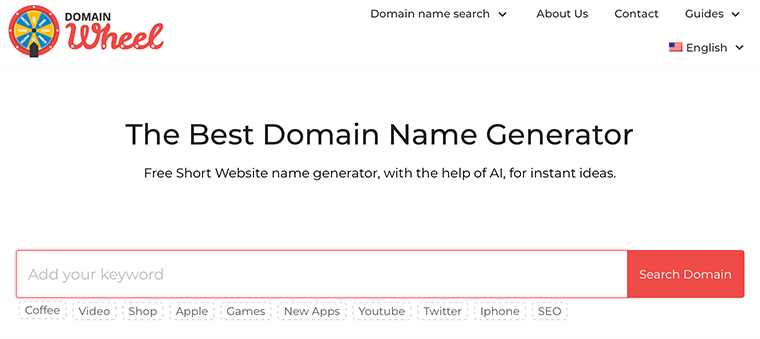
Some of the best domain name generators that we’d recommend are Nameboy, DomainWheel, and Instant Domain Search. Learn how to pick a domain name in detail here!
Step 4: Choose the Best Web Hosting for Your Blog
Now your next goal for setting up your blog would be to select a web hosting provider. Although you get lots of great hosting providers out there, the choice is entirely up to you.
Whatever you choose, you need a web hosting provider that prioritizes speed, features, performance, security, and support. After all, having good hosting is one of the fundamental parts of setting up your blog. As it stores the data and makes it available for viewing all over the globe.
Likewise, it even guarantees that when accessing your blog, all the content will be accessible to your audience. So that they can browse any content or section they wish.
Why Do You Need a Good Web Hosting For a Blog?
Now let’s look at some points that make you consider good web hosting for your blog:
- Better Performance: Good web hosting makes sure that loading speeds will no longer be an issue for you. As better the site is performing, there is a higher chance of audience engagement.
- Response Time: If your site takes too long to respond, surely your audience will prefer to go for your competitors’ site. Hence, good web hosting always guarantees a very short response time.
- Good Storage Option: Depending on the purpose of your blog/website, most providers will provide various storage spaces for your files. The best option is to go with such providers that best meet your needs.
- Awesome Security: We all know that trusting any hosting company for your website is not a simple task. Therefore, one makes sure that the provider that they’ve chosen must guarantee several layers of security in place. Along with ensuring a system of data redundancy and constant backups.
- Excellent Technical Support: You never know when you may face an issue or your hosting server may break down. Therefore, if you don’t have good technical skills, your provider needs to be like a member of your technical team.
Other than that, your hosting platform should incorporate many features. Here’s a guide on what to look for in a web hosting platform.
With these factors considered, now let’s check out some of the best blog hosting providers you can check out!
5 Best Blog Hosting Providers Worth Considering
Below we’ve listed a few best blog hosting providers worth considering. Make sure to check them out and decide which one is best for you.
1. Hostinger
Hostinger is a powerful hosting provider that has one of the cheapest options currently available on the market. This is the web hosting choice among many bloggers and small businesses.
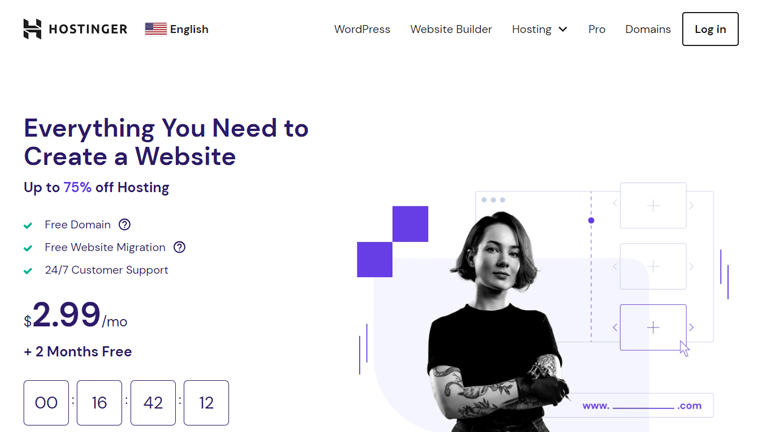
Even with the cheapest price, you won’t have to sacrifice quality for a good service to power your blog. Similarly, most of its hosting plans offer SSD storage with a free SSL certificate, free domain name, website builder, robust technical support, etc.
Hence, Hostinger is a great choice for those who want to start a blog, but don’t want to spend much money.
Learn everything you want to know about Hostinger in this honest Hostinger review!
2. DreamHost
DreamHost is undoubtedly known for its speed, security, and support. At the same time, it’s the most affordable blog hosting provider across all its packages.
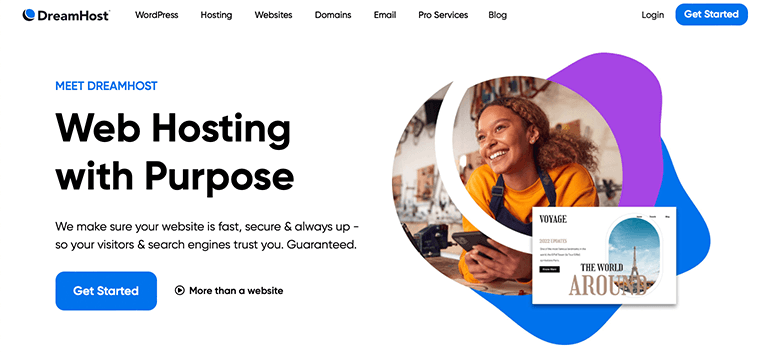
The best thing is that its price plan makes it perfect for bloggers who are looking for budget-friendly providers. Also, it makes sure that you don’t get surprised by sudden hikes in prices as your blog grows.
Additionally, it provides excellent options for bloggers like free domain names, website builders, unlimited bandwidth, storage, and more.
3. Kinsta
Kinsta is a famous cloud hosting platform offering managed WordPress and WooCommerce hosting plans. It’s powered by the Google Cloud Platform, making it well-known for high-speed performance.
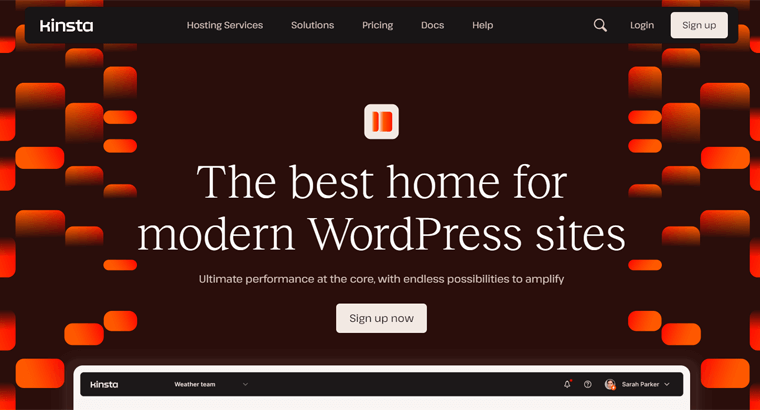
Moreover, it contains 35 data centers in 5 different continents. Also, you can use its Kinsta CDN service having Cloudflare integration. This results in faster and more secure WordPress blogs.
As a managed platform, it handles technical configurations for you. That includes backups, caching, security, free SSL, and more.
Thinking about using Kinsta? Then, make sure to have a look at our Kinsta review for guidance.
4. Cloudways
Cloudways is yet another managed cloud hosting service ideal for blog websites. It’s unique because you can select from multiple cloud hosting platforms, like DigitalOcean, Vultr, Linode, AWS, and Google Cloud.
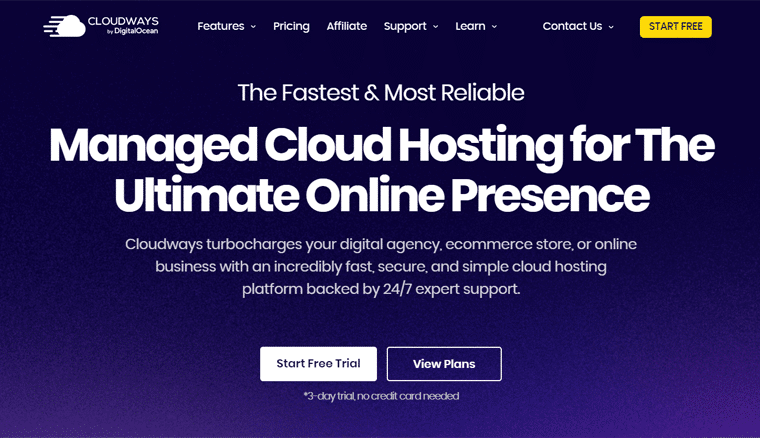
Further, it offers multiple security features, including dedicated firewalls, database security, login security, IP whitelisting, and others. Also, you can create staging sites and clone websites for testing purposes.
For performance, you’ll get access to built-in cache features such as Redis, Varnish, and Memcached. Also, it offers an external Breeze plugin to further improve your website’s speed and performance.
Find the differences between Kinsta and Cloudways here if you’re confused!
5. Bluehost
Bluehost is one of the best blog hosting providers as it offers top-tier, 24/7 customer support, and more. It’s among the few hosting providers recommended officially by WordPress.org.
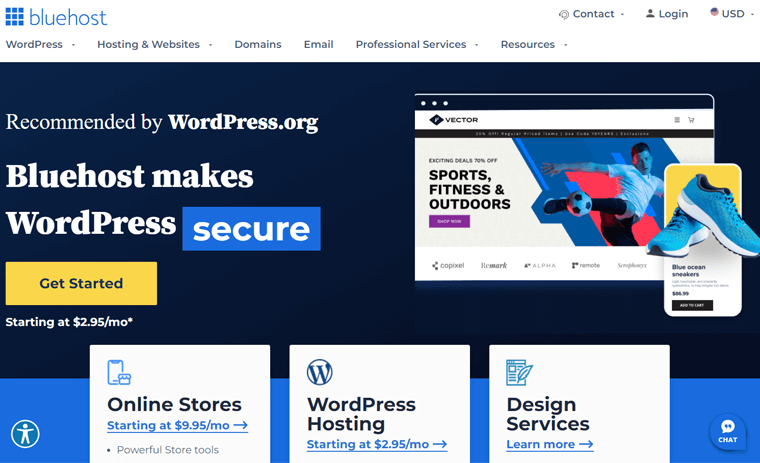
Bluehost offers the best plans for bloggers when it comes to affordability, high-end performance, and exceptional customer support. Alongside that, it even provides free website migrations, free domain names, website builders, and SSL certificates.
Therefore, Bluehost is the most used and trusted web hosting around the world. For more, please read our detailed Bluehost review!
Our Recommended Hosting for Your Blog
So, if you’re going to start your blog then we’d recommend Hostinger for low-budget bloggers. The reasons are:
- Its affordable pricing schemes are ideal for beginners.
- Easy to use and configure the hosting plan.
- Contains a a 1-click WordPress installation.
- Includes several speed and performance optimization features crucial for blogs.
- Provides free domains for 1 year on almost all of the plans.
- Easily lets you scale up and down your resources.
Step 5: Purchase Domain, Hosting, and Set Up Your Blog
By far, we hope you’ve already picked out the best web hosting for your blog. Hence, now we’re going to see how you can get your blog online.
Before we get started with this, you’ll also need to have the software to build your blog. Hence, in this guide, we’ll show you how to build a blog using the WordPress blogging platform. Since it’s the most popular, customizable, and easiest to use.
According to us, WordPress and Hostinger are the perfect combinations of a blog platform & web hosting to create a blog. That’s because WordPress is free publishing software that is quite popular, customizable, and easy to use at the same time.
Similarly, Hostinger is the most popular and reliable hosting company in the blog hosting industry. Besides, it’s extremely affordable and also provides a free domain name for your blog.
Now, let’s see how exactly you can create a blog with Hostinger.
How to Set Up Your Web Hosting with Hostinger?
Let’s look at the step-by-step process of how you can set up your blog with Hostinger:-
#1 Head over to Hostinger.com
First, open the Hostinger site and click the ‘WordPress‘ menu present on the navigation. We’re referring to this because selecting a WordPress plan gives pre-installed software best for blogs.
On the Hostinger WordPress page, there are 3 different pricing schemes i.e. Premium, Business, and Cloud Startup. There, press the ‘Add to Cart‘ button for the plan suitable for your blog.
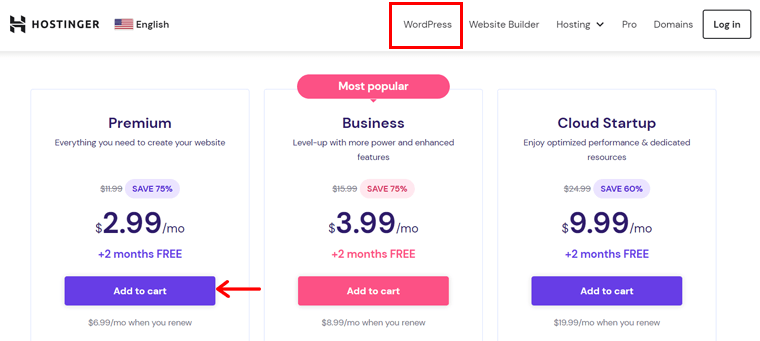
If you’re just starting with your first blog, feel free to select the Premium plan. Since it’s cheap and includes everything that you need when you’re just getting started.
On the other hand, you can always upgrade your plans later if you need to. But, for now, let’s go with the Premium Plan.
# 2 Select a Period
After selecting the plan, the cart page shows up. Here, you should pick a period for the payment. For instance, the ‘Premium‘ plan has 4 periods, including 1 month, 12 months, 24 months, and 48 months.
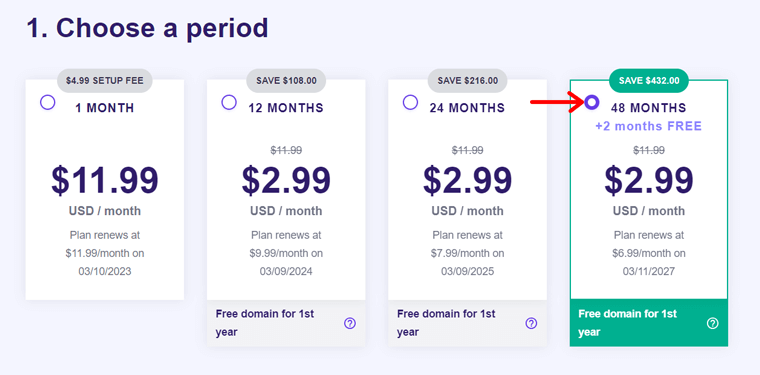
Notably, the prices differ on the period you select. The more duration you’re willing to commit, the lower the prices for that.
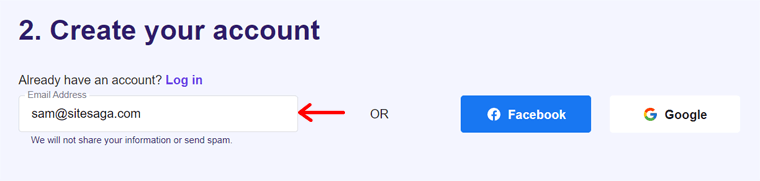
#3 Create Your Hostinger Account
Moving forward, you must create your account either by using your email or via your Facebook or Google account. If you have a Hostinger account already, then click the ‘Log in‘ button.
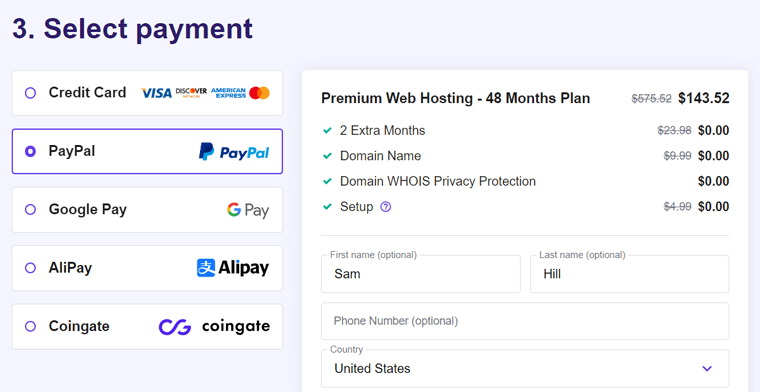
#4 Select Payment
Following that, you must pick a payment method among the options provided. They are credit cards, PayPal, Google Pay, AliPay, and Coingate.
After that, insert your personal and payment details. Plus, there’s a ‘Have a Coupon Code?‘ option where you can keep the code for discounts. Finally, press the ‘Submit Secure Payment‘ button.
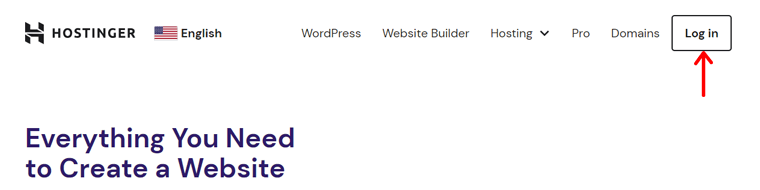
#5 Sign in to Your Hostinger Account
If you just created your account, then now sign into Hostinger. Just click ‘Log in‘ button as shown in the figure below. After that, enter your login details to open the control panel.
Now, click the ‘Start Now‘ button which opens your account area having an email verification message. Once you verify it, move forward and begin the host configuration process.
#6 Claim Your Website Domain
Following that, your ‘Home‘ menu contains an option to claim the domain. So, click on the ‘Claim domain‘ button. There, enter the available domain name and select the extension if you want a free domain for the 1st year.
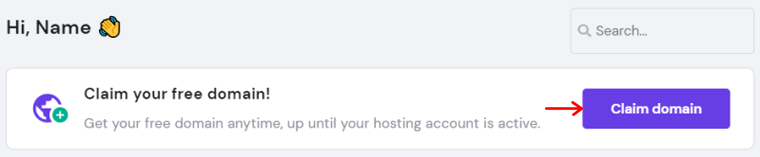
Now, you can claim your unique domain and give away some primary information and contact details. This is how your new domain name for the blog gets registered.
Suppose you need a premium domain or want to use an existing one. Then, move forward to the next step directly as you must point it out to Hostinger servers.
#7 Configure Your WordPress Site
Next, click the ‘Setup‘ button of your blog hosting plan present in the Home menu as before. Now, an onboarding process begins where you first need to answer questions about the blog. That includes whom this website is for. Accordingly, more questions show up.
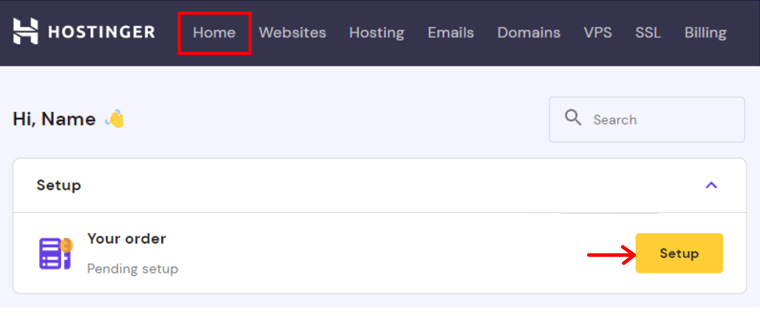
After that, some options display on your screen about whether you’re creating a blog or migrating an existing one. Here, let’s pick ‘Create a new website‘.
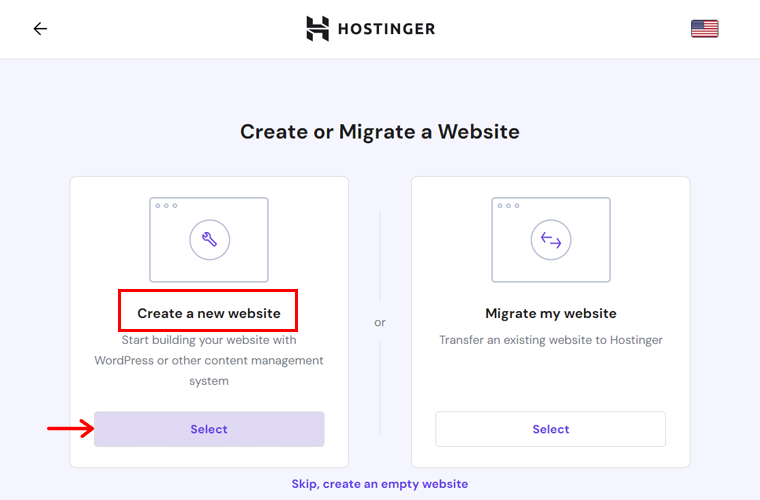
Moving forward, you must pick a platform for setting up the blog, where we’ll go for ‘WordPress‘. Next, you are required to create a WordPress account after entering the login details. There, pick a language, valid email, and strong password. Then, hit ‘Continue‘.
Further, you can pick from the given plugin recommendations to add them to your WordPress blog. Then, click the ‘Continue‘ button.
Afterward, you’ll get some options for your blog theme and AI-powered content. Based on your requirements, continue the process.
#8 Name Your Blog
Next, you must pick the domain for your new WordPress blog. It can be the one you claimed before for free or an existing domain that you purchased elsewhere. But mention it and point it to the servers.
#9 Complete Configuration
Finally, the details of your plan show up. But you must pick a data center location in the ‘Your server location‘ option using the Edit icon. Then, complete the process by clicking the ‘Finish Setup’ button.
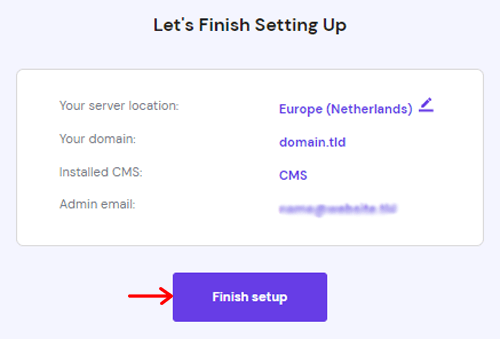
Congratulations! You are now an official member of Hostinger with your WordPress blog hosting plan.
Opening Your WordPress Blog Dashboard
Now, all you need to do is open the dashboard from the Hostinger control panel. To do so, click the ‘Admin Panel‘ button on your blog present in the ‘Websites‘ menu.

This opens your admin area but may ask you to log into the WordPress dashboard.
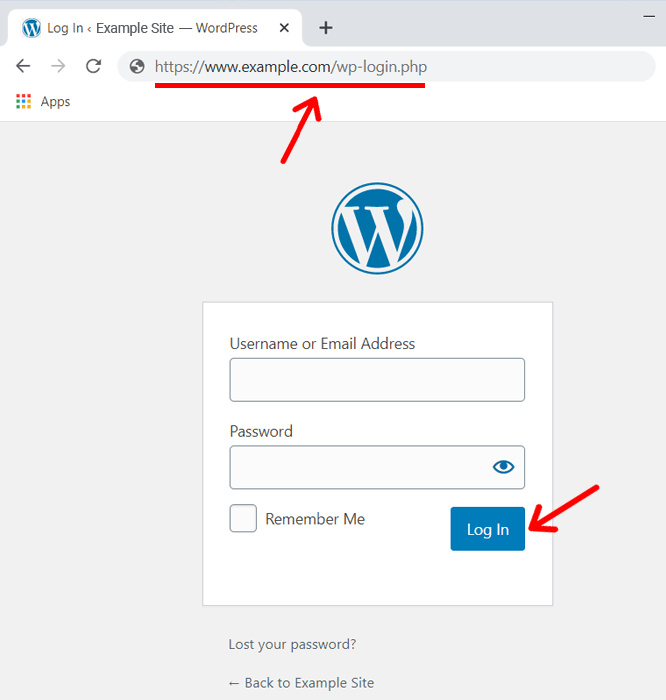
Another way to find your WordPress login page is by entering your website URL followed by /wp-login.php or /wp-admin/.
For example,
- www.example.com/wp-login.php
- www.example.com/wp-admin/
- www.example.com/login/
Using these URLs, it’ll take you to your WordPress login page where you can enter your username and password. Then click on the ‘Log In‘ button.
In this way, you’ll be able to see your WordPress dashboard. After that, you can start customizing your blog, change themes, add plugins, create content, and publish.
Step 6: Start Customizing Your Blog
After you’ve set up your own self-hosted WordPress blog, it’s time to select a theme, customize it, and add essential plugins to your dashboard.
#1 Choose Your Blog Theme & Install
Having a good blog design for your blog ensures that your visitors will love your blog. In fact, there is no doubt that:
The first impression is the last impression.
– Anonymous
Imagine your blog design as a nice outfit that you wore on your prom night. This is how you want your audience to remember your blog when they see it for the first time.

And, that’s exactly why you need a beautiful WordPress theme. In WordPress, a theme determines the overall appearance of a website. So, you should choose a high-quality theme for a good-looking blog design.
How to Choose the Best WordPress Theme for Your Blog?
In WordPress, it’s really easy to change the look of your blog. All you have to be is super careful while choosing your theme.
Now, you might be wondering why choosing a WordPress theme is not easy. But no need to worry at all. We’ll help you with that too.
WordPress comes with many free and premium themes and templates that are available for all types of blogs.
You can get your free themes from the WordPress official themes repository. Whereas you can purchase premium themes from ThemeForest and other independent theme companies like ThemeGrill, WPAstra.com, Themeisle, etc.
However, we don’t recommend you go with a premium WordPress theme when you’re just starting a blog. Because you can get plenty of well-designed and beautiful themes without paying a penny, fully free.
For more, read our detailed guide on how to choose a WordPress theme. This can help you in selecting a perfect theme for your blog.
Our Choice for this Tutorial – Kadence
For this tutorial, we’re going with one of the most popular free WordPress themes Kadence. Here, are some reasons why we love Kadence so much:

- One of the most popular and free WordPress themes.
- Compatible with all major WordPress page builders.
- Comes with a large number of customization options.
- Built for speed and fully optimized for performance.
- The Kadence Blocks plugin offers multiple advanced and custom blocks.
- Kadence Conversions lets you boost visitors on your blog.
- Kadence Galleries lets you showcase beautiful galleries and albums.
- The social sharing function lets customers share your blogs online.
- With its email designer, you can send emails using custom email templates.
To learn more, be sure to check our detailed Kadence theme review.
Installing a WordPress Theme (Kadence)
Now, let’s look at how we can install the Kadence theme and customize it for your blog.
1. Free Kadence Theme Installation
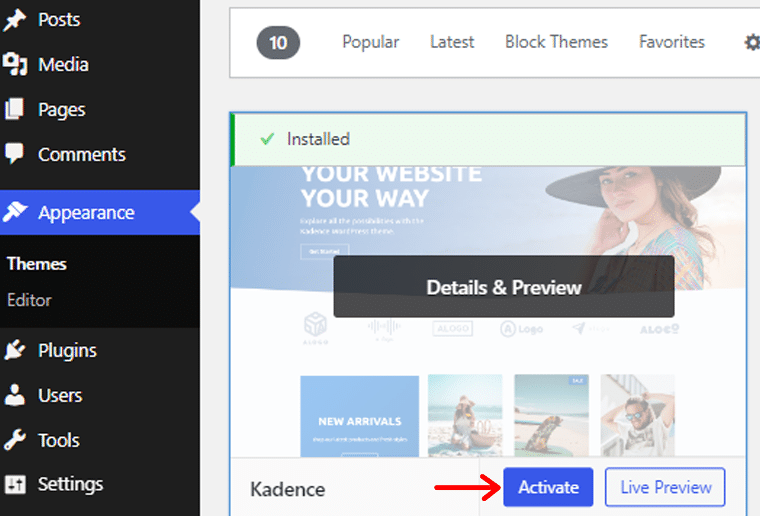
The easiest way to install Kadence or any other free WordPress theme would be from the WordPress dashboard.
For that, log into your WordPress dashboard and go to Appearance > Themes. Next, click on the Add New Theme button.
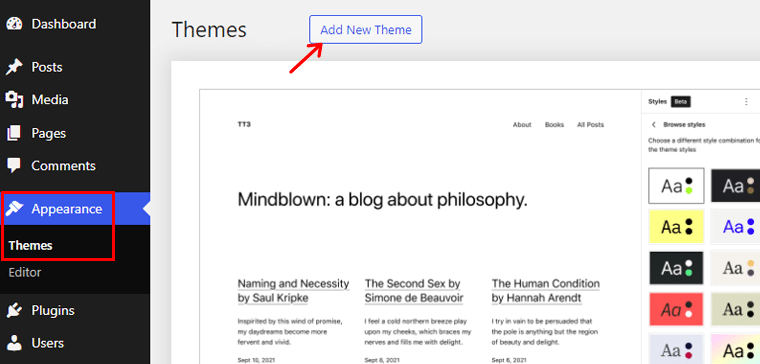
This will take you to the selection page where you can see the search field at the very top right-hand side.
In that search field, you need to search for the name of the theme (i.e. Kadence) that you want to install. Once you have found the theme that best fits your liking, click on the Install button.
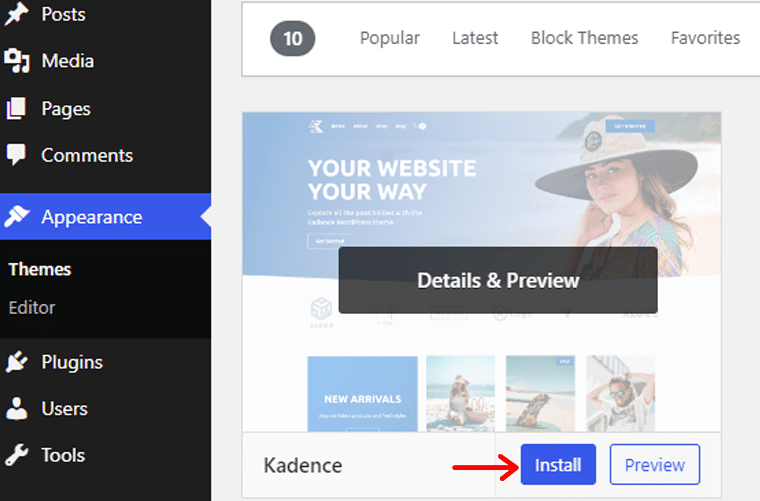
Once the installation is completed, click on the Activate button and you’re done!
For more additional help, check our guide on how to install a WordPress theme.
Pretty simple right? Well, this is how you install a Kadence theme into your site.
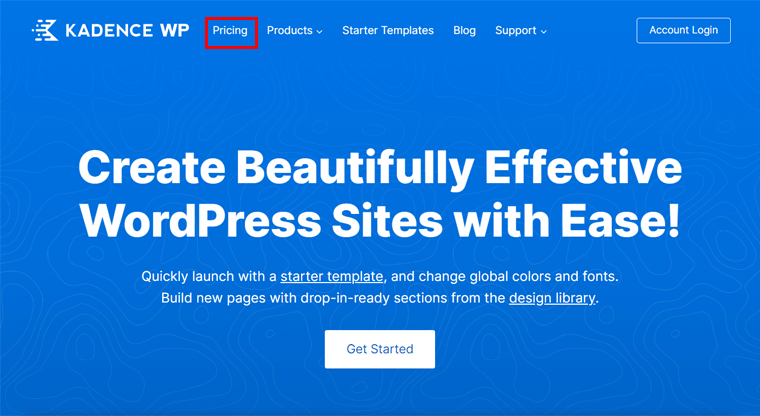
2. Premium Kadence Theme Installation
If you’re going with the premium version of Kadence, then open its website and press ‘Pricing‘.
The pricing page contains multiple options, click the ‘Get the Essentials‘ button of the one you need.
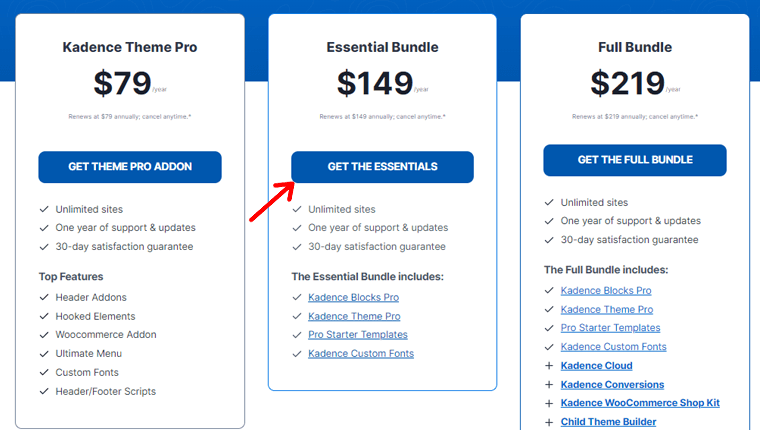
Now, you’ll land on the checkout page where you can create a new Kadence account or log into your existing one. Then, enter your billing information and payment details. Next, click ‘Place Order‘.

Following that, open the ‘Accounts‘ menu on the navigation and select ‘Product Downloads‘. There, download premium options, including Kadence Pro and Kadence Blocks Pro.
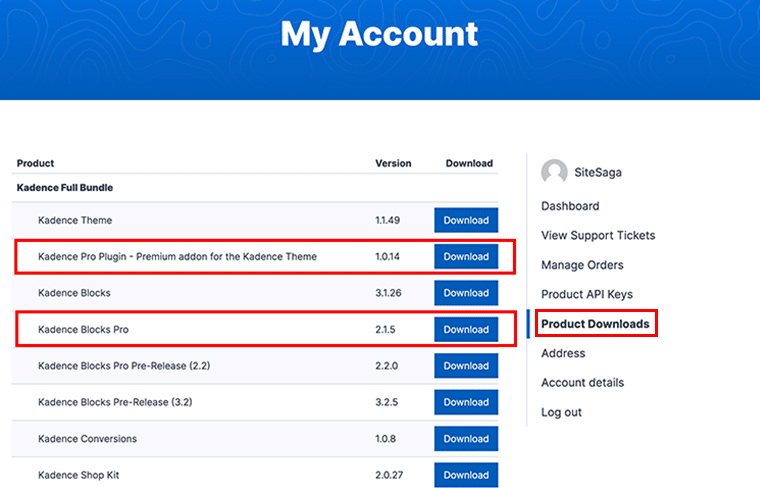
Similarly, go to ‘Product API Keys‘ and find the license keys of those plugins. Simply copy and save them.

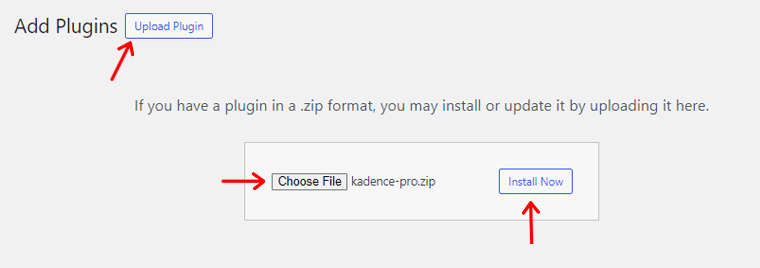
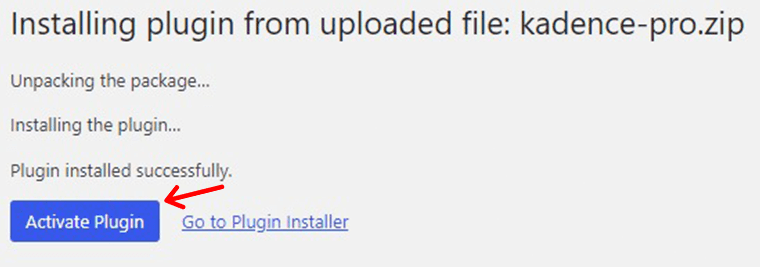
On top of the free Kadence installed blog website, start the Kadence Pro installation. Because it’s an add-on, open ‘Plugins > Add New Plugin‘. There, click ‘Upload Plugin‘ and then ‘Choose File‘. Once you upload it, click ‘Install Now‘.
Following that, click ‘Activate Plugin’.
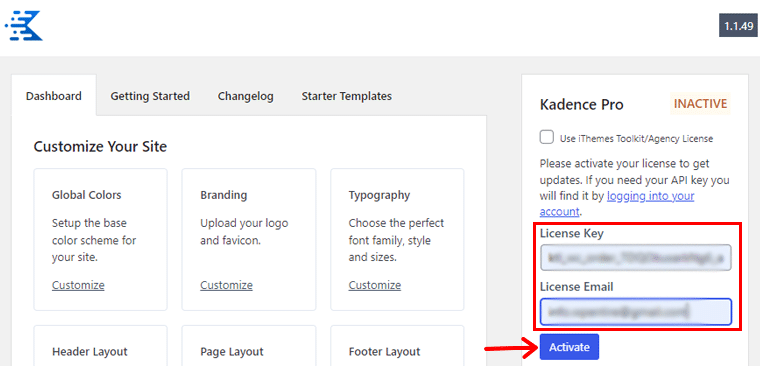
Now, press the ‘Click here‘ option present in the notice message. On the new page, add the license key and email, followed by clicking on the ‘Activate‘ button.
For a detailed guide, learn how to install a WordPress plugin!
#2 Import and Personalize Your Store Template
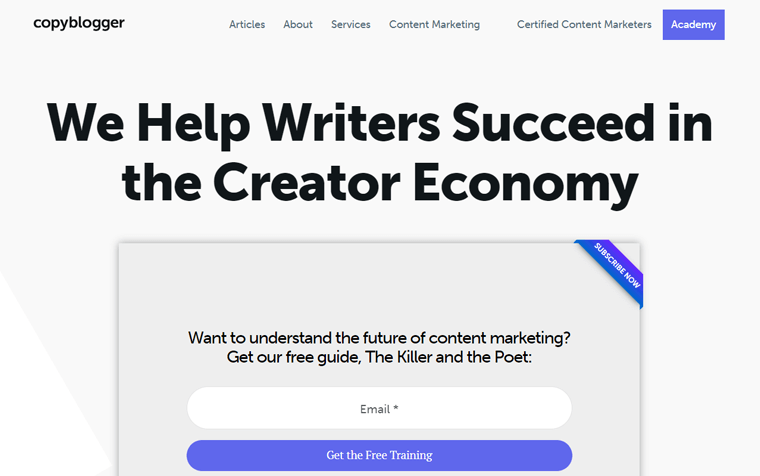
Let’s suppose we’re creating a blog website taking the reference of a real blog, i.e. ‘Copyblogger‘. Now, it’s fine if we utilize an existing template similar to our reference blog to easily start its web design.
So, let’s open the ‘Appearance > Kadence‘ menu and click the ‘Install Kadence Starter Templates‘ button. This provides templates by the Kadence theme.
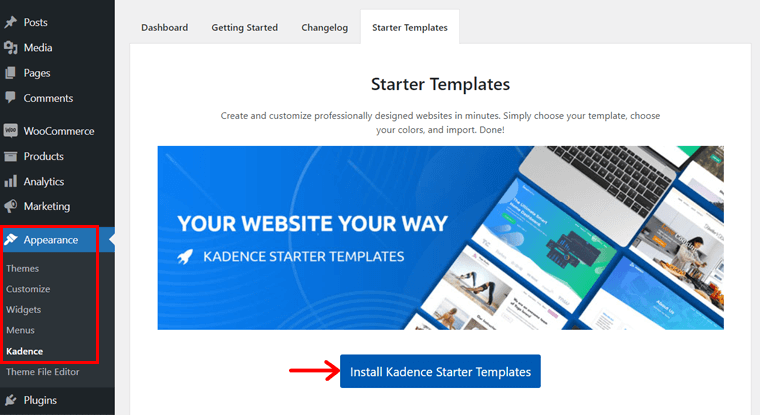
Now, navigate to ‘Appearance > Kadence > Starter Templates‘ on the menu.
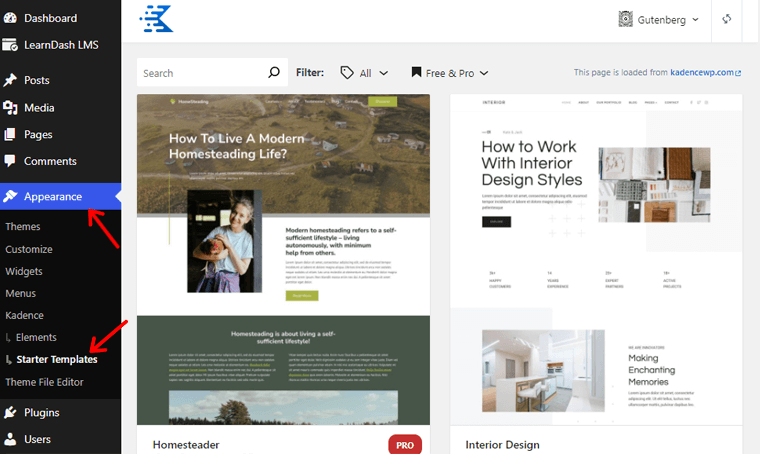
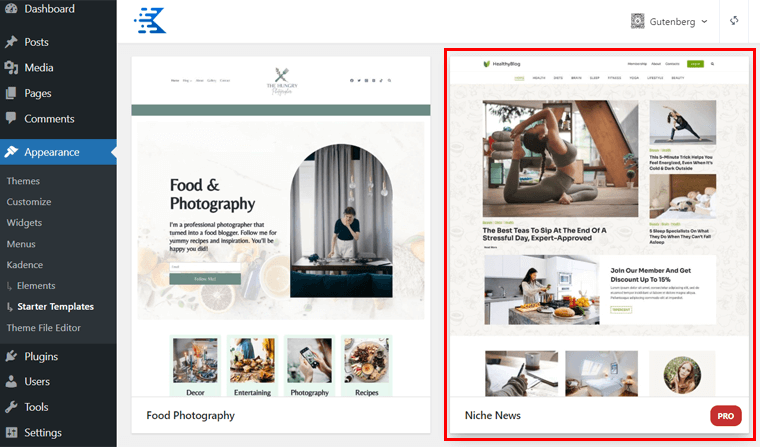
Following that, open the ‘All‘ tag and select ‘Blog’. This filters out and shows only the blog templates. Then, select a template suitable for the blog like we’re doing in this template ‘Niche News‘.
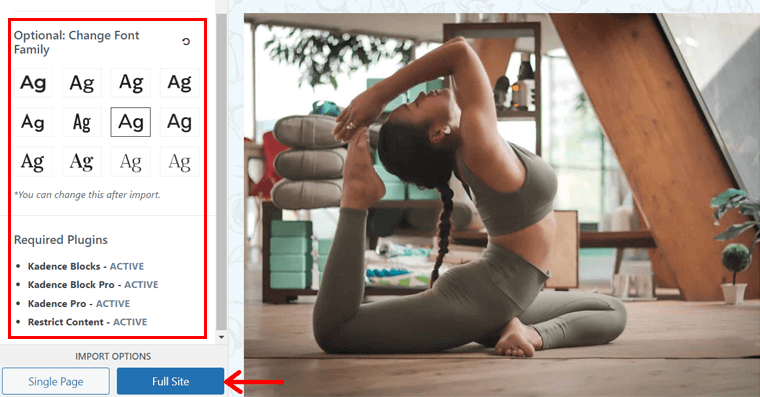
After that, Kadence provides you with several customization options. First of all, you can choose a color scheme as shown below.

Next, pick the font family among the given options. Also, it may notify you about installing some essential plugins, like Kadence Blocks, which installs automatically. Further, select to insert a Single Page or Full Site for your blog.
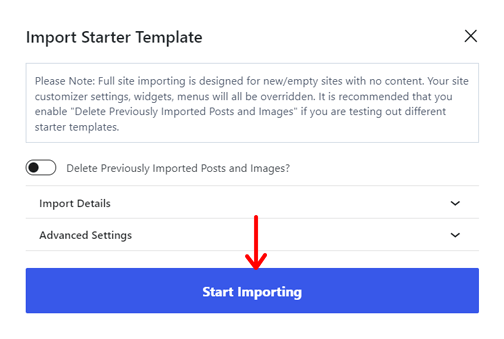
Here, we’ll go for the ‘Full Site‘ button.
As a result, a popup window displays where you must press ‘Start Importing‘. In a while, your template is ready.
Now, let’s look at the WordPress menu, which is ‘Appearance Menu > Customize‘.
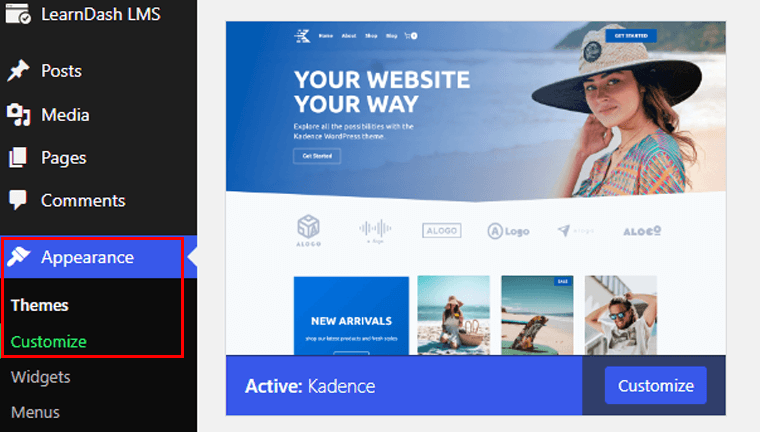
This opens the WordPress Theme Customizer with uncountable options for customization. In Kadence, you can find options under categories like:
- Colors & Fonts
- Header
- Footer
- General
- Posts/Pages Layout
- Search Results
- Site Identity, etc.
To make it even easier to customize your blog’s looks and functionality, we’re going to use Kadence Blocks with Kadence. Let’s have a look!
#3 Getting Started With Kadence Blocks
Kadence Blocks is a powerful WordPress block plugin that powers up your blog built with the Kadence theme. With its advanced and powerful blocks, you can build beautiful websites in no time.
Similarly, you can build and design stunning blogs with its huge Kadence Design library with awesome blocks. Also, it’s extremely easy to use and can build a website with just a click.
Moreover, you’ll receive various customization options for those blocks. That includes controls for layout, color, typography, spacing, and others.
Thus, let’s look at how we can get started with Kadence Blocks.
Installing the Free Kadence Blocks Plugin
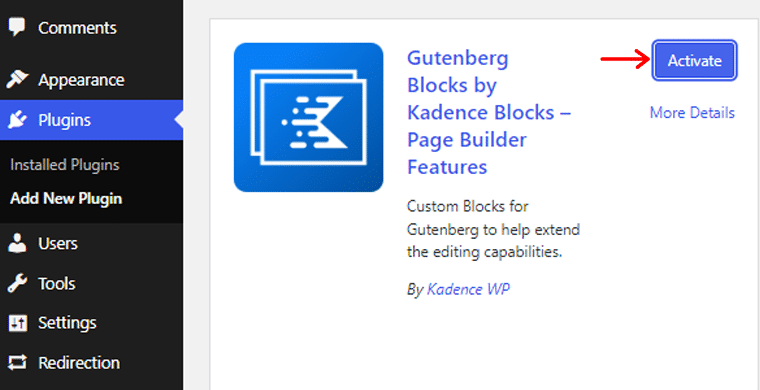
If you want to use the free version of Kadence Blocks, then it’s as simple as any other plugin. Navigate to the ‘Plugins > Add New Plugin‘ menu and search for ‘Kadence Blocks‘. Then, click ‘Install Now‘.
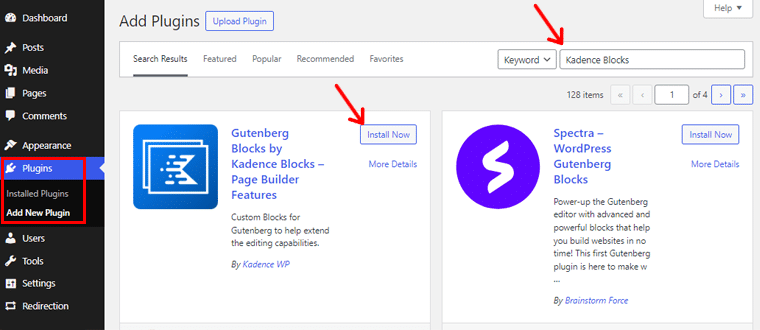
Following that, click the ‘Activate‘ button, and all the beautiful blog blocks are now available.
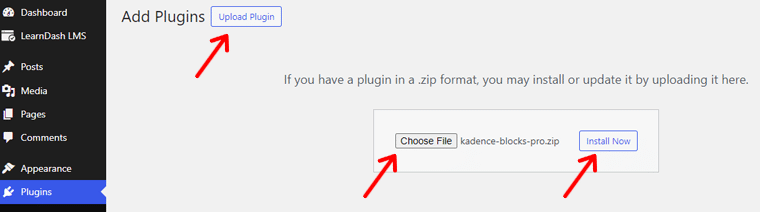
Installing the Kadence Blocks Pro Plugin
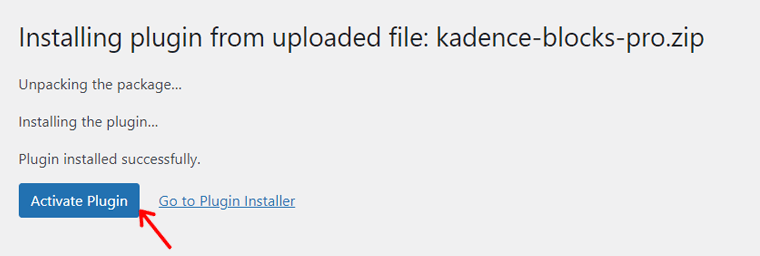
For advanced blocks for your blog, open ‘Plugins > Add New Plugin > Upload Plugin‘. There, click the ‘Choose File‘ button and upload the ‘Kadence Blocks Pro‘ downloaded file. Then, click ‘Install Now‘.
After that, click the ‘Activate Plugin‘ button to activate the paid plugin.
Next, click the ‘Click here to activate‘ option that you can find on the notice. Then, add the license key and email for it and press ‘Activate‘.

However, remember that the free Kadence Blocks plugin is necessary to be installed before using its premium version.
Creating a Post or Page Using Kadence and Kadence Blocks Plugin
Once activation is completed, you can start creating a post or a page that you want to build. The best thing is that Kadence blocks will be automatically added alongside those of the Gutenberg editor.
To simply access those blocks, you’ll have to click on the ‘+‘ icon present at the top of the bar.
On the top itself, you can find all the blocks under ‘Kadence Blocks’.
Now, simply select a Kadence block that you want just like any other Gutenberg block. And, then see it getting added to the post or page.
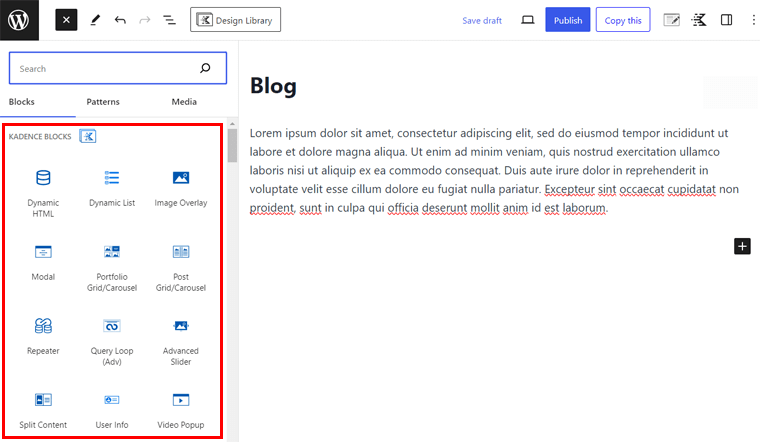
For example, we’ll show you how you can add an image overlay block using the Kadence blocks. Look for the ‘Image Overlay’ block, then click on that block to add it to your editor.
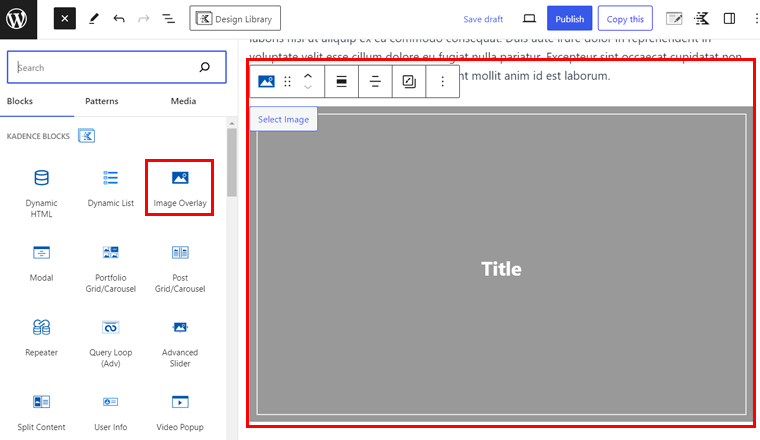
Here, we’ve added this block just below a paragraph. Once you’ve added it, you’ll find the respective settings on the right side for that block.
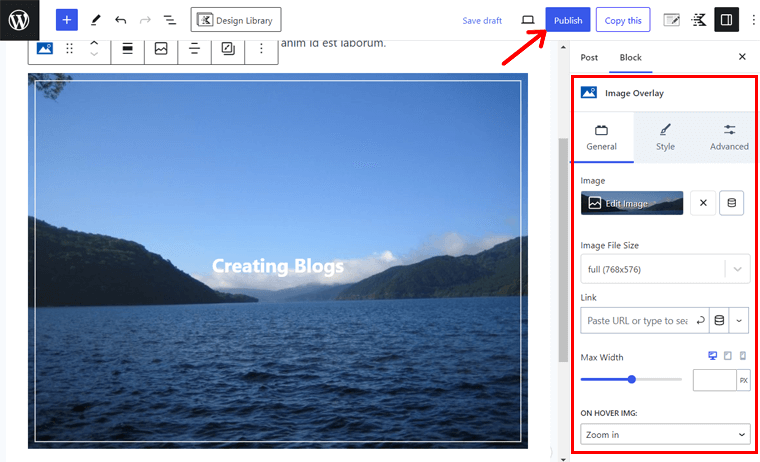
There, you can add the image and change the text. Also, it lets you customize the border, title, and other aspects. Once you’re done save your blog by clicking on ‘Publish‘.
Interesting right?
This is how you can start creating stunning designs with Kadence Blocks.
#4 Install Essential Plugins & Optimize Your Blog
Once you’ve decided on the best theme for your WordPress blog, it’s time to install some essential WordPress plugins. These plugins will help to provide even more customizations and prepare your blog to develop into a real business.
But it can sometimes be overwhelming as there are thousands of free and premium plugins available out there.
Therefore, to help you get through it, we’ve listed some of the must-have WordPress blog plugins when you start your blogging journey:
Rank Math
Rank Math is a popular WordPress SEO plugin that helps you optimize your blog post titles, descriptions, content length, etc. It’s an all-in-one solution that contains everything that you need to manage your SEO, claiming its name as the ‘Swiss army knife of WordPress SEO’.
Therefore, it’s a must-have WordPress plugin that drives many readers toward your blog. Similarly, you can optimize your content with 5 proper keywords that rank in the search engines even when using its free version.
For more details, please read our comprehensive guide and review of the Rank Math SEO plugin!
WPForms
WPForms is a beginner-friendly WordPress contact form builder plugin. It lets you easily create contact forms, feedback forms, subscription forms, surveys, polls, and other types of online forms.

This plugin comes with a user-friendly interface with a powerful drag-and-drop contact form builder. Unlike other form builders, it comes with form landing pages, geolocation tracking, GDPR-friendly, custom WordPress user registration and login forms, etc.
Nevertheless, it comes with many pre-built form templates that can save you time to build your contact form from scratch. Besides, it lets you add, remove, or re-arrange fields as necessary.
UpdraftPlus
Sometimes when you’re working on your important blog or updating your blog, it may cause some conflicts or your sites may stop working. If you haven’t backup your files then BYE they’re gone forever! That’s why you need a plugin such as UpdraftPlus to keep your blog site safe.
UpdraftPlus is the most trusted WordPress backup and restore plugin. After all, it automatically backups and safely stores your files on a remote location like Google Drive, Dropbox, Amazon S3, FTP, email, and more.
Not only that, you can backup your content to more than one cloud service using scheduled automatic backups. Also, it instantly creates a temporary clone of your blog so that you don’t need to test or develop it on your live site.
Wordfence
Wordfence is a popular WordPress firewall and security scanner plugin that comes with firewall protection, malware scan, blocking, login security, and plenty more.
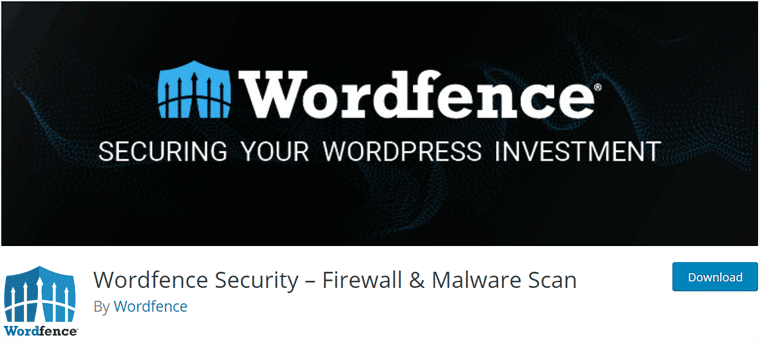
It’s specifically developed for WordPress and blocks attackers looking for vulnerabilities on your site. Besides, its Threat Defense Feed will continually update as new threats emerge every time.
Additionally, it protects and monitors your site from DDoS, malware threats, brute force attacks, spam attacks, and every other type of attack. Therefore, if you haven’t invested in a security firewall for your blog, then you need to add one now.
LightSpeed Cache
LightSpeed Cache is a free WordPress caching plugin that reduces the loading time of your blog by a wide range. It’s a highly customizable server-level caching that boosts your blog with little to no configuration required.
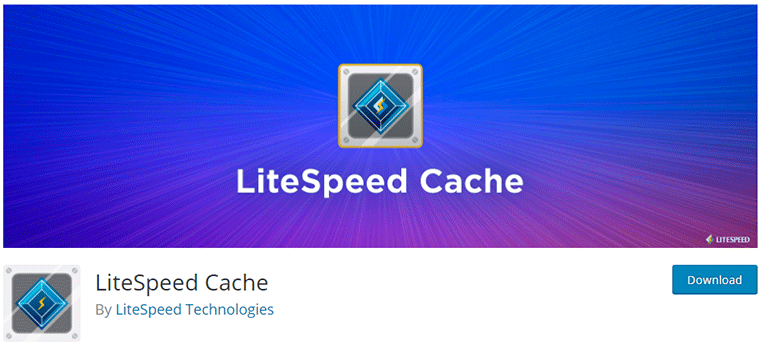
Moreover, it offers extra optimization features like database optimization, minification, a combination of CSS and JS files, CDN support, browser cache, lazy load, etc. Also, you can store a duplicate copy of every web page locally on your system.
You can also find a list of the best WordPress plugins for blogs here.
However, there are many more plugins in the market, but the above plugins are must-have plugins installed on your blog.
Alright, we’ve covered how we can customize our blog with the Kadence theme and installed a must-have blog plugin. Now, let’s dig into creating some of the essential pages that every blog must have.
#5 Set Up The Essential Pages (Home, Blog, About, Contact)
Once you’ve started a blog, you’d want to provide some basic information about yourself to your audience. Such as: Who are you? Why should people listen to you? How can they get in touch with you?
At the same time, you might have questions like “What pages should I have on my blog?”
Hence, let’s take a look at some must-have pages that you can use on your blog.
I) Homepage of Your Blog
The homepage is the first page your visitors see when they visit your blog. It’s the front page where most visitors will land and it determines whether your visitor will browse around or say goodbye to your blog.
Therefore, always make sure when creating your homepage, you must think from the audience’s perspective.
In WordPress, there are 2 options of homepages to choose from:
- show the latest post
- or static page.
If you choose to show the latest posts, then it’ll be a dynamic page that gets constantly updated as new posts are published.
Now, let’s look at how we can select a custom page to be used as a homepage in your blog.
How to Select a Custom Page as Your Homepage in WordPress?
The good thing is that WordPress comes with built-in functionality that helps you create a custom home page. You can use any page on your website as your homepage.
Therefore, let’s look at these three simple steps to set a static page as your homepage.
a. Create a Static Page for the Homepage
To get started, simply go to Pages > Add New from your WordPress admin area to create a new page.
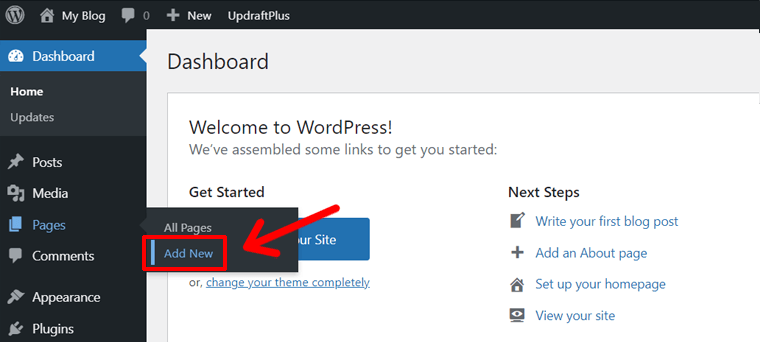
After that, name this page ‘Home’ and publish it. Then, using the WordPress block editor try to add and organize the content and layout of your page.
Once everything is completed, we’ll use this page as your custom homepage. Following that, click on the Publish button to publish your page.
b. Create a Placeholder Blog Page
Since we’re creating a blog site, you’ll need to create a separate blog page to display your posts. This page will act as a placeholder to display our blog posts.
For that, go to Pages > Add New page and give this page titled ‘Blog’. Then, go ahead and click on the Publish button to publish this blank page.
c. Set a Static Page as your Front Page
After you’ve created both the pages, go to Settings > Reading page from your WordPress admin. Then, under the ‘Your homepage displays’ section, select the option ‘A static page’.

Next, you’ll need to select the static page that we’ve created in step ‘a’ i.e. Home as the Homepage. And, similarly, select the placeholder blog page that we’ve created in step ‘b’ i.e. Blog as the Posts page.
Finally, don’t forget to click on the Save Changes button to save your settings.
In this way, you’ll set up a page to be used as your custom homepage.
How to Create a Dynamic Blog Homepage?
On your dynamic homepage, you can showcase the latest or popular blogs on your website which always changes. Now, let’s go through the steps of creating the homepage of the popular blog mentioned below. For that, we must configure the header and footer for the blog.
a. Insert Navigation Menus
First, you must create other pages of your blog that you want to showcase in the header and footer. The steps for creating some of those pages are given in upcoming sections. Overall, let’s make these pages for the tutorial (some are already present) and delete the unnecessary ones from the template:
- Blog
- About
- Our Services
- Contact
- Privacy Policy
- FAQ
- Customer Support
Also, create a new Home page and choose it as the main page of your blog. You can find these steps in the static homepage creation process above.
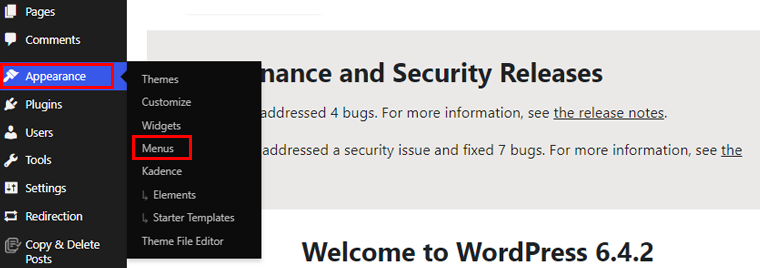
Now, let’s create the navigation menus. Simply, navigate to ‘Appearance > Menus‘.
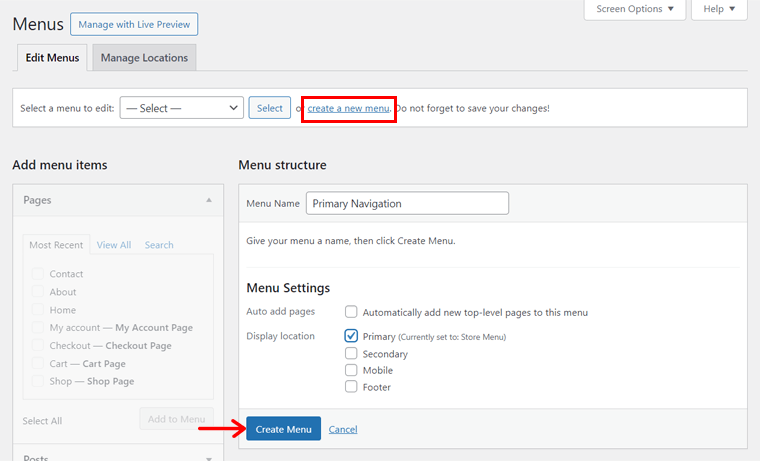
After that, click the ‘create a new menu‘ option. Next, add the ‘Primary Navigation‘ name and select ‘Primary‘ as the display location. Then, click ‘Create Menu‘.
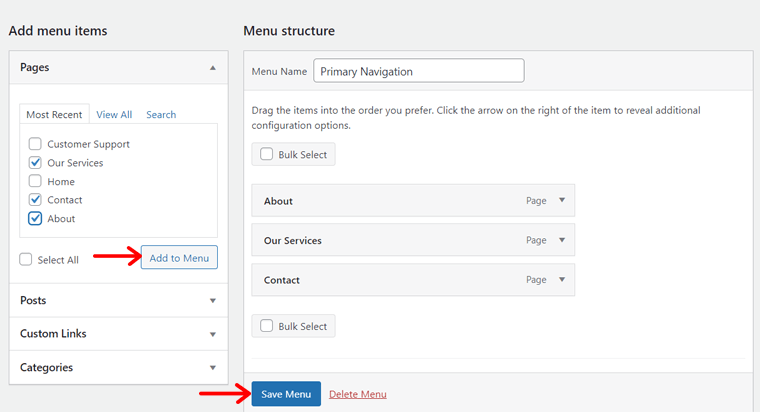
Following that, insert the pages to add to this menu, like select About, Contact, and Our Services, and the Blog page. Then, click ‘Add to Menu‘. After that, press ‘Save Menu‘.
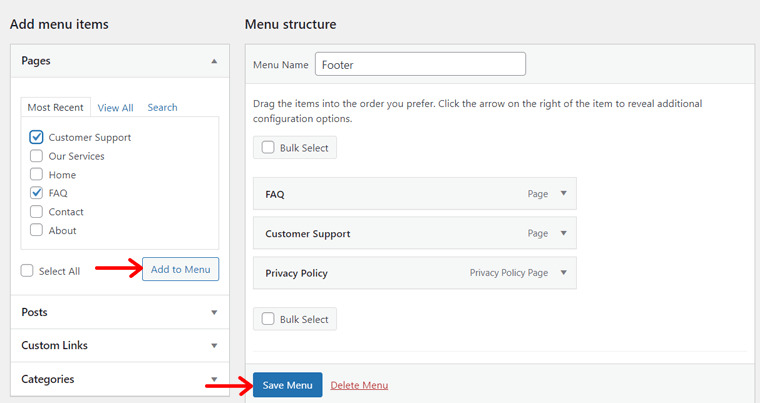
Similarly, create a new menu called ‘Footer’ and choose the display location as ‘Footer‘. Then, click ‘Create Menu‘.
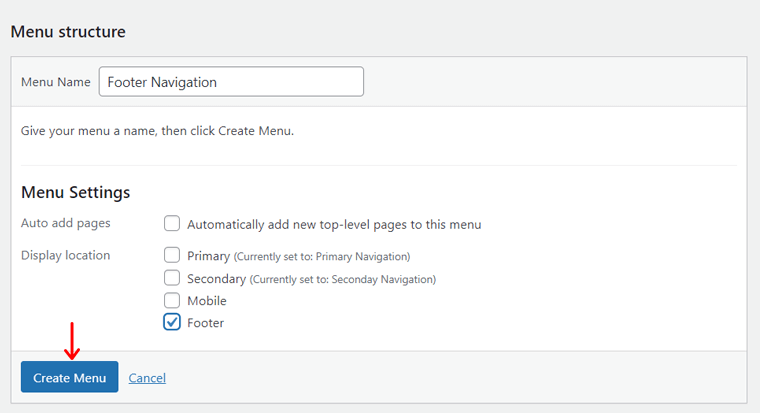
That menu should include the pages to display, for instance, let’s add Customer Support, FAQ, and Privacy Policy. The process is the same as the primary navigation.
b. Creating Header and Footer
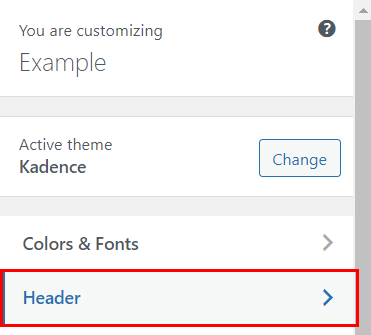
Moving forward, you can start creating the header and footer using those menus. So, open ‘Appearance > Customize‘ and click ‘Header‘.
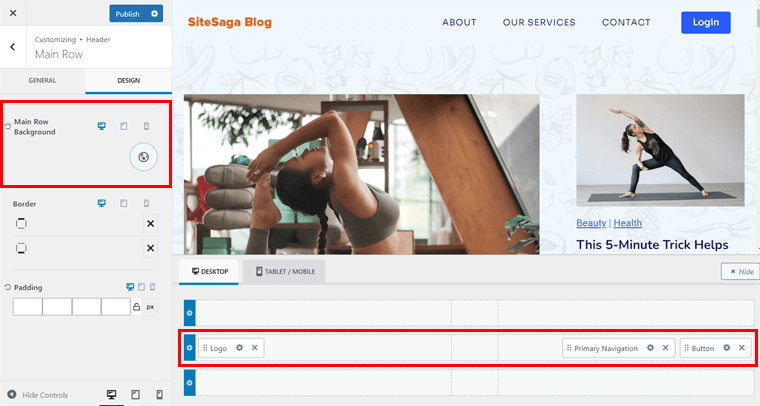
There, insert the logo of your blog first. Just click ‘Logo‘ and ‘Change logo‘, then upload the blog logo.
Now, let’s edit the main row of the header. There, you can already find the use of widgets as in the template, but for the required design, certain changes are required.
Simply put, add the primary navigation widget on the main row, delete the secondary navigation, which isn’t used, and delete the search widget. Also, change the background color of the main row as you like.
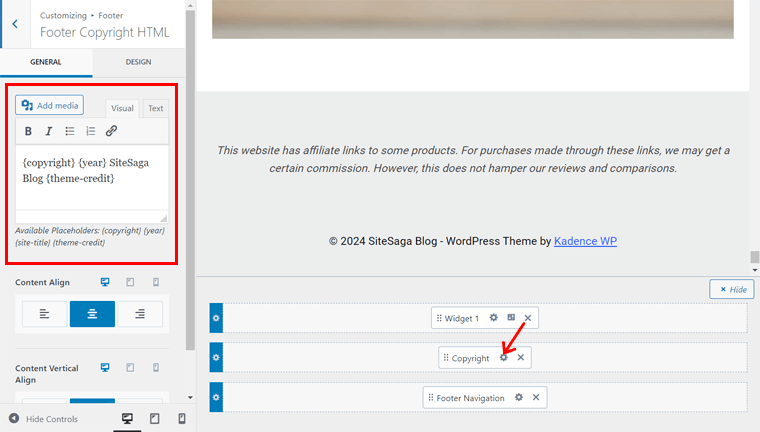
Similarly, open the header options in the WordPress customizer. Now, switch the positions of the footer menu and copyright to meet our requirements as shown below.
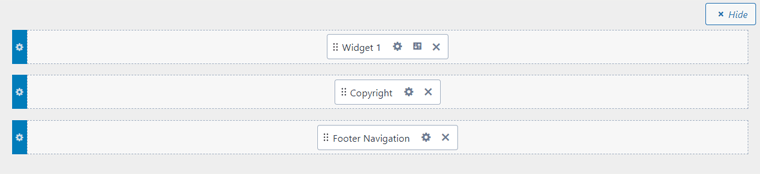
Now, let’s edit and customize the content of these elements. Just click the Settings icon of Widget 1 and remove the default logo of the template. There, insert a paragraph required. Similarly, we can do that for the Copyright widget as shown below.
Now, you can adjust the spacing, color, and other options of each footer section. Once you do that, click the ‘Publish‘ button to save the changes.
c. Customizing the Body Section of the Home
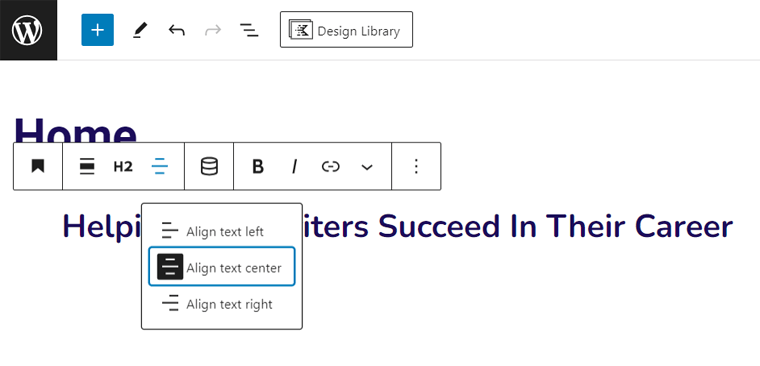
Moving forward, you must now open the Homepage of your blog to start from scratch. According to our aim, add a spacer and then a heading at the top center and edit its content.
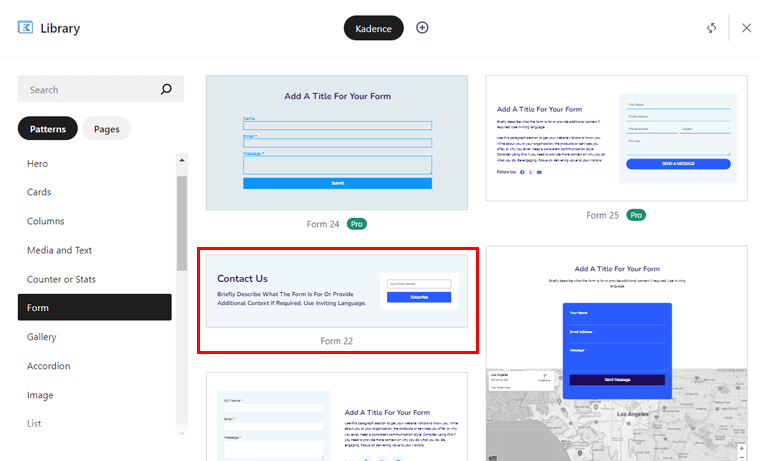
After that, click the ‘Design Library’ option at the top header. This opens a library of pre-designed patterns, where you can find a ‘Form‘ section at the sidebar. Among the given options, let’s click on ‘Form 22‘, which is closest to our design needed.
Now, let’s remove the unnecessary paragraphs on the given position and add them where we want. Adding blocks before and after the form can be possible with the list view.
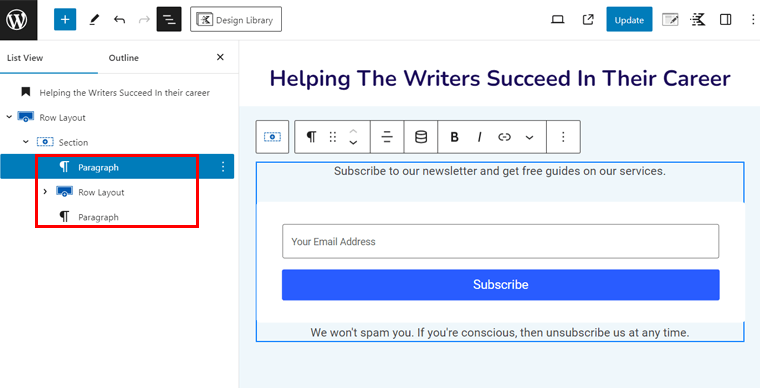
Also, adding columns on both sides and a margin from each side lets the form be in the center of the section. Further, customize the background color, font color, and other aspects of this section.
Below the subscription form section, you need to add the blogs of the website. So, ensure you have blogs published on your website. Please add the author’s name, categories, and other essential details.
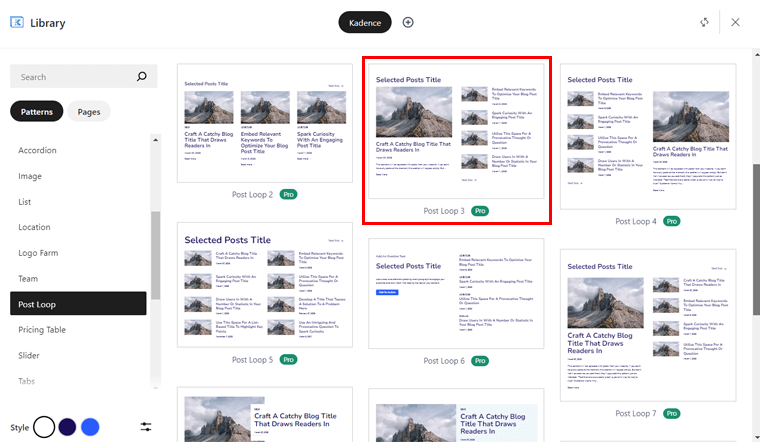
After doing that, click the ‘Design Library‘ again. This time, open the ‘Post Loop‘ tab on the left side and click ‘Post Loop 3‘.
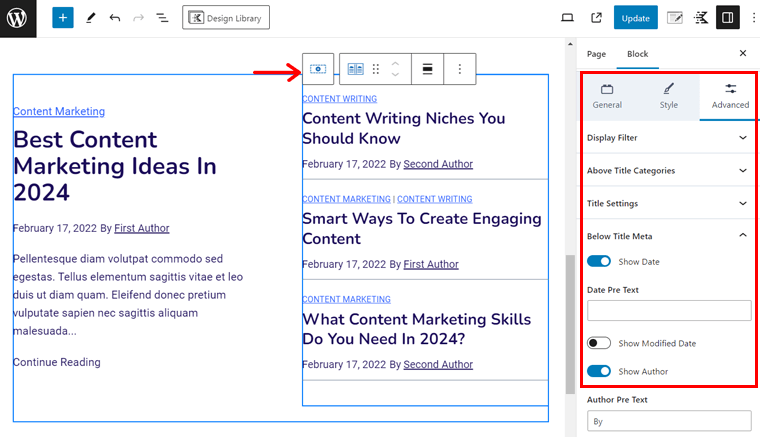
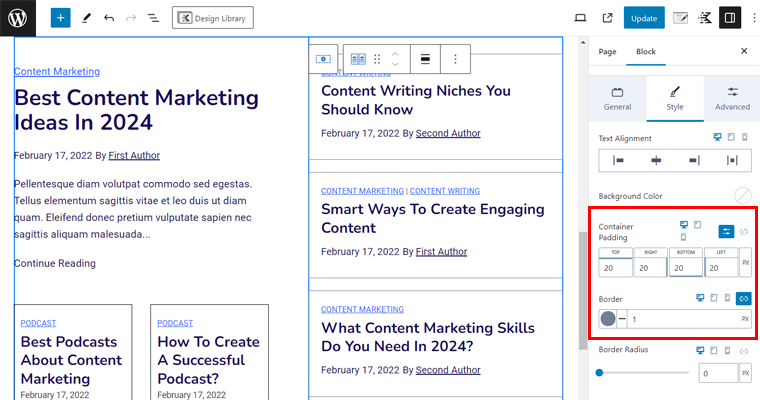
According to our requirement, let’s hide the unnecessary elements of the blogs, like images. And show necessary components like blog categories. Just select a column and you’ll find options on the right side. They are present in the General and Advanced block settings.
Honestly, this pattern isn’t exactly how we require in our blog homepage design. Then, we can further edit it. So, let’s add a column below the featured blog and insert a Kadence block ‘Post Grid‘. After that, you must select a layout for that section as we did.

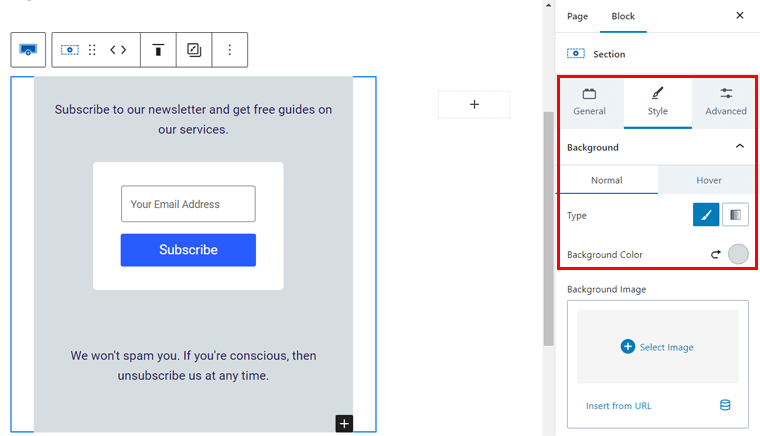
Similarly, edit the block settings option for this section. Along with that, let’s add a border to each of the blog posts as in the real website and make it look good with some padding. All of which is present in the ‘Style‘ tab of the settings.
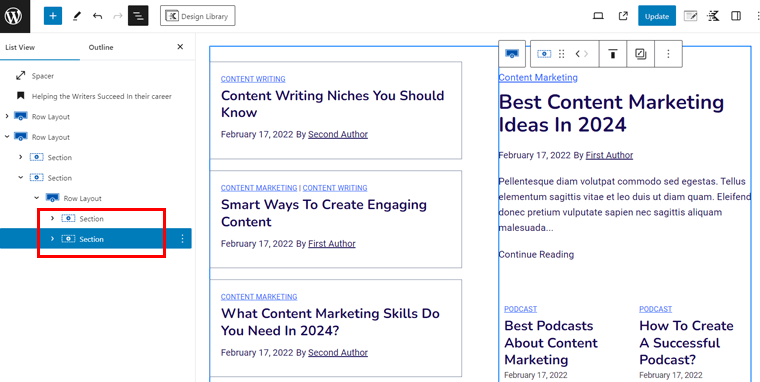
In the same manner, you can do the same for the next section because it displays the other blogs of the website. Just duplicate the recently made section from the list view. Then, switch the position of the columns for a contrast design like this:
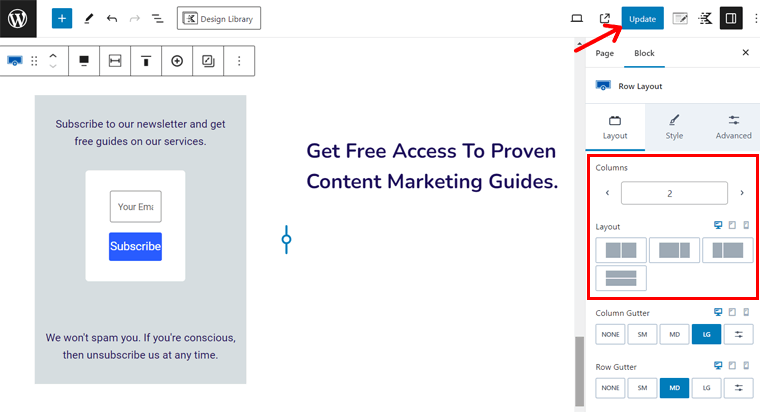
Now, moving to the last section of the homepage. This part contains the form designed before, so let’s duplicate it and add to this position. Then, adjust the position so that the form is in the left-side and the right side will have the content. Lastly, press ‘Update‘.
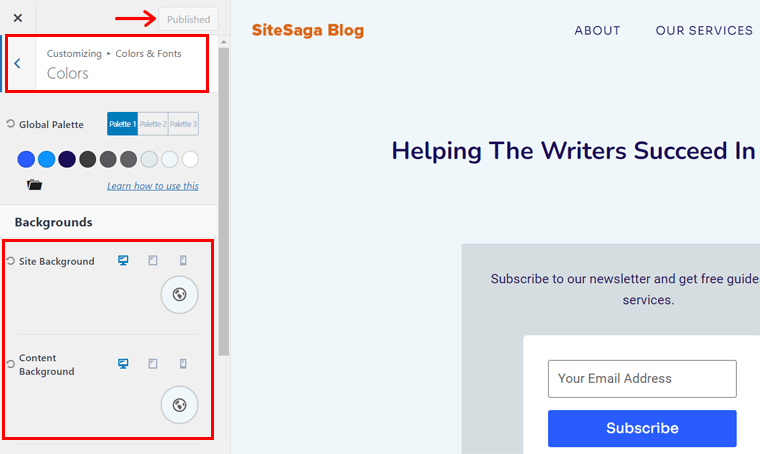
In addition, you can change the background color of each section. Also, it’s possible to change the color of the entire site from the WordPress customizer.
In the ‘Appearance > Customize‘ menu, open ‘Colors & Fonts > Colors‘. There, pick the site background and color background. Lastly, press ‘Publish‘.
With that, your blog homepage is all ready like a professional website! That’s how a crucial part of how to start a blog ends! Here’s its preview:
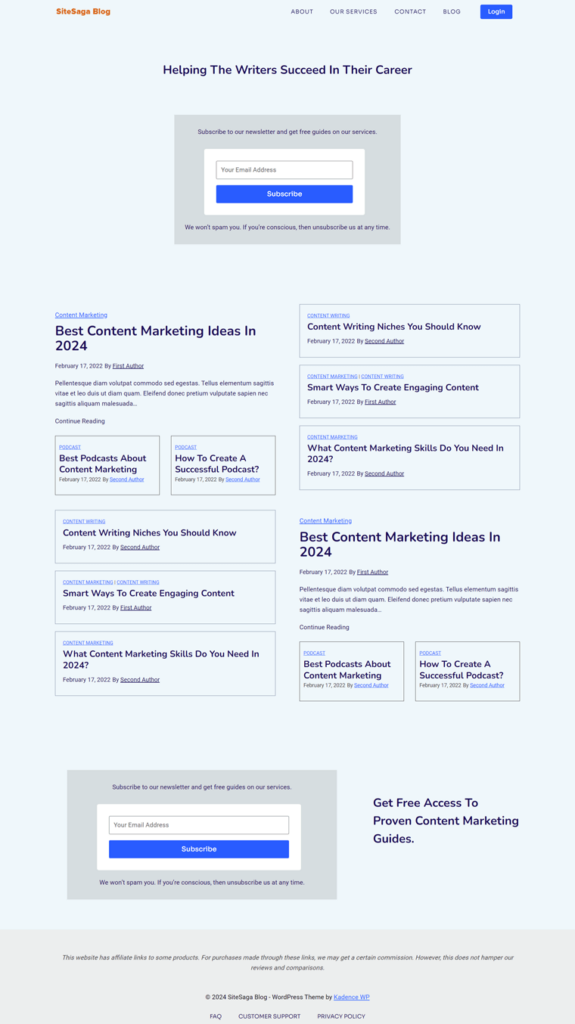
II) About Page
The About page is a must-have page for almost all blogs because it tells you about who you are or about the organization. Most people name this page either “About Us” or “About Me” depending on whether it’s a business blog or a personal blog.
On this page, you need to describe to your audience your ethos, purpose, values, and what audiences should expect to find on your blog.
Thus, let’s look at how you can create an About page for your blog.
How to Create an About Us Page in WordPress?
Just as you would create any other pages, you’d also similarly create your About Us page. Whereas some WordPress themes come with built-in special About Us page templates.
However, if your theme doesn’t offer that, you can simply create an About Us page by going to Pages and clicking on the Add New button.
After that, it’ll take you to the WordPress editor where you can add your content to your page.
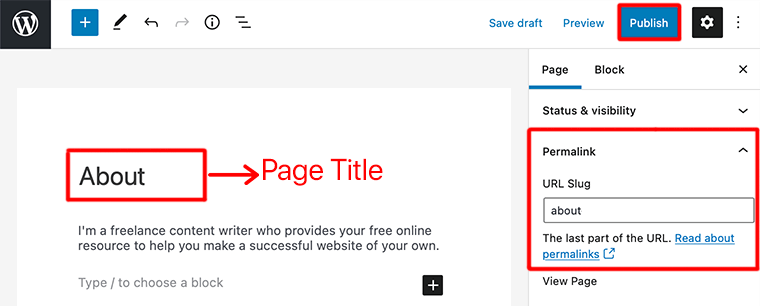
Once you’ve added your content, make sure you name your page either “About Us” or “About Me” or just “About”. Also, use the same name for the permalink.
Finally, click on the Publish button to save your page.
Learn how to create an About Me page in-depth here! Also, find the best About Me page examples!
III) Blog Page
A blog page is a section of your website that contains the sum of all blog posts. This is a great way to engage and communicate with your customers or potential audiences.
Based on your blog, you can share information on new products, and the latest trends, respond to buyers’ FAQs, or provide some expertise. A good blog page always grabs visitors’ attention and can help increase SEO rankings and conversions.
However, if you fail to keep your blog updated, it could have adverse effects on your brand and search engine ranking.
IV) Contact Page
Even though you’ve got a great blog, if your audience can’t find a way to get in contact with you, then it’s worthless. Similarly, advertisers and potential brand associates also need to find your contact information.
Therefore, having a contact page makes it quicker and easier for other people to get connected with you. A contact page must contain your phone number, email address, and physical mailing address with a location map, and social media profiles.
Similarly, you can even add a contact form to make it easy for users to contact you without leaving a public comment on your blog.
Thus, let’s look at how you can create a contact page for your blog using WPForms.
Creating Contact Form with WPForms
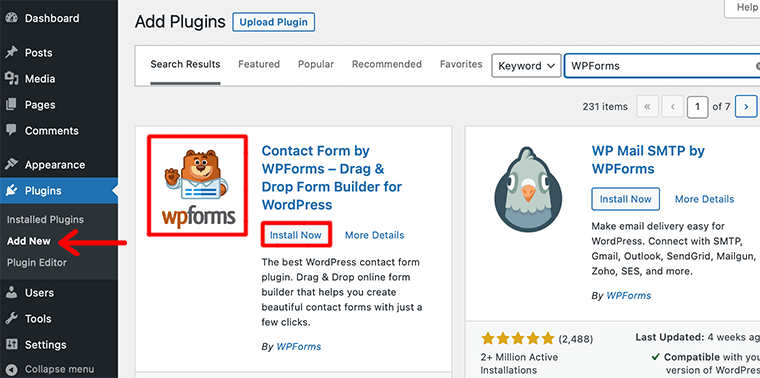
Firstly, log in to your WordPress dashboard and go to Plugins > Add New. Next, click on the Add New button. After that, search for “WPForms” in the search bar. Followed by, clicking on the ‘Install Now‘ button and then clicking on the ‘Activate‘ button.
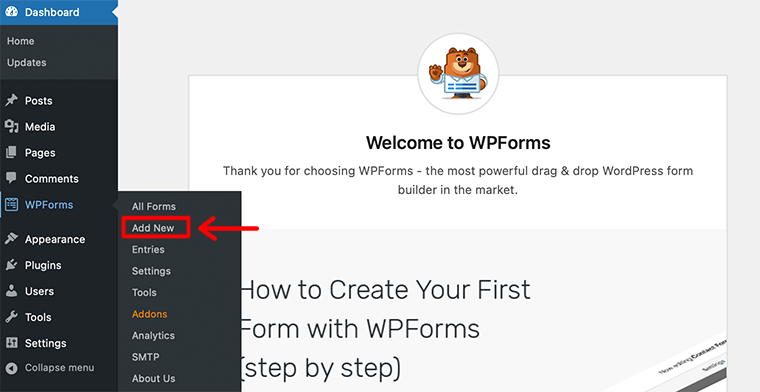
Once you’ve completed installing it, you’ll now be able to see a ‘WPForms‘ tab in a sidebar. To create your form, click on it and then click on the ‘Add New‘ option.
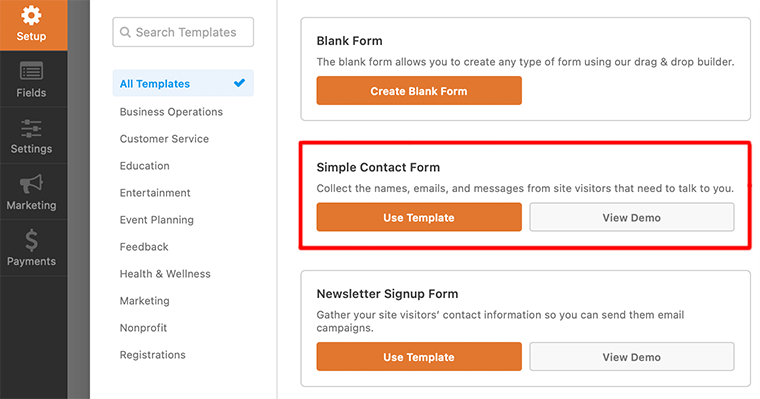
Now it’ll ask you to select a template. There you can find many pre-made templates to help you speed up your process. If it’s your first time, you can choose to start with a blank form as well. Here, you can even give a custom name to your contact form.
For now, we’ll go with the Simple Contact Form.
You’ll then be taken to a simple drag-and-drop form editor. Here you can drag items you want on your contact form from the left and drop them on the right side.
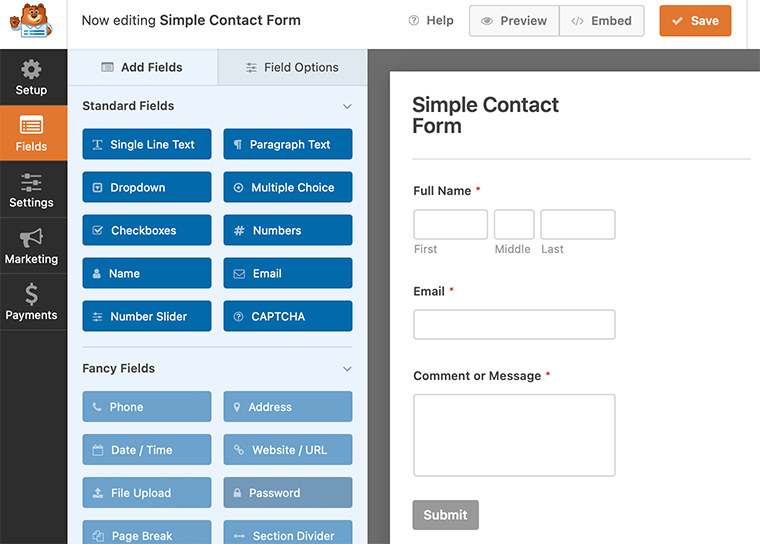
Once you’re satisfied with your contact form, click on the orange ‘SAVE‘ button on the top right to save your changes. Also, you can ‘Preview‘ your contact form before giving it a final go.
Great! if you’ve been able to create a simple contact form following each of the steps discussed above.
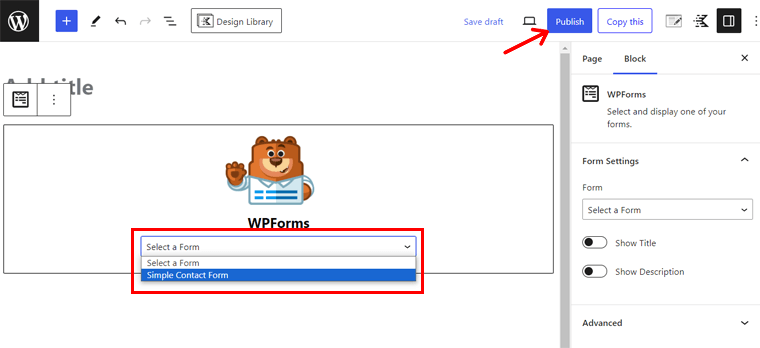
Next is to add a new page called ‘Contact Us’ add the form on that page, and publish the page.
Learn how to add a contact form to WordPress blog here!
Step 7: Start Writing Content on Your Blog
Now that you’ve registered a domain name, chosen your blog platform, and customized your blog theme, it’s time to do some blogging and start creating your first piece of content.
But before that let’s look at some key ingredients that help you write and improve your content writing.
#1 Key Elements Before Starting Writing Your First Content
We all know that there is no secret formula for writing great content. Anyway, these are some tips that can help you improve the quality and quantity of your blog:
- Create an Outline – Before you start writing, you should create an outline for your content. It can help you write a much more useful and well-structured article.
- Study Your Audience – To write great content for your blog, you’ll need to know your audience well. Make sure you have a good answer to these questions – who is the audience, what do they need to know, and what is their attitude toward your topic.
- Find Your Voice – With time, you should discover your voice or tone that can help you develop a certain flow in writing. Make sure your tone aligns with your brand persona and your target audience.
- Original Content – Never plagiarize your content. This can eventually lead you to face backlashes and consequences. Content is all about your perspective, your creativity, and the value you add.
- Keep it Simple – Keep your content as simple as possible and remove anything that doesn’t add value.
- Edit Your Work – Finally, after you’ve created your first draft, make sure to carry out sufficient editing.
- Create a Content Calendar – Create a simple content calendar because it helps you to keep track of topic ideas, articles in progress, and the overall idea of your publishing flow.
With that said, now let’s check out how to add a new blog post in WordPress.
#2 How to Create a New Blog Post with WordPress?
Let’s look at how you can create and edit a new blog post with the WordPress block editor. The WordPress block editor is also commonly called Block Editor, or Gutenberg Editor.
This is an entirely block-based editing area where every piece of content is a block. For instance, paragraph block for a paragraph, gallery block for a gallery, and image block for an image.
These blocks are so easy and user-friendly that anyone without technical skills can also easily make beautiful blog posts.
Now, let’s follow these steps to create your first piece of content for your blog.
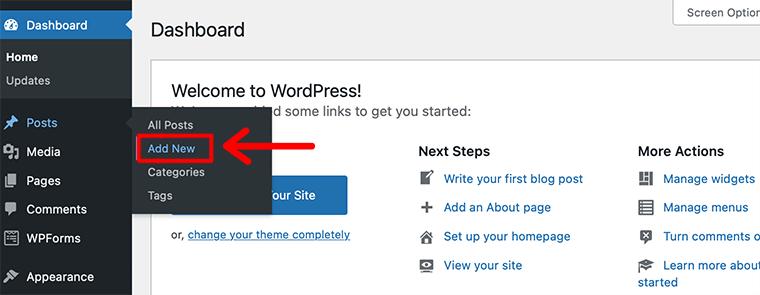
To create your first blog post, go to Posts > Add New from your WordPress Dashboard.
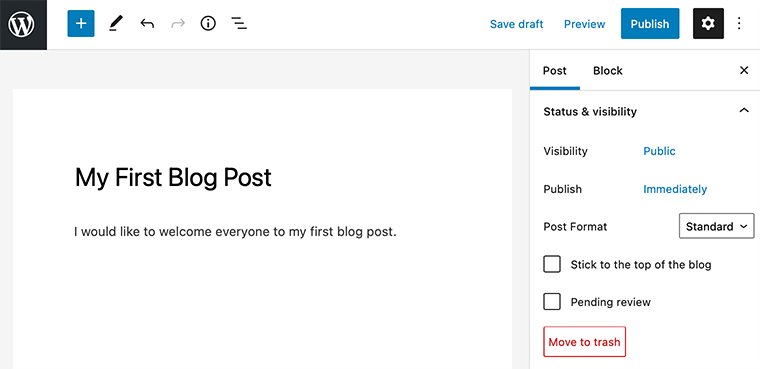
After that, it’ll take you to the next page called Gutenberg Editor. Here you can start by adding the title of your post in the top box. Followed by writing your content for a blog post in the lower box.
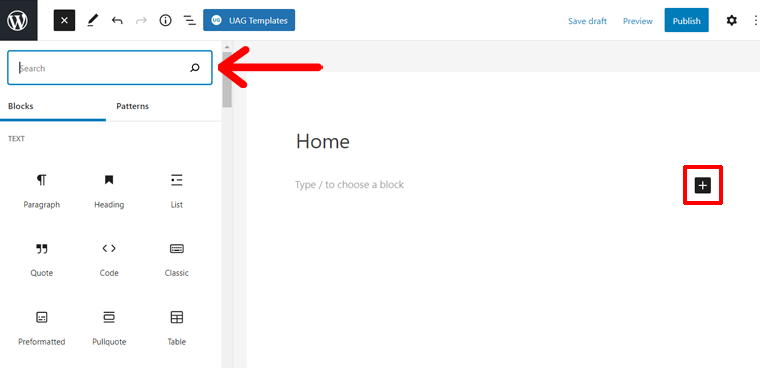
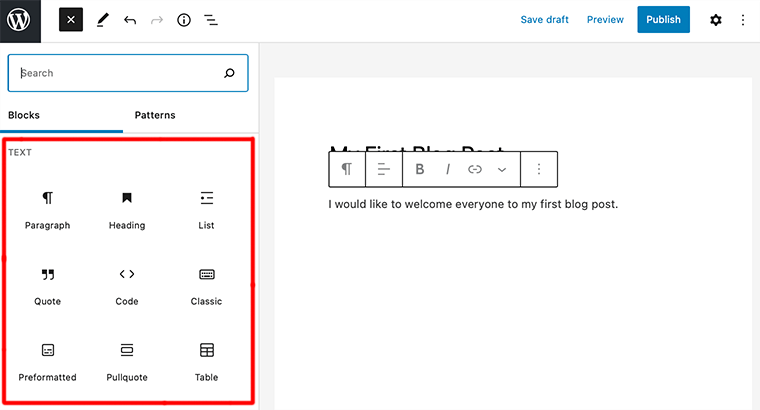
Now that you’ve started adding content, you can even add some other type of content like images, headings, list items, etc. For that, you’ll have to click on the ‘+’ icon present at the top of the bar. There you’ll find all the Gutenberg blocks that you want to add to your blog post.
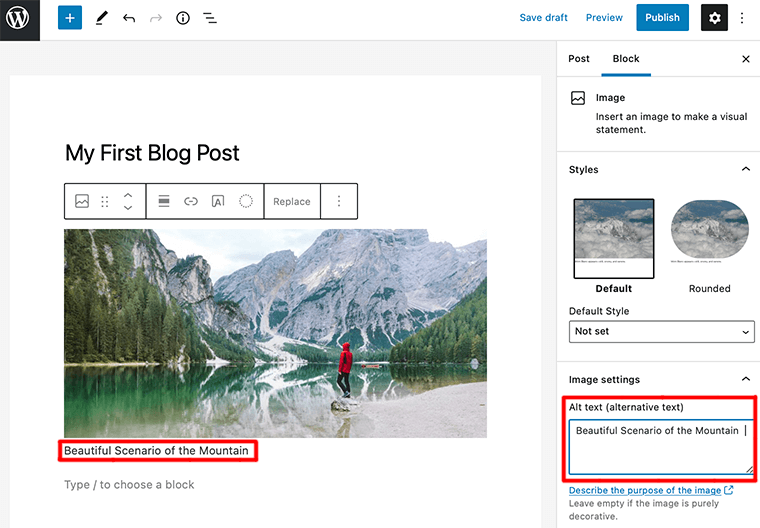
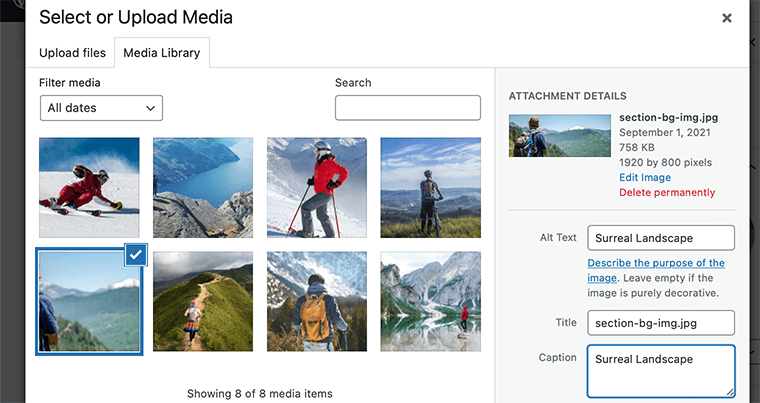
For now, let’s add an image, for that click on Image from the block section. After that, it’ll ask you to either upload an image file, pick one from your media library, or add one with a URL.
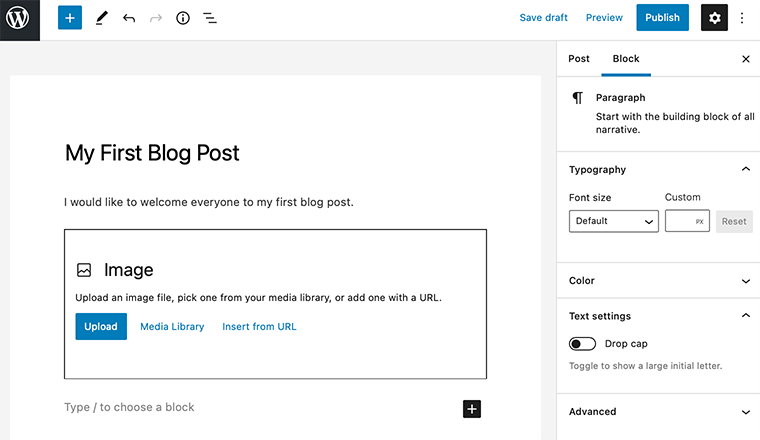
Once you’ve uploaded the image, it’s time to insert the image title, caption, and alt text from the Setting section.
Similarly, you can add other types of block elements like buttons, lists, etc. to create a beautiful blog post.
#3 Optimize Your Content for Better SEO and Readability
The next step is to optimize our content for better SEO and readability, and this is what we’ll discuss in this section.
Search engine optimization (SEO) is a strategic process that is used by website owners to get more traffic to their web pages in search engines.
If your content isn’t well-optimized, then there is a high chance that search engines won’t know what it’s about and may not show it on search results. As a result, when people search for your content, it won’t appear in the search results, and you’ll miss out on all that traffic.
Therefore, you must make your blog search engine-friendly so that you can maximize your search traffic.
Here, we give you some basic SEO tips to optimize your content for better SEO and readability. Let’s start with the easiest one.
Check Your Site’s Visibility Settings
WordPress provides you with the in-built option to hide your website from search engines. This option is much preferable if you want some time to work on your website before it’s ready to go public.
Hence, to ensure that search engines can find your blog, you need to make sure that this option is unchecked.
For that, hover on Settings from your WordPress dashboard and click on the Reading option. After that, it’ll take you to the Reading page and you need to scroll down to the Search Engine Visibility section.
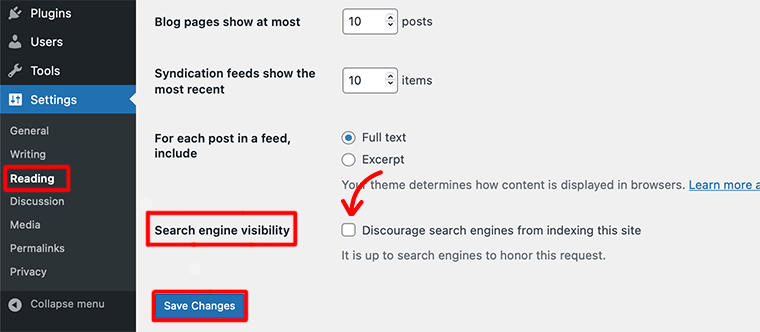
Now, you need to make sure the box is unchecked in Search Engine Visibility. At last, don’t forget to click on the Save Changes button to store your changes.
Change Permalinks Structure
The next thing that you need to take care of is to change your permalink structure.
Permalinks are web addresses that trace back your site’s individual posts, pages, and other content. By default, WordPress does set the permalink structure for you which is not so well-optimized.
Thus, to optimize your permalink, go to Settings and click on the Permalinks. This will take you to the Permalink Settings where you select the Post name option under Common Settings.
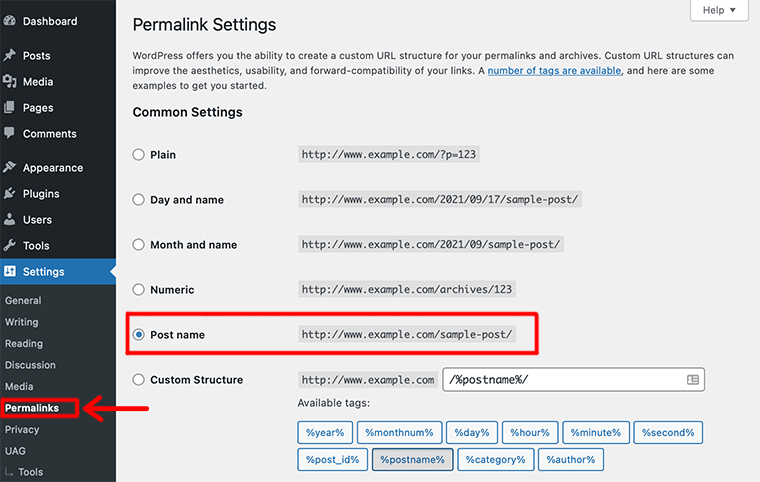
Then, click on the Save Changes button to store your changes.
And that’s how you change your permalink structure for better link structure for your readers and for search engines too.
Use the Best WordPress SEO Plugin
When it comes to choosing the best WordPress SEO plugin, there are thousands of WordPress SEO plugins available in the market. Because of this, it’s quite hard for beginners to choose the best WordPress SEO plugin.
To help you with that we’d like to recommend popular WordPress SEO plugins like Rank Math, Yoast SEO, and SEOPress.
Among them, Rank Math is a growing WordPress SEO with various emerging technologies like AI. In this tutorial, we’ll be using Rank Math for screenshots and examples to help you improve your SEO.
Keyword Research and Optimization
Many beginners seem to randomly pick the topics that they think people are looking for. And based on that they think they should add it to their blogs.
However, this is moreover shooting an arrow in the dark. Because you’ll never know whether your target audience has even heard about that topic in the first place.
That’s why keyword research is a preferred technique that many SEO experts, bloggers, and content creators are in love with. This technique helps you find the keywords that users enter into their search engines to find content, products, and more.
Therefore, you can find many keyword research tools (both free and paid) that you can use. But, we’d like to recommend using Semrush. It’s a widely popular tool that helps you discover keywords and even discover the keywords where your competitors are ranking.
Learn how to use Semrush with its free trial here!
Create XML Sitemaps
An XML sitemap is a list of information about the pages, and other files on your website. It helps search engines to know your website properly while crawling it.
Yet you should understand that when you add an XML sitemap, it doesn’t boost your search engine rankings. Rather it only helps search engines to find the pages quickly and start ranking them.
If you’re using a WordPress SEO plugin like the Rank Math plugin, then it’ll automatically generate an XML sitemap for you.
Or else, you can install a Google XML sitemap plugin to generate an XML sitemap for your site. Here’s a list of the best WordPress sitemap plugins!
Format the Content for Readability
Another important thing to do for SEO would be formatting your blog posts for readability. For content to automatically rank higher in search results, you need to ensure that people and search engines can read and understand your post easily.
For that, these are the top considerations for content readability:
- Write long-form content when possible with appropriate use of keywords, headings, and so on.
- Add plenty of headings (H2, H3, H4, H5, etc). Some of the headings should also contain keywords.
- Remember to fact-check and proofread everything you add to your blog post
- Use auto-formatted bullet points, every time you need a bulleted list
- Fix your spacing by removing double-spacing after periods
- Add more paragraph breaks where your paragraph looks dense
- Be consistent with formatting to keep things neat and clean
NoFollow External Links
Links are a very essential part of every blog post as it tells crawlers how your post or page is related to similar content. At the same time, they even help search engines to decide which pages of your blogs are important.
There are mainly 2 types of links you can add to your post:
- Internal links: Links to other pages or posts on your own blog.
- External links: Links to pages on other blogs or websites.
When you link to a page or website, you’re providing some of your site’s SEO juice to that link. And that SEO score is often referred to as link juice.
But you might not want to pass link juice to all the external links you add to your blog. That’s so because some links may be affiliate links or not so trustworthy links.
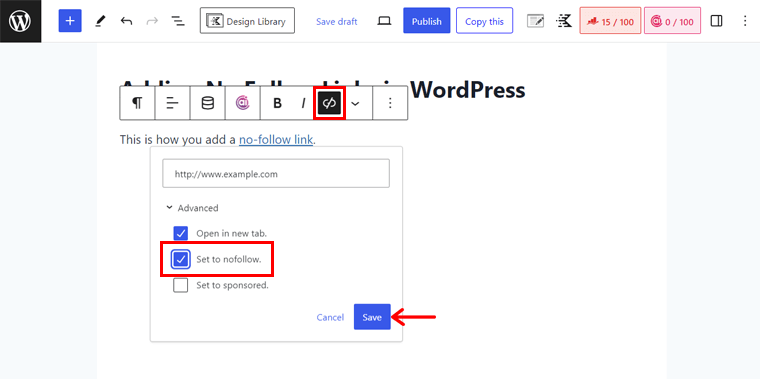
That’s when you need to add the ‘nofollow’ attribute to external links (links that go to any websites that you don’t own). This will instruct search engines not to follow those links and not to pass any link authority to the link target.
Although WordPress doesn’t have an option to make links nofollow. However, if you’re using the Rank Math SEO plugin, then you can do it easily.
To add the nofollow attribute to external links, ensure that when you’re adding a link, simply tick mark the “Set to nofollow” option. With that, also tick mark the ‘Open in a new tab‘ options. Then, hit ‘Save‘.
Apart from that, you need to make sure that your blog gets enough to follow links from other related blogs. Getting enough link juice from high-authority websites helps your website rank.
Optimize Images for SEO
Another important thing about any blog is its images. They make sure that your blog posts are more interesting and easier to understand.
Having said that, if you’re not careful with image sizes and their quality, then they may take more time to load and can slow down your blog.
Hence, you need to make sure that you always optimize your images for faster loading. here are several ways to optimize your images for SEO:
- Add only relevant images to your blog
- Insert images correctly and keep your image placement consistent
- Use original size image without sacrificing quality
- Add a descriptive title and alt tags
Optimize Meta Title and Description
Just like you optimize images, you’ll also need to optimize your title and description to get maximum clicks.
Although these SEO meta tags don’t appear on the actual page, they help search engines better understand what the webpage is about.
A great way to add meta tags to your post in WordPress is to use the Rank Math plugin.
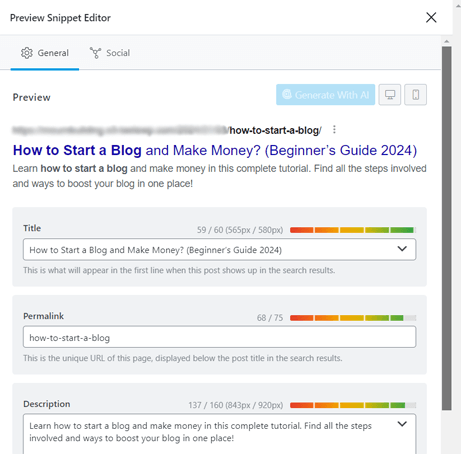
Once the plugin is installed, open the Rank Math option present on the top bar of the WordPress editor. There, you’ll find the ‘Edit Snippet‘ button in the Preview section.
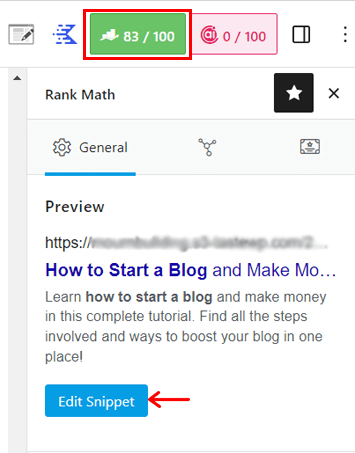
In that section, you’ll get a snippet preview of what your post will look like in the search results. Also, below that, you’ve other options like adding the title, meta descriptions, and permalinks.
Learn everything about using this SEO plugin in our Rank Math review!
Use Proper Categories and Tags
Some people really don’t use WordPress categories and tags. Since they think that it’s not so important to do that.
However, categories and tags do help you organize your blog posts on your website. It’s a really good approach for internal organization and optimization. At the same time, it also helps search engines to understand your website structure and content.
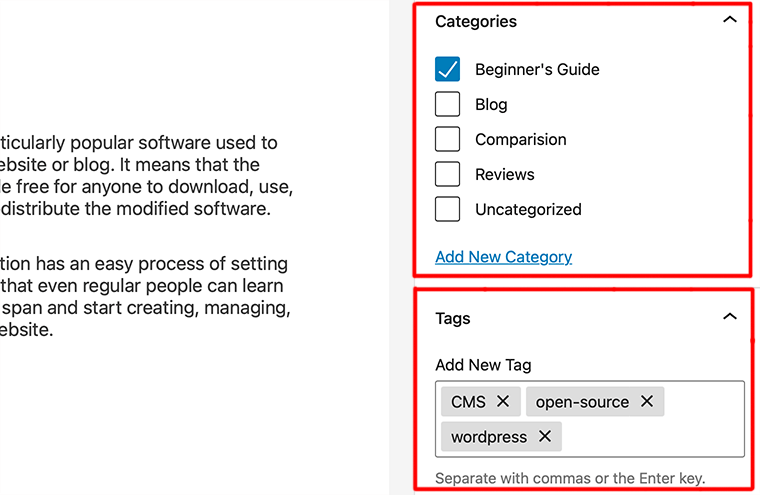
Categories are used to describe the topics that you cover in your blog. In simple terms, it’s used for a broad grouping of topics.
For example, if you’re creating a blog on news, you might use categories such as political, world, business, sports, health, etc.
On the other hand, tags are more specific keywords that you want to use to associate related content. For example, a blog post under the sports category can have tags like football, tennis, cricket, athletics, etc.
Hence, if you use categories and tags properly, it makes it easier for your users to browse your blog. Similarly, it also makes it easier for search engines to browse your blog.
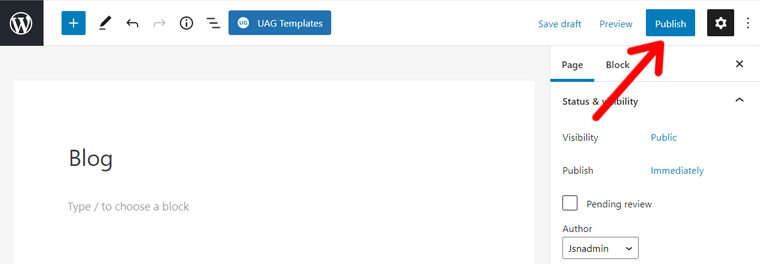
#4 Publish Your Blog Post
After you’ve completed writing a post on your blog, giving a title to your post, adding an image to your blog post, and optimizing your post for better SEO, it’s time to publish your blog post.
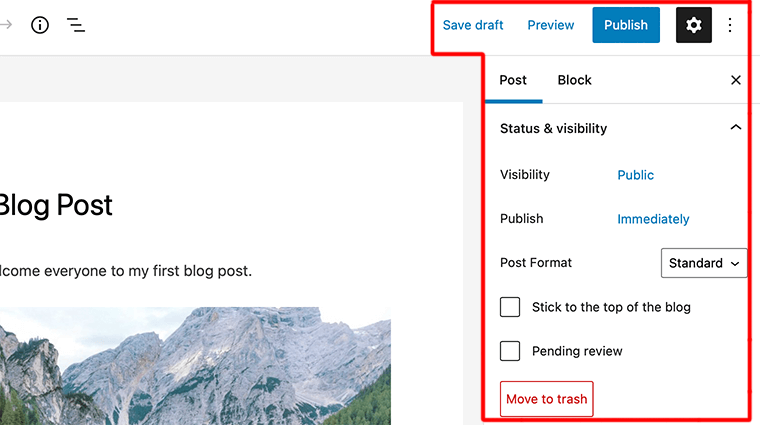
As we already know, the WordPress editor is divided into two columns. If you look at the left column that is where you write content, and in the right column you’ve all post settings including publishing options.
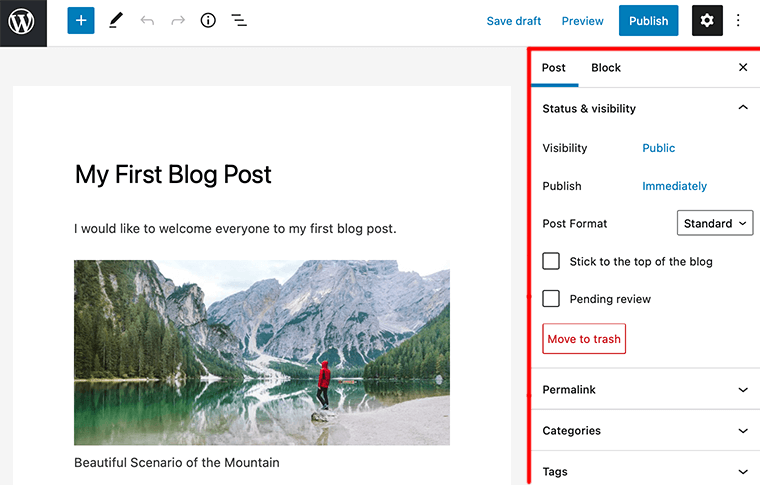
Now, let’s look at all the publishing options that are present in the right column.
- Save Draft – On clicking on this link it’ll save your post as a draft. At the same time, it also automatically saves your changes as you go on writing.
- Preview – The button will allow you to open a live preview of your post in a new window tab.
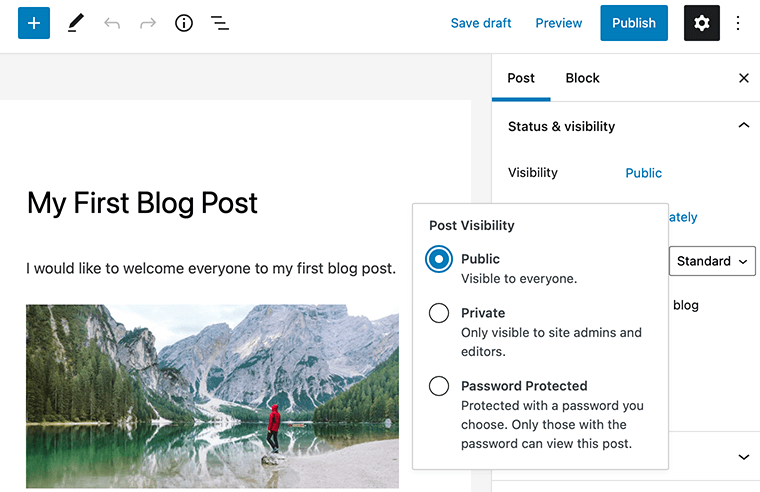
- Visibility – This option lets you determine whether you want to make your post public, private, or password protected. By default, it’s always selected as a Public option.
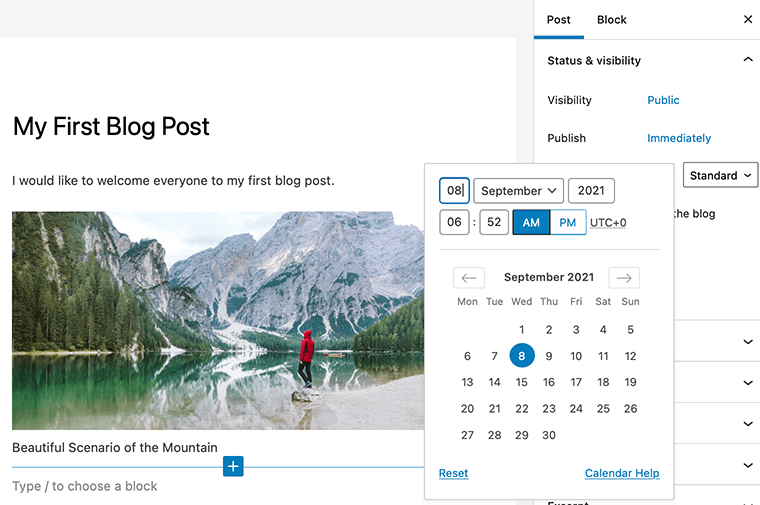
- Publish Schedule – This option lets you schedule the publishing time for your post. By default the option is selected to be published immediately. However, you can schedule your posts to be published later at any given time and date.
- Post Format – It allows you to define the visual representation of your post. It comes with a number of post formats such as Standard, Aside, Gallery, Link, Image, Video, etc.
- Stick to the top of the blog – If you want a specific post to appear on top of other posts, you select this check box.
- Pending Review – Generally, this option is for multi-author blogs where contributors can just save posts and not publish them.
- Move to Trash – If you want to delete any post, then you simply click on this button.
- Publish – Finally, you click this button after you’ve completed editing your post to make it go live on the internet.
Step 8: Promote Your Blog Content
By now, you’ve learned how to start a blog, how to create blog posts, and how to score better ranking in search engines.
Still having your blog post published on the internet isn’t sufficient. Because there are millions of blogs available with similar content on the internet. Therefore, you need to promote your blog so that it gets noticed on the internet.

Let’s look closely at the basic promotion strategies that will help you grow your audience once you start a blog. It’s not mandatory that you need to use every strategy – try a few of them and see what works well for you.
#1 Start with Your Close Group of Circle
Once you’ve made your blog live on the internet, the very first people you want to tell about your blog are your close circle. This circle mostly includes your family, friends, neighbors, and colleagues within your field.
You should inform them that you’ve started your blog, request them to become your followers and ask them to comment on your blogs. Lastly, don’t forget to thank them for their constant support and love.
#2 Use Social Media to Promote Your Blog
Social media is by far the best platform for immersing yourself in a particular industry, while also allowing you to reach more people at once.
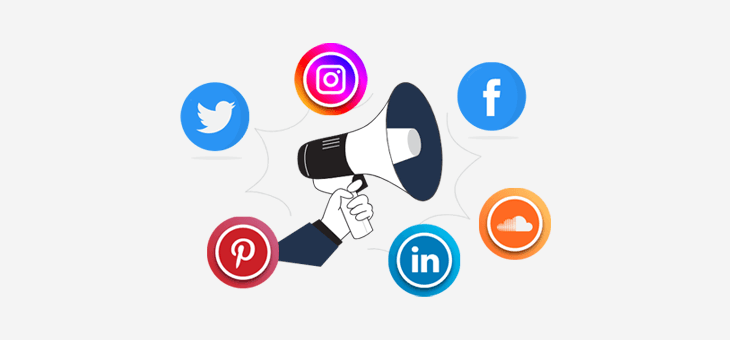
Facebook, Twitter, LinkedIn, YouTube, Pinterest, Reddit, and Instagram, are some of the biggest networks that help you find the right audiences for your blog. All you need to do is pick the best platform that suits your niche and audience interests.
Then start sharing your content or schedule your content to be shared at later dates, with tools like Buffer or Hootsuite.
If somehow your content starts thriving then you can become viral on social media. Then, people will start making your memes, videos, hashtags, etc.
Here are the best social share plugins for WordPress. Also, check out this guide on how to add social media share buttons to your blog!
#3 Guest Posting
The best thing about starting a blog is that you’ll find a community of other bloggers who love to help each other out. Guest posting is the best way to connect with an already-established audience.
A guest posting is an act of writing content for another person’s blog to build relationships, exposure, authority, and links.
To land your first guest blog post, look for places where your audience is, create amazing content, and pitch it to other bloggers.
#4 Reach Out to Influencers
As a beginner blogger, it’s quite hard to build an audience. To help you with that, get someone influential who can introduce you to their audience.
You should reach out to influencers who have a lot of followers and have a high retweet and reply ratio. To connect with your targeted influencer, mention them on social platforms and ask for opinions on your content.

At the same time, it’s not just beginner bloggers but even experienced bloggers who blog full-time will be doing it.
In short, you’ll find a lot of competition. Hence, you need to come up with an effective plan and effort if you want your outreach.
#5 Introduce Rewards or Referral Program
When you incentivize people to share your content, it’ll likely result in people sharing. It’s one of the great ways to promote your content and to get people to share.
For instance, you can organize a webinar and ask attendees to refer to at least one of their friends as well. In that way, both of them receive free merchandise of your brand or even a discount of some sort.
You don’t always have to reward them in any form but, remember to thank them for their constant love and support. Since there are lots of people who would participate generously with no hope of return. All you’ve to do is ask people to refer others to like and share your blog.
Similarly, you can simply invite a few of them to your special events or feature them on your blog.
#6 Advertising on the Web
In comparison to traditional direct marketing tactics, advertising your content on the web has been found to do wonders these days.
You can pay to promote your content on Facebook, Twitter, or LinkedIn. After all, displaying ads is a great option for getting your content seen.
Pay-per-click (PPC) can help your content get more reach on a variety of platforms. By using this technique, you only have to pay when someone clicks on the post.
Likewise, you can consider driving paid ad traffic to a landing page first. In this way, you engage your audience with your content.
However, we don’t recommend it if you’re just starting. Because we think that spending money on Facebook ads or Google ads at the very start of your journey is harmful to your blog.
But once you’ve got a solid foundation in place, you can apply this to drive more traffic to your blog.
Find the best WordPress banner plugins to easily insert advertisements on your blog.
#7 Build Your Email List
After you’ve started a blog, you’ll also begin attracting new readers and visitors to your blog. And once they start coming, you’ll also want to make sure that they’re coming back.
This is the time when email marketing plays a big role. You can collect the email addresses of your visitors with their permission. So, that they can be notified when you publish new blog posts or share promotional offers.
In this way, it’ll make sure people are coming back to your blog. Also, it’s a great way to build trust and closer relationships with your visitors.
Here’s a list of the best email marketing services. Get these features on your blog using the best WordPress email marketing plugins.
Now that we looked at some of the ways to promote your content, it’s time to make money with your blog.
C. How to Make Money with a Blog? (Best 5 Ways)
Now that you’ve successfully set up and run your blog, here are some ways to make money with your blog.
1) Sponsored Blog Posts
Some bloggers don’t find it interesting to display ads on their blogs and wonder how to monetize a blog without ads.
Hence, one of the best ways of monetizing your blog is through writing sponsored blog posts. As your blog grows, you might start getting approached by companies that’d like to sponsor you.
After that, companies will compensate you to represent their product, talk about it, and promote it to your audience.
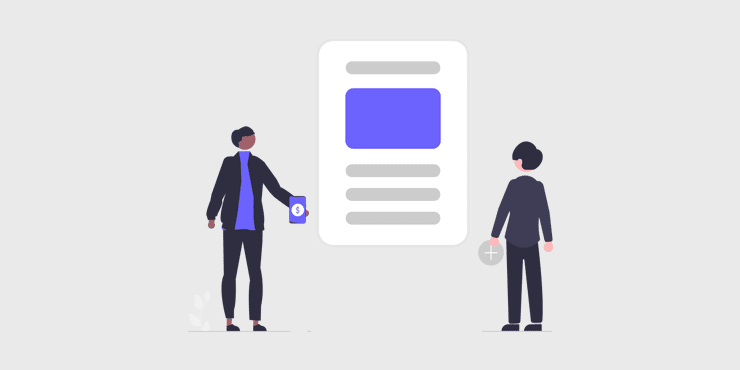
For example, you’ve got a blog on fashion and trends. Suppose H&M comes out with their new autumn collection and they offer to pay you to write an article about their range. In this way, you’ll also be able to add some affiliate links to your blog.
However, this method usually works if you have a strong niche audience. Still, you can take the initiative by reaching out to the top companies in your field and asking about sponsorship options.
2) Place Ads on Your Blog
Another best way to make money blogging is by placing ads on your blog posts. It’s one of the easiest ways to make money from your blog.
You can place ads anywhere, but we recommend placing them across the top of blog pages or in the sidebar. When you add ads to your blog, it provides you with a healthy revenue stream for your blog post.
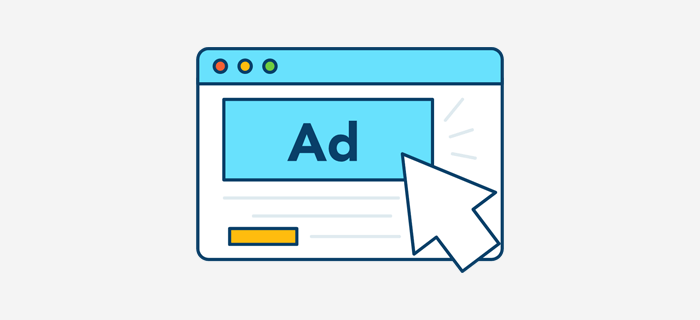
There are two ways through which you place ads and make money from your blog.
The first one is by directly offering advertising space on your blog to businesses. This one is known as a direct advertisement.
And the second one is to use ad networks like Google AdSense that would show ads automatically based on your content and user interest.
With Google AdSense, all you do is add a script from Google to your blog and then start displaying ads. After that, you’ll get paid for every click on the ad. These are called CPC (cost per click) ads. For more, check our detailed article on Search Engine Marketing (SEM).
Similarly, while placing an ad, you get the freedom to choose your preferred ad sizes, shapes, and placement of your ad on your blog.
3) Affiliate Marketing
Affiliate marketing is a popular advertising strategy where you promote other companies’ products by including a link in your content to a product or service for sale on another site.
Following that, if someone buys the product based on your recommendation, then you’ll receive a certain amount of commission.
Today if you look, affiliate marketing has become one of the effective ways of earning online even with a small investment. Since most bloggers are using it these days to make millions of dollars every year from their blogs.
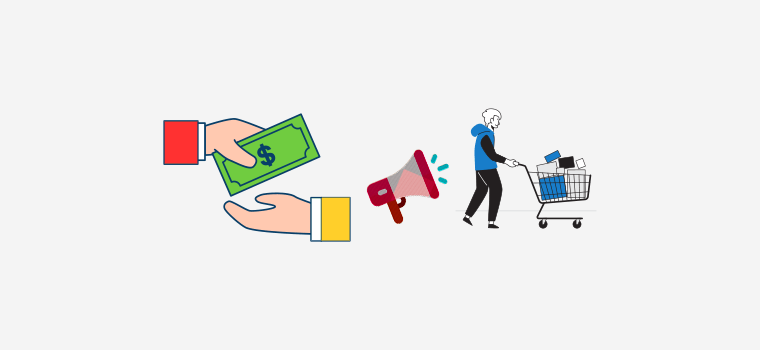
If you’re interested in getting started with affiliate marketing, here are some of the popular affiliate marketing marketplaces to join:
In those markets, you can look for those products that you’ve already used and the ones that your audiences may be interested in as well. After that look for affiliate programs that you can sign up for.
Hence, affiliate marketing is the best way to make money online. Because it lets you promote a wide variety of products. Also, almost all popular eCommerce stores like Walmart, ASOS, Amazon, Apple, BestBuy, and others have an affiliate program.
4) Create a Paid Membership Website
A paid membership or subscription plan is another way to generate revenue over the long run from your blog. This can be the best alternative to earn money from your blog if you’re not interested in selling ads or sponsored posts.
In this method, you can charge your audience to pay a certain fee to access some content or areas of your blog. Based on your content, you can make your audience pay a fixed amount regularly, typically monthly or annually. Learn what a membership site is here!

Basically, you can even reward paid members with a variety of perks, such as access to webinars, learning resources, free blog content, and a community area.
In this way, you can produce recurring income with a more stable, predictable, and accurate revenue stream. Check the most popular membership website examples, types of membership sites, and the best membership website ideas.
In WordPress, you can easily create a membership site using a membership plugin like MemberPress or Paid Memberships Pro. Along with a suitable membership theme for WordPress.
5) Sell Online Courses
If your blog tends to provide educational or training services, you can start earning money by selling online courses or coaching packages.
Remember that you don’t always have to sell physical products, you can even opt to sell digital services as well.
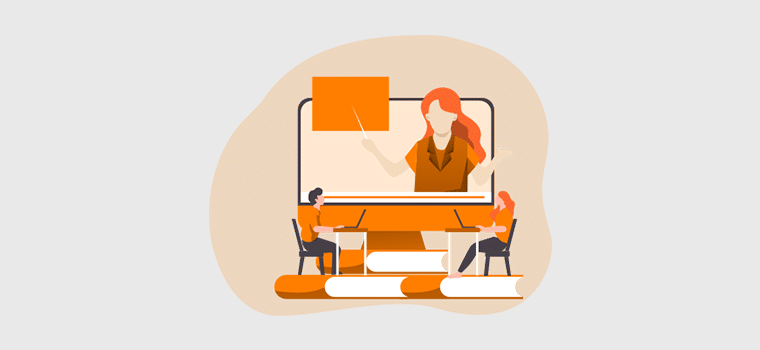
For example, if you run a health and fitness blog, you might sell fitness-related equipment. On the other hand, if you manage a technology blog, you might try selling digital guides on how to master that technology.
When you create self-guided course materials, it allows your users to proceed with their courses at their own pace. And with each progress through their courses, you can build more courses based on their interest.
Besides selling courses online, you can also offer live video training and make them pay for your time.
You can quickly set up an online course with WordPress using the LearnDash plugin. Find more from the best WordPress LMS plugins or the popular WordPress online course plugins list.
6) Sell Products/eCommerce
Nowadays, many bloggers can be seen on an eCommerce platform, creating an online store, and start selling products. When it comes to selling products, your products could be physical or digital.
To sell your products, the main thing you need to set up is a system for accepting payments from all over the world. Especially when you’re selling physical goods, you’ll need to manage your stock, organize shipping, and handle taxes and duties.
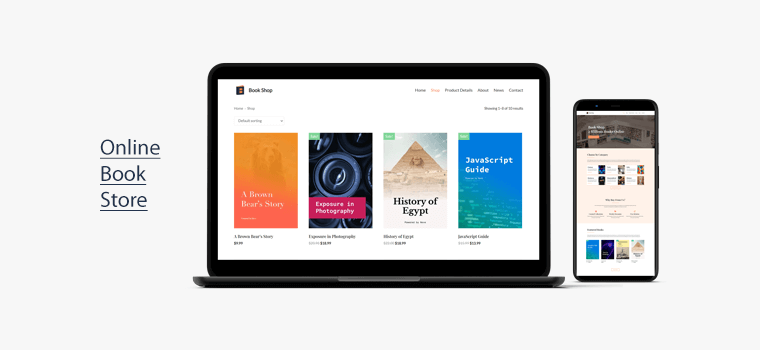
On the other hand, selling digital goods is less complex logistically since they’re generally delivered electronically.
Pick one of the best WordPress free eCommerce themes and the best WordPress eCommerce plugins!
These are just a few options when it comes to making money from your blog. You should master at least one of the blog monetization strategies. However, depending on your blog, you go with any number of revenue streams to discover what works best for your business.
D. Additional Blogging Tools to Grow Your Blog
1) MC4WP: Mailchimp for WordPress
MC4WP is a popular WordPress newsletter plugin that can help you grow your Mailchimp lists and write better newsletters through various methods. It’s a free WordPress plugin that guarantees to convert your site visitors into subscribers for your Mailchimp lists.
Using this plugin you can create emails, landing pages, postcards, and more to interact with your target audience effectively. You can easily create good-looking, user-friendly, and mobile-optimized sign-up forms with complete control over the form field.
Besides, it tightly integrates with all major eCommerce tools like Shopify and WooCommerce. With its free plan, you can list up to 2000 subscribers. This is the reason why it is the best newsletter service for thousands of businesses.
2) MonsterInsights
MonsterInsights is the best Google Analytics plugin that easily connects your WordPress site and tracks all the data you need to know about your website. in just a few clicks, you can set up analytics, and get insights on how your site is performing.
It comes with a comprehensive set of tools that are both easy to use and powerful. It allows you to track the number of visitors visiting your blog, your top content, what users do on your blog, and so on.
Unlike other Google Analytics plugins, it comes with advanced Google Analytics tracking features that you can enable with just a few clicks. Also, it automatically tracks your affiliate links, banner ads, and other outbound links using link tracking.
3) Grammarly
Grammarly is the best online grammar checker that ensures everything you write on the web is grammatically correct, precise, easy to read, and attractive. This is an awesome tool for those who usually tend to face some grammatical issues while writing fast emails or long reports.
It’s a must-have handy tool if you don’t want to look unprofessional or possibly risk your business. Besides, it’s an AI-powered writing assistant that has all the necessary document editing tools that are required for creating web-ready content.
4) ThirstyAffiliates
ThirstyAffiliates is the best WordPress affiliate link-cloaking plugin. It allows bloggers to add, manage, and easily insert affiliate links into their posts and pages. Thus, it’s a popular affiliate marketing plugin among affiliate marketers like publishers, distributors, or advertisers.
With ThirstyAffiliates, you can organize the affiliate link in a single place and you won’t even need to enter the URLs manually in the keyword. Moreover, it comes with built-in reports that tell you how much your affiliate links have been clicked and what is popular on your blog.
Not just only that, it includes an automatic link health checker that automatically looks at your affiliate links for 404s or broken links. After that, it’ll notify you whenever it detects any problems.
5) AddToAny Share Buttons
AddToAny Share Buttons are the best WordPress social sharing plugin that makes it super fast and easy to share your content. It lets you add beautiful and lightning-fast social share buttons to your blog.
Unlike other sharing plugins, it doesn’t slow down your website and guarantees to look great no matter what screen size or resolution. Also, you can use it to share your content across any services like Facebook, Twitter, Tumblr, WhatsApp, Reddit, LinkedIn, and more.
Therefore, it’s also known as a ‘universal social sharing platform’ because it supports more than 100+ social networks. Likewise, you can add an official share counter alongside your share buttons.
Conclusion
That’s the end of our beginner’s guide on how to start a blog and make money. We hope that it’ll help you establish your own blog and generate revenue.
And believe us, this is exactly what we did when building our blog SiteSaga. If you love this blog and like our work, then we guarantee that you can achieve something similar very soon. You just need to START TODAY!
If you’ve any further queries on how to start a blog and make money, then please leave a comment below. We’ll try to get back to you as soon as possible.
You may also want to explore our comprehensive guides on SEO and digital marketing! These articles will provide you with greater insights on how to grow your blog and succeed with it!
In addition, learn the benefits of personal blogging and know the differences between blogs and vlogs.
Lastly, don’t forget to follow us on Facebook and Twitter. And, please share this guide on your social media accounts and spread the message!