

Are you looking for an in-depth Amelia plugin review? If yes, then look no further.
Nowadays, businesses and service providers are turning to innovative tools to streamline their operations. Similarly, you may be looking for a booking plugin that seamlessly integrates into your WordPress website. Isn’t it?
Use Amelia, a powerful WordPress booking plugin that lets you easily schedule and handle appointments. Say goodbye to the scheduling complexities and hello to an organized booking process.
In this review, we’ll cover each aspect of the Amelia plugin, including its features, pricing, support options, etc. So, join this journey to determine if Amelia is the best WordPress booking plugin. Let’s start!
Overall Rating
Amelia is the ultimate WordPress booking plugin for appointments and events. Today, over 60K websites are using Amelia for the booking solution on their websites.
Best of all, it scores a brilliant 4.6 out of 5 stars (491 user reviews) on the WordPress.org plugin repository.
Undoubtedly, we would also give Amelia a perfect 4.8 out of 5 stars. You can see that we deducted the remaining 0.2 rating. That’s because beginners may feel a little overwhelmed when syncing it with their calendars.
However, we recommend using this plugin for your website. That’s when Amelia seems to fit your needs. But you must try and use the free version first. Also, you can check out its demos here to visualize how your booking or event system will appear.
Once you’re ready, you can upgrade to a paid plan. Most of all, you’ll also get a 15-day money-back guarantee policy. So, within the first 15 days, determine if you want to continue using this plugin.
Now, let’s move forward and learn about the pros and cons of the Amelia plugin.
Pros and Cons of Amelia
The following lists represent the pros and cons of the Amelia plugin. So, read them thoroughly:
Pros of Amelia
- Amelia has a user-friendly interface, making it easy for you and your employees.
- Offers a wide range of features, like booking forms, recurring events, etc.
- Sends automated reminders and notifications to improve business efficiency.
- Seamlessly integrates with popular WordPress plugins, calendar applications, etc.
- You’ll get insights into your business performance, employees, and more.
- Ideal for everyone including private clinics, beauty salons, law consultants, etc.
- Provides demos whether front-end or back-end to visualize the plugin functions.
Cons of Amelia
- Calendar synchronization may be overwhelming for beginners.
- It doesn’t offer a free trial for the premium plans.
Following that, let’s officially begin the Amelia plugin review with a brief overview.
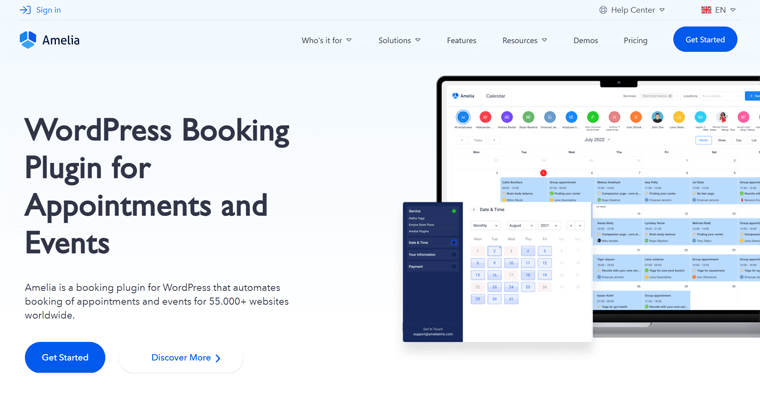
A. What is Amelia? – An Overview of the Plugin
Amelia is an all-in-one WordPress booking plugin that automates the booking of appointments and events. Simply put, it provides a robust solution for businesses of all kinds to streamline their appointment and event management processes.
Specifically, it’s ideal for businesses offering services like hair salons, yoga, private clinics, consultants, etc. Where appointments are essential and customers need to be able to book them easily and conveniently.
Moreover, it offers a powerful booking calendar that perfectly organizes and presents your services and events in a user-friendly format. Ultimately, your clients can also effortlessly navigate and find the most convenient time for securing their spot.
Wondering how to show the Amelia features on your site? Delightfully, this plugin offers multiple shortcodes. Using them, you can show your booking functionality as you want.
Focusing on the mobile-first concept, every front-end and back-end Amelia element is designed to have seamless functionality across devices. So, both administrators and clients will get a highly flexible and accessible booking experience.
In addition, Amelia’s standout features include its integration with calendars and payment processors. Further, it excels in event management so that you can create, manage, and promote events alongside appointments on one platform.
Finding Amelia Fascinating?
Amelia is a powerful, intuitive, and versatile booking solution for your business. If you’re already sure about using it for your business website. Then, get started now!
Learn all the key features of the Amelia plugin next!
B. Key Features of the Amelia Plugin
Now, let’s explore the heart of the Amelia WordPress plugin in this section as we delve into its key features. And discover what sets this plugin apart in our comprehensive review.
1. Advanced Appointment Booking Features
Whether you’re running a small business or a large enterprise, Amelia has all the tools you need to manage your appointments efficiently and effectively.
This means you can book appointments like a pro with Amelia’s advanced appointment booking features.
With Amelia, you can:
- Customize your booking forms to collect the specific information you need from your clients. From basic details like names and contact information to more specific preferences or custom questions.
- Create and manage multiple calendars for different employees, locations, or services. This makes it easy to keep track of all your appointments and ensure that you’re never overbooked.
- Define complex booking rules such as minimum and maximum book lead times and buffer times between appointments. Plus, you can allow for group bookings, package bookings, recurring appointments, and more.
- Gain insights into client history, preferences, and appointment records to provide personalized services.
And that’s just the beginning! Amelia’s advanced appointment-booking features are designed to make your life easier and help you grow your business.
Having said that, managing your schedule and enhancing the customer experience has never been easier.
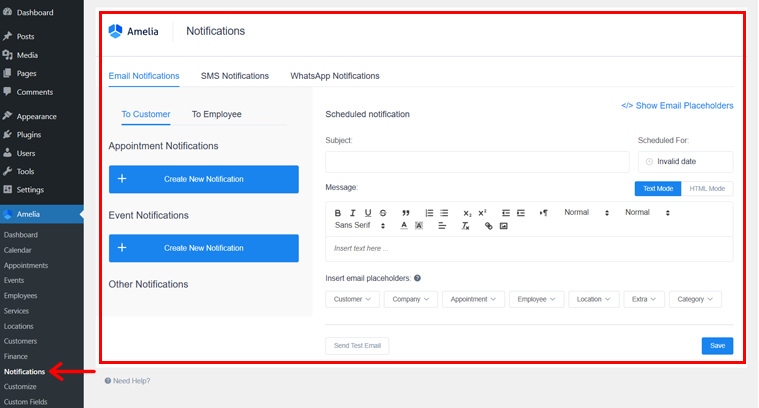
2. Automated Notifications and Reminders
Amelia’s automated notification and reminder feature helps you keep your customers and employees informed and on schedule.
With Amelia, you can auto-send SMS, email, and WhatsApp notifications and reminders about upcoming appointments, appointment changes, and other important events.
This feature is incredibly valuable for reducing no-shows and improving customer satisfaction.
In addition, it’s equally flexible. You can customize the timing, content, and recipients of all notifications.
For example, you can send a reminder email to customers 24 hours in advance of their appointment. Then send a text message reminder 1 hour before their appointment. You can also choose to send notifications to customers only, employees only, or both customers and employees.
With that, your customers are more likely to show up on time. You can also remind employees of their upcoming appointments. So, they are more prepared and provide the best possible customer service.
3. Professional Booking Wizard
The Amelia plugin revolutionizes appointment scheduling with its user-friendly professional booking wizard. This feature is crafted to effortlessly guide clients through the booking process. Further, it ensures a seamless experience for both you and your customers.
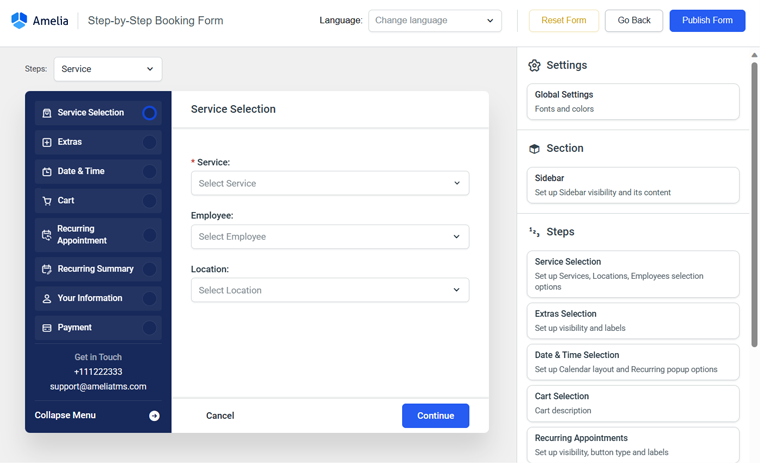
Here’s how Amelia’s professional booking wizard distinguishes itself:
- Easy Steps: The booking wizard simplifies the journey. It’s like following clear labels, making it easy for clients to book without any confusion.
- Instant Updates: It updates as clients pick, showing the latest options. This way, clients won’t make mistakes and can choose the best time and service.
- Personalized Appointments: Clients can make appointments their way. They can pick their favorite staff, add notes, or ask for extra services, making them happy.
- Progress Tracking: The wizard shows where clients are in the booking process. So, your clients know where they are in the booking process, avoiding confusion and frustration.
- Mobile-Optimized Interface: It works well on phones and tablets. Clients can easily book on the go, making it convenient for them to set up appointments anytime, anywhere.
No doubt, with Amelia’s professional booking wizard, you can give your customers a convenient and hassle-free way to book appointments. This can help you improve your customer satisfaction and increase bookings.
4. Insightful Dashboard and Reporting
Another significant highlight of the Amelia plugin is that it provides an insightful dashboard and reporting feature. It’s designed to provide you with a clear overview of your appointment bookings and performance. So, you can make data-driven decisions for your business.
Moreover, the dashboard offers real-time analytics, allowing you to monitor your bookings and track key metrics at any given moment. As a result, you can get instant access to crucial information such as appointment volumes, staff performance, and revenue generated.
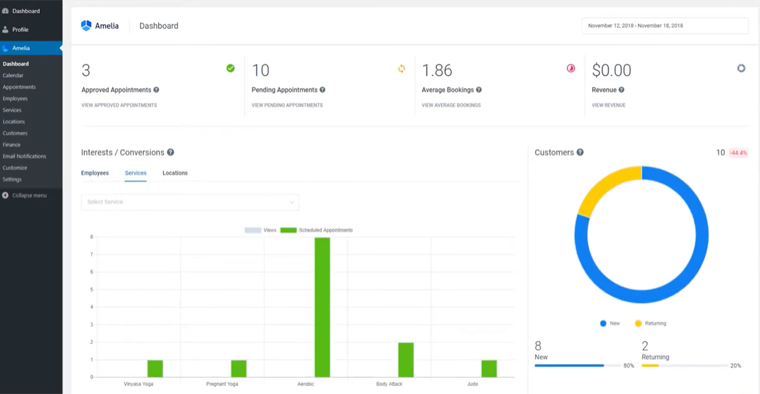
Also, from the dashboard, you can easily view and organize upcoming, pending, or completed appointments. The simple interface allows you to monitor appointment statuses, view customer details, and make necessary adjustments effortlessly.
Regarding reporting, you can generate custom reports tailored to your specific requirements. Simply choose the metrics you want to track, select the time periods, and create informative reports.
With this data, you can stay on top of your business’s performance and identify trends or areas that require attention.
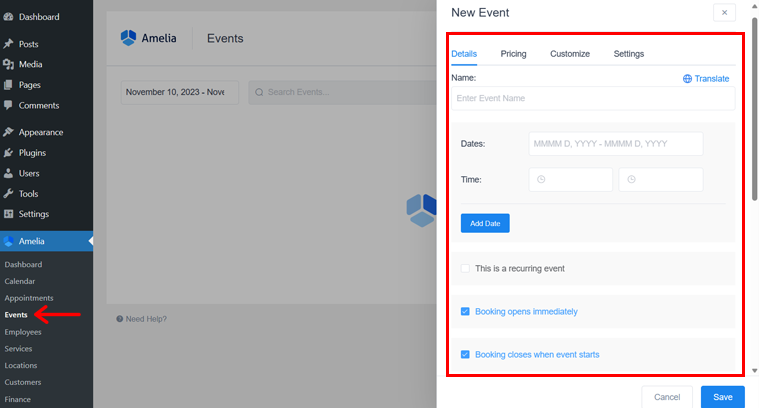
5. Event Management Options
Do you need to manage events for your business or organization along with your bookings? Well, Amelia has got you covered with its event management options.
Precisely, you get the following event management options:
- Custom Forms for Essential Info: With this, you can create custom event forms, effortlessly collecting attendee details and post-event insights with tailored fields.
- Seamless Ticket Sales and Waitlisting: Manage ticket sales and waitlists seamlessly, setting prices, monitoring demand, and ensuring well-attended events.
- Effortless Event Cancellations and Refunds: Handle event cancellations with ease, notifying attendees and automating the refund process for a hassle-free experience.
- Calendar Integration for Easy Management: Sync events with external calendars, like Google Calendar, and manage availability effortlessly with a simple admin calendar.
No doubt, Amelia’s event management options provide a centralized hub for your event planning needs. Further, this enables you to streamline the process and focus on delivering exceptional experiences for your attendees.
Are you planning to exclusively create an event website? Then, check our article on how to create an event website. You can also browse WordPress event themes and event registration plugins for event websites.
6. Extensive Integration with Plugins and Tools
Amelia integrates with a wide range of plugins and tools, so you can connect it to the other systems you use to run your business.
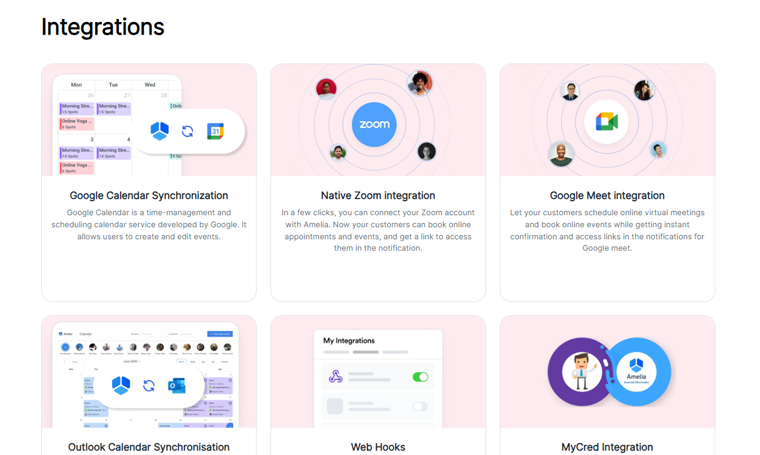
Here are some specific examples of plugins and tools that Amelia integrates with:
- Google Meet Integration: Enable clients to schedule virtual meetings and confirm online events instantly.
- WooCommerce Integration: Manage payments, taxes, and invoices seamlessly through the native Amelia WooCommerce integration.
- Payment Processing: Seamlessly integrates with widely used payment systems like PayPal and Stripe, facilitating direct online payments from customers via your booking form.
- Other tools: Connect with widely used tools such as Google Calendar, Google Analytics, Webhooks, MyCred, Lessonspace, and more for enhanced functionality.
With that, Amelia ensures a smooth flow of data and enhances the overall performance and versatility of the plugin. So, enjoy the convenience of a fully integrated system, align your business processes, and leverage the power of various tools to elevate your customer experience.
7. Additional Features
Besides the above-mentioned features, there are still a handful of cool features that Amaelia provides to you. Such as:

- Coupons for Packages: Provide your customers with exclusive discount codes for use during their booking process when purchasing packages.
- Pay via a Link: Enable customers to conveniently finalize transactions by using a personalized and secure payment link sent via email.
- Packages of Services: Encourage customers to make more significant purchases by bundling single or multiple services into a package of appointments.
- Page Builders: Seamlessly integrates with page builders like Elementor and Divi, enabling the creation of visually stunning website pages for your booking site.
- Manage Multiple Locations: Easily handle appointments at multiple business locations by storing data, addresses, and geolocations.
- Time Zone: Automatically detect the time zone on your client’s computer, displaying a slot in their time zone. While you can view slots in your time zone.
Having said that, let’s jump into the next section of this Amelia plugin review.
C. How to Install and Configure the Amelia Plugin?
Let’s walk through the process of integrating the Amelia plugin into your website in this review section. The steps cover both the free and premium versions of the plugin.
Depending on your requirements, follow the instructions below. Ready? Let’s get started!
1. Free Amelia Installation
Installing the Amelia plugin for free is a breeze and follows the same steps as adding any other plugin. The simplest way to do this is through your WordPress admin dashboard.
Step I. Installing the Amelia Free Version
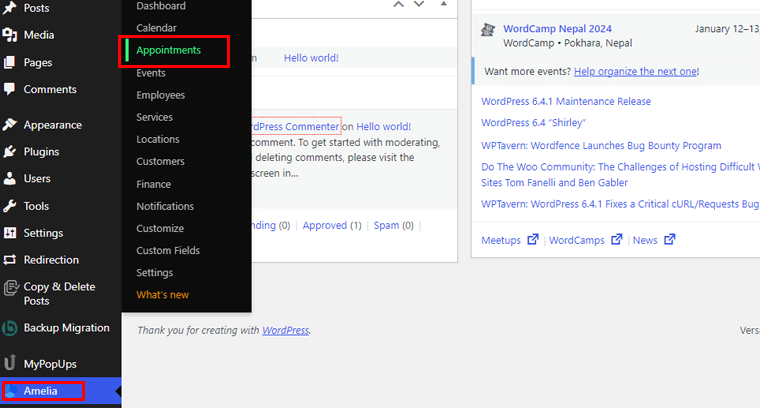
To begin, access your WordPress dashboard and navigate to the ‘Plugins > Add New’ section.
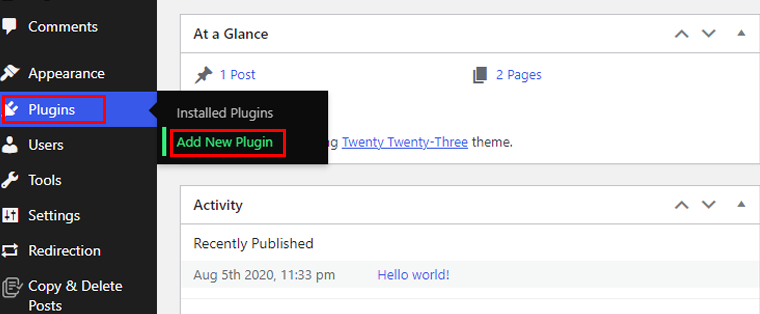
Navigate to the “Add Plugins” section and look for the term “Amelia.” Once you spot the plugin listed in the search results, proceed to click on the “Install Now” button.
Step II. Activating the Amelia Plugin
Next, press the “Activate” button when it shows up, just as shown in the example screenshot below.
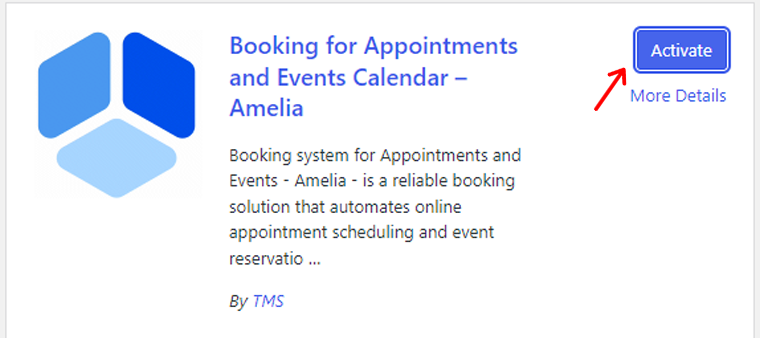
Congratulations! You’ve successfully installed and activated Amelia on your website. Well done!
Explore alternative methods to install a WordPress plugin in this comprehensive guide.
2. Premium Amelia Installation
If you’re using the free Amelia plugin and are considering upgrading to the premium version. Then you can start by updating the free plugin to the latest version on your WordPress dashboard.
Simply navigate to ‘Plugins’ and select ‘Installed Plugins’ to find the update option.
Prepare yourself to purchase an Amelia premium plan directly from its official website. Follow these steps promptly!
Step I. Purchasing Amelia Premium
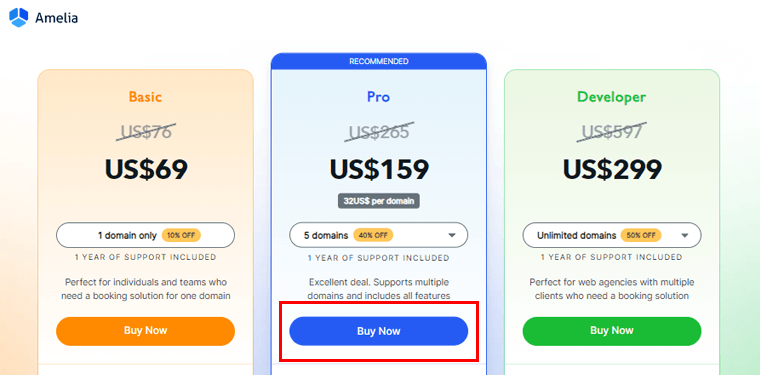
Initially, explore the pricing details for Amelia by visiting its official website. On the pricing page, you’ll encounter 3 plans: Basic, Pro, and Developer.
Select the option that best aligns with your business requirements and click on the ‘Buy Now’ button.
Now, click on the pop-up that appears. Enter your email address and name as requested. Then click the “Continue” option.
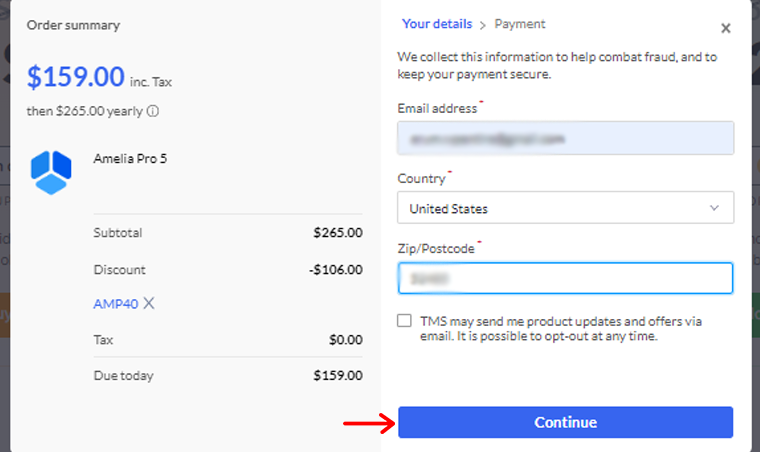
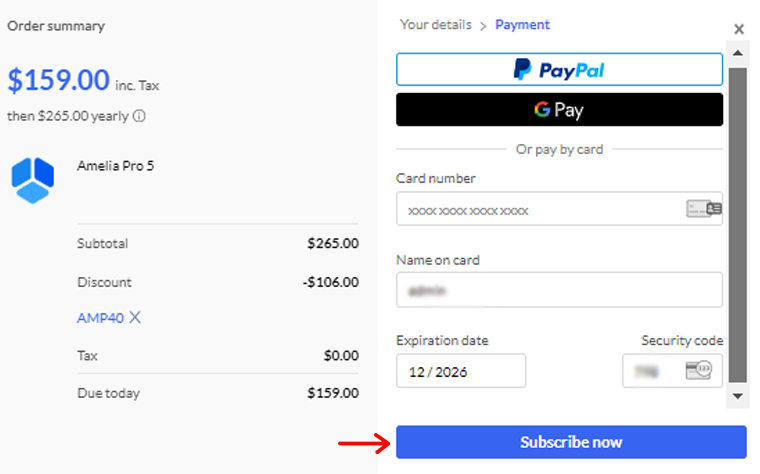
Next, decide on your preferred payment method, either credit/debit card or PayPal. Enter the necessary payment details, and when you’re ready, click ‘Subscribe Now’ to finalize your purchase.
After purchasing the Amelia plugin, you’ll receive an email. There, it includes the URL of your TMS plugin dashboard. Open that URL and log in to your TMS Store account to initiate the download of the Zip file.
Inside this compressed file, you’ll find the most up-to-date version of the “Amelia Plugin.”

Step II. Installing and Activating the Amelia Plugin
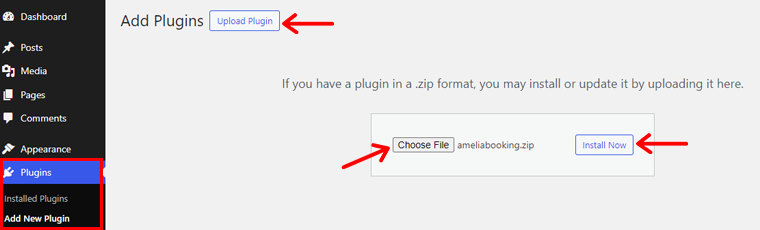
Now, go to the ‘Plugins > Add New’ section in your WordPress dashboard. Select ‘Upload Plugin,’ then click the ‘Choose file’ button to upload the plugin file you downloaded. Finally, press ‘Install Now’ to complete the installation process.
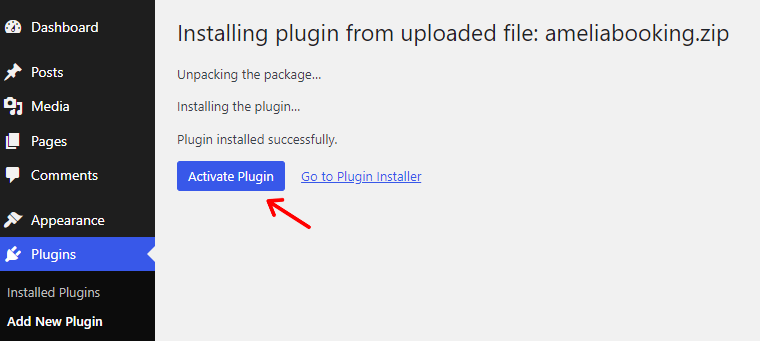
Once the installation finishes, simply hit the ‘Activate Plugin’ button to get started.
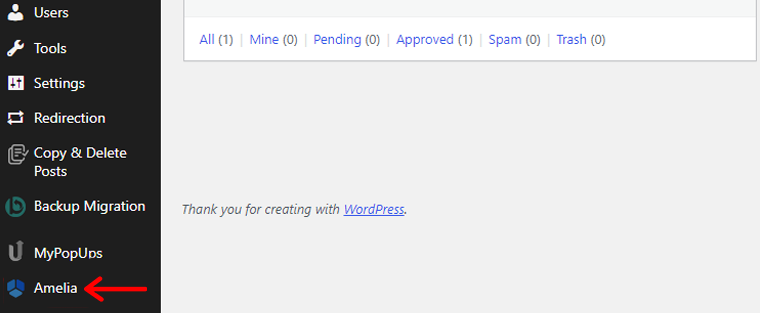
Now you’ll see “Amelia” on the WordPress dashboard menu bar.
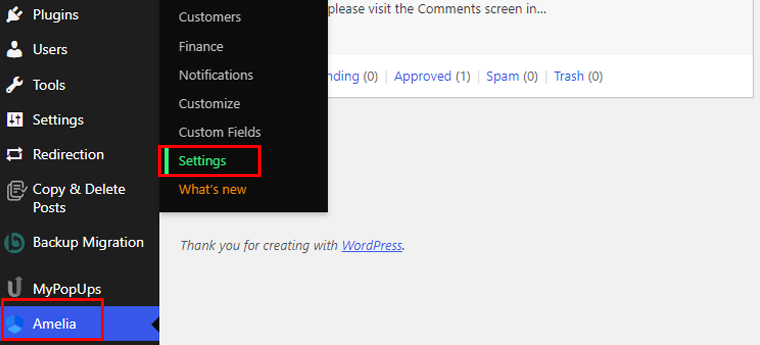
3. Amelia Configuration Process
To set up this plugin, navigate to the “Amelia >Settings” menu.
I. General Settings
First, let’s start with “General Settings.”
The general settings serve as the foundation for configuring essential parameters. It’s crucial to adjust them before utilizing the WordPress booking plugin to guarantee smooth functionality.
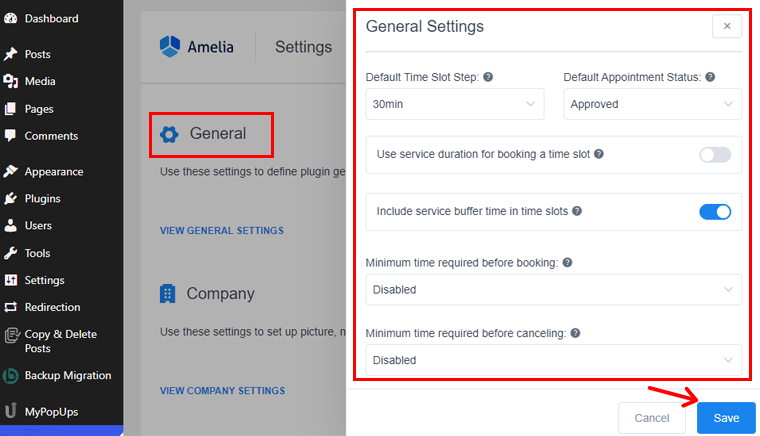
We’ll go through some key options within this section:
- Default Time Slot Step: Let you set a standard duration for time slots, forming a grid for business hours and appointment lengths. Determining the scheduled appointment intervals.
- Default Appointment Status: You can choose the default status for new appointments. If you pick “Pending,” upcoming appointments will start with this status.
- Minimum Time Required Before Booking: Specify the earliest time customers can request a booking before the actual appointment. By default, this feature is turned off.
- Period Available for Booking in Advance: Decide how soon customers can book appointments in the future. For instance, if you choose 365 days, clients can schedule appointments up to a year ahead.
- Set the Phone Number as a Mandatory Field: Lets you choose whether customers must or can choose to provide a phone number when booking. By default, this feature is turned off.
- Set Email as a Mandatory Field: Choice to decide whether the email field in the booking form should be required or not. By default, this feature is turned on.
- Show Booking Slots in a Client Time Zone: This allows you to utilize the plugin across various time zones. Enabling this option lets your clients view time slots in their respective time zones.
Besides these, there are many other settings you can go through in general settings.
II. Company Settings
Here, you can customize your company’s image, name, address, website, and phone number settings. These changes will replace the placeholders in company notifications.
The Company setting will help you to update your organization’s Picture, Name, Address, and Phone details, just like the example image. These changes will be reflected in notifications automatically sent to your employees and customers.
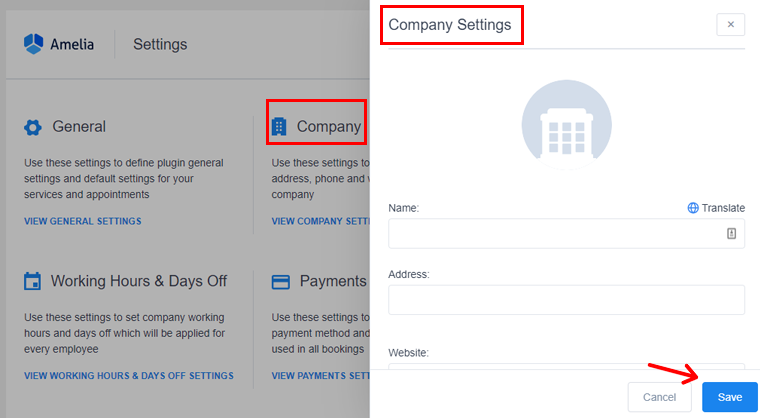
Note that only administrators have access to these settings.
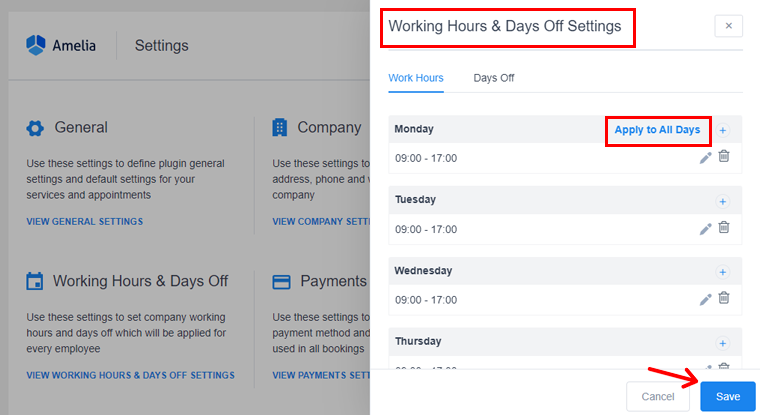
III. Working Hours and Days Off
In this section, you’ll set the overall guidelines for work hours, breaks, and days off that apply company-wide. These settings will act as a standard for future employees.
Keep in mind that individual employees may have their own schedules that can override these company-wide settings.
Working Hours
This feature enables you to establish standard working hours and breaks for your entire company. If you prefer uniform hours each day, set the first day and use the “Apply to All Days” button.
However, modifying global working hours won’t affect existing employee schedules. It’ll only apply to new employees created after the changes.
Days Off
In the Days Off feature, you can designate specific days when the entire company is off. Simply click “Add Day Off,” input the name, choose individual days or a range, and decide if these days should recur annually.
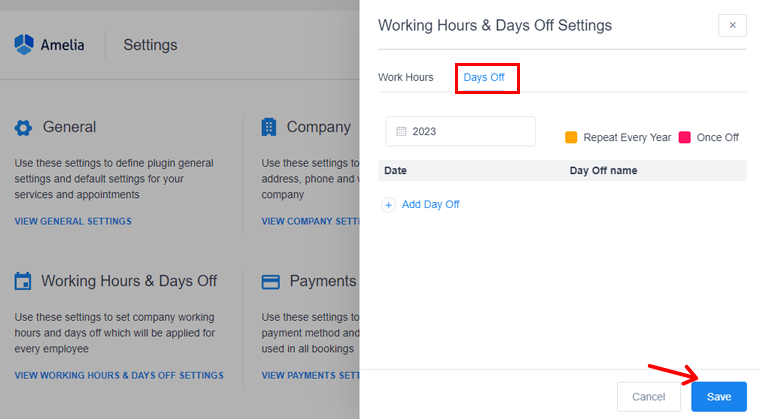
It also has system color codes for repeating and one-time days off for easy distinction.
Note: The Days Off feature is designed exclusively for services and does not apply to events.
IV. Configuring Schedule
In Amelia, setting up schedules can be done in two ways:
- Company-wide Schedule: Easily establish general working hours for the entire company by navigating to the “Working Hours & Days Off” section on the Settings page.
- Individual Employee Schedule: Tailor working hours and service schedules, and designate Days off and Special Days for each employee separately. For more personalized scheduling!
When you view the Employee profile, you’ll find three tabs that relate to the schedule, (Work Hours, Special Days, and Days Off).
Work Hour
To edit Work hours go to the “Amelia > Employes” option.

Here, you can personalize the work hours and breaks for individual employees if they deviate from the standard company settings. After making adjustments, simply click the “Apply to All Days” button.
Or add multiple time periods, each with its own distinct set of services. This enables you to create a versatile and customized service schedule throughout the day.
Besides, next to each period, there’s a menu of services. Pick one, two, or more services for your employee to focus on during that specific period.
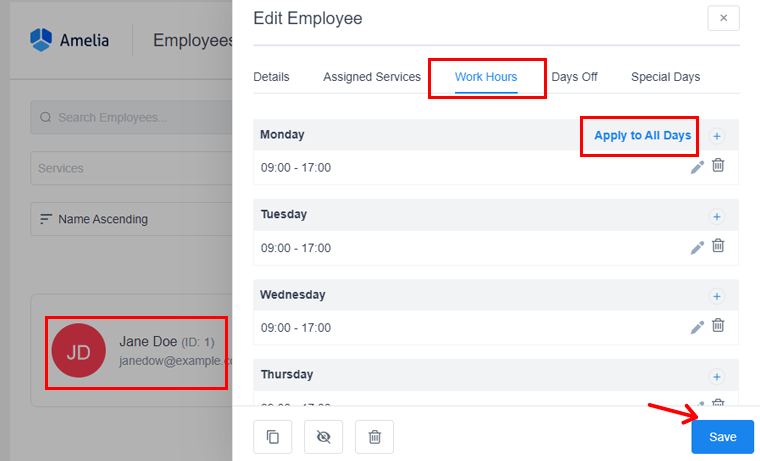
Moreover, you can specify various locations or assign distinct workplaces for each employee’s designated work hours. If you have an employee working at different places, then you can select specific locations for each time period.
Then click the “Save” option.
However, when you choose a specific location for your work hours, it auto-blocks that time for all other locations you’ve added.
Days Off
Here, you have the flexibility to designate specific days off for each employee.
Simply click the “Add Day Off” button and explore various options. Enter the name, date, or date range for the day off, and choose if it should recur annually. Once you click “Add Day Off,” the system will save your customized time off.
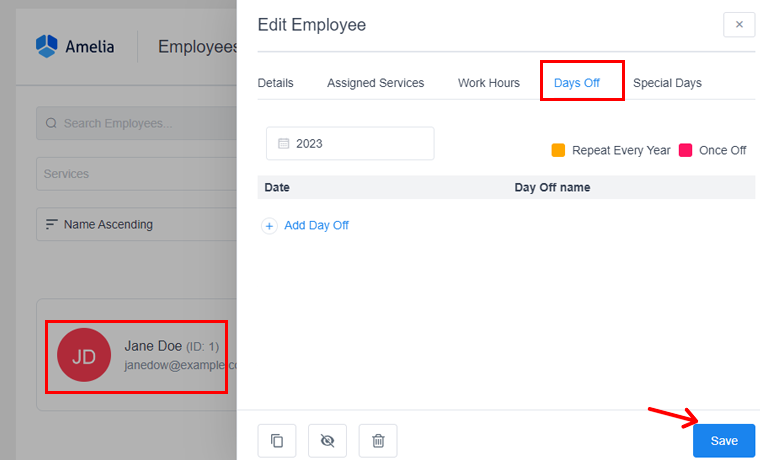
And do not forget to click the “Save” button.
Special Days
You can customize an employee’s schedule for specific days by clicking the “Add Special Day” button. Simply select a date or range, set working hours, choose services, and pick a location. Click “Save Special Day” to apply the unique schedule.
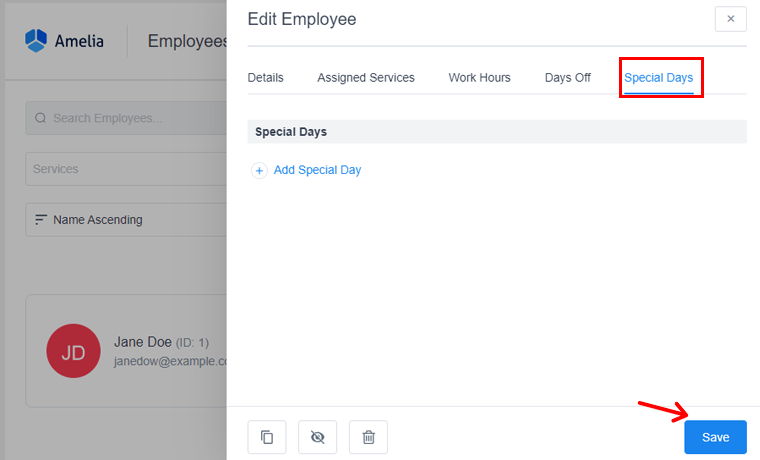
Then click the “Save” option.
Note: Employees can update their details, manage their schedules, request time off, and designate special days. You can customize these permissions in the Roles Settings, giving you control over their specific actions. Let’s look at some crucial Amelia steps related to it next!
How to Add a Front-end Customer Panel?
The customer panel lets your customers see their past bookings, reschedule, and/or cancel their future appointments and events. With this panel, customers can also update their profile information without needing to log into the WordPress dashboard.
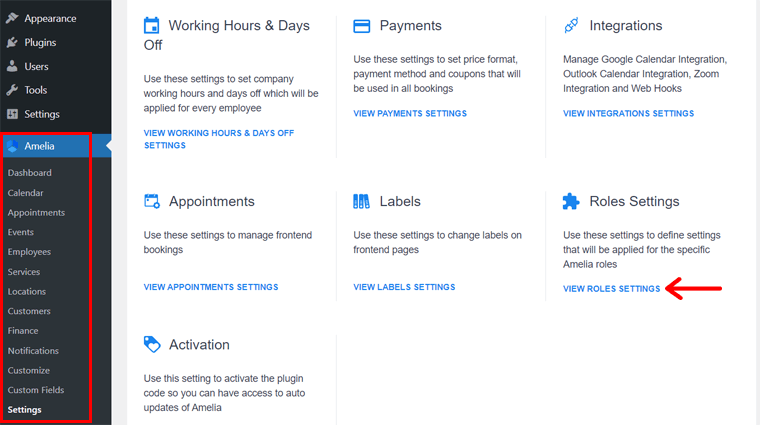
To utilize this panel for customers, open the “Amelia > Settings” menu. There, click the ‘View Roles Settings’ option inside ‘Roles Settings’.
Now, on the ‘Customers’ tab, enable the ‘Enable Customer Panel’ option.
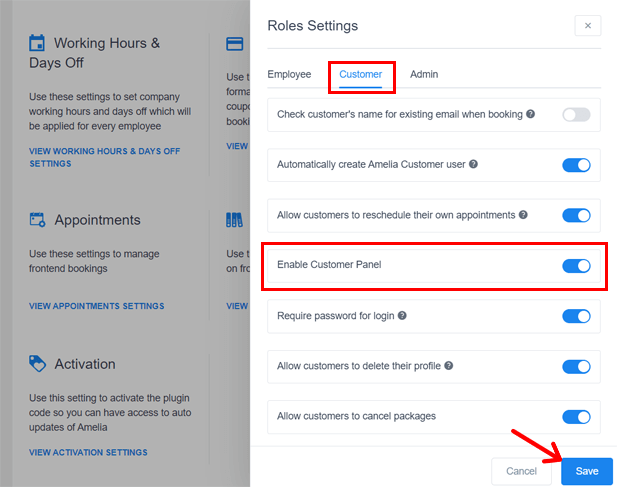
Once you do that, 4 options appear along with it. They are:
- Require password for login – Specify if customers can log in with a password or solely via a link from the email notifications.
- Allow customers to delete their profile – Shows a ‘Delete’ button on customers’ profiles to delete their personal information. But it doesn’t delete their appointments.
- Allow customers to cancel packages – Customers can view and manage their packages from their panel. Enabling this will also let them cancel those packages.
- Customer panel page URL – Paste the URL of the page that’ll have the customer panel shortcode. That link will be used when sending notifications to customers.
Similarly, you can find other options in the ‘Customers’ tab, like ‘Allow customers to reschedule their appointments’. Make sure you press ‘Save’ after making the changes.
Plus, you can set the minimum time required before canceling or rescheduling in ‘General Settings’. Further, enable ‘Allow payment via Payment Link’ in ‘Payment Settings’.
Importantly, you can add the customer panel to a page of your website using a shortcode. For that, open a page and add the block ‘Amelia – Customer Panel’. This inserts the shortcode into the page automatically. That can be:
- [ameliacustomerpanel appointments=1 events=1]
- [ameliacustomerpanel events=1]
- [ameliacustomerpanel appointments=1]
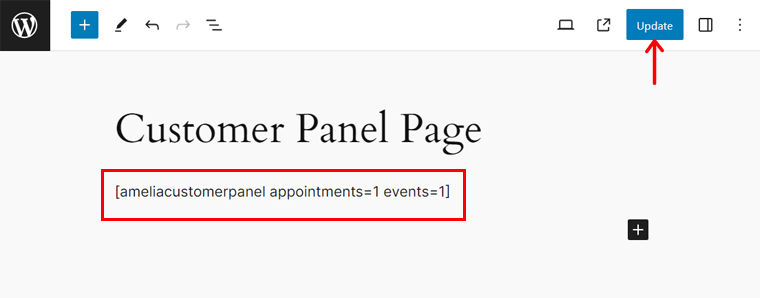
Now, publish or update your page. That’s it!
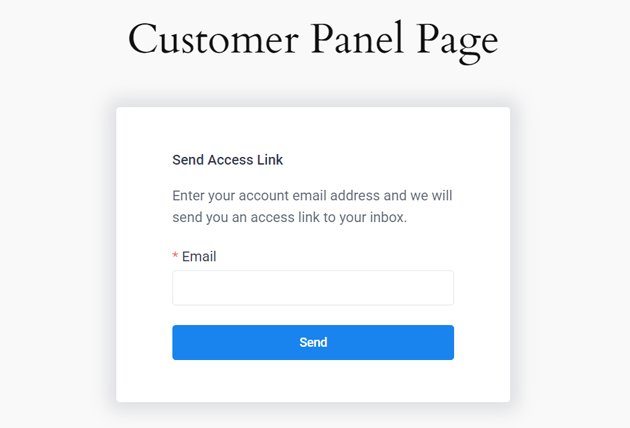
Suppose you disabled login for customers. Then, the panel looks like this:
How to Add a Front-end Employee Panel?
The front-end employee panel lets your employees manage their past bookings. In addition, they can also alter their personal information without needing to log into the dashboard.
Honestly, the process of configuring and using this function is similar to the customer panel. Let’s see!
First, navigate to ‘Amelia > Settings > View Roles Settings’. Now, open the ‘Employees’ tab and allow the ‘Enable Employee Panel’ option.
This loads the option ‘Employee Panel Page URL’. Here, you must paste the URL of the page that’ll have the employee panel shortcode. This link will also be used to send email notifications.
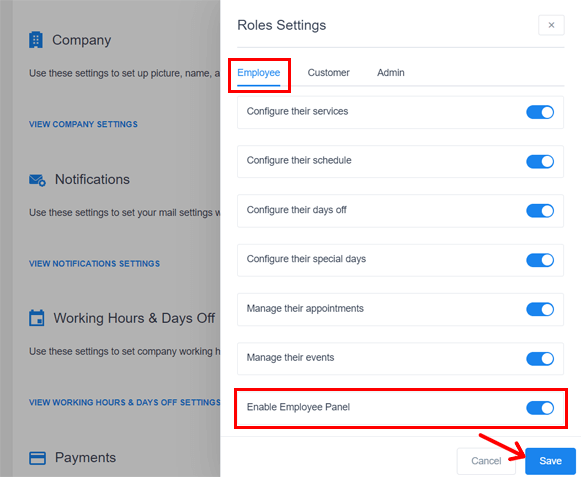
Apart from that, you can choose the options that employees will have on their panel. By default, they can see their appointments and events. Others include:
- Configure their services, schedule, days off, special days, etc.
- Manage their appointments and events.
Wondering how to set employees’ passwords? As an admin, you can set that on their employee page. After saving, an email with login details is sent to the employee. Later, they can change the password in their profile. Remarkably, you can use a custom email template.
Importantly, you can add the employee panel to a page of your website using a shortcode. For that, open a page and add the block ‘Amelia – Employee Panel’. This inserts the shortcode into the page automatically. That can be:
- [ameliaemployeepanel appointments=1 events=1]
- [ameliaemployeepanel events=1]
- [ameliaemployeepanel appointments=1]
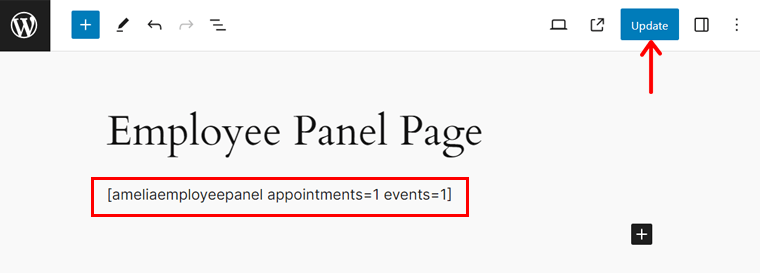
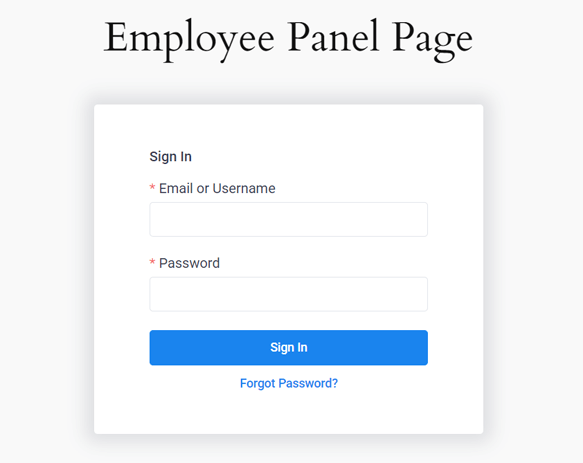
Now, publish or update your page. That’s it! The employees need to log in to access their panel, which looks like this:
V. Configuring Payments
Payment settings enable you to customize the way prices are displayed and processed. You can choose the preferred price format and payment gateway, ensuring consistency across both the front-end and back-end.
Let’s go through the payment settings:
Currency
This section lets you set the currency for all the prices throughout your website.
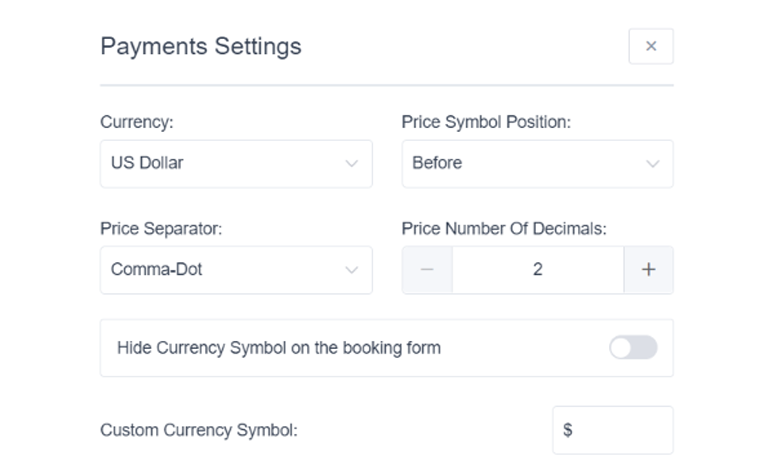
What you can do in this setting is:
- Price Symbol position (before or after the amount or separated by a comma).
- Price Separator to decide which symbol to use for separating thousands, and so forth.
- The number of decimals in the price allows you to set the number of digits after the decimal separator.
- Hide the currency symbol in the booking form.
- The default payment option lets you choose the main payment method for customers.
Besides these, there are other settings in payment options. You can go through this documentation for detailed insight.
D. How to Set Up a Booking System Using Amelia?
Moving on, to streamline your scheduling and enhance customer convenience, let’s dive into the process of setting up a booking system using the Amelia plugin.
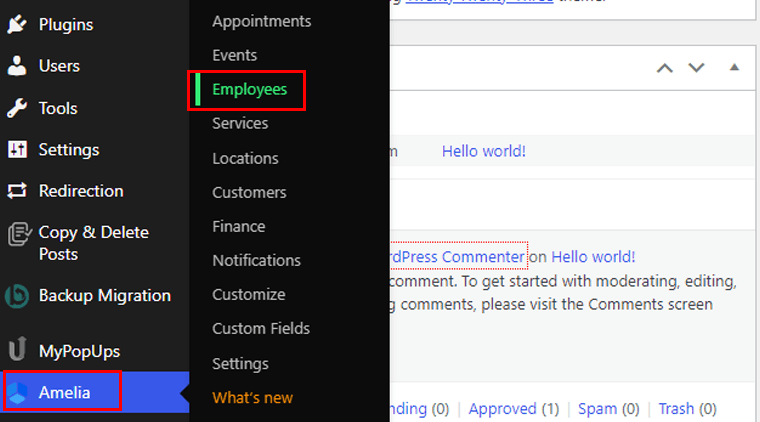
Step 1: Adding Employees
To start, navigate to the “Amelia > Employees” section in the backend.
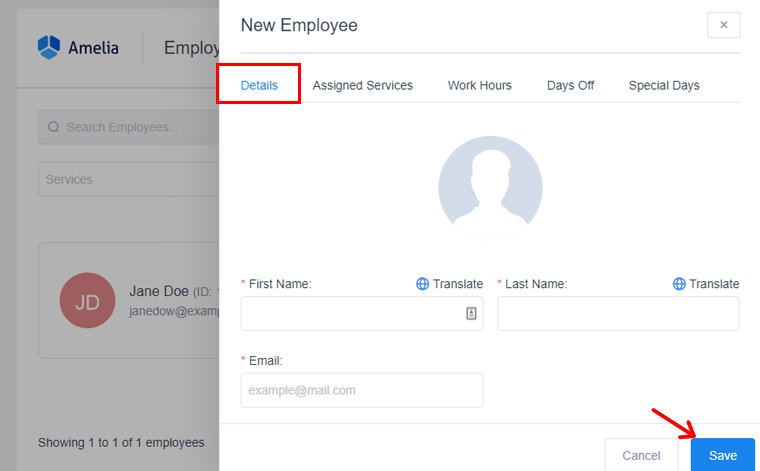
Click either the “Add Employee” button or the “+” button located at the bottom right of the page. This action will display the “New Employee” dialogue.

Now on the Details tab, add the details of the employee. That includes the name, email, password, phone, and description. Then hit the “Save” button.
Then, on the Assigned Service tab, you can see the services provided by team members. Also, each employee can have multiple services, and there’s no maximum limit on the number of services they can handle.
Besides these, you’ll have the ability to set the working days, days off, and special days off settings.
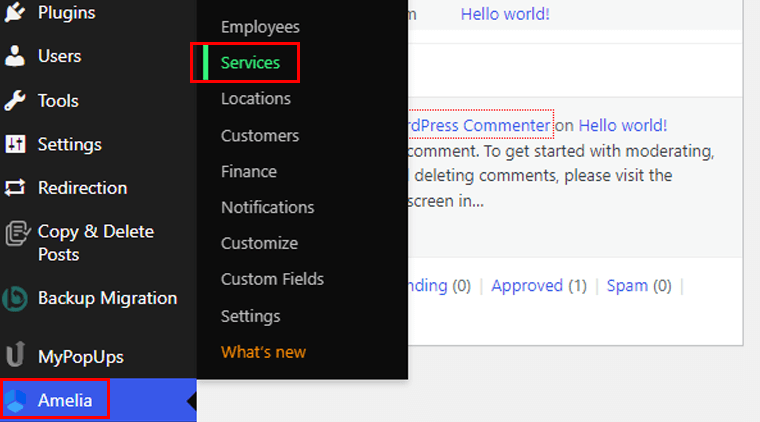
Step 2: Adding Service Categories and Services
After completing the initial setup in the general settings, your next step is to establish a Service Category. This step is crucial, as each service must belong to a category for the plugin to function properly.
Start by going to the “Amelia > Services” option.
There, you can click the “Add Category” button.
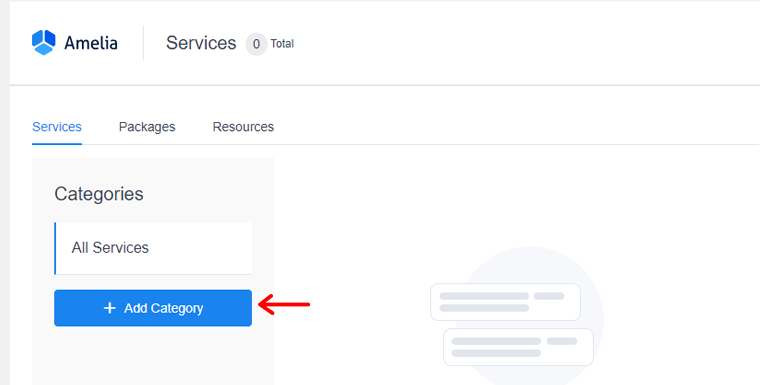
After that, name your category, click on the checkmark, and your category will be saved.
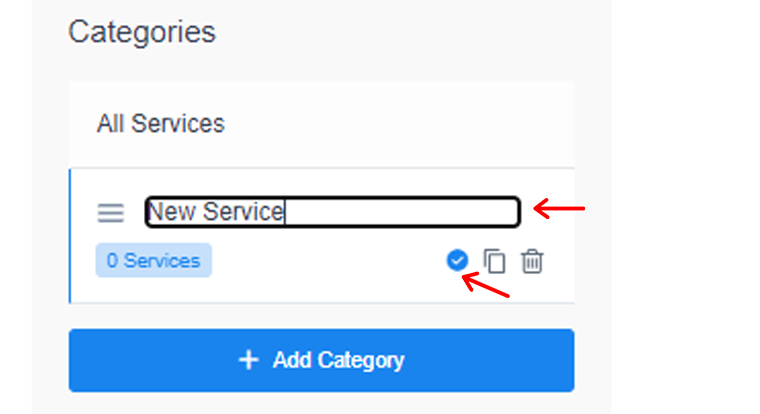
Once you’ve added a category, proceed to add services by selecting the “Add Service” or “+” button.

This action will open the “New Service” dialog with different settings tabs. They are:
- Service details: Here, add details about your services, like name, category, description, etc.
- Duration & pricing: You can set price, duration, buffer time, minimum and maximum capacity.
- Gallery: From this option, add the images of your services.
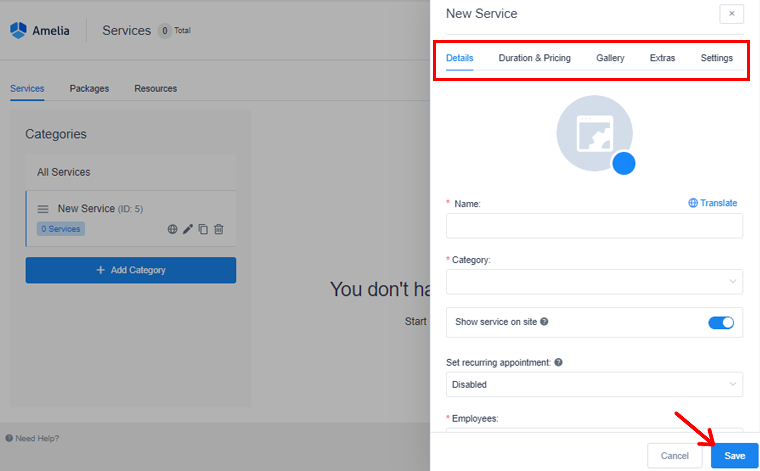
Once done, click the “Save” option, and you’ve successfully created a service.
Step 3: Inserting a Custom Form on Your Website
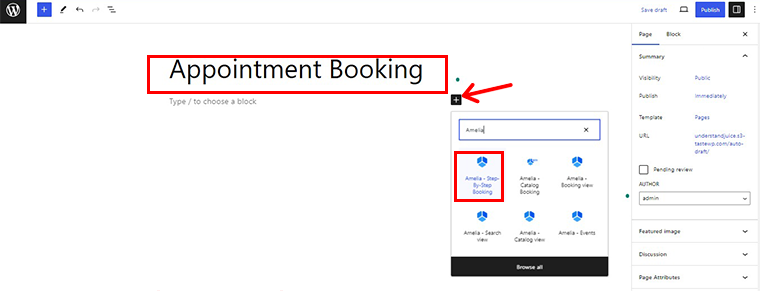
To get started, make a new page for your booking form. Go to ‘Pages’ and click on ‘Add New.’

Now, you’ll be prompted to open a fresh page editor.
After that, click the ‘+’ icon after giving it the name “Appointment Booking.” In the search bar, type ‘Amelia.’ Once you locate ‘Amelia – Step-By-Step Booking,’ select it.
After adding the Amelia booking form shortcode, simply click the ‘Publish’ button in the top right corner to finalize the changes.
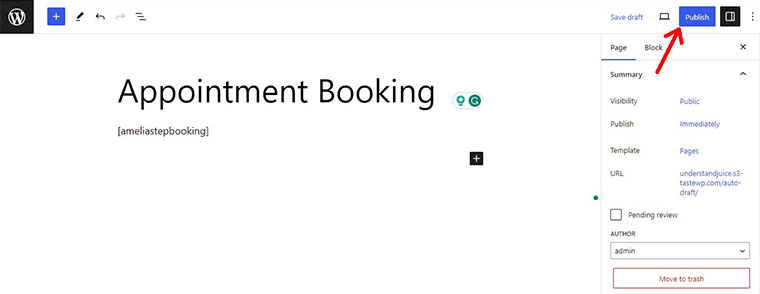
Soon, your booking form page will be live. Look to the right sidebar, where you’ll spot the URL. Right next to it, you’ll find a ‘Copy’ button. Give it a click!
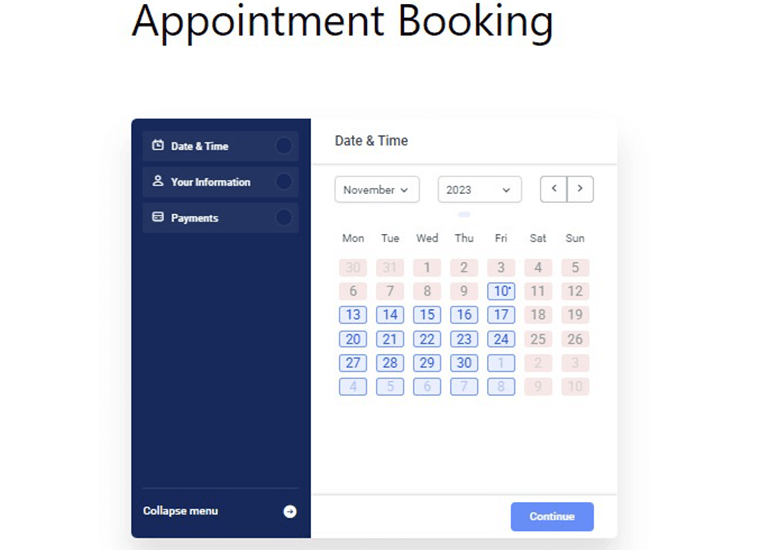
Example of Amelia form on the website!
Step 4: Creating and Managing Appointments
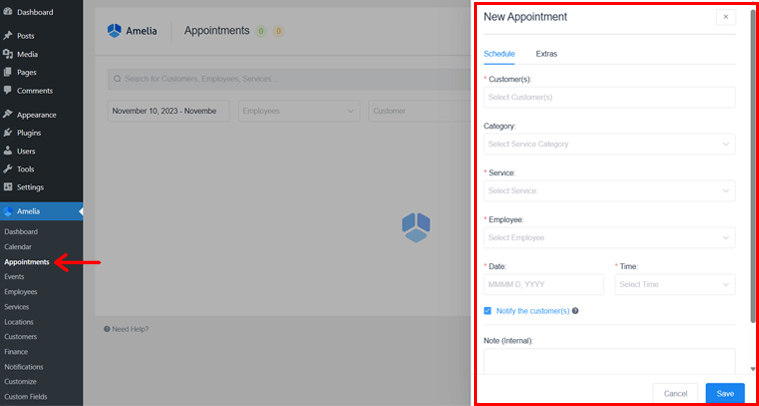
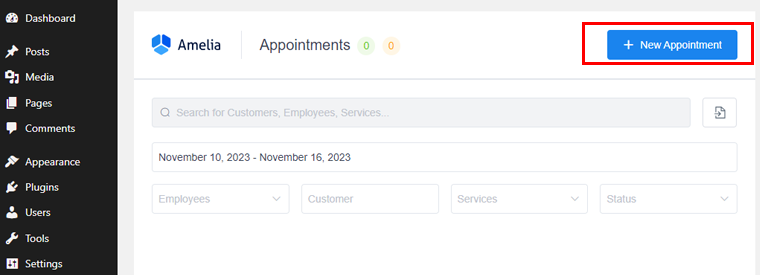
The next step is to create the appointments. To do so, go to “Amelia > Appointment.”
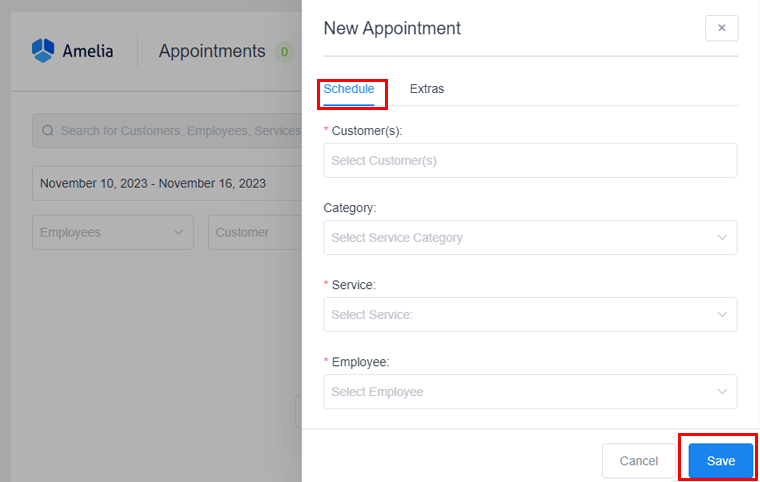
There click on the “New Appointment” option. And a dialogue box will appear.
Now on the Schedule tab, start adding customers, categories, service, employees, date, times, and notes. Then click on the “Save” option.
There, you’ve successfully created new appointments.
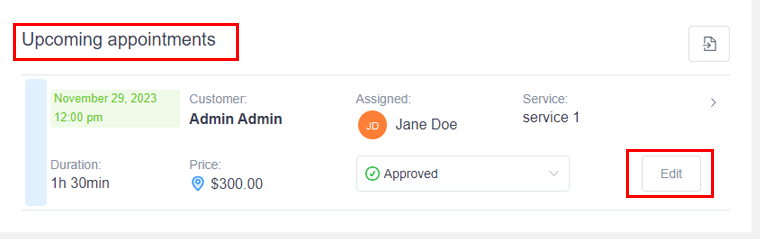
To manage the appointments, go to “Amelia > Dashboard”.
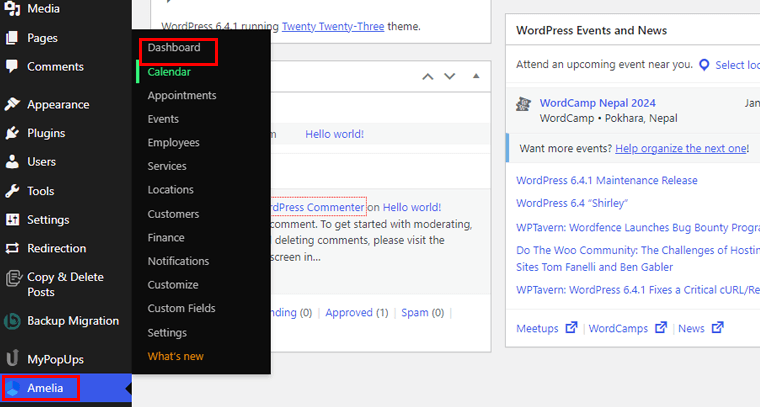
There click the “Edit” option. This will open the “Edit Appointment” dialogues, where you can easily change the appointment parameters.
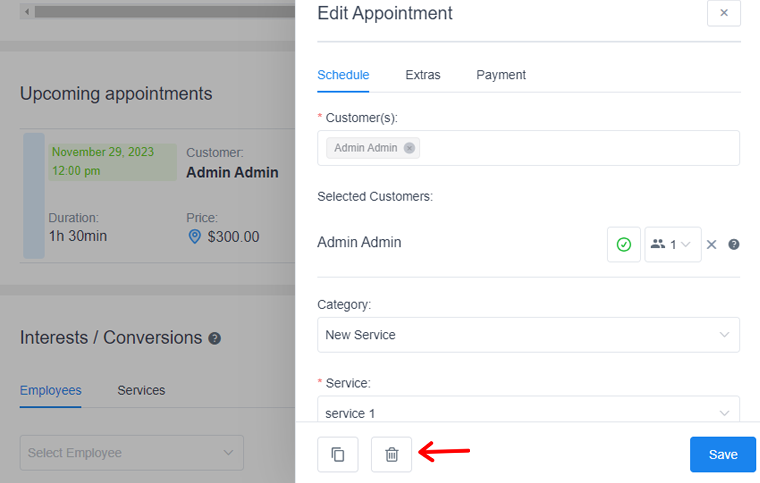
There you can edit the scheduled date, change the customer booking status, and change employee, and service. Also, you get to choose whether or not to send the customer a notification about the appointments.
However, to delete an appointment in the “Edit Appointment” window, just click the “Trash” icon and then confirm by clicking “Delete.”
So, you’ve now successfully created and managed the appointment.
Step 5: Previewing Your Booking System by Customers
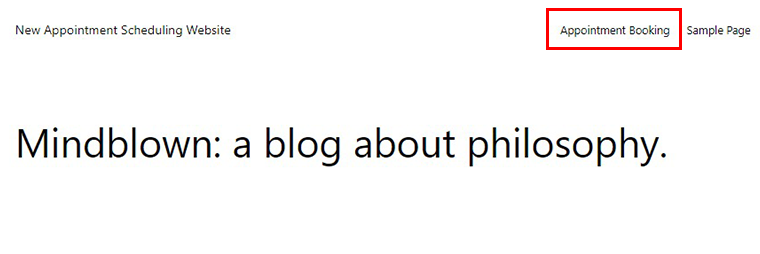
Once you’ve completed all the steps, let’s see how the appointment booking looks from the customer’s perspective.
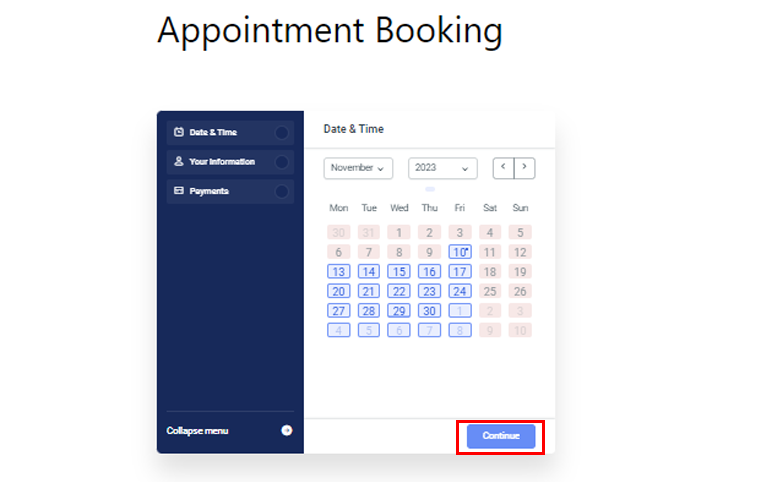
So the first customer will need to visit your website and then go to the “Appointment Booking” option.
Then Amelia’s booking form will appear. First, you need to choose the date and time then click on the “Continue” button.
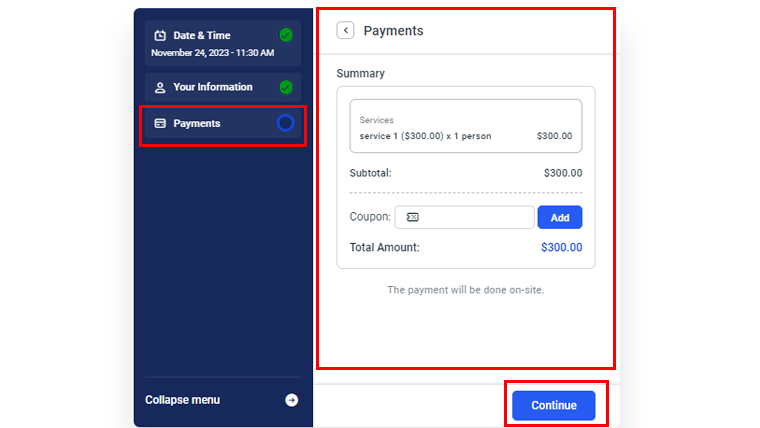
After that add your name, email, and phone number, and click the “Continue” option,

After that, you’ll be provided with a total payment summary. If you’re satisfied, then click on the “Continue” button.
Once complete, you’ll be prompted with a congratulatory message along with your appointment details. Also, you’ll have the option to add this appointment to your Google, Yahoo, Outlook, or Apple calendar. Once done, click on the “Finish” option.
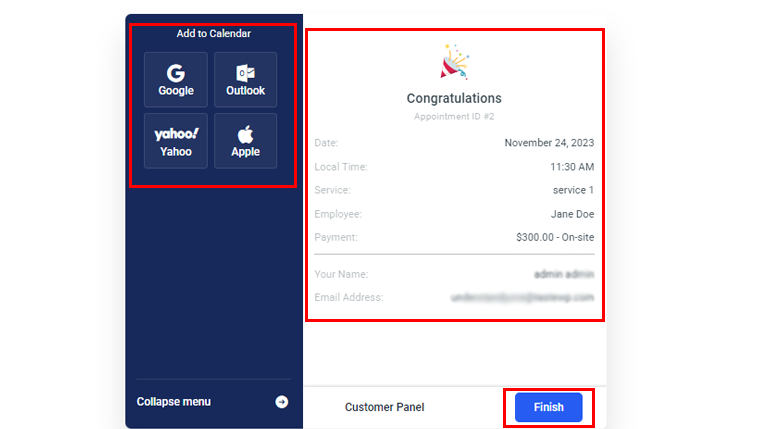
And that’s all!
E. Pricing Schemes of the Amelia Plugin
Do you want to start the booking process for your appointments or events using the Amelia plugin? If yes, then you must first know about the pricing schemes available.
Delightfully, Amelia is a freemium WordPress booking plugin. Meaning, it offers both free and premium options based on the needs of your business.
For the free plugin, you can download it from WordPress.org’s plugin directory and upload it to your website. Another easy way is to install the plugin directly from your dashboard.
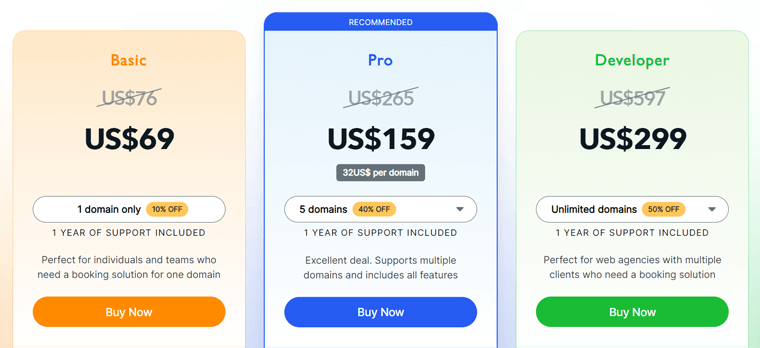
Notably, the free plugin includes basic features for a booking system. So, if you want more features, then simply go with a premium plan. Here are the Amelia pricing plans:
- Basic: $69 per year, $216 for lifetime use, 1 site, automated notifications, 4 payment providers, discount coupons, and more.
- Pro: $159 per year, $414 for lifetime use, 5 sites, Basic plan features, WhatsApp integration, cart, resources, etc.
- Developer: $299 per year, $899 for lifetime use, 1000 sites, REST API, and Pro plan features.
Further, there isn’t a free trial on its premium plans. But you’ll get a 15-day money-back guarantee policy that lets you get a refund if you discontinue using it within 15 days.
F. Customer Support Options in Amelia
When deciding to choose a WordPress plugin, it’s crucial to check its customer support. Doing so helps you learn if the Amelia plugin team will support you in any situation.
Remarkably, Amelia provides both free and premium support options for you. For free plugin users, it’s ideal to visit the Support Forum for the plugin on WordPress.org. There, you can state your questions and get answers to them from their experts.
Other than that, you’ll find multiple support options on its website. First, you can submit a ticket to the team on this page. There, mention your basic information, purchase code, ticket subject, and ticket description.
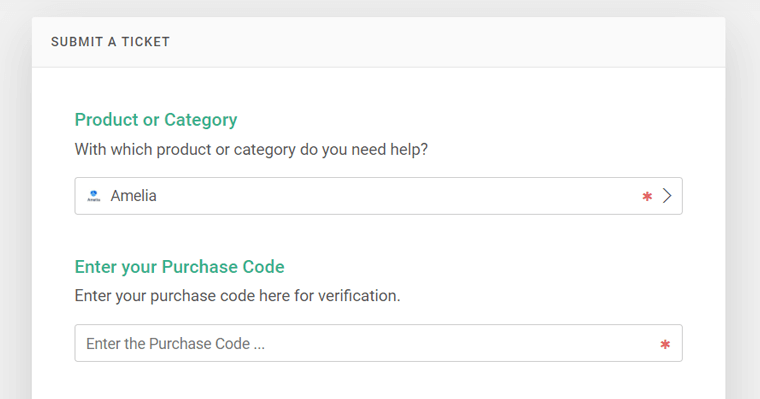
Moreover, you can make the ticket visible to other users. Hence, you can also view all the public tickets sent by other users.
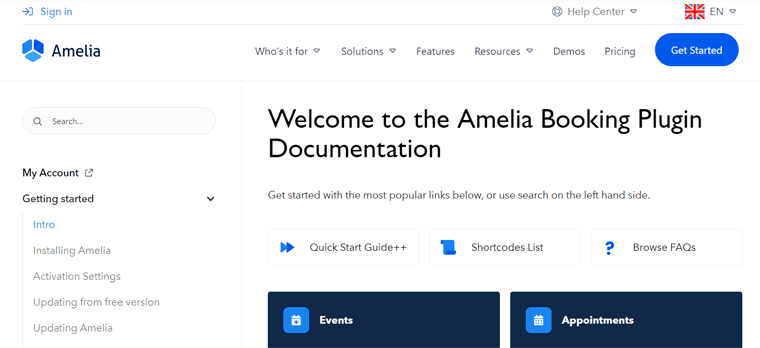
Now, if you have a simple confusion, then you may find its answer in its documentation. This page contains resources under categories like getting started, integration, events, etc.
Last but not least, easily learn the entire process of using Amelia via its video tutorials.
As a premium plan user, you may have more support options. Amazing, isn’t it?
G. Best Alternatives to Amelia
Until now, we learned everything about the all-rounder Amelia plugin. Hopefully, you may have decided if you should use it for your website.
If you want to look for similar options, then continue reading. Here are the best alternatives to the Amelia plugin. So, let’s get rolling!
1. Appointment Booking by MotoPress
Appointment Booking by MotoPress is a one-stop solution for seamless online booking and appointment scheduling. It’s best for time and service-oriented businesses, like beauty, sports, education, etc.
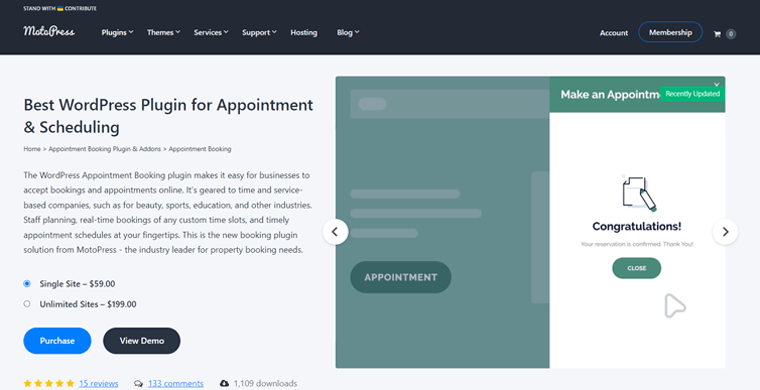
Unlike Amelia, this plugin lets your customers view their past bookings. Simply put, it can store the log history of each appointment. So, when a customer logs into their account, they can find tools to view their past and future bookings with details.
Pricing:
Appointment Booking by MotoPress is a freemium WordPress plugin with both free and pro plans. You can simply download the free plugin from WordPress.org and upload it to your website. Otherwise, install the plugin right from your WordPress admin area.
The following list includes its premium pricing options with all exclusive features:
- Single Site: $59 for a single website and every premium feature.
- Unlimited Sites: $199 for unlimited websites and all paid features.
2. Bookly
Bookly is a free WordPress scheduling plugin that accepts online bookings on your website and automates its reservation system. It’s a single place to manage the booking calendar, client base, services, and whatnot.
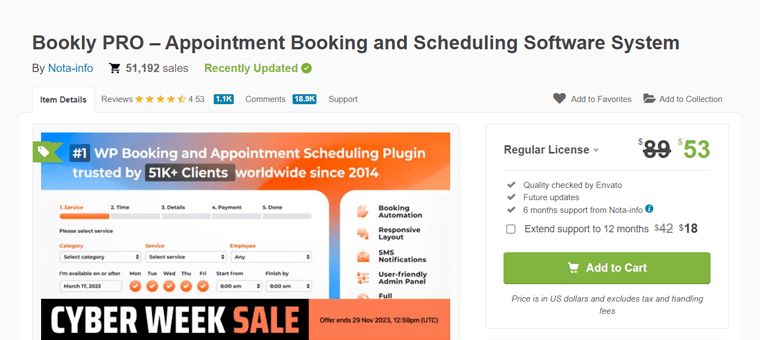
Best of all, you’ll find dozens of add-ons for your booking system. One of which is the waiting list that you won’t find in Amelia. With this feature, your clients can wait until a spot is available to book an appointment.
Pricing:
Bookly is a completely free WordPress plugin for bookings. So, you can directly install it from your dashboard. Otherwise, download it from WordPress.org’s plugin directory and upload it to your website.
Notably, Bookly doesn’t have premium plans. But it offers the Bookly Pro add-on. You can purchase it from the CodeCanyon marketplace for $53 for a regular license with 6 months of support. For 12 months of support, pay $18 extra.
3. QuickCal
QuickCal is a simple yet powerful WordPress appointment-booking plugin. With its flexible time slot booking, you can build unlimited custom calendars with different schedules and availability. That can be based on locations, staff, etc.
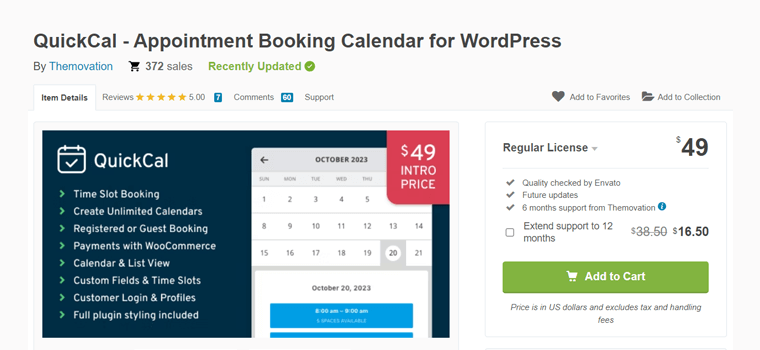
Further, its unique feature is appointment buffering. Simply put, it ensures appointments aren’t getting booked too close to the current date and/or time. Pretty amazing, right?
Pricing:
QuickCal is a premium WordPress plugin available to purchase from the CodeCanyon marketplace. It costs $49 for a regular license that includes future updates and 6 months of support. Get 12 months of support by paying an additional $16.5.
With that, we’re closer to the end of this Amelia plugin review article. So, let’s sum up!
Final Thoughts – Is Amelia the Best WordPress Booking Plugin?
After examining this review, you should now have a clear understanding of the Amelia plugin. Hopefully, this guide will aid you in determining if Amelia is the right choice for streamlining appointment and event scheduling on your website.
In essence, Amelia is an efficient and user-friendly booking system for WordPress websites. With Amelia, your clients can easily schedule appointments. Also, you can manage your business’s bookings quickly.
For those interested in exploring the Amelia plugin, we recommend starting with its free version. Alternatively, you can explore the plugin’s demos to get a hands-on experience before deciding to opt for the premium plan.
Be sure to bookmark this resource for future reference. This lets you stay updated on all aspects of Amelia, including updates and new features.
Frequently Asked Questions (FAQs) on Amelia
Have some queries that you want instant answers for? Go through these FAQs on the Amelia plugin and solve your confusion right away!
1. Can I add a custom field to my booking form?
Yes, indeed. You can add different kinds of custom fields for the customer to your booking form. Some of them can be about their special requests, addresses, file uploads, etc.
2. Is adding the Custom Service Duration feature available in the free version of Amelia?
No, the custom service duration feature isn’t available in the free version of Amelia. But you can get this function on all of its premium pricing schemes. Using this feature, a single service can have multiple durations to choose from at different prices.
3. Will I get a notification of the schedule after booking the appointments?
Obviously, you and your customers will receive custom notifications via email and SMS after booking the appointments. Also, Amelia sends different reminders and follow-ups.
4. Does Amelia allow the management of multiple employees?
Yes, Amelia allows the management of multiple employees, but only on its premium version. Further, you can specify their working hours, service schedule, capacity, price, etc.
5. Can I create packages of different services using the booking form?
Of course! The higher plans of Amelia let you create packages or bundles of different services, specifying a discount on the booking form.
If you’re new to setting up a website, then check out our tutorial on creating a website. This guide will walk you through the process from scratch.
Conclusion
That’s a wrap for our review of the Amelia plugin! Hopefully, you’ve got a comprehensive understanding of its features and functionalities.
In conclusion, the Amelia plugin stands out as a versatile booking solution, making it a valuable asset for every business. Moreover, it provides a smooth experience for both admins and clients.
If you require further clarification, then please feel free to drop your queries in the comment section. We’re here to assist you to the best of our ability.
Further, read our similar articles on the best travel booking WordPress plugins and the best hair salon booking plugins for WordPress.
Stay updated on our latest articles and insights by following us on Facebook and Twitter.