Wondering how to create an ‘About Me’ page on WordPress? If yes, then you’ve come to the right page.
No doubt that the ‘about’ page is one of the most important and valuable pages for every website. It’s the perfect place for your readers to connect with you and learn about who you are and what you do.
Very common but of paramount importance, creating an ‘about’ page is never easy. That’s one of the reasons why most people neglect to create an About page for their site.
Therefore, we’ve come up with some tips and straightforward guides to help you create an engaging ‘About Me’ page on your WordPress site.
Let’s begin!
Why Create an About Page on Your Website?
The ‘about‘ page is an essential page to your site that helps you build your business and audience. An ‘about’ page is not just about providing information regarding who you’re, what is your business, and what your business does.
Rather, it’s more about promoting and connecting your business with your potential customers. In simple terms, the ‘about’ page helps your visitors to know you better and reflects the purpose and personality of your business.
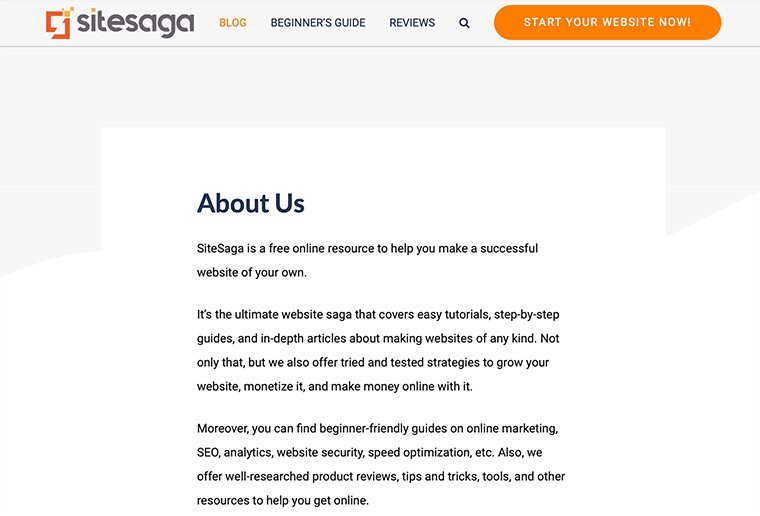
For example, you can check our About Us page. (https://www.sitesaga.com/about/)
Although we might think that the ‘about me’ page is all about you and your site rather it’s about the readers. When you address your readers first, this always makes them special.
As a result, it helps to strengthen much-needed trust and credibility from your visitors. Besides, it also helps you convert your visitors into potential customers.
Therefore, we must be extra cautious while creating an About page for our WordPress site. Now let’s look at what things we must not forget while creating the About page.
What Should You Include In Your About Me Page?
1. Introduce Yourself
You can give a brief description of who you are and talk about your background and personality. This is for those who are running their sites. However, if it’s a company, then it’d be better if you introduce your team members along with their social presence links.
However, don’t go overboard and talk about unwanted random facts about yourself.
2. Talk About Your Site
Once you give a brief description of who you are, it’s time to describe what your blog is about. Talk about the mission, vision, and goal behind your site. And tell your readers how you’ll achieve them.
3. Multimedia (Photos and Videos)
When you add photos and videos to your content it makes your site much more conversational and approachable. As we all know, one picture can speak a thousand words.
4. Social Proof
If you want to make sure that your visitors trust you and your site, you should prove it with enough possibilities to gain their trust. For instance, you can place the social count on the page to display the number of followers on different social platforms.
Maybe you can add a testimonial instead to share quotes and blurbs from your clients and readers.
5. Guide Your Readers Where To Go Next
Once the readers come to your ‘about’ page and read all of your stuff, they somehow find themselves lost at the end. They might not know what is the next best thing that they can do on your site.

Hence, you need to guide them next to what else they shouldn’t miss on your site. Like you can recommend some of your popular blogs on your site.
Things To Avoid While Creating an About Me Page
- Lengthy Boring Writing – Make sure that your writing reflects your humor rather than trying to be funny. Also, try to keep your writing to less than 300 words.
- Being Self-Centered – Remember that the ‘about me’ page is not all about you. The readers who click on this page will want to know about your story and what your site can do for them.
- Not Updating Regularly – Never forget to come back and update the page to ensure it accurately reflects your real life.
Video Tutorial – Create an ‘About Me’ Page on WordPress
Do you prefer learning from a video tutorial instead? Here it is!
If you still love the step-by-step guide in detailed article form, keep scrolling to the bottom.
Method 1 – Create a Simple About Me Page Using Default WordPress Blocks
Here, we’re going through the step-by-step process to create an ‘about me’ page on your WordPress site.
So, let’s check out the steps given below:
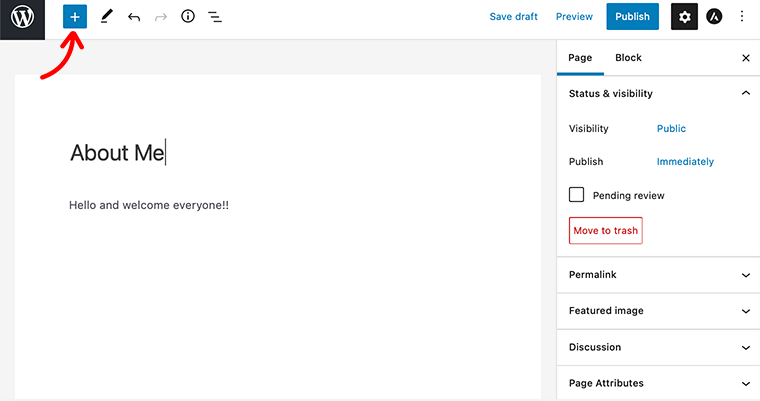
Step 1: Add a New Page and Name it ‘About Me/ About Us’
Firstly, log in to your WordPress dashboard and then navigate to Pages > Add New.
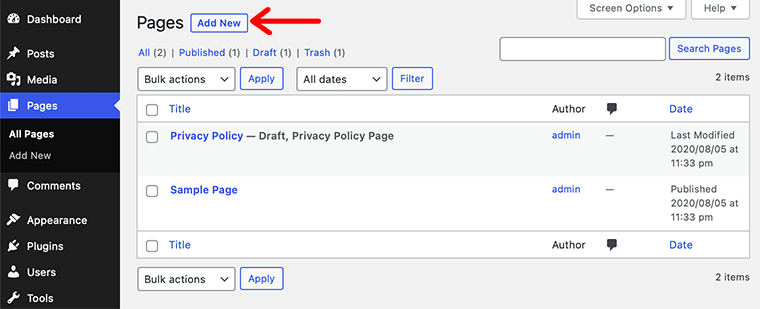
Once you click on that button, it’ll take you to the WordPress page editor. From here you’ll be able to create any sort of page for your site.
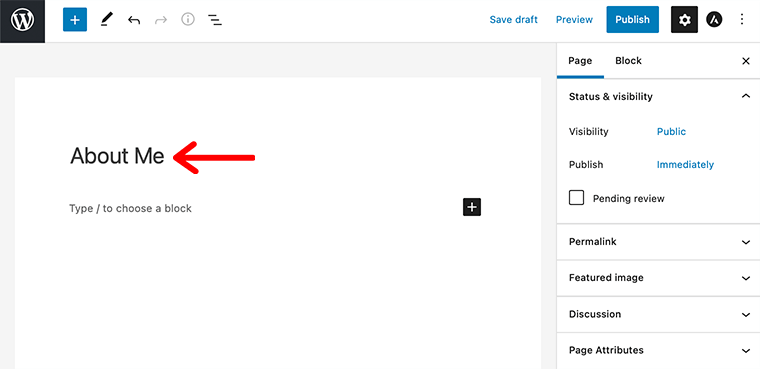
At the very first, it’ll ask you to give a Title to the page. Since we’re creating an About page, it would be great if we name this page About Me itself.
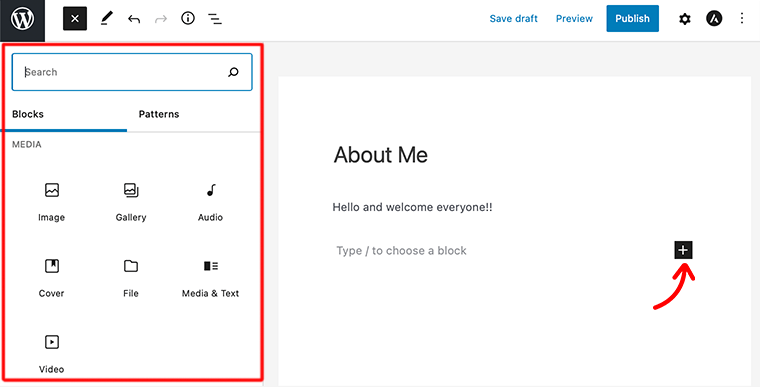
Step 2: Write About Page Content and Add Photos
After you’ve added your page title, it’s time to add some content. You can add whatever content you wish to share with your readers. But remember not to bore your readers with your monotonous lengthy writing.
To make your content much more interesting you can add some other types of content like images, quotes, list items, etc. For that, click on the Plus ‘+’ icon at the top of the page. This will then basically list out all the Gutenberg blocks that you can add to your About page.
For now, let’s see how we can add an image to our About page. For that click on the Image icon from the Gutenberg block section. After that, it’ll ask you whether you want to upload an image file, pick one from your media library, or add one with a URL.
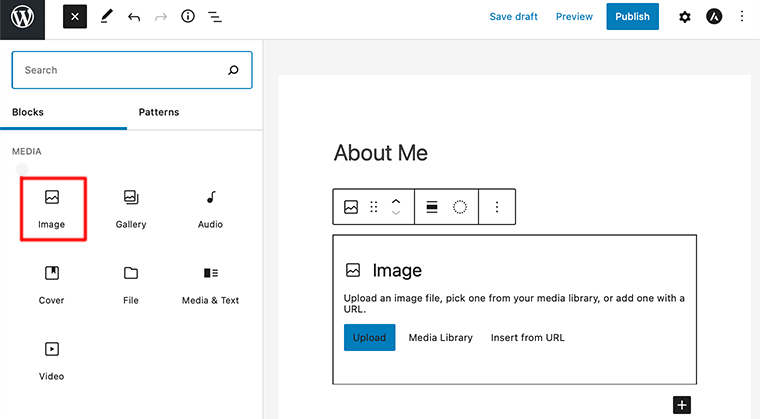
For now, let’s upload the image. Once you’ve uploaded the image, it’s time to insert the image title, caption, and alt text from the Setting section.
Lastly, you can add other types of block elements like videos, quotes, etc. to create a beautiful About page.
Step 3: Publish the Page
After you’ve completed adding the content, title, and images to your post, it’s time to publish the page.
So before that, it’ll be better if you Preview it one last time and then click on the Publish button.
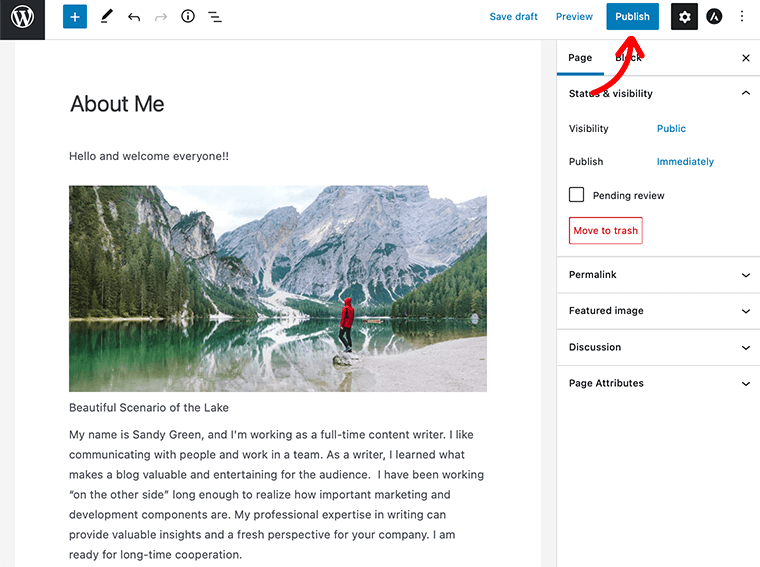
Once you’ve published, you’ll get a confirmation that the page is live along with the page address. Now you can either click on the View Page or Copy Link to save your page’s URL.
Step 4: Add Your ‘About’ Page to Menu
In this final step, we’ll see how we can add our ‘about’ page to our site’s menu. We must add this page to the navigation menu of our site because it makes it easier for our visitors to see and navigate to that page.
The first thing is to select Menus from the drown-down menu under Appearance on the left side of the WordPress admin area. This will then take you to the Menus page from where you can create and manage the menus.
In most cases, when you start a new site, a menu is already created for you automatically. Hence, you can add your ‘about’ page directly to that menu without having to create a new menu.
You’ll see your current list of menu items resides on the right-hand side of the Menu section. If you’ve multiple menus on your site, you’ll have to select the menu that you want to edit from the dropdown list.
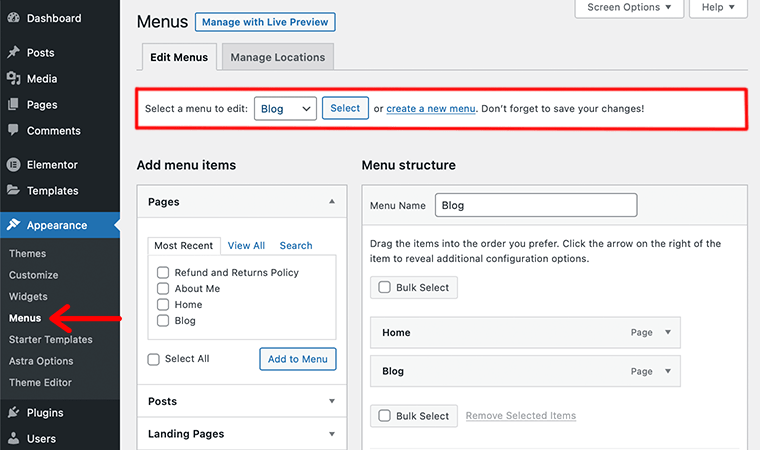
For that, simply select the menu you would like to edit from the Select a menu to edit and then click the Select button. This will then display the selected menu with its menu items.
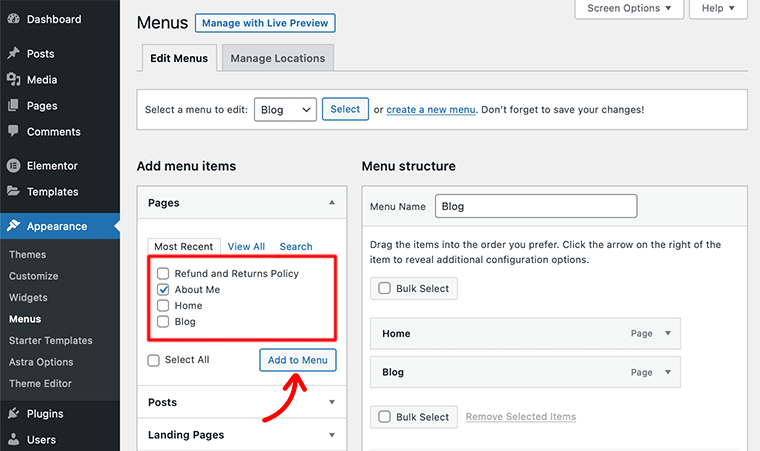
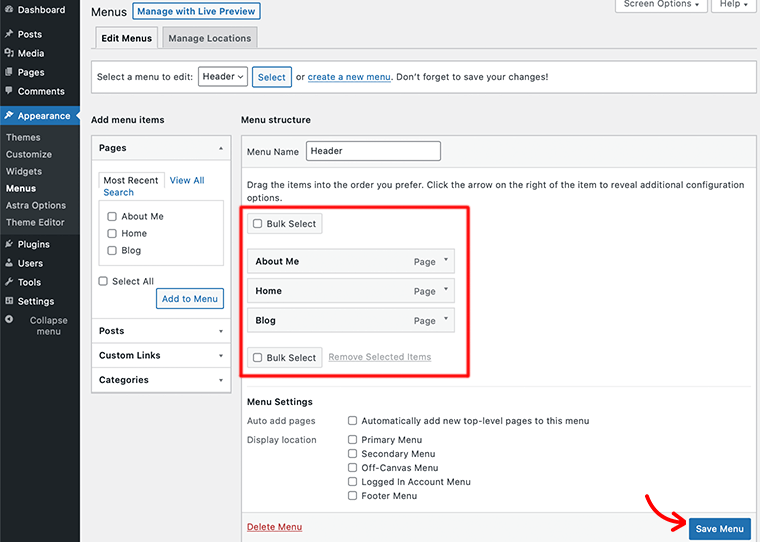
After that, you’ll notice those menu items on the Menus page will match the menu items that appear on your site. Now, from the Add menu items section, you’ll need to search for the About Me page that we created earlier and then click on the Add to Menu button.
Once you’ve done that, the About Me page will be added to your existing menu. Likewise, you can rearrange the order of the menu by simply dragging each item into the order you prefer.
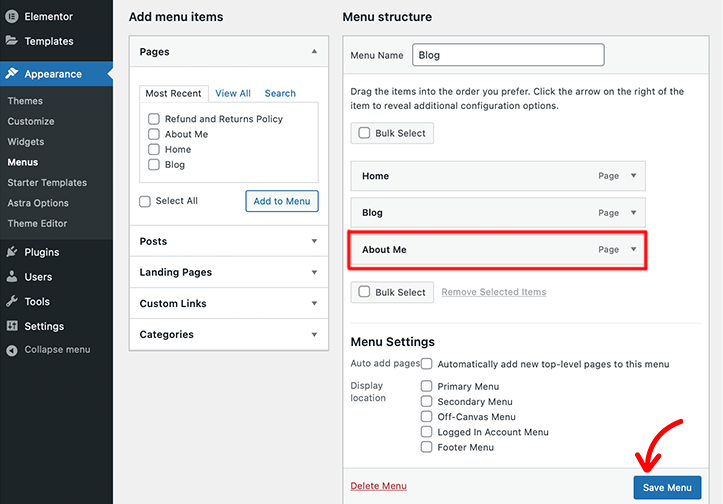
Lastly, after updating your menu items, don’t forget to click the Save Menu button. Now, let’s see how we can create a new menu and add our ‘about’ page to that new menu.
How to Create a New Menu and Add the About Page to That Page?
However, if you need to create a new menu from scratch, then follow these steps.
Firstly, type in the name for your menu bar in the Menu Name field, then click on the Create Menu button.

Following that, just beside the Menu Structure section, there is the Add menu items section. In that section, you’ll need to click on all the boxes for the pages that you want to include in your new menu.
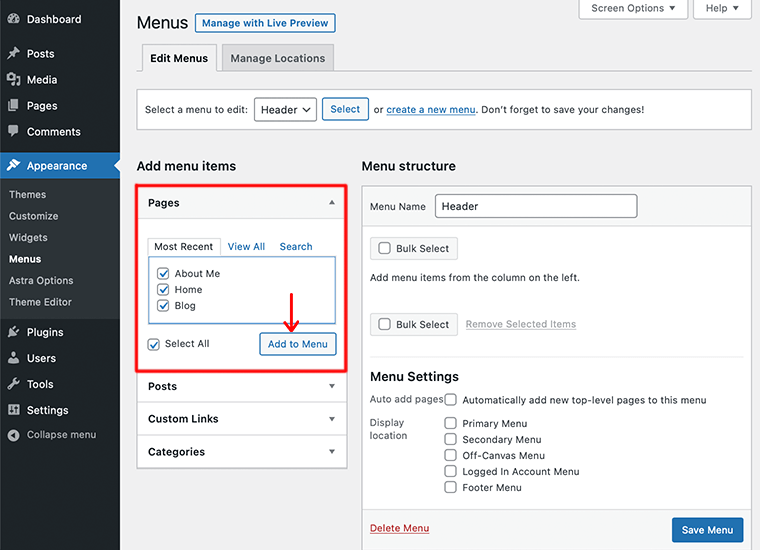
Since earlier we’ve created our ‘about’ page which we’ve named About Me so don’t forget to click on that box too. And then click on the Add to Menu button.
Next, you’ll notice that the About Me page has been added to your menu. If you want to rearrange the order of the menu then simply drag each item into the order you prefer. Also, for more setting options, check the Menu Settings option.
Lastly, once you’re satisfied with your menu’s settings and order, click on the Save Menu button to save your settings. Now you can visit your home page and see it to make sure that the menu looks the way you want it to.
Great! if you’ve been able to create an ‘about me’ page on WordPress following each of the steps discussed above.
Method 2 – Creating a More Visually Attractive About Page (With Astra + Elementor)
Here we just now looked at how we can easily create a simple ‘about’ page just using WordPress.
If you have been creating an ‘about us’ page like this then, it’ll instantly be overlooked by the visitors.
Therefore, to stand out to leave a good impression, you can use the WordPress page builder. Because they come with ready-made templates that help you to easily get started with the design.
Hence, in this guide, we’ll be using Elementor page builder and Astra theme to create an awesome ‘about’ page for your site. Since both of them are quite rich and compatible with one another. Also, their combination lets you design every aspect of your site such as header, footer, dynamic pages, etc.
Similarly, as an alternative, you can also use the Kadence theme with Kadence Blocks to create your About page.
Step 1: Install The Astra Theme and Starter Templates Plugin
Firstly, let’s install the Astra theme, for that, log in to your WordPress site. Then, go to Appearance > Themes > Add New.
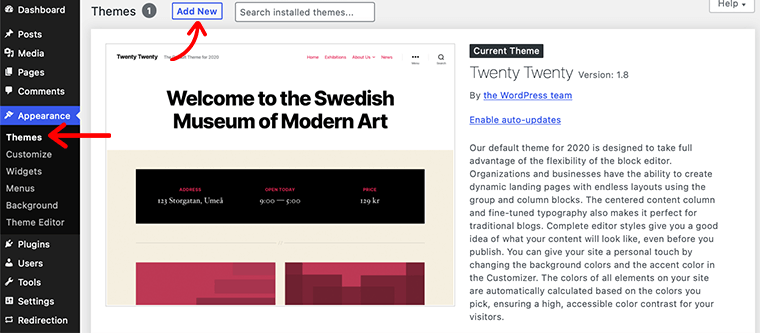
Then, search for the Astra theme, install it, and then activate it.

After you’ve installed the Astra theme, now let’s install the Astra Starter Templates plugin.
We’ll use this plugin for the ready-to-use ‘about me’ template. The plugin offers more than 300+ pre-made templates that work perfectly with popular WordPress page builders. Also, this plugin has a specific category dedicated to the ‘about’ page containing 20+ templates that you can choose from.
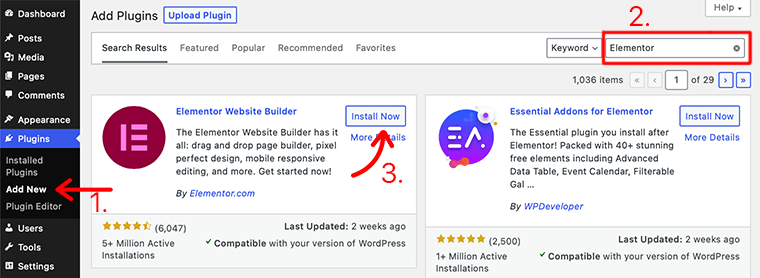
Go to Plugins > Add New. Then, search for the Starter Templates plugin in the search field.

Once you found your plugin click on the Install Now button. After installing it, click on the Activate button. This is how you fully install Starter Templates on your website.
Step 2: Install The Elementor Page Builder
Next, we’re going to install the Elementor page builder. We’ll need this page builder plugin because it comes with a drag-and-drop tool that makes it quite easier for you to customize your pages.
To install the Elementor page builder, go to Plugins > Add New. Then, search for the Elementor in the search bar of your dashboard. Once you’ve found the plugin, click on the Install Now button and then complete it by clicking on the Activate button.
Before we head to other steps, we want to tell you that Step 1 and Step 2 are optional. You don’t have to follow these two steps if you’ve already installed these tools on your dashboard.
Now let’s see the next step.
Step 3: Create a New Page and Import One of the Starter Templates
After you’ve installed the Astra theme, Elementor, and Starter Templates plugin, you’re ready to create your About page.
To do that, go to Pages > Add New in your WordPress dashboard. This will then take you to the WordPress page editor. Next, we need to import one of the starter templates from the Astra theme.
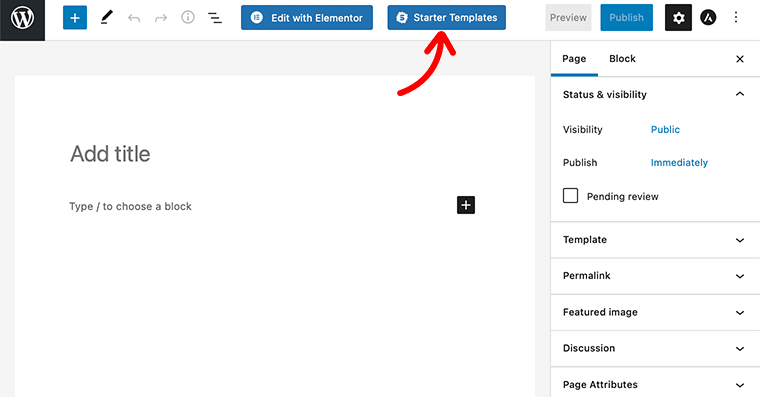
For that, click on one of the blue buttons that say Starter Templates located at the top of the page.
This will then take you to the Astra Starter Templates library from where you choose that one template that suits your site. Because we’re only creating an About page for our site, click on the Patterns options from the top menu.
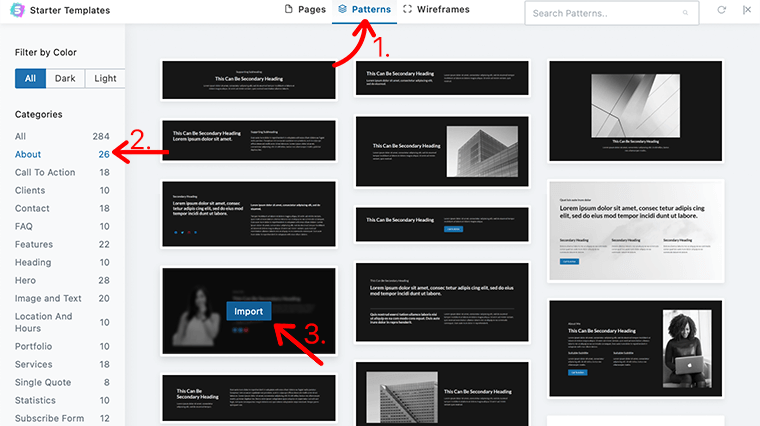
After that, from the sidebar, select the About category and you’ll see more than 25+ pre-built templates for the About page. Hover on any one of those templates that you want and click on the Import button.
Step 4: Customize Your Page With Elementor
Once you’ve imported your demo template, it’s time to customize it according to your preference. For that, click on the Edit with Elementor option from the top of the page.
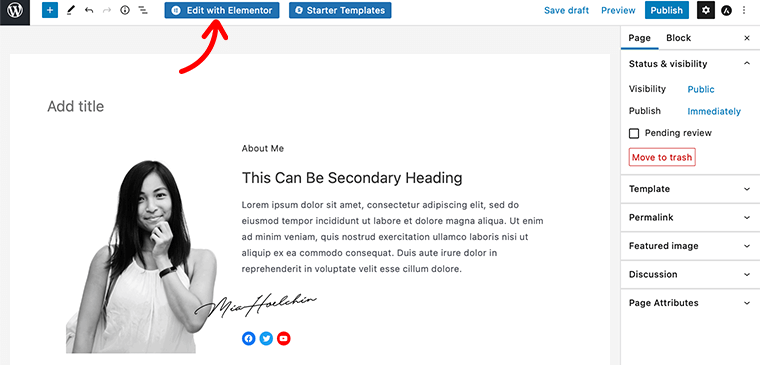
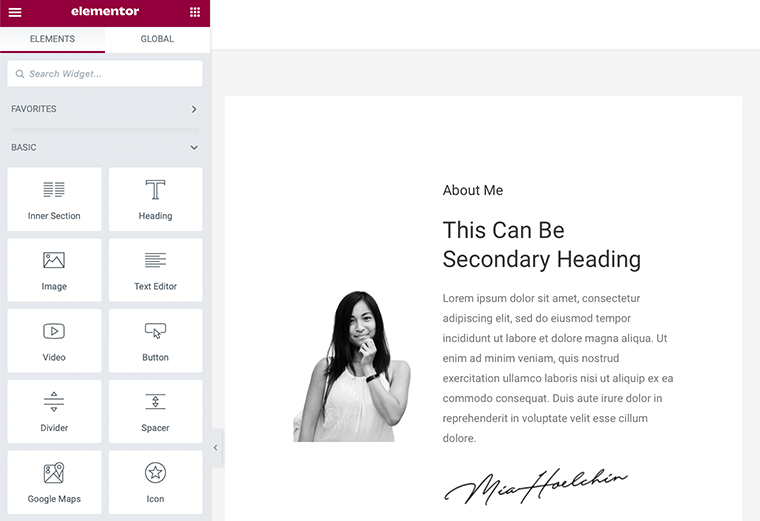
It’ll then open into the Elementor drag-and-drop interface which gives you more control and flexibility to customize your page.
Finally, once you’ve completed customizing the page, click on the Publish button to publish the page.
This is how you create an attractive ‘about’ page with the Astra theme and Elementor page builder. These two’s combination gives you the power to completely customize the page without having to know anything about code.
Conclusion
That’s it, guys! We’ve come to the end of this article.
We hope this article helped you know how to create the ‘about me’ page on WordPress. Now, you can create an awesome ‘about’ page on WordPress using some of these tips and formulas.
If you have any more queries about how to create the ‘about me’ page, then feel free to comment below. We’ll get back to you as soon as possible.
Also, don’t forget to share this article with your friends and colleagues.
You may also like our article on how to add a contact form & page on WordPress & how to check if a website is built on WordPress.
Also, follow us on Facebook and Twitter for fresh articles from our blog.