
Are you on a quest for an in-depth Elementor review? If yes, then don’t go anywhere.
Elementor is the most popular WordPress page builder, with over 5 million active installations. It’s feature-packed and user-friendly, offering a wide range of tools to craft stunning sites.
If you’re contemplating whether it’s the best WordPress site builder, then don’t worry. We’ve done our research and used Elementor thoroughly.
Hence, this article justifies Elementor’s features, pros, and cons to determine if it’s the best for your page-building needs. Now, let’s get started and uncover Elementor’s magic.
Overall Rating
Elementor is a feature-rich WordPress page builder plugin. It contains several features to design and create responsive, dynamic, and attractive website pages.
Did you know? Elementor has an average score of 4.6 out of 5 stars in the WordPress plugin directory. Outstanding, isn’t it?
Unquestionably, we’ll also give Elementor 4.8 out of 5 stars. Here, we deducted the remaining 0.2 ratings only because it doesn’t offer a lifetime payment option.
So, do we recommend using Elementor? Yes, indeed! We highly recommend using it for your website creation if it fulfills your needs and budget.
However, you can first try using its free version before purchasing a premium plan. With your increasing demands, you can upgrade to a paid plan later.
Notably, Elementor includes a 30-day money-back guarantee policy. Meaning, you can decide whether to continue using it or not during this time.
With that, let’s dive into the pros and cons of Elementor!
Pros and Cons of Elementor
Like any other WordPress plugin, Elementor has its own set of pros and cons. So, let’s get to know them before we begin this Elementor review.
Pros of the Elementor Page Builder
- It comes with an easy-to-use interface and a drag-and-drop live editor.
- Contains an extensive set of widgets and templates.
- Gives your website a responsive design suitable for mobile devices.
- Includes features like theme builder, pop-up builder, form builder, etc.
- WooCommerce builder lets you create eCommerce sites easily.
- Compatible with popular WordPress plugins and WordPress themes.
- Provides frequent updates, ensuring it stays secure and up-to-date.
Cons of the Elementor Page Builder
- Many widgets and templates are present in the premium version.
- It doesn’t offer any lifetime pricing options for its premium plans.
- Reliance on Elementor can make it challenging to switch to other page builders.
Now, let’s move ahead and learn in-depth about Elementor.
A. What is Elementor? – A Brief Overview
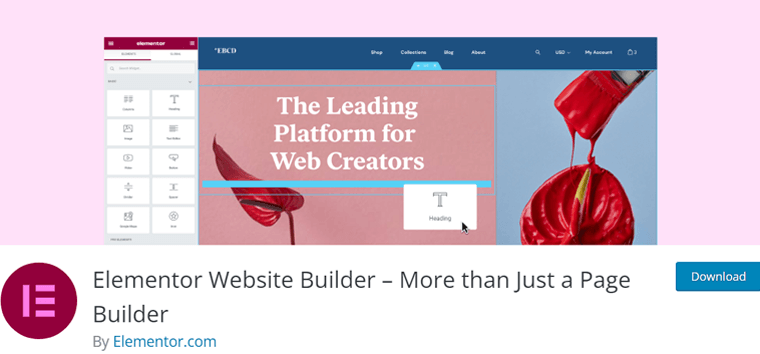
Elementor is one of the most popular drag-and-drop page builder WordPress plugins for websites. It was launched in 2016 and is now known as the powerhouse in the site-building industry. Exactly, it has more than 5 million active installations globally.
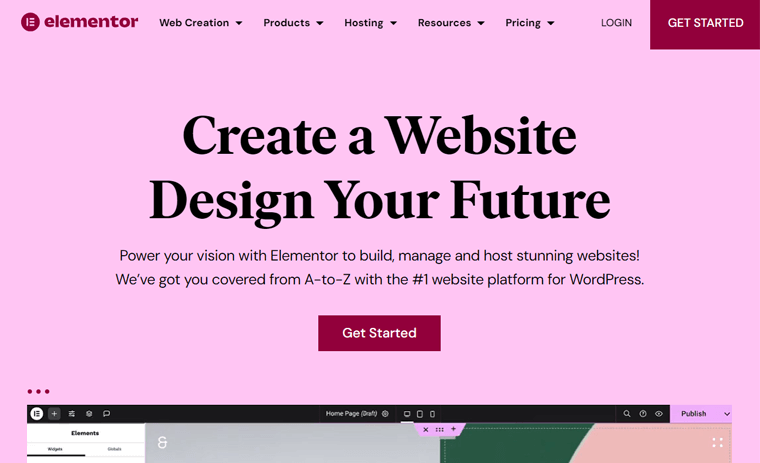
Further, it empowers users with an intuitive and user-friendly interface. The drag-and-drop functionality simplifies the entire design process. Meaning, it lets you create and design stunning web pages visually without the need for coding.
Moreover, Elementor lets you customize the layout, style, and content of each aspect of your website. Whether that’s the website’s header, footer, or sidebar.
On top of that, you can utilize its vast library of 300+ templates and 100+ widgets to quickly streamline the site-building process. In addition, it supports responsive design, ensuring your pixel-perfect website looks great on all devices.
Plus, this plugin can translate into 59+ languages. Also, it supports multilingual plugins like Polylang, WPML, etc.
That’s not all! Coming up next, learn everything about Elementor from its features.
B. Major Features of Elementor Page Builder
Elementor has a set of free and premium features for distinct needs. Here, we’ll dive into the most crucial features of Elementor that you should not miss.
Now, without any delay, let’s begin!
1. Intuitive Drag-and-Drop Editor
Elementor has a drag-and-drop editor that simplifies website building and design. Further, it gives a real-time editing experience, allowing you to see changes as you make them.
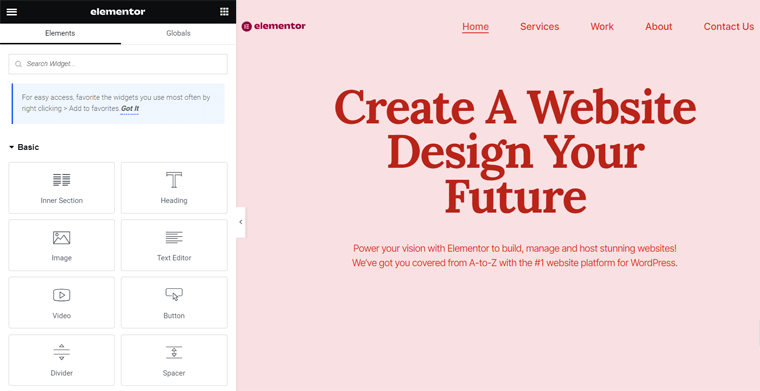
Plus, you’ll get access to 300+ templates and 100+ widgets for endless website possibilities. Simply put, you can use a complete website kit or different templates to create your site. Also, you can import or export templates and their parts.
Similarly, some widgets available are:
| Widget Types | Examples |
| Basic | Sidebar, shortcode, icon, counter, tabs, basic gallery, etc. |
| Pro | Posts, portfolio, slides, reviews, template, mega menu, etc. |
| Theme Elements | Site title, page title, breadcrumbs, sitemap, and more. |
| WooCommerce | Products, cart, my account, product rating, add to cart, etc. |
Find all the widgets of Elementor here!
In addition, you can get full control over layouts. For example, it lets you easily position elements where you want them, which can be fixed or absolute. Similarly, you can seamlessly adjust margins and padding for intricate layouts, like overlapping sections.
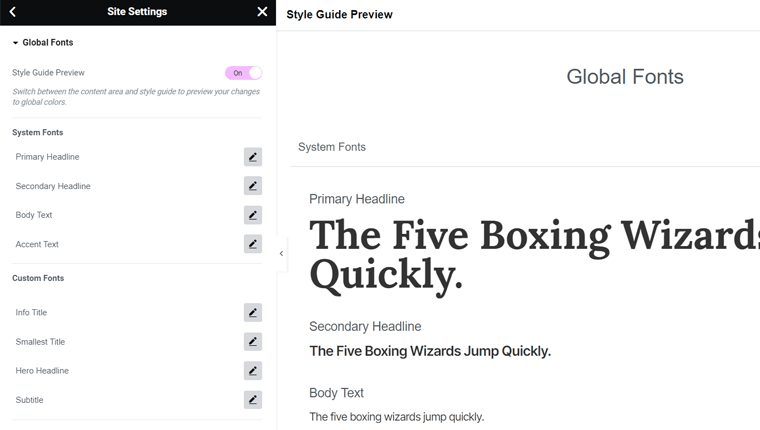
Moreover, you can maintain design consistency by setting color codes and typography choices in one place. That’s basically called global colors and typography.
2. Smooth Workflow
Elementor’s easy workflow streamlines the site creation process smoothly and efficiently. As mentioned before, you can control global website elements and design in one place.
Moreover, you can customize the default settings of elements and set them as default.
Other than that, here are a bunch of workflow features you’ll gain access to:
- Quickly access frequently used widgets from your ‘Favorites’ section in the editor.
- Navigator lets you easily navigate and visualize page elements or layers for editing.
- The search bar finder allows you to navigate between pages and dashboard settings.
- You can collaborate with team members or clients by leaving contextual notes.
- Easy web creation options like shortcuts, multi-select, in-line editing, etc.
- Includes auto-save, draft mode, and revision history for save, backup, and reuse.
- Search and filter templates to use the one that fits your needs the most.
3. Strong Design Capabilities
This page builder empowers you to craft visually stunning websites with precision and creativity. The global fonts, custom CSS, colors, and typography let you maintain consistent design across the website. But you can always stylize every element differently.
Here’s a list of powerful design capabilities you’ll find in Elementor:
- Choose from 1500+ customizable icons or upload your own for your website.
- Insert background videos, background slideshows, shape dividers, and mask shapes.
- Color and effects like gradients, background overlay, box-shadow, blend modes, etc.
- Typography features like font preview, Google Fonts, text stroke, text shadow, etc.
- Responsive design features like hide and show elements, visible responsive values, mobile browser background, etc.
- Interactive features such as motion effects, scrolling effects, hover animations, etc.
4. Outstanding eCommerce Functionality
Following that, Elementor has a comprehensive set of tools to enhance your eCommerce site. You can create and customize each aspect of your online store to engage with your customers effectively.
If you use WooCommerce, then utilize Elementor’s WooCommerce builder. It has everything you need to tailor each detail for a good shopping experience.
So, you can use its WooCommerce widgets and website kits to set up the store as per your needs.
Other than that, find all the eCommerce features Elementor has to offer:
- Use a template or start from scratch for a custom cart with proper layout and styling.
- Edit section titles, labels, and placeholders for form fields, and style the entire checkout process or individual sections to match your brand’s aesthetic.
- Configure the WooCommerce transactional pages and site settings within Elementor.
- Take full control of the design and layout of your single product template.
- Design your WooCommerce product archive template to show your products well.
- Seamlessly integrates with payment processors like PayPal and Stripe.
For eCommerce-specific features, get one of the best WordPress eCommerce plugins.
5. Powerful Theme Builder
Moving forward, another outstanding feature of Elementor is the theme builder. Overall, it lets you transform your WordPress website with ease.

First, you can effortlessly create high-converting landing pages directly within your existing site. This converts visitors into engaged users on your site. Further, the loop builder lets you make your main item templates and use them to show posts, listings, or product archives.
Additionally, the theme builder includes the following features:
- The visual guide lets you review and edit each component of your site individually.
- Customize the header and footer areas of your website for a professional look.
- Define where your global templates will appear across your site, with conditions.
- Direct your visitors to 404 pages built with Elementor for a better user experience.
- Design an archive page, single posts, a search results page, and single pages with a cohesive look.
- Create content fields using ACF, Toolset, and Pods and insert them on any page.
6. Easy-to-use Form Builder
The form builder lets you create customized and interactive forms for your website. You can maintain brand consistency by customizing fonts, colors, and spacing.
Further, it can be any type of form, such as for new leads, newsletter subscriptions, surveys, etc. Hence, you can easily build a simple contact form or a complex survey with Elementor.
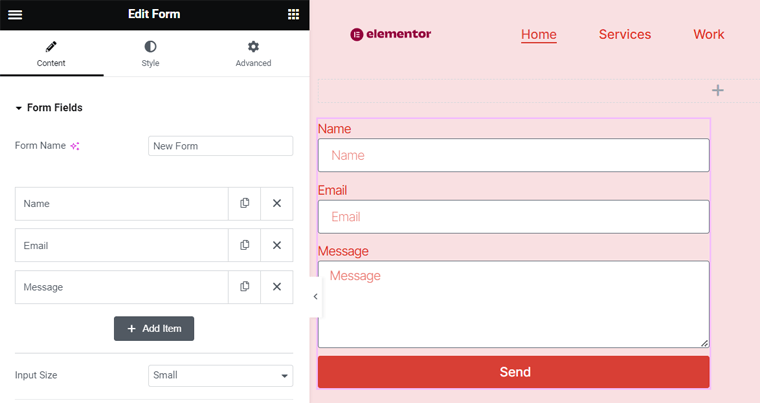
Moreover, the forms can be in a single-step or multi-step layout. This depends on how much information you want to gather. Also, you’ll get 20 different form fields to pick from.
In addition, find out all the other features of Elementor’s form builder here:
- The HoneyPot function helps block spambots.
- ReCaptcha helps in the verification of entries and preventing malicious submissions.
- Determine what happens after a visitor submits a form. It can be email notifications, redirection to a thank-you page, display pop-ups, etc.
- Collect data and store it in your Elementor account for easy management.
- Integrate with marketing and CRM (Customer Relationship Management) tools to sync data with your existing workflows and databases.
Hence, with advanced integrations and features, anyone can streamline data collection to enhance their online presence.
Want a separate plugin for creating forms? Then, use one of the best WordPress form plugins.
7. Attention-Grabbing Popup Builder
Similarly, Elementor’s popup builder lets you design eye-catching pop-ups with ease. You can create a wide range of popup types, like lead capture, exit intent, welcome back/login, email subscription, etc. That can be done by using widgets or templates.
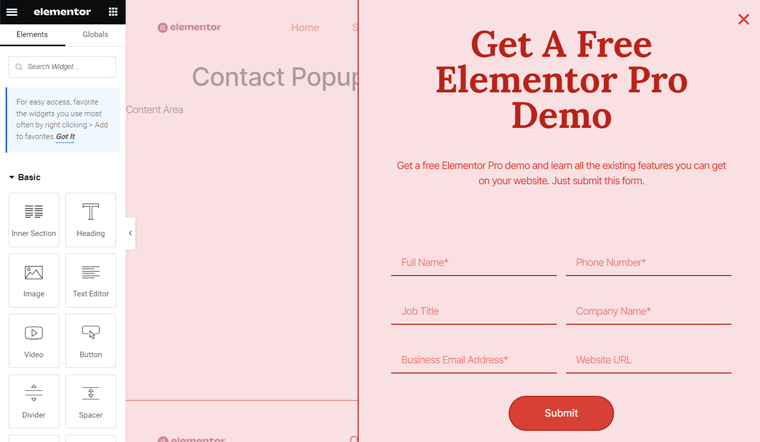
With its drag-and-drop live editor, you can easily customize them to match your brand’s style. Some pop-up styles are full-screen, modal, slide-in, top/bottom bars, etc.
What’s more? Learn about the additional features below:
- You can precisely target your visitors using triggers, display conditions, and settings.
- Its conversion tools can add custom forms and integrate with marketing and CRM.
- Lets you choose when and where your popups will be displayed.
- Ability to store the information within Elementor to easily manage and track it.
8. Interactive Marketing Features
Apart from form and pop-up builders, Elementor has a wide range of marketing features. First, you can connect with your audience via apps like WhatsApp, Google Calendar, etc. Also, it lets you add custom icon links to all your social media profiles on your site.
On top of that, it also gives the following marketing features:
- You can show the reviews, user feedback, and star ratings of your users.
- Lets you send confirmation emails to visitors after they submit a form on your site.
- Ability to send user-friendly messages to improve the user experience.
- Integrate with an email marketing service to automate the form submission process.
9. Extensive Integration
Elementor integrates well with many plugins and platforms. Overall, we already pointed out some integration features beforehand. Here, let’s learn the list of integrations:
| Integration | Plugins / Platforms |
| Email Marketing Services | Mailchimp, ActiveCampaign, ConvertKit, GetResponse, etc. |
| CRM | HubSpot |
| Automation and Notifications | Zapier, Slack, Discord, etc. |
| Social Media Integration | Facebook SDK |
| Security and Verification | ReCaptcha + ReCaptcha V3 |
| Content Enhancements | Fontello, Font Awesome Pro, Fontastic, IcoMoon, etc. |
| Video Options | YouTube, Vimeo, Dailymotion, external, or self-hosted video. |
10. Other Additional Features
Did we miss anything? Maybe you can find them in this list of additional features:
- Activate maintenance mode with the coming soon or maintenance mode templates.
- The replace URL feature makes sure everything with your new domain is updated.
- With version control, you can roll back and restore with one click.
- Activating safe mode isolates Elementor from potential error triggers.
- The role manager lets you control user access and content changes.
- You can choose upcoming features for your website.
- Stay informed about add-on compatibility issues with Elementor.
With that, let’s review the working functionality of Elementor.
C. How to Install and Configure Elementor?
Now, we’ll explore the steps of installing and configuring Elementor. Here, we’ll show you the process of doing so for both the free and premium Elementor versions. Here we go!
1. Free Elementor Installation Process
If you want to use the free Elementor plugin, then first install and activate it on your site. The process is easy and similar to that of any other plugin.
Step 1: Install the Elementor Page Builder
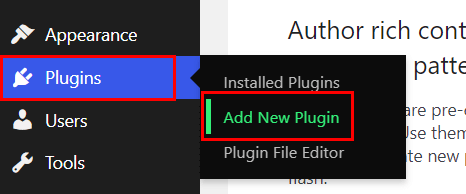
Log into your WordPress dashboard and open the ‘Plugins > Add New Plugin’ menu.
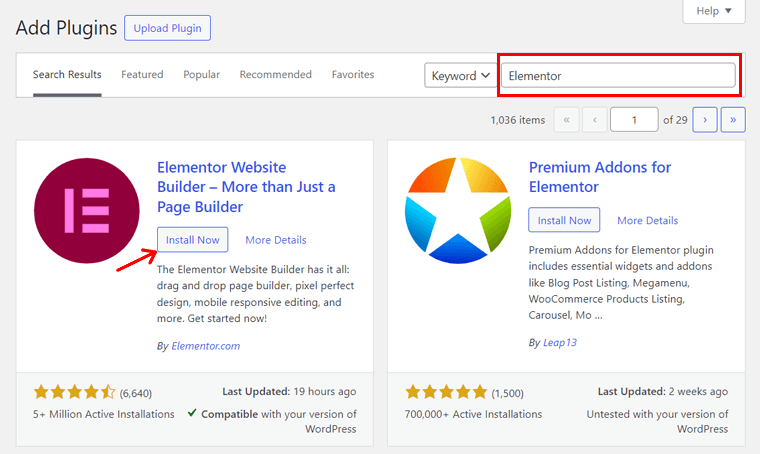
There, search for the keyword ‘Elementor’ on the search bar. Once you find the plugin, click on its ‘Install Now’ button, as shown below.
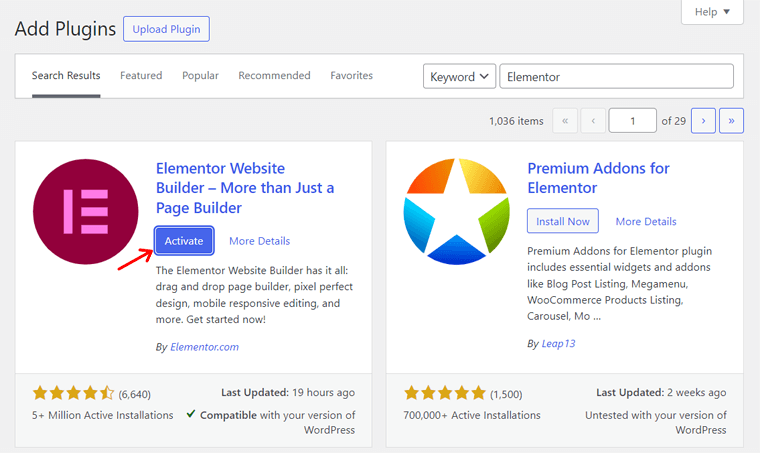
Step 2: Activate the Elementor Page Builder
After the installation is complete, click the ‘Activate’ button. By doing that, the free version of Elementor gets installed and activated on your website. Congratulations!
Read how to install a WordPress plugin in this guide for other methods.
2. Elementor Pro Installation Process
Moving forward, let’s look at the installation process for a premium plan of Elementor. For that, you must purchase and then only activate the plugin on your website. Let’s see!
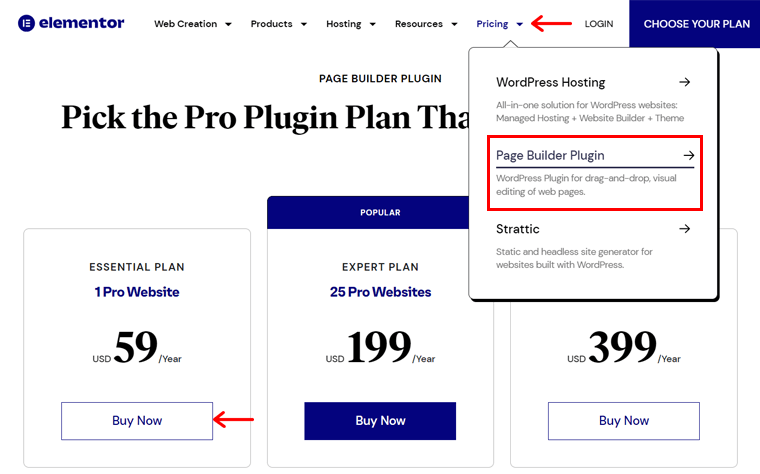
Step 1: Purchase Elementor Pro
First, visit the Elementor website and hover over the ‘Pricing’ dropdown menu. There, click the ‘Page Builder Plugin’ option.
This opens the pricing page, where you can find the available pricing schemes. Among them, pick a suitable plan, and click on its ‘Buy Now’ button.
Now, you must log into your Elementor account. If you don’t have one, then you should sign up and then log in.
Next, the checkout page opens up. So, enter your billing information, and then choose a payment method. Afterward, click the ‘Pay Now’ button.
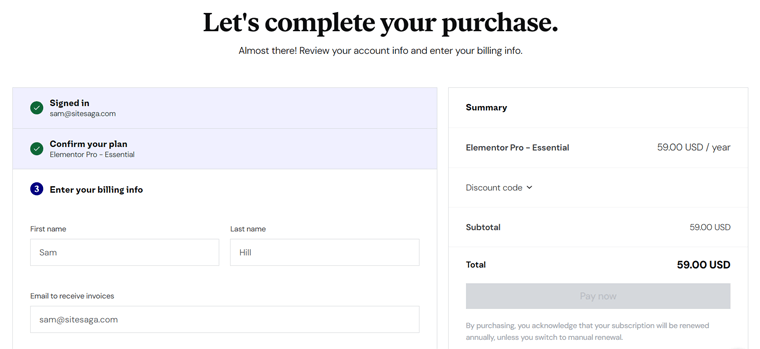
Following that, open your Elementor dashboard with your credentials. Then, you’ll have to click the ‘Download Plugin’ button. This downloads the ZIP file to your desktop.
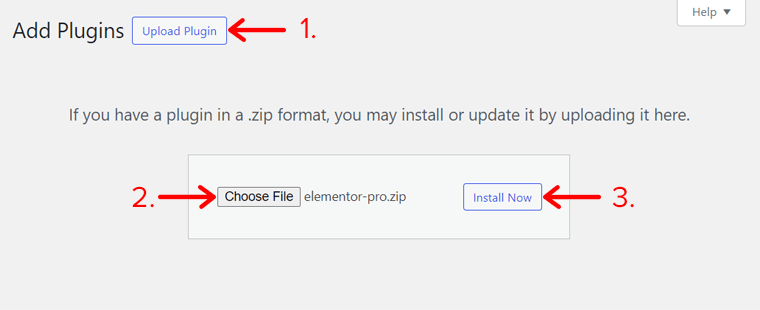
Step 2: Upload, Install, and Activate Elementor Pro
Moving forward, open your WordPress dashboard and visit the ‘Plugins > Add New Plugin’ menu. There, click the ‘Upload Plugin’ button.
After that, click the ‘Choose File’ button and upload the plugin’s ZIP file. Next, hit the ‘Install Now’ button.
In a while, you’ll see an ‘Activate Plugin’ button to click. But still, you must activate your license. So, navigate to the ‘Elementor > License’ menu and click ‘Connect & Activate’.
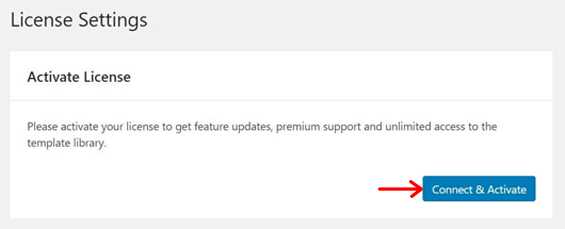
Hence, you must log into your account and click on the ‘Connect’ button. Once you do that, Elementor Pro is ready to use on your website. Congrats!
3. Configuring the Elementor Page Builder Settings
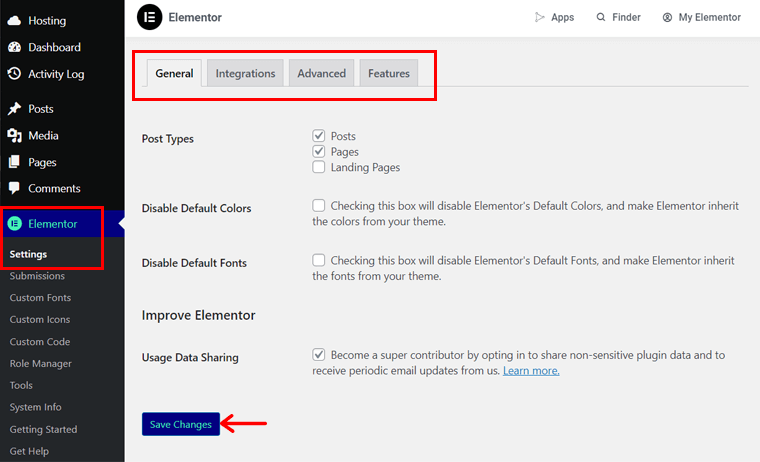
After the activation of Elementor, whether free or paid, you should configure its settings. For that, find the recently added menu ‘Elementor’ and open the ‘Settings’ sub-menu.
There, adjust the settings according to your needs. For instance, learn the options given:
- General: Here, you can select the post types and choose theme fonts and colors.
- Integrations: This tab lets you integrate Elementor with multiple advanced apps.
- Advanced: Setup exclusive features like Google Fonts, Generator Tag, etc.
- Features: Enable or disable the use of existing and upcoming features for the site.
Once you complete this, hit the ‘Save Changes’ button.
D. How to Craft an Eye-Catching Website with Elementor Pro?
In this Elementor review section, we’ll move forward and check out how to craft a website with Elementor. For that, we’ll be using some available options from this page builder itself.
So, without any delay, here we go!
Install the Hello Elementor Theme
Unquestionably, you can add any free or paid WordPress theme to your site that’s compatible with Elementor. That’s to have a website with the perfect design and layout.
Best of all, you can insert the free Hello Elementor theme. It’s a minimal and lightweight theme by Elementor. So, if you want to start your site with limited options, then utilize this.
To use Hello Elementor, navigate to the ‘Appearance > Themes’ menu. There, click the ‘Add New Theme’ button.
Now, search for the ‘Hello Elementor’ theme and click on its ‘Install’ button.
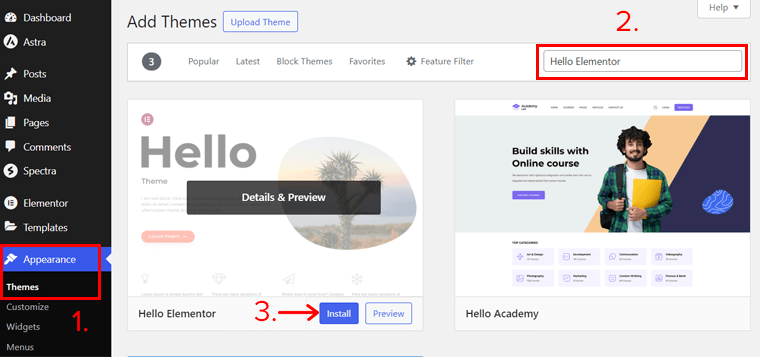
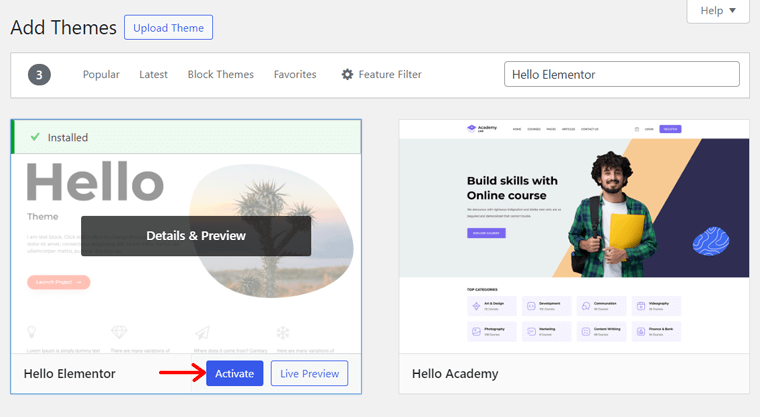
Next, click the ‘Activate’ button. That’s it! Your site now has the Hello Elementor theme.
Learn the detailed process of installing a WordPress theme here. If you’re unsure which theme to use, then find the answers on how to pick a WordPress theme.
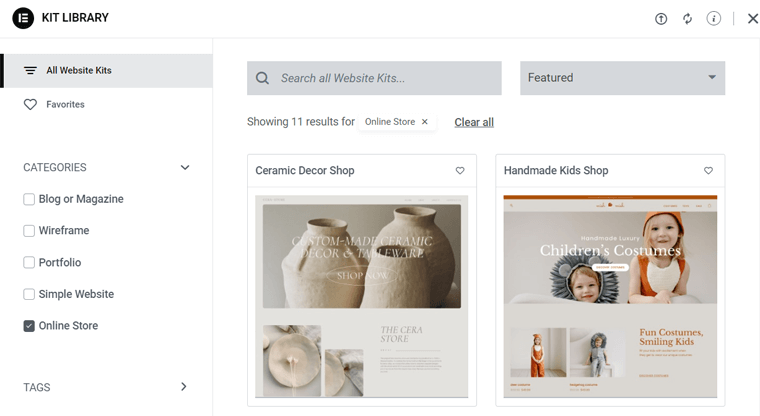
Import a Template from the Kit Library
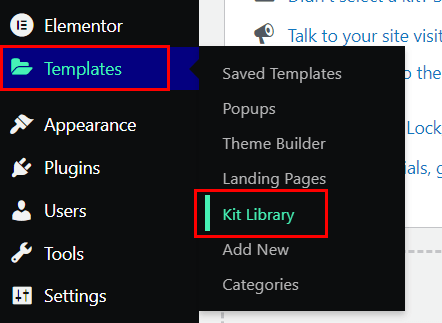
Suppose you want to use a professionally designed template for your entire website. For that, Elementor has a Kit Library with several free and premium website templates.
To insert a template, open the ‘Templates > Kit Library’ menu on your dashboard.
On the new tab, search for the type of website you’re building to get template options. Once you find a suitable template, click it.
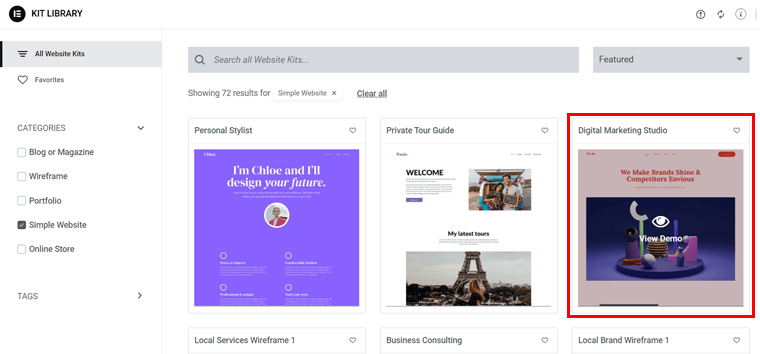
Now, you’ll see its demo, and all you need to do is hit the ‘Apply Kit’ button.
Most of all, you can configure what elements to insert into this theme. If you want everything, then directly click the ‘Apply All’ button.
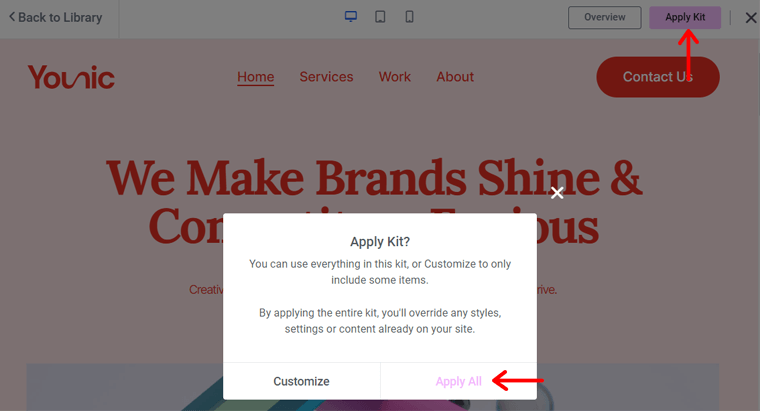
Lastly, click the ‘Close’ button to return to the dashboard.
Note: If you’re using the free Elementor version, then you must connect with your account before inserting the template. In the paid version, it’s already done, so there’s no need.
Elementor Interface Overview
Moving forward, you can use the Elementor page builder to customize the pages. Simply open a page and click ‘Edit with Elementor’. Just like we’re doing for the homepage.
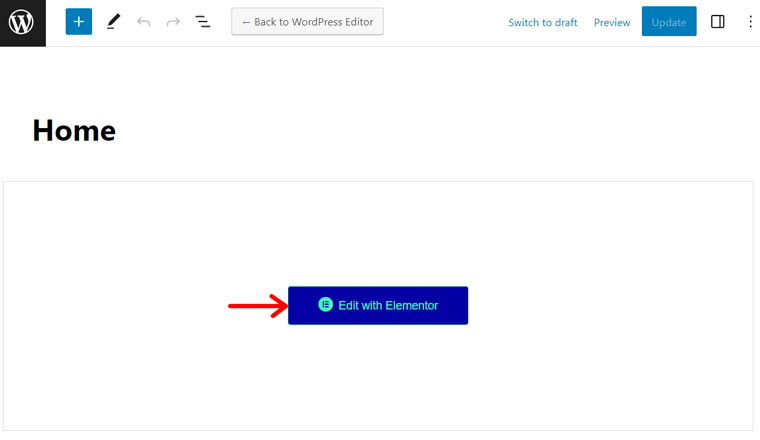
This opens the Elementor interface, which is different from the default WordPress editor. But before editing the page contents, let’s learn the basics of the Elementor interface.
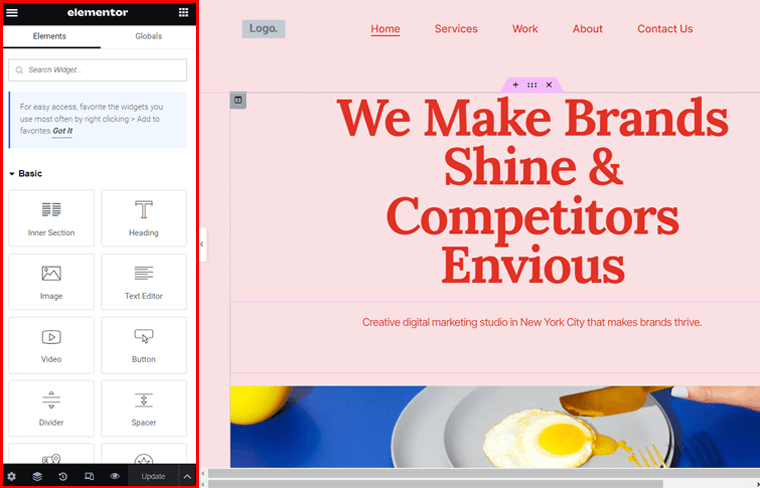
Notably, there are 2 sections present with their own set of functions. They are:
Left Side Section
The left side mainly focuses on the elements available to use. You can simply search for an element and once you find it, drag it from here to the right-side section.
In addition, the top-left hamburger menu in this section includes a bunch of settings and navigation options. That includes site settings, a theme builder, and user preferences.
Among them, you must configure the site settings to ease the web design process. Here are the steps:
- Design System: Choose the global color and global font for the website.
- Theme Style: Adjust the typography, buttons, images, header, footer, etc.
- Settings: Configure the site identity, layout, background, and more.
Similarly, the bottom part contains a variety of options, including:
- Settings: It includes general settings, styling, and advanced options for elements.
- Navigator: This opens a pop-up showcasing a content overview to move elements.
- History: Here, you can view the previous revisions of your current session.
- Responsive Mode: It lets you check your page on different screen sizes.
- Preview Changes: Clicking this option shows a preview of your site separately.
- Save Option: Publish a new page, save it as a draft or a template, or update the page.
Right Side Section
On the other hand, the right side gives a front-end live preview of your webpage. There, you can see the changes you make to the page in real-time. Furthermore, you can add a new section or a template using the given options here.

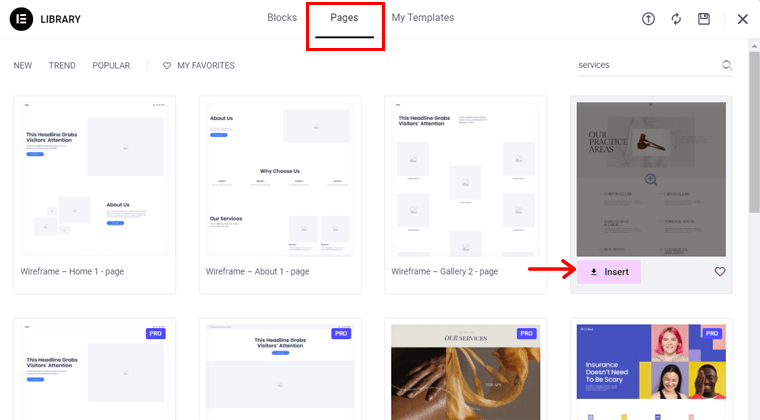
Import a Page Template
Suppose you want a page that doesn’t exist on the site kit. So, you can use a separate template for that page. For that, simply click the ‘Template’ option which has a folder icon.
On the ‘Pages’ tab of the pop-up display, you’ll find several page templates to choose from. Click the ‘Insert’ button of the one you want, and then the ‘Apply’ button. That’s all!
Note: If your website isn’t connected to your Elementor account yet, then you have to do so before inserting a template for the page.
Customize the Pages on Your Site
Next up, let’s see how you can customize your pages. To change the text of the template, press the default text and remove its content. Then, write your content either from the front-end preview on the right or from the ‘Content’ settings on the left.
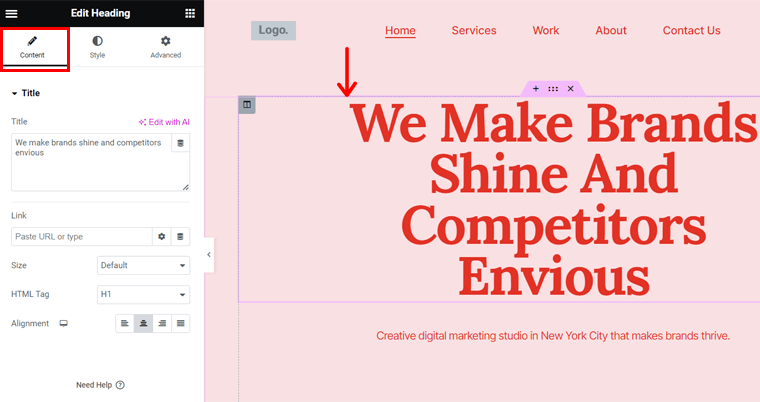
Similarly, you change the images to suit your needs. All you need to do is click the image, and you’ll see the ‘Choose Image’ option on the left. Now, upload your image and press the ‘Insert Media’ option.
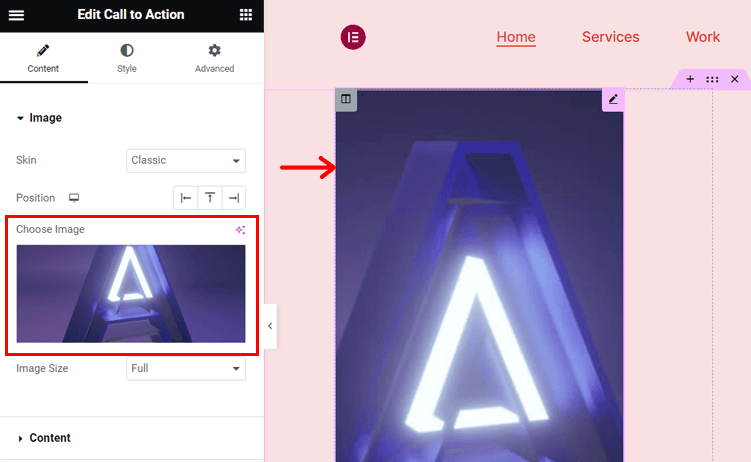
Once you use your content on the page, you can stylize it as you want. For example, when you select a text, you’ll get the ‘Style’ and ‘Advanced’ options for it on the left side. There, you can find options for colors, motion effects, borders, and more.
Add New Sections
Want to create your own sections? For that, click the ‘Add Section’ option of the existing section below the place where you want the new section. Then, click ‘Add a New Section’.
Next, pick your structure from the given options. Based on that, your columns will be created.

Now, you can drag and drop the elements from the left side to these columns. Freely edit and stylize them, as we mentioned before. That’s it!
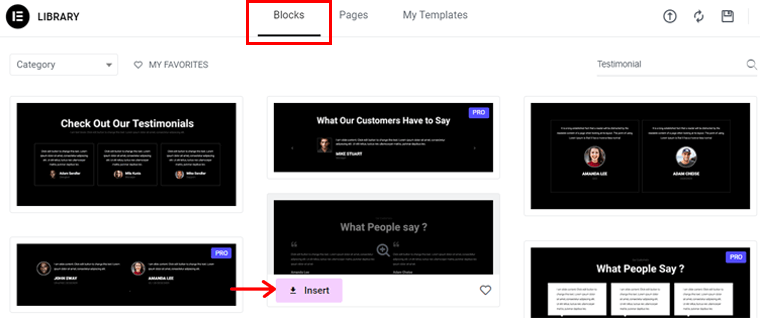
Add Blocks for New Sections
Similarly, suppose you want to add a pre-designed section to your page that’s not present on the template you’re using. Then, you can insert a block.
To do so, you must follow steps similar to those for adding a template. First, press the ‘Add Template’ option and open ‘Blocks’.
Now, filter or search for the block you want. Once you find it, hover over to the block and hit the ‘Insert’ button. All that’s left is to edit and customize the block. That’s all!
Remove a Section
For example, you don’t want a section of the template you’re using. Then, you can remove it from your page. But how do you do it?
Just select the desired section to remove. Afterward, you’ll see a cross sign in the top center. So, click on it, and that section will be deleted from the page. As simple as that.

Importantly, make sure to keep saving the changes you make to the website. For a published page, you should click the ‘Update’ button.
Preview Your Elementor Page
Once you edit and customize a page, click the ‘Preview Changes’ option. This shows your page on a separate tab like this:

Isn’t your page beautiful because you used Elementor? Yes, right?
With that, this completes the necessary steps involved when using Elementor. But our Elementor review doesn’t end here. Find out about its pricing options next!
E. Elementor Pricing Plans: What Are the Options?
Elementor is a freemium page builder plugin for WordPress. Meaning, it has both free and premium pricing options.
For the free plugin, you can download it from the WordPress.org plugin repository. Then, upload it to your admin area. A simpler way is to install the plugin from your dashboard.
Suppose the free features aren’t enough for your WordPress website. In that case, you can buy one of the premium pricing plans. Choose one based on your needs and budget.
- Essential Plan: $59 per year for 1 website
- Expert Plan: $199 per year for 25 websites
- Agency Plan: $399 per year for 1000 websites
In addition, you can get Elementor for 3 websites for $99 per year.
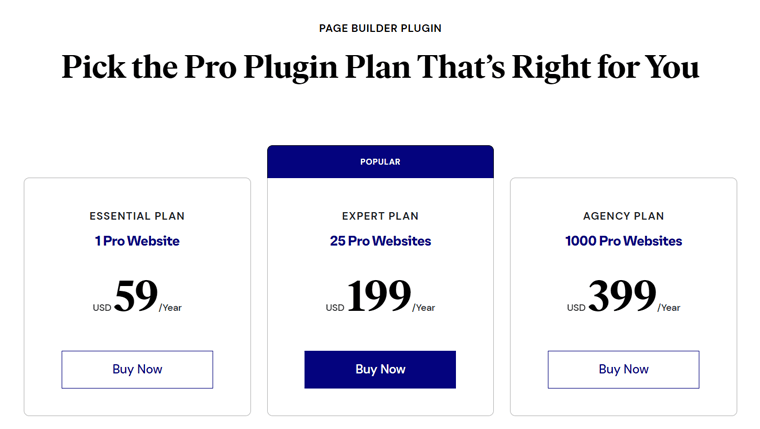
All these plans include the same premium features. Some paid features are the popup builder, motion effects, dynamic content, role manager, etc.
Plus, the premium plans include a 30-day money-back guarantee policy. Simply put, you can get a 100% refund if you decide to discontinue the service within 30 days of purchase.
Learn everything about the Elementor pricing plans on this page.
F. Popular Elementor Add-ons and Extensions
The core Elementor plugin has multiple features for building a website. But suppose you didn’t find a feature you wanted on any plan. Instead of integrating another plugin for that feature, you can add them using the available add-ons and extensions of Elementor.
Simply put, Elementor add-ons and extensions let you extend the plugin functionalities for more elements and features. They can be free, premium, or a combination of both.
So, check out the most popular Elementor add-ons and extensions here!
1. Essential Addons for Elementor
Essential Addons for Elementor is one of the most popular Elementor add-ons, with over 1 million active installations. Exactly, it offers 90+ advanced elements and extensions to easily make attractive WordPress pages and posts.

Further, some free widgets you’ll access are countdown, team members, testimonials, flip boxes, progress bars, etc. Plus, some extensions are scroll to top, table of contents, etc.
Features:
- Integration with Templately gives 4000+ ready-to-use blocks and templates.
- Premium elements include testimonial sliders, content timelines, price menus, etc.
- Some exclusive extensions are content protection, parallax, particles, and more.
- Every element contains options to customize your website in every way possible.
- Lets you enable or disable elements so that your website loads faster and smoother.
- Completely compatible with Flexia, a lightweight and modern WordPress theme.
Pricing:
Essential Addons for Elementor is a freemium add-on. So, you can use the free elements or extensions by downloading the add-on from WordPress.org’s plugin directory. Another way is to install it right from your admin area.
For the premium elements and extensions, you can purchase this add-on by buying one of the following plans:
- 1 Website: $37.48, 80+ widgets, 10+ extensions, Templately Pro (1 month), 1 year of support and updates, etc.
- Unlimited: $74.98, 1 Website plan features, Templately Pro (3 months), and more.
- Lifetime Unlimited: $187.48, Unlimited plan features, lifetime support and updates, Templately Pro (6 months), etc.
2. ElementsKit
A powerful all-in-one addon for Elementor is ElementsKit. It contains 90+ widgets and extensions, like the button, icon box, flip box, image masking, image hover effect, etc.
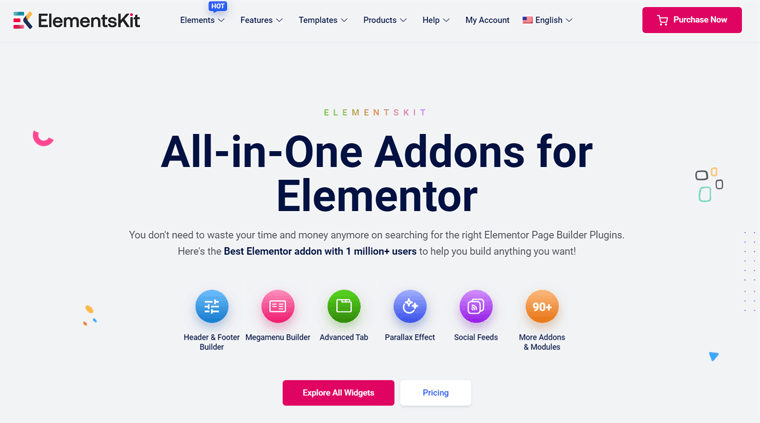
Moreover, it has a layout library that offers 500+ professionally designed blocks and 25+ complete homepages. Using them, you can instantly create beautiful sections of your site.
Features:
- Its header and footer builder lets you easily create custom headers and footers using any element or widget.
- The mega menu builder can make a mega menu with simple lists or off-canvas styles.
- Includes custom controls like multi-widget areas and an image picker. Simply put, a multi-widget area lets you use widgets inside another widget.
- Conditional visibility features can control content visibility by applying conditions.
- With the widget builder, you can create custom widgets for your projects.
Pricing:
ElementsKit is also a freemium add-on with free and premium options. You can download the free add-on from the WordPress.org plugin directory. Or install it right on your website.
If you want the premium features, then purchase one of the following pricing schemes:
- Personal: $35.1 per year, $95.2 for lifetime use, 1 website, 70+ add-ons, 500+ blocks, 25+ homepages, social feeds, etc.
- Professional: $69.6 per year, $181.3 for lifetime use, 5 sites, Personal features, etc.
- Agency: $125.3 per year, $317.85 for lifetime use, unlimited sites, and Professional features.
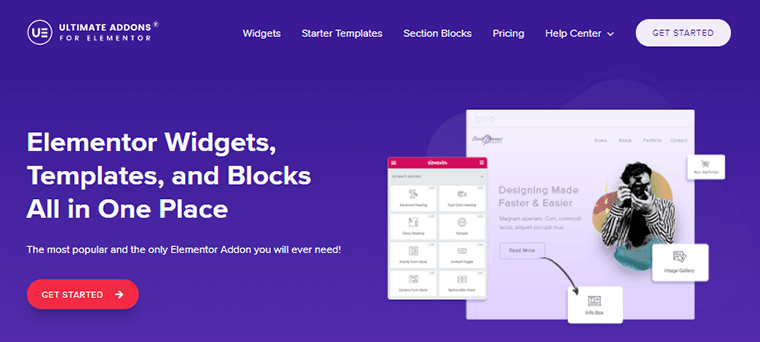
3. Ultimate Addons for Elementor
Last but not least. Ultimate Addons for Elementor is a premium Elementor add-on that provides a complete toolkit for new design options. Exactly, it has 40+ widgets and extensions to take your design abilities to a different level.
Want to know them? Some popular widgets you’ll find are the mega menu, form styler, login form, WooCommerce widget, info box, business hours, etc. All of them are customizable.
Features:
- Contains 100+ templates to speed up your workflow for creating stunning sites.
- Includes 200+ section blocks that you can drag and drop on your site and customize to give it a new look.
- You can add engaging particle animation to your website for animated backgrounds.
- The white-labeling feature can rebrand the addons and state them as yours with full credits.
- Stop repetitive work by reusing the Elementor designs from one site to another. That’s called the cross-site copy-and-paste feature.
Pricing:
Unlike others on this list, Ultimate Addons for Elementor is a premium extension. Meaning, you must purchase a plan to get access to its widgets and extensions.
The pricing plans are:
- Ultimate Addons: $57 per year, $237 for lifetime use, unlimited site usage, etc.
- Essential Bundle: $137 per year, $677 for lifetime use, Ultimate Addons, 110+ templates, Astra Pro, etc.
- Growth Bundle: $187 per year, $937 for lifetime use, Essential Bundle, Convert Pro, Schema Pro, and more.
Moving forward with this Elementor review guide, let’s learn about its customer support options.
G. What Customer Support Options Does Elementor Offer?
Do you have any queries about Elementor that you want to discuss with its team? Then, make sure to check its customer support options.
Elementor provides several customer support options to its users. If you’re using the free plugin, then one way is to post your question in the Support Forum on WordPress.org.
For more options, visit its site and open the Contact page. It contains a list of the available ways to contact the team. Also, you can hover over the Resources menu to find them.
There, opening the Help Center page gives detailed documentation about the plugin. Some categories are forms, widgets, pop-ups, layouts, etc. Also, watch their video tutorials if you want to learn and improve your skills in Elementor.
Similarly, Elementor’s FAQ page contains answers to common questions related to the components of this page builder and billing. Plus, you can visit the Community page to connect with experts for learning, support, and inspiration.

In addition, go through the blog articles and webinar videos to get better knowledge from experts. Last but not least, developers can open this page for explanations of the different Elementor tools.
H. Looking Beyond Elementor: 3 Best Alternatives
Beyond Elementor, some WordPress page builders also stand out for websites. So, if you want to check out the best Elementor alternatives, then have a look at this list.
1. Beaver Builder
Beaver Builder is a clean and straightforward page builder for WordPress websites. It’s known for its lightweight code and minimal impact on page loading times.
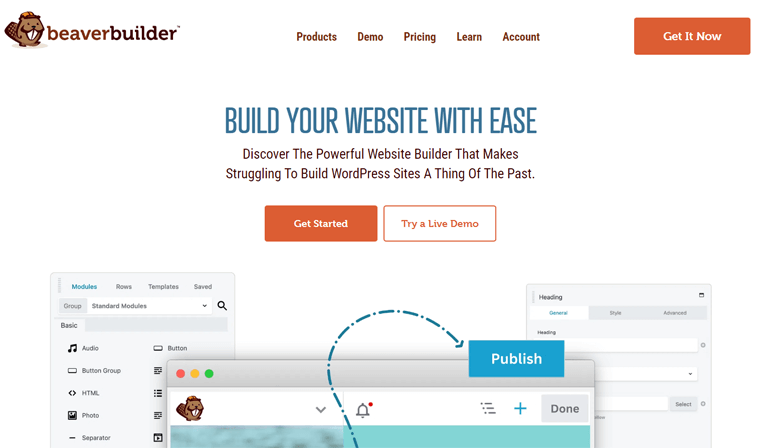
Moreover, this plugin is developer-friendly, as developers can work with custom themes and templates. Also, it’s more compatible with a wide range of themes compared to Elementor. Hence, it’s ideal for freelancers, entrepreneurs, and agencies.
Pricing:
Beaver Builder is a freemium WordPress plugin like Elementor. The free plugin is present in the WordPress.org plugin directory to download and use. Or simply install it on your site.
For exclusive features, get one of the following premium pricing plans:
- Standard: $74 per year, unlimited sites, annual support, and all features.
- Pro: $149 per year, Beaver Builder theme, multisite abilities, and Standard features.
- Agency: $299 per year, white-labeling, and all Pro plan features.
- Ultimate: $409 per year, Beaver Themer Addon, Assistant Pro, and Agency features.
Find the differences between Beaver Builder and Elementor. If you prefer Beaver Builder, then read the complete Beaver Builder review. Also, you can use the best WordPress themes for Beaver Builder and the best Beaver Builder extensions here.
2. Divi
Divi is yet another visual page builder known for its intuitiveness and ease of use. It may be a premium plugin, but it offers a lifetime license, which Elementor doesn’t. Hence, it can be cost-effective for long-term use.

Moreover, Divi offers a vast library of pre-designed layouts and templates. The Divi builder is also highly customizable, with fine-tuned control options. Ultimately, this saves time in your web design process.
Pricing:
Divi is a premium WordPress plugin, unlike Elementor. So, you can choose one of the following pricing plans to unlock its capabilities:
- Yearly Access: $89 per year, site packs, unlimited sites, access to Bloom, Monarch, and Extra.
- Lifetime Access: $249 for lifetime use, lifetime support, and Yearly Access features.
3. WPBakery Page Builder
WPBakery Page Builder is a popular page builder plugin for WordPress websites with a backend and front-end editor. This lets users create and edit content directly from the admin area. So, it’s different from Elementor, which only focuses on the front-end visual editor.
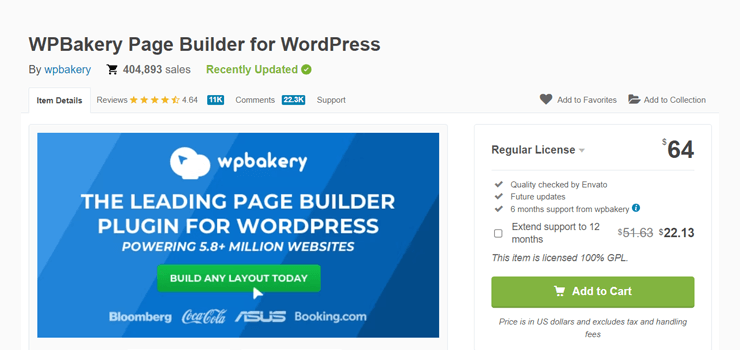
In addition, this page builder contains a large library of predefined elements and templates. Exactly, it contains 50+ premium content elements, 100+ layouts, 200+ 3rd-party add-ons, 40+ grid design templates, etc.
Pricing:
Similar to Divi, WPBakery is a premium page builder. But it’s available to purchase from the CodeCanyon marketplace. The regular price is $64, which includes future updates and 6 months of support.
If you want to extend its support for up to 12 months, then the total cost becomes $86.13.
Final Verdict – Is Elementor the Best WordPress Page Builder?
After reading this Elementor review, you should have a better understanding of the plugin. Hopefully, you can now determine whether it’s the right choice for your business.
In summary, Elementor is an excellent page builder for creating visually appealing and highly customizable web pages. It stands out as a versatile and user-friendly plugin suitable for any business, even without coding experience.
Notably, we recommend starting with the free Elementor plan and exploring its capabilities. Once you’re comfortable with it and see its potential, consider upgrading it to a paid plan.
Further, you can buy a paid plan, keeping its 30-day money-back guarantee policy in mind. So, within 30 days, you can decide whether to continue using a premium plan or not.
Don’t forget to bookmark this blog to keep learning about Elementor.
If you’re a beginner in web design, then read our tutorial on how to make a website from the ground up.
Frequently Asked Questions (FAQs)
Have a look at some FAQs on Elementor review if you still have some basic queries.
1. Is it possible to create custom headers and footers using Elementor?
Yes, you can create custom headers and footers using Elementor. Also, you can visually edit them and add scrolling effects. But you may need a paid plan to access this functionality.
2. What differentiates the free and Pro versions of Elementor?
The main difference between the free and Pro versions of Elementor is the feature set. The paid version offers a more extensive set of motion effects, templates, widgets, etc. Further, it offers advanced features such as the theme builder, the WooCommerce builder, etc.
3. Is Elementor SEO-friendly?
Elementor is one of the fastest WordPress page builders that lets you create engaging pages. This positively impacts your website’s SEO performance. Moreover, it supports integration with several plugins, including the WordPress SEO plugins, for more online visibility.
4. Is there a restriction on the number of pages I can build in Elementor?
There isn’t any restriction on the number of pages you can build with Elementor. You can craft as many pages as your web hosting provider allows. But remember that the speed and performance of your site may be affected by the number of pages.
5. Does Elementor work smoothly with the Gutenberg editor?
Yes, of course. Elementor works smoothly with the Gutenberg editor, which is the default editor for WordPress. You can use Elementor to design and stylize your content sections while still benefiting from the Gutenberg editor functionality.
Conclusion – Elementor Review
And that’s a wrap! We’ve gone through an in-depth Elementor review. Hopefully, Elementor shines as one of the best WordPress page builder plugins.
Overall, its user-friendly interface, extensive customization options, and features empower both beginners and experienced web designers to create stunning sites. Further, its ever-evolving updates and improvements make it a reliable choice for everyone.
If you have any more questions or need further clarification about Elementor, then please reach out to us by leaving a comment below. We’re here to address your queries in this Elementor review.
Did you know Elementor has its own hosting service? Learn about Elementor Hosting in this review article.
In addition, if you enjoy articles like this, then explore our other articles. They are on the best membership plugins for Elementor sites and how to add Instagram feeds to Elementor.
Lastly, stay up-to-date with our latest content by following us on Facebook and Twitter.