Are you wondering how to set up a WooCommerce store and start your own online business? If yes, then don’t go anywhere.
WooCommerce stands out as the most widely used eCommerce platform worldwide. It’s known for its flexibility, cost-effectiveness, and user-friendly interface, even for beginners.
Nevertheless, setting up WooCommerce can be a daunting task for some newcomers. Many individuals find it difficult to begin the initial steps and configure WooCommerce correctly.
In this tutorial, we’ll walk you through the entire process of setting up WooCommerce. Also, you’ll learn various ways to enhance and grow your eCommerce store. So, let’s start!
Advantages of Using WooCommerce for Your eCommerce Store
First, let’s learn the advantages of using WooCommerce for your eCommerce store. Just go through the points below, and you’ll know the reasons behind its significance.
- Cost-effective: WooCommerce is free and open-source, letting you create an online store at no initial cost. Other than free add-ons, paid add-ons are quite affordable.
- Versatile Selling: It allows you to sell a wide range of products. That includes physical, digital, virtual, appointments, reservations, or affiliate products.
- User-Friendly: Using WooCommerce is quite easy. The interface is straightforward, letting you configure options for shipping, payment, and whatnot.
- Extendable Ecosystem: You’ll get many extensions, like memberships, product filters, recurring subscriptions, payment gateways, etc.
- Flexible: Further, this plugin supports various popular WordPress themes and plugins for customizing your online store as you want.
- Commission-free Sales: Unlike Shopify, another well-known eCommerce builder, WooCommerce doesn’t charge commissions, allowing you to keep all earnings.
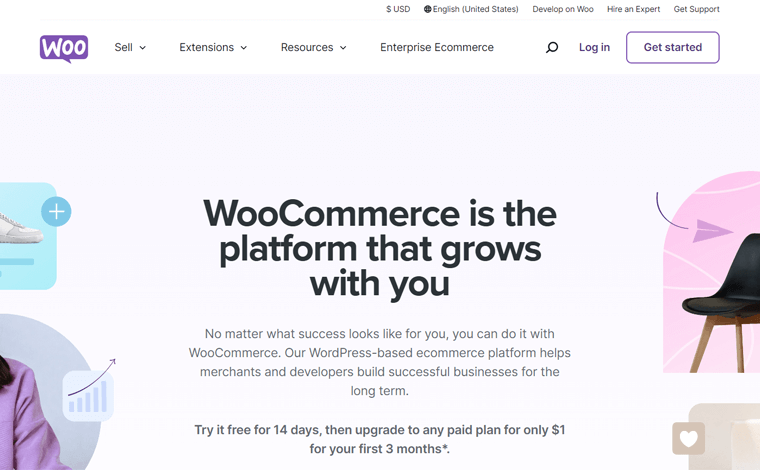
That’s not all! WooCommerce is a powerful WordPress eCommerce plugin to turn your website into a fully functional online store. So, you’ll gain lots of benefits!
For now, let’s move ahead and know the requirements for creating a WooCommerce store.
Essential Things You Need to Create a Functional WooCommerce Store
To make a WooCommerce store from the ground up, you’ll require the following essentials:
- Hosting Account: You must select a secure and reliable web hosting provider that stores your WooCommerce store. It’s better if that’s a WooCommerce hosting plan.
- WooCommerce Plugin: Check if your hosting plan has the WooCommerce plugin. If not, then you must install it to get the eCommerce functions on your WordPress site.
- Domain Name: To make your eCommerce site easily accessible, register a unique and memorable domain name. It denotes the address of your site on the web.
- SSL Certificate: Your WooCommerce store must have an SSL (Secure Sockets Layer) certificate installed. This secures online transactions and customer data.
- eCommerce Model: Select a proper business model for your eCommerce store. It can be business-to-business (B2B), business-to-consumer (B2C), etc.
- Product Types: Based on your eCommerce niche, determine which kinds of products your online store is selling. It can be physical, virtual, services, subscriptions, etc.
- WordPress Theme: Choose a responsive WooCommerce-compatible theme that matches the design and functionality requirements of your store.
Notably, all these components aren’t free and involve monetary costs. The WooCommerce plugin itself is free, but other prerequisites are also essential for creating a website. Hence, depending on your choice of these services, they can be free or premium.
With that, let’s dive into our main section!
How to Set Up a WooCommerce Store? (Step-by-Step)
Creating a functional WooCommerce store involves multiple key steps. For a smooth and successful eCommerce website setup, you must accomplish all these steps.
Without any delay, let’s find out the entire process for how to set up a WooCommerce store!
Step 1: Buy a WooCommerce Hosting Plan
WordPress is a website builder that lets you create any kind of website. After adding the WooCommerce plugin, your website gets the eCommerce features. But it won’t be available to everyone, meaning you must host the website on your own.
So, you must select a web hosting platform that stores your website files and makes them accessible globally. For a WooCommerce website, you can directly pick a hosting service providing a WooCommerce hosting plan. Because it’ll have WooCommerce pre-installed.

However, choosing a web hosting platform is a critical decision. So, you must perform intense research to ensure the solution is ideal for your eCommerce needs.
To guide you on that, we’ll specify the consideration points and recommendations. Let’s go!
How to Pick the Best WooCommerce Hosting Platform?
It’s not enough if your hosting platform is just optimized for WooCommerce. The following points are the different factors you must consider before purchasing a hosting plan:
- Security: Security is crucial for eCommerce websites. So, choose a hosting service that provides security features, such as regular backups, SSL certificates, etc.
- Performance and Speed: Your hosting server must have good performance, SSD storage, and fast loading times so that your store will give a positive user experience.
- Cost: Compare the pricing plans of the different WooCommerce hosting providers. After that, pick a plan that includes the essential features within your budget.
- Uptime Service: Pick a WooCommerce host with an uptime service so that you won’t lose sales. Ensure it has a Service Level Agreement (SLA) with an uptime guarantee.
- Server Location: Check if there’s a server location that’s geographically close to your target audience. This improves page load times for customers in that region.
- Scalability: Ensure your hosting plan can scale as your business grows. A good hosting provider should offer scalable resources for high-traffic and product listings.
Other than that, some other criteria can be support options, user reviews, ease of use, etc. Learn all the factors in our guide on how to select a web hosting platform.
3 Best WooCommerce Hosting Platforms
Now, let’s find out some of the best WooCommerce hosting platforms worth using.
These providers offer a managed WooCommerce hosting solution. With a managed hosting service, you can focus on launching and growing your eCommerce business. Whereas the hosting provider will take care of managing your servers and websites.
But why go for a managed hosting solution? eCommerce websites need to be dynamic and functional. So, we recommend buying a managed hosting service to let you do so.
1. Nexcess WooCommerce
Nexcess is a reliable, fully managed hosting provider with many web hosting solutions for various needs. The Nexcess WooCommerce hosting service is also outstanding for online stores. It provides store design and monitoring tools for enhancing sales performance.
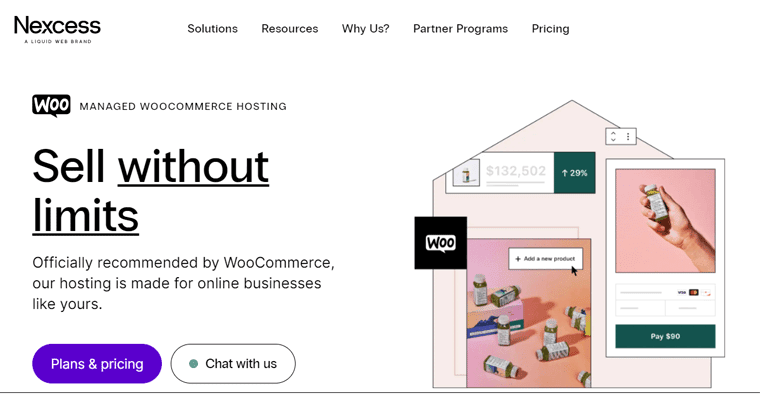
Moreover, you’ll get various performance and security features, like free SSL certificates, automatic daily backups, CDN (Content Delivery Network) service, etc.
Pricing:
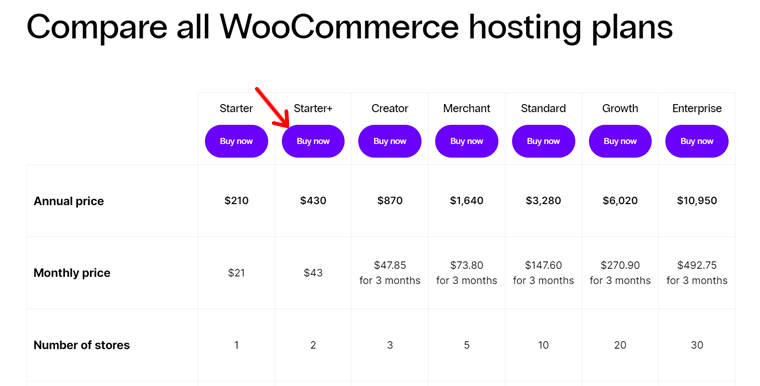
The table below shows the pricing plans for the Nexcess WooCommerce hosting solution:
| Plan / Features | Starter | Starter+ | Creator | Merchant | Standard | Growth | Enterprise |
| Monthly Price | $21 | $43 | $47.85 for 3 months | $73.8 for 3 months | $147.6 for 3 months | $270.9 | $492.75 |
| Annual Price | $210 | $430 | $870 | $1,640 | $3,280 | $6,020 | $10,950 |
| No. of Stores | 1 | 2 | 3 | 5 | 10 | 20 | 30 |
| Bandwidth | 3 TB | 4 TB | 5 TB | 5 TB | 5 TB | 10 TB | 10 TB |
| Storage | 30 GB | 45 GB | 60 GB | 100 GB | 300 GB | 500 GB | 800 GB |
Do you want to learn more about the Nexcess WooCommerce hosting solution? Then, make sure to read out the full review on Nexcess WooCommerce.
2. Kinsta WooCommerce
Kinsta is a popular cloud hosting service provider with managed WordPress and WooCommerce hosting solutions. The Kinsta WooCommerce hosting service ensures your technical requirements are managed. That includes backups, security, caching, etc.
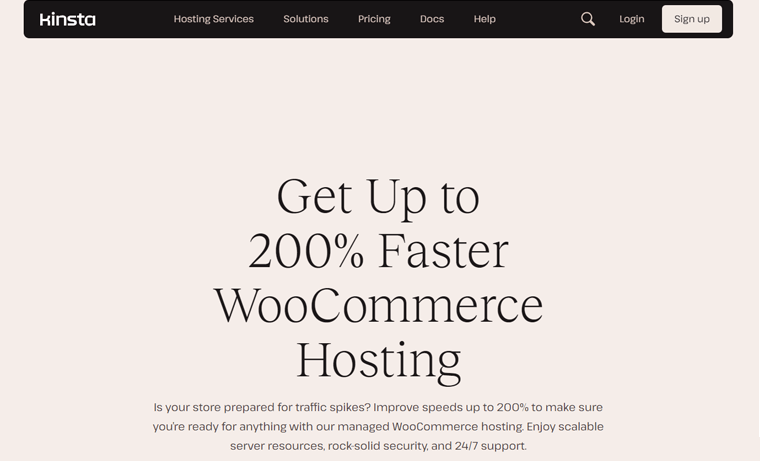
In addition, it comes with an easy-to-use MyKinsta dashboard. There, you can find tools for uptime checks, local development (DevKinsta), staging environments, and whatnot.
What’s more? Kinsta provides rock-solid security for your financial data with Enterprise Cloudflare DDoS (Distributed Denial of Service) and malware protection.
Pricing:
Check out the pricing schemes of Kinsta’s WooCommerce hosting solution below:
| Plan / Features | Starter | Pro | Business 1 | Business 2 | Business 3 | Business 4 |
| Price Per Month | $24 | $47 | $77 | $150 | $227 | $300 |
| Price Per Year | $350 | $700 | $1150 | $2250 | $3400 | $4500 |
| No. of Site(s) | 1 | 2 | 5 | 10 | 20 | 40 |
| Visits Per Month | 25K | 50K | 100K | 250K | 400K | 600K |
| Storage | 10 GB | 20 GB | 30 GB | 40 GB | 50 GB | 60 GB |
Thinking about using Kinsta for your WooCommerce store? Then, learn everything about it in our Kinsta hosting review.
3. Pressable
A trustworthy hosting provider for building stable WooCommerce stores is Pressable. It offers excellent support, security, and performance features. Each plan comes with Jetpack Security Daily for enhanced security and performance optimization.
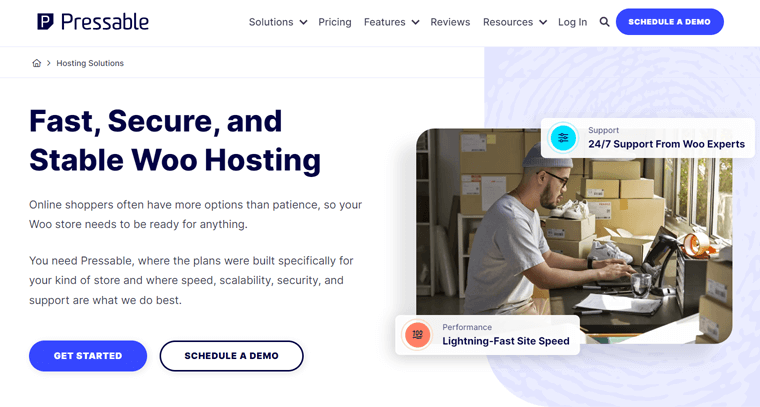
Additionally, it has a global CDN and caching service present in 28 locations. Ultimately, your websites will load at lightning-fast speed at your target locations.
Pricing:
Find out the most suitable plan for your online shop among the following Pressable plans:
| Plan | Personal | Starter | Advanced | Pro | Premium | Business | Business 80 | Business 100 |
| Price Per Year | $250 | $450 | $600 | $900 | $1550 | $3500 | $5450 | $6750 |
| Price Per Month | $25 | $45 | $60 | $90 | $155 | $350 | $545 | $675 |
| WordPress Installs | 1 | 3 | 5 | 10 | 20 | 50 | 80 | 100 |
| Monthly Visits | 30K | 50K | 75K | 150K | 400K | 1M | 1.6M | 2M |
| Storage | 20 GB | 30 GB | 35 GB | 50 GB | 80 GB | 200 GB | 275 GB | 325 GB |
Confused if Pressable is the best choice for your website? Then, here’s a complete review of Pressable that you shouldn’t miss out on.
Our Recommendation – Nexcess WooCommerce
Among all the other hosting providers, we recommend using Nexcess WooCommerce for your online store. But why? Here are a bunch of reasons to support our statement:
- Free Object Cache Pro quickly loads your products and provides a smooth checkout.
- The plugin performance monitor tool looks after your store’s performance, page weight, and load times once a plugin is installed or updated.
- WooCommerce Automated Testing runs the store’s functionality checks nightly.
- The sales performance monitor tool gives weekly insights to your inbox about sales trends, slow site speed, etc.
- Offers top-quality plugins like Solid Security Pro and Iconic WP plugins to add lots of value to your online store.
- Offers premium themes, such as Astra Pro, Qubely Pro, and more. Also, free Kadence pre-installed.
- Glew.io Analytics is an advanced analytics tool with features like data visualization.
- With auto-scaling, your store will work even during sudden traffic spikes.
- You can visually compare 2 versions of your store to find out and resolve bugs.
- Automates image compression and lazy loading to improve the site’s performance.
In summary, Nexcess WooCommerce provides several features, tools, and premium features for your eCommerce website in one place. Overall, they boost your store’s performance, scalability, security, and whatnot.
Hence, it’s an ideal choice for streamlined and efficient eCommerce operations. So, we’ll be using Nexcess for our further steps!
How to Purchase and Get Started with Nexcess?
To purchase a Nexcess WooCommerce hosting plan, there are a series of steps to follow. Go through them carefully.
Step i: Select a WooCommerce Hosting Plan
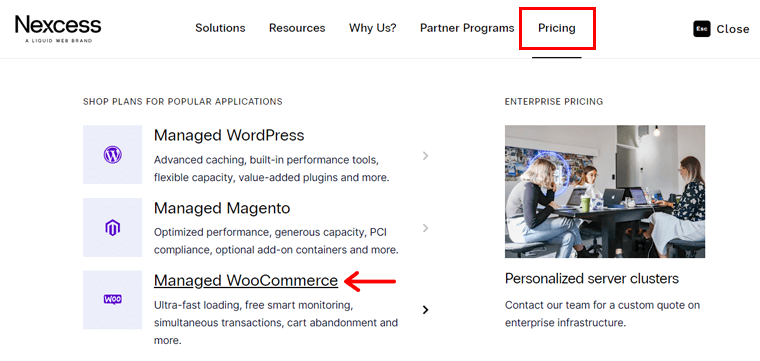
First, open the official website of Nexcess and click the ‘Pricing’ menu in the navigation. Then, press the ‘Managed WooCommerce’ option.
Once you land on the desired page, carefully view all the pricing schemes. After you make a choice, click the ‘Buy now’ button on that plan.
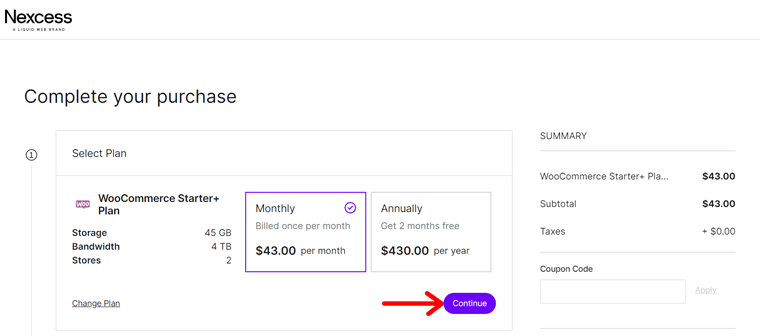
Step ii: Complete the Purchase Process
Moving forward, the checkout page opens up. There, you can pick the annual or monthly plan and click ‘Continue’.
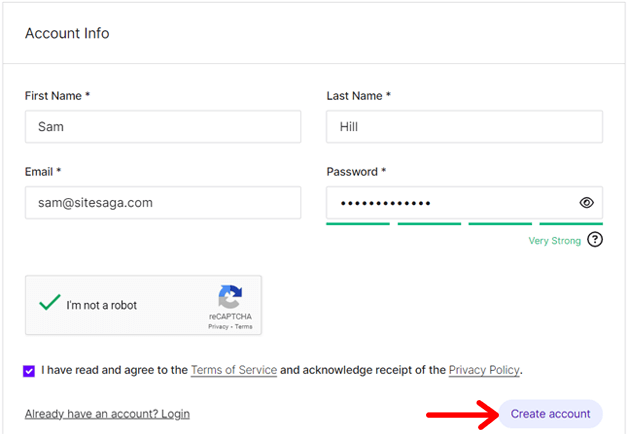
Afterward, fill in your account information if you’re a new user. Then, click the ‘Create Account’ button. If you already have an account, then login directly from the given option.
Following that, you must mention your billing address and enter the payment information. Also, don’t forget to select a suitable server location. Keep on saving the new details by clicking the ‘Continue’ button.

Next, you can review your order details once. Plus, you can insert a coupon code if you’ve got one. Lastly, hit the ‘Complete Purchase’ button.
Then, you’ll get an order completion email with your portal link and account information.
Step iii: Getting Started with Nexcess Portal
When you log into your Nexcess portal, you can find your plan getting created and WooCommerce is installed on the ‘Plans’ menu. After the process is completed, you’ll get another email about the successful Nexcess plan activation and WooCommerce installation.
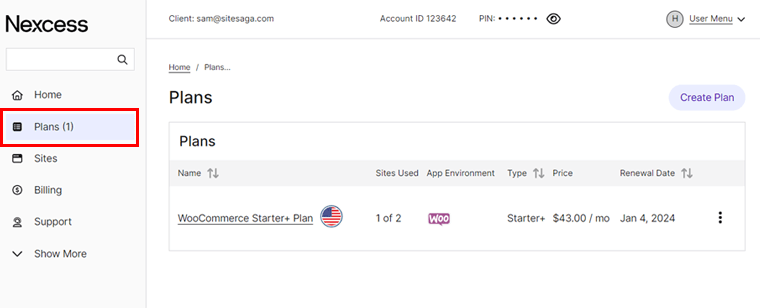
Notably, Nexcess automatically sets up a WooCommerce site on its own after the purchase. So, within the plan, you can find your new website.
Best of all, you can change the website name and configure its settings as you wish. But the most important part is to add a custom domain name. Learn about it next!
Step 2: Get Your WooCommerce Store Domain
Importantly, you must get a domain for your WooCommerce store. A domain is the name of your website that people type in the address bar of their browser to access your website.
Notably, a domain has 2 parts, a Top-level Domain (TLD) and a Second-level Domain (SLD). Here, SLD is the name of your website, while TLD is the extension or suffix.
For example, on our website ‘SiteSaga.com’, ‘SiteSaga’ is the SLD and ‘.com’ is the TLD.

About how and where to get a domain name, keep reading to learn everything. Here we go!
How to Choose a Domain Name?
Now that we know about domains, you may be wondering how to get one for your store. So, let’s get to know some crucial tips to help you pick the perfect domain name for your WooCommerce store.
| Reason | Description |
| Relevance to Your Business | Your domain should reflect your business or the products you sell. This makes it easier for customers to understand what your WooCommerce store is about. |
| Use Keywords | Include relevant keywords that people may use when searching for products similar to yours. This improves SEO (Search Engine Optimization). |
| Keep it Short and Simple | Make sure your domain is short, easy-to-spell, memorable, and user-friendly. This reduces the chances of mistyping and misspelling it. |
| Avoid Numbers and Hyphens | Remember that you shouldn’t use numbers, hyphens, or any other complex characters in your domain. This only results in mistyping. |
| Think Long-term | Select a domain name that matches your brand, even if it expands. Also, check if it’s available on major social media platforms for consistency. |
| Select the Right Extension | ‘.com’ is the most popular domain extension that you can use. Other than that, you can select the ones specialized for eCommerce sites, like ‘.store’. |
Hence, your website’s domain must be unique and closely related to your brand. It plays a crucial role in distinguishing your website from others.
Also, a memorable domain makes it easier for people to locate and revisit your website. So, choosing a domain name for your store is a vital step in forming your online presence.
Get a detailed guide on how to choose a domain name here! Still confused about choosing a domain? Then, take help from the best free domain name generators. These tools automatically generates domain ideas based on your keywords.
Where to Get a Domain Name?
Just deciding on a domain name for your site isn’t enough; you must check its availability and register it to make it yours. Moreover, you can get the domain name in many ways.
1. Domain Registrars
A domain registrar is a business that sells domains, or a company where you can register a domain for your website. They don’t just manage domain reservations but also assign IP addresses for those domains.
Some popular domain registrars are Namecheap, GoDaddy, Domain.com, Hostinger, etc. Find all the best domain registrars on this list to go with the most suitable one.
Further, you can find platforms that provide both domain registration and hosting services. In fact, Nexcess also offers domain name services. So, you can either register a domain with Nexcess or buy it from Namecheap.
2. Web Hosting Providers
Did you know? Multiple hosting providers also provide domain registration services. Using such a host, you don’t have to look for a different platform to get a domain for your store.
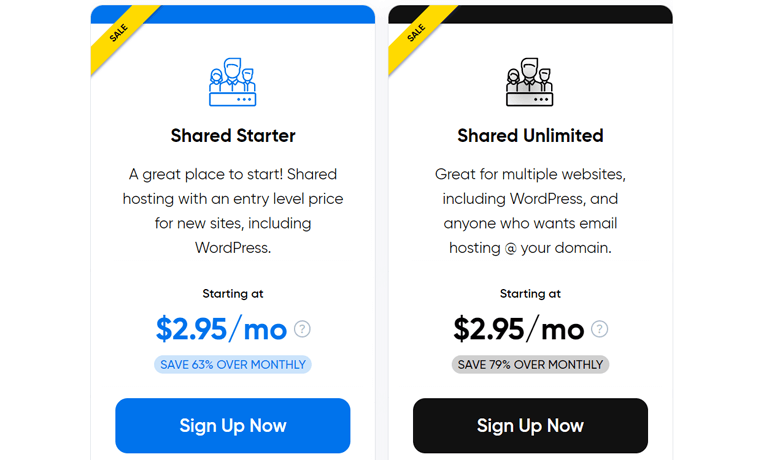
In addition, some web hosting services offer a free domain (for the 1st year when you sign up for hosting). One example is DreamHost. Its shared starter hosting plan costs $2.95 per month billed annually, and includes a free domain to be used within the first 3 months.
However, a managed hosting platform is what we suggest for your WooCommerce store. Because they have more speed, security, and performance features. For example, Nexcess.
So, you can go with a managed host and use a separate domain registrar. Or, use Nexcess not just for hosting your online shop, but also for domain registration.
How to Change the Domain Name on Nexcess?
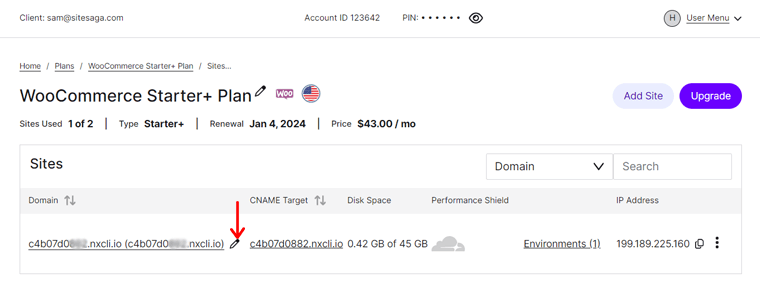
To change the domain of your Nexcess WooCommerce store, click the ‘Plans’ menu in the control area first. Then, open your WooCommerce plan.
When you see your website on the list, click its pencil icon, which redirects you to the domain configuration section.
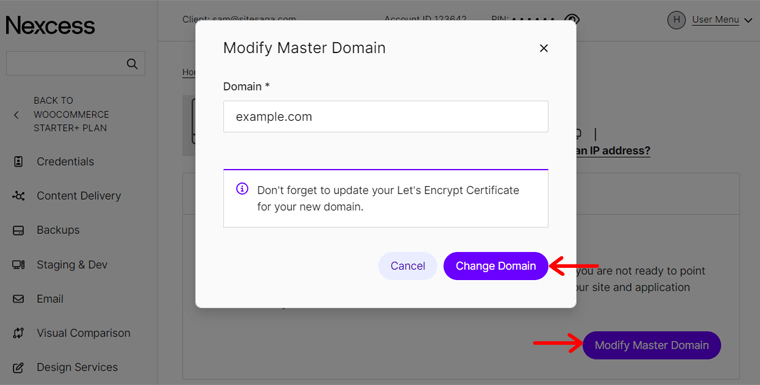
Here, click the ‘Modify Master Domain’ button and insert the new domain. Don’t forget to hit the ‘Change Domain’ button.
Once you do that, you must update your SSL certificate, clear the cache, and test the website. Learn how to do so from this documentation.
How to Open Your WordPress Dashboard?
Delightfully, a WordPress website is already built when using Nexcess. So, after you alter the domain, you can directly log into your website dashboard.
To do so, click on your website inside the chosen plan and you’ll be redirected to the ‘Credentials’ menu. There, you’ll find the ‘Site Login’ button that you must click.
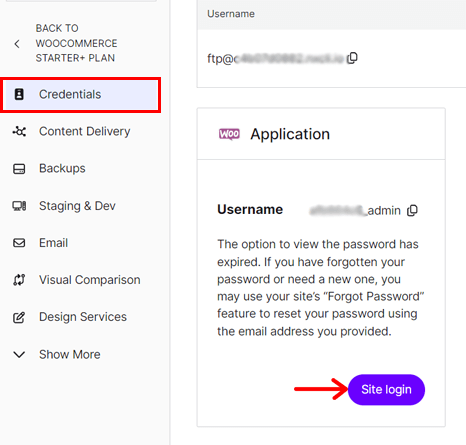
Now, the login page opens, where you must enter the username and password. These credentials are all defined back on your Nexcess panel. Once you enter the credentials, click on the ‘Log In’ button, and there you go, your WordPress dashboard is in front of you.
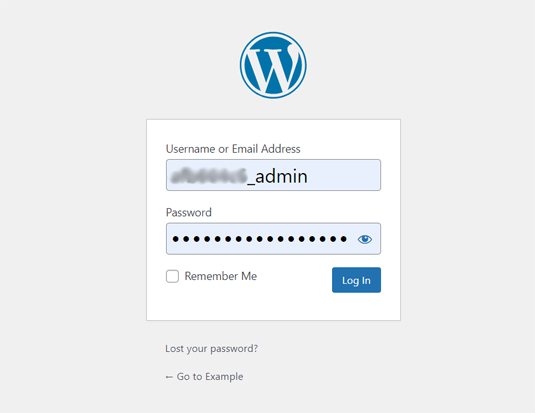
Here’s a quick process of how to log into your WordPress dashboard.
Step 3: Install a WooCommerce Theme
Once you’ve secured top-notch hosting and a compelling domain, the next crucial step is to pick a theme. Also, you must design your site in alignment with your business needs.
Imagine walking into a retail store where the products are haphazardly displayed. In such a scenario, you’ll quickly leave the store, won’t you?
Similarly, a professional and enticing design is necessary for your online shop to captivate visitors. So, your store should nicely showcase the products for a positive user experience.
That’s how your WordPress theme will provide the entire outlook for your website.
In this step, we’ll help you set up a WooCommerce store by choosing and installing a suitable theme. So, let’s get rolling!
How to Select the Best WooCommerce Theme?
First, you must compare all the WooCommerce themes based on your requirements. For instance, appearance and functionality. Then, choose the perfect one among them.
To help you out, these are the various factors to keep in mind when selecting your theme:
- WooCommerce Compatibility: Ensure that the theme is specially designed for WooCommerce stores. It must be compatible with the latest WooCommerce version.
- Responsive Design: Many users access online stores via mobile devices. So, your theme should have a responsive design for a consistent and user-friendly experience.
- Easy Customization Options: Pick a theme with the right balance of customization options and easiness. So, ensure its design elements don’t require coding skills.
- Seamless Integration with Plugins and Extensions: Check if the theme supports WordPress plugins and WooCommerce extensions you’ll use on your online store.
- Speed and SEO: Further, your theme mustn’t affect the site’s speed. Also, it must have built-in SEO optimization. This improves the site’s performance and ranking.
Apart from these guidelines, some include support materials, demo content, user reviews, cost, social media integration, etc. Here’s a complete article on how to select a theme.
3 Best WooCommerce Themes
Are you aware that you can get a WooCommerce theme in many ways? WooCommerce itself has a theme store with around 80 themes from different categories and industries. Some eCommerce niches include food and drink, fashion and apparel, etc.
In the official WordPress theme repository, you’ll find hundreds of free eCommerce themes. Most of which have a premium version available on the theme’s original website.
Additionally, there are several marketplaces selling premium WordPress themes. They are ThemeForest, Themify, etc.
Among a long list of WooCommerce-compatible themes, here’s a shortlist of the best ones we recommend. So, let’s dive in!
1. Kadence
Kadence is a popular multi-purpose WordPress theme catering to the needs of various website owners, including eCommerce businesses. It includes eCommerce templates suitable if you own a clothing store, coffee shop, restaurant, etc.
Moreover, it has shopping cart functionality. Due to this, it becomes easy for you and your visitors to navigate what’s in the shopping cart.
A premium plan also offers a shop kit with 15+ powerful modules. Some of them are advanced reviews, variation galleries, variation swatches, product brands, etc.
Pricing:
Kadence is a free WordPress theme with premium add-ons and bundles. You can download the free theme from the WordPress.org theme repository and upload it to your website. Otherwise, directly installing the theme from the dashboard is also possible.
If you want access to the paid features, then buy one of these Kadence pricing schemes:
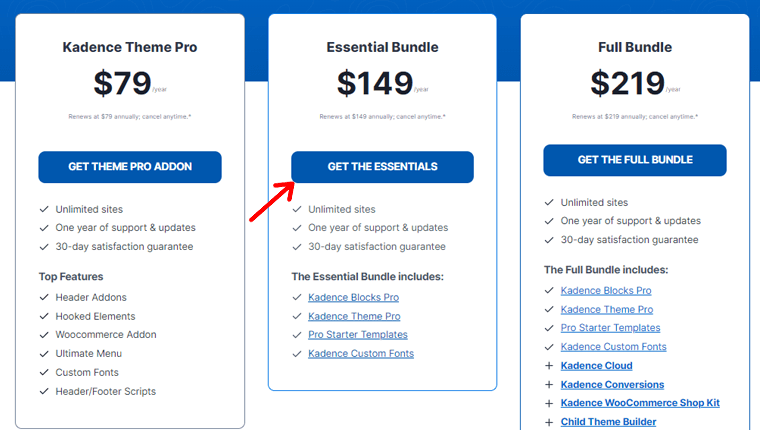
- Kadence Theme Pro: $79 per year, unlimited sites, WooCommerce add-on, etc.
- Essential Bundle: $149 per year, Kadence Theme Pro, pro starter templates, etc.
- Full Bundle: $219 per year, Essential Bundle, WooCommerce shop kit, and more.
Want to explore more about Kadence? If yes, then read our honest Kadence theme review.
2. Neve
If you’re looking for a mobile-optimized WordPress theme, then choose Neve. This theme is mobile-ready and AMP (Accelerated Mobile Pages) compatible, making your online shop look good and work smoothly on every device.
Additionally, it offers WooCommerce features like quick view, sticky cart, product gallery slider, wishlist, etc. Further, you can find multiple WooCommerce templates that you can import and use for your website.
Pricing:
Neve is also a freemium WordPress theme, with both free and premium plans available. To get the free version, simply download it from WordPress.org’s theme directory or install it from your WordPress dashboard.
Suppose the free features aren’t enough for your online store. Then, here are the premium Neve pricing plans you can buy:
- Personal: $69 per year, unlimited sites, header booster, 1 year of support, etc.
- Business: $149 per year, Personal plan features, WooCommerce Booster, premium starter sites, and more.
- Agency: $259 per year, Business plan features, Otter Pro, white label support, etc.
Read our detailed review of the Neve theme to learn everything about it.
3. Storefront
Do you want to use an eCommerce theme designed by WooCommerce? If yes, then go with Storefront.
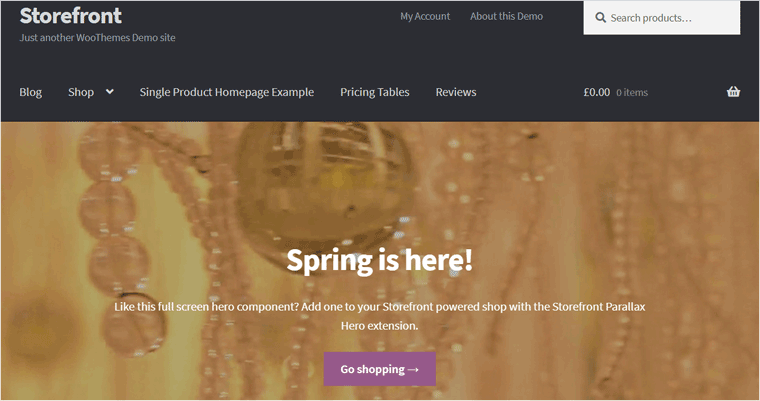
Storefront is a free WooCommerce theme offering deep integration with WooCommerce and WooCommerce extensions. It lets you create an eCommerce-focused homepage with sections like recent, featured, on-sale, and top-rated products.
In addition, this theme follows accessibility guidelines. Ultimately, your store will be accessible to a larger group of audiences.
Pricing:
Storefront is a completely free WooCommerce theme. So, you can either download it from WordPress.org’s theme repository or the WooCommerce theme store and upload it to your site. Another way is to install it right in the admin area.
Our Recommendation – Kadence
Among all the WooCommerce themes, we recommend using Kadence for your online store. Check out the list below to find out the reasons:
- The Kadence Blocks plugin provides several advanced and custom blocks.
- The Kadence Shop Kit provides several modules for extra store functionality.
- Kadence Conversions lets you boost sales and engage customers in your store.
- With Kadence Galleries, create beautiful product galleries and albums.
- Easy social sharing function to let customers share your products on platforms.
- Its email designer allows you to edit the custom WooCommerce email templates.
- Google CAPTCHA addition is possible to WooCommerce review forms, etc.
Best of all, Kadence and Nexcess are from the same company, so the free Kadence theme is automatically installed on your dashboard.
Also, we recommend using its Full Bundle. Why? Because you’ll access all its current and future products in one package.
How to Install Your Chosen eCommerce Theme?
Once you choose your theme, you can install it on your website. The process of doing that is almost the same for all the themes. So, let’s go through the steps of installing Kadence.
1. Free Kadence Installation
First, let’s have a look at the installation process for the free theme.
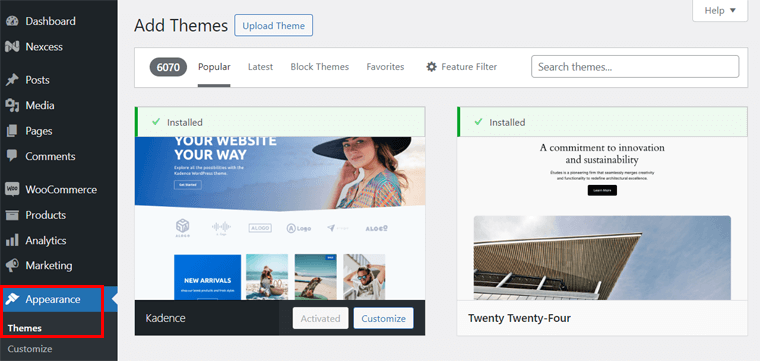
For that, log into your WordPress dashboard and navigate to the ‘Appearance > Themes > Add New Theme’ option.
There, search for ‘Kadence’ and click the ‘Install’ button once you find it. Afterward, click the ‘Activate’ button to make the theme run on your website.
Because your Nexcess WooCommerce plan already does that for you, here’s how it looks:
For a detailed guide on how to install a WordPress theme, check out this article.
Surprisingly, your Nexcess hosting may have already installed Kadence on your website. In that case, you don’t have to do the steps manually.
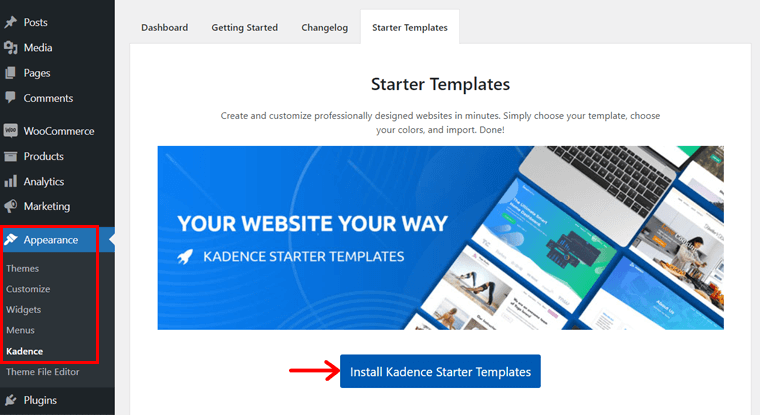
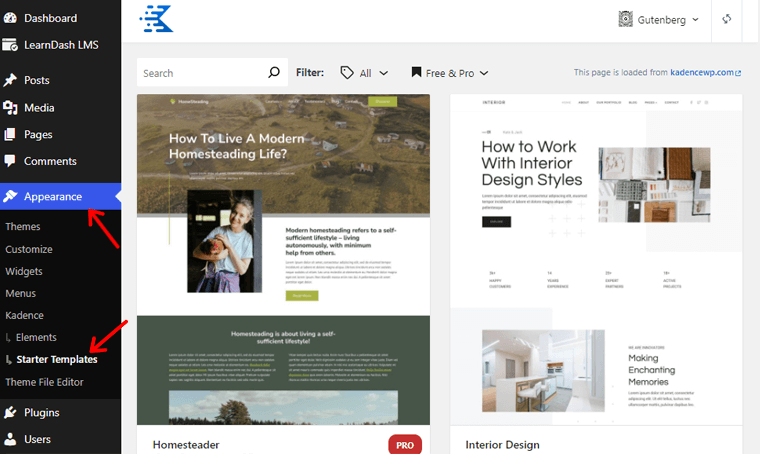
However, you must install the Kadence starter templates plugin if you don’t want to start eCommerce site creation from scratch.
For that, go to the ‘Appearance > Kadence > Starter Templates’ option. There, click on the ‘Install Kadence Starter Templates’ button.
2. Premium Kadence Installation
Now, we’ll guide you through the process of purchasing and using a Kadence bundle (For example – Essential Bundle). So, carefully follow the steps below:
Step i: Purchasing the Kadence Essential Bundle
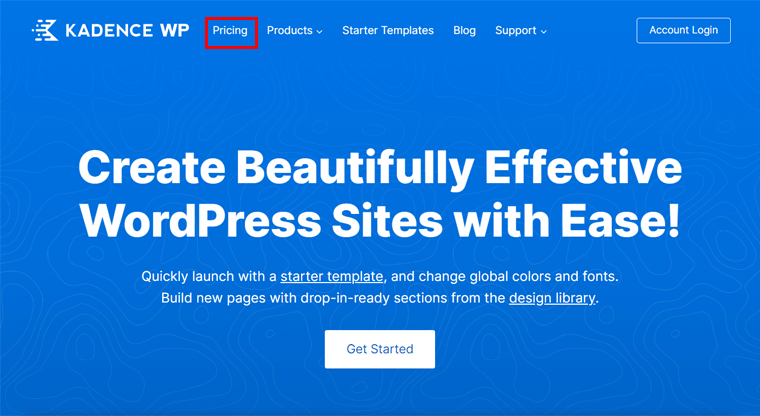
First and foremost, open the Kadence website and click the ‘Pricing’ menu.
Among the given pricing plans, select the one you want. As per our recommendation, let’s click the ‘Get the Essentials’ button on the bundle.
This redirects you to the checkout page. Here, either log into your Kadence account if you have one. Otherwise, enter the email address to create a new one.
Following that, enter your billing information and payment details. Don’t forget to agree with the terms and conditions before clicking on the ‘Place Order’ button.

After the purchase is successful, open the ‘Accounts’ menu on the navigation. In that dashboard, go to the ‘Product Downloads’ option. There, you can download all the necessary premium options.
For now, let’s click the ‘Download’ button for the Kadence Pro Plugin and Kadence Blocks Pro.
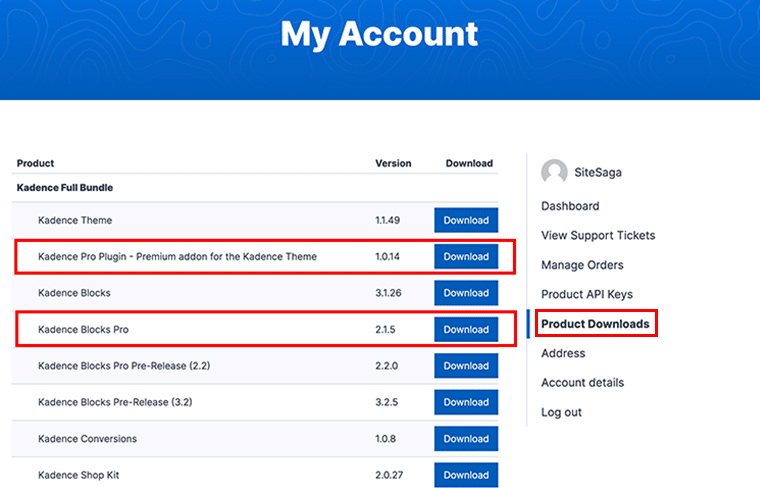
Similarly, you must find the license key for activating these plugins. So, open the ‘Product API Keys’ menu on the sidebar. Then, copy and save the license keys for the products.

Step ii: Installing the Kadence Pro
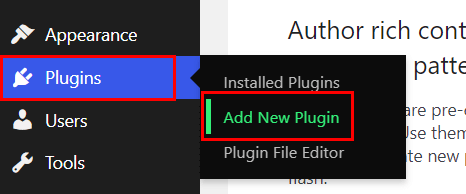
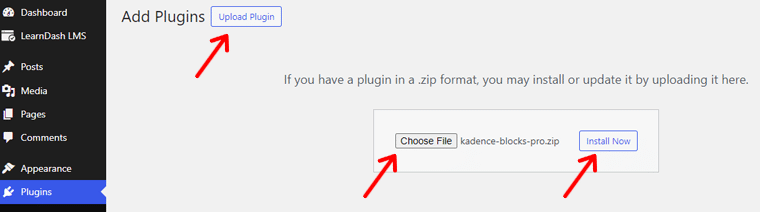
Moving forward, ensure that your site has the free Kadence theme, which is compulsory. After that, start the Kadence Pro installation. So, navigate to ‘Plugins > Add New Plugin’. Yes, Kadence Pro is an add-on or plugin for the theme.
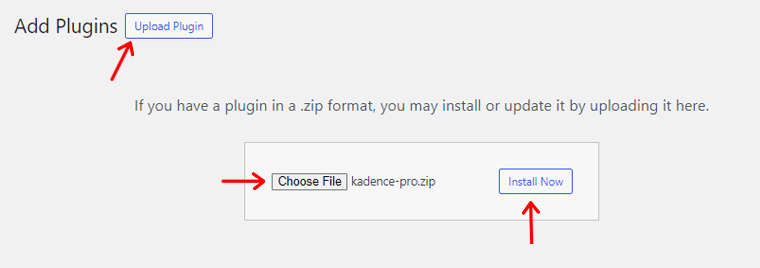
Next, click the ‘Upload Plugin’ button and then the ‘Choose File’ button. Afterward, upload the plugin folder and hit the ‘Install Now’ button.
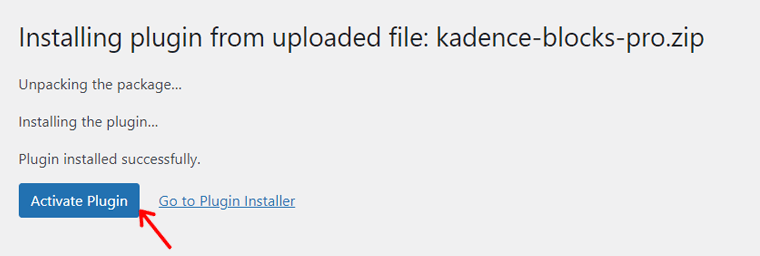
Once the installation is complete, click on the ‘Activate Plugin’ button as shown below.
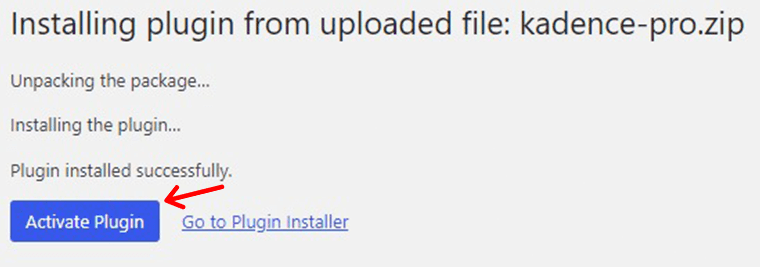
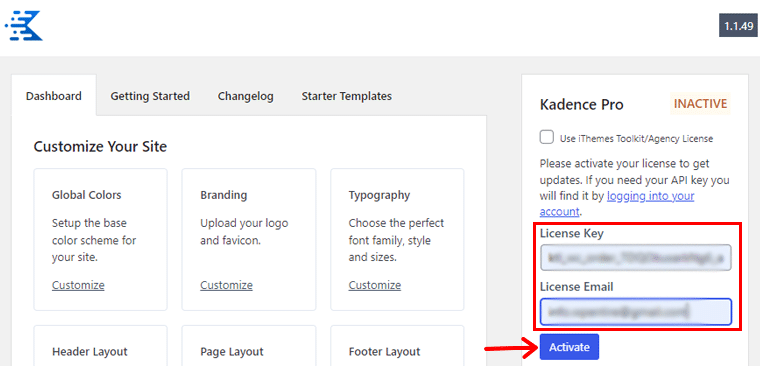
As per the notice, you must also activate the premium features using the license key. So, press the ‘Click here’ option, which will redirect you to a different location.

There, enter the license key and license email. Then, click the ‘Activate’ button. After a successful process, an ‘Active’ message will show up for Kadence Pro.
That’s all about installing Kadence Pro for premium theme features. Here’s a complete guide on how to install a WordPress plugin.
Import and Personalize Your Store Template
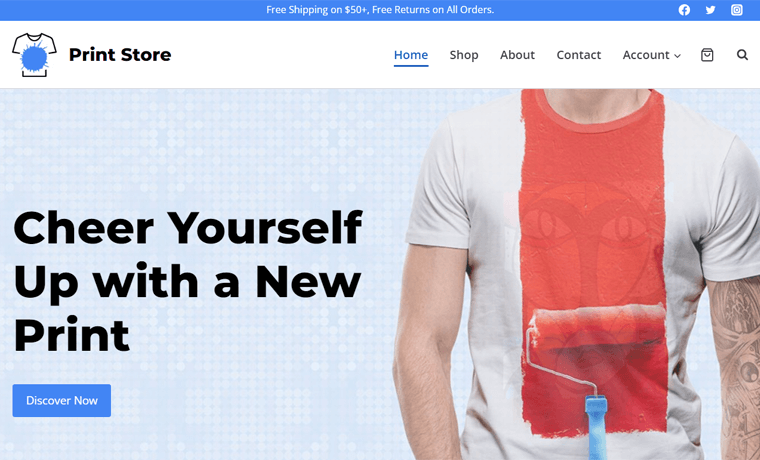
Now, let’s move ahead by taking reference of an eCommerce website. A popular eCommerce site that we can show the creation process of is Benjamin Hardman Studio.

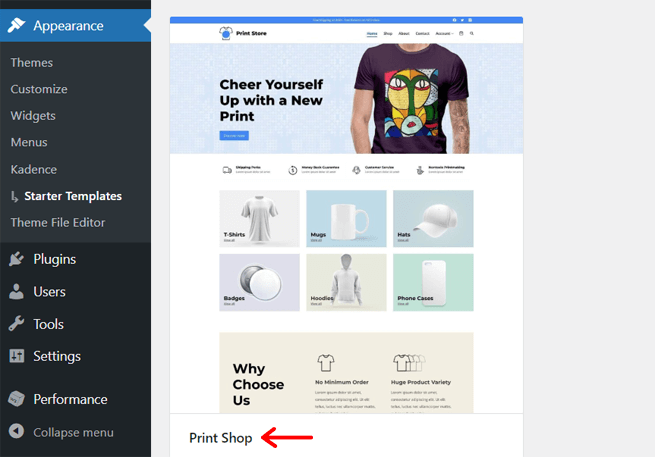
So by using Kadence, let’s import a suitable starter template for the WooCommerce store. First, navigate to the ‘Appearance > Kadence > Starter Templates’ menu.
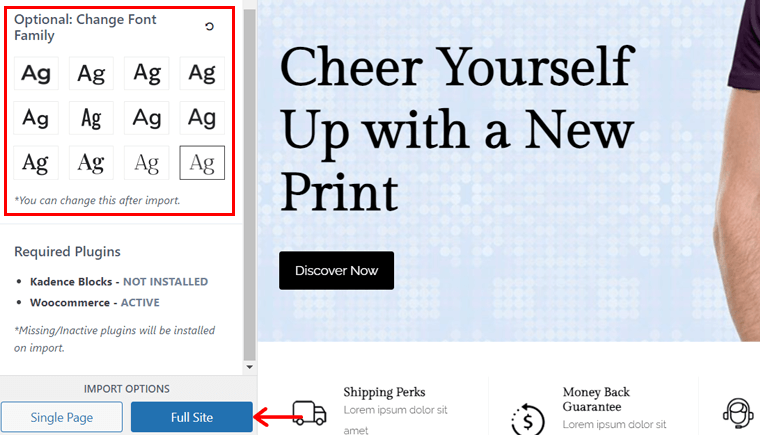
With that, pick a template you want, which can be free or paid. Here, let’s go with a free eCommerce template called Print Shop that has a similar design to that of our desired site.
Now, you’ll have multiple customization options to choose from. First, pick the color scheme among the given options. Notably, you can change the colors after template import.
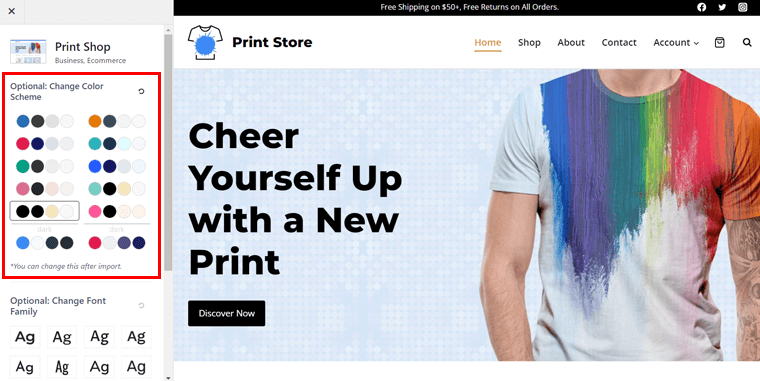
Below that, you’ll find multiple font family options, so choose a suitable font for the site. In addition, your template may require you to install some plugins, such as Kadence Block. So, during the insertion of the template, the free plugins get automatically installed.
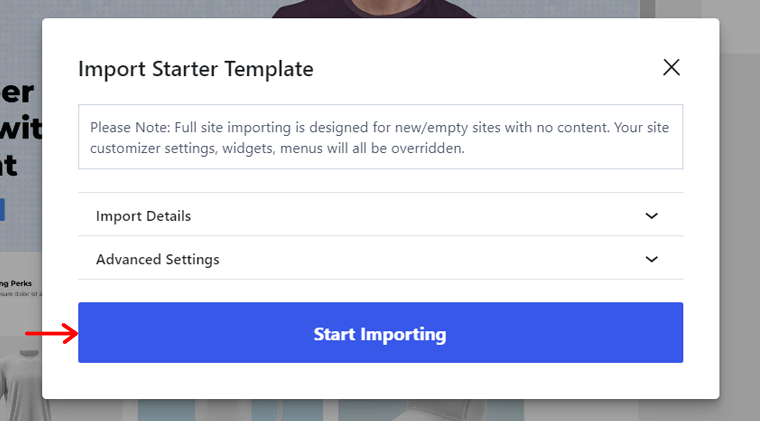
Following that, you can find 2 options, namely Single Page and Full Site. In our case, let’s select the ‘Full Site’ button.
This opens a popup window, where you must click the ‘Start Importing’ button.
For now, let’s stop the site customization process and do it after setting up WooCommerce. However, you can install the Kadence Blocks Pro plugin for more features and use it later.
Install Kadence Blocks Pro
The installation process of Kadence Blocks Pro is similar to that of Kadence Pro. You must navigate to the ‘Plugins > Add New Plugin > Upload Plugin’ button.
There, press the ‘Choose File’ button and upload the ‘Kadence Blocks Pro’ file. Next, click the ‘Install Now’ button.
Later, click the ‘Activate Plugin’ button to activate this premium plugin.
Similarly, press the ‘Click here to activate’ option present on the notice.
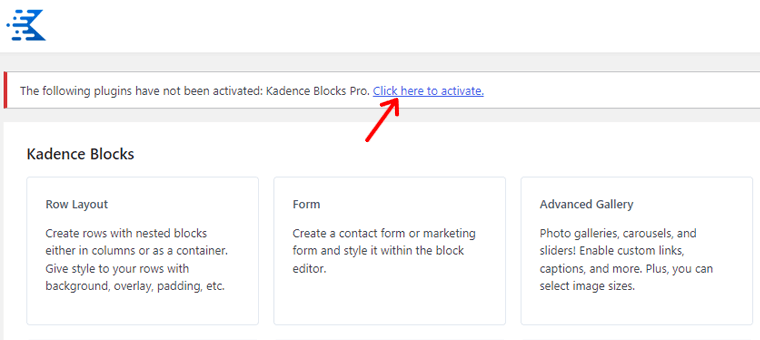
Now, insert the license key and license email for that plugin. Lastly, hit the ‘Activate’ button.

With that, let’s get into the WooCommerce plugin configuration process.
Step 4: Set Up the WooCommerce Plugin
Delightfully, WooCommerce is auto-installed in your Nexcess-powered online store. So, you can directly begin its configuration.
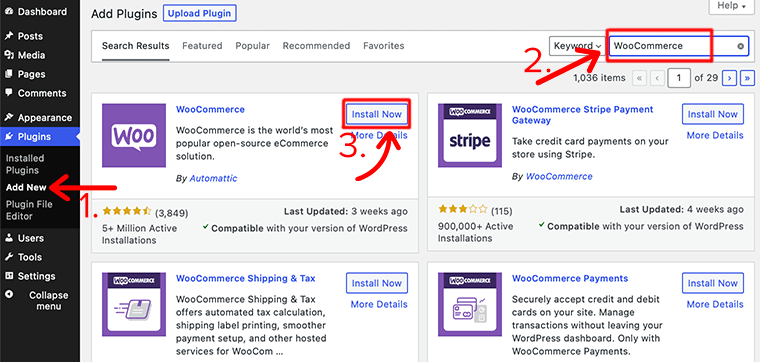
For other web hosting plans without this functionality, you must install WooCommerce first. In simpler words, navigate to the ‘Plugins > Add New Plugin’ menu.
There, search for ‘WooCommerce’, and once you find it, click the ‘Install Now’ button. After a while, also press the ‘Activate’ button.
With that, please follow the steps below on how to set up a WooCommerce store.
Using Setup Wizard
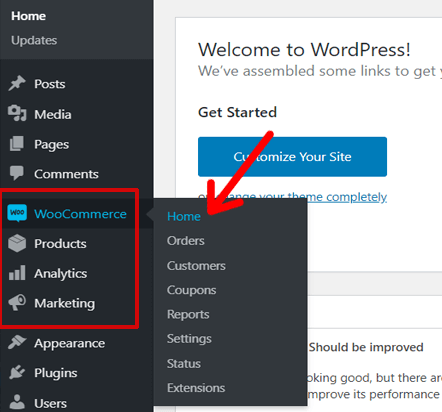
First, visit the ‘WooCommerce’ menu on the dashboard or navigate ‘WooCommerce > Home’.
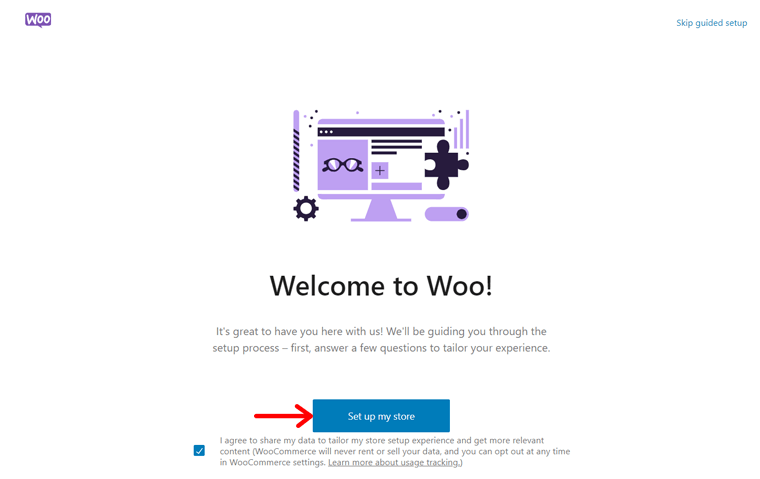
This opens the setup wizard. There, click the ‘Setup my store’ button.
Moreover, you must describe your business, whether it’s new, already selling, or for a client. After you make the choice, click the ‘Continue’ button.
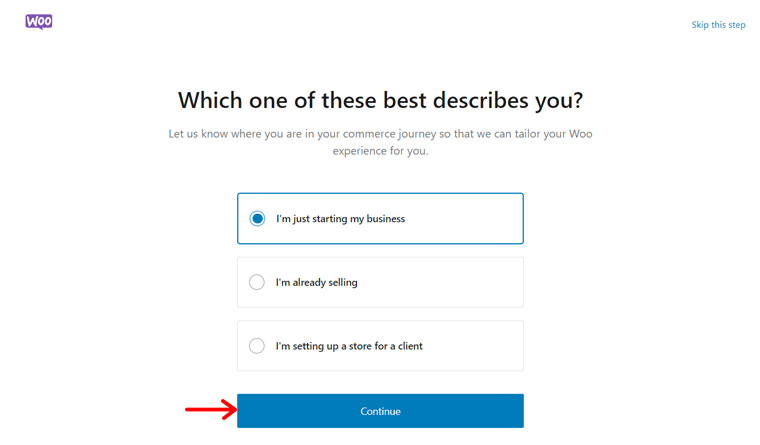
Following that, state your WooCommerce store’s name, industry type, and location. Here, we chose the store name as ‘SiteSaga Store’ and the industry as ‘Other’. Because it’s a print shop selling quality images. Don’t forget to hit the ‘Continue’ button.

Furthermore, WooCommerce recommends the use of some free features. They are:
- Jetpack AI Assistant for content creation
- Showcase your products on Pinterest
- Reach your customers with MailPoet
- Google listings and ads to drive sales
According to your needs, select which features you want and click the ‘Continue’ button.
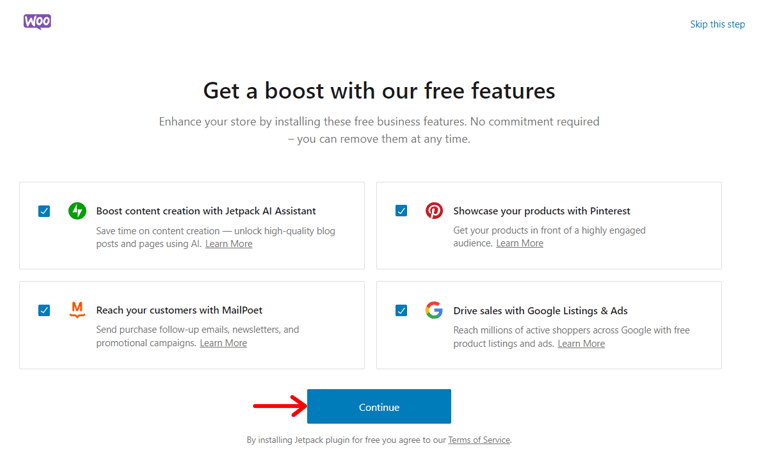
Lastly, it lets you connect your store with your WordPress.com account for Jetpack features. So, you can perform that or just press the ‘No, Thanks’ option.
Configuring Additional Settings
Everything isn’t present in the setup wizard, so ensure you configure the settings. Just open the ‘WooCommerce > Settings’ menu, and you’ll find multiple tabs with settings.
Here are some crucial settings you must configure right now:
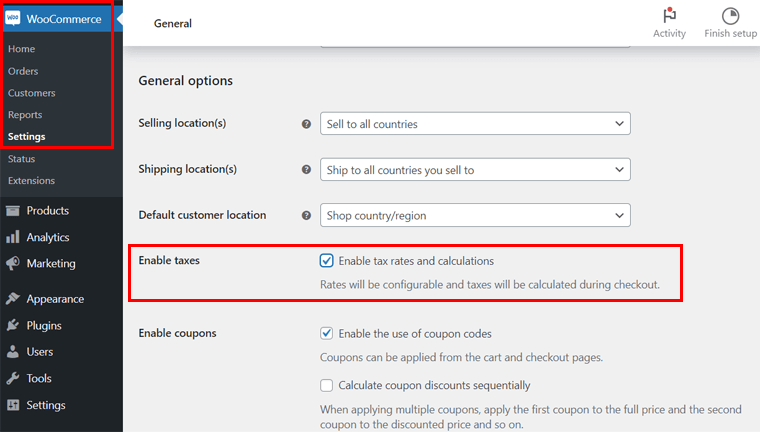
1. General
Here, you need to specify the store location in more detail. Further, there are general options about the shipping locations, customers, taxes, and coupons. Lastly, you need to configure the currency, including the type and how it’ll be shown.
Don’t forget to ‘enable tax rates and calculations’.
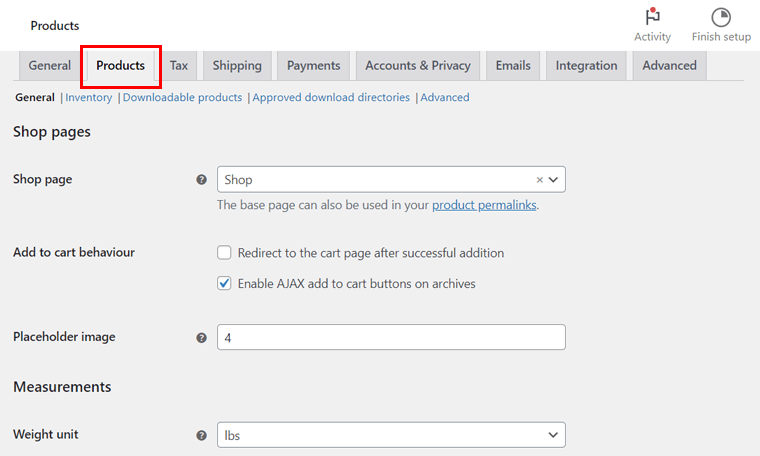
2. Products
In this tab, it lets you configure general settings for the products like shop pages, measurement units, product reviews, and ratings. Also, there are options for inventory, downloadable products, etc.
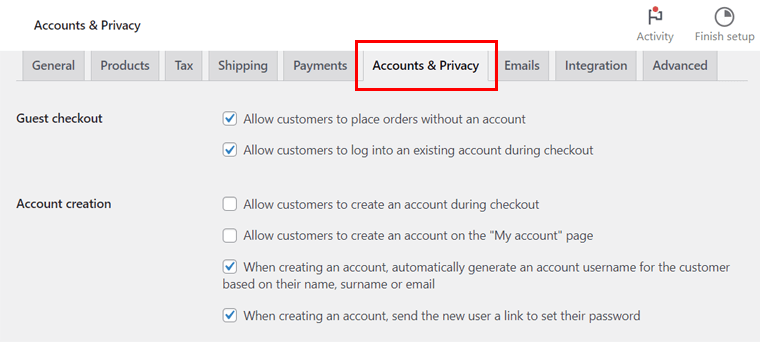
3. Accounts & Privacy
Here, you can set up the account and privacy policy pages. The accounts can be guest or registered customers. Similarly, the privacy policy can be for registration or checkout. In the end, there are some personal data retention options.
4. Emails
In this section, you can manage how the emails will be sent to customers using MailPoet. The emails can be for new orders, failed orders, canceled orders, and more.
5. Integration
This tab lets you enable MaxMind integration to perform geolocation lookups. So, just enter the license key and file path.
6. Advanced
Here, you can set up the pages and features for the WooCommerce store. The pages include cart, checkout, my account, and terms and conditions. The features are related to checkout and account.
Once you have completely used these settings, click the ‘Save Changes’ button. Notably, we’ve skipped some essential settings to explain in detail later. So, don’t worry!
Step 5: Set Up a Payment Gateway in WooCommerce
Now, we’ll delve into the most crucial configuration part when creating a WooCommerce store. That’s to implement a payment gateway that obtains payments from customers.
Remember, selecting the right payment processor for your business is crucial. So, carefully analyze the options based on the sales volume, processing fees, supported locations, etc.
Moreover, ensure that it integrates well with your business’s bank account. Also, check if it supports various payment methods, like direct bank transfers, credit card transactions, etc.
In WooCommerce, you can integrate several payment gateways into your eCommerce site. Some of them include:
- Stripe
- PayPal Payments
- Square
- Mollie Payments, and more.
Importantly, you can use more than one payment gateway for your WooCommerce store. With that, let’s learn how to set up a WooCommerce store for payment integration.
Initially, open the ‘WooCommerce > Settings’ menu on your WordPress dashboard. There, click the ‘Payments’ tab, which has default payment options. So, let’s go through them first.
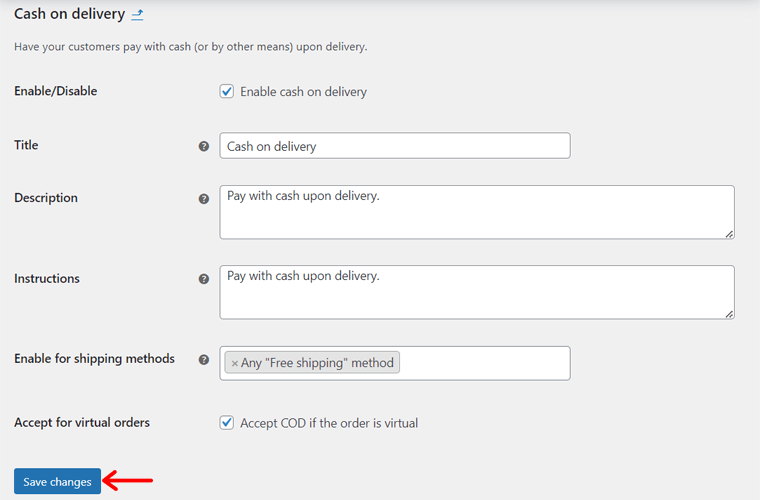
You must enable a payment method and then click on its ‘Finish set up’ button. For instance, let’s check out the process for ‘Cash on delivery’.
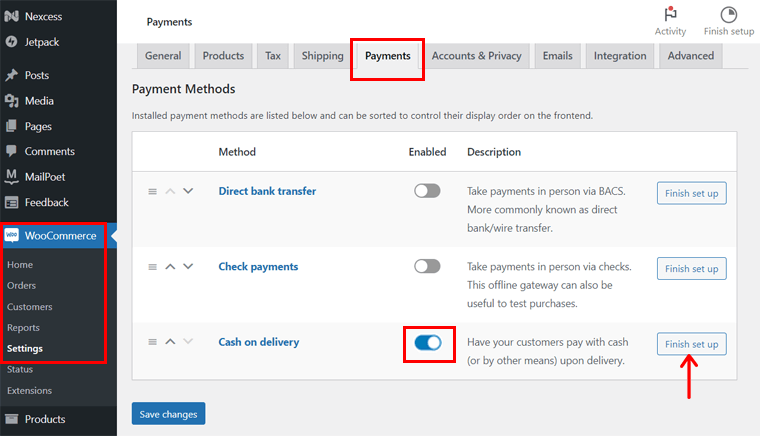
Here, you must enter the payment title, description, and instructions. Further, select the shipping methods and figure out if this method is accepted for virtual orders or not. Lastly, click the ‘Save changes’ button.
A similar process applies to check payments and direct bank transfers.
How to Set Up WooPayments in WooCommerce?
Other than these 3 options, you can use a WooCommerce extension for advanced payment gateways. For example, WooPayments is the official WooCommerce payment gateway.
To use it, you must install the plugin. The steps include:
- Navigate ‘Plugins > Add New Plugin’ on the dashboard.
- Search for ‘WooPayments’ on the search bar.
- Click the ‘Install Now’ button in WooPayments.
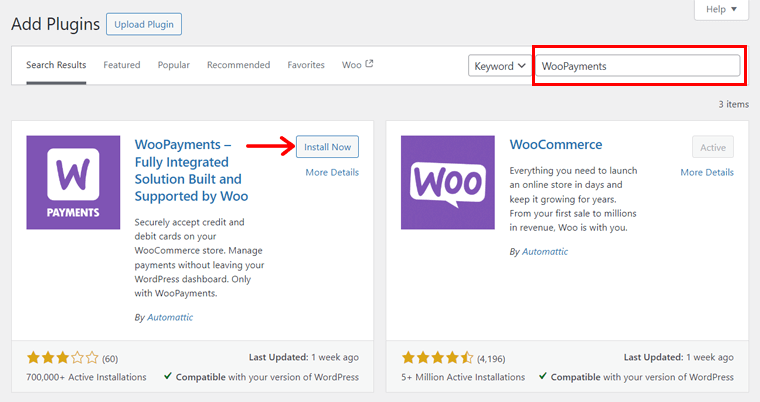
Lastly, press the ‘Activate’ button.
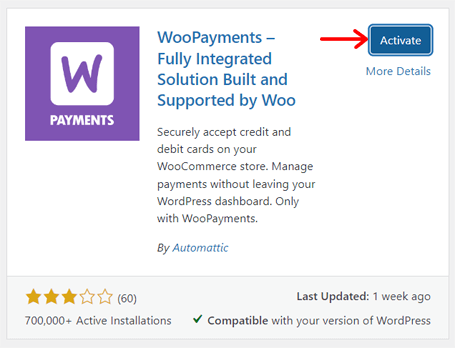
Now, move back to the ‘WooCommerce > Settings > Payments’ option. There, enable ‘WooPayments’ and hit the ‘Finish setup’ button.
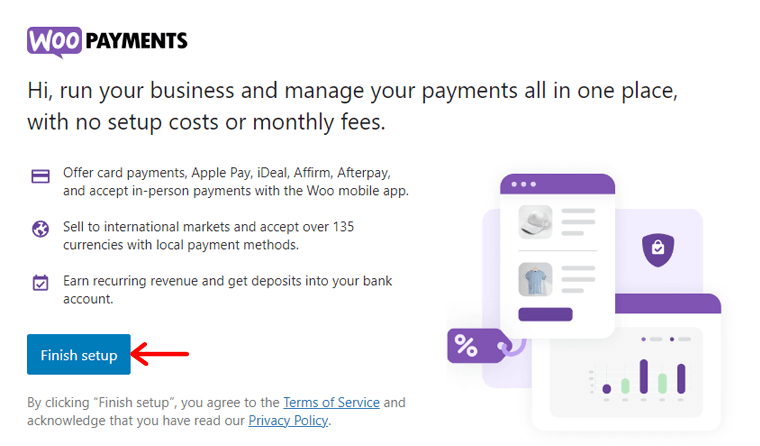
Following that, you must connect your website with the WordPress.com account. Also, account creation is necessary for WooPayments, where you need to specify your personal and business information.
Learn about configuring WooPayments on your online store in this documentation.
Step 6: Configure WooCommerce Shipping Methods
Similarly, shipping is another vital component for timely product delivery if you’ve global customers. So, decide your shipment methods, costs, and charges beforehand.
Unquestionably, your eCommerce site can have multiple shipping methods for different customers. For instance, local customers can have free delivery.
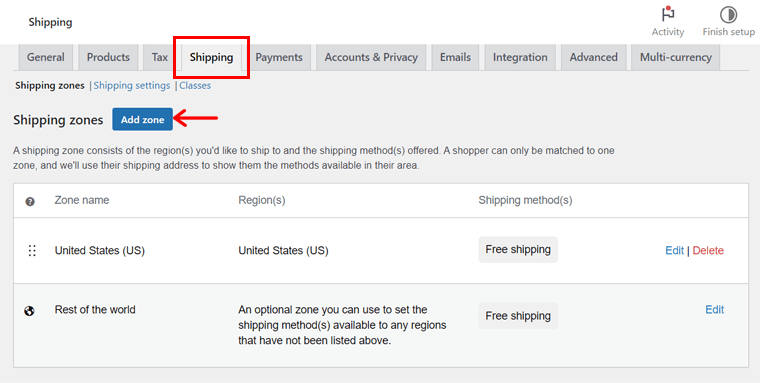
Keeping that in mind, let’s focus on the process of configuring such shipping methods. For that, navigate to the ‘WooCommerce > Settings > Shipping’ menu. Then, follow the steps:
The first step is to create different shipping zones. Why? Because it lets customers know your shipment locations. Also, you can define the shipping methods and rates accordingly.
So, in the ‘Shipping zones’ tab, click the ‘Add zone’ button.
On the new page, enter the ‘Zone name’ and select multiple related ‘Zone regions’. Below that, click the ‘Add shipping method’ button.
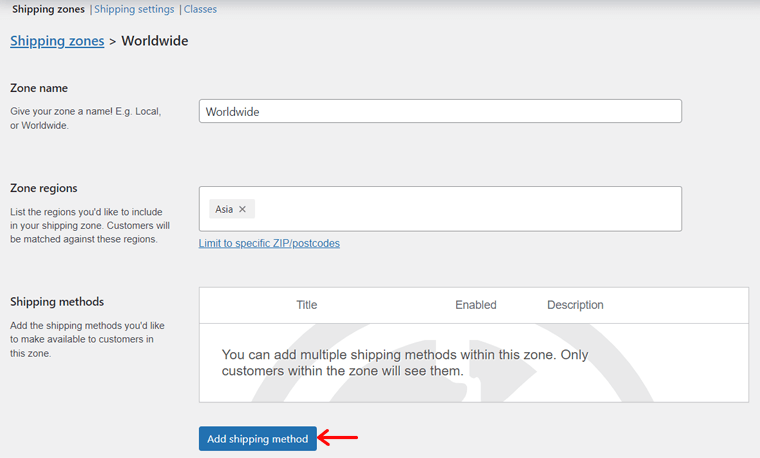
Following that, select the shipping method among the options, like:
- Flat rate: Set a fixed cost to charge for the delivery of a product, regardless of its destination or weight.
- Free shipping: No shipping fee is charged for the shipping zone.
- Local pickup: Lets customers pick up their orders from your store.
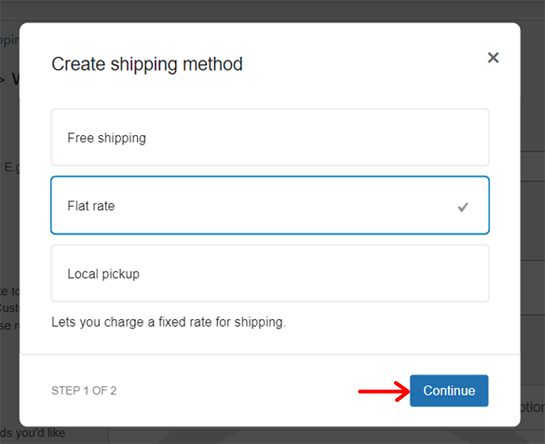
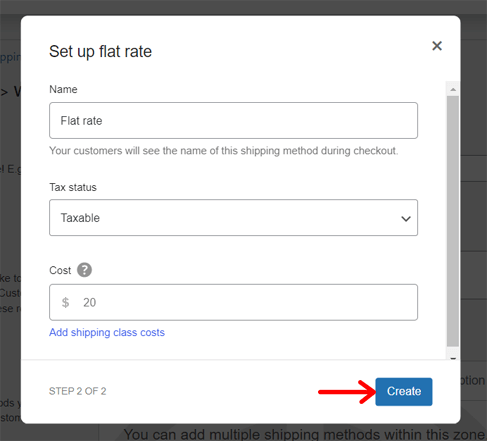
If you select the flat-rate shipping method, then you must edit it and mention the cost. After that, click the ‘Create’ button as shown below.
Besides shipping zones, you can find other tabs for shipping options and shipping classes. But what are they? Let’s have a look:
- Shipping options: Here, you can set up the shipping calculations and destinations.
- Shipping classes: Add shipping classes for categorizing products based on factors.
Learn about shipping classes in this documentation.
Step 7: Adjust Tax Rates of Your Store
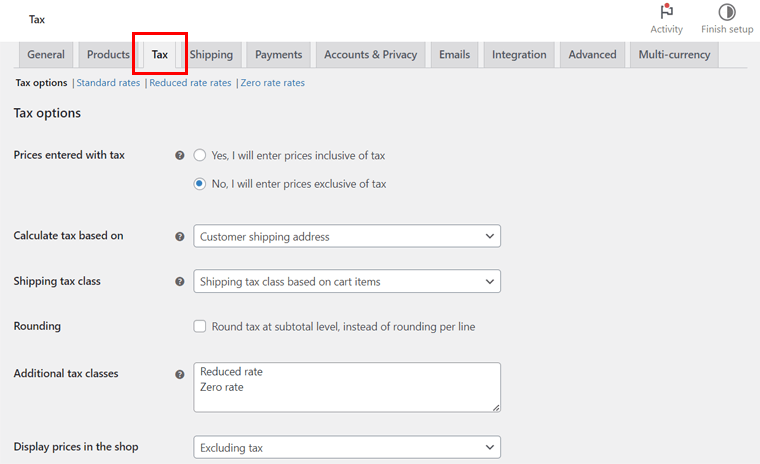
Moving forward, configuring taxes is another essential step in creating a WooCommerce website. To get its options, ensure you tick ‘Enable taxes’ in the General Settings. Only after that will you receive the ‘Tax’ tab.
Now, the ‘Tax’ tab includes multiple separate settings. But first, add the tax rates. That can be Standard rates, reduced rates, or zero rates. After that, move to the ‘Tax options’.
This includes the following options:
- Prices Entered with Tax: Determine how you’ll input product prices. Either the catalog prices are input using the base tax rate or they are tax-exclusive.
- Display Prices in the shop, during cart, and checkout: If your prices include tax, then choose Including tax. Otherwise, select Excluding tax.
- Shipping tax classes and Additional classes: By default, it’s set to standard class. But if you require a different tax class, then select them.
- Calculate tax based on: Choose which address is utilized for tax calculations. That can be the customer billing address, shipping address, or store base address.
- Rounding: Enable this option for rounding at the subtotal level and not per line.
- Price Display Suffix: Define how you’ll show the tax price. For example: Price incl. VAT: {price_including_tax}
- Display Tax Totals: Specify if there’ll be one total tax amount or item-wise.
Afterward, click the ‘Save Changes’ button.
Here’s a complete guide on setting up taxes in WooCommerce.
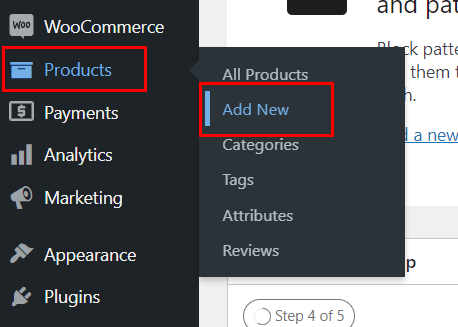
Step 8: Add Products to Your Store
Once the configuration process is done, start adding your products to the store. Remember, the product page is the most vital page in your online shop, as it displays your products. So, carefully add the products that will help you showcase them later.
For that, navigate to the ‘Products > Add New’ menu. There, you must perform a series of actions. Do them serially, as stated below:
1. Keep Product Title and Description
First, you must enter the name of the product in the ‘Product name’ section. Below that, there’s the ‘Product description’ section to write the details of the product in sentences.
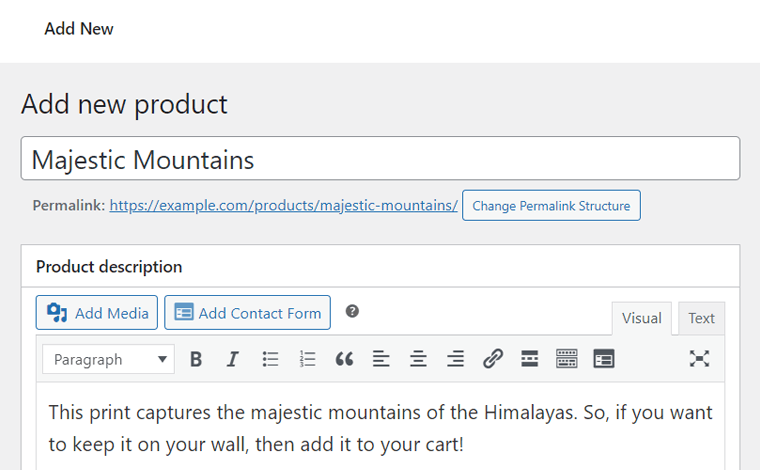
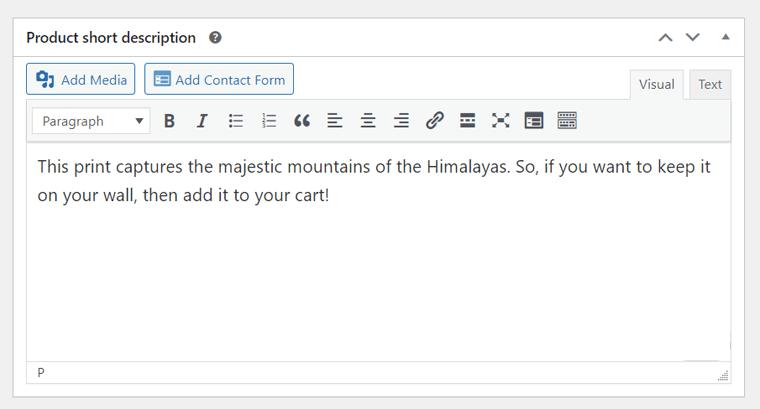
At the bottom, there’s also a ‘Product short description’ section. So, you can add the short version of the product description here.
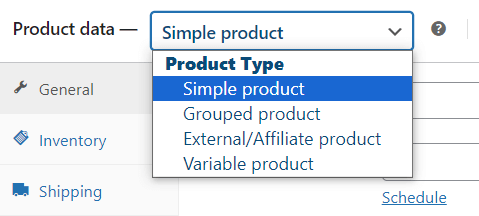
2. Select the Product Data Type
In the ‘Product Data’ section, select the type of product you’re selling on your website. In fact, WooCommerce lets you sell the following kinds of products:
- Simple Product: A physical, virtual (digital), or downloadable (file) product.
- Grouped Product: A combination of multiple simple products.
- External/Affiliate Product: Dropshipping products or affiliate products.
- Variable Product: If you sell several variations of a product based on sizes, etc.
3. Configure the Product Data Settings
Based on your product type, you must configure the available settings for your products. So, let’s set up the product data for a simple product and a variable product for reference.
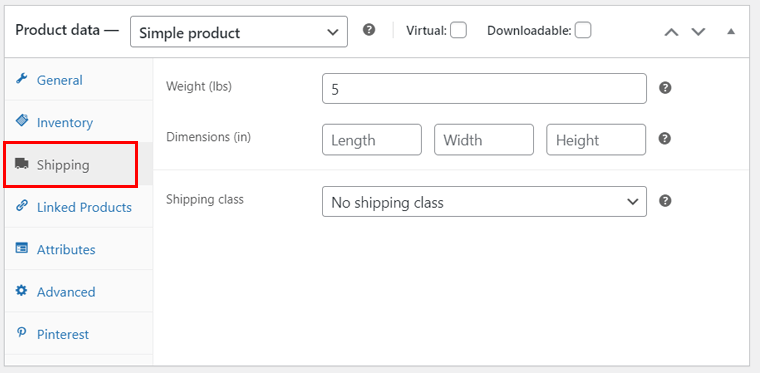
I. Simple Product
For a simple product, you’ll get around 8 tabs of settings. Let’s go through them one by one:
General: Here, add the regular and selling product price. Also, you can schedule sale price dates for discount campaigns.
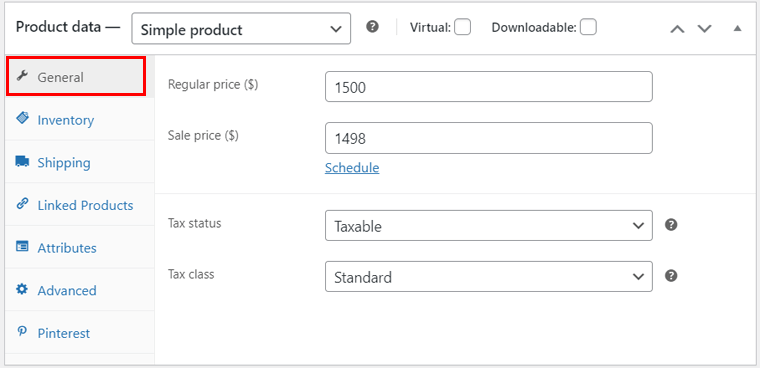
Inventory: In this tab, enter stock details like SKU (Stock Keeping Unit) and stock status. Also, enable or disable stock management and purchase limits.
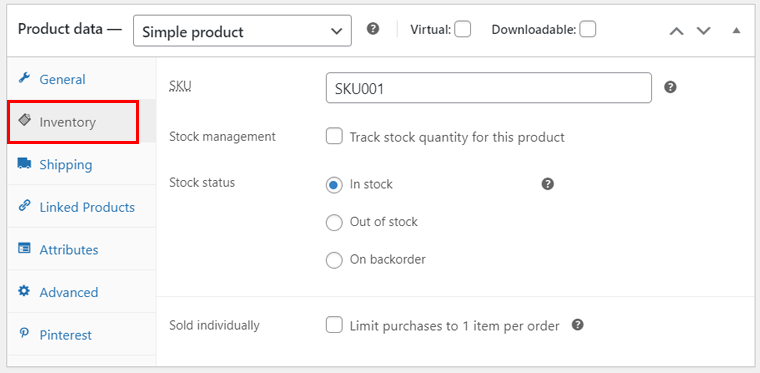
Shipping: Now, mention the product’s weight and dimension. Also, select a shipping class if you want to group similar products.
Similarly, other options include:
- Linked Products: Once you add other products, specify upsells (recommended when viewing a product) and cross-sells (recommended when adding a product to the cart).
- Attributes: Insert specific characteristics of the product, such as size or color. Doing so helps customers find the desired products.
- Advanced: Add a purchase note, enable product review, etc.
- Pinterest: State the condition and product category for showcasing the product.
II. Variable Product
Almost all the settings for a variable product are the same as those for a simple product. The only thing different is that you must compulsorily specify the Attributes of the product.
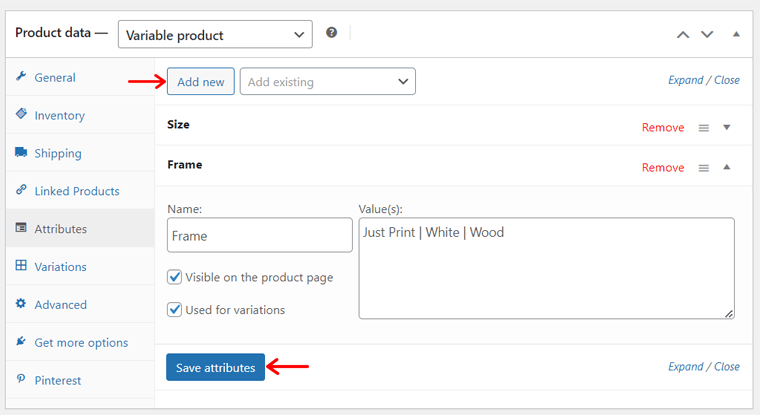
Actually, the products in our desired real website are variable. So, let’s select ‘Variable Product’ as the product data and open ‘Attributes’.
For example, the different attributes can be the sizes of an image. Just add the name ‘Size’ and its values, separated by ‘|’ as in the image below. Then, click ‘Save attributes’. Ensure you tick the ‘Used for variations’ option.
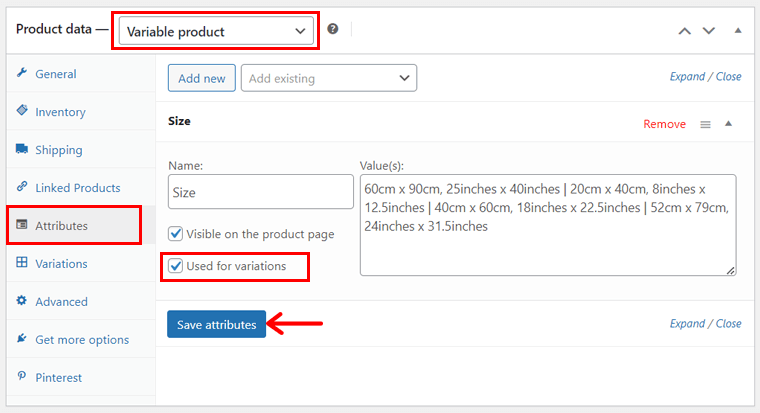
Now, click the ‘Add New’ button to add another attribute, which is ‘Frame’ alongside its values like ‘Just Print | White | Wood’.
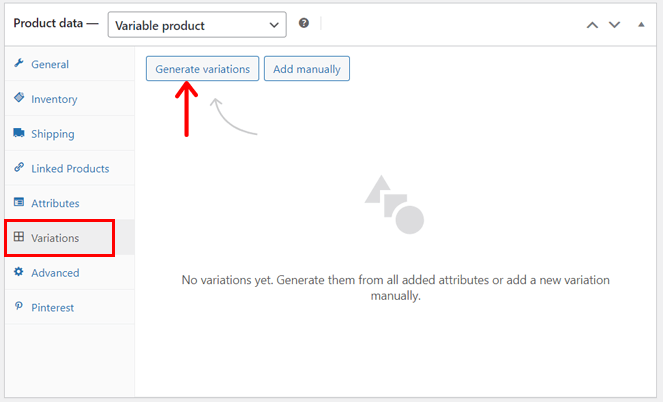
Following that, open the new ‘Variations’ tab. Here, you can either manually add them or automatically generate them from the attributes. The easiest way is to click ‘Generate variations’ and then the ‘Ok’ button for confirmation.
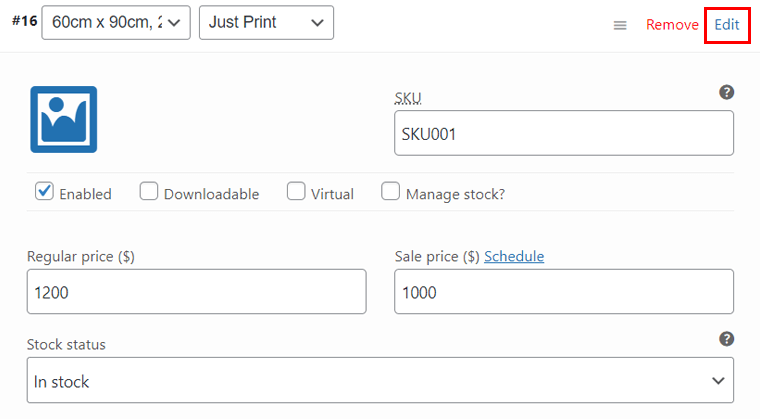
In addition, you must click ‘Edit’ to include the prices and other details of each variation and lastly click ‘Save Changes’. By default, the product variations will be in a drop-down menu in the website preview.
Notably, creating a grouped product is just combining the simple products. Whereas for an external/affiliate product, you must insert the Product URL and Button Text. That’s it!
4. Product Image, Gallery, Tags, and Categories
On the right side of the editor, you can find various sections. First, click the ‘Set product image’ option to upload a product image.

Similarly, you can press the ‘Set product gallery images’ option to insert multiple product images to showcase in a gallery.
Following that, click the ‘Add new category’ option to create and choose the product category. However, this isn’t compulsory if you sell the same type of product.
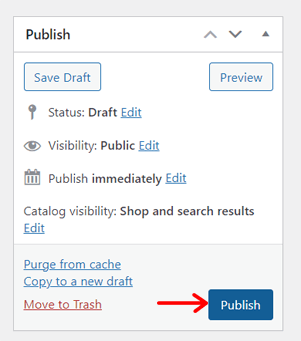
5. Publish the Product
Once everything else is done, look at the top-right section. There, you can configure the status and visibility of the product. Also, save it as a draft or publish it.
Here, let’s click the ‘Publish’ button and make the product live. Similarly, do the same for all the products.
Step 9: Create Essential eCommerce Pages
Next, you can start editing and customizing your WooCommerce site. That includes setting up all the necessary pages. Even if you’re using a template or starting from scratch, you can personalize it the way you want.
First, let’s know all the essential pages for the eCommerce website. They are:
| Pages | Description |
| Home | The first page of your website that your customers visit. Here, you can display your featured products, ongoing sales, and more. |
| About | On this page, you must describe your eCommerce business, including its mission and vision. Learn how to create an About page here. |
| Contact | Here, you can state your physical shop location and the ways customers can connect with you. Pick a WordPress contact form plugin, and then add a contact form to this page. |
| Privacy Policy | This page shows how your website collects, uses, stores, and protects users’ personal information. Also, it states your privacy rights and terms. |
| Blog | If you want to increase the number of visitors to your WooCommerce store, then add articles, news, etc. to a blog page. Read how to start a blog here. |
| Testimonials | You can add this page to show how happy your previous customers were with your service to potential customers. |
How to Create a Homepage for Your WooCommerce Store?
Among all the above-mentioned pages, your homepage is the most crucial one. So, we’ll show you how to make a compelling homepage.
As said before, let’s take the reference to the mentioned real website and try to create a homepage like it. Before that, add all the products and set up WooCommerce.
Shall we start? Here we go!
Adding Required Navigation Menus
The desired real website contains 3 major menus for its homepage. The 2 menus are in the header, and 1 menu is in the footer.
On these menus, it includes links to different pages of the eCommerce website. Similarly, let’s add pages like this:
- View All Prints (rename the Shop page from the template)
- FAQs
- About Us (the template may already have this)
- Privacy Policy (the template already has this)
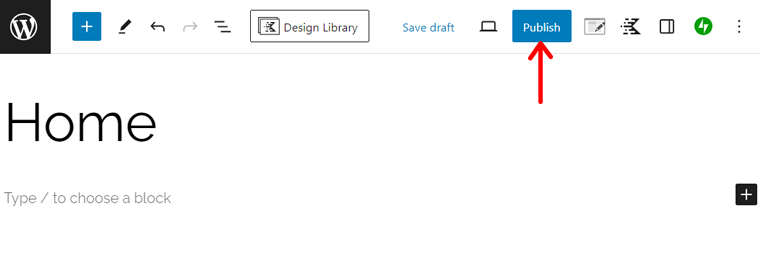
If you’re wondering how to create a new page, then all you must do is navigate to the ‘Pages > Add New Page’ menu.
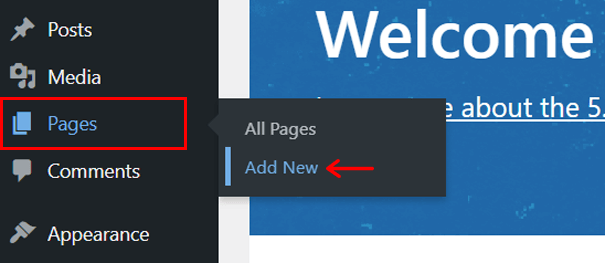
There, insert the page name and click ‘Publish’. The screenshot below shows the process for adding a new homepage called ‘Home’.
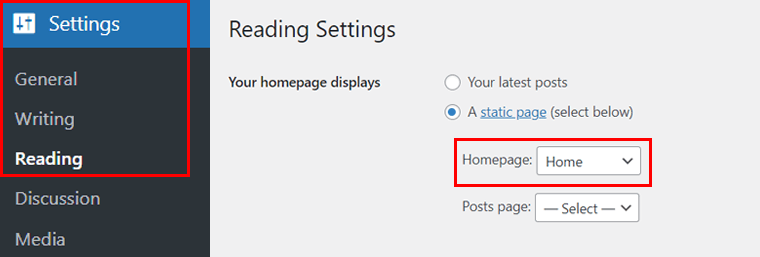
We won’t use the homepage of the chosen template, so ensure you select this ‘Home’ page as the ‘Homepage’ in the ‘Settings > Reading’ menu.
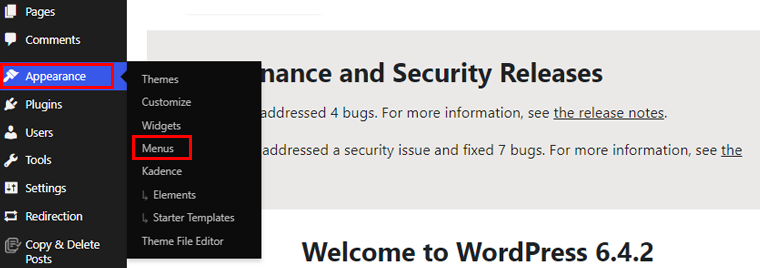
Following that, go to the ‘Appearance > Menus’ option.
There, click on the ‘Create a new menu’ option. Now, add the menu name as ‘Primary Navigation’ and also set the ‘Display location’ as ‘Primary’. Lastly, hit ‘Create Menu’.
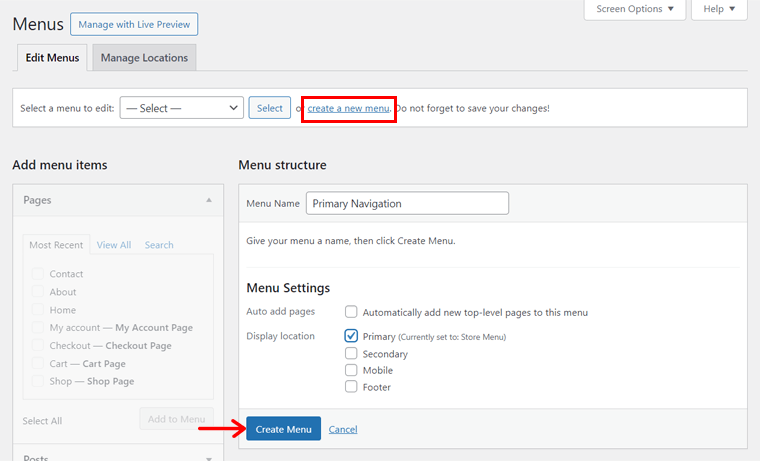
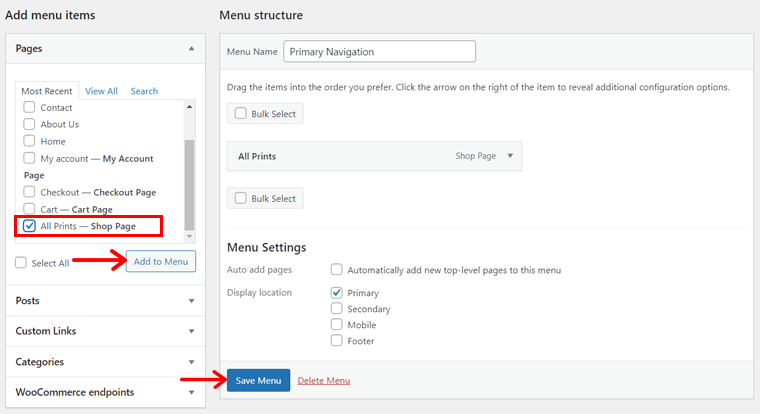
In the reference print shop, the primary menu contains the shop page link. So, select the ‘View All Prints’ page on the ‘Pages’ section and press the ‘Add to Menu’ button. Also, click the ‘Save Menu’ button to save this primary menu.
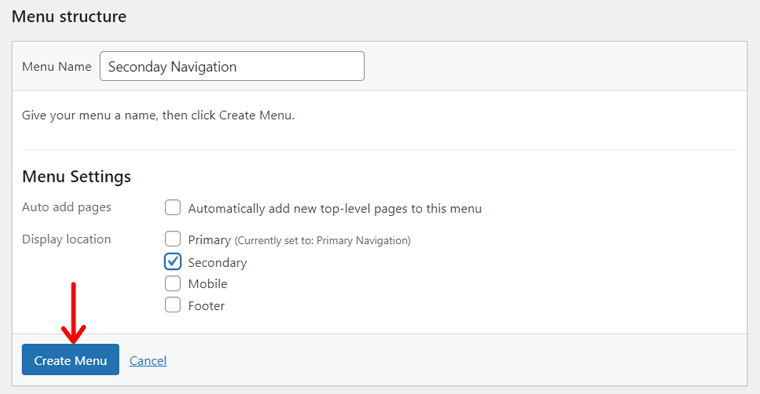
Similarly, make another menu, but this time save it as ‘Secondary Navigation’ with ‘Secondary’ display location.
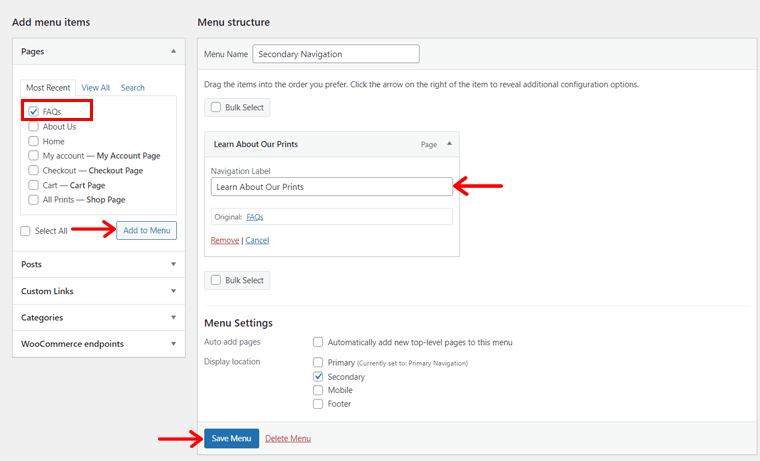
Further, add the page ‘FAQs’ to the menu, but change the navigation level to ‘Learn About Our Prints’.
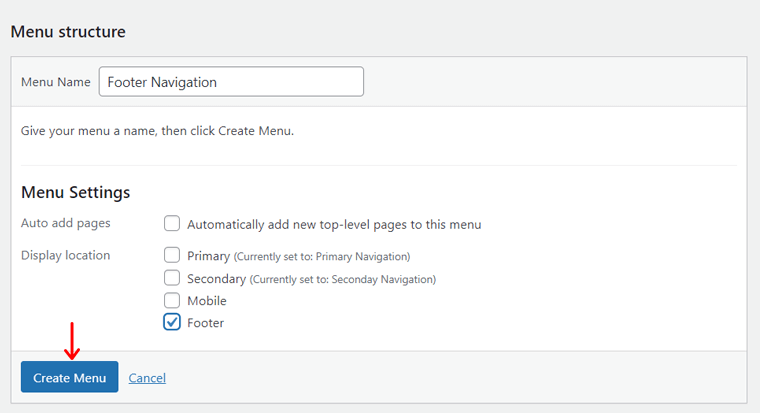
Lastly, create another menu named ‘Footer Navigation’ with the display location as ‘Footer’.
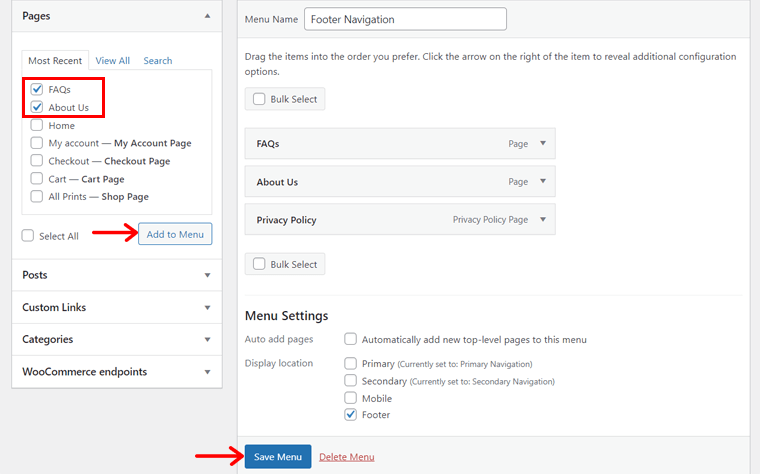
There, insert the pages FAQs, About Us, and Privacy Policy as shown below.
Inserting Necessary Widgets
Other than the page links, the footer of the desired website contains other elements. To add them, you must create widgets with those components. So, let’s begin the process!
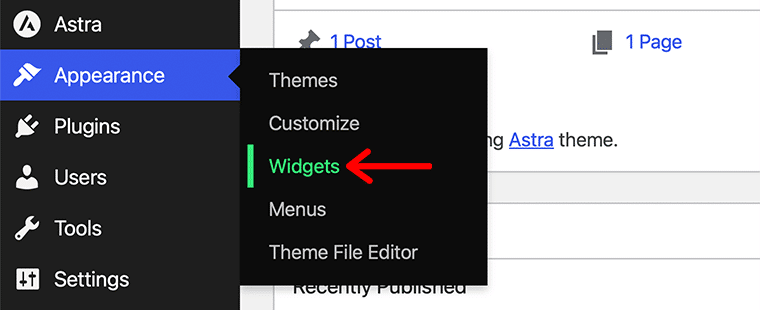
Initially, open ‘Appearance > Widgets’.
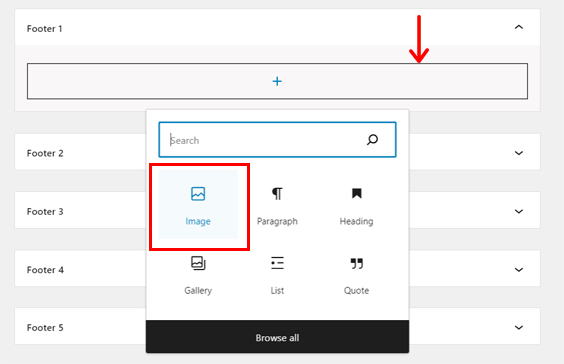
Then, start editing a Footer widget present in the template. There, insert an Image block and upload the website’s logo.
Similarly, use another Footer widget and insert the image of the ‘PayPal’ payment method. Hit the ‘Update’ button to save the changes.
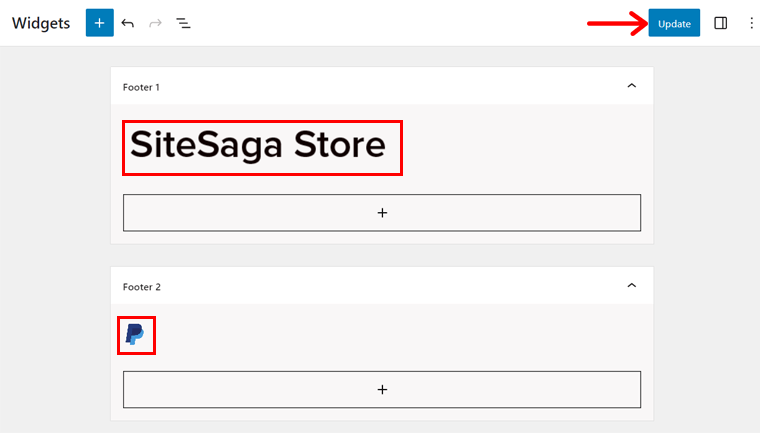
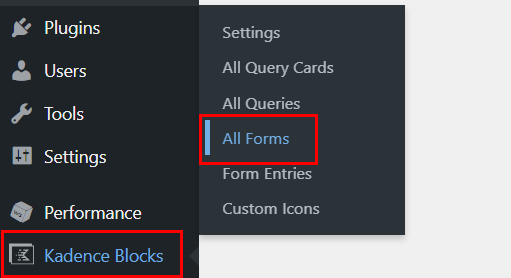
Lastly, the final widget requires the use of Kadence Blocks. So, first, navigate to ‘Kadence Blocks > All Forms’ and click the ‘Add New Post’ button.
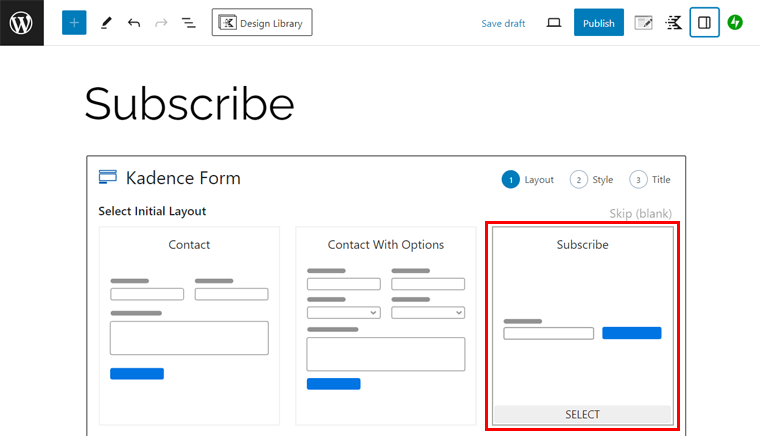
There, add the form title as ‘Subscribe’. Below that, you’ll get some options for the Kadence form.
First, you must select a form layout. So, let’s go with ‘Subscribe’. Then, choose a form style; we’ll go with ‘Underline’.
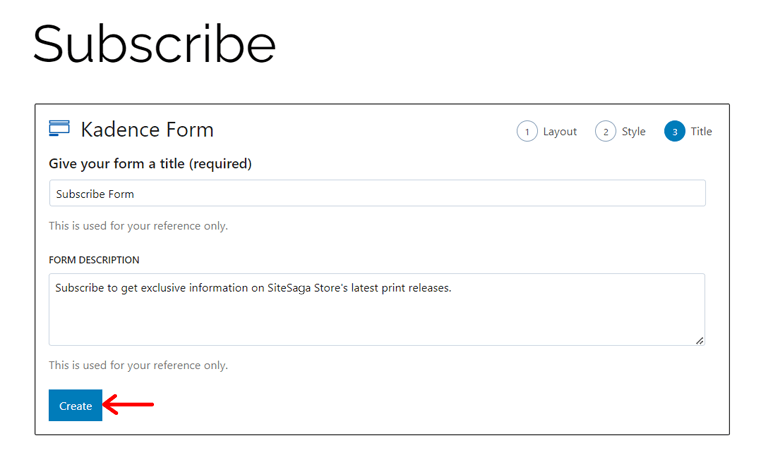
Following that, insert the form title and form description again. Next, click ‘Create’.
Now, let’s customize the subscription form. Such as:
- Using the ‘Mail’ icon instead of the ‘Subscribe’ button.
- Removing the button color and keeping the icon color black.
Following that, click the ‘Update’ button.
Going back to the widget creation process, insert the paragraphs as on the original site. After that, add a ‘Kadence Form (Adv)’ block and pick ‘Subscribe Form’. Also, click ‘Select’.

Below that, insert the ‘Social Icons’ block and insert icons for some social media channels. Also, customize them as you like and keep their links. Lastly, press ‘Update’.
Building the Header and Footer of Your Store
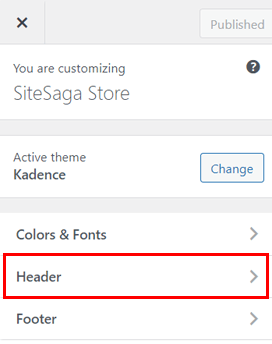
Once you create the menus and widgets, let’s start creating the header and footer. For that, open ‘Appearance > Customize’ on the dashboard, which opens the ‘Home’ page.

On the WordPress customizer, you can see that the homepage currently includes the header and footer of the template added. So, if we aren’t using its components, then delete them.
So to make it like the real website, open ‘Header’, which brings a drag-and-drop interface for the header section at the bottom of the page.
In the ‘Top Row’, open the settings icon and change the background color to white. Also, add a border like at its bottom of 1px and set it to black color.

Now, on the Top Row, click the ‘+’ icon in the center section and insert ‘Secondary Navigation’.

Moving forward to the Main Row, do the following actions:
- Insert ‘Primary Navigation’ in the first column.
- Add the ‘Logo’ to the 2nd column.
- Keep the ‘Search’ and ‘Cart’ options in the 3rd column.
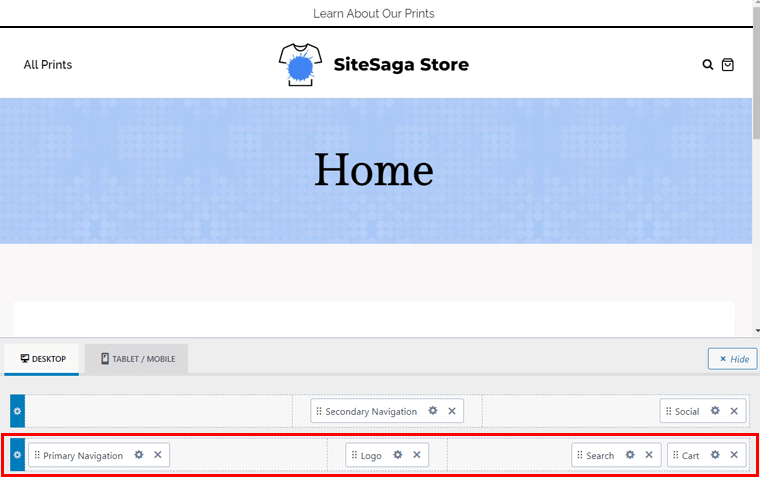
Sideways, go to ‘Header > Logo’ and change the logo of the website. Also, select ‘Logo’ as the logo layout and adjust its size. Don’t forget to publish the page to save the changes.
Following that, open the ‘Footer’ option on the customizer. There, you’ll find a similar interface at the bottom similar to the header. There, perform the following actions:
- Change the color of the footer to white.
- Insert the widget with the website logo on the left side of the ‘Top Row’.
- Keep ‘Footer Navigation’ to the left side of the ‘Middle Row’.
- Besides that, add the widget with the subscription form in the center.
- Add the widget with the PayPal image in the center of the ‘Bottom Row’.
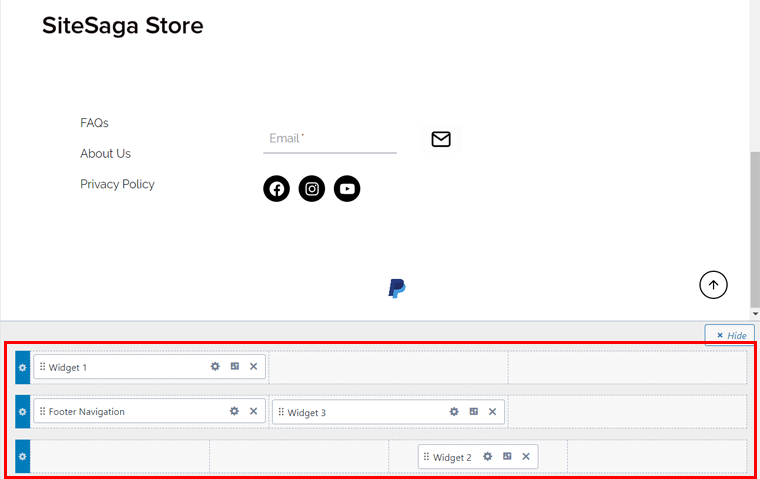
Complete the necessary customizations and press ‘Publish’ to save the changes.
Designing the Body Section of the Homepage
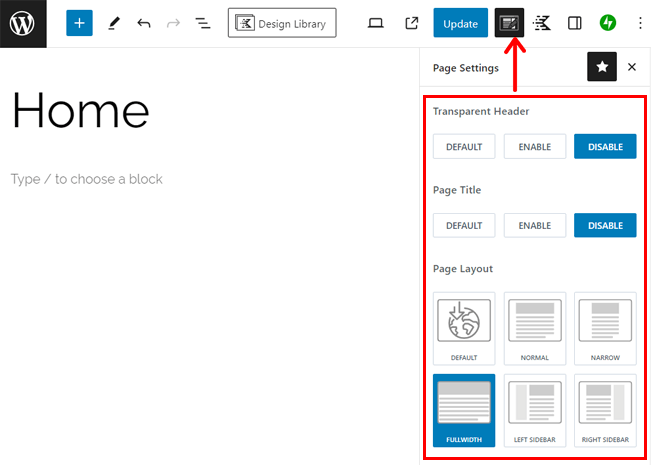
Now that we have the header and footer all set, let’s move on to the body section. For that, open the Home page, then configure the settings of the homepage that previously came from the template. So, ensure you disabled the page title, used a full-width page layout, etc.
Once it’s done, click the ‘Design Library’ button at the top of Kadence.
Next, click the ‘Media and Text’ tab and search for the pattern with a cover image similar to that of our reference website. That’s ‘Media and Text 3’, so click on it.
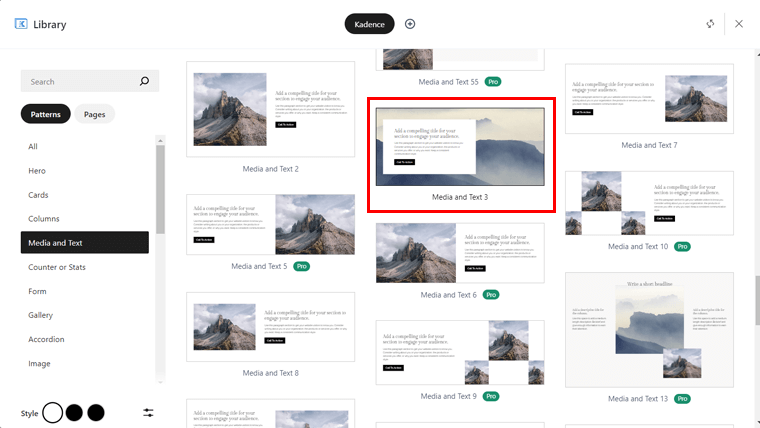
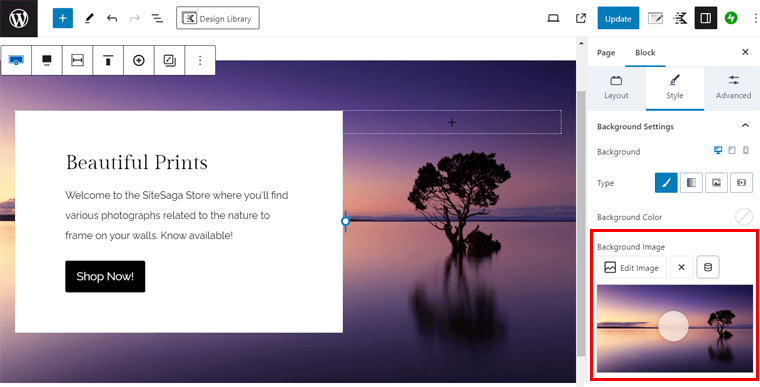
Moving forward, change the text of the heading, paragraph, and button as per our requirements. Afterward, select the entire pattern and click ‘Edit Image’ on the Block settings. Now, upload the image, completing our first section.
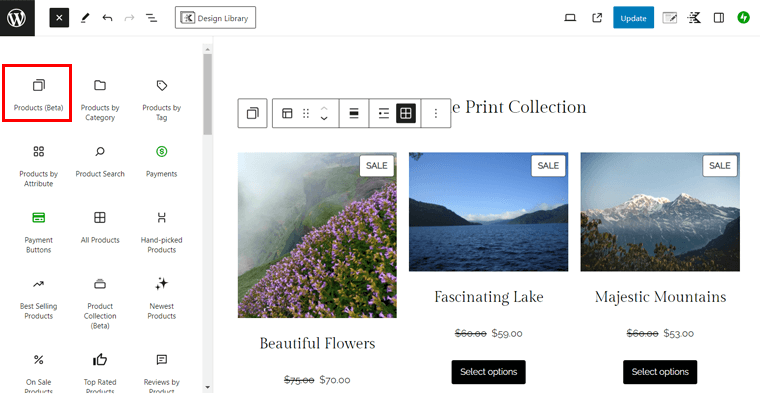
To keep some space, insert a spacer block. Below that, add the heading ‘View the Print Collection’ with a link to the shop page.
Furthermore, you can add the ‘Products (Beta)’ block. Ensure you show only 1 column.
Similarly, you can use another media and text pattern for the About section, and then change the image and text as per the requirements. For instance, ‘Media and Text 8’ pattern of Kadence is suitable for this section as shown below:

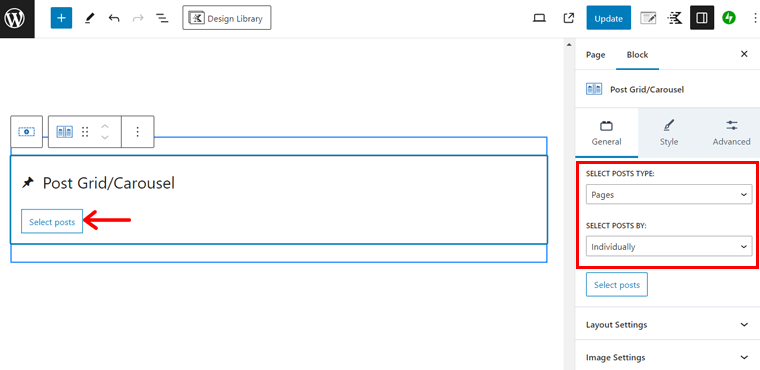
For the last section, you need to show some pages having featured images. So, find a Post Loop pattern, for example ‘Post Loop 2’ and insert it to the page. There, ‘Select the posts type’ as ‘Pages’ and ‘Select posts by’ as ‘Individually’.
Now, click the ‘Select posts’ button.
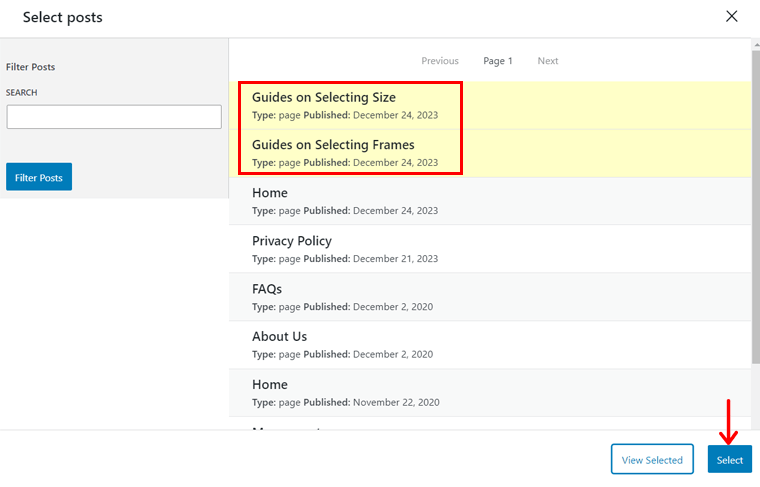
Following that, click on the 2 pages and 1 is the shop page. Then, hit ‘Select’.
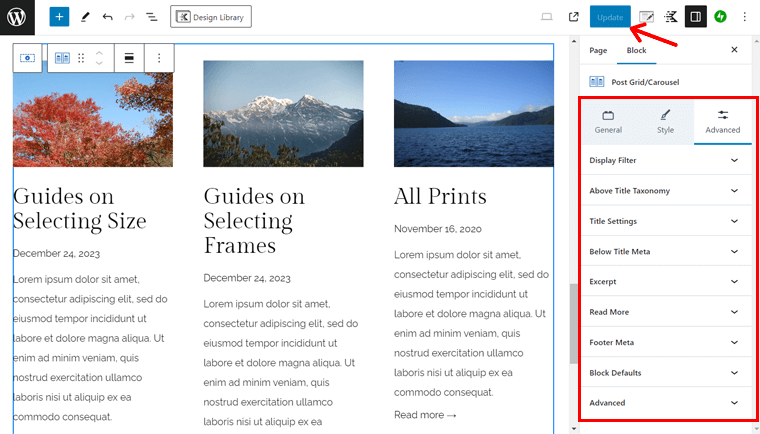
Lastly, go to its ‘Advanced’ settings and configure the excerpt, date, read more, etc.
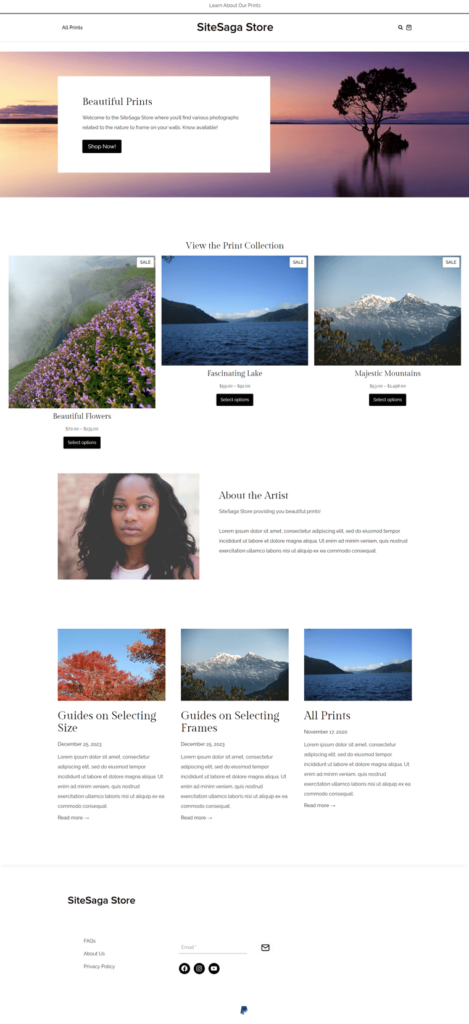
That’s all! Congratulations! Your homepage is ready as a popular eCommerce website.
Here’s a preview of what your homepage looks like:
Hopefully, you can create the homepage and other pages of your WooCommerce store. Best of all, the crucial pages are automatically made by WooCommerce and your template. So, all you need to do is customize them.
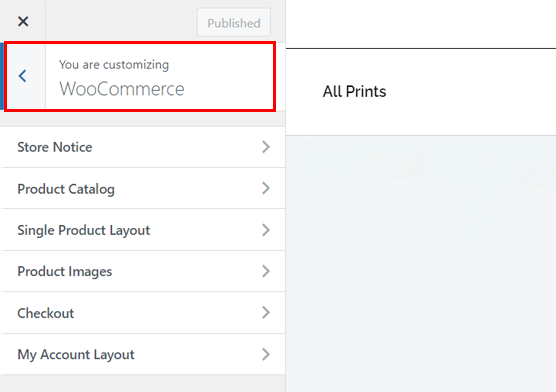
For the predesigned WooCommerce pages, you can personalize them from the WordPress customizer as well. Just navigate to the ‘Appearance > Customize > WooCommerce’ menu. There, you’ll find the following settings:
- Store Notice: Customize what and how to display notices regarding your store.
- Product Catalog: Fix the layout, width, alignment, style, etc., of the product catalog.
- Single Product Layout: Similar options as in the Product Catalog but for a product.
- Product Images: Adjust the main image and thumbnail image sizes.
- Checkout: Change how your checkout page looks and works.
- My Account Layout: Select the layout and state whether to show a name and avatar.
After making the changes, click ‘Publish’.
Using WooCommerce Blocks on Store Pages
You can add various elements as you wish using just WooCommerce blocks. So, let’s use one WooCommerce block to add a section on a page.
First, open a page from the ‘Pages > All Pages’ menu. There, click the ‘+’ button at the top bar, which opens the blocks, patterns, and media you can use. Scroll to the bottom, and you’ll find blocks under the ‘WooCommerce’ section.
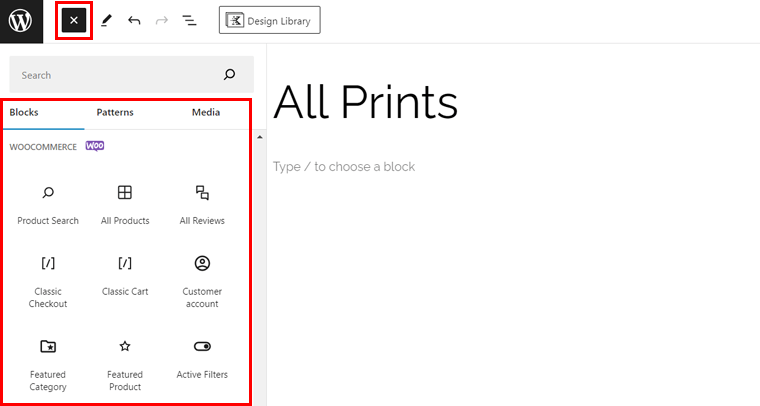
Now, simply drag and drop the elements onto your page as per the requirements. There are several options, such as:
- Featured Category
- Featured Product
- Filter by Price
- Filter by Rating
- Top-rated Products
- Newest Products, etc.
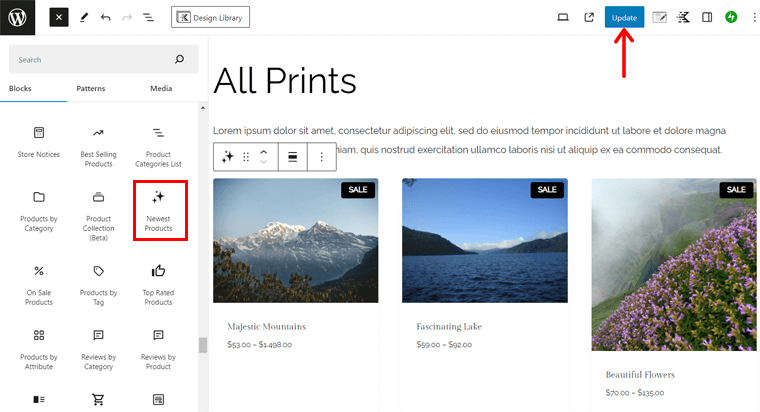
Among them, let’s add a block to the shop page. Shall we? Let’s go!
For example, let’s drag the ‘Newest Products’ block from the list. Now, on the right side, you can find the ‘Block’ settings for it. Ensure to adjust its settings, like:
- Layout: Select the number of columns and rows to show.
- Content: Choose what content you want to display.
- Filter by stock status: Decide to show or hide different statuses of stock.
- Filter by Product Category: Pick the product categories you want to show.
Don’t forget to add the heading ‘Our Newest Products’ before the block. Once you complete this, click ‘Update’.
Learn how to change product page layout using ProductX, a WooCommerce block plugin.
Hopefully, your WooCommerce site is already looking beautiful. But wait and learn more!
Step 10: Install Additional Plugins and Extensions
Another step that WooCommerce recommends completing is installing certain extensions and add-ons. Other than that, we also suggest using plugins essential for your online store.
Here, we’ll go through the vital ones and guide you through our recommended plugins. Let’s go!
WooCommerce Recommended Extensions
Previously, when setting up WooCommerce on your website, we hope you added the essential recommended WooCommerce extensions. They were:
| Extensions | Description |
| Google Listings & Ads | Integrate your WooCommerce shop with Google. Ultimately, this lists your products on Google for free and lets you launch paid ad campaigns. This helps increase sales in your store. |
| Pinterest for WooCommerce | Showcase your product catalog on Pinterest with ease. And let Pinterest users know about your products when they tend to buy them. |
| MailPoet | Uses the MailPoet email marketing service to let you create and send purchase follow-up emails, newsletters, and promotional campaigns. |
Other than that, you can find more in ‘WooCommerce > Extensions’ in the dashboard. You can download the free ones there and get access to the purchase page for the paid ones.
Useful WooCommerce Plugins
In addition, we’ll point out some useful WooCommerce plugins from other companies. Using them, you can add various attractive features to your eCommerce website.
Without any delay, let’s start the exploration!
1. YITH Wishlist
YITH Wishlist is a powerful WooCommerce plugin by YITH that lets customers save their favorite products. It lets them easily and quickly find their interested products if they decide to buy them later.
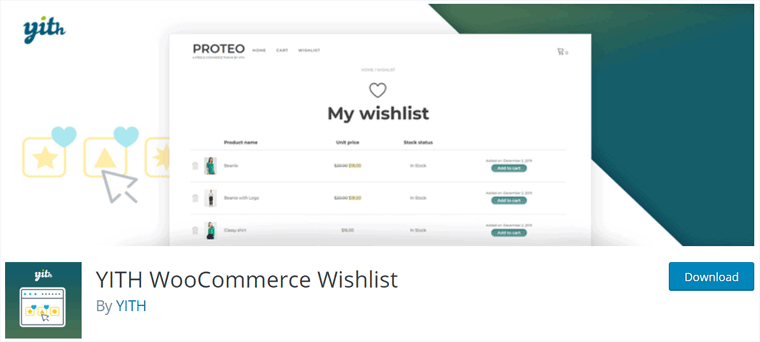
Moreover, consumers can share their wishlists with relatives and friends on social networks. Why? Because their relatives and friends could now buy those products for them on special occasions, like birthdays and Christmas.
Pricing: Freemium (free + premium) plugin, the premium plan costs € 99,99/year.
How to Use the YITH Wishlist?
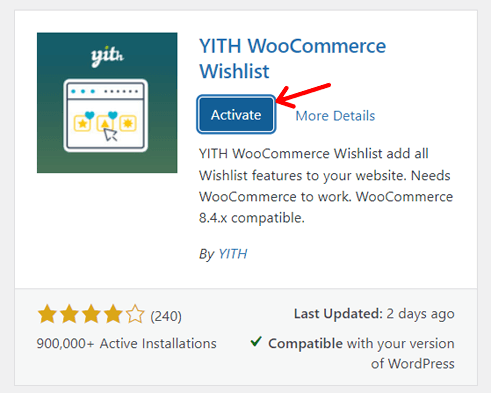
First, you must install and activate this plugin on your website. Just navigate to the ‘Plugins > Add New Plugin’ menu and search for ‘YITH Wishlist’. Once you find it, click ‘Install Now’.
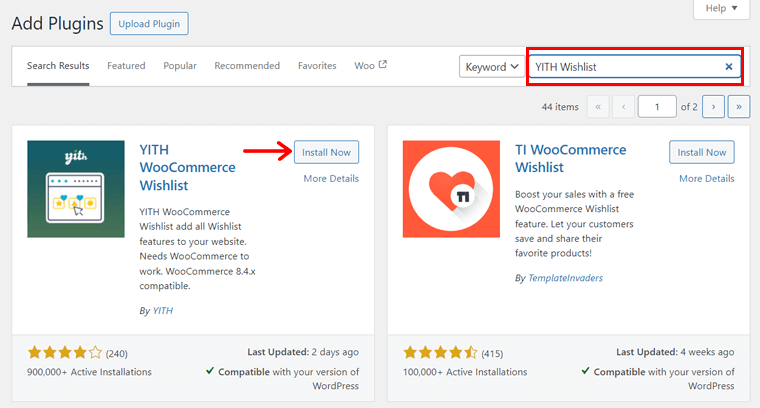
Afterward, click ‘Activate’ to activate the plugin, like in the screenshot below:
In a while, you can see the new ‘YITH > Wishlist’ menu on your dashboard. There, it includes some settings you can configure. They are:
- General: You can enable AJAX loading, which can load cacheable wishlist items.
- Add to wishlist: Here, select how and where you want to show the wishlist option. Also, it lets you customize and edit the text.
- Wishlist page: This setting includes options for the wishlist page, like location, edit, and customization.
Once you complete making these changes, click the ‘Save Changes’ button.

Even if you keep the default settings, you can see the wishlist functionality automatically added to your website. Now, customers can add a product to their wishlist.
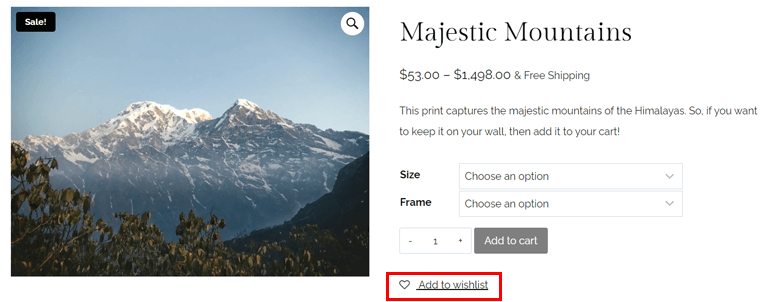
Then, they can browse the products as shown in the image below:

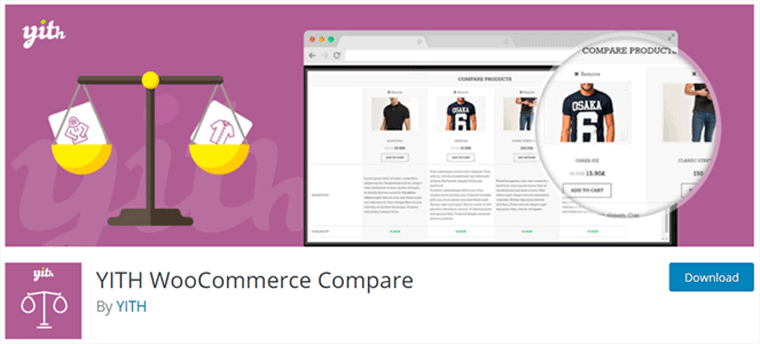
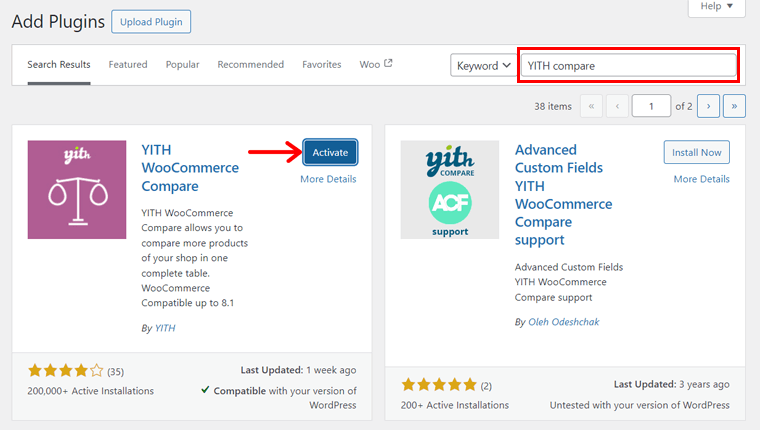
2. YITH WooCommerce Compare
Another WooCommerce plugin that allows customers to compare products from your shop is YITH WooCommerce Compare. Basically, this plugin lets visitors see the difference between the products with ease in a comparison table.
Moreover, you can completely customize this table according to your needs. Also, you can configure the table, specifying which WooCommerce attributes to show during comparison.
Pricing: Completely free to use.
How to Use the YITH WooCommerce Compare?
First of all, install and activate YITH WooCommerce Compare on your dashboard like other plugins. Here’s a screenshot of the activation process:
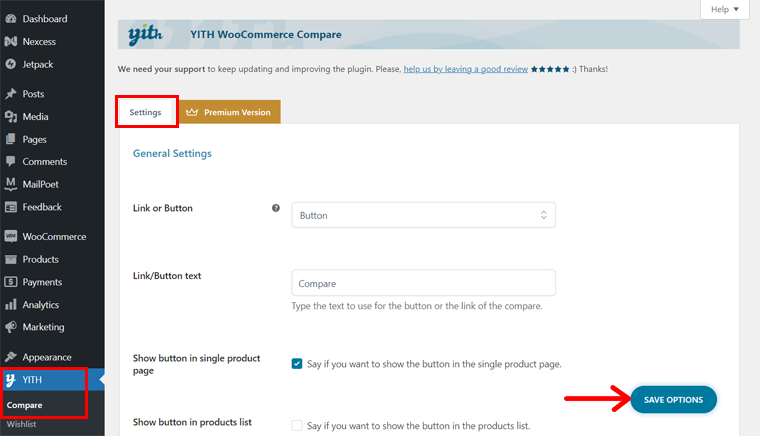
This adds the ‘Compare’ submenu to the same ‘YITH’ menu on your dashboard. Open that menu and check out the settings available:
- General Settings: Select a button or link for this functionality. Accordingly, configure the text, display location, and design for the compare button or link.
- Table Settings: Edit the title, fields to show, image size, and more for the table.
Last but not least, hit ‘Save Options’.
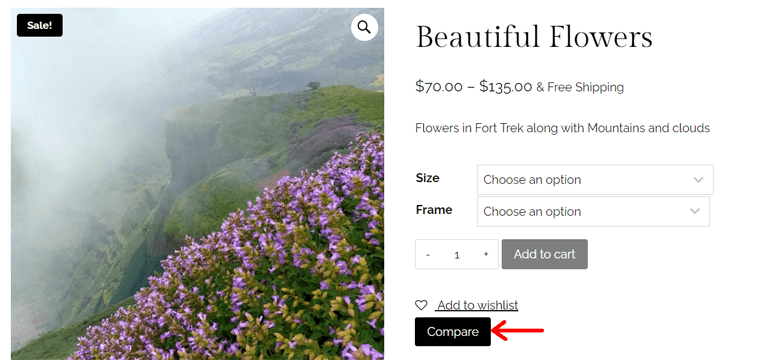
On the front end, you can see a ‘Compare’ button or link for each product. Once you click that, the product will be added to the table.
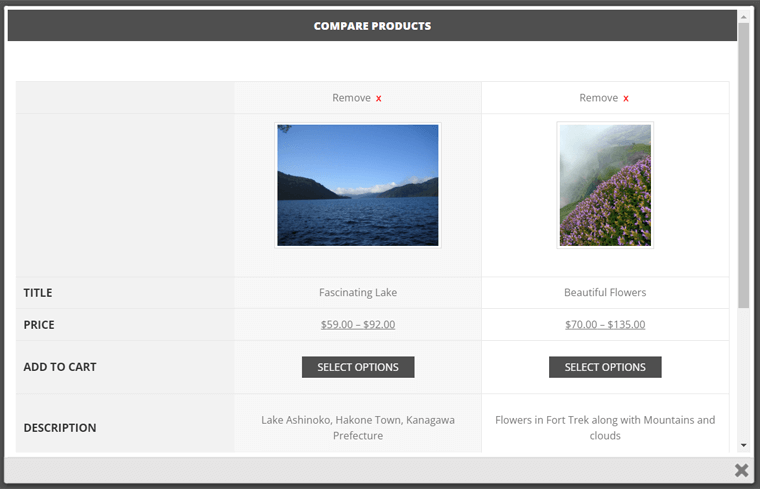
Similarly, you can add another product to the table. After you do that, you can see the results you were waiting for. A comparison table with both products.
3. Variation Swatches for WooCommerce
Do you want to sell multiple variations of a product in a different way than with the default WooCommerce feature? Then, take advantage of the Variation Swatches for WooCommerce plugin. It provides a professional experience to choose attributes for variation in products.
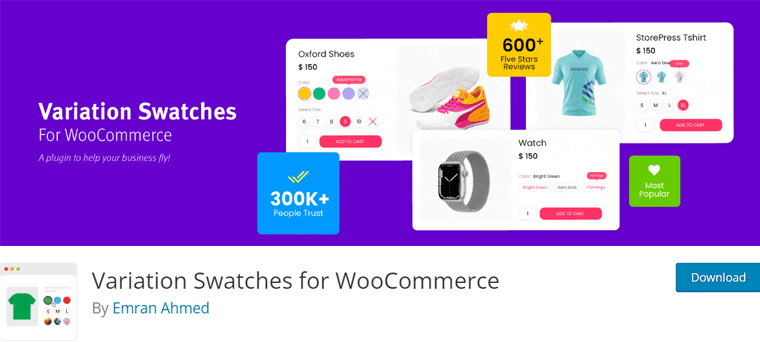
Moreover, you can display the product variation items in different images, colors, and labels. Also, it offers a Quick View option, letting customers load the color and image swatches in a quick view separately.
Pricing: Freemium (free + premium), premium price starts at $49/year.
How to Use Variation Swatches for WooCommerce?
Initially, you must install and activate the Variation Swatches for WooCommerce plugin. The process is the same as how we do it for YITH Wishlist.
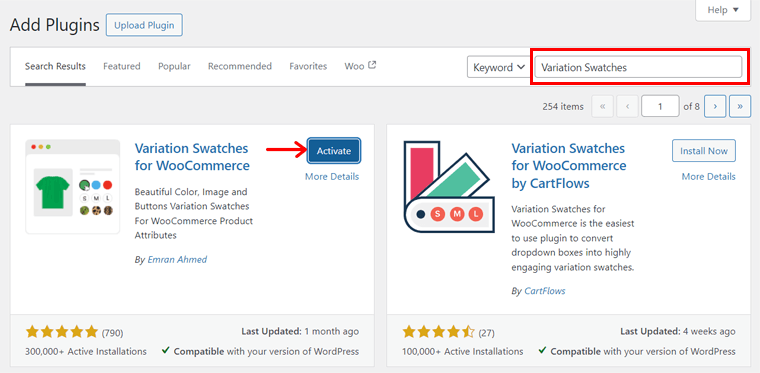
By doing that, you’ll find a new menu ‘GetWooPlugins’ on your dashboard. So, open its ‘Swatches Settings’.
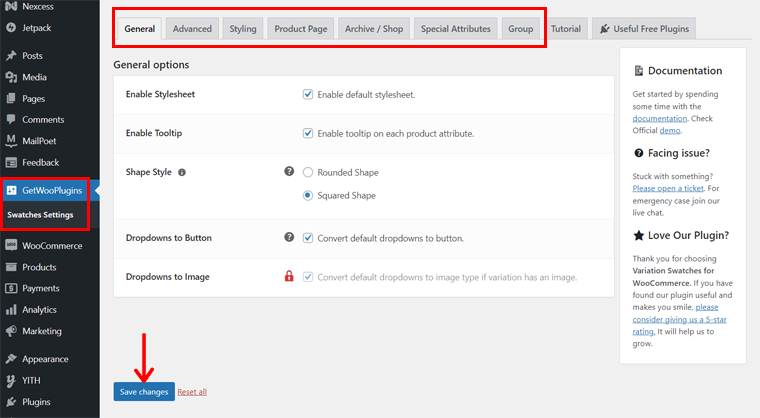
There, it includes lots of configuration options for the plugin functionality. So, let’s know about each tab available:
- General: Includes general options like enabling the stylesheet and tooltip.
- Advanced: Select how you’ll show disabled attributes, attribute image size, etc.
- Styling: Configure the swatches indicator and size of product page swatches.
- Product Page: Setup preloader, variation label separator, variation stock info, etc.
- Archive / Shop: Options for the archive and shop pages, like alignment and position.
- Special Attributes: Choose how to show a single variation in catalog mode.
Once you configure these settings, click ‘Save changes’.
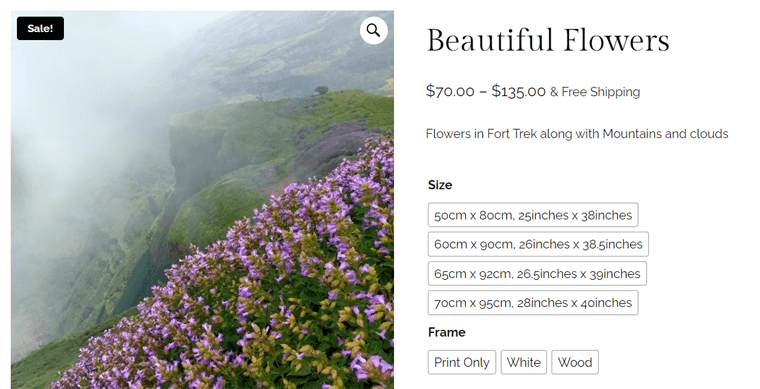
Remember, this plugin suits products that you chose ‘Variable Product’ when creating them. We mentioned the process of creating a variable product earlier in Step 8.
When forwarding the process, your variable product should include attributes and variations configured. We already made them based on the size and frame.
Instead of having a drop-down menu for the variable products, using this plugin shows them in swatches. That’s similar to the design of our SiteSaga Store. Check it out:
Additional Must-have WordPress Plugins by Nexcess
The core WordPress platform provides basic features for a website. Similar to adding WooCommerce for eCommerce functionality, your website should contain some features that require the use of additional plugins.
Guess what? The web hosting platform we’re using, i.e., Nexcess, offers multiple free and premium plugins accessible right on your WordPress dashboard. Yes, you heard it right!
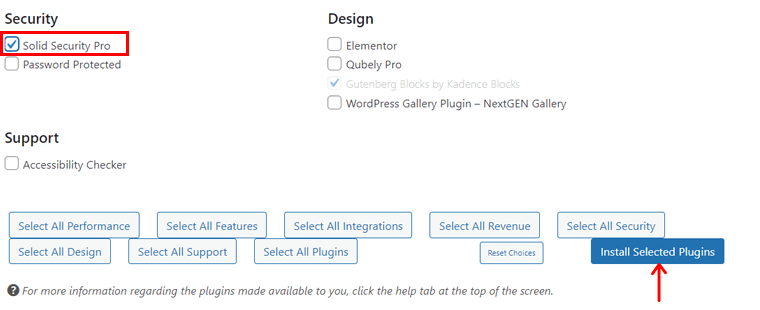
All you need to do is navigate to the ‘Nexcess > Install Plugins’ menu.
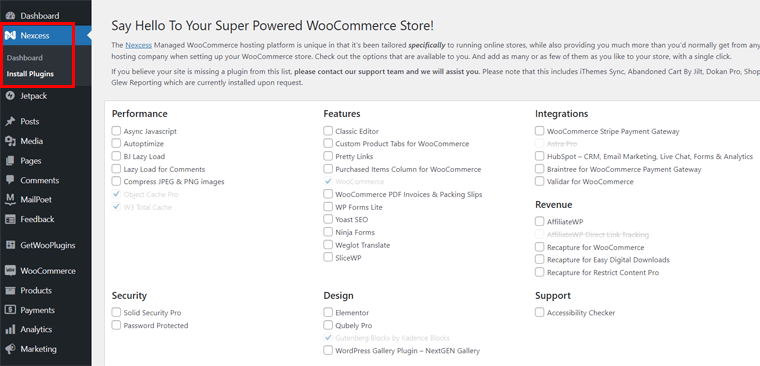
Then, select the required plugins. Lastly, click the ‘Install Selected Plugins’ button. That’s all!
Here’s a list of vital plugins by Nexcess you should be using on your WooCommerce store:
1. Solid Security Pro
Solid Security, previously called iThemes Security, is a powerful WordPress security plugin. It strengthens user login security, carries out vulnerable scans, and protects your site from brute-force attacks.

Moreover, it offers security website templates, one of which is eCommerce. So, you can select the eCommerce option while setting up the plugin. Ultimately, your website’s security features will focus on selling products or services.
Pricing: Nexcess provides access to the Solid Security Pro version with a license. Actually, this premium plugin starts at $99 for one site. But you’ll get it for free!
Find out all about the different products from SolidWP, including Solid Security, in the SolidWP review article. Overall, we recommend purchasing its suite to access all the tools.
2. HubSpot
HubSpot is an all-rounder WordPress plugin for services like CRM (Customer Relationship Management), email marketing, live chat, and analytics. Customer support and relationship management are crucial for an eCommerce website, and HubSpot lets you do that with ease.
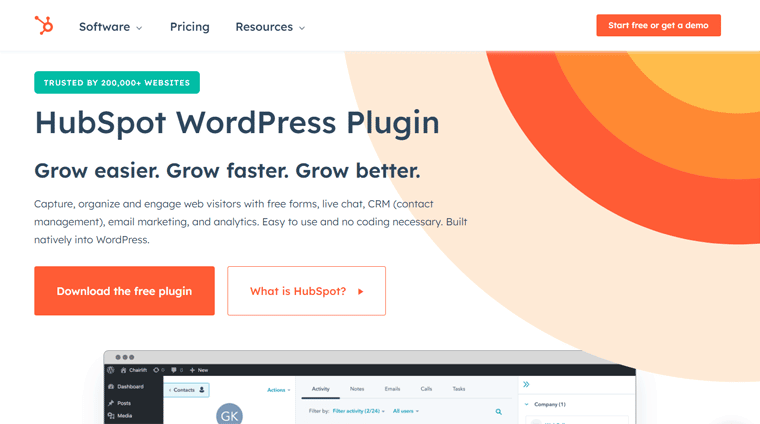
Moreover, it has built-in marketing analytics, including email marketing, web traffic analysis, etc. So, you can understand the marketing activities of your online store that are performing the best. Also, it lets you fix the ones that must be improved.
Pricing: Free WordPress plugin. But you can get a premium service based on your needs.
Find the must-have WordPress plugins for a website here!
More Plugins and Tools for Your WooCommerce Store
Moving forward, here are some extra plugins and 3rd-party tools to use for your online shop. They help you start and grow your WooCommerce store. So, let’s know about them.
1. Semrush
Semrush is a widely used online marketing tool to enhance a website’s search engine rankings, social media presence, and more. Overall, it contains 50+ smart tools for SEO, content marketing, market research, advertising, etc.
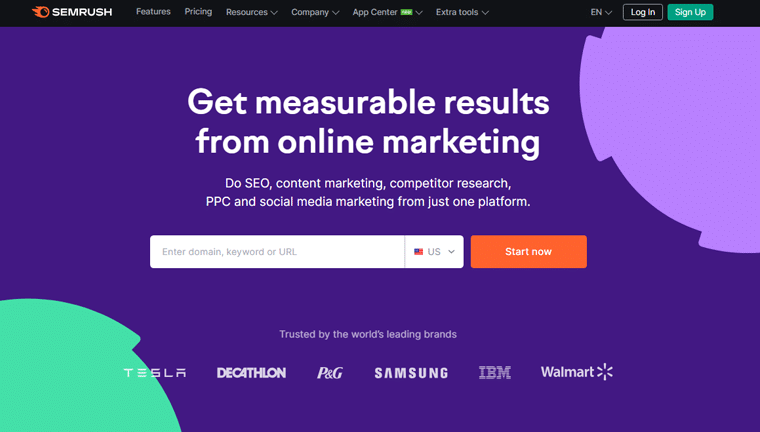
Moreover, you can use it to find the right keywords for your WooCommerce store. Also, it lets you analyze your website, backlinks, and traffic. As a result, you can conduct website auditing, ad campaign optimization, research competitors, etc.
Pricing: This tool has a limited free version, like 10 domains and keyword analytics per request. Further, the starter ‘Pro’ plan costs $129.5 per month.
Learn how to use Semrush for free with its premium trial, available for 7 days!
2. Dokan
Do you want to launch a multi-vendor marketplace? If yes, then Dokan can be the right extension for your WooCommerce store. As an admin, you can create coupons, make announcements, advertise products, and others.
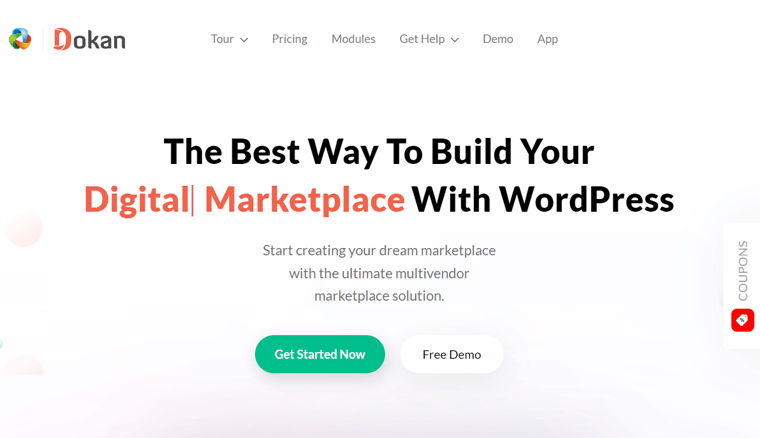
On top of that, your vendors can manage shipping and orders, create variable products, bulk edit the products, etc. If you or your vendors require any feature, then there are 30+ modules to strengthen your WooCommerce store.
Pricing: Freemium (free + paid). The starting price of the paid plugin is $149 per year.
3. WP Rocket
WP Rocket is a leading WordPress caching plugin for performance and speed optimization. It helps you improve the SEO, core web vitals, conversion rate, and overall user experience of your website. Plus, you can integrate it with RocketCDN for enhanced performance.
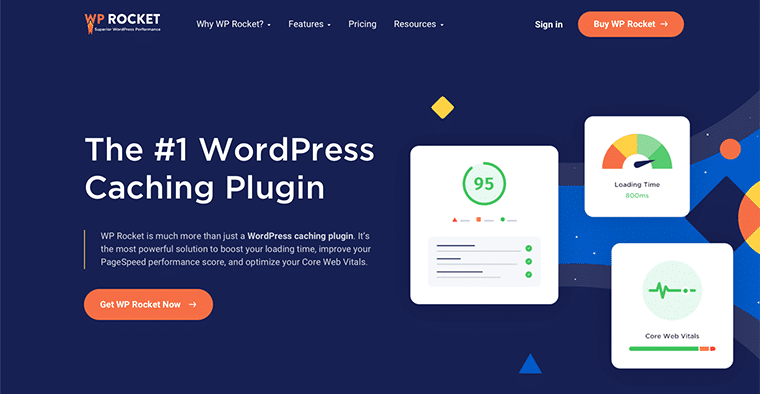
Some notable features of WP Rocket are lazy loading, database optimization, preloading, minification, GZIP compression, etc. So, it focuses on many aspects other than caching.
Pricing: Freemium (free + paid). The premium plan starts at $59 per year for 1 website.
Check out our honest review of WP Rocket to easily start using it.
4. Gravity Forms
Gravity Forms is the ultimate WordPress form builder plugin with a visual form editor and drag-and-drop interface. You can use this plugin to create any kind of form, such as contact forms, surveys, payment forms, etc.
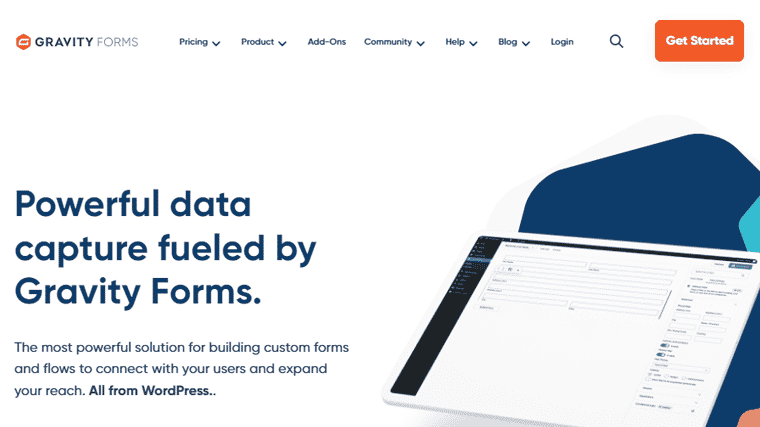
Moreover, you can utilize several fields on the form and edit them as you want. Also, it lets you configure your form like show/hide fields, sections, pages, and buttons. Then, you get to set the custom automated workflows for any form you build.
Pricing: It’s a premium plugin with a starting cost of $59 per year.
Alternatives: If you want free plugins, then you can go with WPForms or Fluent Forms. Both of them also include premium versions for additional features.
5. Rank Math
Rank Math is a rapidly growing WordPress SEO plugin that helps your website rank well on search engines. It’s referred to as the ‘Swiss army knife of WordPress SEO’. That’s because you’ll access a complete set of features for your website’s SEO and visibility.
On top of that, it provides several on-page SEO tools for SEO optimization of pages. Unlike other free SEO plugins, Rank Math allows content optimization for up to 5 keywords per page even in its free version.
Pricing: Freemium (free + premium), the premium plan begins at $3.99 per month.
Alternative: Here’s a Rank Math review to see if it’s ideal for improving the SEO of your online store. However, Yoast SEO is another WordPress SEO plugin used by most sites on the web. It’s one of the Nexcess recommendations you can consider using.
6. Buffer
Buffer is a popular social media automation tool that lets you schedule and automate social media posts. Simply put, you can share information about your products, deals, and other content on several social media platforms from one place.
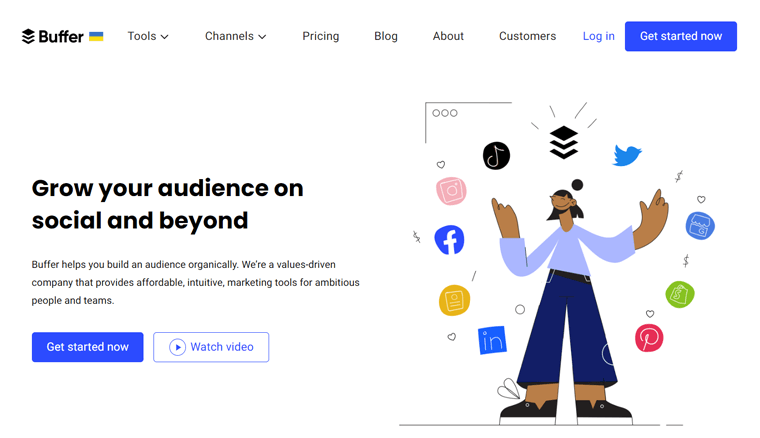
Moreover, it lets you customize the social media post content as you like. Also, schedule the different groups of posts based on your requirements.
Pricing: The free plan lets you connect to 3 channels. The starter plan adds more features at $6 per month per channel.
7. Veeqo
Moving forward, Veeqo is an inventory management tool that lets you manage your inventory, orders, shipping, etc. So, you can perform all these activities for your WooCommerce store from one place.
In addition, this platform works best for omnichannel retailers. Meaning, you can sell your products in WooCommerce and others like Shopify, BigCommerce, etc. But in one central location, it lets you manage the inventory.
Pricing: Veeqo is a 100% free tool without restriction on the number of users or shipments.
8. Google Analytics
Google Analytics is the ultimate analytical tool for analyzing all the data for your business from a single location. It’s a must-have tool for your eCommerce website. Using it, you can track your website traffic, user behavior, and sales performance.
Generally, the WordPress analytics plugins provide a Google Analytics dashboard on your WordPress website. So, before you utilize such a plugin, you should start using Google Analytics itself. With several visualizations, tracking and managing your site is simpler.
Pricing: It’s completely free to use.
Step 11: Launch Your WooCommerce Store
The steps to creating a WooCommerce store are coming to an end. But before you launch it, you must preview and test all its features so that potential customers don’t leave your store without doing anything.
Hence, we’ll state all the essential things you need to perform before launching your WooCommerce store. Keep reading:
1. Check if Your Website is Mobile-friendly
First, you must ensure that your online shop is mobile-friendly for users accessing it from any mobile device, whether smartphones or tablets.
Simply put, the website should let visitors easily perform actions when using any device. That can mean clicking buttons or viewing clear product images. For that, you must optimize the images and content for mobile viewing.
2. Review Your Product’s Display
As mentioned before, you must show high-quality images of your products. Further, the descriptions, currency, etc., should also be precise and accurate. Moreover, please verify the product categories and tags for each product.
So, you must check the pages of your eCommerce website to ensure they showcase the products beautifully. Yes, it must be well-organized and easy to navigate.
3. Test Your Website on Web Browsers
Not only on mobile devices, but your website should also be functioning well on all the major browsers. That includes Chrome, Safari, Microsoft Edge, Firefox, and more.
That’s why you must ensure your website is working perfectly on these browsers. That too, without any challenges or configuration required.
On top of that, the design and functionality of your website should also be the same in all browsers. If you find any issues, then resolve them instantly.
4. Test Your Payment Process
Another crucial review that you must perform before launching your WooCommerce store is to test its payment process. So, conduct a thorough test of the entire checkout process. That includes testing the transactions for smooth functionality.
Further, verify that the payment gateways and methods are configured and functioning accurately and securely. Also, confirm that order confirmation emails are sent promptly.
On top of that, check the configuration of all the other eCommerce components. That includes shipping, taxes, etc.
5. Launch Announcement
When you’re testing all the components of your eCommerce website, you can initially announce the launch. This builds anticipation among potential customers.
Thus, you can share the launch announcement through various channels, such as social media, email newsletters, etc. There, it’s possible to highlight the key features, promotions, or discounts to grab the attention of initial customers.
Right then, you can also encourage users to provide feedback and share their experiences on your new WooCommerce store.
With that, let’s dive into the final step of how to set up a WooCommerce store.
Step 12: Promote and Market Your Store
After launching your WooCommerce store and making some sales, your work doesn’t end here. It’s essential to actively bring people to your eCommerce store.
To do this, you must apply smart strategies that attract visitors to your website and turn them into customers. Don’t you know about them? Don’t worry; we’ll explore some simple and effective ways to build a successful online shop.
Let’s begin right away!
1. Optimize Your Store’s SEO
SEO is an essential strategy for any website for a successful business. So does it for online stores where there’s tough competition. Hence, eCommerce SEO can be a big deal for you!

To ensure your eCommerce store ranks prominently in search results and attracts customers, product pages need optimization. For that, a series of actions is necessary. That includes:
- Conduct keyword research and strategically use relevant keywords in product titles, descriptions, page URLs, etc. Learn how to add keywords to your website here.
- Optimize the website’s speed for better search engine rankings.
Learn all about SEO in this guide. Also, you can utilize the best SEO tools and the popular WordPress SEO plugins.
2. Loyalty Programs and Discounts
In your WooCommerce store, you can set up loyalty points for every purchase made. With this loyalty program, you can reward repeat customers, increasing customer retention.
Simply put, offering discounts, free products, deals, or promotions is possible based on the points earned by customers. Here, discounts can be for specific products, events, or seasons.
3. Social Media Marketing
Over half of the global population engages with social media. This shows that promoting and connecting with your audience through social media platforms is crucial. Hence, you must set up business profiles on channels like Facebook, Instagram, Twitter, and Pinterest.
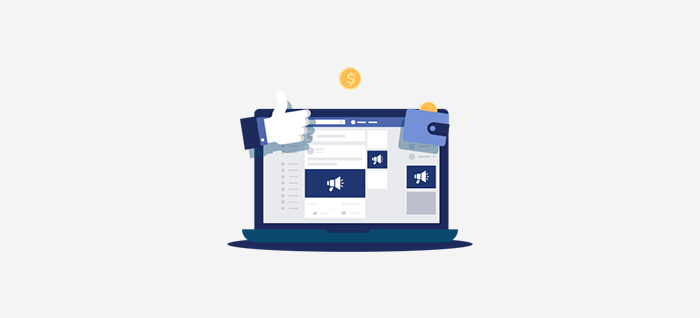
After that, you should regularly share engaging content, such as product images, promotions, events, etc. Also, connect with your recurring customers and take action on customer feedback.
Find the best social share plugins for WordPress. Also, learn how to add social media share buttons to your website here!
4. Content Marketing
To gain trust and engage with your audience, consider creating a blog. There, you should regularly publish content related to your products and niche. That can be about addressing common questions from your customers too.
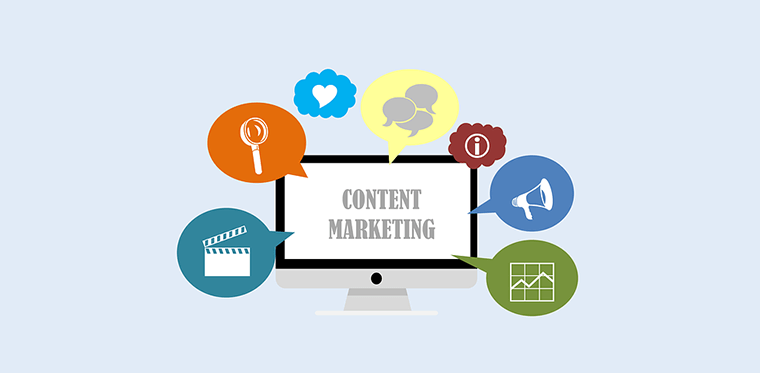
On top of that, you can generate valuable content like infographics and videos. All of this content is shareable on social media and via email. As a result, this drives more traffic to your store and conveys helpful information to customers.
Want to easily generate content? Then, find the best AI tools for content transformation.
5. PPC Advertising
PPC (Pay-per-click) advertising is a budget-friendly way to promote your eCommerce business. It lets you target ad space on search engines, social media, and websites.
Simply put, Google Ads lets you target potential customers searching for products that are similar to yours. With that, you can prioritize your eCommerce website in search results.
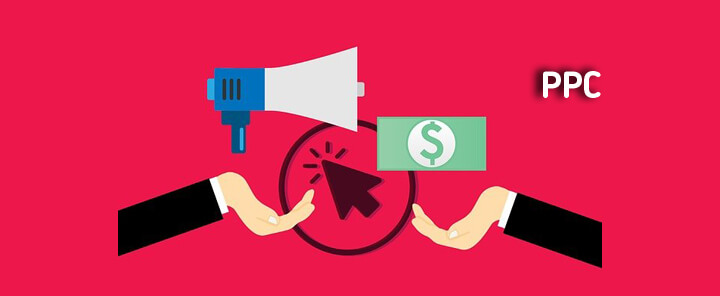
In addition, social media advertising is also beneficial for targeting specific audiences. Plus, retargeting ads is another way to bring back visitors who didn’t make a purchase.
6. Email Marketing
As said before, WooCommerce recommends using MailPoet for email marketing. But why? In email marketing, you must collect email addresses from your customers and site visitors.

After which, you can perform various actions to promote and market your products. Like:
| Strategies | Description |
| Segmentation | Lets you divide your email list according to customer behavior, purchase history, or preferences. With that, you can send targeted and relevant content to the right audience. |
| Newsletters | You can regularly send newsletters to share your valuable content, news, and updates on your WooCommerce store. |
| Other Email Variations | Further, you can also share promotions, offers, product recommendations, customer reviews, testimonials, and abandoned cart emails. All of these emails entice people and improve sales. |
| Automated Workflows | Using email marketing services, you can automate email sequences. That can range from welcome emails to the entire customer journey. |
For WordPress, you can use any email marketing plugin compatible with WooCommerce. Pick the best one from this listicle.
7. Affiliate Marketing
Affiliate marketing is an online marketing strategy that lets businesses reward affiliates for driving traffic or sales to their site. For that, affiliates use tracking links provided by the business and earn a commission for each successful referral or sale via those links.
Hence, you should also set up an affiliate program using a WordPress affiliate plugin. By doing that, other businesses can promote your products for a commission.
Furthermore, you can partner with influencers or bloggers who can create content about your store or products. In return, this helps you reach more customers and increase sales.
However, you must clearly identify relevant affiliates, commission structures, and payment terms. Also, it’s great if you offer promotional materials like banners, product images, etc.
8. Collaboration with Other Businesses
First, make sure to participate in online communities to interact with other businesses or potential customers. That can be done by joining forums, groups, and communities in your niche. There, share your expertise, answer questions, and promote your relevant products.
Following that, start collaborations or partnerships with other businesses. By doing that, you can offer joint discounts or bundled promotions. Also, it’s possible to co-host events, run social media contests, and generate joint advertising materials.

Ultimately, both eCommerce businesses will be able to expand their customer reach. Not to mention, influencer marketing is another way to increase brand awareness with the help of the popularity of suitable influencers.
9. Make Improvements and Scale Your Business
What’s more? You must continuously monitor your online store’s performance. Also, you should analyze the customer feedback. According to the insights, make sure to keep making improvements to your eCommerce website.
As your WooCommerce store grows, find opportunities to scale your business. You can also expand your product line. Plus, always stay updated on eCommerce trends.
Overall, expanding your business and monitoring it regularly also helps in accurately promoting your business to a wider audience.
In summary, setting up a WooCommerce store is a dynamic process. It involves careful planning, execution, and ongoing optimization. By following these comprehensive steps, you’re well on your way to building a successful eCommerce website.
With dedication and a customer-centric approach, your WooCommerce store has the potential to thrive in this competitive eCommerce world. Good luck!
Frequently Asked Questions (FAQs)
Last but not least, read the answers to the FAQs below so that all your confusion is crystal clear. Have a look!
1. Do I need any technical expertise to set up a WooCommerce store?
No, you don’t need to have advanced technical skills to set up a WooCommerce store. But it’s a plus point if you do. Nevertheless, its setup and usability process are beginner-friendly. Also, you’ll get access to resources, like this tutorial, for full guidance.
2. Which payment gateways are compatible with WooCommerce?
Popular payment gateways like PayPal and Stripe are compatible with WooCommerce. So, you can pick the one that suits your business needs.
3. How do I secure my WooCommerce store?
You can secure your WooCommerce store by implementing various security practices. That includes regular updates, using SSL certificates, installing security plugins, etc. All of them protect your store and customer data.
4. Can I migrate my existing online store to WooCommerce?
Yes, it’s possible to migrate your existing online store built on any eCommerce platform to WooCommerce. There are various tools and services available to assist with the migration process.
5. Are there any costs associated with using WooCommerce?
The WooCommerce plugin itself is free. So, the costs depend on your choice of hosting, domain name, premium theme, extensions, payment gateway, and additional plugins.
Do you want to know from A to Z about creating a website from scratch? Then, read this guide.
Conclusion
Let’s conclude our journey on how to set up a WooCommerce store with confidence! In this tutorial, we’ve mentioned the essential steps to creating a WooCommerce store.
Hopefully, you now have a solid foundation for the key components of your WooCommerce store. That’s from picking a reliable host to promoting your online shop.
By following this tutorial diligently, you can have your eCommerce store up and running efficiently. But if you face any confusion, then don’t hesitate to drop a comment below. We’re here to address your queries and guide you toward a successful implementation.
Further, you can read our similar articles on how to create a personal website and how to create a membership website.
If you found this article helpful, then why not share it with your friends and colleagues? Follow us on Facebook and Twitter for updates!