Are you wondering how to write a blog post outline? Well, you’re in the right place!
Think of a blog post outline as your writing map. It helps you write smoothly and keeps your readers engaged. Hence, having a solid structure beforehand is key to crafting a captivating blog post.
In this guide, you’ll discover how to convert your ideas into a well-organized blog post using the power of blog outlines. Also, you’ll learn how to write an outline for a blog post that boosts your blog’s ranking. All of that by using a noteworthy example!
Now, let’s explore the magic of optimized blog outlines to create engaging content!
Table of Contents
What is a Blog Outline?
Before diving right into the main topic, learn what a blog outline is.
A blog outline is a structured plan or a roadmap for your blog post. It lets you organize your thoughts, and content structure, and maintain the flow of the blog. Ultimately, you can now identify the main points that you’ll add to the blog post before writing it.

For example, let’s say you’re planning to write a blog post on the steps to install a WordPress plugin. But there can be several ways to do so. So, if you start writing a blog without any planning, then will your blog post be good enough? Certainly not!
Hence, you must create a blog outline that shows the different ways of installing a WordPress plugin. That could be for the free and premium plugins. This makes it easier to start writing your blog, isn’t it?
In return, visitors can also directly jump into the process they want to actually read from your blog. So, creating a blog outline is helpful for both you and your readers.
Video Tutorial – Creating Blog Outlines
Do you prefer watching a video to learn the blog outline creation process? If that’s a yes, then here we go!
If you want to keep reading, then read the steps of creating blog outlines that rank. All of us from the SiteSaga team follow these steps before and while writing a blog post outline.
Why is Creating a Blog Outline Important for Ranking?
A well-structured blog outline provides a roadmap to content creation. Moreover, it also improves its search engine performance and overall impact on the audience.
But why? Find the significance of creating a blog outline for ranking here!
1. SEO Optimization
When you create a blog’s structured plan, you must undergo some steps. They are detailed analysis of relevant keywords, their search intent, and competitors.
Now, if you write your blog post based on such a detailed outline, then no wonder that your blog will automatically rank well on search results.

For instance, generating blog outlines involves the identification and usage of target keywords in your headings and subheadings. With that, search engines can understand the main goal of your blog and improve the chances of ranking for those keywords.
In addition, creating a blog outline lets you organize your content better than your competitors. With a clear blog structure, search engines can easily crawl and index your content, positively impacting your website’s SEO (Search Engine Optimization).
Learn everything about SEO in this complete guide!
2. Content Relevance
You can identify the search terms, intent, and goals of your target audience after you conduct search intent and competitors analysis. Because of that, you’ll have a detailed blog outline. Now, when you write a blog based on that, you can create relevant content.

In simpler terms, a well-structured outline ensures that your content stays focused on the main topic. This prevents the addition of irrelevant or off-topic content. As a result, your message will be relevant to the target audience.
3. Readability and User Experience
Are you aware? Blogs that consistently publish high-quality content experience have an average growth rate of 30% in traffic. (Source: HubSpot)
Writing a blog post outline includes planning all the headings and subheadings you’ll include on your blog. With that, you can imagine that it’ll improve the organization of your blog post leading to more readability and user experience.
If you want to improve the user experience of your blog, then here’s a guide for you!

Simply put, here’s how it works:
- Readers can now quickly scan through the sections of your blog and find the information they need, enhancing user experience.
- The logical flow of your thoughts helps users read and understand the blog better.
- Easy navigation on your blog post engages readers, minimizing bounce rates.
Read the benefits of personal blogging and the benefits of blogging for business here!
With that, let’s jump into the next section!
Things to Do Before Creating a Blog Outline
Thinking it’s now time to start creating a blog outline? No, not yet! You must perform a series of actions beforehand. Here’s a checklist of those things to do:
1. Choose and Optimize the Blog Headline
First of all, you must have the blog headline or article title for the blog post. Based on that, the other steps will continue.
Hence, you must brainstorm and generate a list of possible blogs you want to write. Accordingly, select a suitable topic and focus on that.
Now, you must think of a catchy and engaging headline for that idea to resonate with your target audience. Overall, it should be relevant to your blog niche.
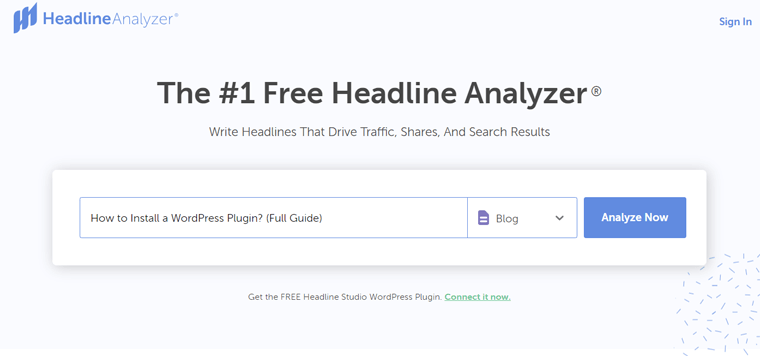
Do you have a dilemma on what headline to go for or how to optimize it? Then, you can utilize tools like AnswerThePublic, CoSchedule Headline Analyzer, BuzzSumo, etc.
Know that a blog title is different from a website title here!
For this tutorial, we’ll go for the title ‘How to Install a WordPress Plugin? (Full Guide)’. Taking this as a reference, we’ll continue the other steps of this guide.
2. Keyword Analysis
50% of bloggers perform keyword research for their blog content. (Source: Orbit Media)
So, you must conduct a thorough keyword analysis to pick relevant and high-performing keywords related to your blog title. Further, try identifying keywords with high search volume and low keyword difficulty. Then, use various short-tail and long-tail keywords.
For example, you can utilize SEO tools like Google Keyword Planner, Semrush, and Ahrefs to discover them. Let’s use the Keyword Magic Tool by Semrush.
In the screenshot below, you can find some keywords for our chosen topic along with their keyword difficulty and search volume in Semrush.
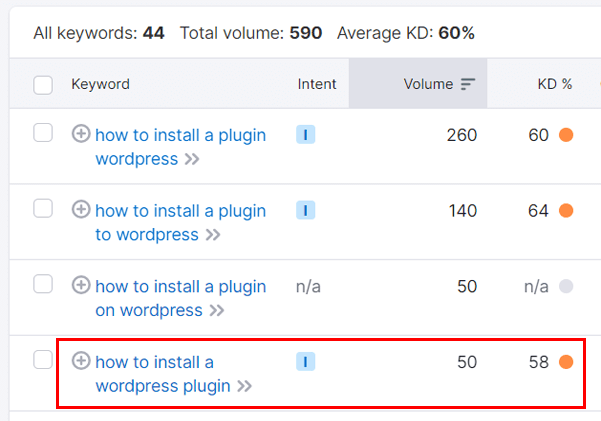
Hence, the ideal focus keyword in this scenario can be ‘how to install a WordPress plugin’. The reason is its high search volume and low keyword difficulty.
Learn how to use Semrush for free with its free trial to enjoy the premium features here!
3. Search Intent Analysis
When you analyzed the keywords on Semrush, did you find a column for search intent? Yes, we do, right? Basically, search intent refers to the questions or things that are in people’s minds when they search for something online.
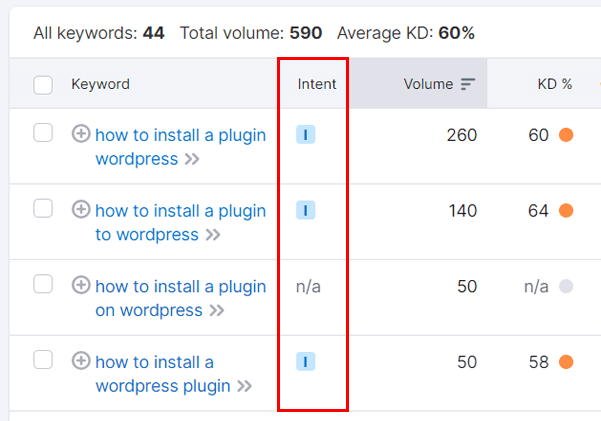
Before creating a blog post outline, analyzing the search intent is also necessary. But you must know what every search intent means.
Types of Search Intent
Generally, there are 4 major kinds of search intent. They are:
| Types of Search Intent | Description | Example |
| Informational | When users are seeking information about something | How to install a WordPress plugin |
| Navigational | If users are looking for a specific website or webpage | WordPress.org |
| Commercial | If users are comparing products or services that they may buy | Best portfolio WordPress themes |
| Transactional | When users intend to make a purchase or perform an action | Buy a WordPress.com plan |
Once you’re aware of the search intent types, you must learn the process of analyzing them. For that, you should understand your blog readers. To understand what your blog readers want, think about the questions they may have when they search.
For example, in our chosen topic, they may be curious about these things:
- How to install a WordPress plugin?
- What are the things to keep in mind before installing a plugin?
Following that, consider who your readers are. Meaning, who are the target audiences or people who are thinking these questions and searching online. In this example, the people are beginners trying to use WordPress plugins.

After identifying and understanding your readers, hopefully, you’ll recognize which search intent your chosen keyword is. In our example, the ‘How to install a WordPress plugin’ keyword is informational search intent. Do you know why?
It’s because people are trying just to seek information about the process of installing a WordPress plugin. As simple as that!
Blog Outline Goals
Once you figure out the search intent, you must list out the goals of your blog outline. But remember to construct the goals in such a way that it expresses your users’ search intent in the best way possible.
For instance, the goals of the example blog headline can be:
- To make WordPress users (beginners) learn the requirements before installing a WordPress plugin.
- To state the various methods of installing the WordPress plugin.
4. Competitor Analysis
The next step after search intent analysis is to perform competitor analysis. To do that, you must identify your main competitors. Just use your keyword on the search engine and check the top 5 competitive articles that are ranking well.

In addition, you must analyze their various content strategies, such as:
- Explore their article headlines, headings, and subheadings.
- Analyze their writing style and format.
- Find out their word count using online tools.
- Take notes from their rich schema and multimedia elements utilized. That includes images, videos, FAQs, infographics, etc.
- Search for their targeted keywords and their SEO strategies using SEO tools.
- Look for gaps or areas where you can provide unique value to your audience.
Based on these insights, you can plan out your blog outline. That includes determining the expected content length, writing format to use, etc.
Did you know? Long content is most effective for SEO and the average length of top-ranking content is around 1447 words. (Source: Banklinko) So, you can take the help of the WordCounter online tool for competitor analysis.
Just add the URL links of the competitive blog posts one by one. Then, check their number of words. Now, all you have to do is take an average and use that value as a base on how long yours should be.
Once you’re all set, you can start the blog creation process. That’s where we’re heading towards next!
How to Write a Blog Post Outline?
Now, we’re on the main part of this step-by-step guide. Here, you’ll learn how to write a blog post outline that helps your blog to rank well on search engines. This involves multiple steps, so buckle up your seatbelts and get ready!
Step 1: Begin with the Introduction
Your blog outline should always start with an introduction section. An introduction gives the overall overview of your blog post to instantly captivate your readers’ attention. Within the introduction, you must plan on adding the following major components:
- Start your introduction with a thought-provoking question or surprising fact. This makes the readers want to continue reading.
- Welcome your readers with a warm message to engage them from the beginning.
- Introduce your topic or give context about your blog post. This helps the readers know what to expect from the post.
- Also, mention the purpose or main idea of your blog post. This lets the readers know what they’ll gain after reading this blog.
- Give a quick preview of the headings your blog post contains for a roadmap.
- Encourage the readers to keep reading the article.
- Lastly, insert a table of contents that lists the blog’s headings and subheadings.
Step 2: Headings and Subheadings You’ll Cover
Following that, you must plan your blog post’s body section. Here, you have to discover and break down the main topics your blog will contain in logical sections. Simply put, plan out the headings and subheadings to organize your thoughts and structure your blog.
Tips for Organizing Your Content
Unsure about organizing your blog content while creating your blog outline? Here are some tips to follow:
- If a section requires long content, then divide them into smaller subheadings.
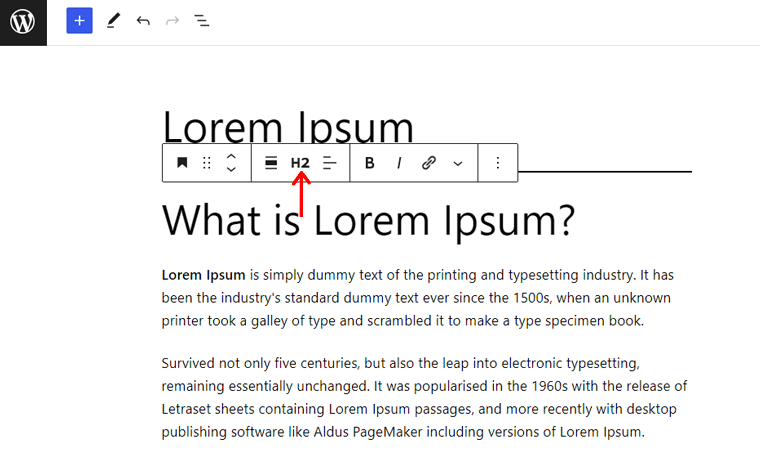
- Use a hierarchical structure for headings. The main heading (H1) is the blog headline, followed by H2 for main sections, H3 for subheadings, and so on.
- There must be a logical order of the sections for a natural progression of ideas.
- The headings and subheadings must be clear, descriptive, and concise.
- Insert relevant keywords into your headings and subheadings for SEO benefits.
- Within the subheadings, you can also use bullets to specify the content you’ll add.
Here’s a full guide on how to write engaging blog posts. This shows the major components of a blog post that help you in the formation of your blog post outline.
Blog Outline Example
Here’s an example of a blog outline containing the headings and subheadings identified:
- Things to Remember When Installing WordPress Plugins
- How to Install a WordPress Plugin?
- From the WordPress Dashboard
- Using the ZIP File
- Manually via FTP
Step 3: Add Supporting Evidence and Examples
When you’re writing a blog post outline, you can also add sections or plan the headings where you can insert various supporting resources. They can be:
| Supporting Resources | Description | Example |
| Statistics | Include relevant statistics that support your points and add credibility to your content. | There are over 59,000 plugins available for free on WordPress.org. |
| Examples | Use real-world examples that elaborate your ideas and make them more suitable for the reader’s understanding. | WordPress plugins like Rank Math are the most downloaded, showcasing their widespread use for web content optimization. |
| Case Studies | If applicable, then you can insert case studies that provide insights and deep analysis of your context. | Learn how a small business website increased its conversion rate by 15% after installing a lead generation plugin. |
However, these supporting evidence and examples may not be valuable for every blog post. So, it’s not compulsory to plan and include them while writing a blog post outline.
In that case, you can add sections that can be relevant to every blog post. For example, you can insert a FAQ section near the end of your blog post outline. Adding a FAQ section is beneficial for the content visibility in the search engines.
If you have a WordPress blog, then take the help of one of the best WordPress FAQ plugins.
Step 4: Insert Optimized Visuals and Media
Here are some interesting facts and statistics:
- Adding videos to blog posts can have a 4x improvement in the engagement metrics. (Source: Orbit Media)
- If you use over 7 images per post, then your blog website can have 2.3x stronger results. (Source: Orbit Media)

Similarly, you can outline the areas where you’ll insert relevant multimedia into your blog post. Meaning, you must think about what images, infographics, or videos you’ll add to your post that’ll engage your readers. But remember these guidelines:
- Images: It’s best to add an image after every 2 or 3 paragraphs. Ensure you create high-quality images that complement your content and improve its visual appeal. But you must optimize the images beforehand using optimizer tools.
- Videos: If your blog post is a tutorial, review, or guide, then you can embed at least 1 related video that provides additional context or demonstrations.
- Infographics: Suppose your heading has to elaborate complex information. Then, you can plan to insert infographics to visually describe the content.
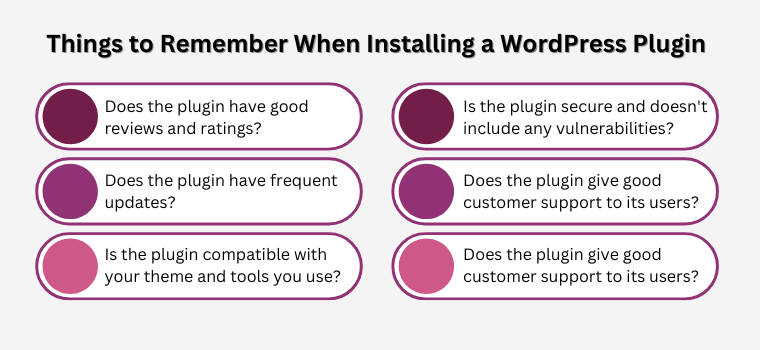
For example, you can add an infographic for the heading ‘Things to Remember When Installing WordPress Plugins’ like below. This infographic shows the different factors to consider while installing a WordPress plugin.
Step 5: Keyword Placement
Keyword placement is another vital step when creating a blog post outline for enhancing SEO and content relevancy. We have already mentioned the process of finding relevant keywords for a blog post.
Following that, you must strategically incorporate those relevant keywords into your content. Hence, it should be on these sections of the blog:
- Blog title
- Headings
- Subheadings
- Introduction
- Body section
- Conclusion.

In addition, you must be aware to keep them in your URL structure and image alt texts. Also, keywords should be utilized in the meta description and meta title. So, it’s ideal to plan everything out when writing a blog post outline.
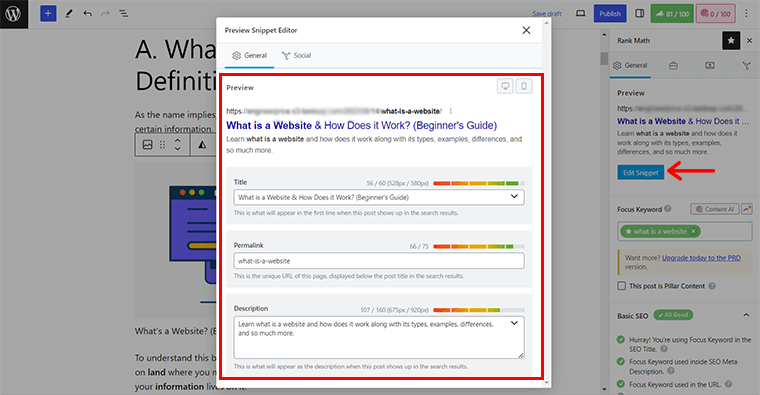
However, avoid forcefully or excessively using keywords that refer to keyword stuffing. This practice is discouraged by search engines.
So, what’s the best way to use keywords in all these places but avoid keyword stuffing? The answer is utilizing the various related keywords.
Keywords can be long-tail and short-tail. Long-tail keywords are specific phrases with low search volume but they usually attract highly targeted traffic. Whereas short-tail keywords are short search terms like the ones we considered for our focus keyword.
Therefore, you can use broad and specific keywords in your blog outline or when planning your blog post. In this way, it helps you cover a wide range of search queries.
Learn the entire process of adding keywords to your website here!
Step 6: Find Internal and External Linking Sections
Are you aware? 72% of bloggers believe that using internal linking boosts their SEO. (Source: Orbit Media)

To improve the credibility of your blog post, you can write a blog post outline mentioning the sections for internal and external links. By strategizing the incorporation of these links, you’ll receive lots of benefits to enhance the blog’s ranking.
So, learn what these links are, their importance, and how to find these sections below:
| Internal Links | External Links |
| Internal links mean adding links to relevant blog posts on your website so that visitors have more exploration. | External links mean adding links to reputable sources from other websites to support or provide additional details on your blog topic. |
| Adding internal links enhances user engagement, improves SEO, reduces bounce rate, and establishes the topic authority of your niche. | Adding external links increases credibility, trustworthiness, the relationship between other bloggers, and collaboration opportunities. |
| Find sections to add internal links as much as you want while creating a blog outline. | Find sections to add external links only when you want to provide evidence of your content. |
Step 7: Keep Call-to-action and Conclusion
Hopefully, your outline with the headings and subheadings is ready. Also, we hope that you planned out the position of the different essential components in your blog outline. But that’s not the end! Your outline should end with a conclusion section.
There, you must summarize the key points of your blog post. Also, you can recommend your readers with certain tips related to your article title. On top of that, you can plan on adding all the following things to enhance user experience and take certain actions:
- Encourage readers to leave a comment if they have any queries or liked your post.
- Recommend the readers to visit other similar blogs from your website.
- Ask the readers to share the post or subscribe to your newsletter.
- Include your social media profile links so that interested readers connect with you.
In addition, you can plan on adding other call-to-action buttons to your blog post. It can be for subscribing to your blog, downloading the content, or visiting other blog posts.

Step 8: Final Outline Review and Refine
Before you start your blog post using your blog outline, you must proofread it for grammar, spelling, and coherence. Here’s a quick look at them:
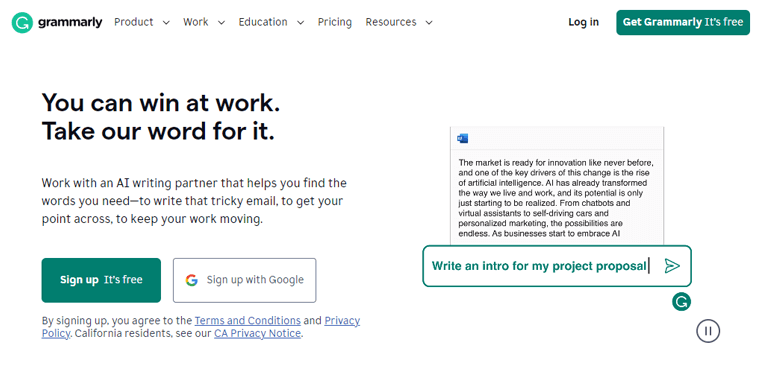
- Grammar: Use tools like Grammarly to check for grammatical errors. Also, ensure that your headings are clear and concise with respect to your blog title.
- Spelling: Verify the spelling of words to reduce typos and errors. Having accurate use of words on the outline shows the professionalism of your content.
- Coherence: Recheck that the ideas flow logically from one point to another on your blog outline. There must be consistency in your language and writing style.
In addition, you must ensure that the outline aligns with your blogging strategy and brand voice. Your blogging strategy for this specific blog article depends on the search intent. So, verify if the outline educates, solves a problem, or guides your audience.
Moreover, everything you plan must have the same brand voice. It can be formal, casual, informative, or humorous. So, pick a type to reflect your blog’s personality.
Other than that, you can double-check the keyword integration, visual consistency, etc. Plus, you can ask for a senior or colleague to check your blog outline.
Step 9: Utilize AI Tools or Templates
If you need, then you can take the help of online tools for writing a blog outline. It can be AI (Artificial Intelligence) tools like ChatGPT or templates from other web sources.
It’s ideal to use them just to add additional blog sections that you may have missed out on. But don’t use them blindly as the suggestions can be inaccurate.
Suppose you can enter a prompt in ChatGPT like below and you’ll get a blog outline:
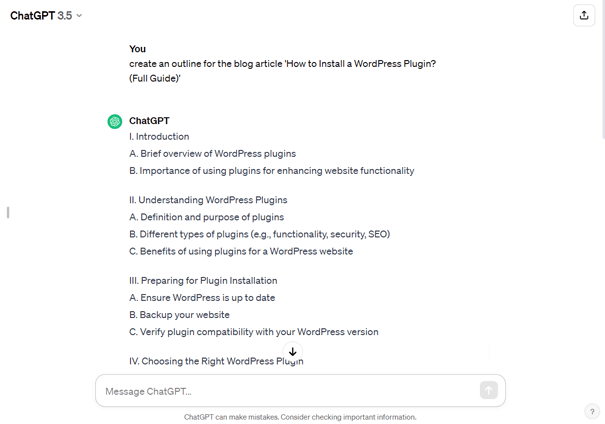
This concludes the steps on how to create a blog outline. All of them help your blog outline to create content that ranks well on search engines and provides engagement to the readers.
Find the best AI rewriter tools and learn how to use AI for SEO here!
Frequently Asked Questions (FAQs)
Got more questions? Your queries may already be answered in this FAQs section!
1. What are some effective strategies for selecting a compelling blog topic?
You must select a compelling blog topic by considering your expertise or passion, researching trending topics, and recognizing your audience’s interests. These are some effective strategies that let you pick something that resonates with you and your readers.
2. How can understanding my audience influence the blog outline?
Understanding your audience influences your blog outline because the content structure is made based on their interests, preferences, and needs. Hence, knowing their questions and concerns lets you build a roadmap that engages and addresses their expectations.
3. What are some common mistakes to avoid when crafting a blog outline?
When crafting a blog outline, some common mistakes to avoid include neglecting your audience’s perspective, not organizing the ideas logically, being too vague, etc. Thus, your blog outline must be clear, relevant, and have a logical flow for user engagement.
4. How does a well-structured outline contribute to the overall success of a blog post?
A well-structured outline contributes to the overall success of a blog post as it provides a roadmap for your writing. It helps you cover all the key points in a logical flow improving the blog’s readability and impact. More visibility results in more success.
5. Can I adapt this outline creation process for different types of blogs?
Yes, you can adapt this outline creation process for different types of blogs. Here, we gave an example of a tutorial headline. But you can use it for a personal story, product review, or anything. Just maintain focus, organize ideas, and deliver content coherently.
Don’t know where to begin your blog? Then, here’s a comprehensive guide on how to start a blog and make money. Also, check out the best blog website examples.
Conclusion
That’s a wrap! We’re at the end of this article on how to write a blog post outline. Hopefully, now you’re able to prepare perfect blog outlines that help your posts rank.
In summary, most bloggers today are creating blog post outlines before starting to write. This shows the significance of constructing blog outlines. Hence, you must write a blog post outline covering all the essentials of a good blog post.
If you have any more queries, then don’t hesitate to mention them in the comment section. We’ll gladly reply to you with the possible answers to your questions.
Furthermore, you can also read some helpful guides from our blog. They are the best WordPress blog themes and what’s the best blogging platform.
Lastly, follow us on Facebook, Instagram, and Twitter to get updates on our blogs.
