Are you eager to know how to change product page layout in WooCommerce with ProductX? If it’s so, then you’ve landed in the right place to learn that.
WooCommerce is one of the most popular eCommerce platforms to create an online store or eCommerce business. It provides you with powerful functionalities to run an online store.
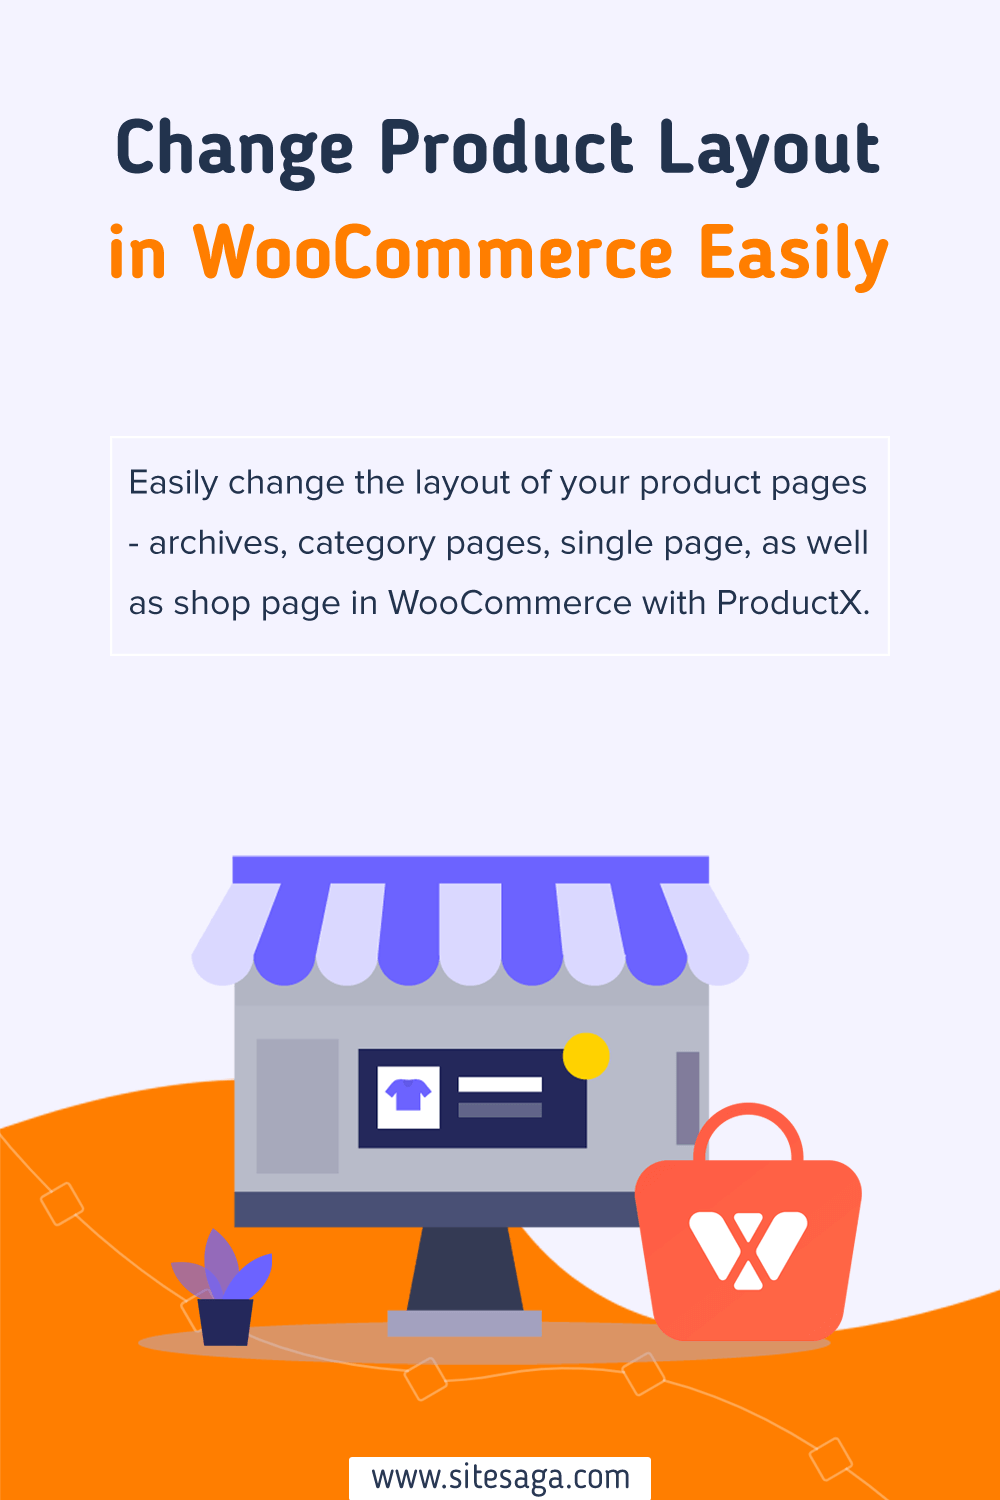
But along with the functionalities, you need an attractive product layout to drive more sales. ProductX solves that problem by offering amazing custom WooCommerce blocks and the ability to change the product page layout in WooCommerce.
Here, in this article, we’ll show you how to change the product page layout on your WordPress WooCommerce website with ProductX in detail.
Without further ado, let’s dive in.
Why Change the Product Page Layout in WooCommerce?
No doubt, an attractive and visually appealing product page layout will help you boost your conversion rate. And further increase sales from the existing visitors to your website.
So, talking about the default WooCommerce product page, it’s built using a very basic WordPress template. It’s functional and covers the essentials of a product page. However, WooCommerce doesn’t offer much in the way of customization.
But you don’t need to worry at all! There’s a possibility to utilize different WooCommerce themes to change the look and feel of your product page.
Not only that but there are also WooCommerce plugins that help you customize your WooCommerce-based site. They’re perfect when you want to make a specific adjustment without changing your theme.
Among such plugins, ProductX is one great option available. It comes with a number of custom WooCommerce blocks to design your WooCommerce store. Plus, you’ll get to change the layout of your product pages easily.
So, let’s start by learning a little more about the ProductX plugin.
Introducing ProductX – WooCommerce Custom Blocks Plugin
ProductX is a simple yet sophisticated Gutenberg blocks plugin for WooCommerce. That’s to say it’s a WooCommerce extension plugin that offers custom blocks and extra features for your WooCommerce store.
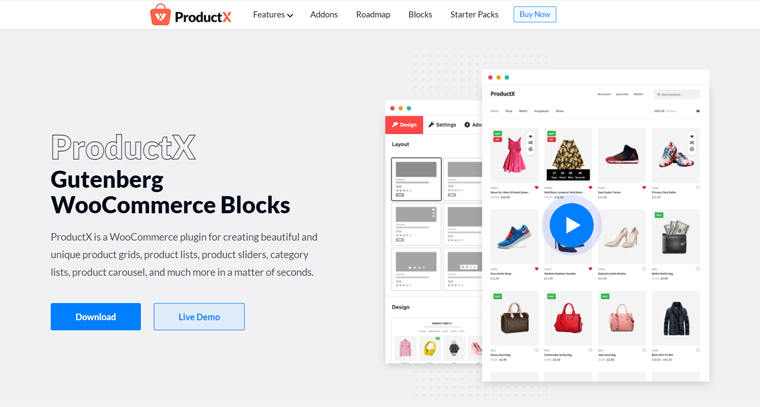
This plugin, in essence, adds a variety of product blocks to your WooCommerce product pages. For instance, a product listing, a slider, a category listing, a carousel, etc.
Moreover, it also has a quick view, product comparison, image flipping, wishlist, and many more useful functions. You can also display your most recent products, best-selling products, on-sale items, featured items, category items, and so on.
You can use it to create beautiful layout designs for your WooCommerce store, both the single product page and archive page. Ultimately, adding more elegance to be able to sell anything in your eCommerce store in larger quantities.
Not to mention, it offers ready-made designs to create the ideal product page without having to start from scratch.
Hence using ProductX, you have complete control over how you wish to craft your product page. You can arrange your products in a list or in attractive grids or in sliders.
Key Highlights of ProductX:
Let’s take a deeper look at the key features of this plugin to get a better understanding of it:
- You can utilize a variety of criteria, including category, tag, order, filter, offset, and more to show products
- Easily embed your design into the grid blocks with its vast customization possibilities.
- Offers an advanced query builder that lets you create your own bespoke query to display your products.
- Employ the Ajax filter to swiftly view the required products in case of a plethora of products displayed.
- Activate the sales status functionality to keep consumers up to date on the status of their orders.
- Allows you to view your goods’ current stock status in a grid format.
- The pagination and ‘load more’ features of post lists and post grids make navigating products a breeze.
- As ProductX works with multilingual plugins like WPML and Loco Translate, you can localize your products all over the world.
ProductX Pricing:
ProductX is a freemium plugin that’s available for both free and premium versions. From the WordPress.org directory, you can download the free version straight to your dashboard. It’s also possible to get it via the company’s official website.
You can, however, upgrade to the premium version to unlock the complete set of features. The premium version is available at the following pricing schemes:
- 1 Site License Plan: Costs $39/year or $119/one-time payment for a single site license.
- 5 Sites License Plan: Costs $63/year or $199/one-time payment for 5 site licenses.
- Unlimited Sites License Plan: Costs $79/year or $311/one-time payment for unlimited site licenses.
Also, all the pricing schemes come with premium support and updates, and all pro features.
How to Change Product Page Layout in WooCommerce with ProductX?
You can change the product page layout in WooCommerce in a few simple steps. So stick with us as we take you on this adventure.
Step 1: Install & Activate the ProductX Plugin
ProductX can be installed on WordPress just like any other WordPress plugin. The setup is a lot easier.
To clarify, in order to use ProductX’s premium version, you must first install the free version. Firstly, we’ll see the free version installation process and then head towards premium.
I) Install & Activate the ProductX Plugin (Free Version).
The first thing to do is log in to your WordPress dashboard from where we’ll download the plugin.
Now, on the left navigation of the dashboard, go to the ‘Plugins’ section and click on the ‘Add New’ button.
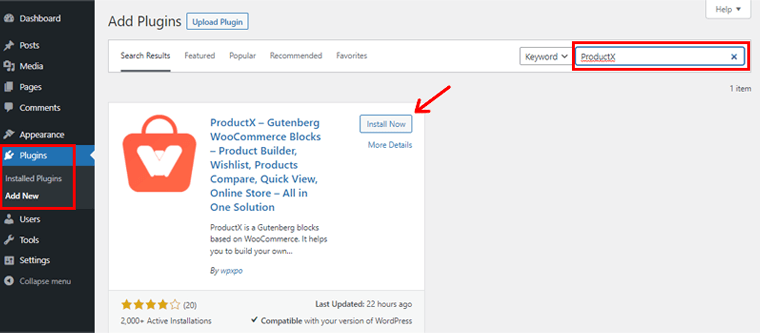
At the top right corner of your dashboard, type the ‘ProductX’ plugin in the search field. Once you’ve located the plugin, click on the ‘Install’ button.
After installation is complete, you’ll see the ‘Activate’ option, as shown below. Click the button to activate it.
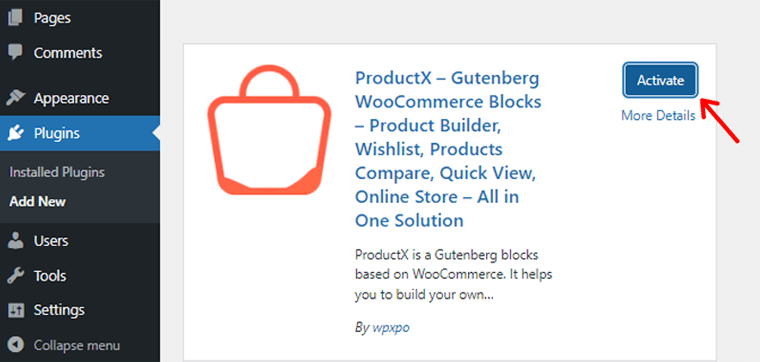
The free version of the ProductX plugin has now been successfully installed. Afterward, the welcome page will appear with the ‘ProductX’ menu in the left navigation box.
II) Set up the ProductX Plugin.
Below the ProductX section, there are a couple more sub-menus. There, you’ll find the ‘Settings’ option.
There are options for General Settings as well as other addon settings like Compare, Flip Image, and so on.
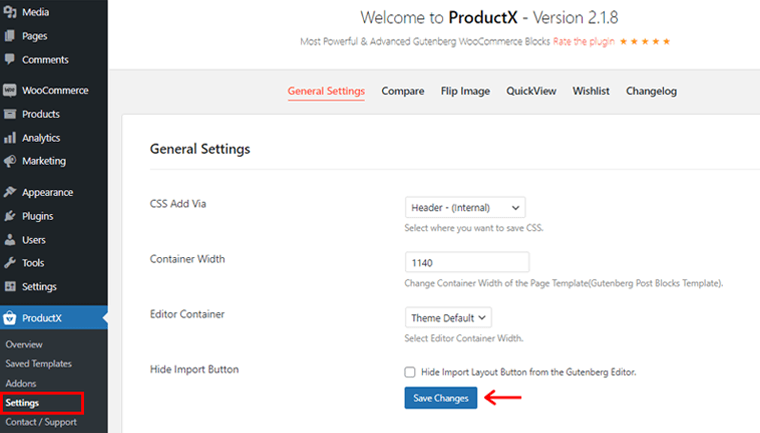
After that, you can tweak things to fit the needs of your website. Ultimately, click the ‘Save Changes’ button to save any changes you’ve made.
Since the ProductX plugin is a WooCommerce extension plugin, it extends the functionality of WooCommerce by offering various needed blocks.
So, you need to install the WooCommerce plugin in order to utilize the ProductX plugin.
If you haven’t already done so, you can also get a notification on your dashboard to install the WooCommerce plugin.
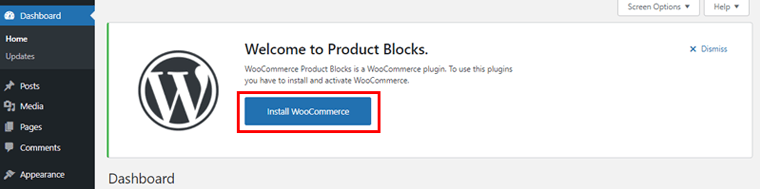
Simply, click on the ‘Install WooCommerce’ option on the notification panel. Following that, activate and set up your WooCommerce store.
III) Purchase the Premium Version of the ProductX Plugin
The first action you should take is to go to WPXPO’s landing page and purchase premium ProductX.
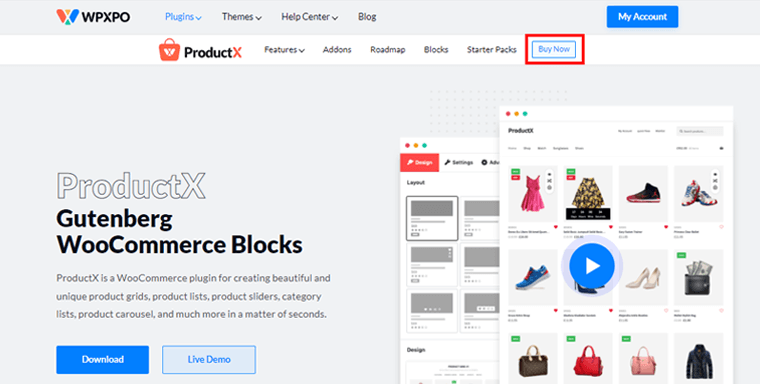
Then click the ‘Buy Now’ button on the navigation bar. You’ll be taken to the ProductX pricing page after that.
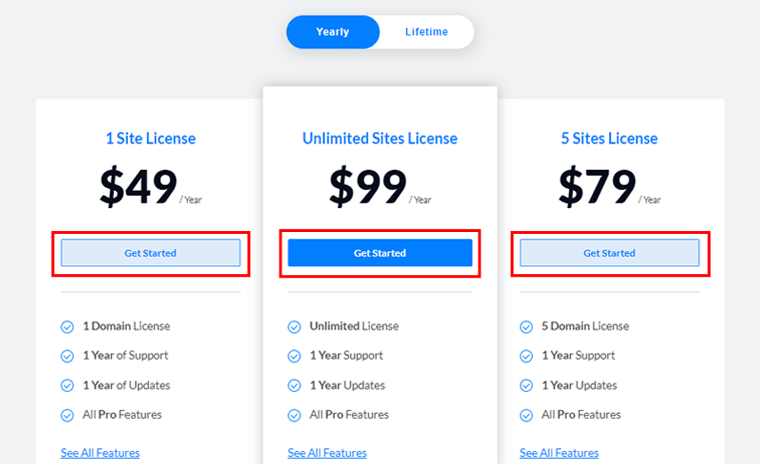
You’ll see different pricing schemes available. Select the option that best meets your needs and click the ‘Get Started’ button.
A new Checkout page will appear after that.

You’ll need to fill out all of the required information and create an account there. You can also apply a coupon code for a discount if you have one.
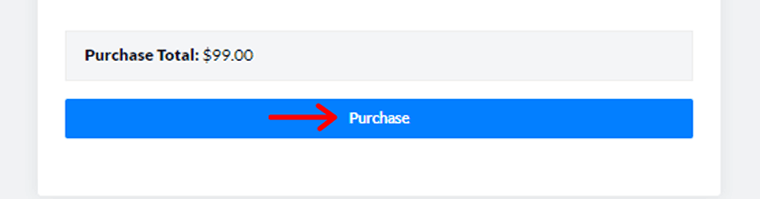
After you’ve filled all of the fields, click the ‘Purchase’ button.
Upon successfully purchasing ProductX pro, you’ll receive an email with a download link and license key. You can then download the premium ProductX zip file. And save the license key for later use.
IV) Upload, Install & Activate the ProductX Plugin (Premium Version).
To install the premium ProductX plugin, you must first upload the zip file you previously downloaded.
To do so, go to your WordPress dashboard and click on ‘Add New’ under the Plugins menu.
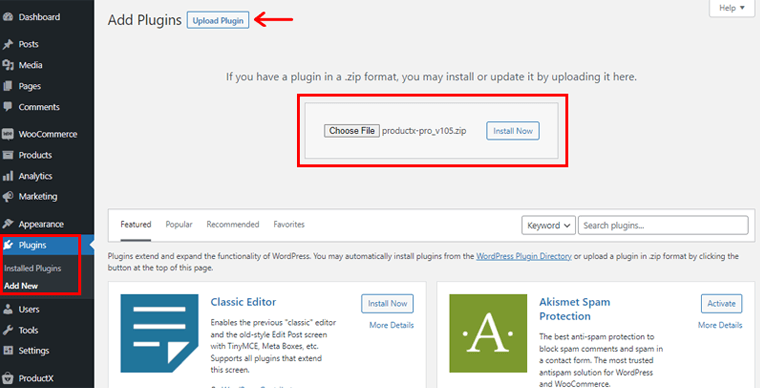
Following that, click ‘Upload Plugin’ and then the ‘Choose File’ option. Now, upload the downloaded file in that area. And click the ‘Install Now’ option next to it.
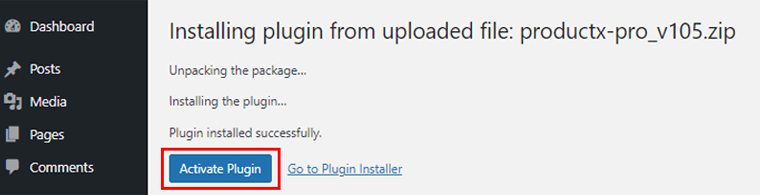
Afterward, you’ll see the ‘Activate’ option, click on it.
V) Insert your License Key
Following that, you’ll be taken to a licensing key page, where you’ll need to enter the license key that you previously saved.
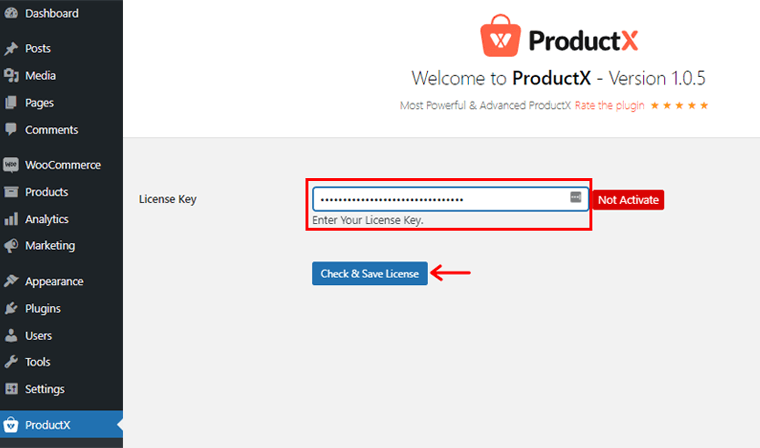
Place the license key in the License key box and click ‘Check and Save License’.
That’s it! Your license key and the premium ProductX plugin have both been enabled successfully.
Don’t forget to set up your premium version’s Setting choices the same way you did the free version.
Step 2: Creating Single Product Page Layout Using ProductX Builder
ProductX premium version features an exclusive WooCommerce Builder Addon that helps you to create or change the product page layout. Essentially, using this addon, you can easily create a single product page layout.
Note that for your product page layout, you must first create and publish your products in various categories. If you already have a WooCommerce store, this shouldn’t be an issue. Simply follow our guidelines as we walk you through the procedure.
Also, you can import the WooCommerce demo products to test out the plugin for the upcoming illustration.
So, let’s see how to create a single product page layout in depth.
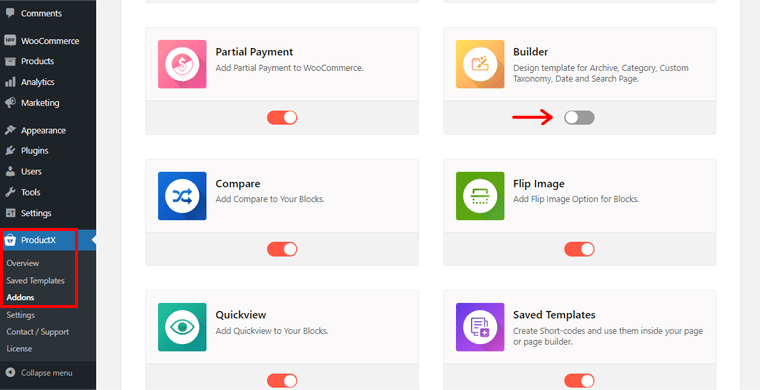
I) Activate the Builder addon to Create the Template
Now, the first thing you need to do is activate the Builder addon. To do so, navigate to ‘ProductX’ in the left navigation and then to ‘Addons’. Then, enable the Builder addon.
Then, under the ProductX menu, you’ll notice a ‘Builder’ option. Click on it.

Following that, click the ‘Add New’ option on the top left side to build a new template layout.
Then, you’ll see the page as shown below. There, you need to put in the required information on the Name of Your Template and Select Template Type fields.
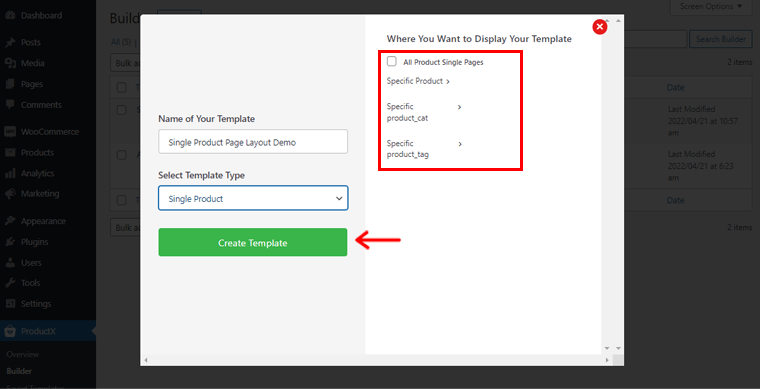
So, let’s put the name as ‘Single Product Page Layout Demo’. On the Select Template Type field, you’ll see 3 options. They are Single Product, Product Archive, and shop. You are free to choose any of them depending on your requirements. As of now, we chose Single Product.
After that, you must determine where you want your template to be displayed. On the right, you’ll notice a number of options:
- All Product Single Pages
- Specific Product
- For Specific product_cat
- Specific product_tag
These settings may also differ depending on the template type you’ve chosen.
So we’ll enable the option for All Product Single Pages here. Then, click on the ‘Create Template’ option below.
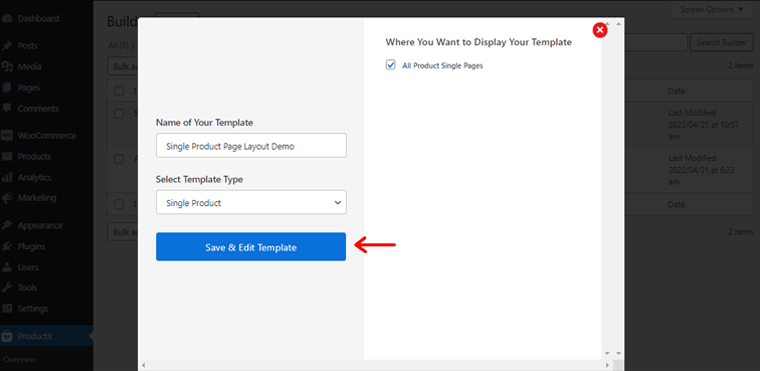
When you’re finished, click the ‘Save & Edit Template’ option. Just click on it.
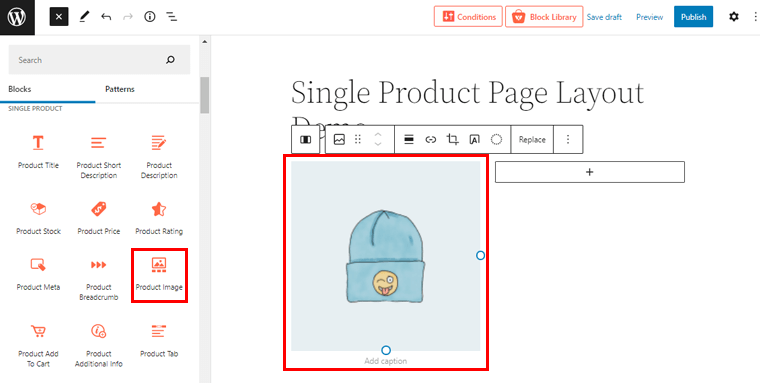
You’ll now be taken to the page editor. Click the (+) icon on the left side of the page editor. So, if you scroll down a little bit, then you’ll see various Single Product blocks.
To be precise, you get 14 Single Product blocks to utilize for creating your desired single product page layout. Furthermore, each block’s design includes Style and Advanced design features as well. However, depending on the block chosen, the options for customizing each design aspect vary.
II) Add Single Product Blocks
Now, let’s add a few key single product blocks and customize them to build the single product page layout.
To make our single product page layout more precise, here we’ve added 2 columns from the block editor.
To do so, simply click on the (+) icon and click on the ‘Column’ option to select the required number of columns.
i) Product Image Block
Now, in the first column, you need to add the Product Image block. From the Single Product Block fields, you can simply drag the Product Image block to the column you’ve created previously.
ii) Product Title Block
Following that, you need to drag the Product Title block on the second column to add the title to your product.
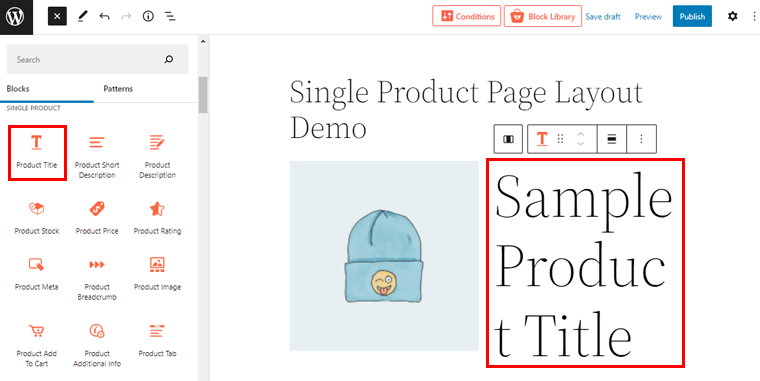
Now, you might see the Product Title is quite larger in size. Simply double-click on it. And on the right, you can see customization settings.
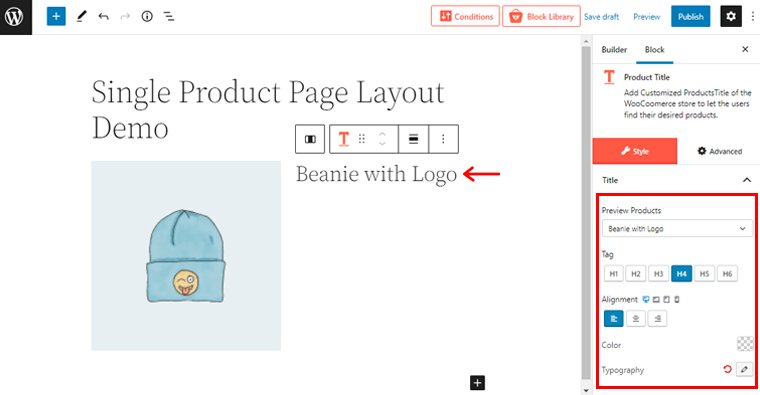
Here, you can change the product name, heading tag, alignment, color, and typography.
Now, we’ve added a few more sub-column in the second column to add more blocks.
iii) Product Short Description Block
And with that, you can also add a short description of your product using the Product Short Description Block on the sub-column in the second column.

Now, like before, simply double-click on the description to access the customization settings on the right.
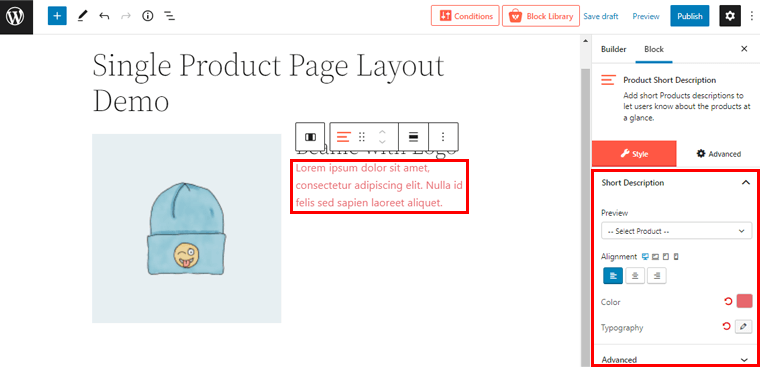
From there, you can change the alignment, description color, typography settings, and other advanced settings.
iv) Product Price Block
As we know, price is one of the important factors to show in your product page layout. So with that, let’s add the Product Price block.
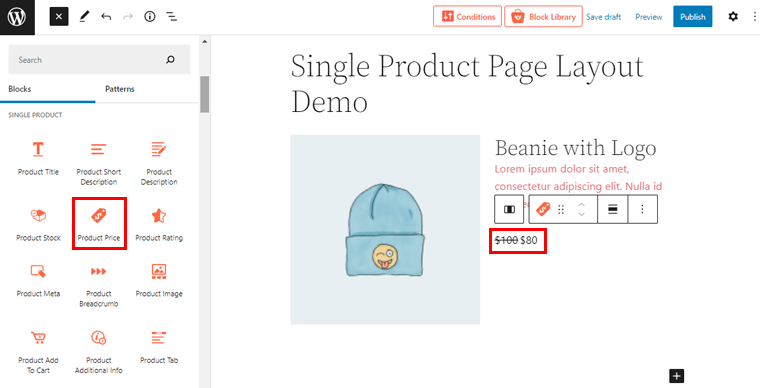
You can double click on the price to further tailor it to your design.
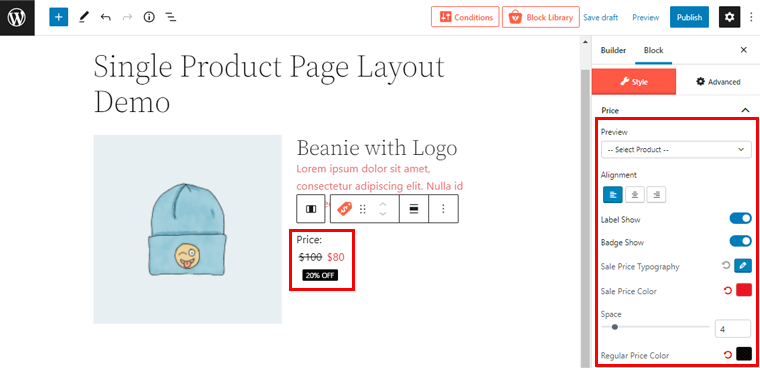
On the right, you’ll see all the customization as shown above. You can show the price label, badge, change sales price typography, sales price color, regular price color, and so much more.
v) Product Stock Block
Another key block is the Product Stock block. You can use it to specify the product’s availability. Like before, you can simply drag the Product Stock block to your specified location.
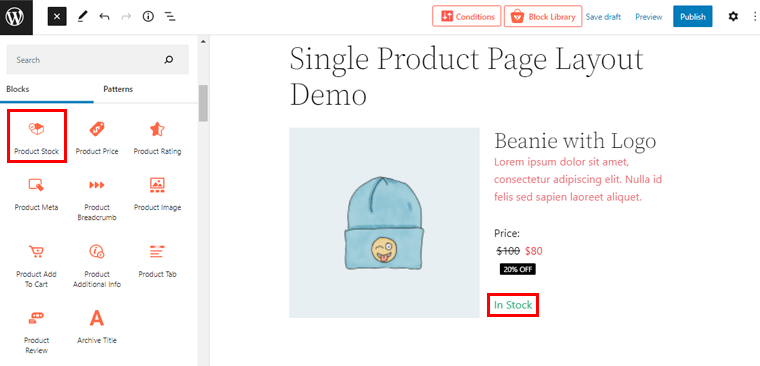
By double-clicking it, you can further access the customization. From there, you can edit the product stock status from the dropdown. You’ll see 3 options there: In Stock, Out of Stock, and On Back Order.
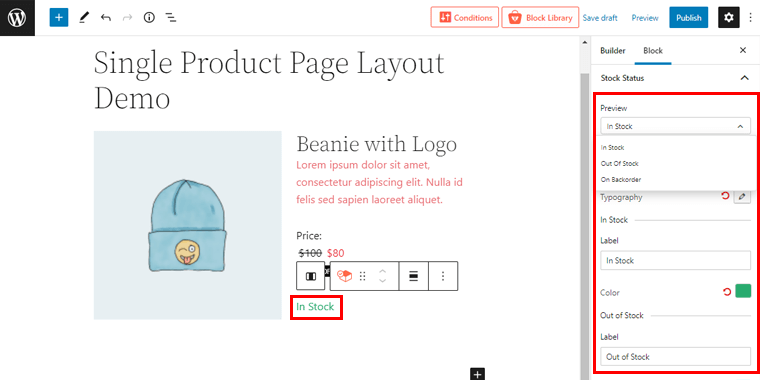
Further, you can change the text alignment, typography, corresponding color, and much more.
vi) Product Add to Cart Block
Similarly, you can put the ‘Add to Cart’ section by simply dragging the ‘Product Add to Cart Block’ in your specified field.
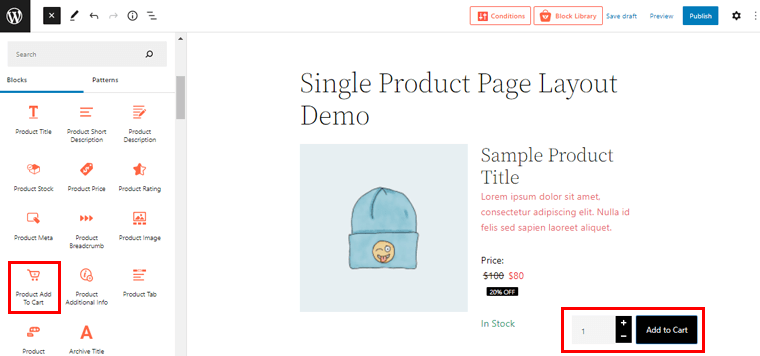
By double-clicking the block, you can tailor the block to your choices from the customization options on the right.

From here, you can change the alignment, enable/disable compare and wishlist, set quantity position, color, background, padding settings, and much more.
Similarly, you can use the same technique to add other Single Product Blocks as needed to construct or change the desired single product page layout.
You can add Product Review, Product Rating, Product Meta, Product Additional Info, and many other such blocks effortlessly.
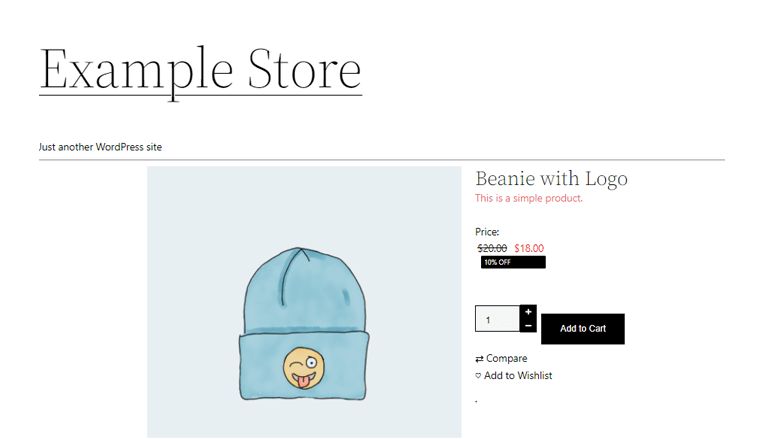
III) Publish the Single Product Page Template Layout
Once everything is done, you can click on the ‘Publish’ button in the top right corner to publish the single product page layout.
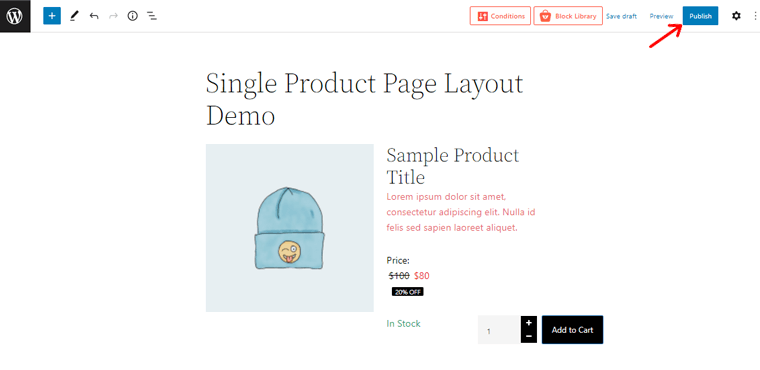
Now, if you preview your single product page on your WooCommerce store then, you can see the changes there. Quite easy, right?
With that, let’s move ahead to learn to build the product archive page layout.
Step 3: Building the Product Archive Page Layout Using ProductX Builder
Another feature of the ProductX WooCommerce Builder addon is that it lets you create an archive product page layout. So, in this section, let’s see how to do that.
I) Create a New Archive Page Template Layout
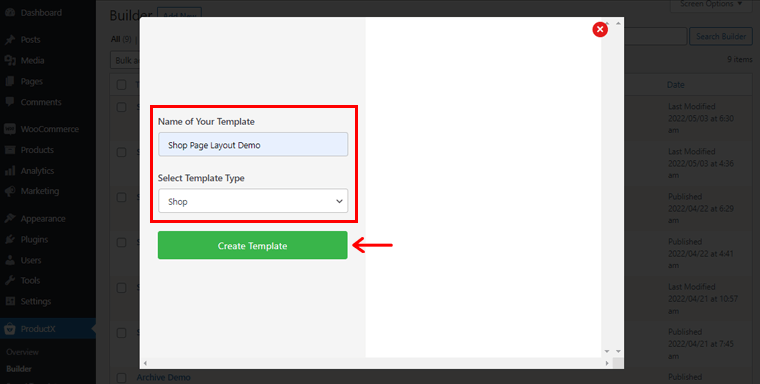
Like before, go to the ‘Builder’ option under the ProductX menu and click on it. Following that, on the top left side, click on the ‘Add New’ option to build a new archive template layout.
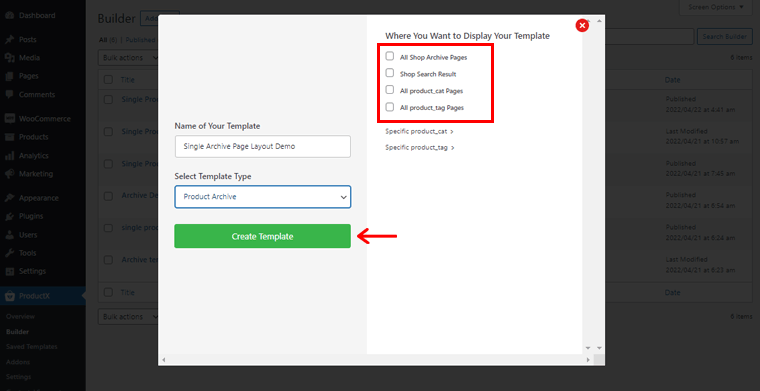
Then, you’ll see the page as shown above. There, you need to enter the required information on the Name of Your Template and Select Template Type fields.
So, let’s put the name as ‘Single Archive Page Layout Demo’. On the Select Template Type field, let’s choose Product Archive.
Then, you should determine where you want your archive template to be displayed. On the right, you’ll notice a number of options:
- All Shop Archive Pages
- Shop Search Result
- All product_cat Pages
- All product_tag Pages
Also, do note that these settings may differ depending on the template type you’ve chosen.
So we’ll enable the option for All Shop Archive Pages here. Then, click on the ‘Create Template’ option at the bottom.
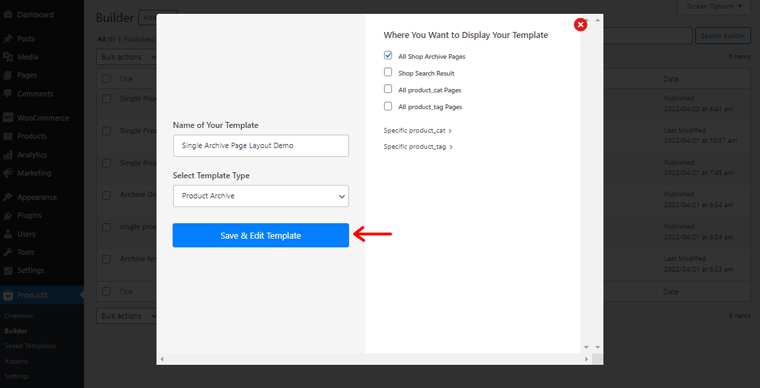
Once you’re done, you’ll see the ‘Save & Edit Template’ option. Just click on it.
Now, you’ll be directed to the page editor. Simply, click the (+) icon on the left side of the page editor.
There you’ll get access to various WooCommerce products blocks to create an archive page layout.
Now, here we’ve chosen Product Grid#4 block for the archive page.
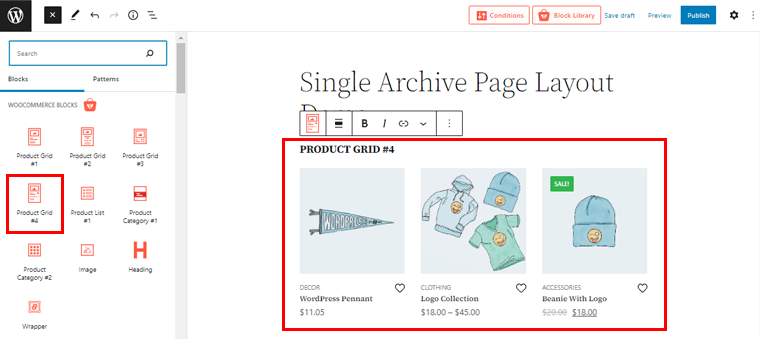
Do note that you can also choose other grids depending on how you want your archive page layouts to look.
II) Customize Archive Page Template Layout
As of now, let’s customize the product grid that we’ve just chosen.
To get access to customization possibilities, simply double-click the block.
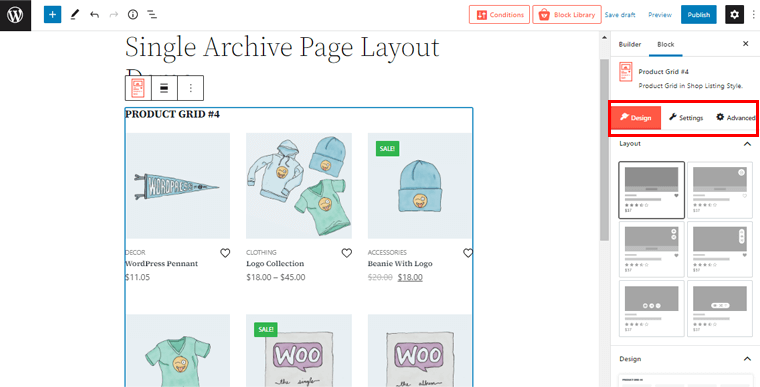
And you’ll see 3 different customization options on the right-hand side. They are Design, Settings, and Advanced. So, let’s look at what changes we can make to the archive page using these possibilities
Design
From this field, you can choose the layout of the product grid. There are various layouts available.

As you select the design of your choice on the right side, you can see the changes on the left side. This way, you can preview the archive page template as you’re creating it.
Settings
Using the settings option, you can twist and turn the product block to your choice. On clicking the settings options, you’ll find various general and other customization choices for your archive page.
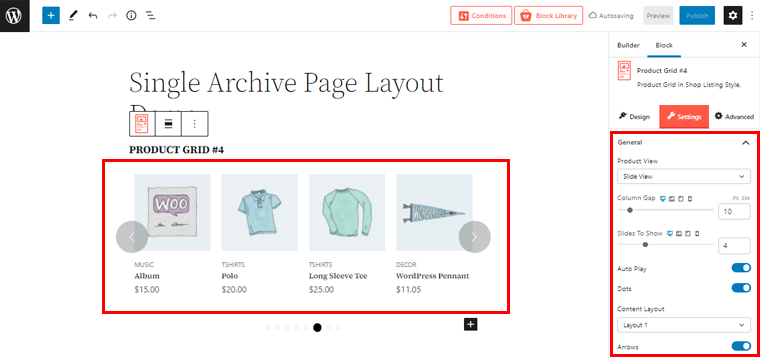
You can change Product View to Slide View, just like we did in the above screenshot. Similarly, you can set the column gap, a number of sliders to show, and a plethora of other settings.
Advanced
Likewise, if you click on the Advanced option, then you can see 4 different elements. They are General, Responsive, Custom CSS, and Advanced.
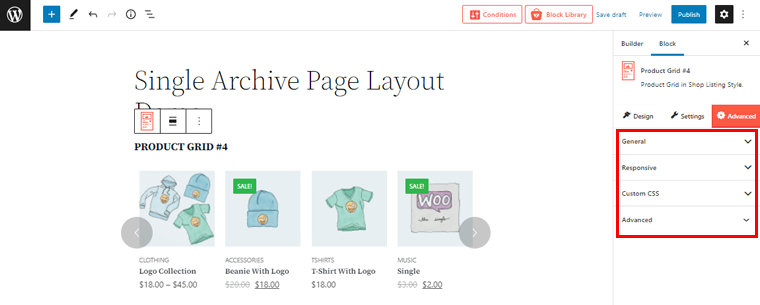
Using these choices, you can make an advanced archive page layout. Such as entering your own Custom CSS, setting the responsiveness of your archive page on various screen widths, and much more.
III) Publish the Archive Page Template Layout
After you’ve finalized everything, you can click on the ‘Publish’ button in the top right corner to publish your archive page layout.
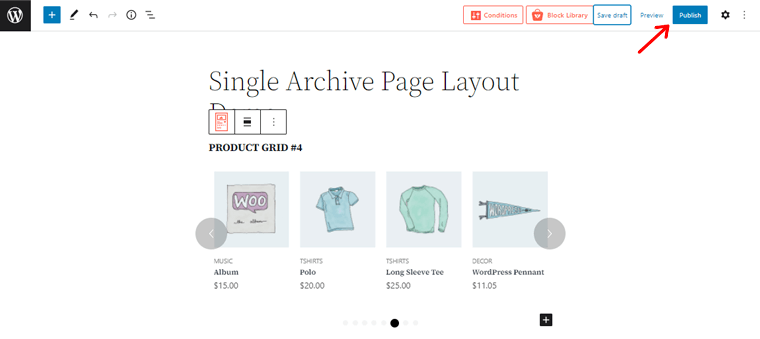
Now, if you preview any of your archive product pages on your WooCommerce store then, you can see the changes there. Pretty easy, right?

Whether you want to change a single product page or archive page in your WooCommerce store, it’s effortless. Thanks to the ProductX plugin’s WooCommerce builder addon.
Step 4: Creating Shop Page Layout Using ProductX Builder
Similarly, you can also create a shop page layout with the ProductX WooCommerce Builder add-on. Let’s look at how to do that in this section.
I) Create a New Shop Page Template Layout
Now, like before, go back to the ProductX menu and click on the ‘Builder’ option. Then, on the top left side, click ‘Add New’ to create a new shop page template layout.
Following that, you’ll see the page as shown above. There, you need to fill in the required information on the Name of Your Template and Select Template Type fields.
So, let’s name it ‘Shop Page Layout Demo’. On the Select Template Type field, let’s choose the ‘Shop’ option. Afterward, you need to click on the ‘Create Template’ option at the bottom.
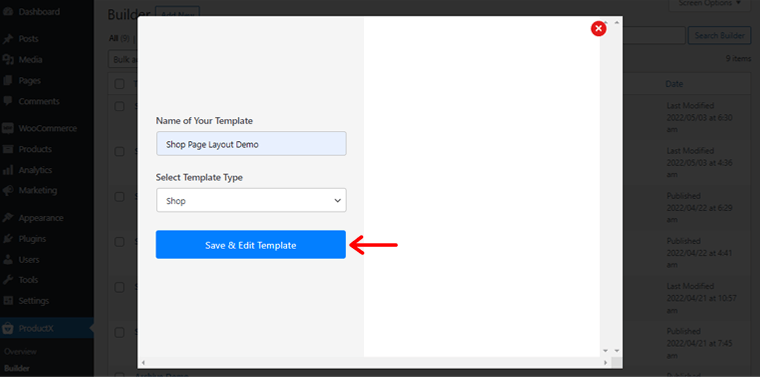
In a short while, you’ll see the ‘Save & Edit Template’ option. Simply click the button.
II) Import the Ready-Made Template to Create a Shop Page Layout
Following that, you’ll be taken to the page editor. Now, just as you did on the archive page, you may manually design the shop page template here. Nevertheless, we’ll show you one of the easy ways out.
That is, you can import the ProductX ready-made templates known popularly as starter packs to create your shop page template layout. This way, you won’t have to start from scratch, which will save you a lot of time.
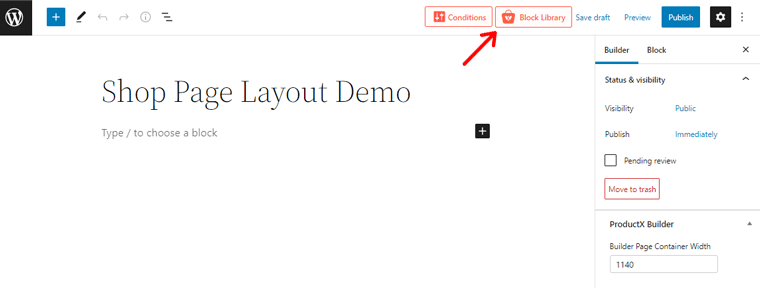
Just like on the screenshot above, you can find the Block Library option at the top of your page editor. Click on it. That gives you access to lovely starter packs and ready-made block designs.
For now, let’s look at the Starter Packs section. You have full control over which ready-made template you want to use for your shop page.
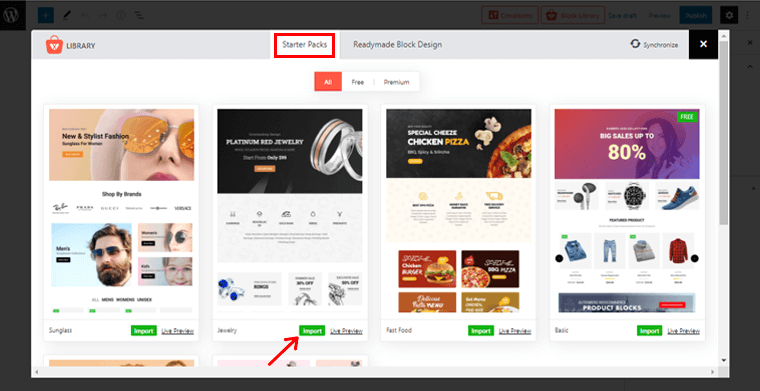
You can simply click the ‘Live Preview’ button to receive a live preview of any selected template for your shop page. After you finalize, you can click on the ‘Import’ button to import the template. Here, we’ve decided to import the Jewelry template.
Your selected template will appear in the editor after a few moments. Afterward, from the block editor on the left-hand side, you can effortlessly make all the necessary modifications to the imported layout.
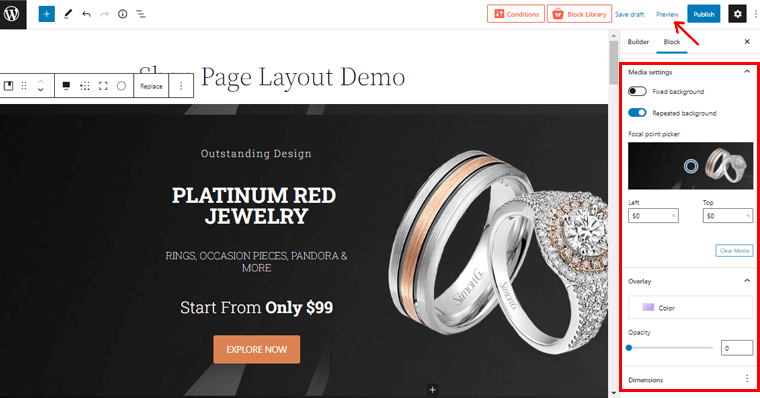
Following that, you can click on the ‘Preview’ option to get a clear sense of how your shop page template will look.
On preview, you’ll see the changes to your shop page exactly to your created shop page layout. And if there is no content or products on a certain element of your imported layout, then you’ll see the same demo content. In such cases, you’ll have to manually change those contents.
For instance, as we don’t have the banner image in our store, so we manually changed the banner image to our product image. In the same way, you can manually edit other contents of your shop page layout.
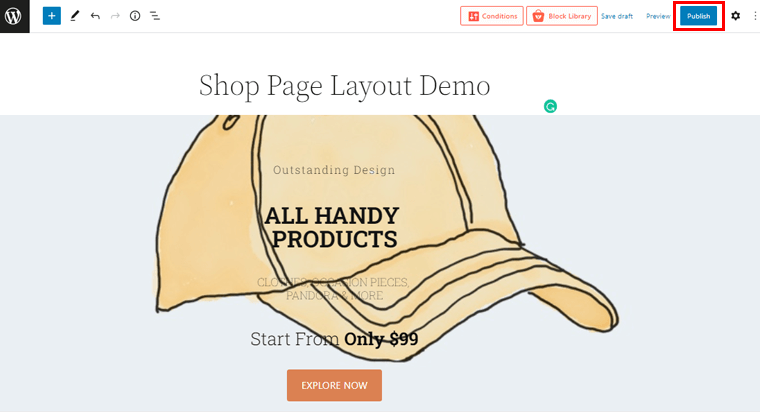
III) Publish the Shop Page Template Layout
And that’s it! You can click on the ‘Publish’ button at the top right corner to publish your shop page template layout.
Now, if you preview your shop page, then it’ll look something like the image shown below.
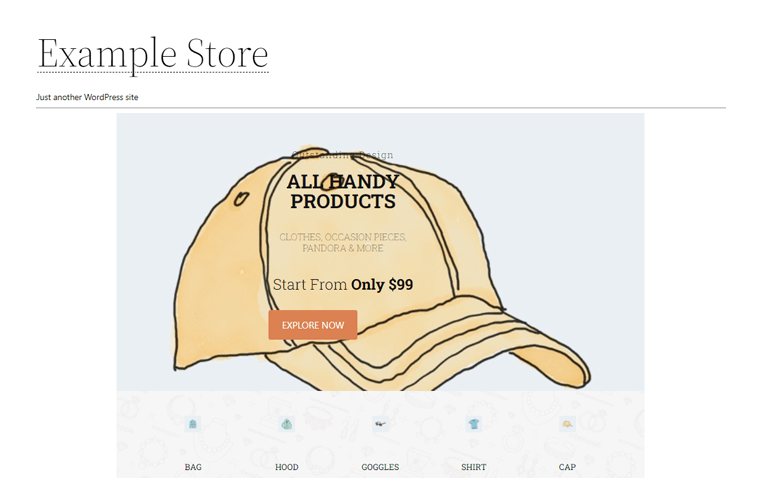
That’s how you can easily change the shop page layout of your store using the WooCommerce builder add-on feature of the ProductX plugin.
Conclusion
That’s it, folks! We’ve come to the end of our tutorial article on how to change product page layout in WooCommerce with the ProductX plugin.
We believe you can now create your own elegant and attractive product page layout of your choice using ProductX. And thereby, changing the layout of your WooCommerce WordPress site’s product pages. You should absolutely give it a try if you haven’t already.
Please feel free to ask if you’ve got any queries in the comments section below. We’ll assist you in every way we can. You may also share your thoughts if you’ve changed the product page layout before.
If you enjoyed this article, then don’t hesitate to share it with your friends and family. Also, check our recent tutorial article on how to use Semrush for free and a review article on the Soledad theme.
Remember to follow us on Facebook and Twitter to keep an eye out for similar content.