Are you unsure whether the Everest Backup plugin, a new WordPress cloud backup plugin, is worth trying? Or looking for an honest review of the Everest Backup plugin? If it’s so, then you’ve come to the right spot to clear your doubts.
Any website can be vulnerable to a variety of cyber-attacks, server problems, and database failures. You’ll lose all of your valuable website data if this happens. So, you’ll need regular backups to keep your website data safe from such incidents.
And this is where a WordPress backup plugin comes into play!
Everest Backup is one such backup WordPress plugin that can backup, restore, migrate, and clone your website. It’s brand new yet one of the best cloud storage backup plugins available in the market.
So, should you use it? You’ll find out everything here; just go through the entire article. Let’s begin.
A) Introducing Everest Backup – WordPress Cloud Backup Plugin
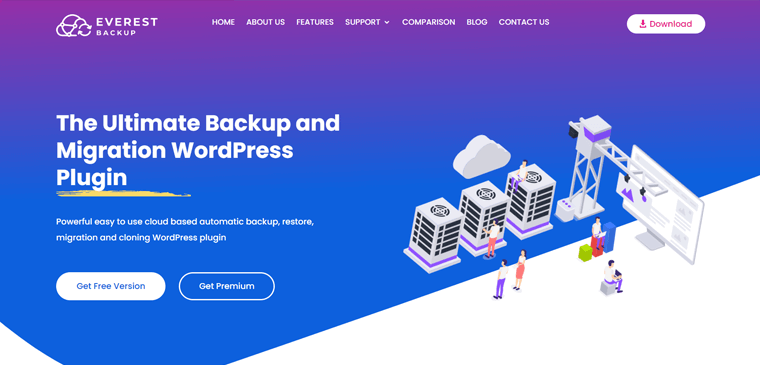
Everest Backup plugin is the newly launched cloud-based backup plugin for WordPress. With help of this plugin, you can backup, restore, migrate and clone your WordPress site easily.
Essentially, it comes with free in-built Google Drive integration. All you need to do is simply connect to your Google Drive. And there you have it: all of your backup files have been automatically uploaded to a folder in your Google Drive account. You’ll also get an email containing the backup details with each backup.
In fact, this plugin offers a really simple interface and it’s quite easy to use. As a result, anyone, even non-techies can easily backup and restore their website data with a few clicks.
Even better, you get the option to set an automatic backup on your website. All you have to do is connect to your cloud storage and schedule backup.
Moreover, the capabilities of Everest Backup go beyond backup and restore of your WordPress website. As it provides you with one of the quickest methods to migrate a WordPress website from one destination to another.
Having said that, now let’s move on to the next section of this review to understand more about the Everest Backup plugin.
B) Key Features of Everest Backup Plugin
We’ll go through the key features of Everest Backup in this section of the review. Let’s take a closer look at these features.
1. Manual and Automatic Backup
Everest Backup offers both manual and automatic backup schedules.
In the manual backup option, you can manually backup your website data and information in your specified backup storage location. By default, it backups your plugins, themes, media, and database.
However, you can further tailor it to only particular specified backups by manually clicking on files that you don’t want.
Similarly, in the automatic backup option, you can enable it and schedule the time of the backup of your website’s data. You can set the automatic backup of your site to a daily, monthly, or weekly basis. This way, your website is automatically backed up on a regular basis, according to your preferences.
Further, you can restore the backup data with a single click from the history details.
2. Backup on Google Drive
Another key feature of the Everest Backup plugin is that you can safely store your backups on Google Drive and other cloud services. As it includes a built-in Google Drive integration. Not to mention, Google Drive is one of the most popular cloud storage and Google’s prominent online repository.
All you’ve to do is activate the Google Drive from Everest Backup’s addon and connect your Google Drive account. Following that, you’ll find all your backup files automatically uploaded to the specified folder. Further, you can restore the same backup files as necessary in a few simple clicks.
We’ve shown the whole process step-by-step below in section D.
3. Migration and Cloning
Everest Backup plugin provides other additional capabilities such as migration and cloning of your WordPress website. As a result, this also makes it one of the most effective WordPress website migration tools.
Simply, install the Everest backup plugin on both of your websites i.e. source website and destination website. Then, make a backup file and move it from one to another. All you’ve to do is create and copy the migration key from the source website and paste it on the destination website.
There’s no need to save and upload files from your computer. And, there you go with your site cloned and migrated in a few simple clicks. Learn the whole process in section F.
4. Advanced Reporting
Another key feature of the Everest Backup plugin is that it provides an advanced reporting feature. That means this plugin not only backups or restores but also reports to you about the changes.
Once you enable the email log option, you’re notified after each scheduled backup is completed. It also facilitates adding multiple emails besides admin email for advanced reporting. Consequently, you’ll know the state of your website as well as the changes taking place on it.
Besides, it alerts you when the plugin needs attention or maintenance. This way, you can always have an updated and comprehensive backup of your website.
5. Human Readable Logs
Another distinguishing aspect of this Everest Backup plugin is that it contains human-readable logs.
That means you’ll get all the information about your backup files in a human-readable form. Such as start and completion time of restoration, exact files restored, the time required for restoration, and much more.
This way, you don’t need any technical skills to figure out what’s going on throughout your website backup.
6. Multisite Compatible
Generally, a multisite network is a group of sites that share a common WordPress installation. In a multisite setup, multiple sites share the same database and plugins, and themes. Everest Backup plugin’s other feature is that it’s multisite compatible.
That means you can add an independent site as a subsite of a multisite. And further, backup and restore the entire WordPress Multisite Network. Moreover, it facilitates managing all your backup files from your WordPress dashboard.
So, these are some of the key features that the Everest Backup plugin provides. Now, let’s move forward to another section of this review that is the installation process of the Everest Backup plugin.
C) How to Install Everest Backup Plugin?
It’s quite easy to install and set up the Everest Backup plugin. You can simply install the Everest Backup plugin from the WordPress directory in the following 2 steps:
Step 1: Install the Plugin
First things first, you need to log in to your WordPress dashboard.
Then, on the left navigation of the dashboard, go to the ‘Plugins’ section and click on the ‘Add New’ button.
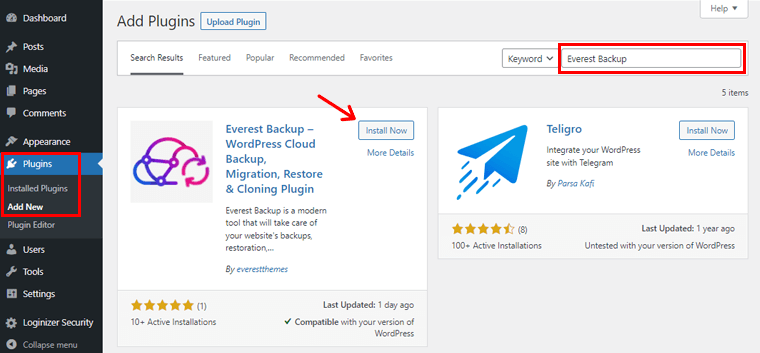
Now, type the ‘Everest Backup’ plugin in the search field at the top right corner of your dashboard. After you’ve found the plugin, click on the ‘Install’ button.
Step 2: Activate the Plugin
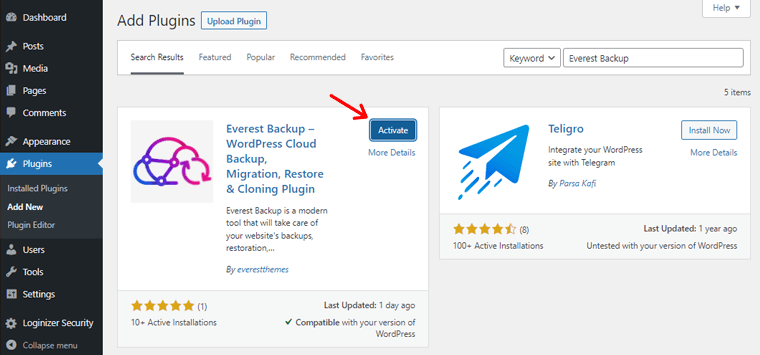
Once the installation is completed, you’ll see the ‘Activate’ option as shown above. Click on the ‘Activate’ button.
And there you go with your Everest Backup plugin installed. Following that, you’ll find the ‘Everest Backup’ section in the left navigation area.
If you want to learn more ideas, check out our detailed guide on installing WordPress plugins.
D) How to Create a WordPress Site’s Backup with Everest Backup?
As we’ve mentioned earlier, you can backup your WordPress site both manually and automatically with the Everest Backup plugin. So, let’s look in more detail at how to create a WordPress site’s backup with the Everest Backup in this section of the review.
First of all, go to the ‘Everest Backup’ section in the left navigation section of the dashboard and click on the ‘Backup’ button. Then, you’ll see 2 options:
- Manual Backup
- Schedule Backup
So, let’s look into them individually.
I) Creating a Backup of your Website Manually on Server
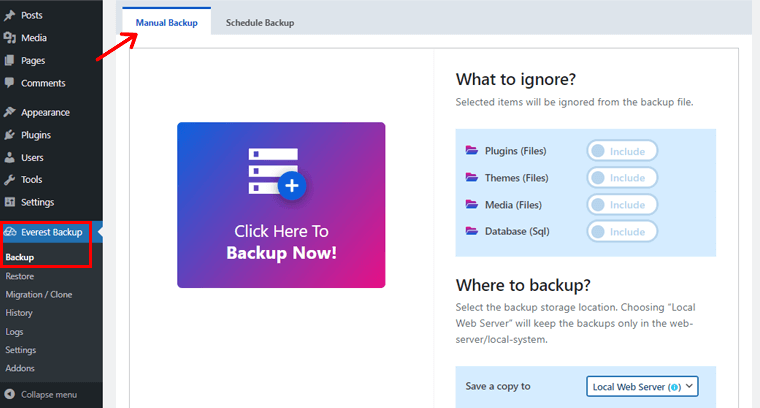
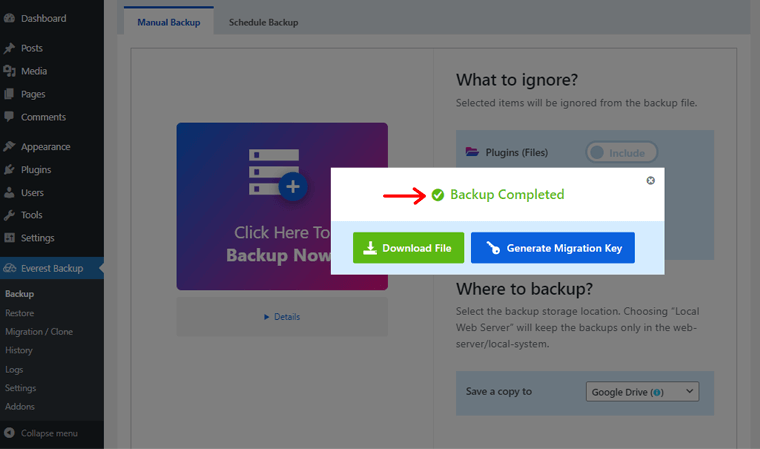
After you click on the ‘Manual Backup’ option, you’ll see the page as shown above.
Now, on the page you can see, ‘What to ignore?’ section. That means once you click on backup by default plugins, themes, media, and the database of your site are backed up. You can ignore them if you want all’s backup.
In case, you don’t want any particular one of them, you can click on the respective field.
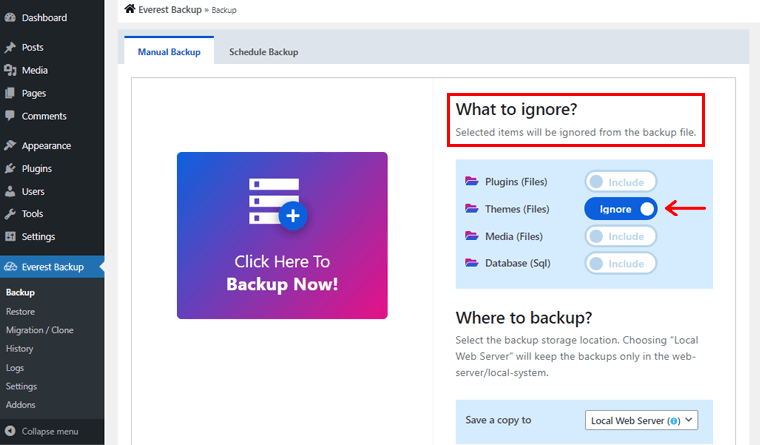
For example, if you don’t want themes, then click on the ‘Themes’ field as shown in the image above.
Following that, you can see, ‘Where to backup?’ section.
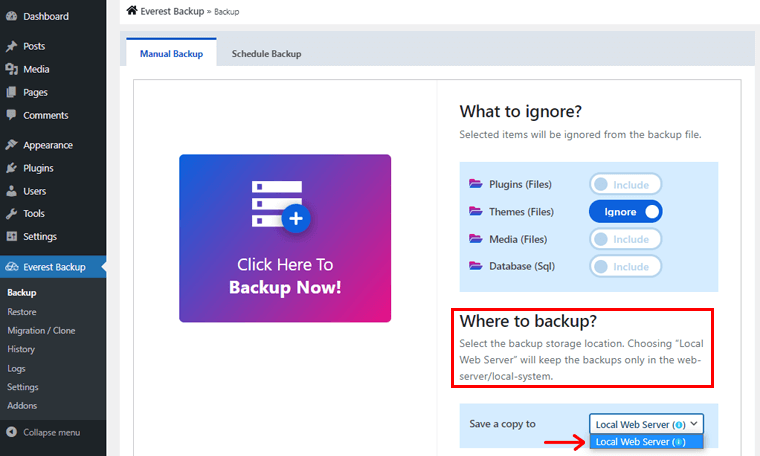
Here, you can select a location for your backup storage. In the beginning, you’ll only find ‘Local Web Server’ in the dropdown menu. You can click on the ‘Local Web Server’ option to create a backup file on the local server.
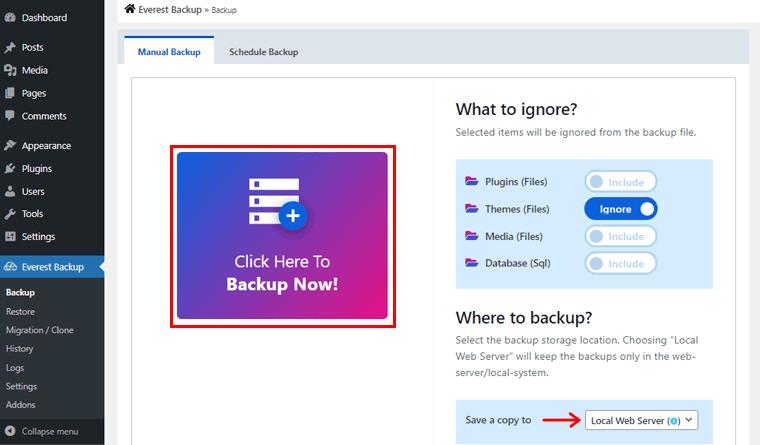
Following that, click on the ‘Click Here to Backup Now!’ option.
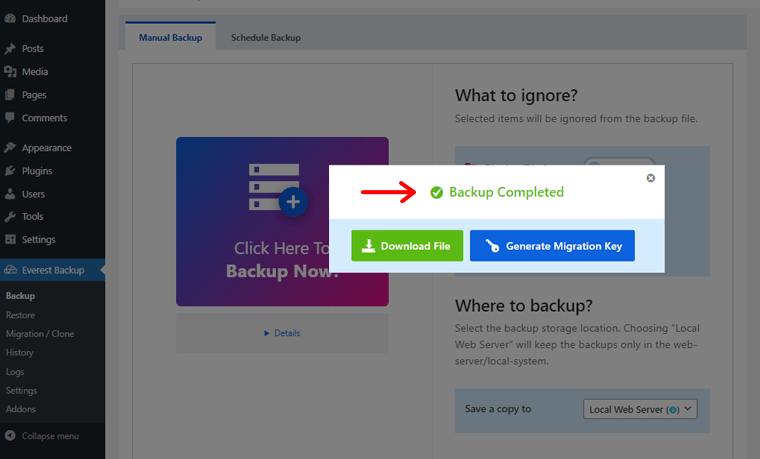
Once the backup is completed, you’ll see a popup box with 2 options i.e. ‘Download the File’ and ‘Generate a Migration Key’.
You can click on the ‘Download the File’ option to download your backup files on your local computer.
However, if you want to migrate the files to another location, then you can click on the ‘Generate a Migration Key’ and copy-paste in your chosen location.
II) Creating Backup Manually in Google Drive (Alternative Storage)
When you download the backup files to your local web server, you may be using the web hosting resources unnecessarily.
In fact, if you use all your hosting storage, it’ll impact your site’s performance. Therefore, you shouldn’t take backups on the web server often.
And, that’s where third-party cloud storage like Google Drive becomes helpful. Thankfully, the Everest Backup plugin provides the ‘Google Drive’ option to store your backups in Google Drive.
Now, let’s look at how to connect the Everest Backup plugin with Google Drive.
For that go to the ‘Everest Backup’ in the right navigation and click on the ‘Addons’ option.
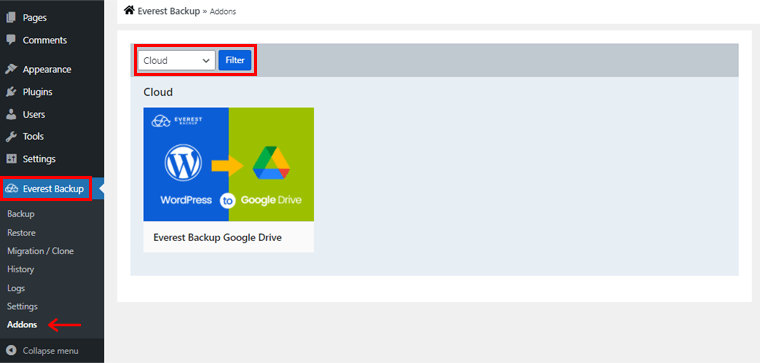
Then, click on the ‘Cloud’ option from the Select dropdown menu at the top and then the ‘Filter’ option.
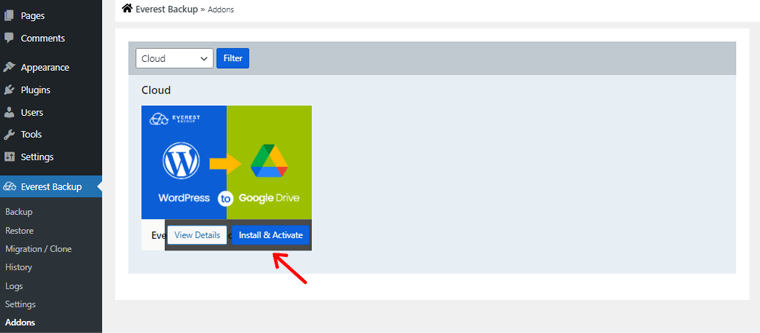
Then, you’ll see ‘Everest Backup Google Drive’. Now, on hovering your mouse on it, you’ll find the ‘Install & Activate’ option and click on it. Afterward, you’ll see that Everest Backup Google Drive is active.
Following that, you’ve to link your Google account so that the Everest Backup plugin can store your site’s backup in your Google Drive.
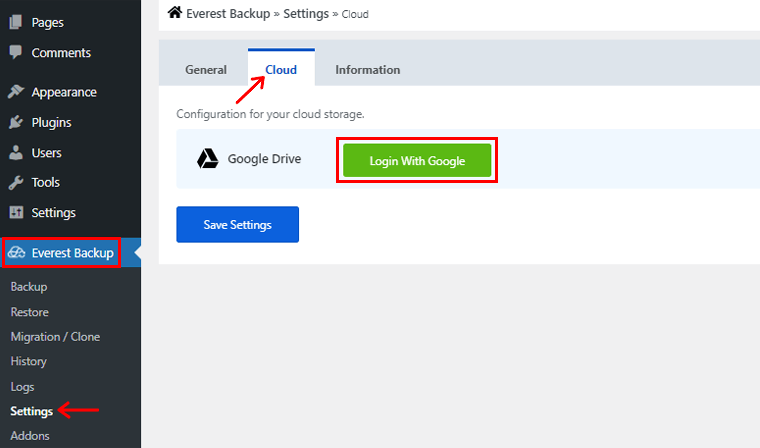
To do so, go to the ‘Everest Backup’ section in the left navigation and click on the ‘Settings’ option.
On clicking it, you’ll see General, Cloud, and Information sub-options. Then, click on the ‘Cloud’ option. There, you’ll see the ‘Login With Google’ option. Click on it to link your Google account.
Once you’ve logged into your Google Account, you’ll see the Transfer Rate box. Here, you can set your internet speed from Slow Internet to Fast Internet. Then, you can click on the ‘Save Settings’ option to save the changes.

Now, let’s come back to the backup page as before. For that, from the left navigation, go to ‘Everest Backup’ and then to the ‘Backup’ option.
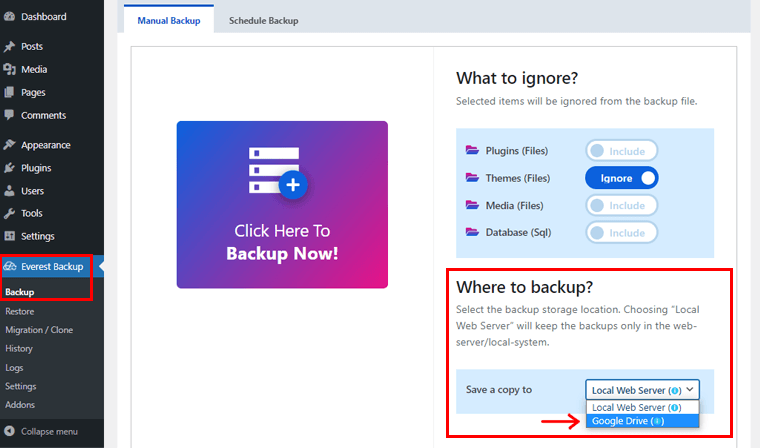
So, if you again click to the dropdown menu in the ‘Where to backup’ section, you’ll now find the ‘Google Drive’ option. Then, click on it.
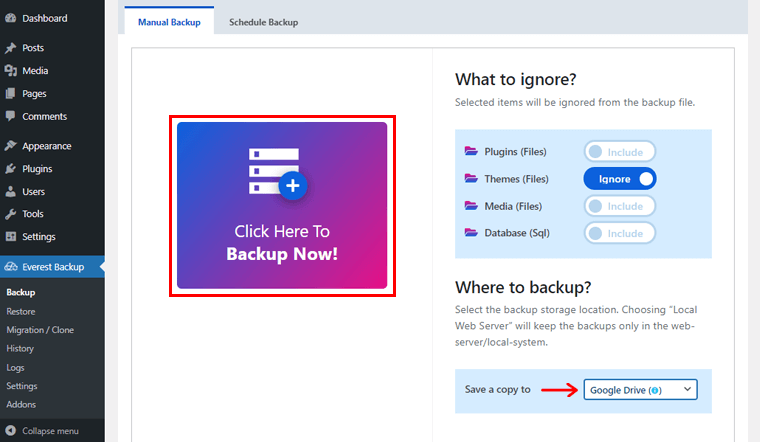
Following that, click on the ‘Click Here to Backup Now!’ option.
Once the backup is completed, you’ll see a popup dialogue box with 2 options i.e. ‘Download the File’ and ‘Generate a Migration Key’.
You can click on the ‘Download the File’ option to directly download your backup files on your local computer.
However, if you want to migrate the files to another location, then you can click on the ‘Generate a Migration Key’ and copy-paste in your chosen location.
III) Backing up your WordPress Website Automatically
Similarly, you can also schedule automatic backups rather than manually backup your website. Doing so reduces the effort, time, as well as complexity of backing up the files manually.
With the Everest Backup plugin, you can automatically schedule the backup of your WordPress site.
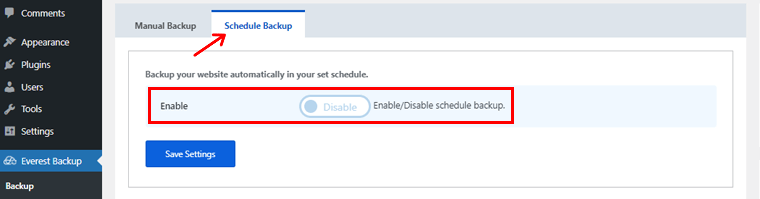
Once you click on the ‘Schedule Backup’ option, you’ll see the page as shown above. You can see that it’s disabled by default. So, first of all, you’ve to ‘Enable’ it.
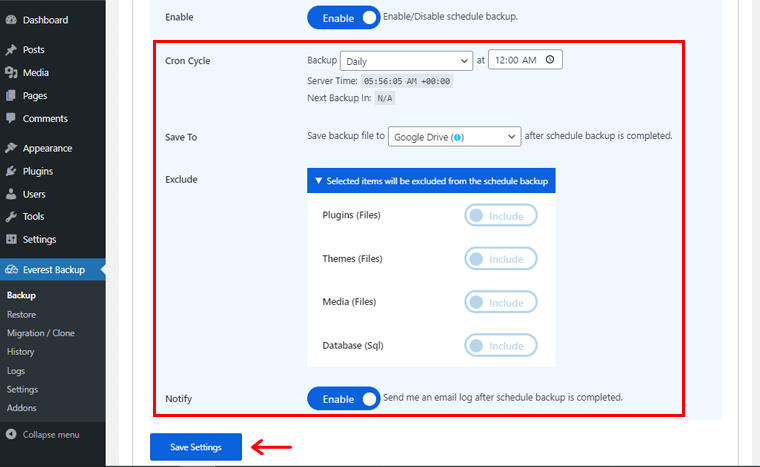
After you enable it, you can configure the following settings.
- Cron Cycle: This field allows you to customize how often you want the plugin to create your site’s backup. You can choose from Daily, Weekly, and Monthly options. Similarly, you can also set the time of your backup.
- Save To: In this field, you can choose the location to save your backup file once the scheduled backup is completed. By default, it’s set to Local Web Server. You can change it to ‘Google Drive’ from the dropdown.
- Exclude: Everest Backup automatically backups your plugins, themes, media, and databases by default. If you don’t want any of it, you can click on the respective field to exclude it. Or else, you can leave as it is.
- Notify: Once you enable this field, you’ll be notified about the completion of your scheduled backup on your admin email. If you want to get notified in more other emails, then you can do so via the General section in the Settings option.
Following that, you can click on the ‘Save Settings’ option to save the configurations.
History of Your Backups
So, once your necessary files are backed up, you can see their details in the History section as well.
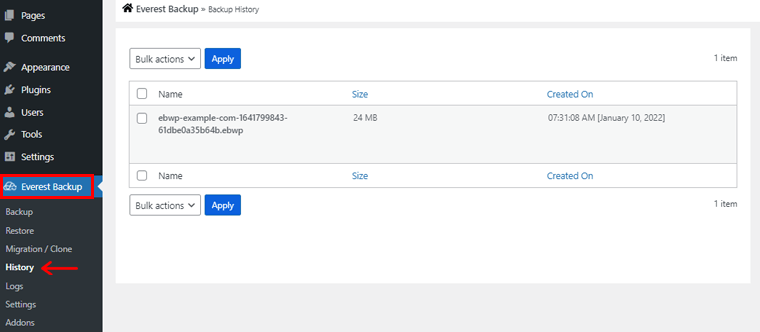
To do so go to Everest Backup in the left navigation and click on the ‘History’ option. On clicking it, you’ll see the page as shown above. The listed files are backed up files by the Everest Backup plugin.
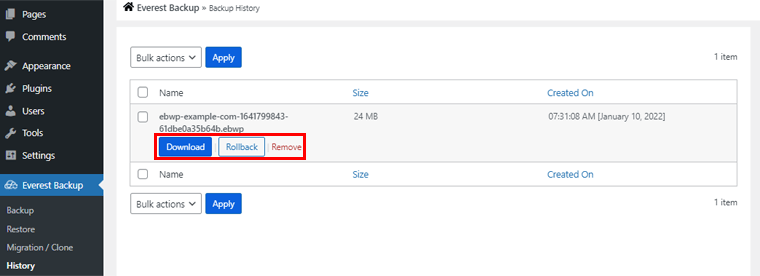
Once you hover your mouse on any of the lists, you’ll see the following 3 options:
- Download: You can download the backed-up file by clicking on this option.
- Rollback: You can directly rollback(restore) the desired backup files without going through a lengthy process.
- Remove: If you don’t want any of the backup files, then you can remove them by clicking this option.
E) How to Restore your WordPress Website?
Sometimes, your WordPress website may get destroyed by harmful alteration. As a result, a few of your important WordPress data is no longer accessible. That’s where restoring your WordPress website to its previous state becomes helpful.
Or, let’s assume you’ve found yourself in a situation where you can’t access pages, functionality, or the entire website. Now, instead of panicking, all you need to do is restore your WordPress site.
Besides, you can also restore your WordPress website if you want to go back to the earlier version of the site. Basically, you can understand restoration as the act or method of recovering data after it has been lost or corrupted inadvertently.
So, once you’ve backed up your files from the Everest Backup plugin, you can easily restore your WordPress website.
You can do so by 2 methods.
- One is by uploading the backup file that you’ve downloaded before.
- Another one is directly restoring the backup file saved on your Google Drive.
So, let’s look at both of the Everest Backup restore methods thoroughly in this section of the review.
I) Restoring your Website by Uploading Backup File
To restore your website, go to the ‘Everest Backup’ in the left navigation and click on the ‘Restore’ option.
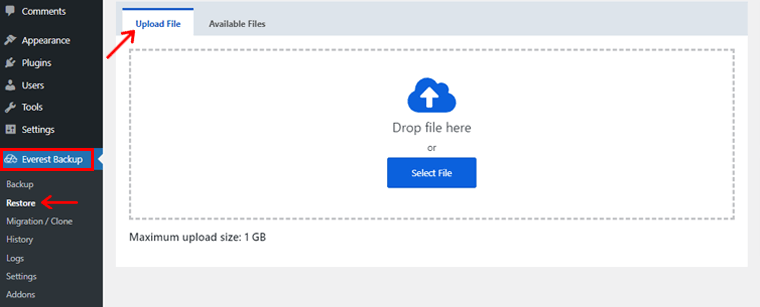
Once you click on the ‘Upload Files’ option, you’ll see a box that says Drop File or Select File. There, you can drop or select the previously downloaded backup file from its respective location.
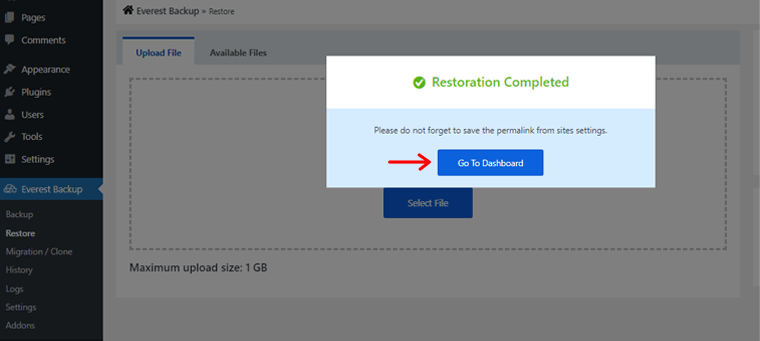
Once the file is uploaded, it’ll automatically restore. It might take a little time as per your file size and internet speed. After it’s done, you’ll see the Restoration Completed popup box as shown above.
Then, you can click on the ‘Go to Dashboard’ option. Then you’ll be directed toward the login page.
II) Restore your Website from the Available Backup Files
Similarly, you can restore your website from available backup files. To do so, go to the ‘Everest Backup’ in the left navigation and click on the ‘Restore’ button.
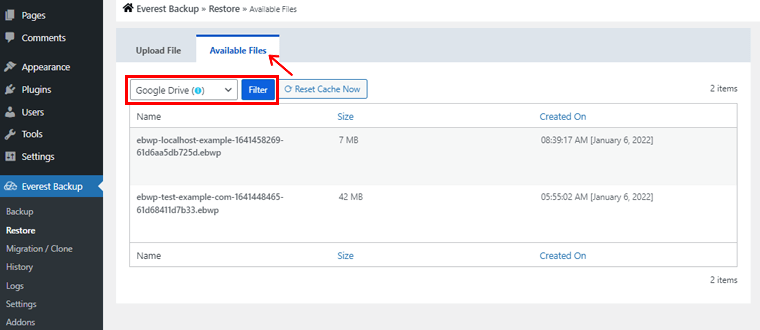
Then on clicking the ‘Available Files’ field, you can see the page as shown above. In the dropdown field, you can choose the backup files either from the Local Web Server or Google Drive.
We’ve chosen the ‘Google Drive’ option.
Also, if you don’t find the Google Drive option in the dropdown, please be noted that you should link your account from the Settings options as before.
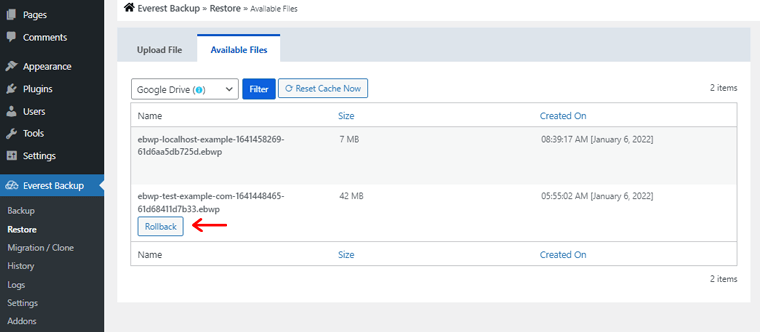
Following that, once you hover on the backup file that is stored on your Google Drive, you’ll see the ‘Rollback’ option. Click on it.
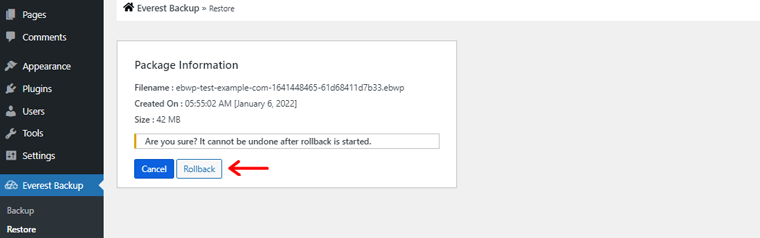
Afterward, as shown above, you’ll again get a reconfirmation popup box of whether you want to Cancel or Rollback. So, click on the ‘Rollback’ option to restore your files.
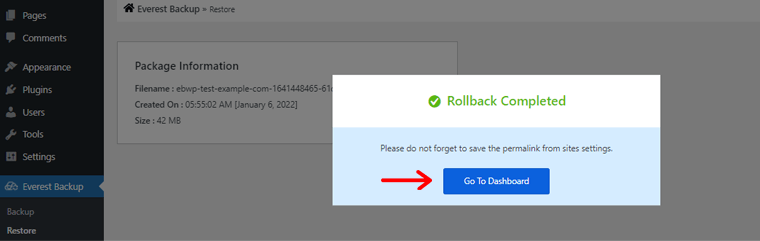
Once your restoration is completed, you’ll see the Rollback Completed popup box as shown above. With that, you’ll have your WordPress site rolled back to the state it was on the specified date.
Then, you can click on the ‘Go to Dashboard’ option. Then you’ll be directed toward the login page.
F) Cloning and Migrating your WordPress Website
Simply put, WordPress migration is the process of migrating a WordPress installation from one server to another while maintaining its functionality.
For now, let’s assume that we’ve two websites. Namely ‘examplewebsite1’ as source website and ‘examplewebsite2’ and destination website. Now, you’ve to migrate the data from the source website to the destination website.
There are various situations when one needs to migrate their WordPress site.
- Such as transferring a local WordPress site to a live server, shifting a website from a subdomain to its primary directory, and so on.
- You can also migrate your website to switch to a more reliable hosting service in terms of better speed, reduced pricing, etc.
As mentioned earlier, the Everest Backup plugin also provides cloning and migrating functions for WordPress sites. So, let’s look at how to clone and migrate your WordPress website using the Everest Backup plugin in this section of the review.
Step 1. Creating a Migration Key
To do so, firstly you should open both of the site’s dashboards and install the Everest Backup plugin in both of them.
Afterward, go to the dashboard of the source website i.e. ‘examplewebsite1’.
Once you’ve installed the Everest Backup plugin, you’ll see the ‘Everest Backup’ option in the left navigation. Click on it and then go to the Migration/Clone option. Then, click on the ‘Migration’ field as you’re going to extract the files from this website.
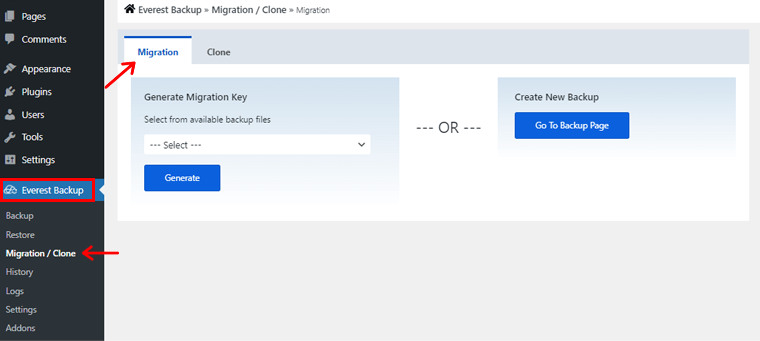
Here, you’ll see 2 options boxes i.e. Generate Migration Key and Create New Backup.
If you’ve already backed up your WordPress site, then you can directly generate a migration key.
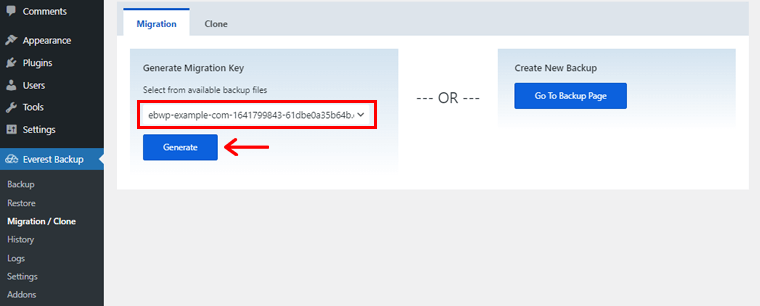
All you need to do is choose the file from the ‘Select’ dropdown menu and click on the ‘Generate’ button.
On clicking it, you’ll see the page as shown above. Now, you’ve to click on the ‘copy’ icon at the end of the Migration Key box. Also, do note that the migration key generated will be valid for only 5 hours.
Similarly, if you’ve not backed up the WordPress site, then you can click on the Go to Backup Page option. On clicking it, you’ll be redirected towards the Backup page. And from there, you can back up the files and generate the migrate key. (For backup guidance, you can look to section D of this blog above.)
Step 2. Paste the Migration Key on the Destination Site
Following that, you’ve to paste the copied migration key in the Clone field of the destination website i.e. ‘examplewebsite2’.
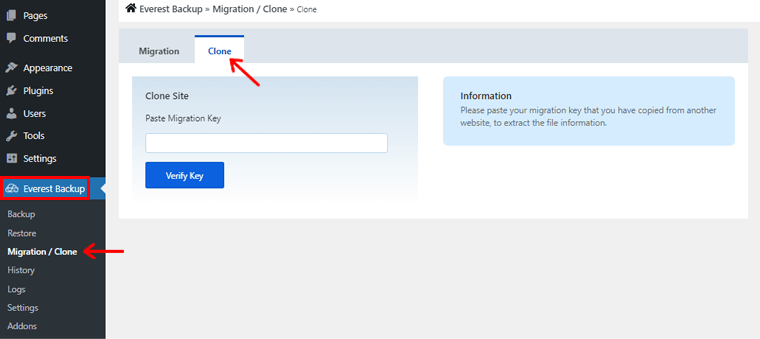
To do so, go to the dashboard of your destination website. You’ll see the Everest Backup in the left navigation once you’ve installed the Everest Backup plugin. Click on it and then click on the Migration/Clone option. Following that click on the ‘Clone’ field. You’ll see the page as shown above.
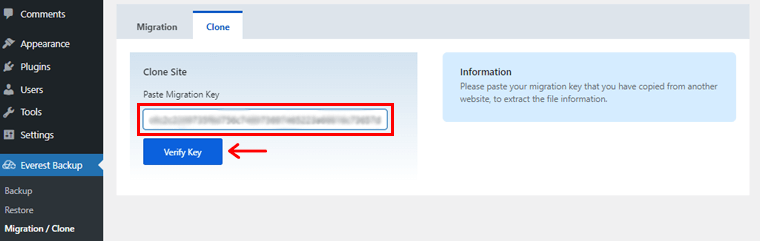
Now, paste the copied migration key in the ‘Paste Migration Key’ box. Then, click on the ‘Verify Key’ option.
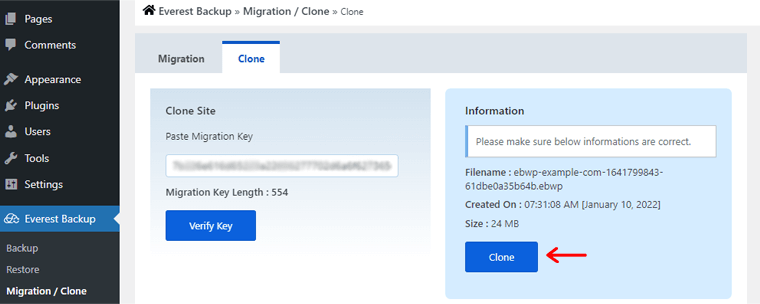
Afterward, you’ll see the ‘Clone’ box on the right as shown in the screenshot above. Click on the ‘Clone’ option.
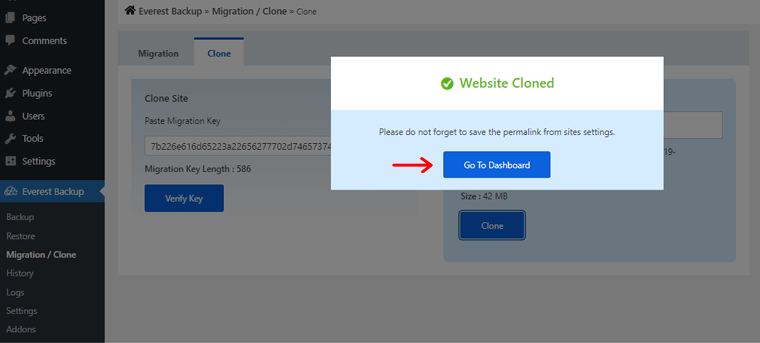
Following that, you’ll see the ‘Website Cloned’ popup box. Just below that, you’ll also see the ‘Go To Dashboard’ option. On clicking it, you’ll be directed towards the login page.
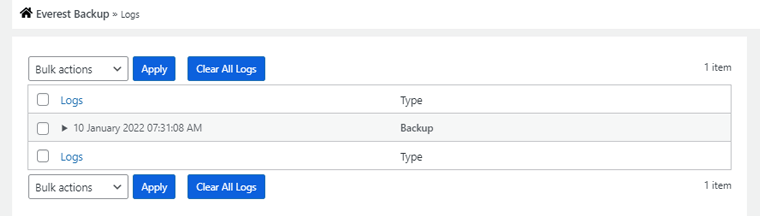
Further, on clicking on the log option of the Everest Backup, you can see the Clone history of the site.
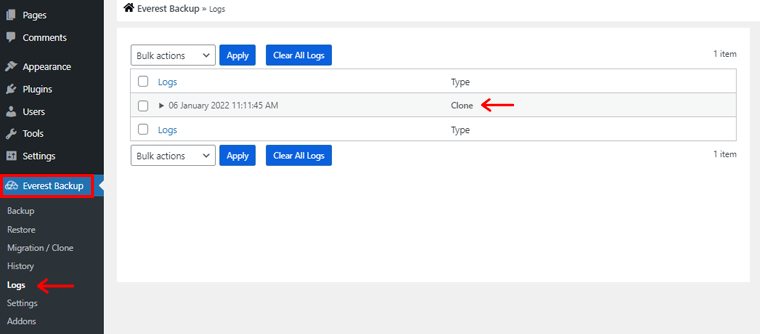
To do so, go to the Everest Backup in the left navigation and click on the ‘Log’ option. Then, you’ll see the page as shown above.
G) Customer Support in Everest Backup
Customer support is crucial for anyone who uses an online product or service, such as a WordPress plugin. Whether you’re a pro or a novice, you should always examine the product’s customer support services before utilizing it.
Everest Backup plugin does offer you great customer support services to assist you with your inquiries.
First of all, you can post your questions to its support forum on WordPress.org. They’ll answer your queries as soon as possible.
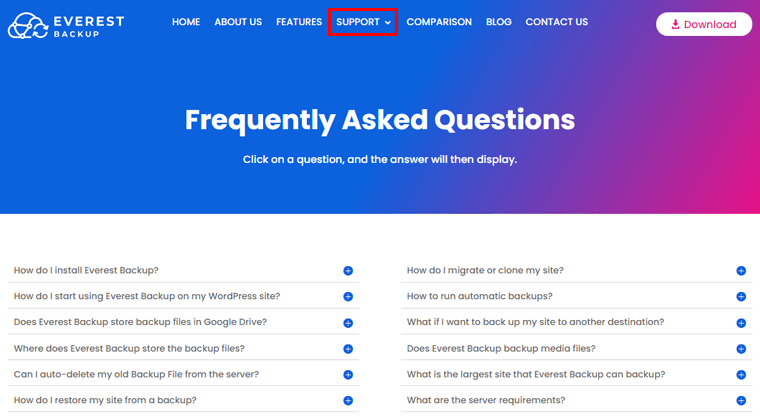
Next, you can go to the Support section in the navigation bar of the Everest Backup plugin’s official website. From there, you can find their Frequently Asked Questions (FAQs) page with tons of useful questions and answers about using the plugin.
Moreover, it also provides personalized email customer support service. So, if you receive any kind of error message while using this plugin, then you can send an email at bug-report@wpeverestbackup.com.
Also, you can provide screenshots of the error message, a log file, and details about your system on email.
This way, you can now use this plugin without any difficulty.
H) Pros and Cons of Everest Backup
There are pros and cons to every plugin. So, in this review, we’ll provide you with a rundown of the pros and cons of the Everest Backup plugin.
Pros of Everest Backup
The pros of the Everest Backup plugin are:
- Beginner-friendly plugin that’s quite simple to use.
- Powerful plugin with advanced features where you can backup, restore, migrate and clone from one same plugin.
- Provides backup of your WordPress site on your own Google Drive.
- You can get notification of completion of your backup in your personal emails.
- Automatic logout of your Google account once the backup is completed.
- Human readable logs to understand what’s going on with your WordPress site.
Cons of Everest Backup
The cons of the Everest Backup plugin are:
- You’ve to link your Google account again for restore and migration/cloning of your site.
- It has limited customer support.
Everest Backup plugin has definitely enough pros to withstand its few cons. However, if you’re unsure you can check out various alternatives to it.
In the following portion of this Everest Backup review, we’ll go over some of the alternatives.
I) Alternatives of Everest Backup
Everest Backup plugin helps you backup, restore, migrate and clone your WordPress website. Likewise, there are other WordPress backup plugins that have similar functionality.
Some of the most popular ones are:
1. UpdraftPlus
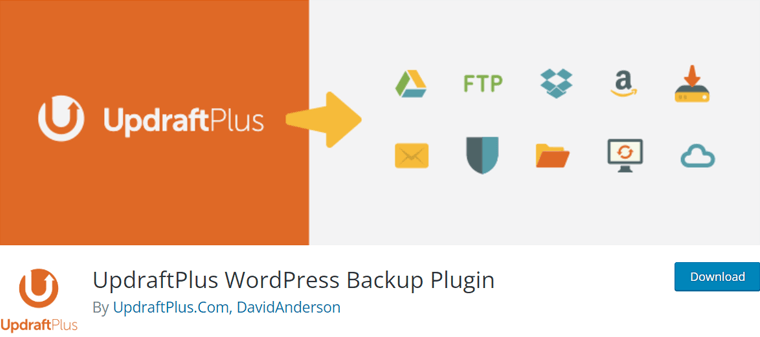
UpdraftPlus is a widely popular free WordPress plugin that makes it simple to create and restore site backups. With over three million active installs, it’s the most used free schedule and backup plugin.
This plugin offers a user-friendly interface that makes generating backups and adjusting settings simple, even for novices. You can arrange frequent automatic backups of your website data and database at different time intervals.
Similarly, setting up UpdraftPlus with WordPress is easy and takes minimal technical expertise. It also works with Dropbox, Google Drive, Amazon S3, and other cloud storage services.
2. All-in-one WP Migration
All-in-one WP Migration is another beginner-friendly backup plugin to export your WordPress site without any technical skills. It’s a simple drag-and-drop solution that allows you to quickly and easily upload your website to many locations.
It supports top cloud storage services and synchronizes easily. This helps you to migrate your WordPress site to cloud services such as Dropbox, Google Drive, OneDrive, AmazonS3, and more. Also, it doesn’t have any limitations on the upload size of the file.
Moreover, it’s a totally mobile-optimized backup plugin. This makes it simple to backup and migrate WordPress when you’re away from home or the office.
3. BlogVault
BlogVault is another trustworthy backup plugin with free cloud storage as well as a staging environment. It only takes a few minutes to get started with BlogVault, and it’s up and running in no time. Its automated workflows make it simple to use and require no technical skills.
It’s more than simply a plugin because it contains everything your website might possibly require in one location. Essentially, it has features such as WordPress backup, restores, staging, migration, as well as site management.
Moreover, all its processing work takes place on its own server. As a result, this will not slow down the speed of your WordPress website.
If you want to know more backup plugins, then you can check out our article on the best WordPress backup plugins.
J) Final Verdict- Is the Everest Backup Plugin Worth Trying?
After reading this comprehensive review, you may already have a good understanding of this Everest Backup plugin. Also, you might have known the answer to your question.
That is, whether the Everest Backup plugin is worth trying or not. The answer is definitely; yes, yes, and Yes!
To sum up this review, the Everest Backup plugin is one of the emerging and powerful backup plugins available in the market. It definitely is quite simple to use yet contains powerful features and functionalities.
You can backup, restore, migrate as well as clone from the same plugin. Moreover, it offers cloud storage backup, advanced reporting, human-readable logs, and much more. This definitely makes the Everest Backup plugin worth trying out.
However, we encourage you to install and test this plugin on a test site (localhost) before just relying on our words. This way, you’ll get a better knowledge of the Everest Backup plugin’s features and functionalities.
Conclusion
And that’s all there is to it. We’ve come to the end of our Everest Backup plugin review. We sincerely hope you enjoyed this Everest Backup review article.
From this review, we believe that you’ve also realized that the Everest Backup plugin is definitely one of the emerging powerful plugins with advanced capabilities. And equally excited to put it to use on your site.
If you have any more questions, please leave them in the comments area. We will do our best to assist you. You may also share your experience if you’ve used it. It would be wonderful to hear from you.
Also, you might want to read our other articles best WordPress security plugins and WordPress speed optimization plugins.
Lastly, do remember to like us on Facebook and follow us on Twitter for more updated content.