Wondering how to get rid of ‘leave a reply’ on WordPress? If yes, then you’ve landed on the right page.
Though comments and replies are a wonderful way to communicate with your visitors, you may not want them sometimes. In fact, comments are good for some websites and not so good for others.
Hence, it’s up to you, whether to get rid of the ‘leave a reply’ section or not.
By default, WordPress includes a comment system on your posts. But what if you want to disable the comment section?
No worries, WordPress also gives you plenty of options to control, enable, or disable comments on your website.
Here in this article, we’ve enlisted some easiest ways to get rid of ‘leave a reply’ on WordPress. So, let’s dive into it!
Why Would You Want to Get Rid of ‘Leave a Reply’ on WordPress?
Getting rid of the comment section from the website is uncommon, but different websites don’t want comments or replies.
Here’re some of the reasons for disabling the comment section:
- Spam comments: It’s one of the most common reasons for disabling the comment section. Although there are many comment anti-spam plugins, some prefer closing the comments entirely. Rightly so, it can completely prevent comment spam.
- Unwanted interaction: Some types of websites don’t want user interaction at all. For example, brochure websites intend only to provide information and notices. So, they may not want any conversation with users.
- No blog sections: Recently opened small businesses don’t have blog sections or contentful posts. They just have information about their service/product. They may also want to turn off comments.
- Slow site speed: If your blog receives tons of comments, then it can also impact your site speed. If you’re not able to regularly monitor and moderate the comments, then they can outgrow your page content and slow down the page speed.
These are some instances why you may want to close ‘leave a reply’ in WordPress. Whatever the reason may be, we’ve got you covered with easy ways!
But before that, let’s see what you’ll miss after removing the comments.
What You’ll Miss After Disabling the Comment Section?
Before you turn of comments, it’s better to consider what you’ll miss after the act. This is to help you make an informed decision.
- You might lose potential customers. Commenting is one of the easiest ways for customers to find out more information about products or services they want to buy. So, when comments are turned off, you might lose some prospects.
- You’ll miss suggestions. Some users may want to provide suggestions but they won’t be able to do so. With such suggestions turned off, you’ll miss opportunities to improve your site.
- Positive comments are social proof. If most of the comments on your site are positive, then they can influence other visitors. And, they may become your regular customer. You’ll lose that opportunity also.
Consider these points and make your decision! If you decided to close comments, then you can use the following methods.
5 Easy Ways to Get Rid of ‘Leave a Reply’ on WordPress
There are various ways to get rid of the ‘leave a reply’ section of WordPress. Therefore, we’ve included some of the easy methods for your website.
So let’s get started!
Method 1. Get Rid of the ‘Leave a Reply’ Section from Your WordPress Site Entirely
With this method, you’ll be able to get rid of the comment section entirely on your WordPress site. This includes all the pages and posts of the website.
For this, log in to your WordPress dashboard and click on the Settings menu. Then, go to the Discussion.
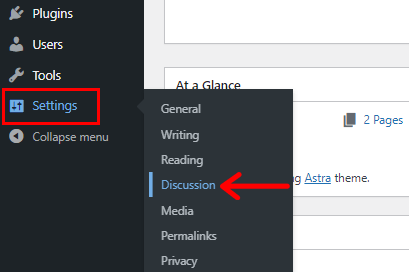
After that, you can see the Default post settings section where you can uncheck the “Allow people to submit comments on new posts” element.

Also, don’t forget to click on the Save Changes button in the bottom-left of the settings page.
This method will simply turn off all the future comments of your article, posts, pages. Not for those that have already been published. We’ll share that in method 4 below.
Method 2. Get Rid of the Comment Section for Specific Posts or Pages
Now, we’ll share how to get rid of the comment section for specific posts or pages. This option will help you close future comments on specific posts.
Here, we provide you with 2 different ways, please go with the one that makes you feel easier.
Quick Edit Method
Firstly, go to the Posts menu of your dashboard and click on the All Posts. There, you can see your posts. Once you hover on any of your posts, you can see the “Quick Edit” option.
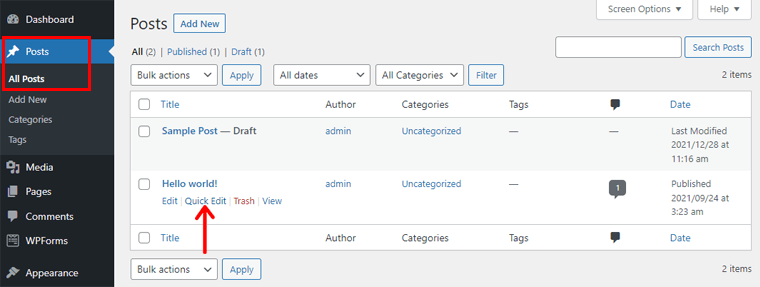
Just click on it and you can see “Allow Comments” on the Tags section. You simply need to uncheck the ‘Allow comments‘ and click on the ‘Update‘ button.
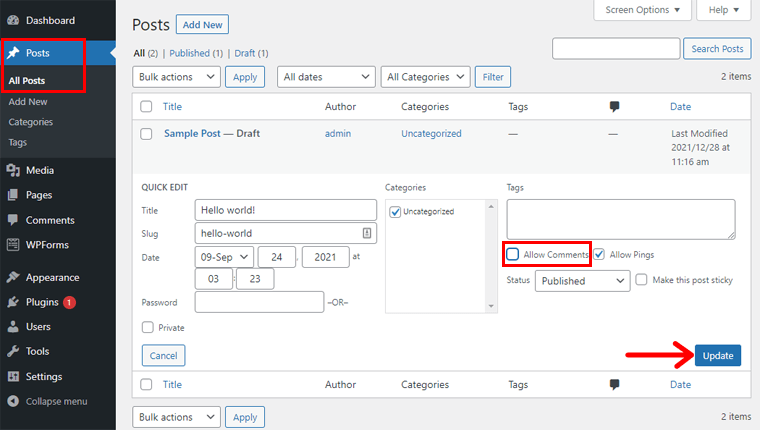
That’s it! Now you’re all set.
If you’ve comments on your pages also, then you can follow the same steps and turn of future comments.
Edit Post Mode
Moving forward, similar to previous method, you can close future comments on some particular blog articles using this method.
To begin, go to the Posts>All Posts from your WordPress dashboard. Hover on any post for which you want to turn off the comment section. There, you can see the Edit option.

Click on it and you can see the Discussion menu on the right side of the Posts section.
After that, click on the Discussion menu and uncheck the ‘Allow Comments‘. Once you do that, click on the Update button on the top-right of the edit mode.
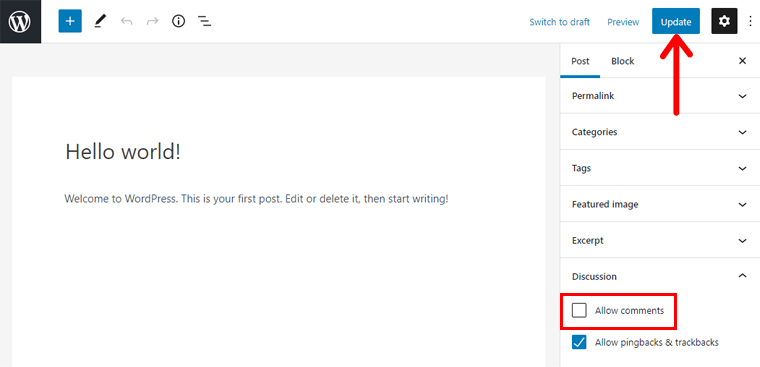
Now, the comments section of this post will be turned off. Also, any visitors won’t be able to comment or reply to your post.
Method 3. Get Rid of the Comment Section in Bulk for Multiple Pages and Posts
If you want to remove the ‘leave a reply’ section from multiple posts/pages in bulk, then this approach is most suitable.
To do so, go to the ‘Posts‘ or ‘Pages‘ menu and click on ‘All Posts‘ or ‘All Pages‘. Now, check the box on the left side of the Title to select the items.
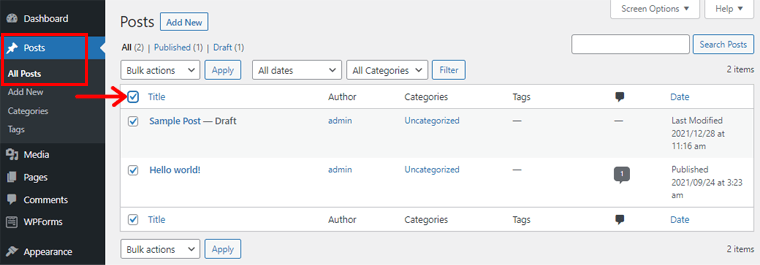
Then, select the ‘Bulk actions‘ dropdown and select the ‘Edit’ option. After that, click on the ‘Apply‘ button to start editing.

There, you can see lots of elements, among them; go to the Comments and click on its dropdown option.
You just need to select “Do not allow” options for your comments and lastly, click on the Update button.
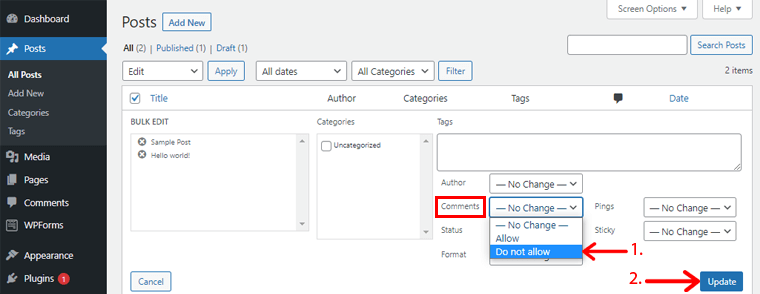
Now, the comment section won’t appear for all the posts and pages that you’ve selected.
Method 4. Delete Existing Comments on Your WordPress Site
The above-mentioned methods only disable the future comments on your website. But you cannot remove already added comments.
To get rid of previously published comments, you need to delete them. We’ll show how to do that easily in this method.
Delete Comments from a Specific Post
Go to the WordPress dashboard and click on the Posts>All Posts menu. You’ll be able to see all the posts.
Firstly, you should find the post from which you want to delete all comments. Once you find the post, go to its ‘Comments‘ column.

There, you’ll see how the number of comments added on that post. Sometimes 2 different numbers; one inside comment icon and another in red circle. The number in comment icon refers to the number of approved comments. Whereas the other in red circle is the number of pending comments.

For example, in the screenshot above, the post has 2 approved comments and 1 pending comment. Now, you can delete them one by one.
To delete the approved comments, click on comments icon. Next, you’ll a new page listing all the approved comments. To remove all comments, click on the ‘Author‘ checkbox which will select all comments and replies.
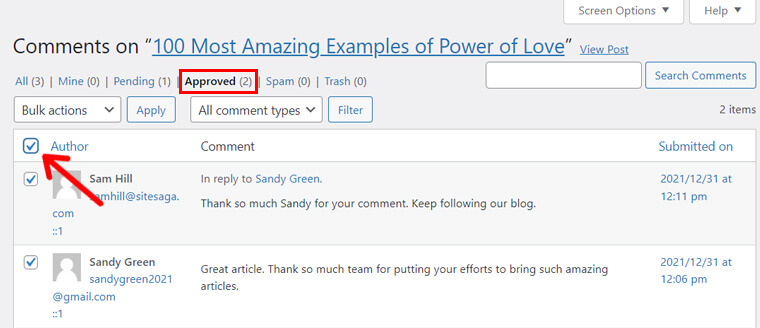
After that, select ‘Move to Trash‘ option from the ‘Bulk actions‘ dropdown. And then, click on the ‘Apply‘ button.
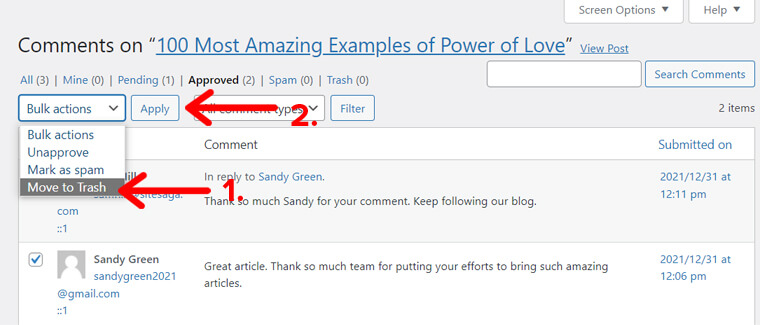
That’s it. You’ll see all the approved comments removed. But if there are more than 20 comments, then you may need to repeat the same process to delete comments on the next page.
Next, can click on the ‘Pending’ option next to the ‘Approved’ option to remove pending comments. Then, you can follow the same steps as above to select all comments and delete them.
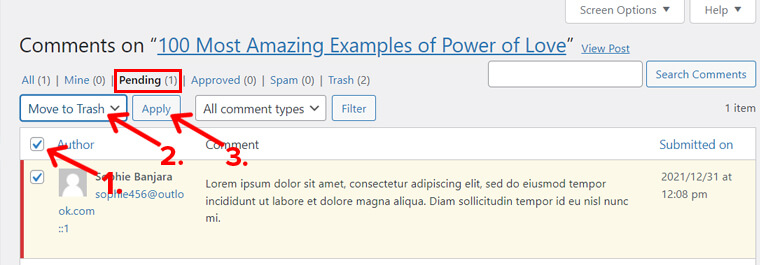
That’s it! This is how you can easily remove all approved and pending comments from an article your WordPress blog.
Remove All Comments on Your WordPress Site
The above method is useful when you want to delete comments from specific posts or pages.
But if you want to delete all comments from all posts, then it’s even easier.
First of all, go to ‘Comments‘ page from your dashboard. There, you’ll see all comments on your website, both approved and pending. Now, to delete your comments in bulk, checkmark on the left side of the Author to select all the comments.
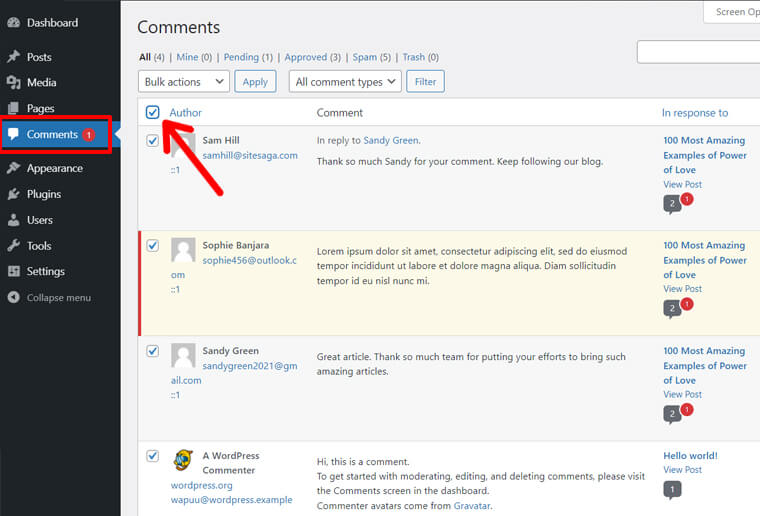
After selecting all the comments, click on the Bulk actions dropdown. On that dropdown, you can see an option “Move to Trash”. Click on it, then go to the Apply button.
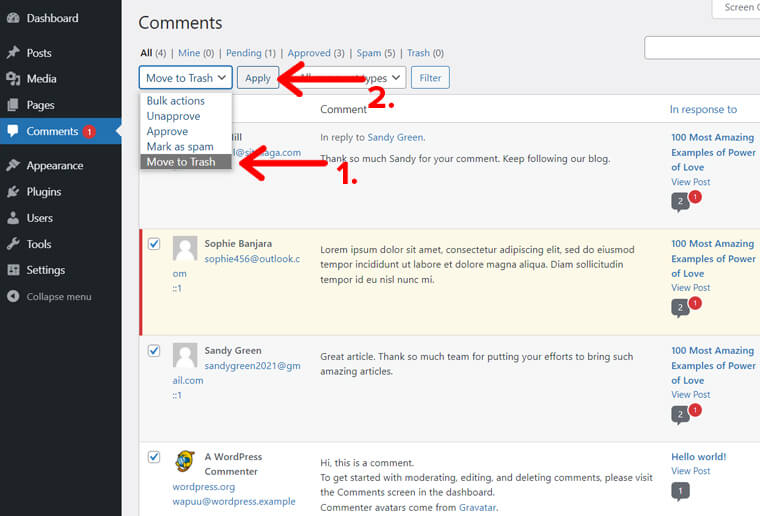
Hence, all the comments can be easily deleted.
Method 5. Use a Plugin to Disable WordPress Comments
You can also install and use WordPress plugins to disable the comments if you don’t want to use the default methods offered by WordPress.
In this article, we’ve selected the Disable Comments plugin that instantly allows or disallows comments from any post, page, or media. This also stops spammers and gives you complete control over the comments on your site.
All you’ve to do is go to the Plugins>Add New and search the “Disable Comments” on the search bar.
Once you find the plugin, click on the ‘Install‘ button.

After installing the plugin, you can see an ‘Activate‘ button. Click on the ‘Activate‘ button to start using the plugin.

Now, on the left side of the menu, go to the Settings and click on the Disable Comments of your dashboard. There, you can have a checkmark on the Everywhere. This helps to disable comments on your entire website globally.
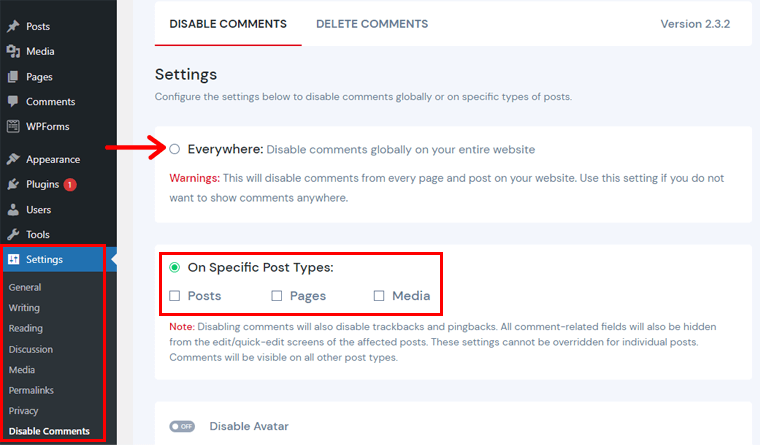
Or, you can checkmark on Posts, Pages, and Media from the “On Specific Post Types” section. It helps to disable comments-related fields for specific posts/pages while the other posts/pages will have a visible comment section.
How to Protect Your WordPress Comment Forms from Spam?
We’ve already covered how to get rid of the ‘leave a reply’ section in the above methods. However, if you’re specifically annoyed with the spam comments, then you can implement some ways to stop spam.
We’ve shortlisted some of the easiest methods, so stick with us till the end.
i) Use Built-in Spam-Protection Features of WordPress
We know WordPress has various built-in features for its users. You can simply use its feature to avoid spam comments. So, let’s dive into the steps!
First of all, go to the Settings and click on the Discussion menu of your WordPress dashboard.
Scroll down below and you can see the Comment Moderation section. In the box, enter the keywords that are frequently used in spam comments.
So, whenever those words appear in your comments, they will be kept in moderation. Putting comments into moderation means they won’t appear without your approval.
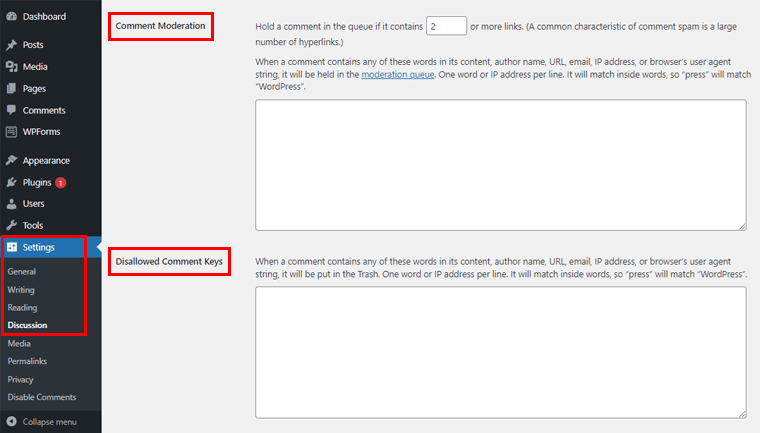
Similarly, you can also see another section as “Disallowed Comment Keys”. This will send any comment containing the disallowed keywords into the trash. You just need to enter the words you don’t want to see on your website.
ii) Closing Comments after Certain Period
Besides deleting and disabling comments on your website, you can simply close the comments after a certain period as well.
To do so, go to the Settings menu in the dashboard of your WordPress website. Click on the Discussion and there you’ll find Other comment settings.
In that section, you can see the element “Automatically close comments on posts older than 14 days”. Checkmark on that option and just select the number of days according to your preference.
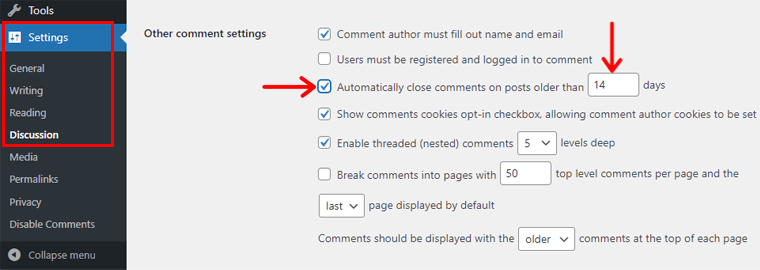
After that, comment section will be automatically closed after the certain days that you’ve selected.
Since the spammers or spambots usually target older articles, using this method will somewhat reduce spam comments. Because the comment will be closed after certain days and no one will be able to comment.
iii) Use a Comment Anti-Spam WordPress Plugin
Aside from using WordPress’s features, you can also use a WordPress plugin for more effectiveness. Here, we’re using the Akismet Spam Protection plugin to show you a step-by-step process on how to avoid spam comments.
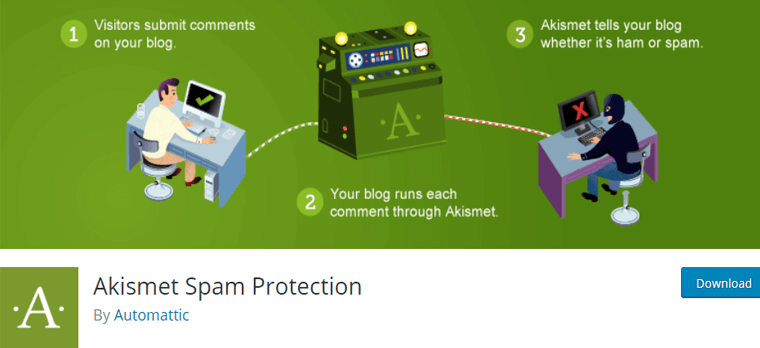
Akismet Spam Protection is one of the most popular anti-spam plugins. It checks your comments to prevent your site from publishing malicious content. You can review and delete the spam comments it catches on your website.
However, if you want to use the completely free anti-spam plugin, then Antispam Bee is a good alternative. As it also helps to eliminate spam comments and trackbacks effectively without the usage of captchas.
Also, check our article on the best anti-spam comment plugins for more options.
Now, let’s move forward into the steps, instead of discussing more about the plugin.
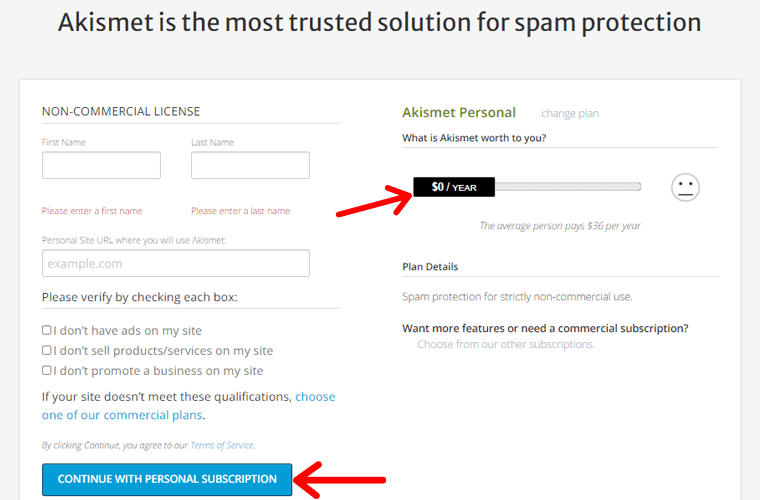
Before installing this plugin, you need to create an account. Go to its official website and click on the Pricing. We’ll be using a Personal Plan for this tutorial.

After clicking on the Personal Plan, you can see a price slider, you can drag and slide it to $0. Then, enter your email address and the URL of your website. Next, you’ll receive an API in your email that you’ve entered while creating an account. This API will be used after activating the plugin.
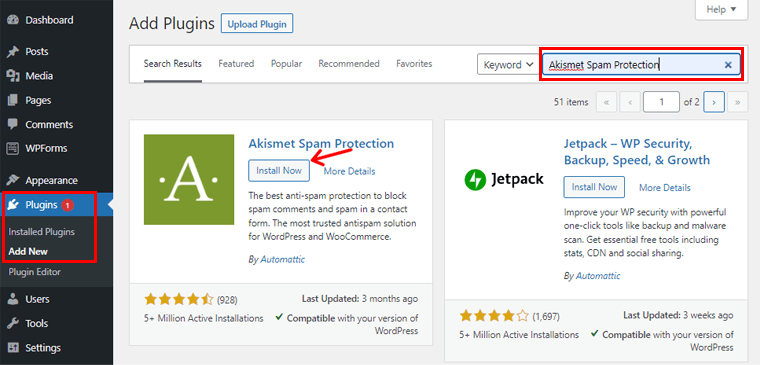
Now, go to the WordPress dashboard and click on the Plugins menu. You can find Add New option, click on it and enter the Akismet Spam Protection on the search bar. After finding the plugin, click on the Install button.
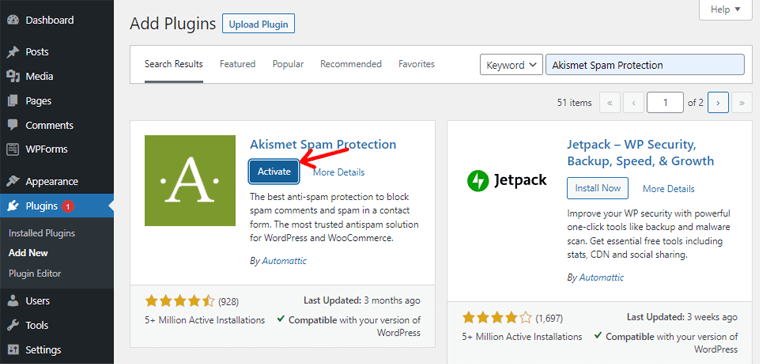
Once the installation is completed, click on the Activate button to check if the plugin works or not.
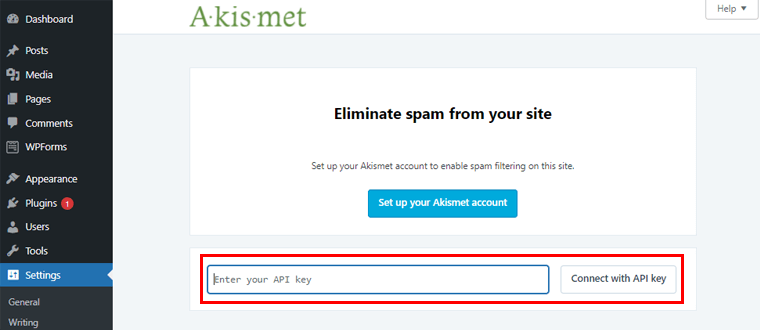
After activating the plugin, you need to manually enter an API that you’ve received in your email. Then, click on the Connect button to integrate your account with the Akismet Spam Protection plugin.
Now that you’ve connected, the plugin will automatically start protecting your site from spam comments. You can also configure its settings according to your need and security, and click on the Save Changes button.
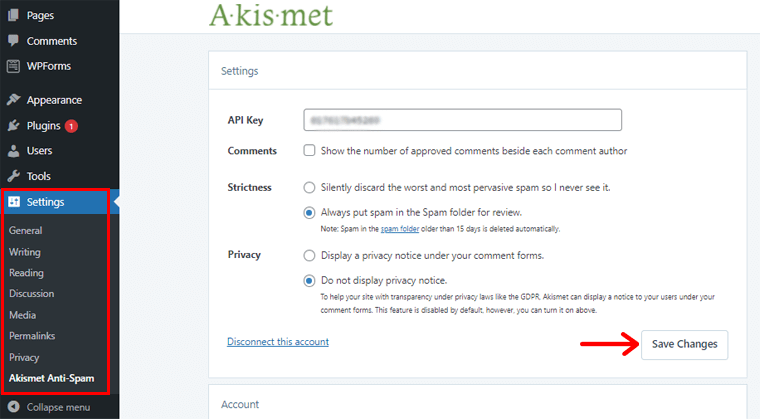
Hence, it’s also one of the easiest and most reliable methods to protect your website from spammers and spambots.
Conclusion
That’s all folks! We’ve arrived at the end of this article.
We’ve discussed different methods that can be helpful to get rid of ‘leave a reply’ on WordPress. We hope this article helped you know how to disable the comment section of your WordPress website. Now, you can get rid of unwanted comments on WordPress using any of these easy methods.
Also, if you’ve tried any of these methods mentioned above, then do leave us a comment below.
If you have any more queries about how to get rid of comments, then feel free to ask us. We’ll get back to you as soon as possible. Also, share this article with your friends and colleagues.
You may also like our article about how to add a contact form & page on WordPress? & how to check if a website is built on WordPress?.
Don’t forget to follow us on Facebook and Twitter for more helpful articles.

