Are you wondering how to recover deleted blog posts on WordPress? Or do you want to recover permanently deleted pages or content using WordPress backup? Worry not! This guide will help you!
We can’t deny that we’ve accidentally deleted our WordPress blog posts a few times. Like us, you may also have removed something you shouldn’t have. Now, you may be thinking about how to restore the deleted content back?
Well, we’ve already faced this situation! So, we know about different ways to retrieve deleted posts and pages in WordPress. We’ve recovered even the permanently deleted content!
Right then, we thought there may be people facing a similar problem. So, we prepared this guide to share the different methods of recovering deleted posts and pages in WordPress step-by-step.
Let’s get started!
What Happens to Your Deleted Posts & Pages?
Being human, we sometimes make accidental mistakes in our daily life. Hence, it’s a very common phenomenon for almost everyone. And we shouldn’t need to be ashamed of it.
Similarly, while working on WordPress, you can accidentally delete your blog posts. Or you delete them thinking you might not need them.
But, you came to know that it contains all the necessary information that your website visitors love. Hence, you should know how deleted posts are handled in WordPress.
Just like your computer, WordPress doesn’t completely delete your items permanently in the first place. It first moves your deleted items into a Trash folder.
The deleted content stays in the Trash for 30 days. After that, WordPress automatically deletes the item permanently from the trash. But, if you try to delete your Trash too, then only all the items in the Trash will be deleted permanently.
Yet, you can recover those posts if you have a backup of the files before being deleted. We’ll show you the whole process, so keep reading.
With that said, let’s look at different ways you can recover your deleted pages in WordPress. We’ve tried to explain each one of them in detail below.
Video Tutorial – Recover Deleted WordPress Posts & Pages
If you like to learn from a video tutorial instead, then here it is!
If you still love the step-by-step guide in detailed article form, keep scrolling to the bottom.
How to Recover Deleted Blog Posts & Pages on WordPress?
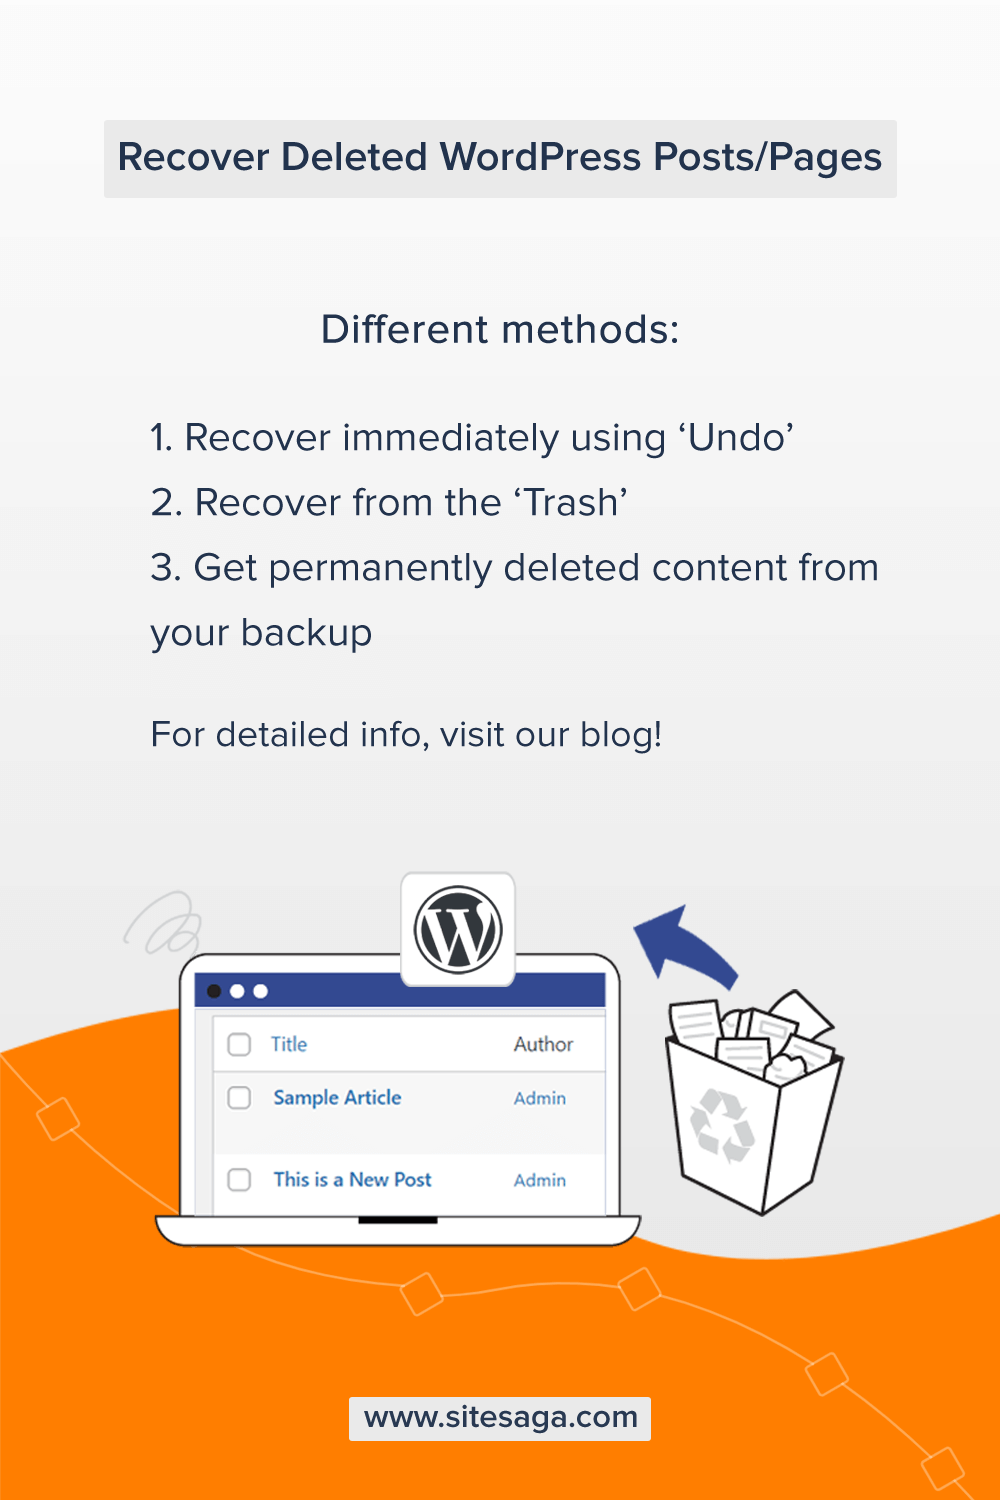
There are several ways in which you can recover deleted blog posts & pages on WordPress. Here, we’re going to see five different ways in which you can recover deleted blog posts & pages on WordPress.
Let’s begin with the first method – recovering a post immediately after deleting it.
Method 1: Recover Immediately Deleted Blog Posts & Pages
This is the very first method that you can try by yourself. If you delete your posts/pages and then realized the mistake immediately. In such cases, the best thing you can do is not to panic.
WordPress gives you an option of Undo to undo your action immediately. Hence, let’s look at how this works.
Suppose you’ve logged in to your WordPress dashboard and you’re inside your Pages or Posts section. And you accidentally deleted a blog post or page.
As soon as your blog gets deleted you’ll see a small notification pop up below the Add New button. That says, “1 page moved to the Trash”. Alongside that, you’ll see an option called ‘Undo‘.
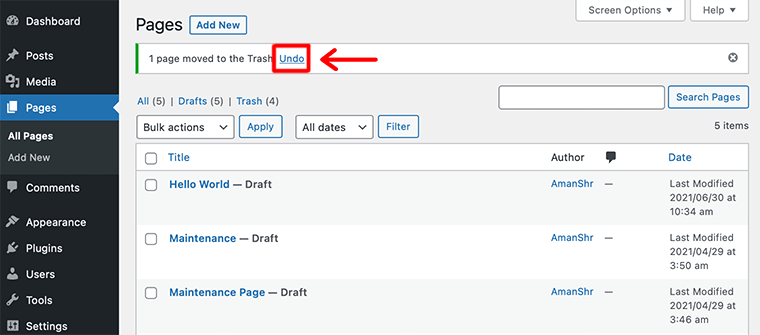
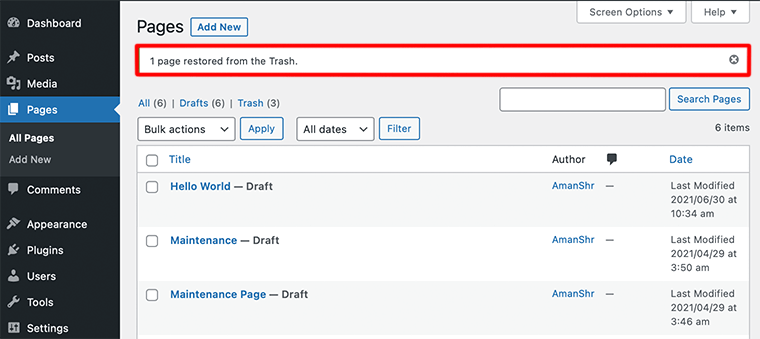
You need to click on that option if you immediately want to restore your page from the Trash. After that, another notification will pop up saying “1 page restored from the Trash”.
Thus this is how you can restore your deleted blog posts immediately using the Undo option. This method will only work if you follow it after you’ve accidentally deleted your blog page/post.
Method 2: Recover Posts/Pages from Trash in WordPress
In the first method, we looked at how we can restore our blog post immediately after deleting it. But, what if you want to restore your post/page that you’ve deleted a few hours or days before?
For that kind of scenario, this second method would be perfect for you all. As mentioned above, the deleted page/post won’t be completely wiped out immediately from your WordPress. Because they get stored in a ‘Trash‘ folder for up to 30 days.
Hence, we’re going to make use of that Trash folder to restore our deleted posts/pages on WordPress. Let’s begin.
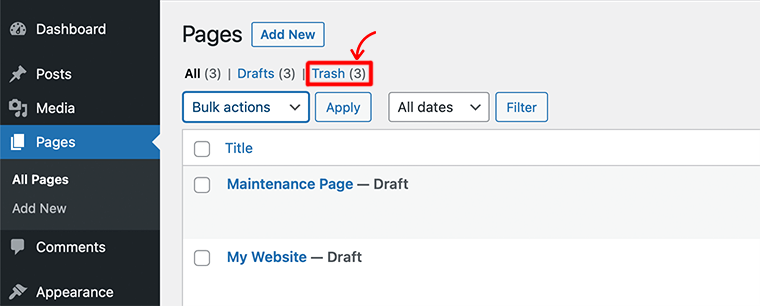
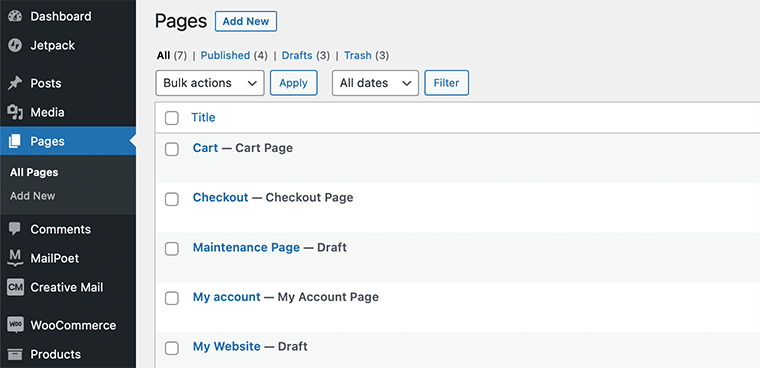
Go inside your Pages or Posts section and click on the Trash tab. This will let you view all the pages that were deleted during the last 30 days.
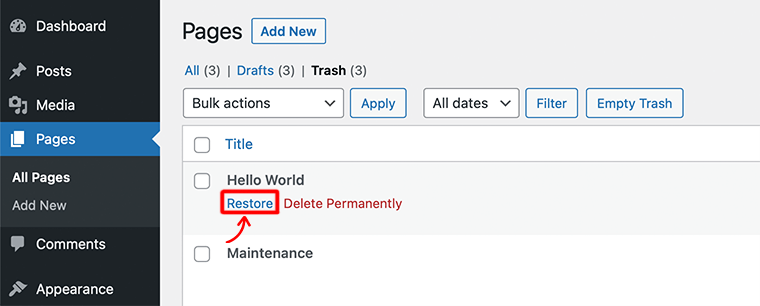
After that, you need to select the page that you want to recover and you’ll see two options. All you need to do is select Restore and it’ll restore your page from the Trash folder.
Also, you can restore many pages/posts in bulk from the Trash folder. For that, you need to select the pages and choose the Restore option from the Bulk action drop-down menu.
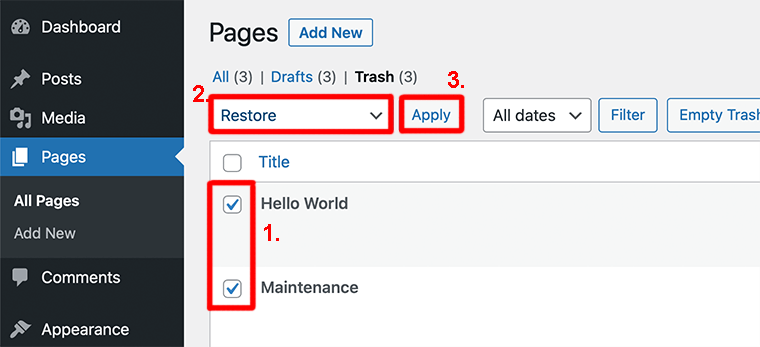
After you’ve selected Restore from the menu, click on the Apply button to save your changes.
That’s it! This is how you recover your deleted pages/posts from Trash in WordPress. It’s the quickest and easiest way to recover your deleted blog posts and pages on WordPress.
Method 3: Restore Permanently Deleted Content Using WordPress Backup
This method is quite more complicated than the previous ones. But with proper guidance, you can also use this method. Anyway, you should go with this method only if the previous two methods fail.
In this method, we’re going to restore permanently deleted content from a backup. But for that, you need to have a backup file of your website saved before the deletion of the lost content.
Now, let’s go through the step-by-step process!
i) Download Your WordPress Backup
First of all, you need to download your WordPress site’s backup. As mentioned before, it should be a backup taken before the posts/ pages are deleted.
Now, go to the backup storage location where you’ve saved your website backups. Chances are you may have backed up your site using a WordPress backup plugin like UpdraftPlus.
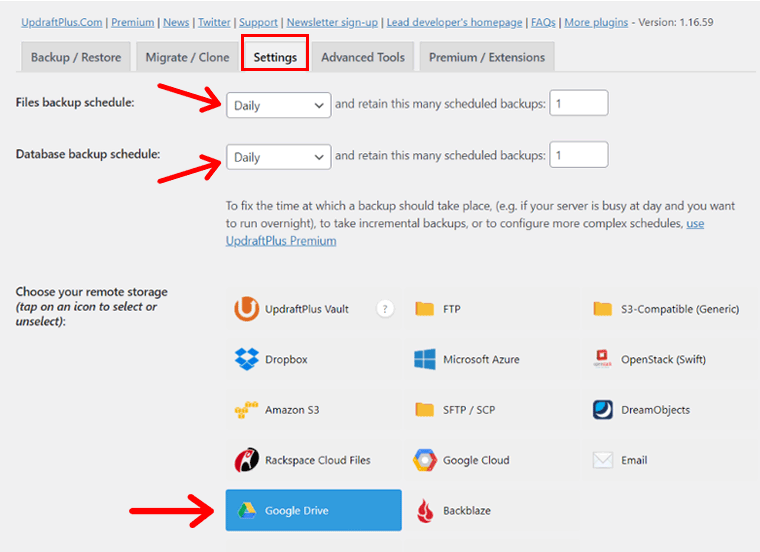
With UpdraftPlus, you can schedule backups daily, weekly, or monthly and save the backup files in remote locations like Dropbox or Google Drive.
In another case, your web hosting provider may have backups of your website. If so, you can check your hosting account dashboard for backup. If you don’t find it, then contact your hosting company and request them to provide you with a backup of the required date.
For this tutorial, we’ll use backup files from the UpdraftPlus Google Drive folder.
On our site, we have scheduled daily backups of both WordPress files and databases and stored them in Google Drive.
So, we can go to our Google Drive and download the required backups.
UpdraftPlus creates a folder named ‘UpdraftPlus‘ in your Google Drive (after you provide access) and stores your WordPress Database, Plugins, Themes, Uploads, and Others in different subfolders.
To recover content like posts and pages, you can simply download the database folder. Select the database of your required date.

After that, you can right-click on the selected Database backup and Download that database to your computer.
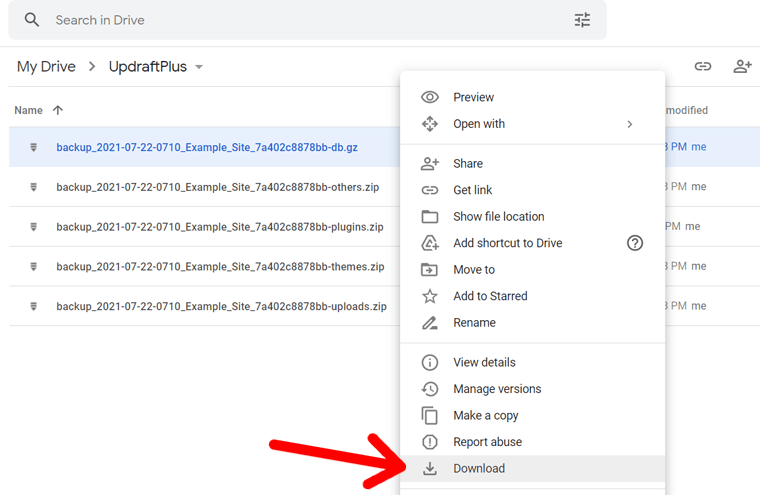
After that, the database folder will be downloaded to your local device.
ii) Set Up a Local Website for Restoring Deleted Content
After that, you need to set up a WordPress website on a local server.
It’s required because we’ll restore the deleted posts to the local site first and then copy the required posts to the live website.
You could also restore content directly on your live site but we don’t recommend that, mainly due to 2 reasons.
- First, it can cause errors and break your live website.
- Second, you may not want to restore all posts included in that backup. Restore plugins like UpdraftPlus don’t have the option to choose specific posts for restoration, but they’ll restore all posts included in the backup. So, it’s safe to restore the database on a local site and copy only the required posts to the live site.
If you don’t know, please follow our step-by-step guide to setting up a WordPress site on localhost using XAMPP. If you’ve already installed WordPress locally, then you can skip this step.
iii) Install UpdraftPlus on Your Local Site and Restore Deleted Posts
Now that you have your local site set up, you need to install a backup and restore plugin. For this tutorial, we’re going to use the UpdraftPlus plugin.
From your dashboard panel, go to ‘Plugins > Add New‘ and search ‘UpdraftPlus’. Once the plugin appears, click on the ‘Install Now‘ button.
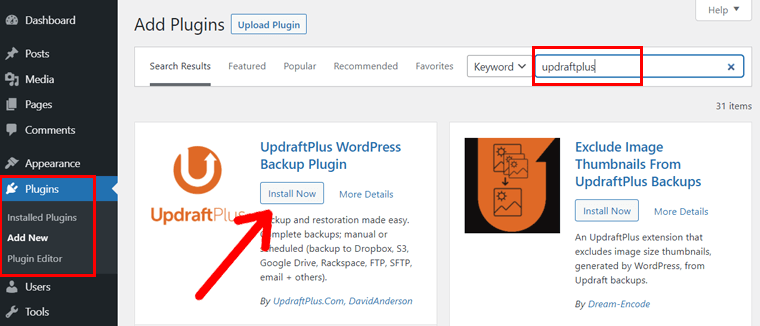
After that, activate the plugin.
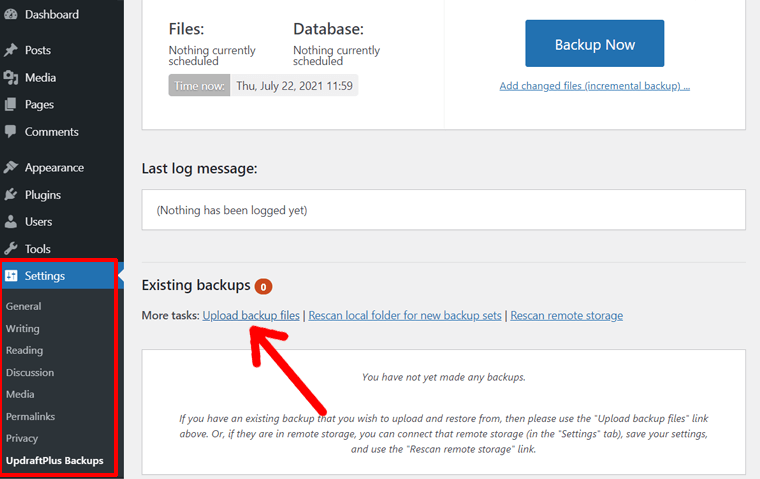
Next, go to Setting > UpdraftPlus Backups. Scroll down the page until you reach the Existing Backups section.
Next, you’ll need to upload the backup file that you downloaded earlier. For that, click on the Upload backup files link to upload your downloaded backup file.
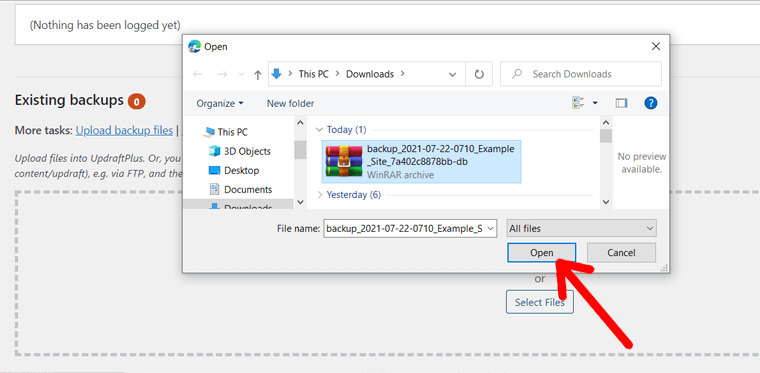
After that, select the WordPress database backup folder downloaded earlier and click on Open to upload.
Once you’ve uploaded the backup, UpdraftPlus will display it below the Existing Backups section. After that, all you need to do is click on the blue Restore button to proceed.
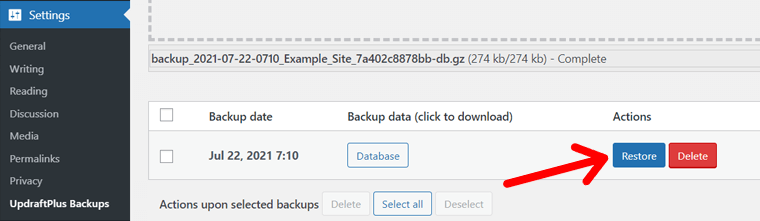
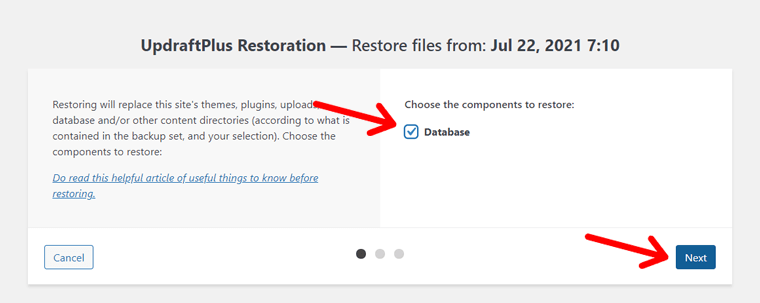
This will take you to the other page that will ask you to select the components that you want to restore. Select Database and click on Next.
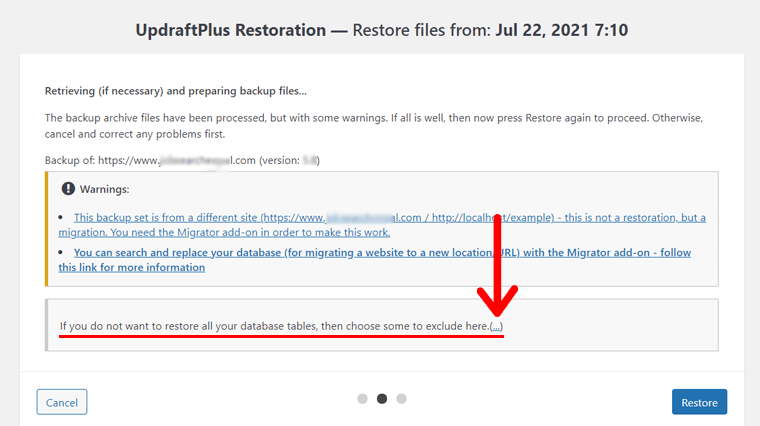
On the next screen, you’ll see a notification that you’re migrating data from another website. Also, you’ll see another message that reads: “If you do not want to restore all your database tables, then choose some to exclude here.(…)”. Click on the (…) link.
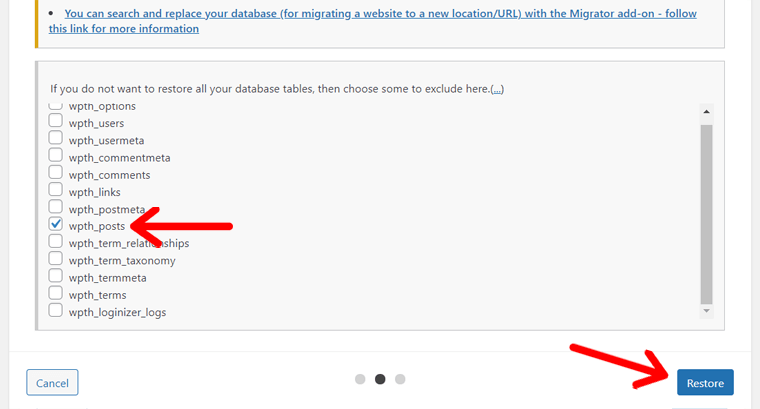
After that, you can deselect all the tables except wpth_posts. It’s the table that contains your posts and pages in WordPress. After that click on the ‘Restore‘ option.
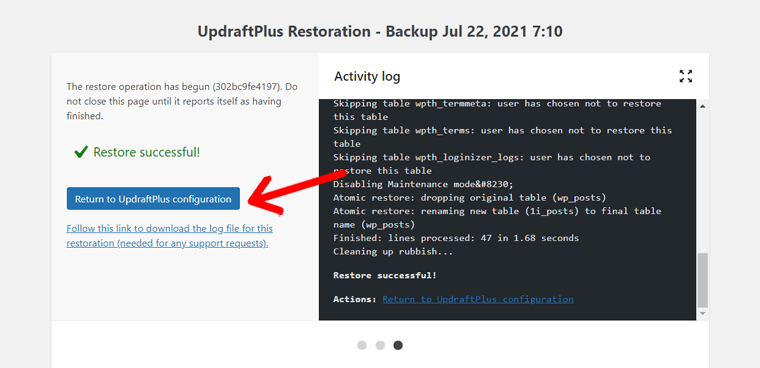
After that, it’ll take some time for UpdraftPlus to restore your posts.
Once done, you’ll find the Restore Successful message. You’ll also find the ‘Return to UpdraftPlus Configuration‘ button. Simply click on it to return to your WordPress dashboard.
After that, you can go to ‘Posts > All Posts‘ and view the restored blog articles.
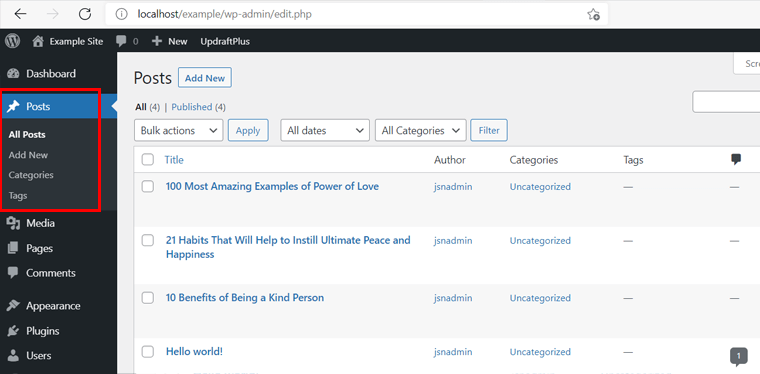
As you can see above, we have restored 4 posts.
Similarly, you can go to ‘Pages > All Pages‘ to view the recovered pages. The ‘wpth_posts’ table in the WordPress database includes both the posts and pages, so both will be recovered when you restore the table.
iv) Copy Content from Local Site to Live Site
Now that, your deleted posts and pages are restored to the local site, it’s time to move them to the live site.
We’ll do it manually by copying the posts one by one. But don’t worry, it’ll take just a few clicks.
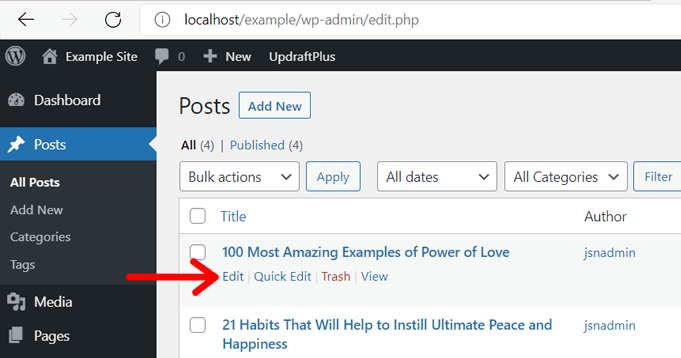
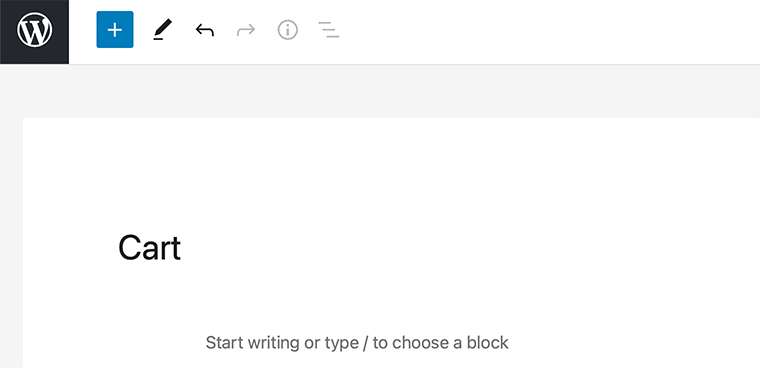
For example, we’ll show how to copy a post and add it to the live site first. Go to ‘Posts > All Posts’ in your local site dashboard and then click on the ‘Edit‘ option below the post you want to move.
Once the content editor opens, click on the 3 dots ‘Options‘, scroll down to the ‘Copy all content’ option, and click on it.
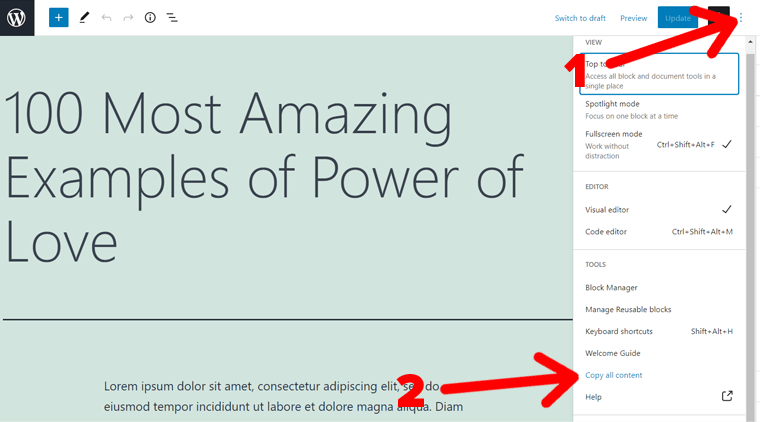
That’s it! You just copied the whole content in the post.
Next, login to your live WordPress website. After that, go to Posts > Add New. Then, paste it into the content area (paragraph block) by pressing Ctrl+V on a Windows computer or Command-V on Mac.
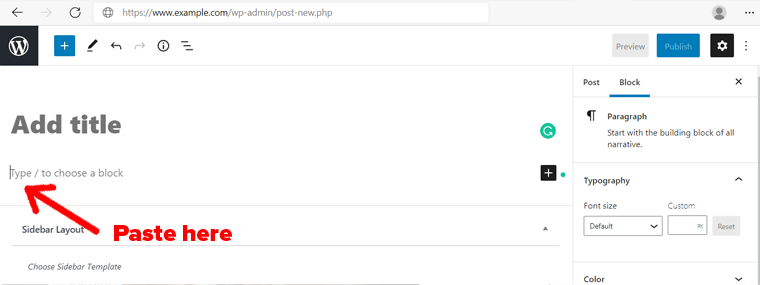
Now your content will be added.
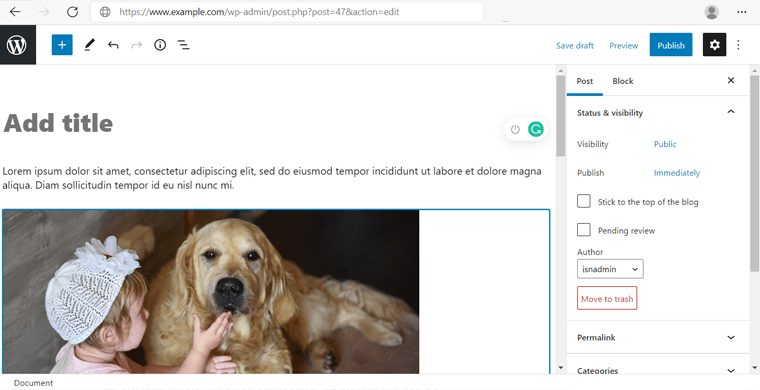
After that, copy the post title as well from the local site and paste it to the site. Then, click on the ‘Save Draft‘ option.
That’s all! Your WordPress article is restored. Now, you can edit, make changes and publish the post again.
Similarly, you can also restore more posts and pages from the backup in WordPress!
Method 4: Recover Your Site Content Using Google Cache
Sometimes you may not find your deleted blog posts and pages in the Trash area. In that case, it becomes slightly difficult to recover your deleted pages and posts. Hence, in that case, Google Cache comes in handy sometimes.
As there is a high chance that Google might have indexed your website at a certain point in time. And stored it on its server so that you can retrieve it later for various purposes.
Now, let’s go ahead and see how you can use Google Cache to restore deleted posts and pages in WordPress.
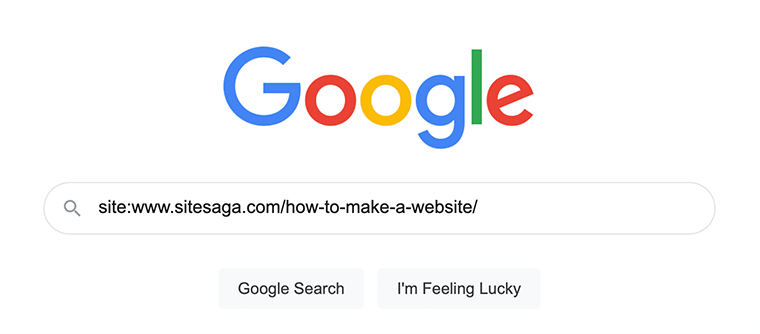
Start by going to the Google search page and then search for the post/page by title “site:www.example.com/name_of_the_post”. Remember to replace “example” with the name of your website.
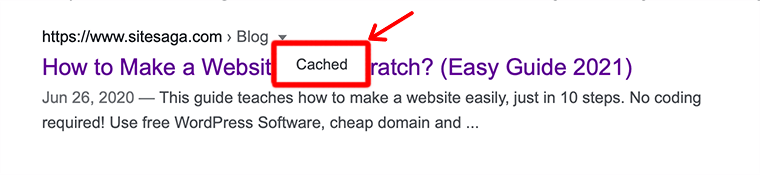
After that, if it shows your post in the result, then click on the arrow pointing down next to your site title. Once you click it, the Cached option will appear. Then, click on the Cached option to find your deleted post or page.
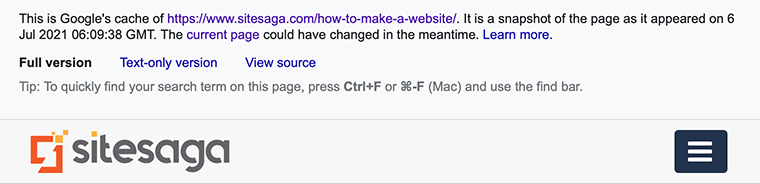
Following that, Google will display the snapshot of your page as it appeared on a particular date. Hence, if you think that is the one you want before you’ve deleted it then you can copy it and recreate the page.
Therefore, to recreate the page, go to Pages >> Add New and then create a new page.
This brings us to an end on how you can recover your blog post or page using Google Cache. It only works if you’ve already published your posts/pages before they have been deleted.
Method 5: Restoring Deleted WooCommerce Pages
When you install WooCommerce, it automatically generates important pages for your WooCommerce store. Such as Cart, Shop, Checkout, and Account Management. These are important for your website because they help to run WooCommerce functions properly.
However, sometimes you can accidentally delete any WooCommerce pages, then you can first try restoring them from WordPress Trash. But if you don’t find it in the Trash then you can restore it using this method.
Here, all you’ve to do is create a similar page from your dashboard. For that, go to Pages >> Add New and then create a new page.
Once you’ve created a new page, now you need to tell WooCommerce to use this page instead. Go to WooCommerce >> Settings page and from there switch to the Advanced tab in the right corner.
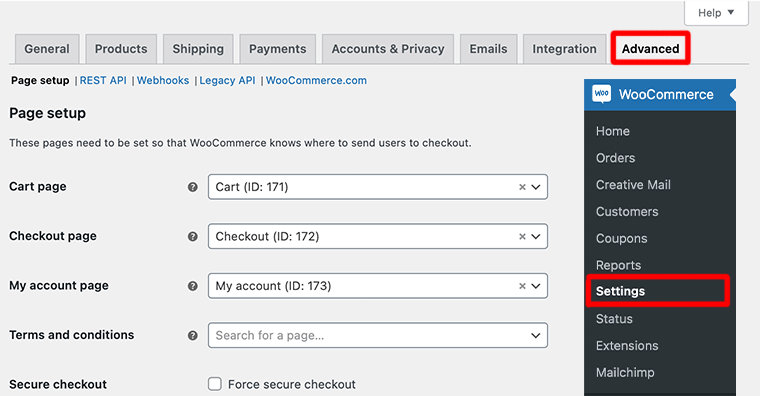
There you’ll see all of your WooCommerce pages that had been created earlier under the page setup option. After that, you need to select the page that you’ve created in the Page Setup.

However, for the Shop Page, you’ll need to go to the Products tab. And, then select the page you want to use as your Shop page.
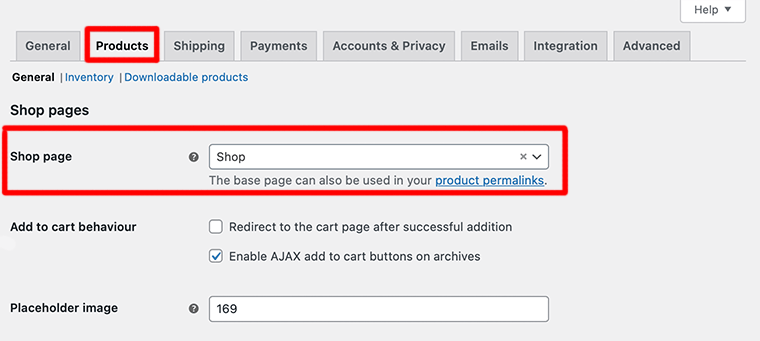
Finally, don’t forget to click on the Save Changes button to save your settings.
Pretty cool right? This is how you restore your deleted WooCommerce pages in WordPress.
Conclusion
We hope this article has helped you with how to recover deleted blog posts on WordPress. We believe that now you can also easily restore deleted WooCommerce pages.
If you’ve any further queries about how to recover deleted blog posts on WordPress., then please leave a comment below. We’ll try to get back to you as soon as possible.
You may want to take a look at our detailed review of Pressable, managed WordPress hosting. Also, have a look at the top web hosting companies for your website.
If you like this article, then please share it with your friends and colleagues. Also, don’t forget to follow us on Twitter and Facebook.