Are you looking for an honest SEOPress review? Or wondering if it’s good enough to use? If yes, then you’re at the correct place to know about it.
An important factor that determines your website’s growth is SEO (Search Engine Optimization). With proper SEO optimization, your website can drive plenty of traffic from search engines like Google and help to make your website successful.
Luckily, there are plenty of SEO plugins available in WordPress. Here, we’re talking about SEOPress. It’s a lightweight SEO plugin that doesn’t slow your site, yet it’s full-featured.
However, it might be confusing to decide whether it’s good enough to use it for your website or not. Don’t worry. We already did the study and brought you this SEOPress review article.
For that, let’s go through the features, pricing, pros, cons, and more to know about the plugin. Then, at the end of this SEOPress review, you’ll be able to decide whether you should use it or not.
So, let’s get started.
A. What is SEOPress? (An Overview)
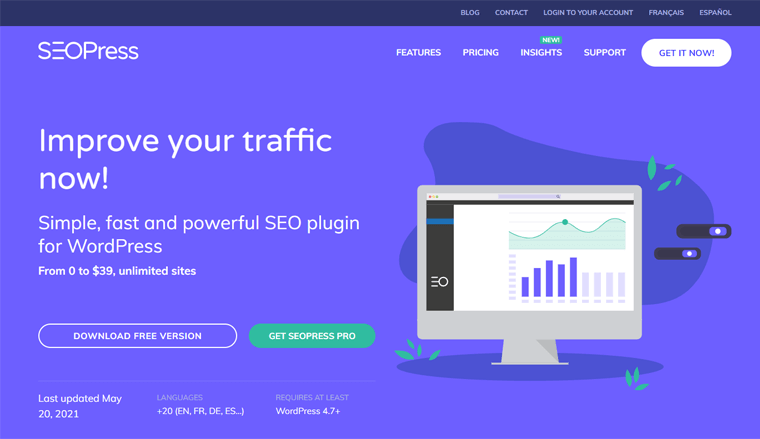
SEOPress is a fast and powerful WordPress SEO plugin that was launched in 2017. Even being one of the new plugins for SEO, there are currently 150K+ active installations of it. It’s quite popular because you can optimize the SEO of your WordPress site easily and quickly.
No wonder it’s an all-in-one SEO plugin. You can optimize your SEO by content analysis with unlimited target keywords. Plus, it contains features for redirection, sitemap, markup, improving links, analyzing, and monitoring your site. Thus, all the features that you may need in maintaining your site’s SEO are in this single plugin.
Moreover, most of the parameters are automatically set in the configuration wizard. This makes it easy for you to configure SEOPress even without knowing much about SEO or coding. Plus, you can easily enable or disable the features of SEOPress.
Not only that, it seamlessly integrates with the popular WordPress plugins and tools related to eCommerce, translation, performance, and analytics. Some of them include Elementor, WPML, Polylang, Divi, WooCommerce, WP-Rocket, and many more.
Besides them, there are several other features in this plugin. We’ll discuss them later in more detail in this SEOPress review article.
B. How to install and set up the SEOPress Plugin?
The process to install and set up SEOPress is similar to any other WordPress SEO plugin. So, follow these steps to quickly configure the plugin on your site.
1. Installing and Activating the Plugin
Firstly, you need to log in to your WordPress dashboard to install SEOPress. After that, you must click on the Plugins section available in the menu. There you’ll find the Add New option. So, click on it.
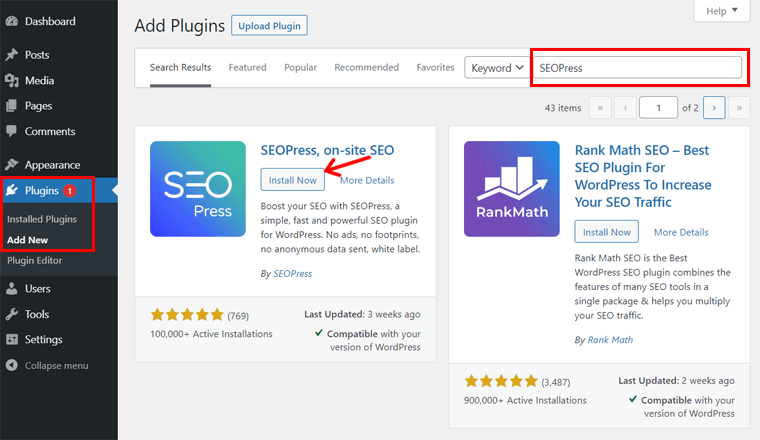
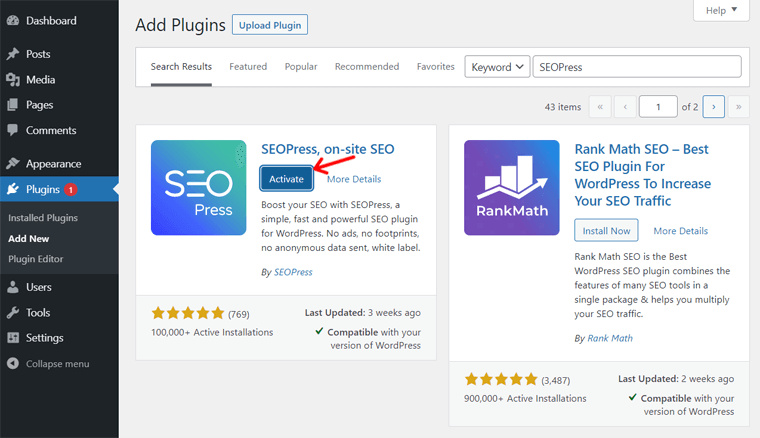
In the Add New section, there’s a search box for searching the plugin to install. Here, you must type the keyword ‘SEOPress’ and enter it to search the plugin.
Click on the Install Now button when you see the ‘SEOPress, on-site SEO’ plugin. After the installation completes, an Activate button shows up. Click on that button, to activate the SEOPress plugin.
Following these steps, the SEOPress plugin will be installed and activated on your WordPress website.
2. Running the Configuration Wizard
Now, that SEOPress is active on your site, you’ll see a new menu named ‘SEO’ on your dashboard menu. Click on it, then the dashboard for SEO opens. Here’s a Get started button that you must click to run the configuration wizard of SEOPress.

Let’s start the configuration following these steps below.
Step 1: Import SEO Settings
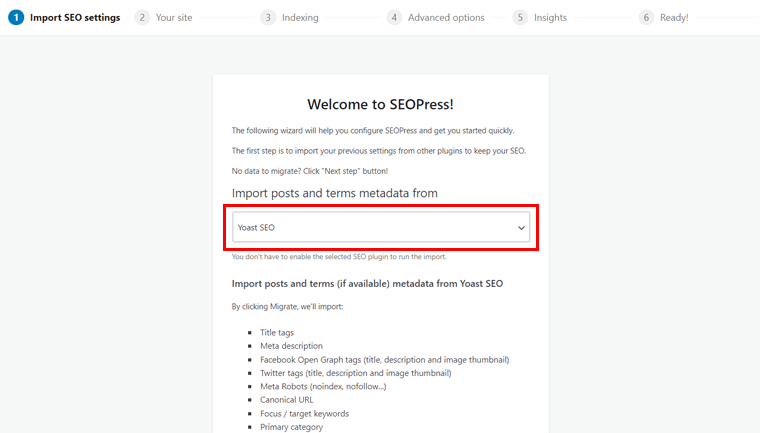
At first, you’ll get an option to import the previous SEO settings from other SEO plugins. If you want to import the data from another SEO plugin that you’ve installed, click on the Select an Option dropdown. There you can choose the SEO plugin such as Yoast SEO as chosen in this figure.
Then, you’ll get a Migrate button option to import the posts and terms metadata from that plugin (if available). So, click on that button if you want to do so.
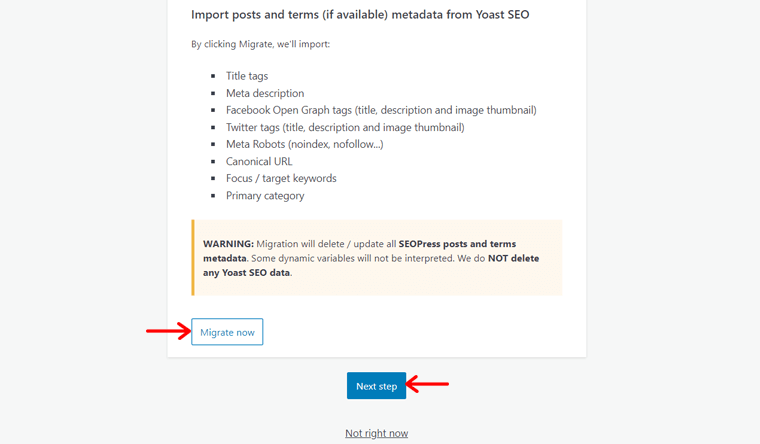
Note that, this migration will delete or update the SEOPress posts and terms metadata. While the data from another plugin will not be deleted.
After the migration completes, you can click the Next Step button to proceed with the configuration.
But, you may not be using any other SEO plugin or simply you don’t want to import any data. In that case, you can simply click on the Next step button directly.
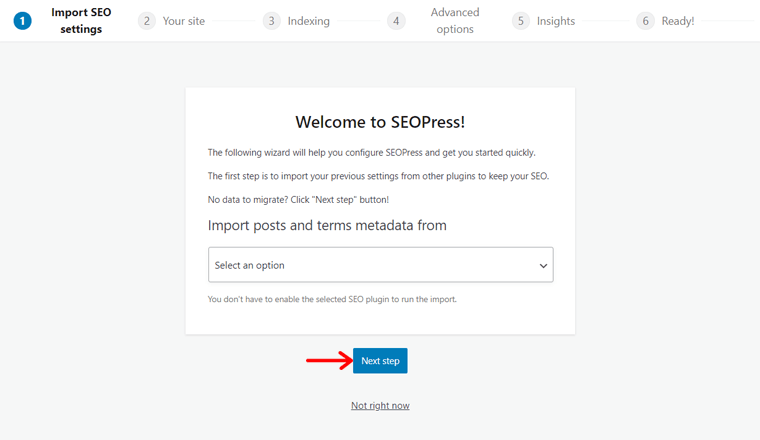
Note: Also, the overall configuration can also be performed later. So, in that case, you can click on the option Not right now. This leaves the configuration wizard and returns you to the dashboard.
Step 2: Your Site
In the next step of the configuration wizard, you’ll have to provide information about you and your website. This will help you to build title tags and knowledge graphs for Google.
First, you need to fill the Separator that you want the dynamic variables to use. You can keep the default value ‘-’ here. Then, for the Homesite title, you need to type the title of your home site.
Next, there’s a dropdown option for choosing whether the site is from an Organization or Personal use. According to your site, you can choose the option. You can also choose None for disabling this feature.
As per this choice, you also need to fill in your name or your organization’s name. Plus, you can keep your photo or your organization’s logo here.
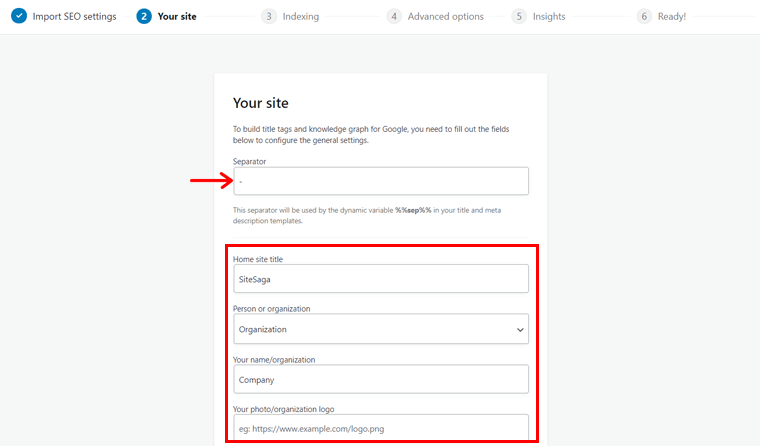
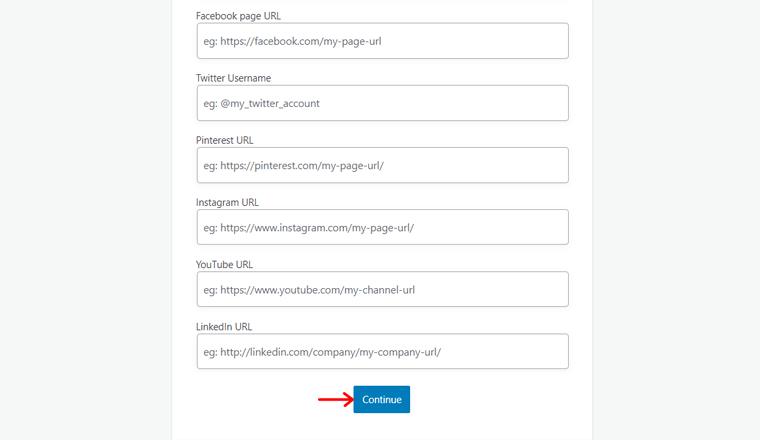
At last, there are some areas to fill in the link or account name of your social media. They are for Facebook, Twitter, Pinterest, Instagram, YouTube, and Linkedin. If you don’t have a social media account on these platforms, then you can leave them empty.
Lastly, click on the Continue button to move on to the next step.
Step 3: Indexing
In this step, you can specify the search engines that you want to be indexed or not. Note that you need to avoid duplicate indexing and poor-quality content.
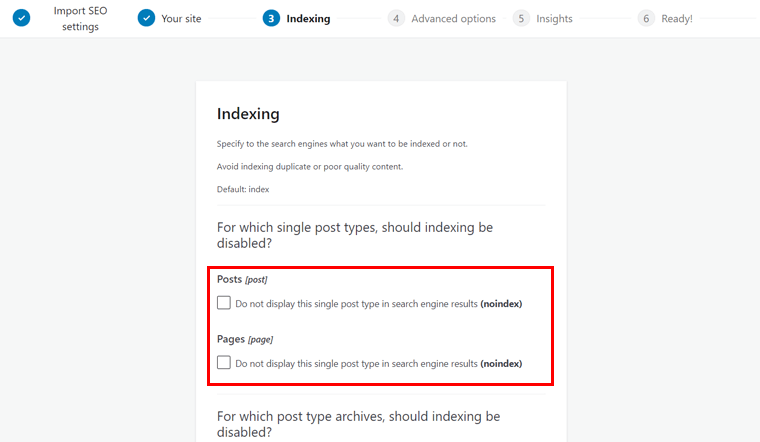
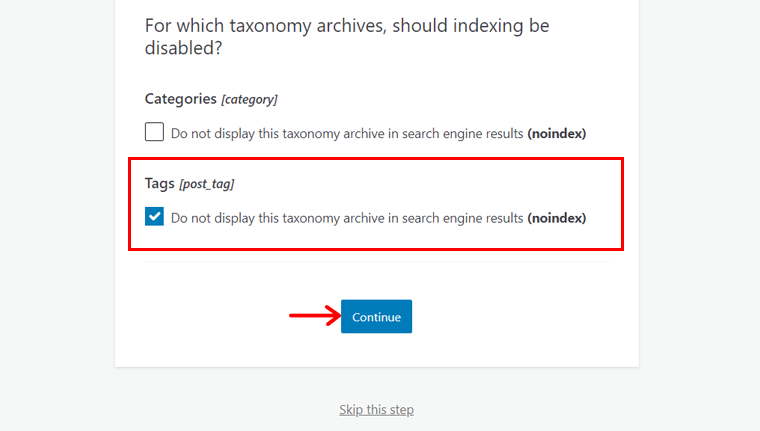
If you want to disable indexing, then only tick the checkbox for the selected options. The options to disable indexing are provided for single post types, post type archives, and taxonomy archives. However, we recommend you to set Tags to be noindex of the taxonomy archive as shown in the figure.
Then, click on the Continue button.
Step 4: Advanced Options
Here, there are a variety of advanced options available that you need to configure before ranking your site on search engines. If you’ve only an author in your organization, then tick the first option as shown below. This avoids duplicate content.
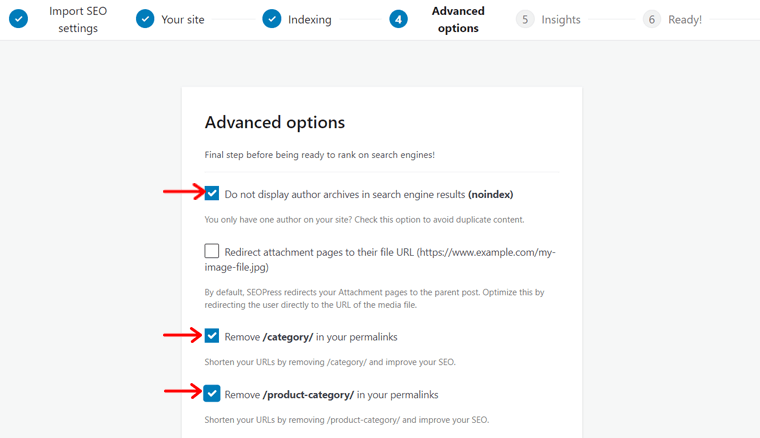
SEOPress redirects your attachment pages to the parent post by default. So, you can tick the next checkbox that says ‘Redirect attachment pages to their file URL’. This will optimize it by redirecting the user directly to the URL of the media file instead of the parent post.
But, it’s better to redirect to the parent post, so you can leave this setting as it’s by default.
You can also remove /category/ and /product-category/ from your permalinks. This will shorten the URLs and improve your SEO. For that, tick on the checkboxes provided.
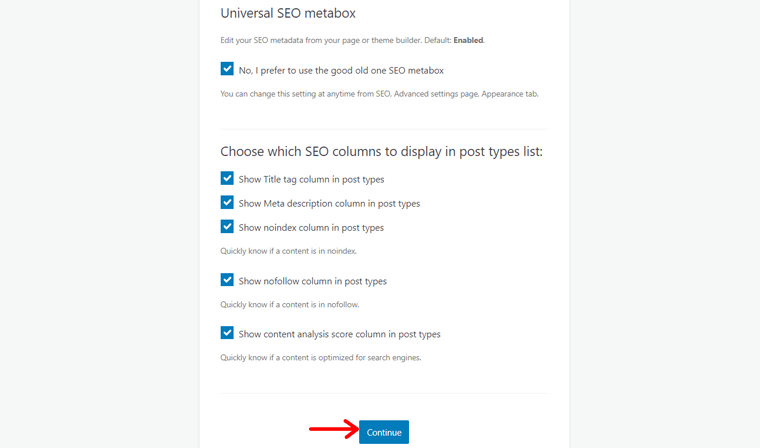
Next, there’s an option to edit your SEO metadata from your page or theme builder. By default, this option is kept enabled.
If you want to use the initial SEO meta box like before, then tick the checkbox.
Finally, you’re able to define which SEO columns to display or hide in your post-type lists. It’s preferred to show all from the list so you can keep the checkbox ticked.
Again, click on the Continue button.
Step 5: Insights
SEOPress provides an opportunity to monitor your rankings and backlinks directly from the WordPress admin. So, each day you can keep the track of your keyword positions from Google Search results.
You can also monitor and analyze your top 1,000 backlinks weekly. Plus, these data can be exported to CSV, PDF, and Excel files.
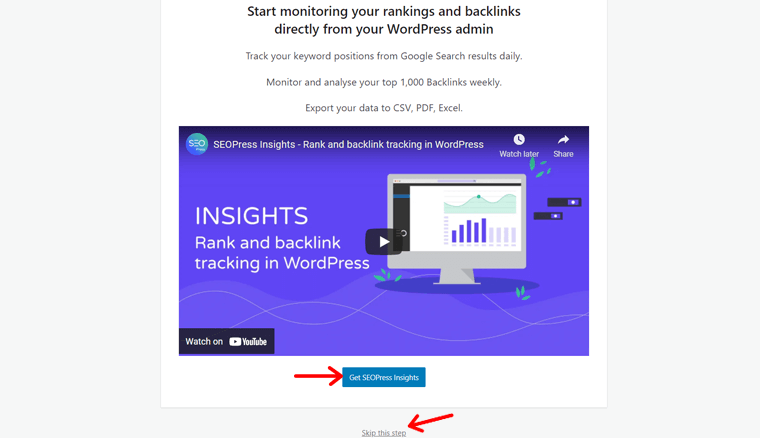
To get SEOPress Insights, you need to click on the Get SEOPress Insights button. However, if you don’t need it, you can click on Skip this step option.
Step 6: Ready!
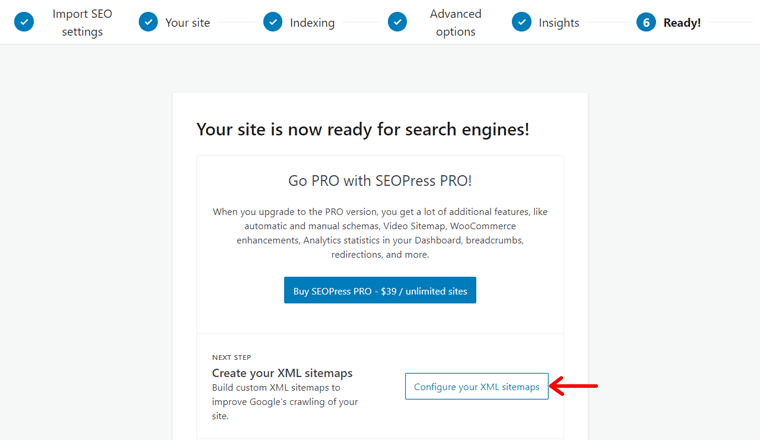
There’s also an option to create your XML sitemaps. You can improve the crawling of your site by building the custom XML sitemaps here.
If you want to do it right now, you can click the Configure your XML sitemaps button. This will lead you to the settings of SEOPress. You can also do it later from the dashboard. We’ll discuss the entire process to configure XML and HTML sitemaps later in this SEOPress review.
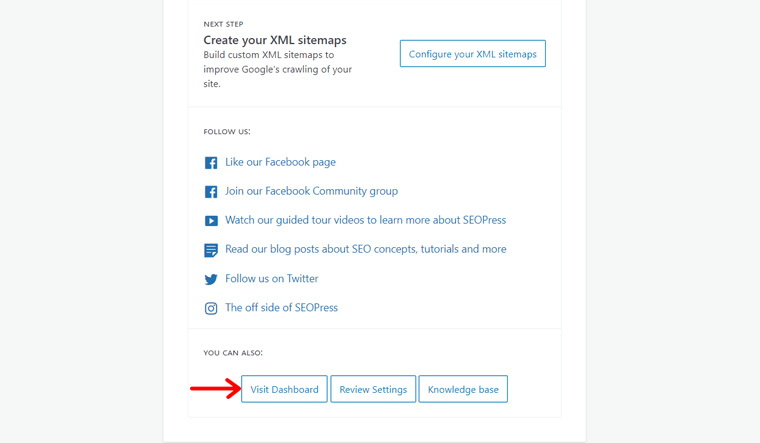
And, it’s the end of the configuration process. So, you can proceed by clicking the Visit Dashboard button. This opens up your WordPress dashboard.
C. Using SEOPress – How to optimize your Posts/Page for SEO?
Now, we’ll show you how to use SEOPress for maintaining the SEO of your posts and pages in this review. It contains tons of features for optimizing your content and web pages.
For the content, you can solve the problems and suggestions that are being detected in your articles. Whereas for the web pages, there are options to improve the off-page SEO. Off-page SEO means the activities taken outside of your site for better ranking.
To know more about the features in detail, let’s jump directly to each of them.
1. Optimizing Blog’s On-Page SEO
On-page SEO is the practice of optimizing the web page content for users and search engines. It includes optimizing your tags, content, internal links, and more. For that, SEOPress contains certain options that you need to fill and accordingly optimize.
There are two sections in SEOPress for optimizing on-page SEO. They are Title settings and Content analysis. So, let’s go through each of them in detail.
Title Settings
The title settings in the SEO meta box contain 3 major components. They are:
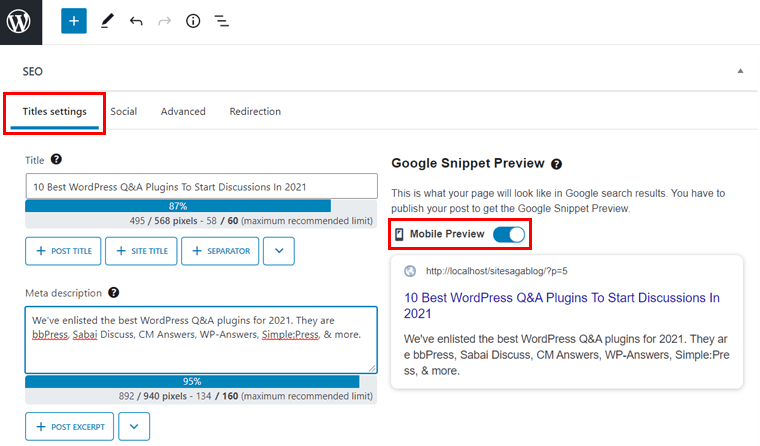
Title
First, you need to fill in the title of the article. Note that the title must be kept as per the limit set by SEOPress. Plus, make sure your title has the target keyword for getting better SEO results.
Instead of typing the title yourself, you can also click the buttons to add the content to your title. Such as post title, site title, separator, etc.
Meta Description
The meta description provides a summary of your webpage when it appears on search engine results. That’s why you need to add the meta description so that your visitors know what the page is about.
You should write the meta description very carefully. First of all, it should be within the limitation of the word size. Next, it must contain the target keyword that you’ve used for your article.
Moreover, you can also use the available options to form the meta description. Like post excerpt, separator, tagline, etc.
Google Snippet Preview
The Google snippet preview provides a preview of how your page will look in the Google search results. You can get the preview for mobile and desktop devices.
By default, you’re getting a preview of mobile devices. You just need to disable the given option to get the preview of the desktop screen instead of mobile.
Content Analysis
There’s a Content Analysis section that’s responsible for analyzing your content and getting better on-page SEO. Here, there are two major things included. They are entering your target keywords and then receiving the analysis of your content based on those keywords.
Target keyword or keyphrase is the search term that you want your post or page to be ranked for. Using it, the search engines and your users can find your article on the search results.
SEOPress allows you to keep an unlimited number of target keywords in an article even in its free version.
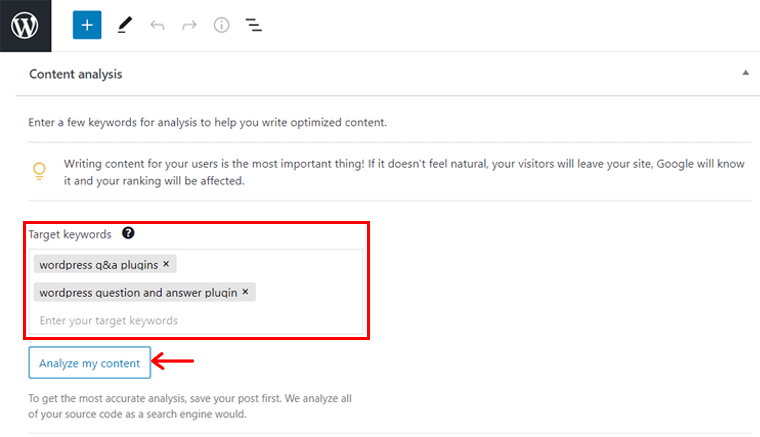
To add all your target keywords, you need to fill them in the textbox available. Here, you can also remove the unnecessary keywords. After you’re finalized with your target keywords, you need to click on the ‘Analyze my content’ button to start your content analysis.
Below it, you’ll see the result of your content analysis like in Should be improved section. Here, you’ll get feedback on the overall content that’s required to improve the SEO. The feedback is also shown into different categories based on the factor to improve.
Overall, the feedback can be denoted good or bad based on the color they have. They are:
- Red-colored ones are the bad things that you need to definitely improve on your content.
- Orange-colored ones are the suggestions that you may want to improve.
- Green-colored ones are the good things about your content.
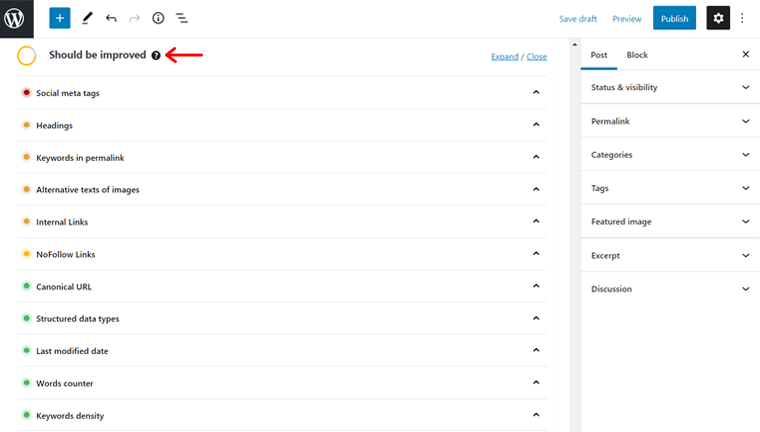
There are several factors according to which your content is analyzed. Some of the important factors include headings, meta description, keyword in the permalink, keyword density, and more.
Every time you optimize your content according to these results, you need to click on Refresh analysis. After which, it points out the analysis result as per the updated content.
2. Social
With SEOPress, you can find seamless integration with popular social media platforms. These platforms include Facebook, Instagram, Whatsapp, Pinterest, and LinkedIn. This enables your site preview to be optimized in such platforms as well.
In the Social section, you can fill the content for your site preview on Facebook and Twitter. Here, you’re able to fill in the title, description, thumbnail, and upload an image. Accordingly, you get to see the preview of your post on those platforms.
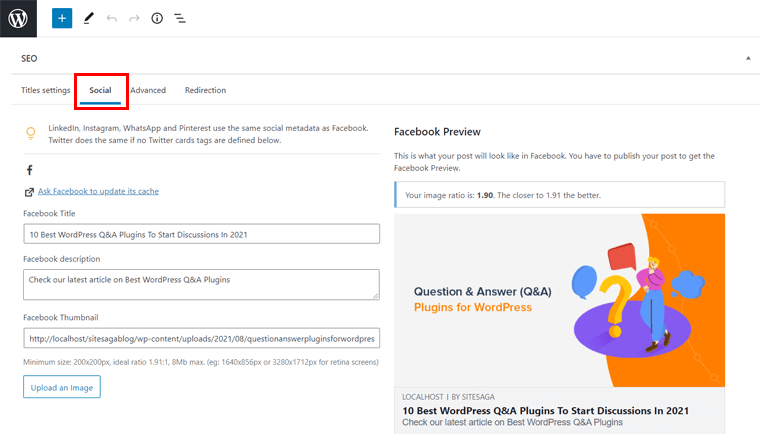
Other social media platforms like LinkedIn, Instagram, Whatsapp, and Pinterest use the same social metadata as Facebook. And, if you don’t define the Twitter cards tags, then it will be the same for Twitter as well.
3. Advanced
The Advanced section contains the options for meta robot settings. Here, you can manage the robots individually for a post or a page. In the WordPress dashboard, there’s also an Advanced tab in the Title & Metas section. There you can configure these settings for your entire website.
If you use the meta robots then the search engines get certain instructions. The instructions are about how you’d like them to crawl or index parts of your site. For that, you can tick the checkboxes for the parameters given to set your meta robots (like noindex, nofollow).
After that, don’t forget to update the post or page to save the changes.
Note that, these settings on individual posts and pages will bypass the global settings on the dashboard. Plus, when you don’t set meta robots, then the default will be index, follow.
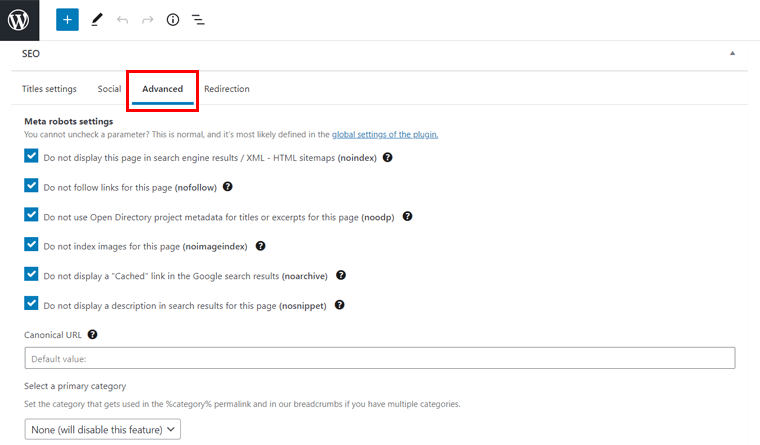
Apart from meta robot settings, the Advanced section also allows you to add the canonical URL for a post/page. Keeping a canonical URL will allow the search engines to index this preferred URL than other URLs available.
Moreover, you can also select a primary category of the post or page. This will be used for the %category% permalink. When there are multiple categories, then it can also be used for the breadcrumbs.
4. Redirection
Redirection offers you to create and manage redirects for the broken links. The main reason to perform redirection is to avoid confusion for search engines and users. This enables the users and search engines to get redirected from your old URL to the new one. Plus, it also avoids losing the backlinks (links formed when a site links another site).
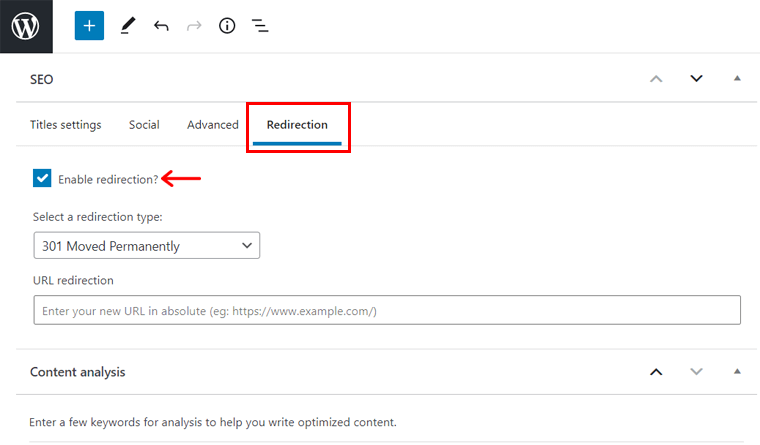
For that, you need to tick the checkbox to enable the redirection in the Redirection section. Then, you can choose the redirection type from the options provided. Some of the types of redirection include 301 Moved Permanently, 302 Found/Moved Temporarily, etc.
Plus, you’ve to also keep the new URL for the redirection.
For carrying out off-page SEO, SEOPress has another powerful plugin called SEOPress Insights. It works on top of SEOPress and lets you monitor your website rankings, backlinks, etc. right from your WordPress dashboard. Check it out – SEOPress Insights!
D. Important Settings and Features
The configuration wizard itself contains lots of settings that you can easily set for your website. However, you can also configure them from the SEO menu in the dashboard. Apart from those options, there are some more important settings and features that need to be pointed out in this SEOPress review.
So, let’s get to know those settings and features of SEOPress.
1. XML and HTML Sitemaps
A sitemap is a web page that contains a list of all the contents of a website. This helps both the users and search engines to navigate or find content about the website. There are two common types of sitemap: XML and HTML.
XML sitemaps are for the search engines to get information about your site. This sitemap contains details like the last updated date or how frequently you modify your site. Plus, it includes the links to all the posts and pages. That’s how search engines can distinguish what to include or update in the search results.
Whereas, HTML sitemap enables your users to easily navigate your site. By the links provided on the sitemap, they’re able to find the required information.
So, you need to create your custom XML and HTML sitemaps for the users and search engines. It’ll help to improve the crawling of your site by robots and get better indexing in the search results.
How to Configure XML and HTML Sitemap Settings?
There are a series of steps that you need to do for creating sitemaps. Firstly, go to the XML – HTML Sitemap sub-menu in the SEO menu of your WordPress dashboard.
After that, follow these steps accordingly.
Step 1: General Settings
SEOPress allows you to create both the XML and HTML sitemaps. You’re able to create XML sitemaps for posts, taxonomies, news, authors, custom post types, images, videos, and more. For the free version, you’ll get to create sitemaps for the image and author only.
In the XML – HTML Sitemap sub-menu, there are 4 tags available. The first one is General. There you need to tick the checkboxes to enable the sitemap options that you want. They are for XML, XML image, author, and HTML. Then, you need to click on the Save changes button.
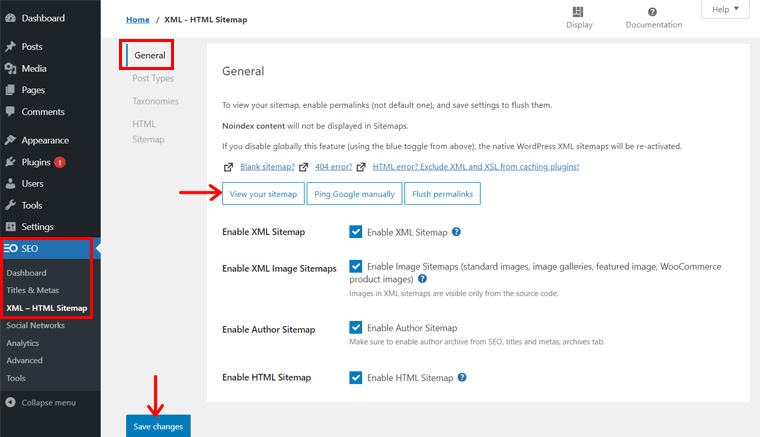
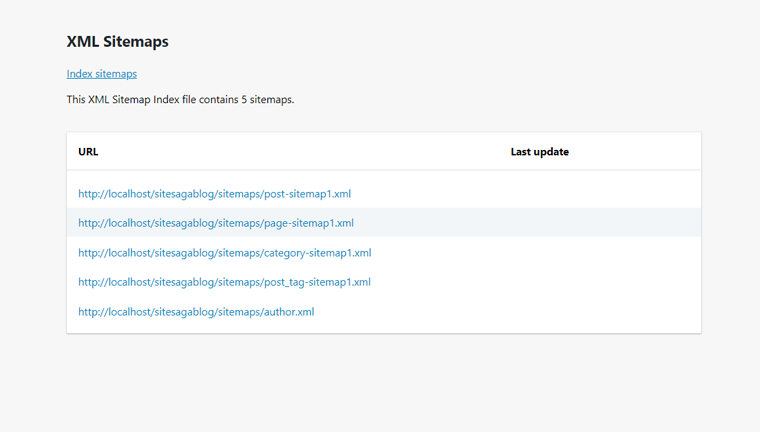
To see the XML sitemap of your site, there’s a View your sitemap button. Click on it and in the new tab you’ll see the list of sitemaps created for your content. The sitemaps are provided according to the type of content like for posts, pages, categories, etc.
When you click on each of the links, you’ll get to see the overall content in that type of content.
Step 2: Post Types
Next is the Post Types. Here, you can tick the checkboxes to include the post types for your sitemaps. By default, pages and posts are already included. You can also include the media attachments here but it’s not recommended to do so.
Finally, don’t forget to click on the Save changes button.

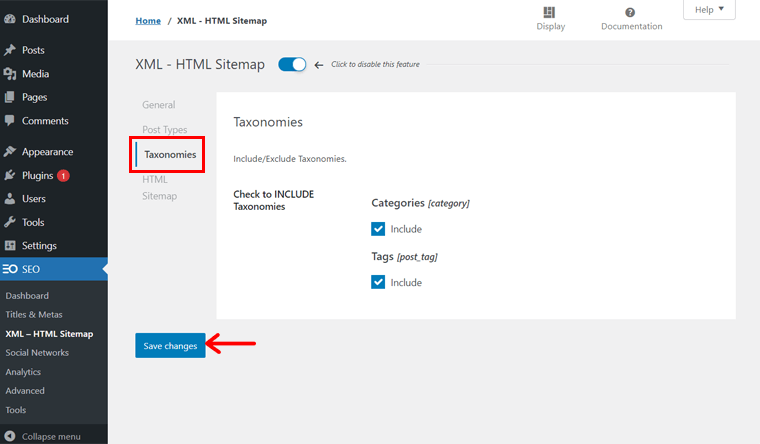
Step 3: Taxonomies
The same goes for the next section Taxonomies. Here, it contains categories and tags that you can include in the sitemaps. By default, both of them are already ticked. If you don’t want to include them, you need to remove the tick in the checkboxes.
Again, click the Save changes button if you made any changes.
Step 4: HTML Sitemap
At last, in this section, you can create the HTML sitemap for your users. By default, there’s a limitation to displaying 1,000 posts per post type.
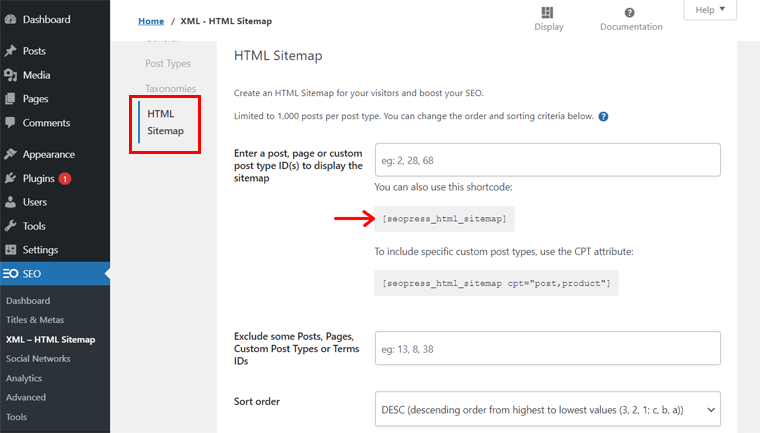
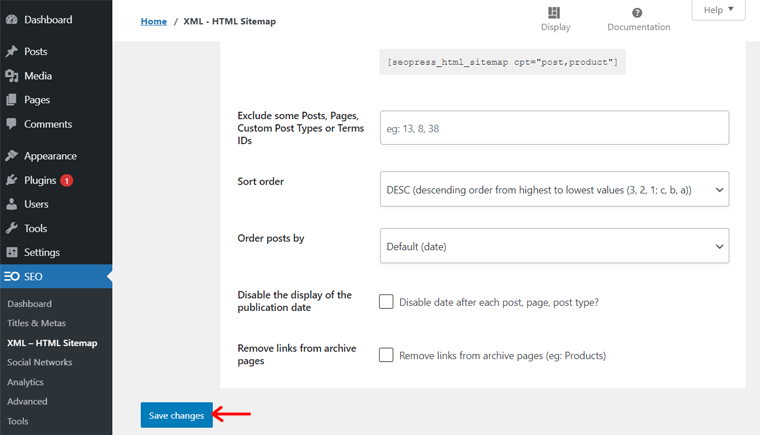
However, you can enter specific posts, pages, or custom post type IDs to display in the sitemap. You’re also able to exclude some posts, pages, and custom post types. Plus, you can also change the order and sorting criteria for the posts.
Then, you can tick the checkboxes present to disable the display of publication date or remove links from archive pages. These options are not compulsory but based on your needs. Lastly, click on the Save changes button.
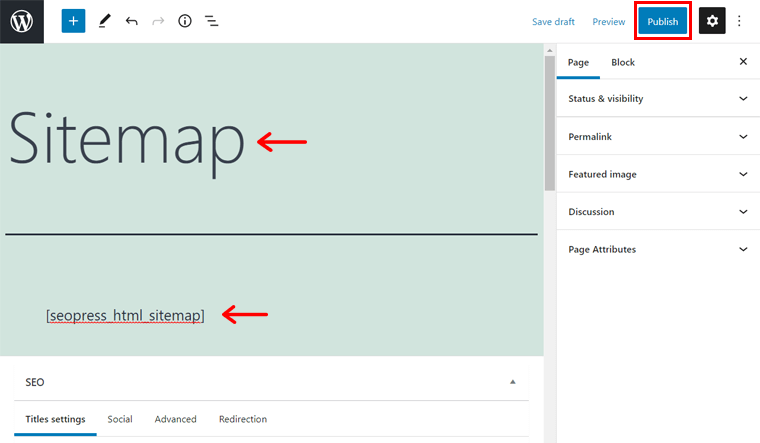
For making the HTML sitemap that users can also see, you need to create a new page for it. You can simply create one using the available shortcode. So, first of all, copy the shortcode available in the HTML sitemap tag of the XML – HTML Sitemap sub-menu.
Then, click on the Add New option in the Pages menu of your WordPress dashboard. Here, write the title of the page as ‘Sitemap’. After that, paste the shortcode in the text area for the content of the page. Click on the Publish button and then preview the HTML sitemap page.
2. eCommerce SEO
eCommerce SEO is not so different from that of optimizing SEO for a website. So, you can look for the keywords for your product pages similar to those for the posts.
In SEOPress, you’re able to improve the rankings for the product pages and more. The premium version of SEOPress has a seamless integration to WooCommerce and Easy Digital Downloads. So, using the given options, you can carry out eCommerce SEO for your website.
By enabling WooCommerce SEO, you’re able to disable indexing on the cart, checkout, and customer account pages. Plus, you can also replace the default WooCommerce product and breadcrumbs with those of SEOPress, and a lot more options.
Similarly, by enabling Easy Digital Downloads SEO, you can remove its meta tag generator. Then, you can add the currency and price Open Graph meta. This allows you to have better sharing on social networks.
3. Breadcrumbs
Breadcrumbs are efficient to use when there are lots of pages on a website. It works as a secondary navigation that improves the usability and findability of the website contents. Not only that, but it also provides information about the structure of the site to the search engines. So, it’s not only useful for users but also for search engines.
Using SEOPress, you’re able to add breadcrumbs to your pages. This improves the overall user experience and SEO of your site. You can also create your custom breadcrumbs for each post, page, or post type.
4. Google Structure Data (Schema) Types
Schemas are the semantic vocabulary of tags that one can add to their HTML. This improves the way search engines read and represent the pages.
SEOPress supports adding Structured Data Types. These are the structured data (or schemas) that are derived from the schema.org protocol. This enables you to mark up your content. As a result, your content will be featured in search results through rich snippets.
Some of the different kinds of data types in SEOPress are a local business, event, product, job, review, etc. Each of which includes manual and automatic schemas with advanced conditions that you can set.
5. RSS (Really Simple Syndication)
Really Simple Syndication (RSS) refers to the collection of web feed formats. This provides updated or shared information of the web page contents in a standardized manner.
In SEOPress, you can easily manage all the default WordPress RSS feeds. That’s why you don’t have to write a single line of code for that. Using the RSS settings, you can disable the useless WordPress RSS feeds like comments. Plus, you can also set to display the content before or after each post.
6. Google Knowledge Graph
Google Knowledge Graph is important for a better search experience in Google. It’s because it provides innovative ways to show the data in the search engines.
In the Social Networks option of SEO menu in the WordPress dashboard, you’ll find Knowledge Graph. From here, you can markup your content with the details of your business and marketing. That’ll help you to get featured in Google Knowledge Graph cards.
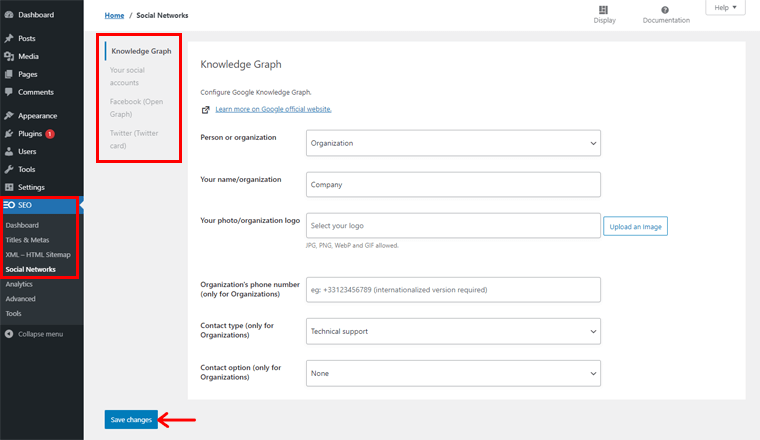
Here, you can add your logo, organization’s phone number, and more of the other information. You might have entered some of the information while using the configuration wizard earlier.
Plus, you can also link your social accounts of media like Facebook, YouTube, Twitter, etc. with it. SEOPress also offers Facebook Open Graph and Twitter cards. This enhances the display of your contents as discussed before.
7. Image SEO
Search engines are becoming better at recognizing the components of images. So, the images and their components should also provide a good user experience with optimized SEO.
SEOPress also includes ways for delivering a good image SEO. There are advanced SEO options for images in the Advanced option of SEO menu in SEOPress.

Enabling this feature will automatically set the image title, alt, caption, and description based on the filename. This is overall improves the productivity to have better image SEO.
8. Google Suggest and Google Page Speed
In the Content Analysis meta box, besides entering your target keywords, the premium version of SEOPress also includes Google Suggest. Here, you need to enter a keyword on the textbox and click on the Get Suggestion button.
Then, you’ll get the top 10 Google suggestions for that keyword. If you’re working with a long-tail technique for your content, this feature is quite helpful.
Moreover, you’ll also find the Page Speed option on the settings of your dashboard. Using this Google Page Speed, you can check the performance of your website. Plus, you can utilize its advice to improve your site’s speed and user experience.
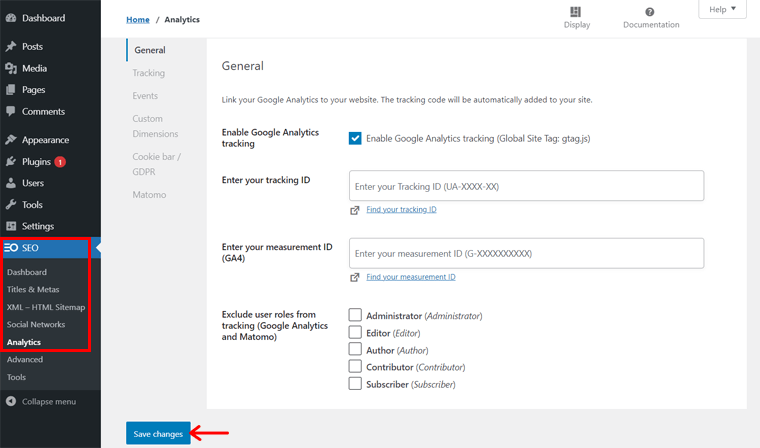
9. Google Analytics
Google Analytics is an amazing tool to understand your customers better. It’s a web analytics service by Google to track and gain reports of your site’s traffic.
SEOPress offers you to have the Google Analytics stats right into your WordPress dashboard. From this, you can analyze the page views, sessions, average session duration, bounce rate, and more about your site.
Additionally, the Advanced option in the SEO menu of SEOPress also contains an E-commerce tag. This option is for enabling the Google Analytics Enhanced Ecommerce feature. Here, you’re able to measure the purchases, addition or removal of products from shopping carts, etc.
E. SEOPress Pricing
SEOPress is a freemium plugin available in both free and premium versions. You can get the free version on its official site as well as on WordPress.org. So, you can also directly install the free version from your WordPress dashboard.
The premium version is called SEOPress Pro. It’s also quite affordable with a cost of $39. This paid version includes all the free features and other additional premium features.
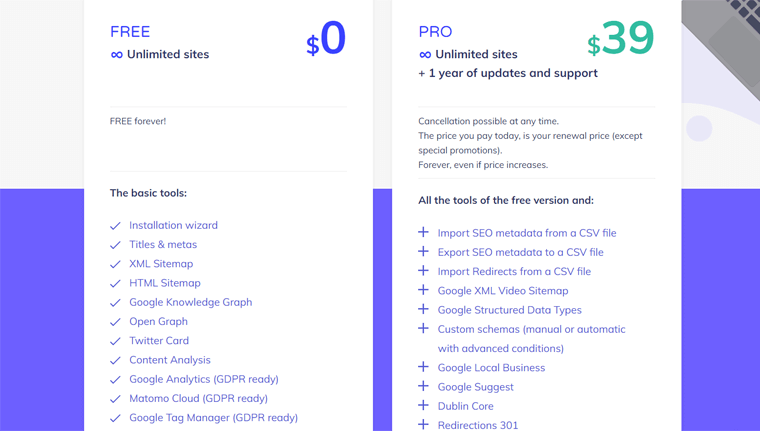
Some of the exclusive features of the premium version are:
- Able to import and export SEO metadata from or to a CSV file, respectively.
- Can add manual or automatic custom schemas with advanced conditions.
- Seamless integration to WooCommerce, Easy Digital Downloads, and more.
- Contains Google Analytics stats in the dashboard.
- Consists of Google news sitemap and Google XML video sitemap.
- Provides Robots.txt, Redirections 301, and 404 monitoring services.
- SEOPress bot checks the broken links and more.
Moreover, you’ll also get 1 year of support and updates with the paid version. You can also cancel the purchase if you’re not happy with the service. For that, you’ll get a 14-day money-back guarantee.
It’s great that both the free and premium version enables you to build unlimited sites. So, you can easily get yourself the SEOPress plugin now!
F. Customer Support Options
The customer support options enable you to get the answers to your queries. SEOPress also provides certain options to provide support to its users. So, you can check them if you’re having any trouble or want to know more about it.
To get answers about the free version, you can simply go to the Support Forum available in WordPress.org. Along with that, the SEOPress support center has provided a Support menu on its original website. Here, it contains all the other customer support options.
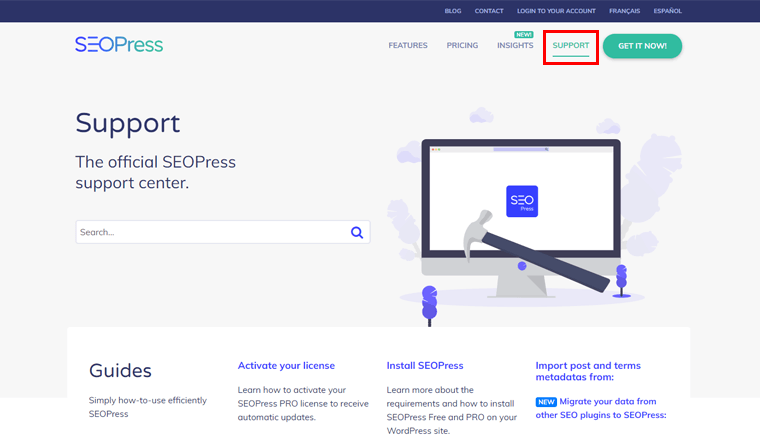
The easiest one is Guides. Here, you can check the guidelines for using the plugin in a simple yet efficient way. It includes basic steps about installing to using the different functions of SEOPress.
Next is the SEOPress Masterclass that contains ebooks that you can download. Now, you can learn about the working of SEO in more detail. Such as improving your ranking, traffic, sales, etc.
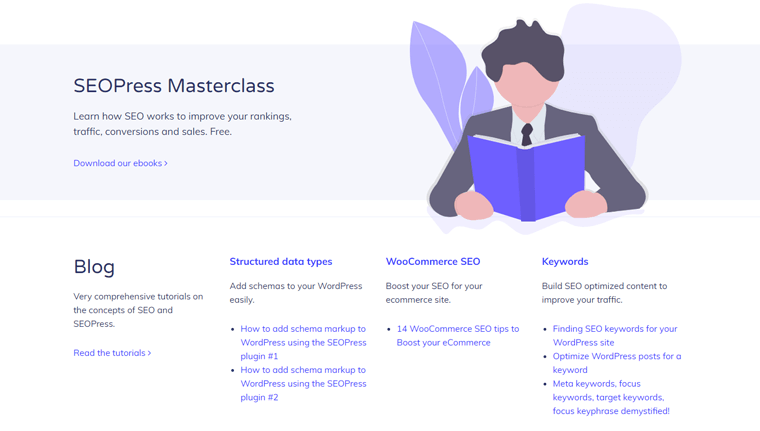
Plus, the experts also have provided tutorial blogs for customer support. Reading them, you’ll get to know more about the concept of SEO and SEOPress. To easily understand SEOPress, you can also check the video tutorials available on their YouTube channel.
Apart from them, you can send an email to discuss your query if you’re using the premium version. Or, you can also check the FAQs available to quickly get your answers.
G. Pros and Cons of SEOPress
SEOPress contains many features that are advantageous for its users. However, there are certain limitations in this plugin as well.
So, let’s see the pros and cons of SEOPress.
Pros of SEOPress
- You can use it on unlimited websites (both free and paid version).
- Affordable premium SEO plugin; cheaper in comparison to other options like Yoast, All in One SEO, and Rank Math.
- Provides good customer support options.
- Can use unlimited target keywords for an article or page.
- Contains white-label solutions for both front-end and back-end.
- WooCommerce ready.
- Full-featured plugin that has every feature you may need for your SEO.
- Offers lots of Google tools like Analytics and Knowledge Graph that helps to build better user engagement and online presence.
Cons of SEOPress
- Comparatively, it’s not as well-known as its competitors.
- May feel confusion when importing the configuration from other SEO plugins.
- Has a big learning curve that’s why you need enough time to get used to using SEOPress.
If you’re thinking of shifting your choice to another SEO plugin, then there are many alternatives to SEOPress. Check out the next section of this SEOPress review to know some of the great alternatives to this plugin.
H. SEOPress Plugin Alternatives & Competitors
SEOPress is not the only SEO plugin available in WordPress. Many other plugins contain amazing features for optimizing your WordPress site.
So, here we provide you with some of the good alternatives of SEOPress.
1. Yoast SEO

Yoast SEO is one of the most widely used WordPress SEO plugins with 5+ million active installs. According to its mission ‘SEO for Everyone’, it has everything that you need to manage the SEO and rank your site higher. Plus, it’s user-friendly with an easy-to-use interface.
Here, you can perform real-time SEO analysis of your content for a focus keyword in its free version. While in SEOPress, you can do the same with unlimited target keywords. However, Yoast SEO performs an in-depth readability check of your content. It includes Flesch’s reading ease, use of transition words, etc. While SEOPress only focuses more on content analysis.
Want to know more about this plugin? Then, check our article on Yoast SEO Review.
2. Rank Math
Rank Math is a lightweight and fast WordPress SEO plugin. Similar to SEOPress, it contains a variety of features. Such as content optimization, linking suggestions, tracking keyword ranking on Google, and more. Plus, you can optimize your content for up to 5 focus keywords per an article in the free version.
Compared to Rank Math, SEOPress provides high-quality service in both free and premium versions. It’s because it also contains features like Google Knowledge Graph. However, this plugin also contains good features like Google Search Console that are not present in SEOPress.
3. All in One SEO
All in One SEO consists of a comprehensive set of features to improve the SEO of a website. Apart from SEO and readability, it also focuses more on the other features. Such as Google Analytics integration, sitemaps, and more.
Even if there’s a wide range of features, the plugin itself is beginner-friendly. So, you can set up and carry out all the advanced features in it within 10 minutes. This makes it a comparatively quick and easy-to-use plugin than SEOPress. Moreover, AIOSEO contains a headline analyzer that provides an overall score of your content which is not available in SEOPress.
Confused between All in One SEO and Rank Math? Read their detailed comparison from All in One SEO vs Rank Math.
I. Final Verdict on SEOPress – Should You Use SEOPress?
After going through this review, we can declare SEOPress is a great WordPress SEO plugin. It contains exclusive features that other SEO plugins may not have. It consists of features and settings that help your site to have better crawling, indexing, and ranking.
SEOPress is a newcomer and needs more attention to be as popular as other SEO plugins. However, everything boils down to what features it offers to be one of the best plugins for you to use. And in the case of SEOPress, it does prove itself in being one of those best SEO plugins.
The user interface, pricing, and customer support options of SEOPress are also good enough. So, we assure you that you can easily use it for your site.
Even so, we also recommend you to first install and use the free version of SEOPress yourself. After you’re sure about the overall functionality it provides for optimizing the SEO, then you can decide to use it.
Conclusion
That’s all folks! We’ve reached the end of this SEOPress review article. We expect that you could understand this plugin and agree on the things we’ve mentioned.
We also hope that you liked this review and come to the same conclusion after trying SEOPress. If you’re already using SEOPress, then you can share your experience in the comment section.
However, if you’re having any doubts or queries, then also feel free to ask us. We’ll try our best to give your response as soon as possible.
You can also read some of our other articles on WP Adminify review for custom dashboards and the best WordPress hosting services.
Finally, make sure to follow us on Facebook and Twitter to stay connected.