Are you wondering what Shopify is? Or looking to know how Shopify works? Then, you’ve got to come to the proper place.
Shopify is a well-known eCommerce platform. It’s currently used by 1,700,000+ businesses online. You get everything that you need to set up your store. If you also want to start an eCommerce site, then it’s a great platform to start with.
We’ve prepared this article to help you understand what Shopify is, how it works and how you can start your online store on the Shopify platform.
Also, we’ll look into its history, security, pricing, pros and cons, alternatives, and so much more. So, let’s dive in.
A) What is Shopify? (Introduction)
Shopify is a popular eCommerce website builder that allows you to create your online store and sell your products. It’s a Canadian-based eCommerce company that was created back in 2006.
Shopify is an integrated eCommerce solution that lets you start, grow, and manage a business. It comes with ready-made online shops that you can tweak and customize to set up your digital business and sell goods and services.
A key aim behind Shopify is to let people build their online store themselves without coding or design skills. Yet, if you’re familiar with HTML and CSS, then it’s a bonus point but coding skill is not a requirement for using Shopify.
Hence, Shopify is one of the largest and most trusted eCommerce platforms currently available in the market.
Shopify Store Real Examples

Let’s look at some of these real Shopify stores examples that are worth aspiring towards.
| Brands Name | Description |
| ToyShades | London-based eyewear brands that create existing sunglasses for both men and women. |
| Studio Neat | Perfect for tech enthusiasts who are missing out on tech accessories from their life. |
| United by Blue | An apparel and home goods company that believes in sustainability and a plastic-free environment. |
| Allbirds | A footwear company that sells shoes made out of wool, sugar cane, and tree bark. |
| Gymshark | A well-known brand in fitness that sells fitness apparel and accessories for both men and women. |
| Kylie Cosmetic | Owned by Kylie Jenner, this popular beauty company sells eye, lip, and skin products. |
| Flourist | Produce and sell 100% premium quality grains, beans, and freshly milled flours. |
| Parkland | They manufacture bags and other accessories made out of 100% recycled water bottles. |
| Bebemoss | Turkish-based handmade children’s toy company that sells adorable lions to unicorns to rabbits. |
History of Shopify (Timeline)
As we know that Rome wasn’t built in a day and neither was Shopify. Hence, now let’s talk about a brief history of Shopify.
2004 – Shopify was founded by Tobias Lütke, Daniel Weinand, and Scott Lake in Ontario Canada. It was opened as an online store that sold snowboards and snowboarding equipment. The store was initially called Snowdevil.
2006 – Tobias Lütke used the Ruby on Rails framework to build their online store for Snowdevil. Later, they launched the platform as Shopify in June.
2009 – After three years, Shopify launched an API and App Store. This allowed developers to develop different applications for the App Store. After that, several companies step forward to develop apps for Shopify.
2010 – Shopify platform joins mobile as they launched their first mobile app for the Apple App Store. For the first time, this allowed store owners to manage their online store directly from their mobile devices.
Within the same year, they started a Build-A-Business competition. This allowed anyone to take part to create a business of their own using their platform.
2013 – Now, Shopify launched its own payment option called Shopify Payments. It allowed store owners to accept cards without requiring a third-party payment gateway.
2017 – Shopify in cooperation with Amazon announced that vendors can sell their products on Amazon from their Shopify stores.
B) Major Features of Shopify Platform
Shopify comes with a variety of tools that can help you to set up and run your business. Depending upon the pricing plan that you choose, Shopify offers different features that you might need to showcase and sell your products online.
Hence, let’s look at some of the features that Shopify has to offer:
- Offers a wide range of free and paid themes from the Shopify Theme Store for your online store’s design or outlook.
- To expand the functionality of your store, Shopify offers a wholesome number of free and paid apps from the Shopify App Store.
- Accepts payments online with their Shopify Payments.
- Shopify POS (Point of Sale) allows you to sell your products in person and sell it almost anywhere.
- Even accepts payment through third-party providers like PayPal, Amazon Pay, and Apple Pay.
- Let’s you sell your products on different online sales channels like Facebook, Amazon, Messenger, Instagram, etc.
- Hire Shopify Experts to help you build your business.
- Provides Shopify Analytics and reports to help you learn more about your sales and customers.
- You can live chat and manage all of your customer and team conversations from one place with a free messaging app called Shopify Ping.
C) How Does Shopify Work? (Starting a Shopify Store)
1. Create an Account With Shopify
Before you start setting up your Shopify store, you need to first create an account on Shopify.
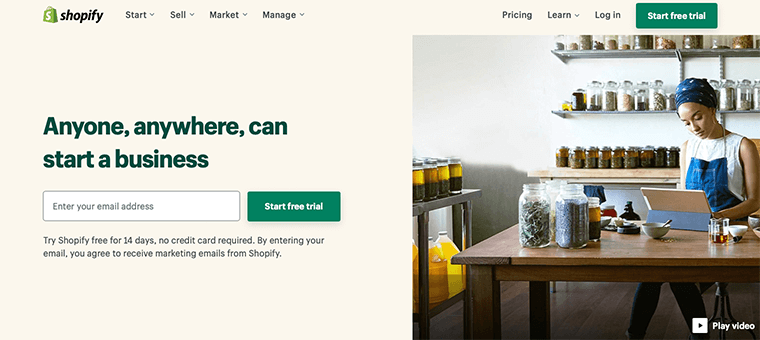
For that, you need to go to their official homepage and then click on the Start Free Trial button.
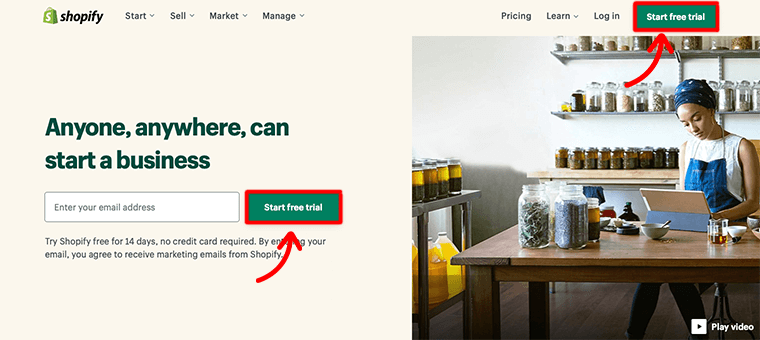
This gives you 14 days free trial without any credit card required. This will be more than enough time to create an online store and improve your store before it goes live.
Step 1: Create Your Store
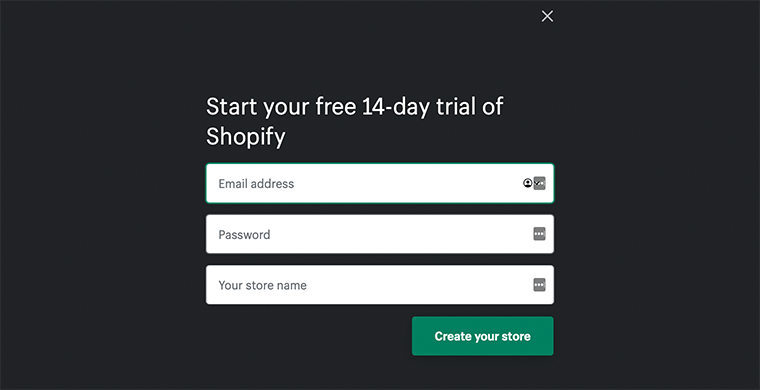
Once you’ve clicked on that button, it’ll take you to the next page where it’ll ask you to type in your email address, password, and store name.
Always remember to use the email address that is associated with the store.
Now click on the Create your store button to continue.
Step 2: Add Business Details
Following that, it’ll take you to another page that will ask you to configure your store and give a good idea about your business.
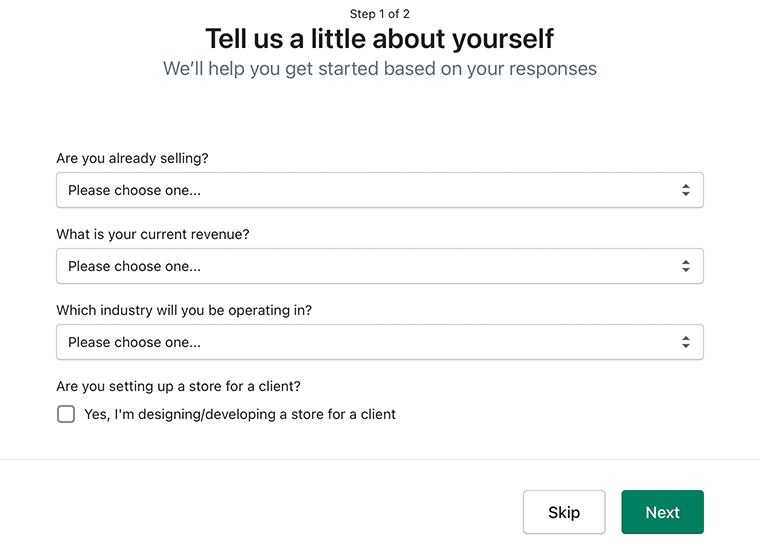
For instance, it’ll ask what you’re planning to sell and what is your current revenue. After you’ve filled in the information, click on the Next button.
Step 3: Add Your Personal Details
Now this will take you to the Address page. Here you need to add your personal information so that you can get paid. You provide your full name, address, country, postal code, and phone number.
Make sure that you fill in all the information correctly.
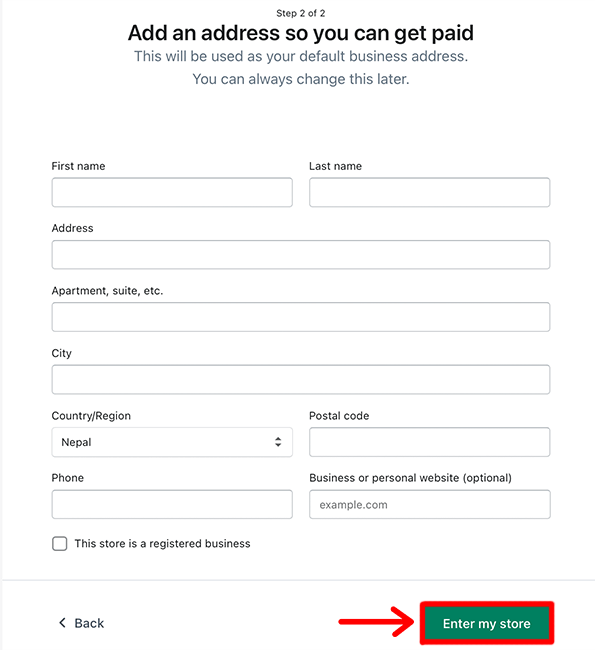
At last, you can also specify whether your business is registered or not.
Step 4: Complete Account Setup
Once you’ve filled in all the information, click on the Enter My Store button to complete the initial sign-up process.
This is how you sign up for a Shopify account.
2. Set Up Your Online Store
After you’ve completed signing up for a Shopify account, it’ll automatically take you to your Shopify Dashboard.
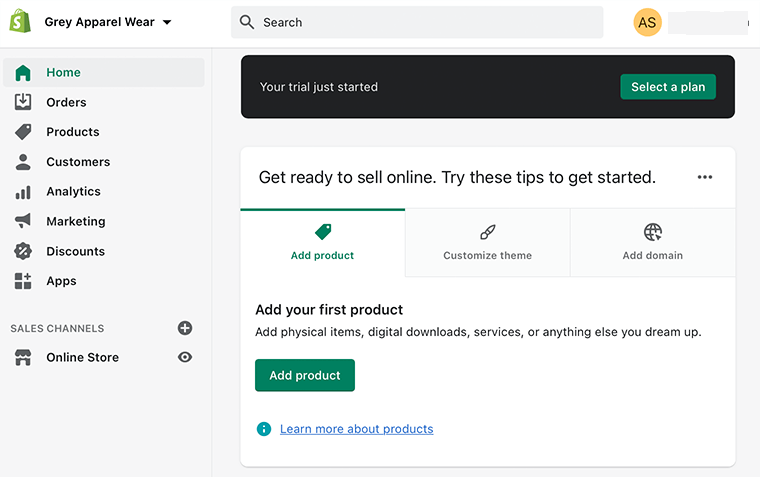
You could see that they’ve got a clean and modern interface that includes all of the features on the left sidebar. Some of the features include Order, Products, Customers, Analytics, and more.
Similarly, on the right-hand side of the page, at the top, you’ll see the option to Select a plan. From there you can choose any of the given plans that suit your business type.
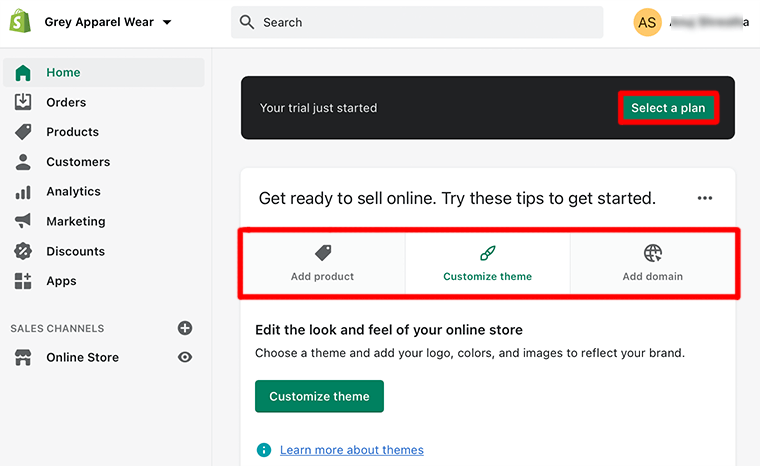
And just below that you’ll see options like Add product, Customize theme, and Add domain. These are goto options that make it easier for you to get ready to sell online.
Now from here, you can start building your online store the way you want. However, if you’re a beginner, then the best thing would be to start by customizing the Shopify theme.
3. Choose and Customize the Shopify Theme
Shopify comes with a huge collection of free and premium themes. However, choosing the correct theme that suits the style of the products you’re selling can be overwhelming.
When it comes to a theme for your store, Shopify gives you three options to choose from:
- Debut Theme – Default theme that you get when you first start building your online store.
- Free Themes – It provides you 9 free themes to choose from.
- Paid Themes – Shopify Theme Store offers tons of paid themes that come with some unique designs.
Therefore, while selecting the theme make sure that it matches your brand and go through functionality details.
Step 1: Default Theme
Go to the Home section and click on the Customize theme option.
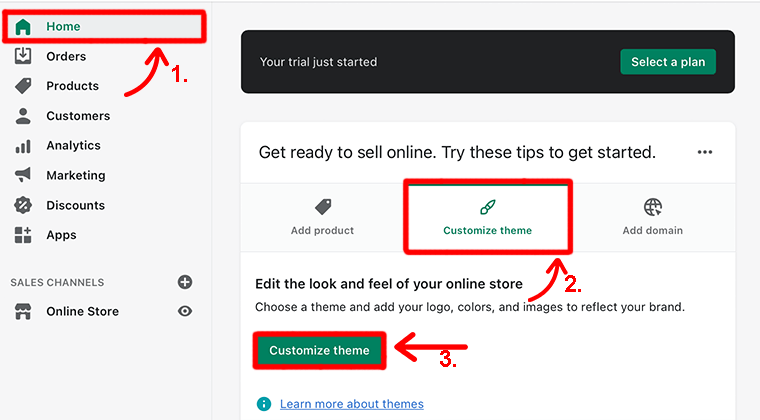
Following that, you’ll be directed to the Themes page and from there you can choose and customize your Shopify store.
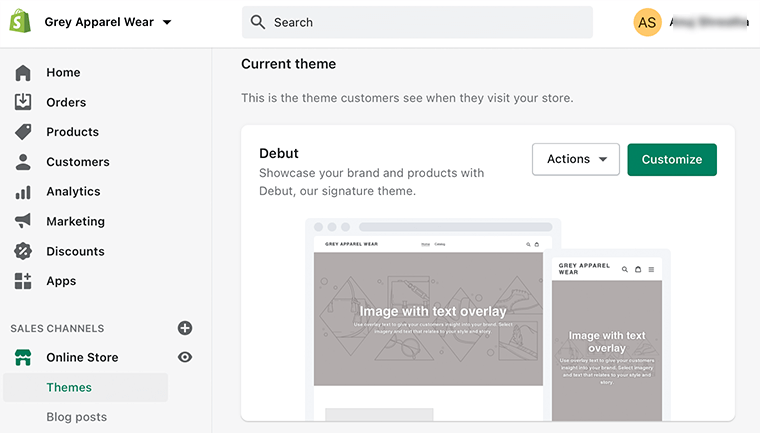
As we’ve mentioned earlier, you’ve already been assigned the default theme (Debut). If you think that theme works well for your business then you can go with that theme.
Step 2: Finding Theme Library Section
However, if you scroll down a bit then you’ll find a Theme Library section that manages all of your store’s themes. There you’ll find the option for both free and premium themes.
You can either click Explore Free Themes or Visit Theme Store.
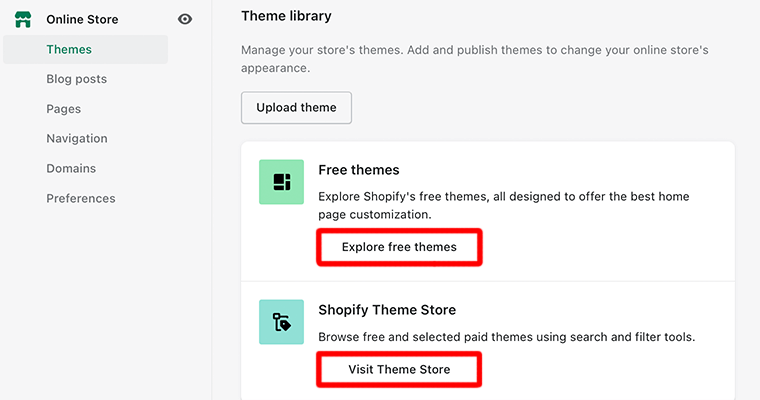
Therefore, don’t forget to browse different themes to see which one works well for your store. Also, view the theme details to make sure they match the style of your company and industry a little better.
Step 3: Selecting Theme
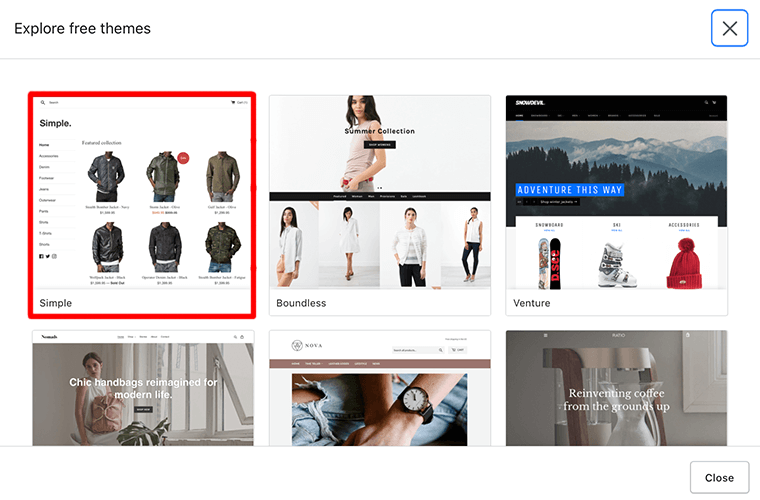
For instance, click on the Explore Free Themes and it’ll pop up a theme library for the free themes. Now, select the first theme – Simple and it’ll open details related to the Simple theme.
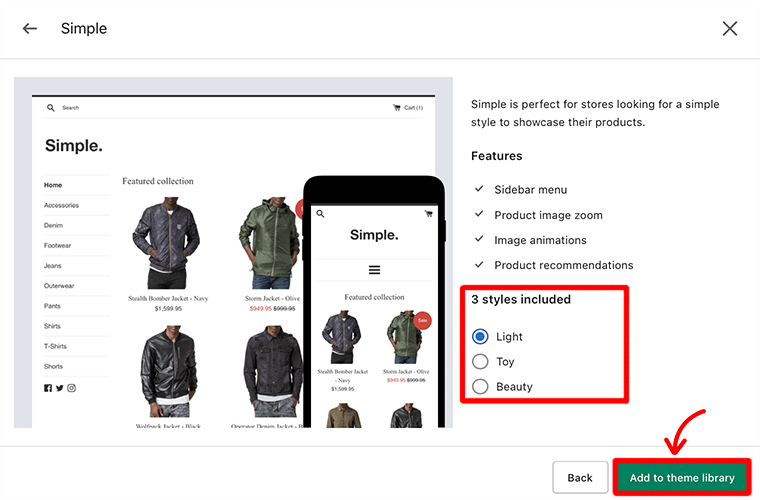
Step 4: Selecting Theme Style
You can see that the Simple theme has three different styles included: Light, Toy, and Beauty. Now make a choice that fits your style, then click on the Add To Theme Library button.
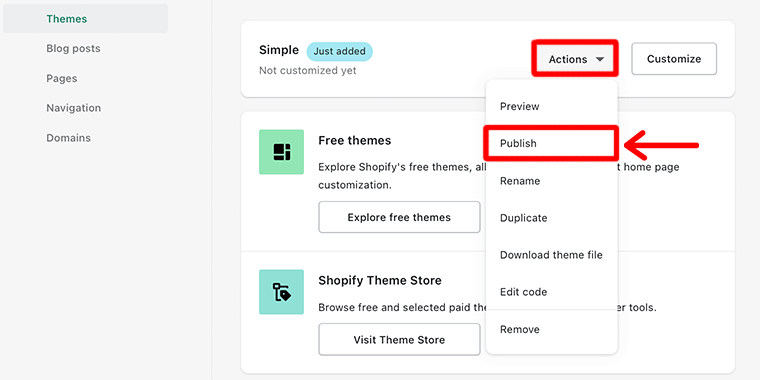
After that, you’ll see that the theme has been added to the Theme Library. Once the theme has been installed, click on the Actions button and then click on the Publish option.
Step 5: Replacing Default Theme
Then, you can find the Simple theme taking the place of the Debut theme from before.
However, if you go to preview its look, then you might not see much in terms of customized design.
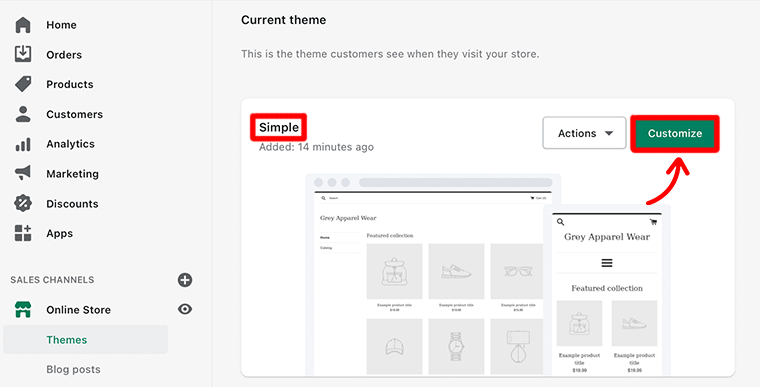
So, to make it look the way you want, we recommend clicking on the Customize button
Therefore, this is how you create and customize your Shopify theme.
4. Create Essentials Pages for Your Online Store
Now that you’ve chosen the theme, it’s time to create some of the essential pages that every eCommerce platform should have:
- About Us
- Contact Us
- Privacy Policy
- Refund Policy
It’s important to create such pages because it lets your customers know more about your business and the excellent team working behind it. Also, it lets them know what type of data you’re collecting and what you’re doing with that data.
Now let’s look at how you can create these pages.
Firstly, from your dashboard, go to the Online Store and select Pages where you can create and manage your pages.
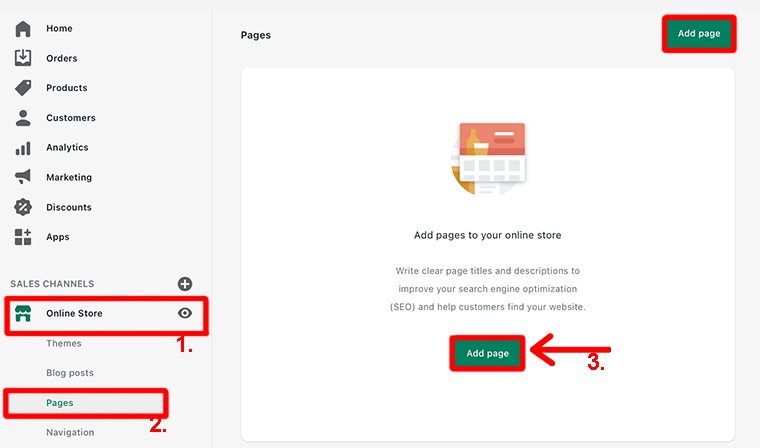
After that click on the Add Page button and it’ll open the page editor from where you can create your pages.
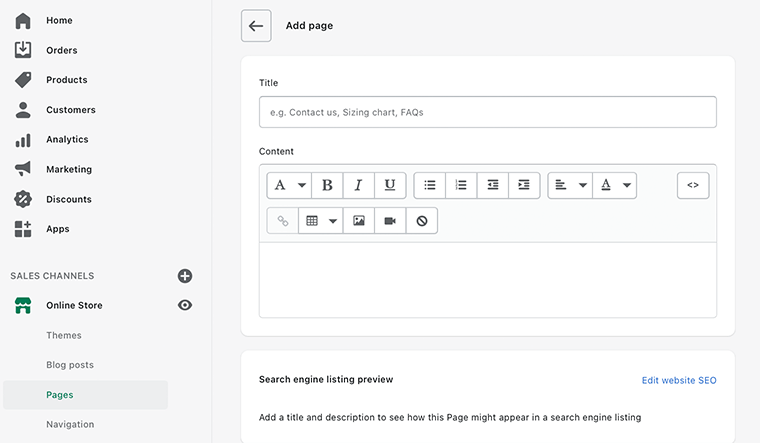
For example, we’ve created an ‘About Us’ page for our online store. Here you can also edit a website’s SEO such as page title, meta description, and URL slug.
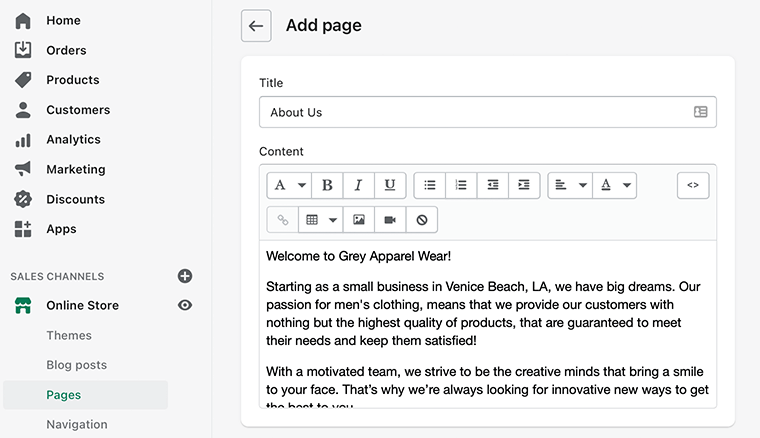
At last, once you have edited your content, don’t forget to click on the Save button to publish the pages.
Similarly, in this way you can create pages for Contact Us and Privacy Policy too.
5. Add Products to Your Store
The next step is to add the products that you intend to sell to your online store. To add a product to your store, you need to click on the Products, then Add Products button.
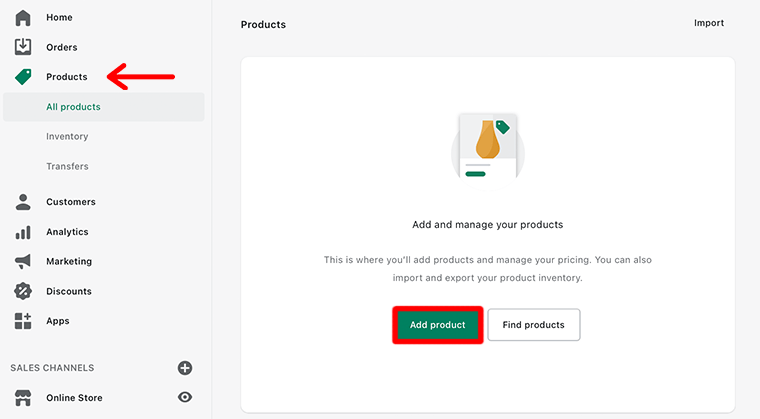
After you’ve clicked on the button, it opens a Product page. There you can add different types of information about the products like Title, Description, Images, and Pricing of the product.
For instance, in our demo sample, we’ve added information about the product. Also, we recommend that you add all the information that may convince your potential customer to buy the product.
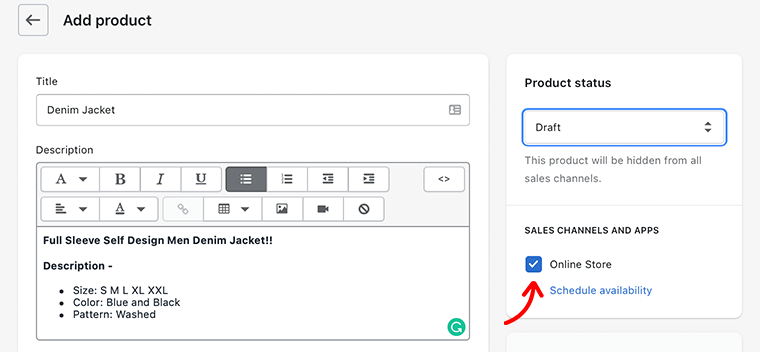
At the same time, make sure you get a tick on the Online Store Sales Channel. This will ensure that your listing will show up on this particular sales channel.
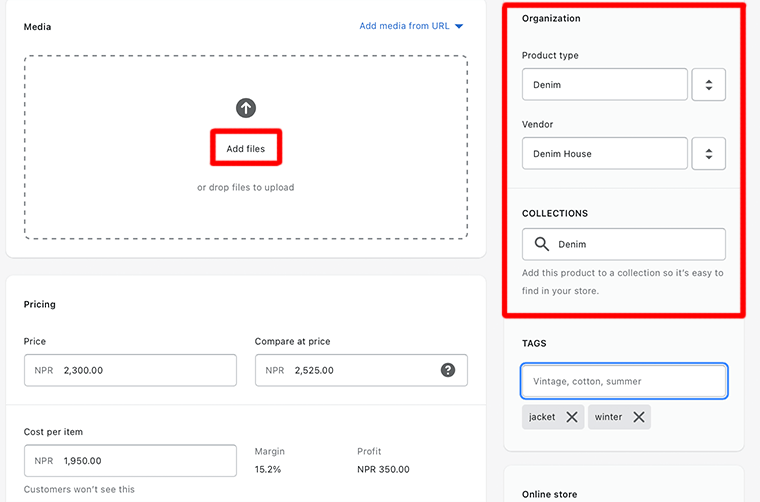
After that scroll down a little and you’ll find many other fields related to your product. Make sure to add those fields with the required information.
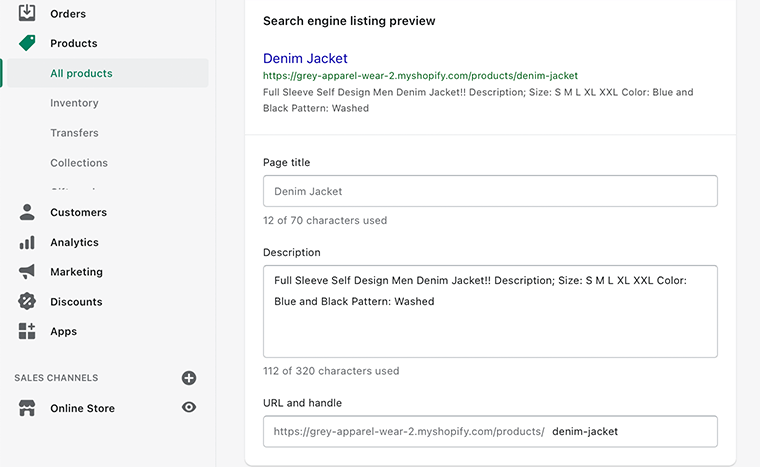
Likewise, at the very end of the page, you’ll see the preview of the search engine result for the product. Also, you can edit that page to improve its SEO such as page title, description, and URL.
Finally, it’s time to publish the product to your store. Before that, in the upper right-hand corner, find the Product Status bar. Now, using the dropdown menu select the Active status.
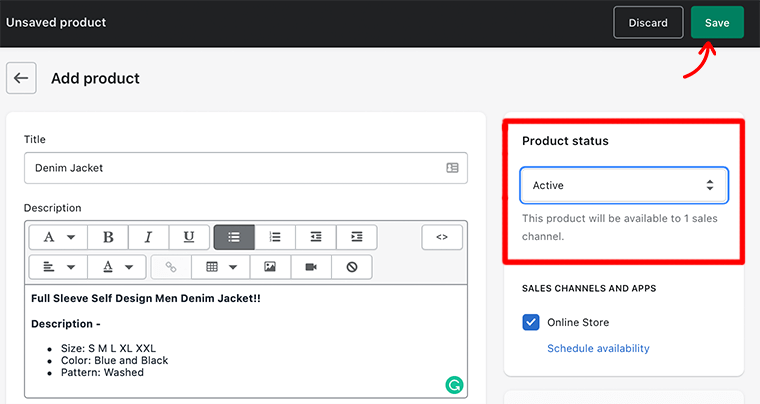
And click on the Save button to complete the process of adding products to your store.
That’s it! This is how you add products to your Shopify store.
6. Configure Your Payment Gateways and Options
At this point, we’re going to see how your store will accept payments and how you as a store owner will get paid.
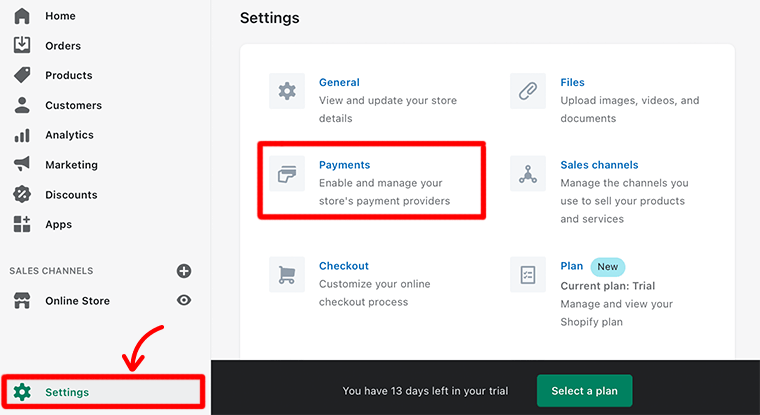
To enable payments, go to your Settings that you can find at the bottom left-hand side corner of the page. Then, select the Payments option from the settings.
However, Shopify offers its payment gateway called Shopify Payments that accepts all major forms of payment.
The only requirement is that your business should be operated from one of the supported countries. Also, your business shouldn’t be considered a prohibited business as well.
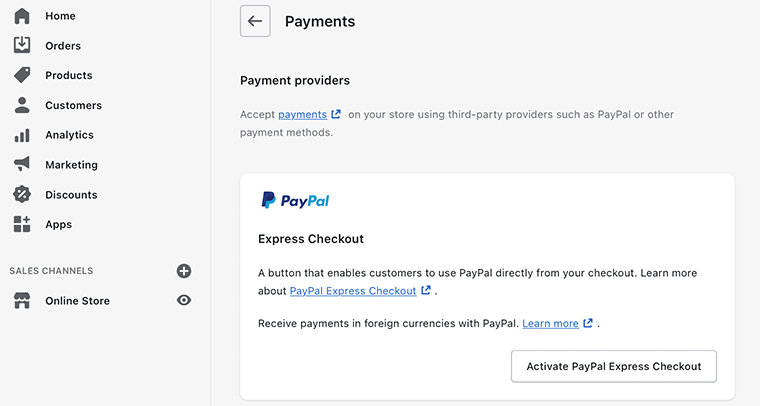
Likewise, if your country doesn’t support Shopify Payments, then you can choose from other payment gateways such as PayPal.
Tips on Managing Your Payment Gateways
Now, let’s talk about a few things that you need to consider while choosing and managing your payment gateways.
- Try to sell your products in multiple currencies. This will automatically convert your prices into the customer’s currencies. You can set the currency for the product you sell under Settings > General.
- Provides different payment options to your customers like different credit cards (e.g. Visa), cryptocurrency, etc.
- To prevent fraud you can introduce Card Verification Value (CVV) and postal code verification.
- Make sure to set your payout schedule. So that you can receive a payout on your preference i.e. daily, weekly, or monthly.
7. Customize Your Shipping Settings
At this point, we’re going to look at how you can ship orders to your customers.
Shipping is considered to be one of the most complex things while carrying out an eCommerce business. It’s very important to decide what shipping methods you would use before you take your first order.
When you’re selling goods online, there are different methods by which you can get your products to your customers. There are usually 3 different methods: shipping, local delivery, and local pickup.
These methods mostly depend on what kind of physical goods you sell.
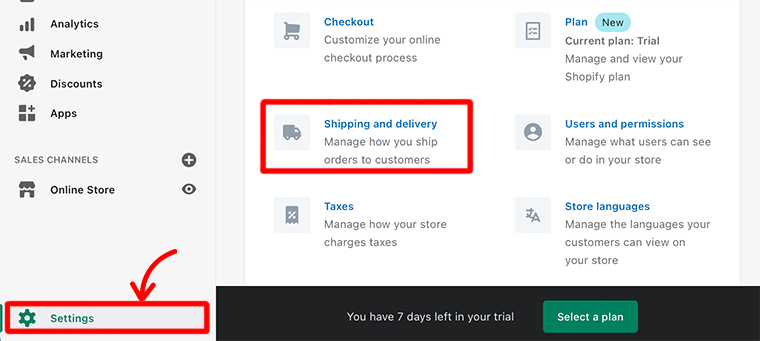
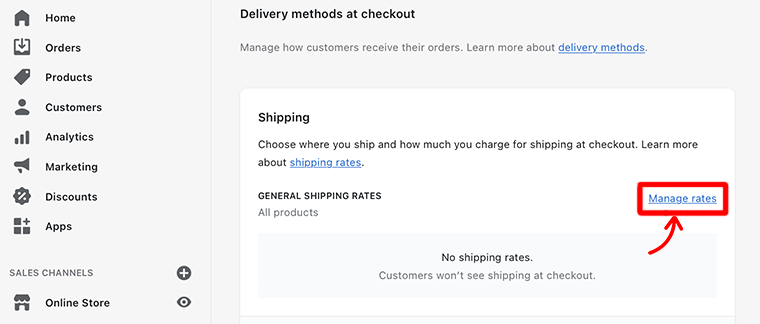
Hence, to correctly set up your shipping plan go to the Settings > Shipping and Delivery page. Here you’ll be able to manage your shipping rates and delivery.
How to Set Up Your Shipping Zones and Rates
Now let’s look at how we can create shipping zones and set your rates for shipping products to customers in certain locations.
For that, go to the Shipping section and click on the link Manage rates.
After that click on the Create shipping zone next to the Shipping to section. This will pop up a page where you can select a zone where you want to ship your product.
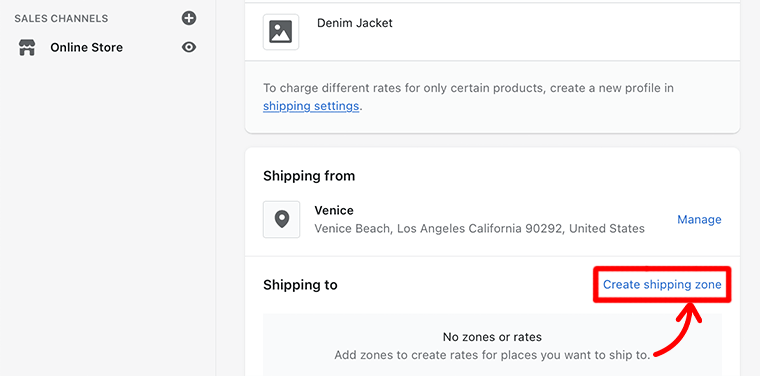
Once you’ve selected the shipping zone, you’ll see that now you can add shipping for that particular zone. For that, click on the Add rate button.

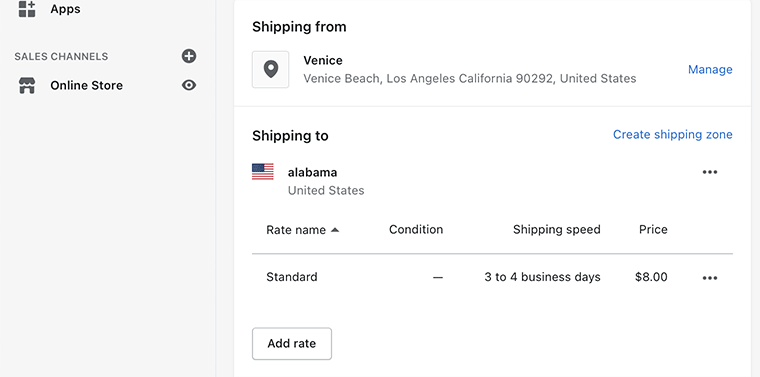
Following that, you’ll be able to add the shipping speed and cost of that shipping. Likewise, if you want to condition based on item weight or order price then, click Add conditions link.

Finally, don’t forget to click on the Save button to complete the process of creating shipping zones and set your rates for shipping.
8. Choose Your Domain Name
A domain name is the address of your website that is easy to remember and is used to access your website. It’s what people type in the browser’s URL to visit your website. Usually, you’ll find your store name as www.examplestore.com.
When it comes to choosing a domain for your website, Shopify provides three options:
- Already existing domain name i.e. www.examplestore.myshopify.com
- Transfer domain
- Buy new domain
The best thing is that Shopify lets you do all of this from your dashboard without having to go to a third-party domain registration site.
For that go to your Online Store that you can find at the left-hand side corner of your dashboard. Then, select Domains to open the domain setting page.
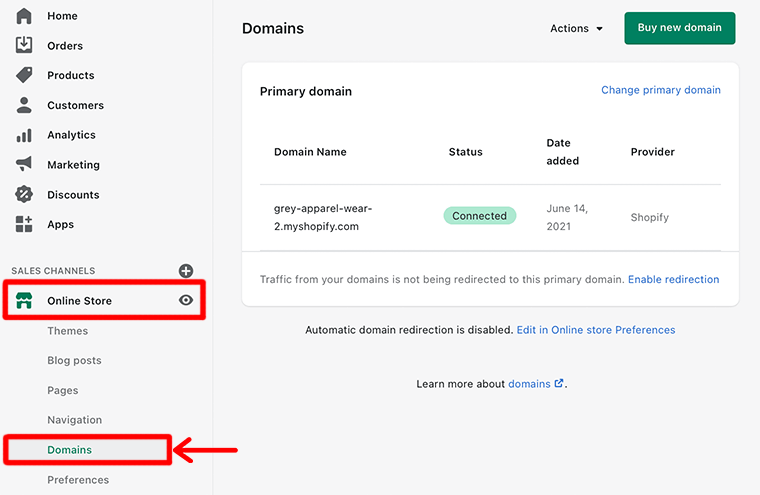
As you could see that a domain name has already been registered to the Primary Domain area. This existing domain is only good for testing purposes.
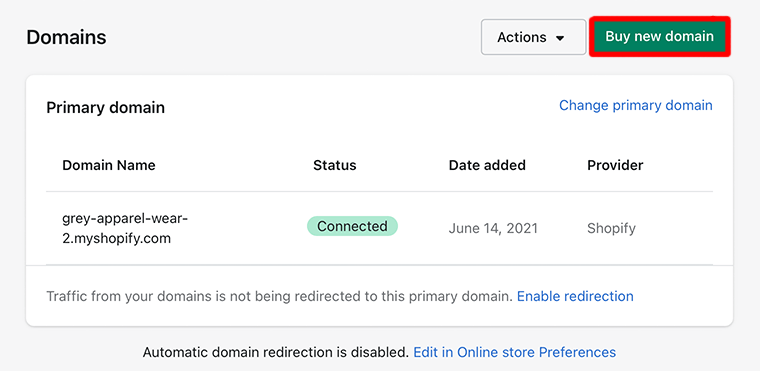
However, if you want a more professional-looking domain without the myshopify.com subdomain, then you need to Buy a New Domain.
9. Launch Your Store
By now, you’ve already got some idea of how Shopify works. At last, after all this hard work it’s time to launch your store.
If you’re pleased with how your website turned out, then you can publish your website for the whole world to see.
But before that, click on the Online Store and select Preferences. Then, in the Password Protection section, don’t forget to uncheck Enable password. Before doing this, make sure that you already have a Shopify plan.
Congratulations, if you’ve been able to create yourself an online store following each of the steps discussed above.
D) Mobile App to Manage Your Store from Phone
As we know that, unlike websites, mobile apps are quite reliable, personalized, and convenient. These mobile apps have become omnipresent, as they play a significant role in almost all aspects of everyday life. Today they’re not only used for daily life communication but also business purposes.
When it comes to mobile apps, Shopify has also come with its mobile app called Shopify Mobile. It hasn’t been so long since Shopify has introduced its mobile app. However, in a short time, it has become an absolute necessity for any business seeking richer engagement and sales.
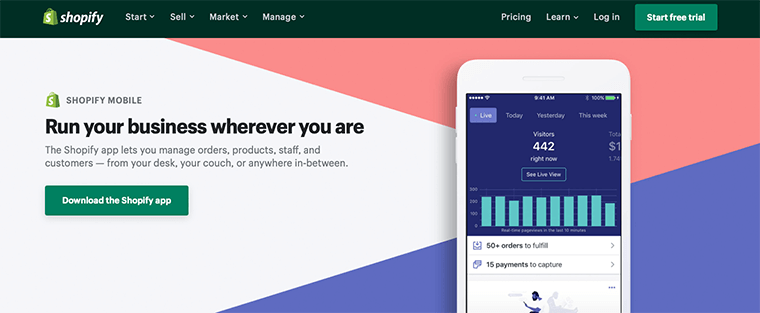
Shopify Mobile is a convenient app that lets you manage orders, products, and customers from your iPhone or Android. It lets you run your business even when you are on the go. Everything that you need to manage your online store is within the palm of your hand.
Some of the features of Shopify Mobiles are as follow:
- Let you upload product photos and set product and pricing details.
- Allow you to add your products to the collection.
- You can view your live sales and visitor traffic.
- Send you a notification whenever someone orders a product.
- Built-in messaging system to let you communicate with the staff.
Hence, Shopify Mobile is a really good app for store owners as it lets you manage your store from your smartphone.
Shopify Mobile App Builder
Similar to store owners, there are lots of customers who wish there was a mobile app for their favorite store too. As they also wish to shop their favorite products on the go. Hence, there are lots of apps in Shopify App Store that help to turn your Shopify Store into a mobile app.
Plobal Apps and MageNative are some of the popular mobile app builders you can find in the app store. These mobile app builders come with a powerful drag-and-drop builder that gives you full freedom for designing your unique mobile app from scratch.
It’s a great way to increase brand loyalty and helps to drive sales instantly with built-in push notifications. Also, you can offer different payment gateways for your customers.
E) Security and Backups of Your Website on Shopify
Shopify is a huge eCommerce platform with millions of people buying and promoting products across multiple countries. It’s a platform in which masses of transactions happen every short time.
Consequently, there’s always the concern of fraud, DDoS attacks, hacking, malware, e-skimming, and many others.
Shopify continually makes sure that its platform is fully secure and free from all those security threats that may damage their reputations. They even ensure that each vendor and customer can use their systems without any worry of getting robbed.
Let’s look at some of the security capabilities that Shopify offers:
- Shopify is an SSL (Secure Socket Layer) licensed eCommerce platform. It allows you to improve your online safety by securing your store’s content and uses HTTPS instead of HTTP.
- Shopify is a level 1 PCI DSS (Payment Card Industry Data Security Standard) compliant. This means that any online transactions made from credit cards are secure and also protect them against identification robbery.
- They strongly trust in protecting the personal information of customers. Also, their developers get access to the data they want to run on their platform to avoid data being leaked.
- Outstanding fraud prevention system that permits you to identify potentially fraudulent orders. This helps you to avoid potential chargebacks.
- Provides two-factor authentication that makes it hard for an unauthorized person to get entry to your account forcefully.
Similarly, Shopify lets you export CSV files of your store so that you can back up your store data. In fact, you may combine your CSV documents and other data to create a backup or duplicate of your store.
F) Shopify Support and Experts
No doubt Shopify is one of the easiest eCommerce platforms that you can find in the market. However, you never know what kind of problem you might run into. Hence, in such cases having good customer support can be crucial for any business.
When it comes to customer support, Shopify provides you everything that you need for support within a single roof. As you just have to go to their official website and click Learn in the menu bar, you’ll get everything listed out there for you.
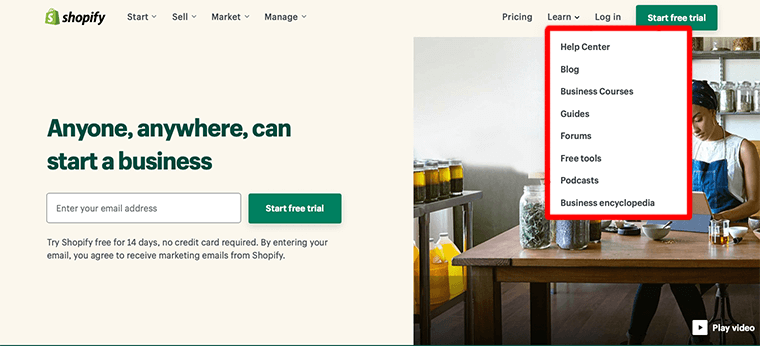
In the menu bar if you just look at the Learn section then it’ll open a dropdown menu that includes furthermore categories. Each category is unique and helpful at the same time.
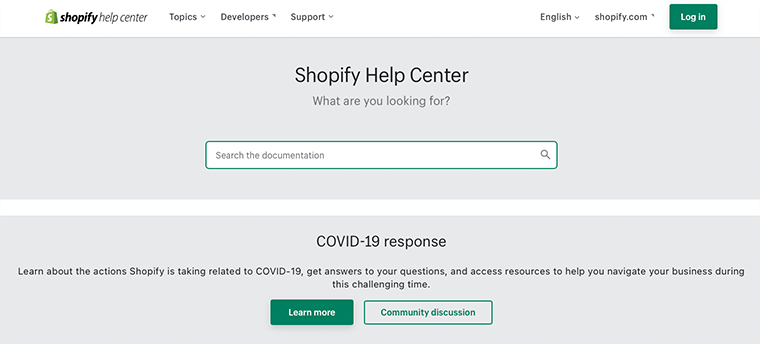
For example, let’s look at the Help Center. It contains all the pre-written information that you might need starting from Migrate to Shopify to Marketing and Promotion. Also, you can type in the queries and search for the documentation.
Similarly, Shopify has included blogs that contain different sorts of articles to help you start and grow a successful business.
These blogs not only contain a quick start guide on what Shopify is but also provide business ideas to help you get started.
The best thing about it is that it’s free to subscribe to.
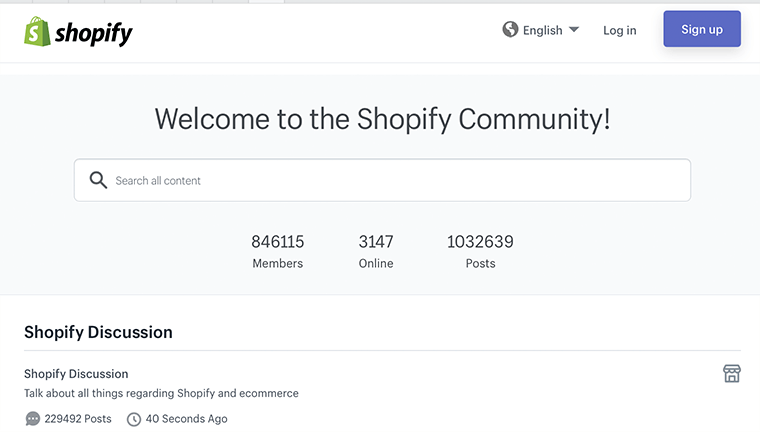
If you’re still a beginner who is struggling with your online store, then get your issues fixed quickly in the community forum. This is a great way to get connected with the community and get help and suggestions.
Additionally, Shopify also provides 24/7 phone support to their customers. Apart from that, you can also get connected with the support team through various social media platforms and emails.
G) Shopify Pricing: How Much Does Shopify Cost?
By now, you’ve already known that Shopify is one of the most desirable eCommerce platforms that help you quickly get your store up and running online. But one common question we always get a lot: How much does Shopify cost?
Shopify seems to offer you 3 different plans to choose from Basic Shopify, Shopify, and Advanced Shopify.
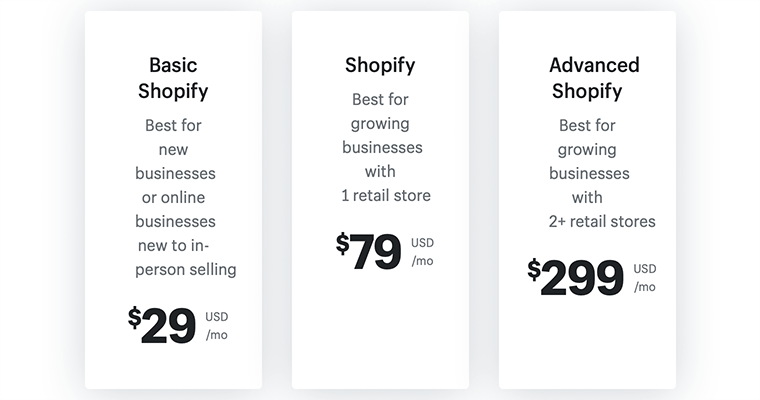
- Basic Shopify ($29/month) Best for new businesses or online businesses new to in-person selling.
- Shopify ($79/month) Best for growing businesses with 1 retail store.
- Advanced Shopify ($299/month) best for growing businesses with 2+ retail stores.
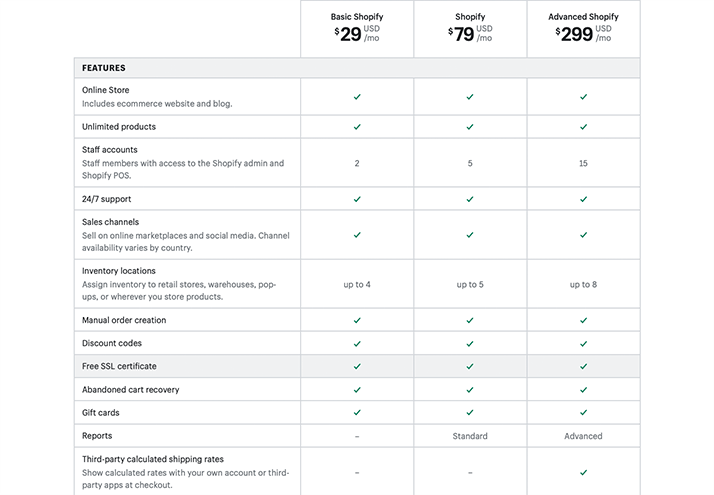
Along with these three major plans, Shopify also offers other plans i.e.
- Shopify Lite ($9/month) Includes financial reports, order management, email carts, git cards, split bill, and QR code product details.
- Shopify Plus ($2,000/month) Includes 18% higher conversion, 60% faster checkout, and advanced discounts and shipping rates.
However, we recommend you to start with Basic Shopify Plan as it’s quite budget-friendly and perfect for those who are starting up with new online businesses.
H) Top Shopify Alternatives & Competitors
Alright, now let’s look at some of the top Shopify alternatives present in the market that come with their unique features and functionalities.
1. WooCommerce
WooCommerce is a flexible open-source eCommerce platform that is built on WordPress. Being an open-source software means that you can use this software freely, modify, and redistribute with others.
There are 2 ways to create an eCommerce site on WooCommerce – a self-hosted store and on WordPress.com. Creating an online store on WordPress.com is much similar to creating on Shopify. Both WordPress.com and Shopify are both fully hosted eCommerce platforms.
But, there’s a more popular way to create a WooCommerce store – by setting up WooCommerce on your own web hosting.
It’ll take some extra time to set up WooCommerce on a hosting. But, it’s more flexible and gives you total authority and control over your website.
For more ideas on self-hosted WooCommerce and WordPress.com, read our article on WordPress.org vs WordPress.com.
Also, check our article on WooCommerce vs Shopify.
2. BigCommerce
BigCommerce is another widely popular alternative to Shopify. It’s a fully-hosted eCommerce platform that offers great features without compromising security, stability, and scalability.

Moreover, it lets you manage your entire product catalog within the BigCommerce control panel. Besides, you can even sell products in multiple currencies more easily than in Shopify. Also, it lets you create an AMP version of your store more easily and for free.
Unlike Shopify, it doesn’t charge you any transaction fee, regardless of the payment gateway used.
Confused between BigCommerce and WooCommerce? Check our full comparison BigCommerce vs WooCommerce.
3. Magento
Magento is a popular eCommerce platform that lets you build high-end online stores suited for larger companies. It offers advanced customizations which can be an overwhelming aspect for most beginners.
However, it comes with over 250,000 developers that help you set up a beautiful and functional online store. Besides, you get multiple add-ons and extensions to choose from through its large partner ecosystem.
However, in comparison to Shopify, Magento is quite expensive as well as not so beginner-friendly.
4. PrestaShop
PrestaShop is an open-source eCommerce platform that has all the features for creating an online store and growing your business. It’s a fully mobile-optimized and responsive platform that not only drives your business but also attracts more visitors.
Unlike Shopify, it allows you to quickly create products with variants from a list of attributes using the combination generator. Indeed, it lets you display your complete product page with the call of action buttons and promotional content.
Also, it provides an option to host your store on any server or with any hosting provider.
5. OpenCart
OpenCart is a free eCommerce platform that comes with wide selections of modules and themes to expand your store functionality. It has powerful store management that makes it easier to manage products, customers, orders, tax rules, and more.
Furthermore, it lets you open and manage multi-stores from one admin interface. Even it has an option to set products to appear in different stores and choose a different theme for each store. Also, it has an in-built affiliate system that lets affiliates promote specific products and get paid for them.
I) Pros and Cons of Using Shopify
We hope that you’ve enjoyed reading our review on Shopify and have found it useful. To sum up, let’s quickly look at some of the pros and cons of Shopify.
First, let’s start with the pros:
Pros of Using Shopify:
- Easy to use and beginner-friendly
- Quick and easy to set up
- Fully hosted platform
- Comes with many attractive and mobile-friendly templates
- Perfect for both small and big online stores
- Manage your store on go with iOS and Android mobile apps
- Allows you to sell products across multiple channels like Facebook, Instagram, and eBay
- 14 days free trial with no credit card required
- 24/7 excellent customer support
Cons of Using Shopify:
- Shopify Payments not available everywhere and top of that charges a transaction fee
- Provides limited customization options
- Quite expensive to build the multi-language store
- Although there is still a learning curve for most the beginners
- Lacks more app options
Conclusion
That’s about it. We hope that you simply understand what Shopify is, the way to build your online store, and many more. Following this guide step-by-step, you’ll be ready to create a successful online store for your business.
If you’ve any further queries about Shopify and how it works, then please leave a comment below. We’ll try to get back to you as soon as possible.
You may want to take a look at our article What is Google Analytics and also have a look at the best Google Analytics plugins for your website.
If you like this article, then please share it with your friends and colleagues. Also, don’t forget to follow us on Twitter and Facebook.