
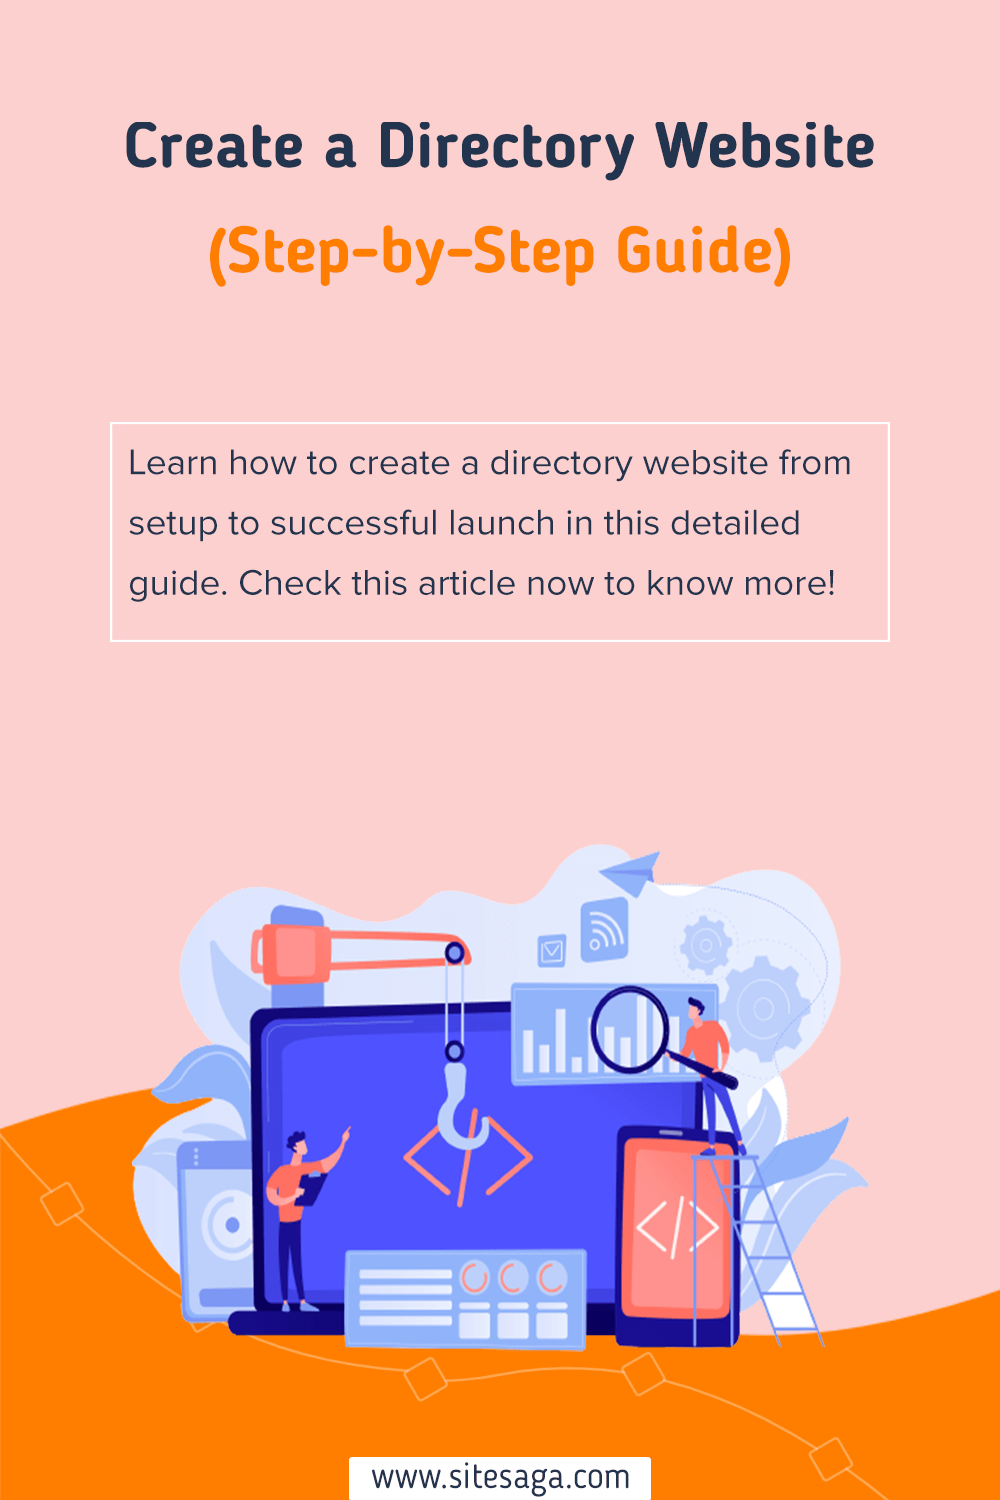
Are you wondering how to create a directory website? Or aiming to build a directory website for local businesses, niche communities, or a comprehensive listing? Then you’re in the right place.
A directory website is a centralized hub of information tailored to meet the needs of your target audience. Also, it has endless possibilities for monetization and community-building.
From conceptualization to execution, we’ll unravel the secrets to create a captivating directory website. With our guidance, you’ll transform your vision into reality and learn how to make a directory website.
So, are you ready to embark on this exhilarating journey to create a directory website? Let’s dive in and bring your directory website dreams to life!
What is a Directory Website?
Before we start with the steps on how to create a directory website, let’s learn exactly what a directory website is.
Simply put, it’s an online platform that brings together a variety of listings, categorizing them for easy access and navigation. Think of it as a digital concierge, guiding users to their desired destinations.

Within this digital cityscape, you can explore diverse realms, from business directories to local services. As well as niche directories catering to specific interests or industries. These directories serve as a virtual marketplace, connecting buyers and sellers.
Moreover, a directory website opens doors to a world of possibilities. Let’s look at them:
- It empowers you to curate a comprehensive collection of listings, tailored to the needs of your target audience.
- Also covers the best eateries in town, niche products for hobbyists, or a one-stop resource hub.
- It’s not just about the listings; it’s about the connections forged and the value created.
- It fosters a sense of community, connecting like-minded individuals and businesses.
- You’ll also have opportunities to monetize through partnerships and advertisements.
- Opportunities to establish yourself as an authority in your niche, and opportunities to make a lasting impact.
So, unlock the potential of a directory website. The possibilities are boundless, and the adventure awaits you.
Benefits of Creating a Directory Website
Creating a directory website can offer several benefits for both website owners and users. Here are some of the key advantages:

- Centralized Information: They serve as a centralized hub to easily find relevant information. It can save you time searching for specific services, businesses, or resources.
- Increased Visibility: Listing services on your directory website helps you reach a larger audience, attract potential customers, and improve your online presence.
- Niche Targeting: Directory websites cater to specific niches, allowing users to find information tailored to their needs.
- Monetization Opportunities: You can monetize through various means, like featured listings, premium placements, advertising, etc.
- Community Building: Also fosters a sense of community by bringing together businesses, customers, or individuals with common interests.
- SEO Benefits: When properly optimized, it improves visibility in Search Engine Results Pages (SERPs).
- User Reviews and Ratings: This also allows users to leave reviews and ratings for businesses or services listed. And helps users make informed decisions and build trust in the businesses.
- Data Collection: You’ll have the opportunity to collect valuable data on user behavior, preferences, and trends within your niche. Helping to gain insights into market demand, and user preferences.
These benefits highlight the value that directory websites can offer to both website owners and users. Making it a popular choice for organizing and accessing information in a convenient and centralized manner.
Now let’s explore the steps on how to create a directory website.
A Step-by-Step Guide to Creating a Directory Website
In the following step-by-step guide, we’ll walk you through the process, equipping you with the knowledge and tools you need. From planning and designing to implementation and launch, we’ve got you covered every step of the way to create a directory website.
Let’s dive in and transform your directory website dreams into reality.
Step 1: Planning and Preparation
Like any great endeavor, creating a directory website begins with careful planning and thorough preparation. This initial stage sets the foundation for successful and seamless execution.

So, let’s delve into the essential aspects and ensure you start on the right foot.
- Define Your Purpose: Start by clarifying the purpose of your directory website. Like, a platform for local businesses, a niche community, or a comprehensive resource hub.
- Research Your Market: Also conduct thorough market research to understand the existing directory websites in your niche. Analyze their strengths, weaknesses, and unique features.
- Outline Categories and Subcategories: Develop a well-organized structure by outlining the categories and subcategories. It’ll provide a clear framework for organizing listings,
- Define Listing Criteria: Establish specific criteria for the listings to include in your directory. Determine the information you’ll require from businesses or individuals.
- Design User-Friendly Navigation: Create a user-friendly navigation system that allows visitors to easily explore your directory website. Consider using search filters, alphabetical sorting, or location-based browsing.
- Develop a Monetization Strategy: Lastly, consider how you’ll monetize your directory website. Explore options like charging for premium listings, advertising, or membership models.
By investing time and effort in the planning and preparation stage, you lay a solid groundwork for your directory website. Stay focused, keep your audience in mind, and prepare to move on to the next step of this exciting journey.
Enjoy our article on what makes a good website to map out your online journey.
Step 2: Pick the Perfect Platform to Create a Directory Website
Once you’ve set your sights, it’s time to tackle the crucial task of selecting the perfect platform. This decision lays the foundation for your website’s functionality, design, and overall user experience.

With an abundance of options available, ranging from customizable content management systems to specialized directory software. Now it’s important to consider factors like scalability, ease of use, and available features.
You can browse our article on what a website builder is for comprehensive guidance.
So, let’s delve into the platform selection and pave the way for a robust and user-friendly directory website.
1) WordPress
Renowned as the unrivaled champion of open-source platforms, WordPress claims its throne as the most popular choice. Its name echoes across the digital realm, synonymous with flexibility and user-friendliness.
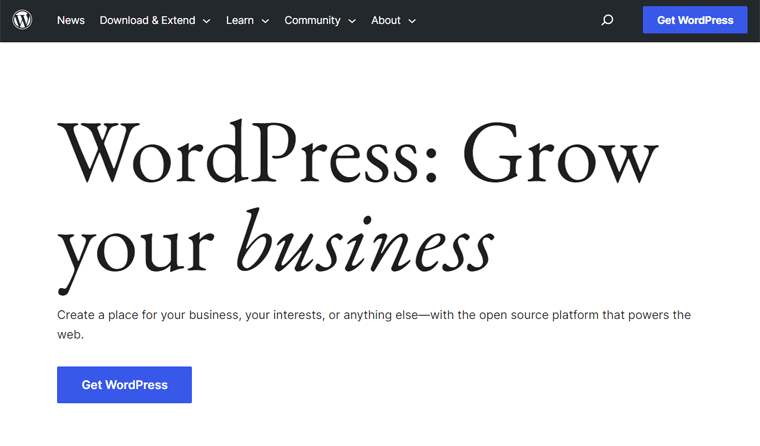
Moreover, unlock the gateway to your imagination, as WordPress showers you with an intuitive interface. And even the technologically challenged can weave dreams into reality. Besides, no need to fear to code. Because WordPress customization is child’s play.
But that’s not all, brace yourself to become a member of a vibrant community. Where WordPress users gather to trade wisdom, and anecdotes, and revel in boundless ideas. Hence, you’ll never tread the path alone on your odyssey through website creation.
Read our comparison of WordPress.org vs WordPress.com to learn more about the differences.
2) Wix
Enter the world of Wix, a beloved drag-and-drop platform that reigns supreme in user-friendliness. If you prefer to steer clear in website development, then Wix stands tall as your savior.

Behold the wonders of Wix, where a user-friendly interface intertwines seamlessly with captivating templates and robust functionality. It emerges as the embodiment of an all-in-one website builder. Embracing the power to bring your wildest imaginings to life and transform your vision into a reality.
Confused about which one is better, Wix or WordPress? Then, check out the comparison article on WordPress vs Wix.
3) Squarespace
Squarespace is the catalyst behind the dreams of countless individuals launching new websites. It’s an all-in-one tool that provides you with the means to craft your online presence. From exquisite template designs and captivating fonts to vibrant color palettes and stylish aesthetics.
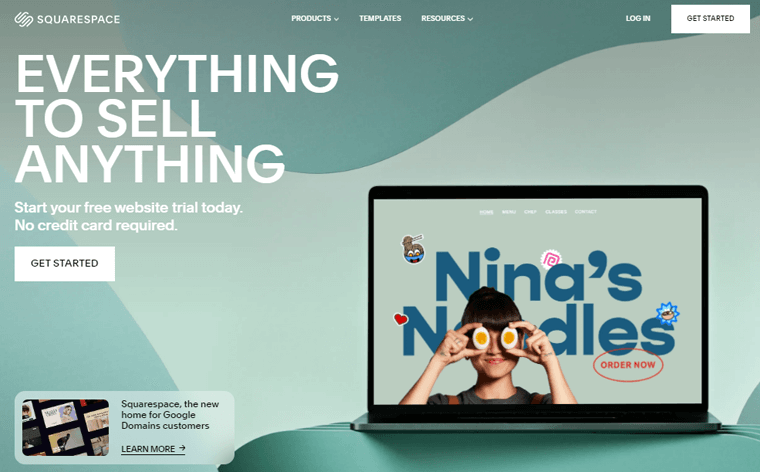
Additionally, its core philosophy revolves around empowering users to construct websites without delving into the complexities of CSS and JavaScript. So, bid farewell to technical hurdles and embrace a hassle-free path to website creation.
Besides, Squarespace offers more than just tools. It unveils itself as a “Software as a Service” (SaaS) platform. This means you can unlock its full potential by paying a modest monthly fee. Hence, granting you unlimited access to the resources to bring your vision to life effortlessly.
Check our comparison article on WordPress vs Squarespace.
Our Recommendation: WordPress.org
In the vast landscape of directory website creation, a multitude of platforms awaits your selection. However, drawing from our experience, we wholeheartedly endorse the use of WordPress.org as the ultimate choice.
Let us shed light on why WordPress.org reigns supreme when it comes to crafting your directory website:
- A Plenitude of Personalization: Immerse yourself in an extensive array of customizable themes. With WordPress.org, your online presence will radiate individuality.
- Monetization Made Effortless: Seamlessly integrate the power of eCommerce through WooCommerce. Unlocking the potential to monetize your digital realm.
- Tailored Functionality: Enhance your website’s capabilities with plugins tailored to your unique needs. Whether it’s advanced galleries, contact forms, or social media integration.
- Unleash Creativity: Revel in the unparalleled flexibility and customization options that bestows upon you. Mold and shape your website to reflect your brand’s personality.
With these compelling advantages in mind, we eagerly invite you to embark on a thrilling journey. Where we will guide you through the process of creating your digital masterpiece using WordPress.org.
Brace yourself as we venture into the next step, ready to unlock the full potential of your directory website.
Step 3: Setting Up Domain, Hosting & WordPress
Now that you’ve chosen WordPress as your platform of choice, it’s time to embark on the next step. Setting up your domain, hosting, and WordPress itself.
This step forms the backbone of your website, ensuring its accessibility, stability, and functionality. By carefully navigating this process, you’ll establish a solid foundation for your online presence.
Let’s move ahead!
i) Seize a Domain Name to Define Your Online Identity
In the vast realm of the internet, your domain name becomes the essence of your online presence. It’s a unique address where seekers of your virtual existence will converge. Besides, it’ll leave an indelible mark in the minds of your visitors.
For instance, www.sitesaga.com is the very domain name that beckons visitors to our blog. Forging a connection that resonates with our vision.

Allow us to share some swift guidance on handpicking the perfect domain name for your website:
- Opt for a domain name that effortlessly rolls off the tongue and sticks in the memory.
- Keep it concise and avoid numbers or hyphens that may confuse you.
- Consider incorporating your name or initials into the domain. This approach facilitates easy recognition and discovery by your audience.
- While the .com extension reigns supreme, other options like .net, .org, and .info exist.
- Before committing to a domain name, perform a thorough search to ensure its availability.
- Utilize domain name generators to save time and find the perfect match.
- Once you’ve discovered a domain name, waste no time registering it through a reputable domain registrar.
Embrace the journey of unveiling your digital identity with a domain name that sets you apart. Also, it captures attention and invites the world to step on your online adventure.
Go through our article on how to choose a domain name for your blog for detailed information.
ii) Unleash the Power of Web Hosting
Picture hosting as the bedrock, the very foundation that empowers your website to thrive. Hosting acts as the gateway, rendering your website visible to the ever-expanding community of internet denizens.
In the expansive realm of web hosting, a multitude of options awaits, each vying for your attention. However, amidst this sea of choices, certain key factors demand your discerning eye.

Seek out providers that boast unrivaled uptime, ensuring your website remains steadfastly accessible. And never underestimate the importance of exceptional customer support, a lifeline when challenges arise.
You can check out our article on what to look for in web hosting for more insights.
While countless providers beckon from the digital horizon, allow us to present a trio of commendable options. Kinsta, Bluehost, and Cloudways.
So, prepare to secure your virtual sanctuary, as you select the ideal web hosting provider. A world of possibilities awaits, where your website can flourish and captivate audiences with ease.
Quick Tour of Web Hosting Setup
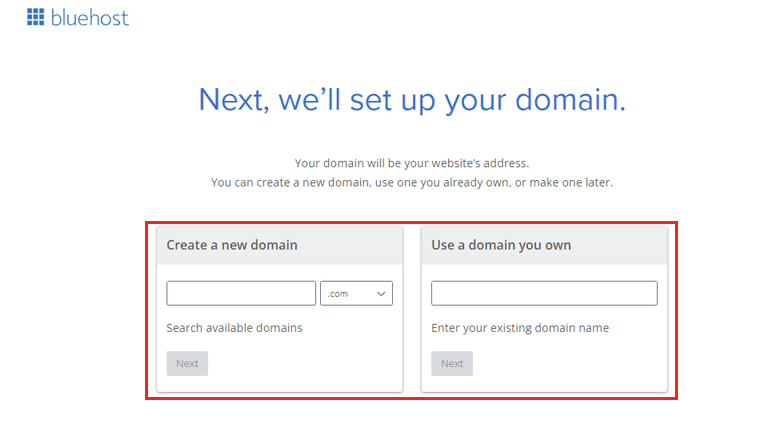
Prepare to step on an exciting journey with the swift demonstration of web hosting setup with the renowned Bluehost.
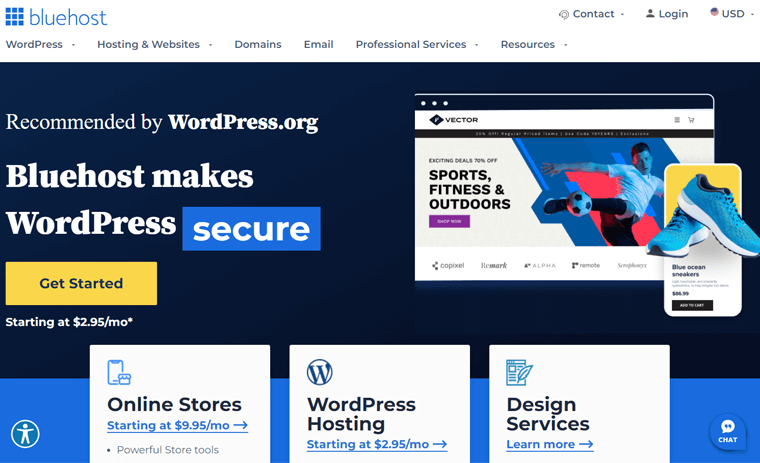
Our adventure begins at the Bluehost home page, where you’ll be greeted by the beckoning “Get Started” button. With a single click, you’ll be whisked away to select the perfect plan for your directory website. Our top recommendations are the Basic and Choice Plus plans.

Now, it’s time to breathe life into your domain name. You’ve two options: create a brand new domain using the “Create a new domain” feature. Or harness the power of an existing domain through the “Use a domain of your own” option.
A simple click of the “Next” button propels you forward, ready for the next step.
Next is Bluehost account creation. This entails filling in your personal details, package information, and payment information.
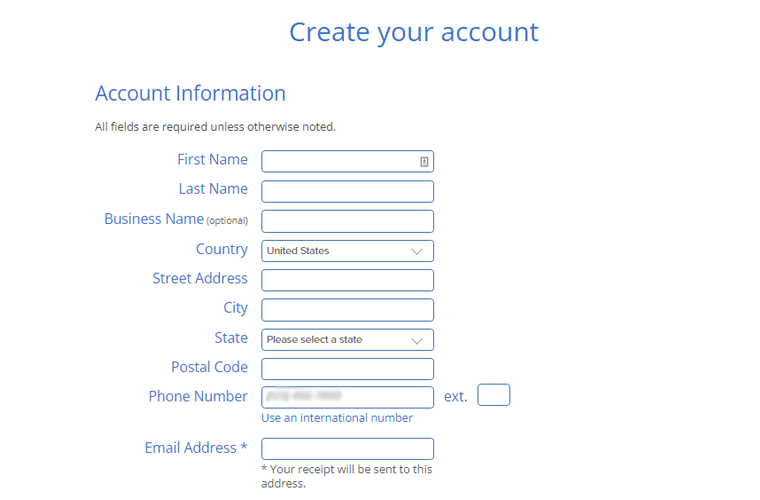
Once done, a single click on the “Submit” button seals the deal.
Congratulations! You’ve successfully set up a hosting plan for your WordPress directory website.
Additionally, Bluehost comes equipped with a pre-installed WordPress. Therefore saving you from the tedious process of manual installation.
Now, log into your Bluehost account and navigate ‘My Sites’ menu. Within this digital oasis, you’ll uncover the hidden gem known as ‘Create site.’
Then it’ll direct you to the WordPress login page.
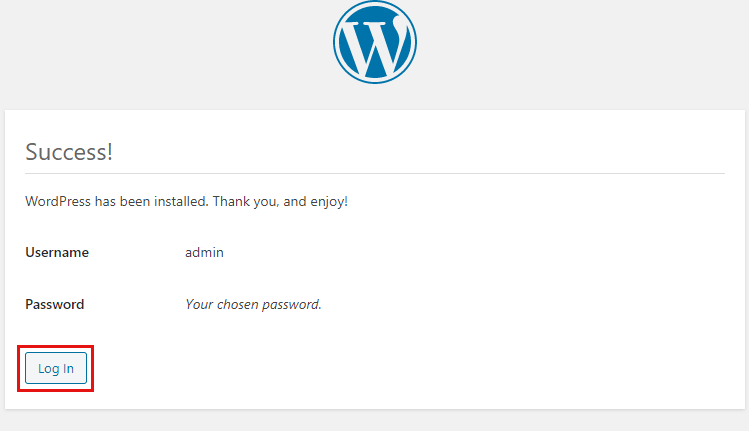
Here, a universe of customization and exploration awaits. Everything is ready for you to shape your website and unleash your creativity upon the digital landscape.
Step 4: Design Your Directory Website
Welcome to the exhilarating step where you can shine and transform your directory website into a visual masterpiece.
This is the moment where you unleash your imagination, sculpting every pixel and crafting an online space.
So follow us as we guide you through this step.
i) Install & Activate Kadence Theme Template
Unlock the gateway to your website’s visual allure, for a WordPress theme holds the key to its aesthetic destiny.
In this guide, we present Kadence, a freemium WordPress theme catering to a diverse range of website needs. Also, it offers captivating visual appeal, an intuitive interface, and customization options.
Besides, check out our guide on how to choose WordPress themes for more guidance.
Now, let’s unravel the steps for Kadence’s seamless installation and activation.
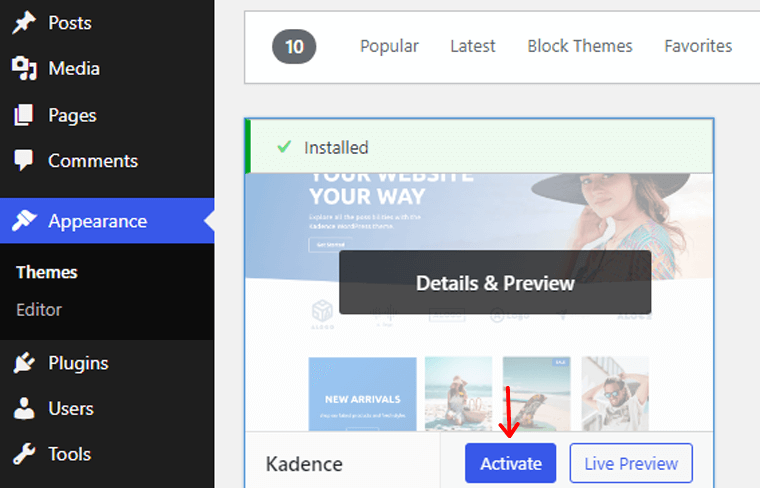
You can easily install the Kadence theme directly from your WordPress dashboard. Navigate to Appearance > Themes > Add New.
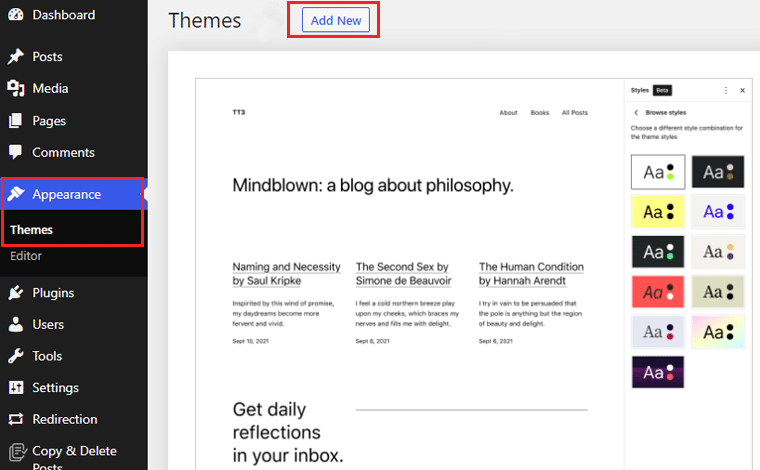
Following that, search ‘Kadence,’ then click on the ‘Install’ button.
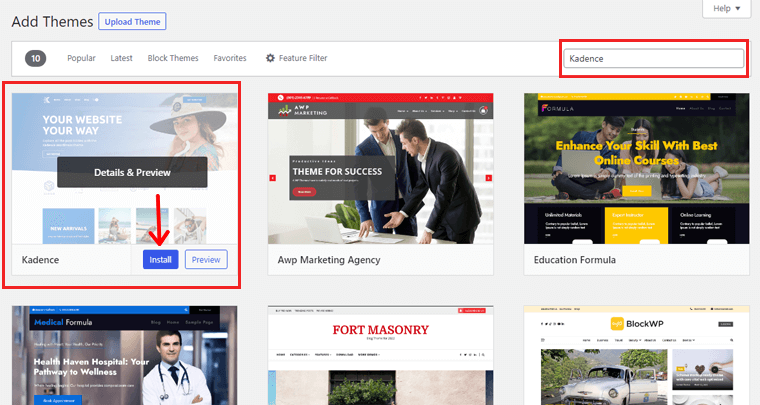
After that, click on the ‘Activate’ button.
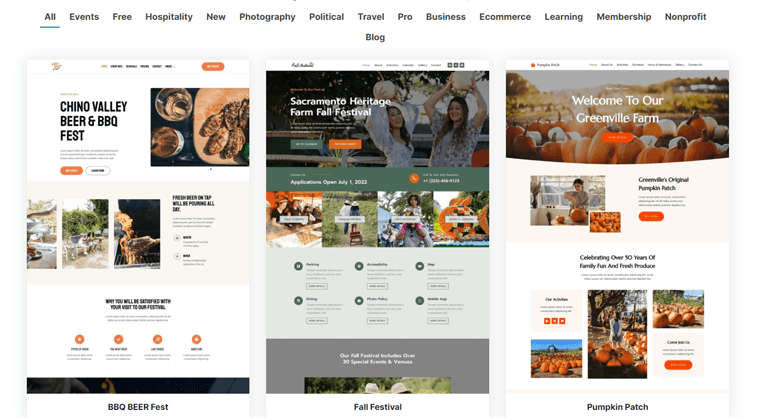
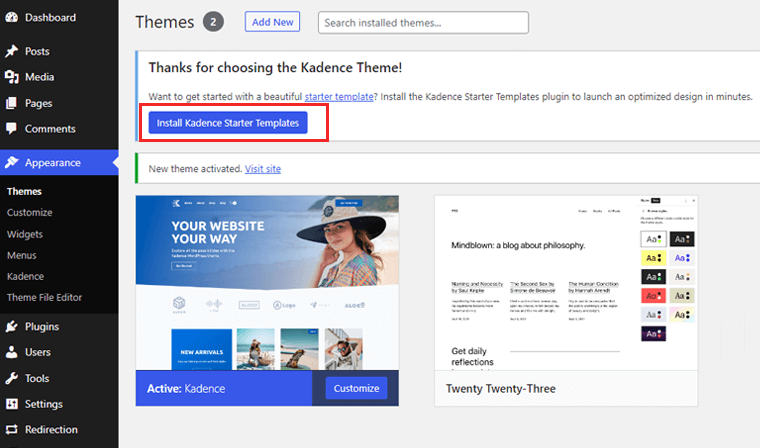
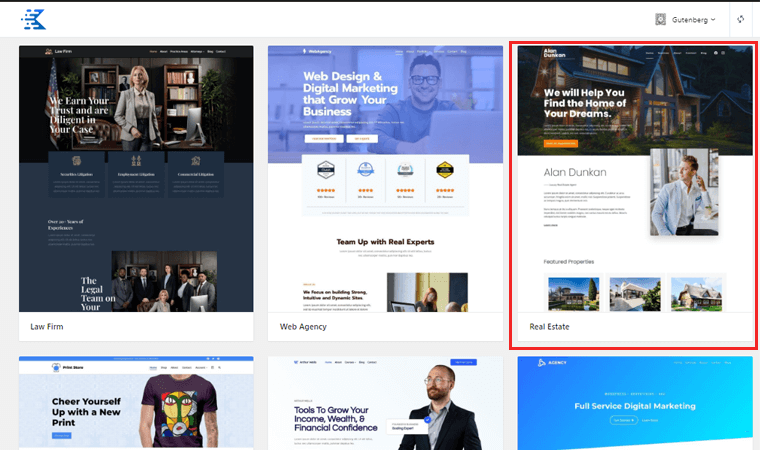
Your next step is to explore the enticing starter templates, waiting to breathe life into your directory website.
Installing Kadence Starter Template
With a simple click on the ‘Install Kadence Starter Templates’ option.
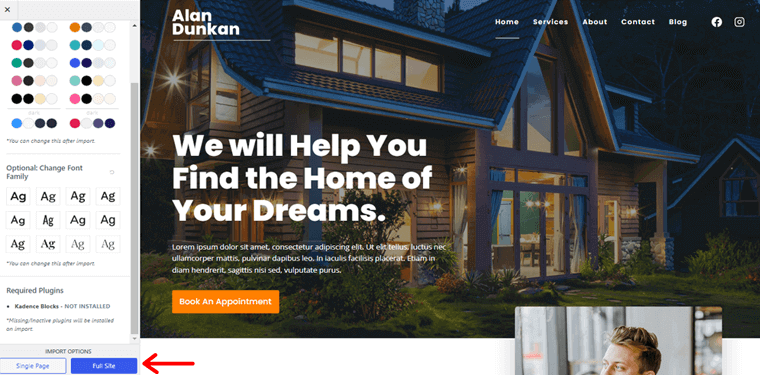
Delve into the treasure trove and discover the perfect match for your vision. In our case, we’ve chosen the captivating Real Estate Agent template.
Here, you’ve the power to modify elements like fonts and colors. Infusing a personal touch into every pixel. Also, you can import the Single Page or Full Site. For our grand adventure, we embrace the ‘Full Site’ option.
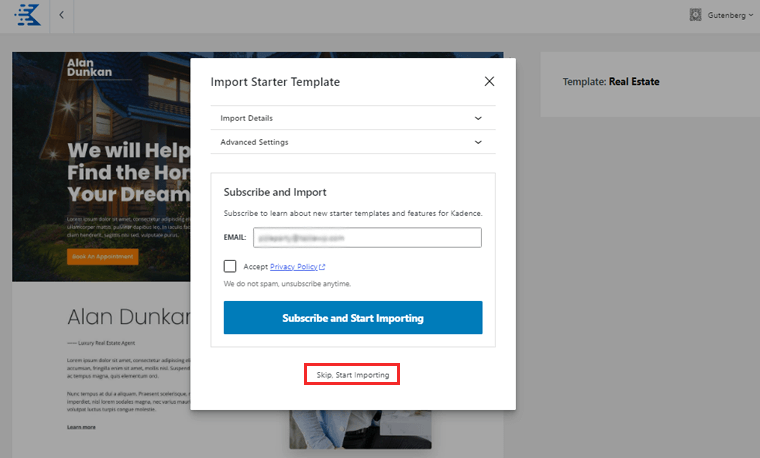
Behold, a pop-up box materializes, tempting you with the option to ‘Subscribe and import the template.’
However, if you prefer to dive straight into the action, fear not! A simple click on the ‘Skip, Start Importing’ option propels you forward without delay.
Witness the final version by clicking the ‘Finished! View your site’ option.
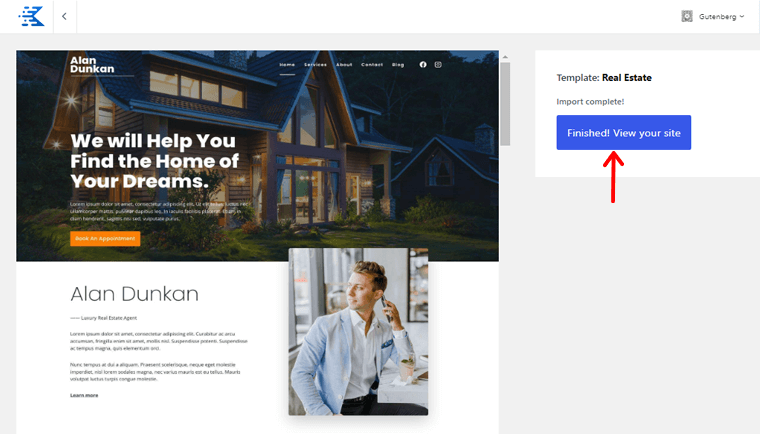
And with that, the journey of transformation reaches its conclusion.
Customizing the Theme Template
As our journey to create a directory website continues, it’s time to explore customization options. Start by navigating to Appearance > Customize.

Here, you hold the power to twist, turn, and mold your imported template. And align perfectly with your website’s vision.
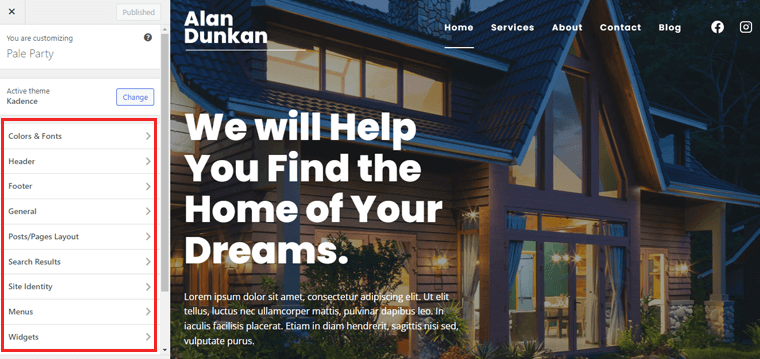
Brace yourself for a delightful exploration of options:
Color & Fonts
If you decide to go on the color adventure, then a fascinating page brimming with options appears before your eyes.
Here, you’ve the power to select hues from three distinct palettes. Also customizing the background colors of your site, content, title above content background, etc.
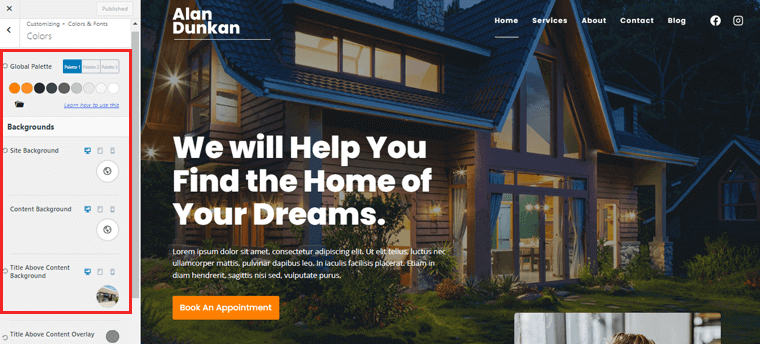
Witness the magic as your chosen colors come alive on various devices. Ensuring a harmonious visual experience for all.
But the journey doesn’t end there. Embrace the allure of the remaining sub-options, each holding its secrets. Delve into the realm of Buttons, where you can configure these interactive elements to captivate and engage your visitors.
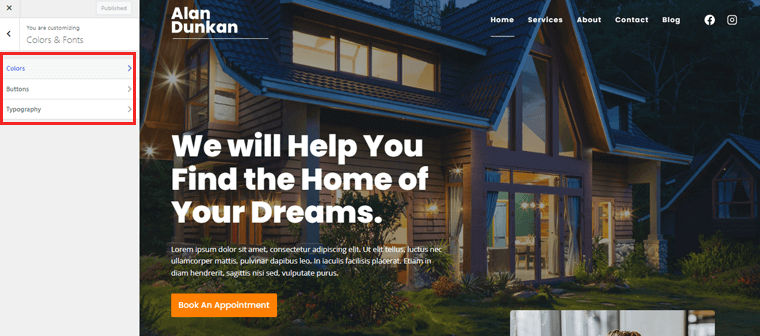
Then, set your sights on Typography. Craft the perfect typography scheme that will grace your website with elegance and legibility.
General
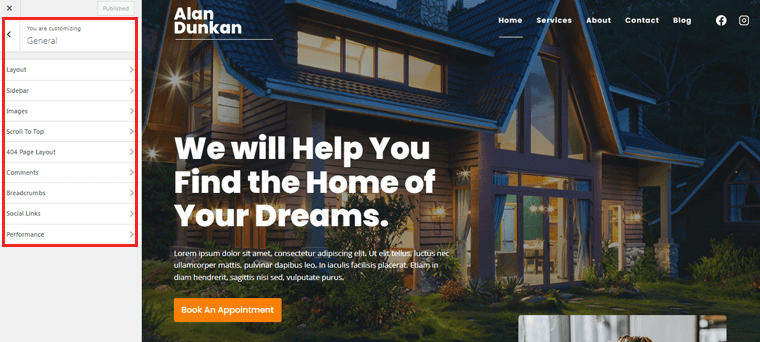
Amidst this thrilling journey, let’s now venture into the realms of the ‘General’ tab.
- Layout customization: Here the overall structure and alignment of your website’s pages come to life. Revel in the freedom to choose between full-width or boxed layouts.
- Wonders of the Sidebar: Granting you the power to enable or disable sidebars on your website. Showcase widgets like search bars, recent posts, or advertisements.
- Images: Here you can fine-tune their appearance and behavior. Delight in the ability to add borders, shadows, overlays, and optimize image size/quality for efficient loading.
- Customize Website’s 404 Page Layout: Create a consistent user experience by tailoring the layout and content to guide and engage your visitors.
- Forge Connections of Social Links: Seamlessly integrate your social media profiles, with icons or buttons. It helps visitors effortlessly connect with you across various platforms.
- Boost Website’s Performance: Unleash the power of lazy loading, minification, and caching. Unlocking faster load times and an enhanced browsing experience.
And let us not overlook additional options like scrolling to the top, comments, and more, awaiting your expert configuration. Also, keep in mind that the options and functionalities may vary based on the version or theme of Kadence.
Post and Page Layout
Within this tab, you’ll unearth a treasure trove of post/page layouts. Here, each option holds the power to elevate your content to new heights. Prepare to design possibilities as we explore some options:
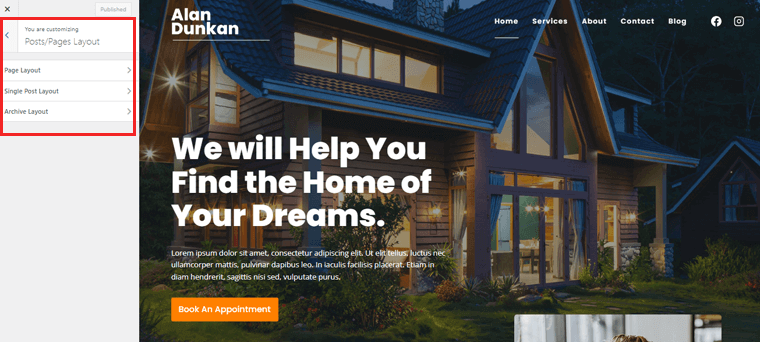
- Page Layout: Embrace the freedom to choose between full-width or boxed layouts. Strategically place sidebars, and align your content for a visually pleasing experience.
- Single Post Layout: Unleash your creativity as you configure the layout. Whether it’s a full-width or boxed design, sidebars, or the precise positioning of elements.
- Archive Layout: Tweak the column count, fine-tune excerpt lengths, and create an organized and visually captivating display of your content.
Once you’ve woven your design magic and brought your unique vision to life. You stand poised at the precipice of your directory website creation journey. And ready to venture forth into the next stage.
ii) Install & Configure Directory Plugin
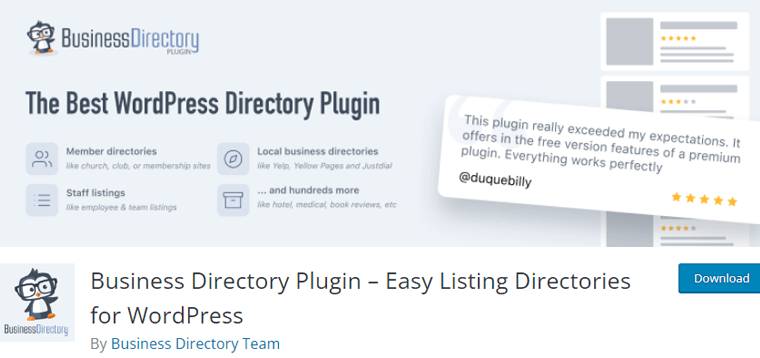
To install and activate the directory plugin, follow these simple steps. For this step, we’re using the Business Directory Plugin.
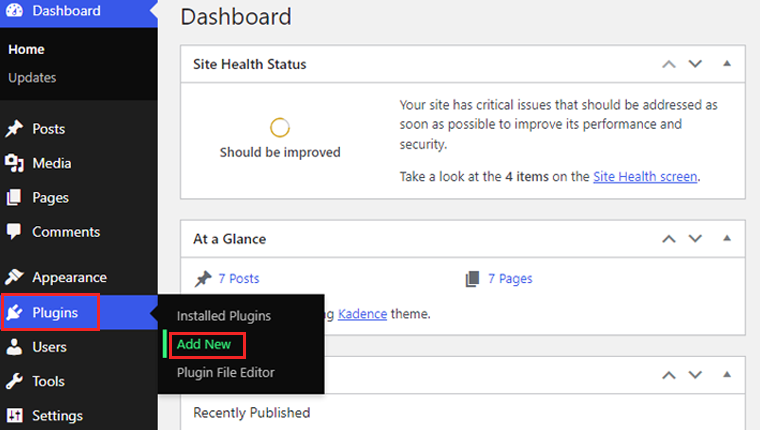
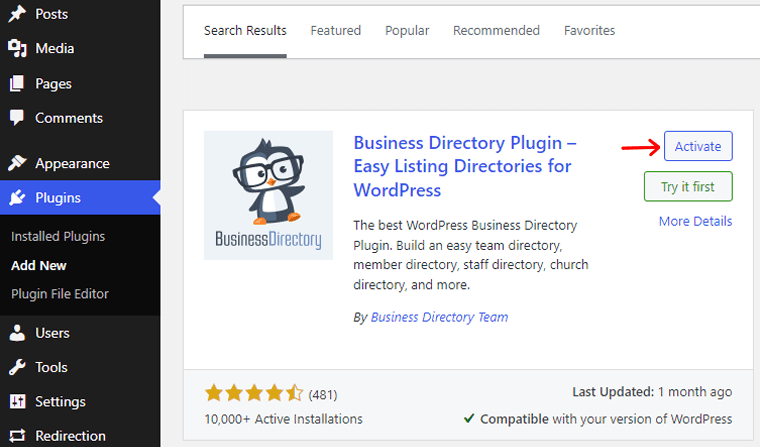
Log in to your WordPress admin area using your credentials. Navigate to the left-hand menu and click on ‘Plugins.’ Then click on the ‘Add New’ button.
In the search bar, type ‘Business Directory Plugin’ and hit enter. Following that click on the ‘Install Now’ button.
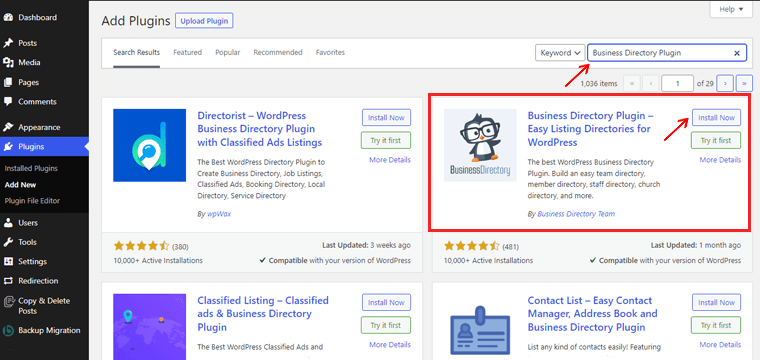
WordPress will begin the installation process. Once it’s complete, click on the ‘Activate’ button.
Configuring Business Directory Plugin
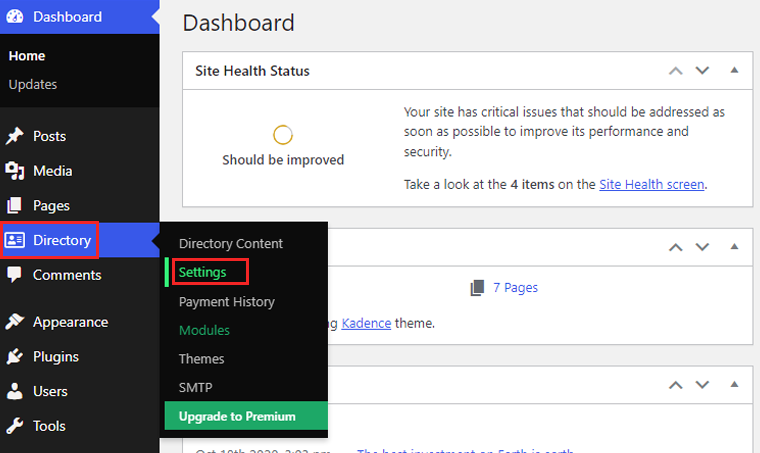
After activation, you’ll be redirected to the plugins page. Look for the ‘Directory’ and click on ‘Settings’ to configure the plugin according to your preferences.
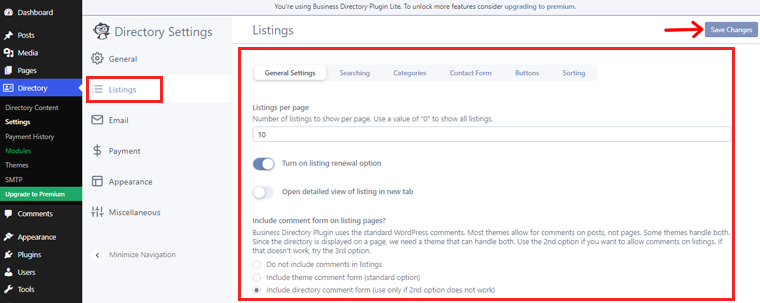
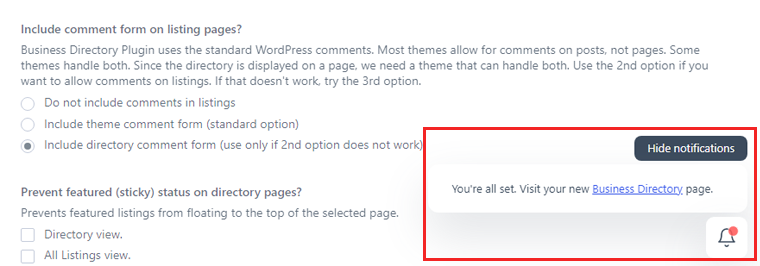
There, look for the ‘Listings’ option. In this tab, you can choose a listing per page. So place the number of listings to show per page.
Also, turn on the listing renewal option and enable the open detailed vise of the listing in the new tab. You can also choose whether to include comments on the listing or comment form.
And when you’re done, click on the ‘Save Changes’ option in the top right corner.
Besides, you’ll have a pop-up option that helps you create the required pages for the directory. Simply click on the ‘Create required pages for me.’
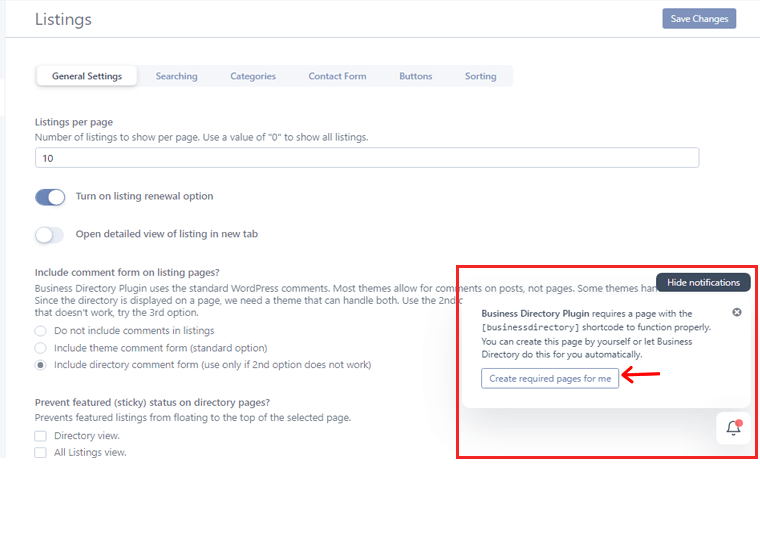
Once you do that, click on the ‘visit your new business directory page’ on the same pop-up option.
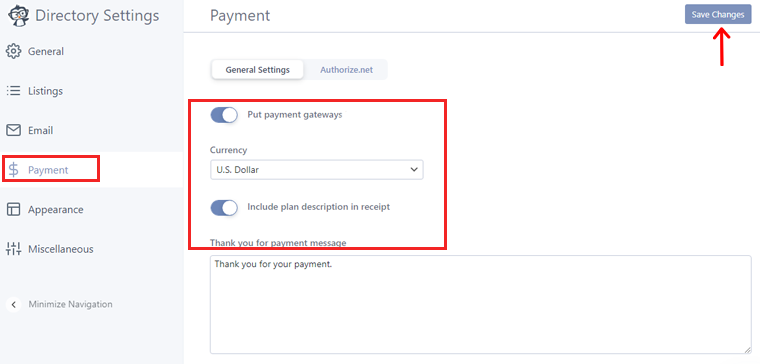
The next option to customize is Payment. There you can add payment gateways, choose the currency, and add plans on the receipt. Once done click on the ‘Save Changes’ option.
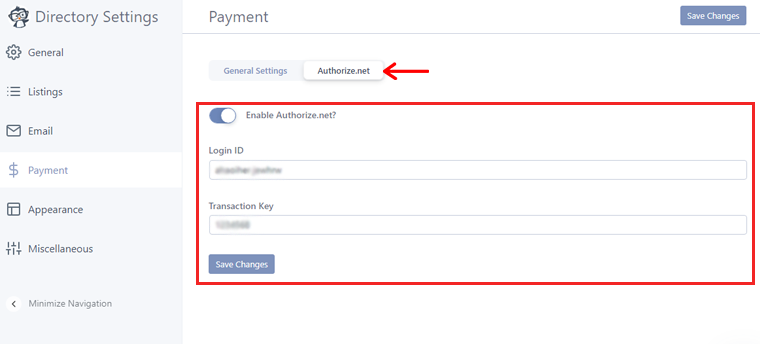
Further, you can choose Authorize.net as your payment gateway. Simply add your login id and transaction key to get access.
Besides there are other options you can go through. They are Email, Appearance, and Miscellaneous.
Step 5: Managing Listings and User Submissions
As your directory website flourishes, it’s essential to master the art of managing listings and user submissions.
In this pivotal step, you’ll discover the secrets to curating and organizing listings with precision.
Creating Listings
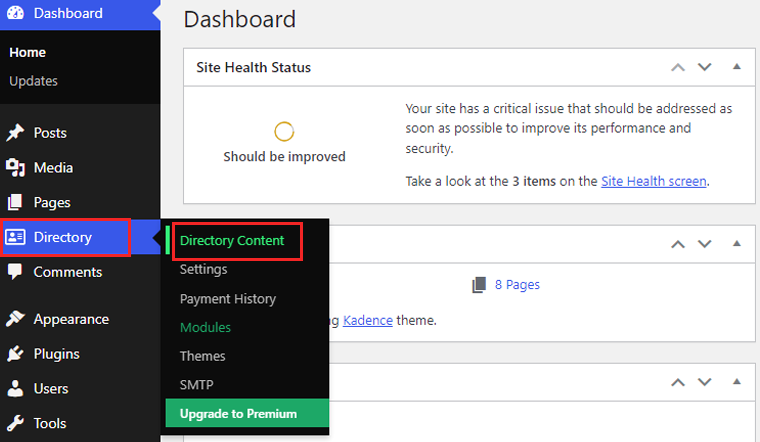
So start by navigating to the Directory > Directory Content option.
Then you’ll be prompted to the page where you can add and manage listings and other options.
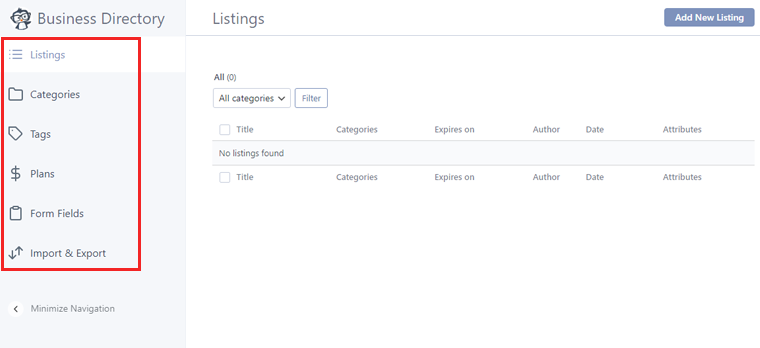
Now we’ll start with listings. Simply click the ‘Listings’ tab and then click on the ‘Add New Listing’ option on the top right corner.

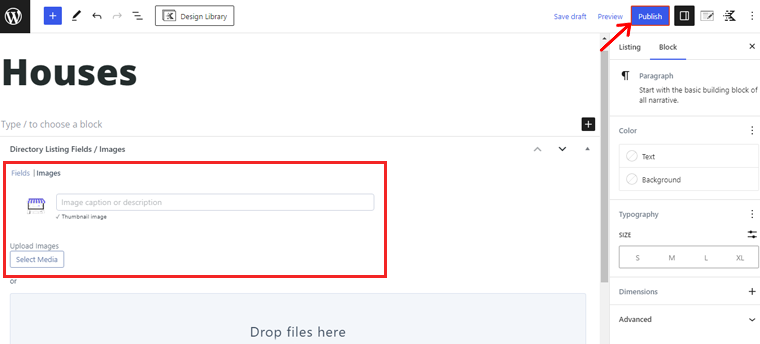
This option will direct you to the editor page. Here you can add listing titles, images, emails, addresses, and more.
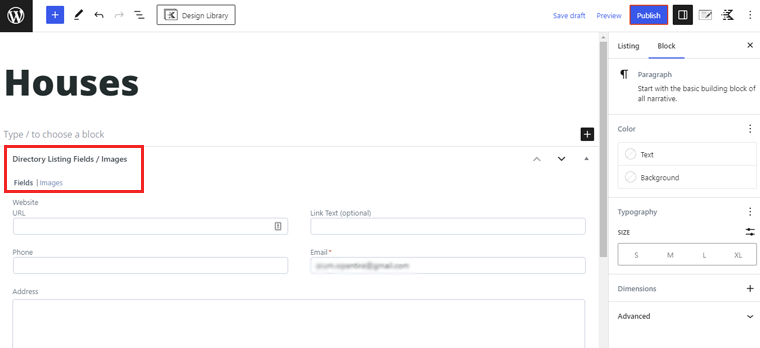
Also, it allows you to add images of your listing. Simply click on the upload image or drop the image file in the editor. Once done click the ‘Publish’ button to make it live on your website.
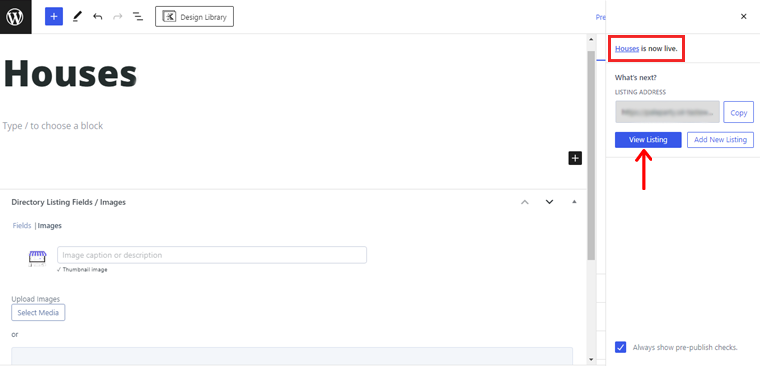
Finally, you’ll get a message that your listing is live. Also, you can view the listing you’ve just created. Simply click the ‘View Listing’ options.
Now to get your listing on your website, start clicking on the pages and choose one. Here we’ll go with the ‘Home’ page
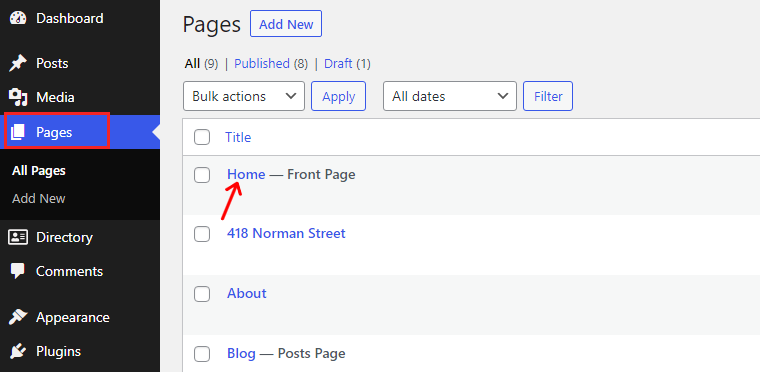
This will direct you to the editor page. There you can scroll to the listing and copy the URL of the listing you’ve created before.
Simply click on the listing then you’ll see the ‘Link’ option on the right side. Once done, hit the ‘Update’ button.
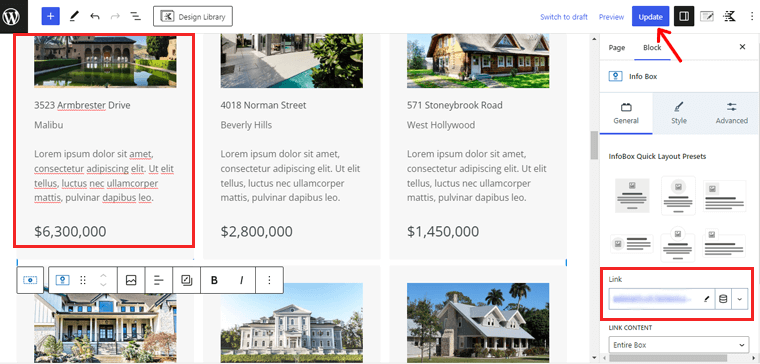
And that’s all! You’ve successfully created a listing and a directory website.
User Submission
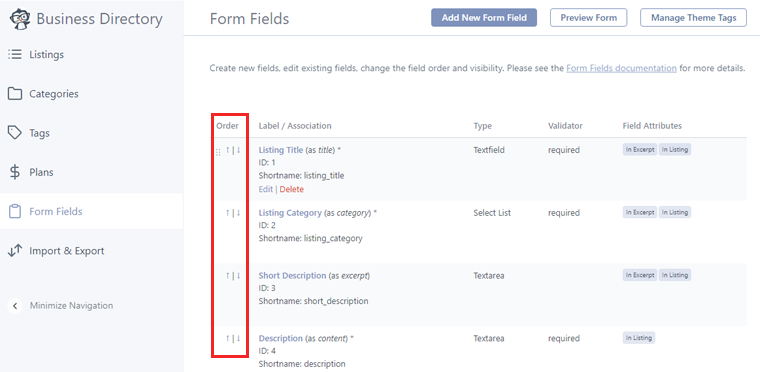
Additionally, the Business Directory presents a standardized form to its visitors. However, you can tailor this form according to your preferences.
So, navigate to the ‘Directory’ and select ‘Directory Content.’
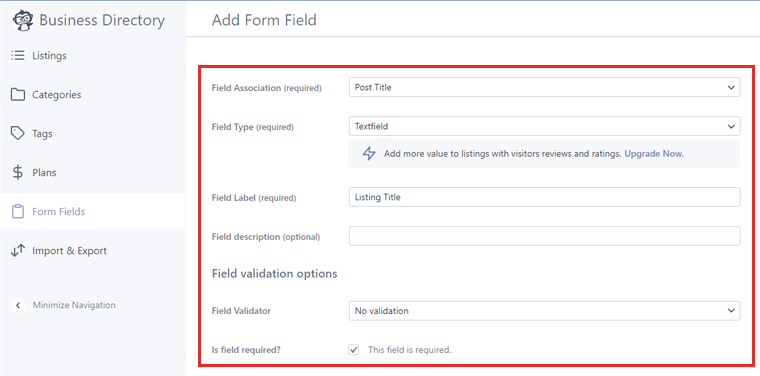
From there, proceed to the ‘Form Fields’ option. On this screen, you’ll find a comprehensive list of the fields that constitute the standard form.

To modify the placement of a field, simply utilize the small up and down arrows in the ‘Order’ column.
Now to make changes click on the ‘Edit’ option on any form.
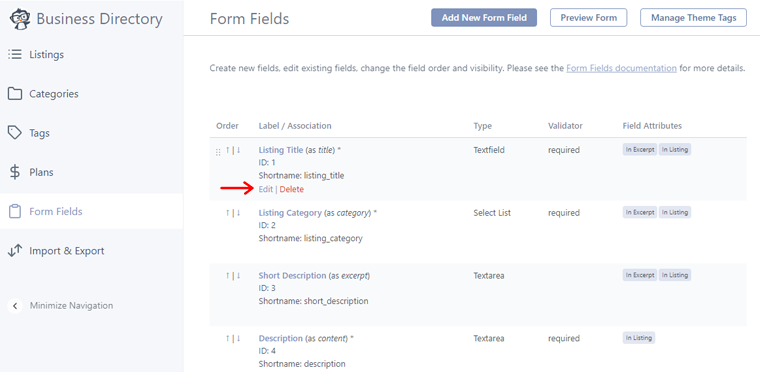
Following that, a new page opens, there adjust the field label, designate it as mandatory, optional description, etc. After completing, save your changes by clicking the ‘Update Field’ button.
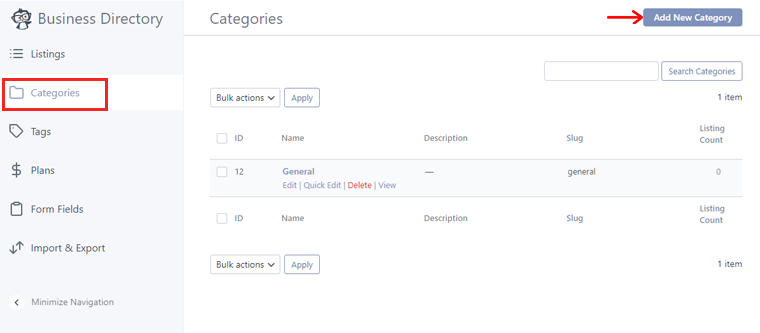
Following that, it’s advisable to establish several categories that users can utilize when submitting listings. It helps to assist visitors in navigating the directory and finding what they seek.
By default, the plugin includes a solitary ‘General’ category. But you’ve the option to supplement it by accessing the ‘Categories’ tab. Proceed to select ‘Add New Category.’
A pop-up window will appear, prompting you to enter a name for the category. Additionally, organize your categories into hierarchical relationships of child pages.
To designate a category as a subcategory, simply access the ‘Parent Category’ dropdown menu and choose a parent category.
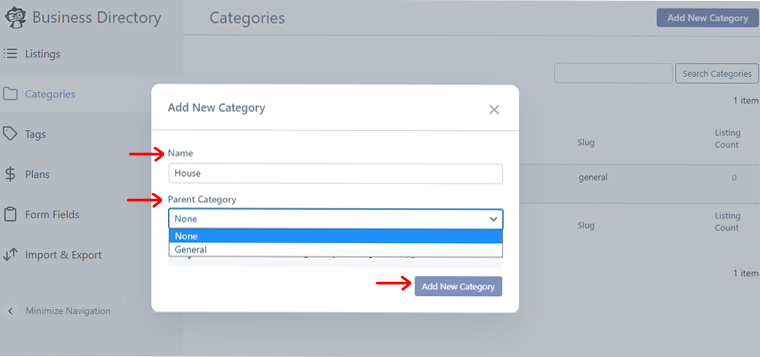
To finalize the creation of the category, click on ‘Add New Category.’
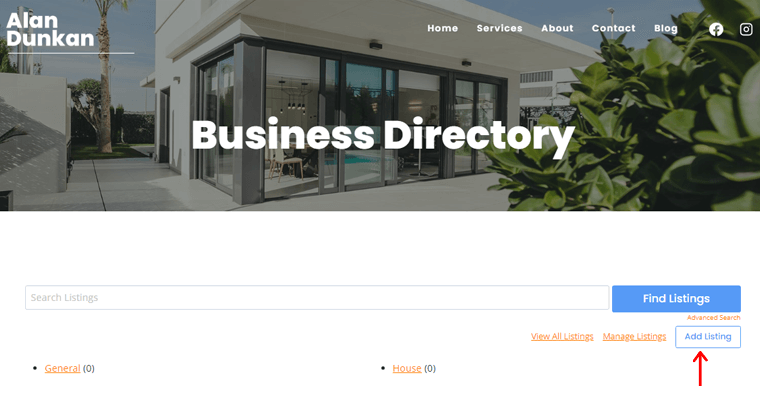
Henceforth, visitors can create a new listing by clicking on the ‘Add Listing’ button on your Business Directory page.
Managing Listings
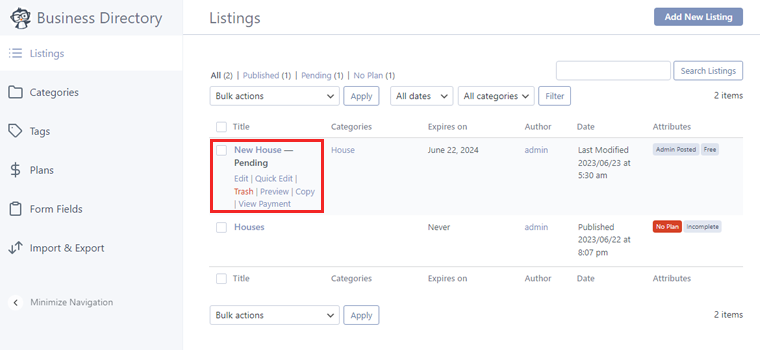
Upon receiving a listing submission, it’ll be necessary for you to manually approve it. Navigate to the ‘Directory’ section and select ‘Directory Content.’
A list of pending listings will be displayed for your consideration.
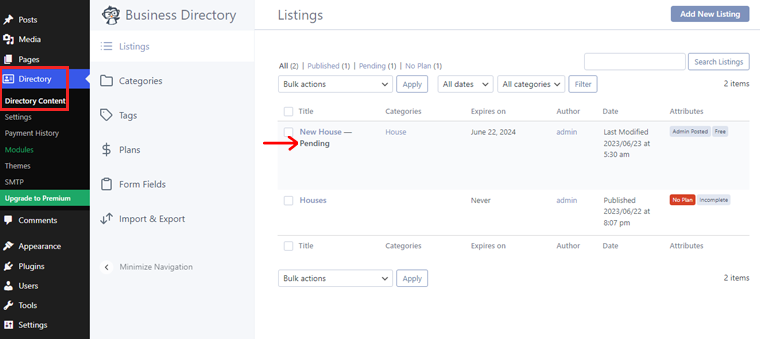
To obtain a closer examination of a listing, simply hover your cursor over it. After that click on the ‘Preview’ link that appears.
This will open the listing in a new tab, allowing you to review its contents.
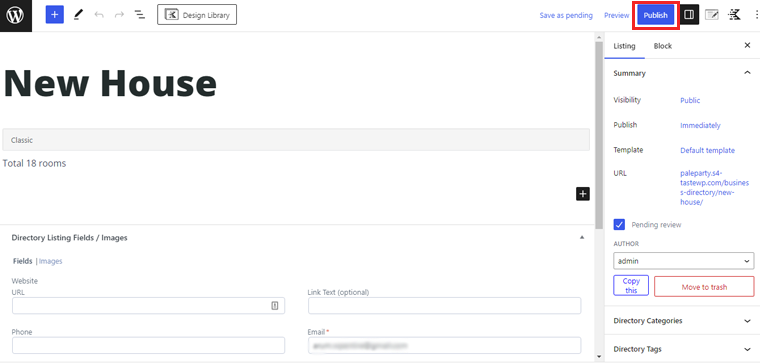
If any alterations are required, then once again hover your cursor over the listing, but this time select ‘Edit.’
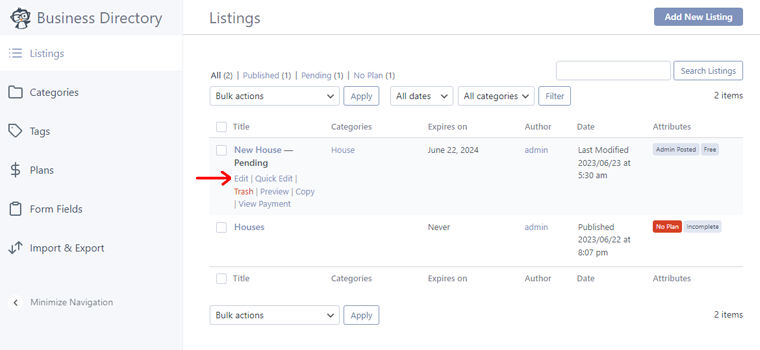
At this point, you’ll have the opportunity to make any desired changes. Once you’re satisfied with the appearance of the listing, click on ‘Publish.’
Step 6: Enhancing User Experience and Engagement
Now that you’ve your directory website up and running, it’s time to focus on enhancing the user experience and engagement. As, by making your website user-friendly and interactive, you can attract and retain more visitors.

So, in this portion to create a directory website, let’s check out some crucial actions to take:
i) Implement Advanced Search and Filtering:
Do you want to enhance the search functionality of your directory website? If yes, then it’s time to implement advanced search and filtering options.
With that, your users can find relevant listings based on specific criteria. Such as categories, locations, ratings, and more.
For that, all you’ve to do is install and configure a reliable search plugin like Ajax Search to enhance search functionality.
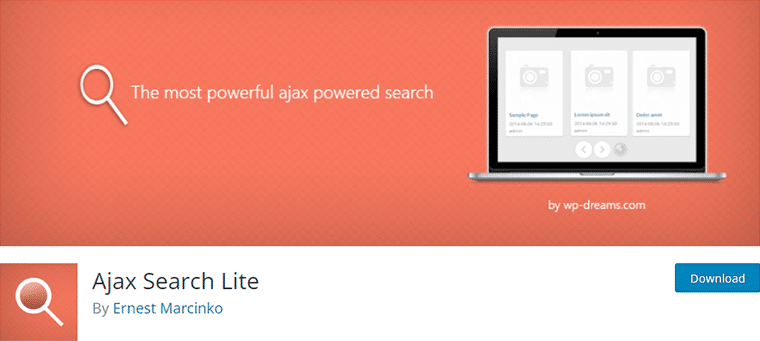
You can install this plugin like you previously installed the directory plugin. For a quick reminder, go to Plugins > Add New. And search and install the plugin right from your WordPress dashboard.
Using it, you can allow your users to easily find listings based on categories, locations, ratings, and other criteria. Further, making it convenient for them to find what they’re looking for.
ii) Enable User Reviews and Ratings:
Similarly, user-generated reviews and ratings play a significant role in building trust and credibility for your directory website. You can create a valuable resource for other visitors. Just by allowing your other fellow users to share their experiences and opinions.
For that, you can opt for a plugin like Site Reviews to enable user-generated reviews and ratings.

This plugin allows you to collect feedback from your visitors and improve your website. On top of that, it’s easy to use and provides a variety of features to help you get the most out of your reviews.
iii) Include Interactive Maps:
Next, you can also integrate interactive maps into your directory website. This provides a visual representation of the location of listed businesses or services. This helps them to see precise locations if they want to, further improving user experience.
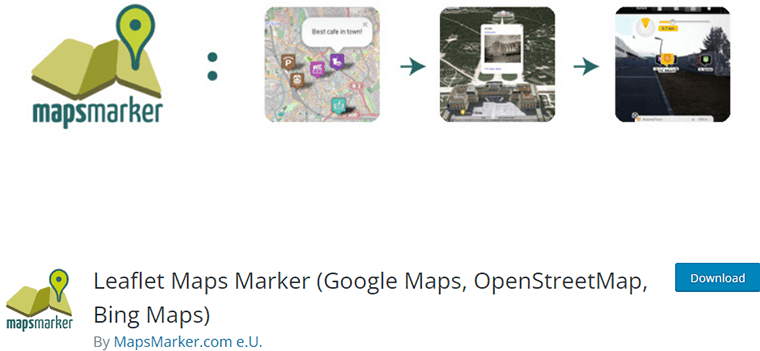
For this, you can use locator plugins like Leaflet Maps Marker to integrate interactive maps into your listings. This plugin allows users to visualize the location of businesses or services and obtain directions easily. Further, enhancing their overall experience.
iv) Enable Social Sharing:
Likewise, social sharing is one of the powerful tools for expanding the reach and visibility of your directory website. You can attract new visitors and increase engagement. Simply by allowing users to share their favorite listings or reviews on social media platforms.
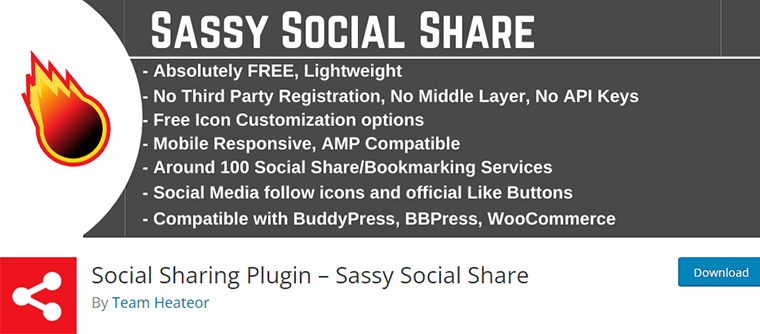
There are several robust social sharing plugins like Sassy Social Share to add social media sharing buttons to your listings. This makes it effortless for users to share their favorite listings or reviews on their social networks. Ultimately, increasing the visibility of your directory website.
Do check our detailed tutorial article on how to add social share buttons for more guidance.
Besides, you can enable comments and actions, provide clear call-to-action buttons, and do so much more. To enhance the user experience and engagement on your directory website.
Ultimately, this increases user satisfaction and fosters a vibrant online community. All thanks to WordPress and its extensive plugin library.
Having said that, let’s jump into the next step of our tutorial on how to create a directory website.
Step 7: Optimizing Directory Listings for Search Engines
Optimizing directory listings for search engines is an important step in ensuring that your directory website ranks high in search engine results.
In this step, let’s focus on some core aspects of SEO (Search Engine Optimization). That will help your directory website appear on the first page of search engine results.

So, here’s how to improve the visibility of your listings. And increase the chances of attracting relevant visitors in this portion to create a directory website.
i) Use Keyword-rich Titles and Descriptions
When creating listings for your directory website, make sure to use titles and descriptions that contain relevant keywords. Doing so will increase the chances of your website appearing in relevant searches.

For instance, consider you’ve a real estate business directory website. And the business’s name is ‘Quick & Best Apartments’. Now, including keywords like ‘3 Bedroom Apartment’ or ‘Luxury Apartments for Rent’ will help related searches to show your listing.
ii) Utilize Structured Data
Structured data is a code that you can add to your website’s pages. This helps search engines understand the content or listing of your website.
For example, Along with your real estate listing, you can also include the property’s address, features, amenities offered, and so forth. With the contact information of the real estate agent, and other relevant details.

Adding this information in a structured form makes it easier for search engines to understand and display the listing in relevant searches. Ultimately, this improves the click-through rates.
iii) Optimize URLs
Make sure to optimize your directory website’s URLs. By using descriptive and relevant keywords in them. Ideally, your URLs should be short and easy to remember.

For example, let’s consider your real estate listings are based in Sydney. For that, you can use your website’s URL as yourdomain.com/sydney-real-estate.
Again, if your listings are based in New York, then you can use yourdomain.com/newyork-real-estate.
This makes it easier for users to remember and find your directory website.
iv) Ensure Fast Loading Speeds
Google loves websites that load quickly, So, you need to make sure your website’s loading speeds are optimized.
Here are some quick tips to follow to improve the loading speed of your directory website.
- Pick a reputable hosting company with quick server responses.
- Utilize caching plugins to store static versions of your website’s pages.
- Minify CSS and JavaScript files to reduce their size and improve loading speed.
- Regularly optimize and clean up your WordPress database to remove unnecessary data.
- Implement a Content Delivery Network (CDN) to distribute static content globally.
- Monitor website performance using tools like Google PageSpeed Insights or GTmetrix.
With that, you can significantly improve the loading speed of your directory website. And fast-loading websites provide a better user experience. Along with contributing to higher search engine rankings and increased user engagement.
v) Optimize Images
Images are an integral part of directory listings. And it’s essential to optimize them for search engines. Make sure to add alt tags to all images, including relevant titles and descriptions.
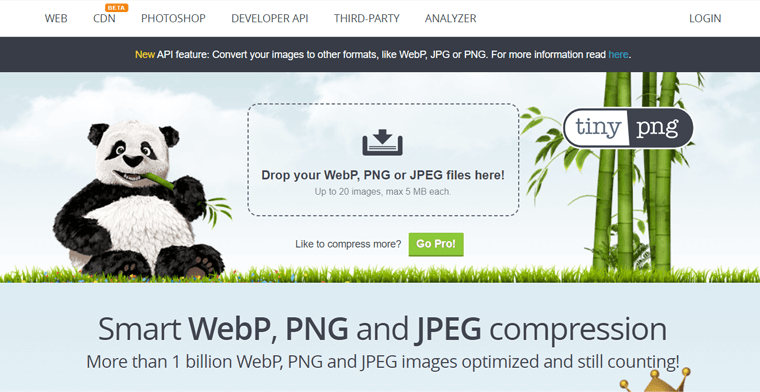
Also, you can compress images using several tools like Image Optim, TinyPNG, etc.
These tools help you reduce the file sizes of your images without hampering the quality. As a result, this ensures your directory website doesn’t take too long to load the images.
With these optimization tips and techniques, you can help your directory website rank higher in search engine results. Ultimately, attracting more leads and conversions.
However, remember that optimizing your website is an ongoing process. So, you should regularly review your website’s performance. And accordingly, make necessary optimizations to ensure you achieve the desired results.
Do you want comprehensive guidance on SEO? Then, make sure to check our definitive SEO guide article to grow your site’s organic traffic.
Step 8: Implementing Security Measures to Protect User Data
When it comes to running a Directory website, protecting user data should be a top priority. Fortunately, there are several security measures you can take to keep your users’ data safe.
And the best part is WordPress has several security plugins that can help protect your website against attacks. Some good options include Wordfence Security, Sucuri Security, and iThemes Security.
Here, let’s check how you can do so using the Wordfence security plugin in this step to create a directory website.

It’s one of the most powerful security plugins for WordPress. That offers features like firewall protection, malware scanning, real-time threat detection, and login security enhancements. To safeguard your website from attacks.
Access your WordPress dashboard and navigate to the ‘Plugins’ section. Click on the ‘Add New’ button.

Next, search for the ‘Wordfence Security’ plugin in the search bar and proceed with the ‘Install’ button.
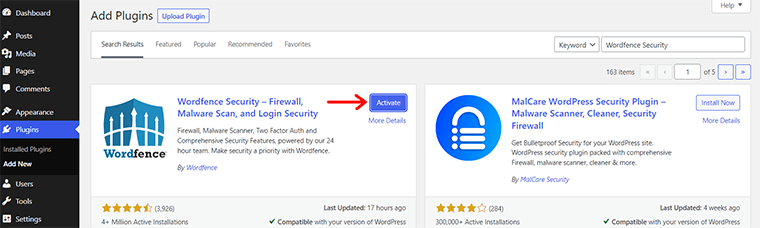
Shortly, you’ll also see the ‘Activate’ button. Click on it to establish a robust defense.
Once the plugin is activated, you’ll get the successfully installed notification. Also, it prompts you to get your Wordfence license.
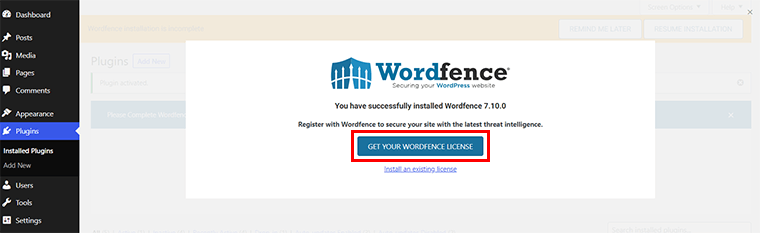
You can quickly get a free license from its official website and insert it. Or, simply click on the ‘Get Your Wordfence License’ option.
Configuring Security Scan by Wordfence
Next, locate the ‘Wordfence’ section in the left navigation of your dashboard. You’ll find a range of options available to reinforce your website’s security.
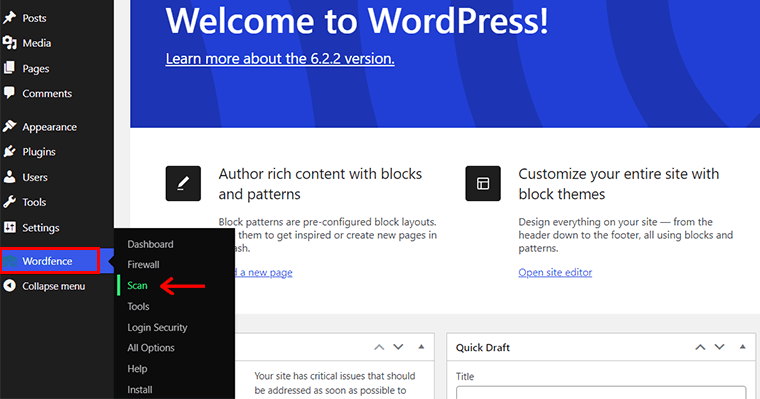
Now, initiate a comprehensive ‘Scan’ of your website to detect any vulnerabilities or potential threats.
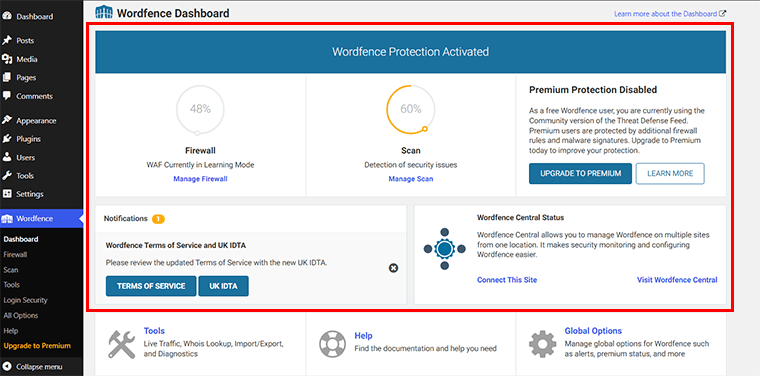
Based on the results of the security scan, take appropriate measures to strengthen your website. Also, Wordfence Security enables you to block suspicious IP addresses, configure firewall rules, and enhance login security.

Moreover, Wordfence Security provides timely notifications for available updates, empowering you to stay ahead of potential threats.
Extra Security Measures to Protect User Data
Besides, here are a few more security measures that you can adopt in your process to create a directory website. So as to protect user data of your automated backups.

- Regularly update WordPress, themes, and plugins to patch security vulnerabilities and stay protected against potential exploits.
- Create a unique admin username. Also, set a strong password using a combination of letters, numbers, and special characters to prevent unauthorized access.
- Choose a reputable hosting provider that offers SSL encryption, server-level security measures, and proactive malware scanning.
- Enable 2 Factor Authentication to require an additional verification step. With that, a unique code is sent to a user’s mobile device, for enhanced login security.
- Create automated backups of your website and database to enable easy restoration in case of data loss or security breaches.
- Track login attempts, file changes, and potential security breaches, regularly reviewing website logs and user activity for any suspicious behavior.
For more comprehensive guidance, you can check our ultimate security guide article on how to secure your website. Make sure you go through it once.
Step 9: Launching and Promoting the Directory Website
Congratulations! You’ve built your directory website using the WordPress CMS platform. Now, it’s time to launch your website and promote it to attract visitors and generate traffic. This is last and final step to create a directory website.

Follow these guidelines to successfully launch and promote your directory website:
- Test the Website: Before launching the website, make sure to test it thoroughly to ensure that everything is working correctly. Check for broken links, missing images, and other issues that could affect user experience.
- Choose a Launch Date: Decide on a launch date that gives you enough time to complete all the necessary tasks before the launch. Make sure to announce the launch date on your social media channels and other marketing platforms.
- Content Marketing: Create high-quality and informative content related to your directory’s niche. You can start a blog section on your website and regularly publish articles, guides, or industry news.
- Create Social Media Accounts: Social media marketing is one of the quickest ways to gain organic traffic. So, use social media platforms such as Facebook, Twitter, and Instagram. To draw traffic to your website and interact with users.
- Email Marketing: Build an email list by offering valuable incentives. Such as exclusive discounts or access to premium content. Utilize email marketing platforms to send your subscribers newsletters, updates, and marketing materials.
- Use Paid Marketing: Consider using paid marketing to advertise your website. Options include Google AdWords, Facebook Ads, and other platforms.
- Collaborate with Other Websites: Reach out to other websites in your niche and collaborate with them to promote your website. This could include guest blogging, cross-promotion, and other strategies.
- Measure your Success: Use analytics tools to measure the success of your website and marketing efforts. You can use this to pinpoint problem areas and adjust your tactics for better outcomes.
With that, you can successfully launch and promote your directory website. Further, bring in a consistent flow of customers, clients, and users who will use and profit from your platform.
Frequently Asked Questions (FAQs)
Last but not least, let’s explore some FAQS on creating a directory website.
A. A directory website is an online platform that organizes and lists businesses, services, or resources within a specific industry or location. Further, making it easier for users to find and connect with relevant information.
A: Yes, you can! Many Content Management Systems (CMS) and website builders, such as WordPress and Wix, offer user-friendly interfaces. That doesn’t require extensive coding knowledge. Plus, you get several templates and plugins that simplify the directory creation process.
A: Important features include a search and filter system, user registration, and submission options. On top of that, you can add review and rating functionality, and a user-friendly navigation structure.
A: There are various monetization options for directory websites. Including paid listings, advertising, sponsored content, or offering premium features. Choose the method that aligns with your website’s niche and target audience.
A: Absolutely! SEO helps improve your directory website’s visibility in search engine results, attracting more organic traffic. You can improve SEO by optimizing your content, using relevant keywords, building backlinks, and more.
Conclusion
And that’s it, folks! We’ve come to the end of our tutorial on how to create a directory website.
Though the process to create a directory website may seem daunting. We hope this guide has been helpful to build a professional-looking website that meets the needs of your target audience.
So why not take the first step today and start to create your directory website?
If you’ve got any kind of confusion, then do let us know your thoughts in the comment section. We’re happy to help you out.
You might like our other similar articles like how to create a personal website and how to make a booking website.
Don’t hesitate to share this article with your friends and family looking to create a directory website.
Lastly, do follow us on our social media handles Facebook and Twitter for more recent updates.